
Are you interested in using MongoDB with the new Next.js 13 app directory? If so, you’re in luck! In this article, we’ll explore how to set up and use MongoDB in the new Next.js 13 App Router. To simplify the development process, we’ll utilize Typegoose, a thin wrapper around the Mongoose library, to create the necessary database models and TypeScript types.
Here’s our roadmap: First, we’ll dive into setting up the MongoDB database within our project. Then, we’ll build a TodoList application using Next.js 13’s Server Actions feature, showcasing how MongoDB can be seamlessly integrated. This means our TodoList app will continue functioning even if JavaScript is disabled or unavailable. Finally, we’ll create the API aspect of the TodoList app, implementing essential CRUD operations such as CREATE, READ, UPDATE, and DELETE.
It’s important to mention that we won’t be creating a separate frontend application for the API in this tutorial. The Server Actions feature in Next.js allows us to directly perform CRUD operations on our MongoDB database without the need for an additional API layer. The API section is solely included to illustrate how MongoDB can be utilized within Next.js API Route Handlers.
Let’s get started and unlock the power of MongoDB in Next.js 13!
More practice:
- How to Deploy or Self-Host a Next.js Application
- Learn Next.js Server Actions and Mutations with Examples
- Integrate FastAPI Framework with Next.js and Deploy
- Integrate Python Flask Framework with Next.js and Deploy
- JWT Authentication in Next.js 13 API Route Handlers
- User Registration and Login in Next.js 13 App Directory
- Build a Simple API in Next.js 13 App Directory
- Build a Simple Frontend App in Next.js 13 App Directory
- Next.js – Add Google and GitHub OAuth2 using NextAuth.js
- Next.js – Use Custom Login and SignUp Pages for NextAuth.js
- How to Setup Prisma ORM in Next.js 13 App Directory
- How to Setup and Use Apollo Client in Next.js 13 App Directory
- How to Setup React Context API in Next.js 13 App Directory
- How to Setup React Query in Next.js 13 App Directory
- How to Setup Redux Toolkit in Next.js 13 App Directory
- Setup tRPC Server and Client in Next.js 13 App Directory
- Setup and Use NextAuth.js in Next.js 13 App Directory

Running the Next.js Project on Your Machine
To run the Next.js project on your local machine and explore the application built to demonstrate how MongoDB can be used to store data in the new Next.js 13 App Router, you can follow these steps:
- Download or clone the project from its GitHub repository at https://github.com/wpcodevo/nextjs13-mongodb-setup and open it in your preferred code editor.
- Open the integrated terminal of your code editor and execute the command
pnpm ito install all the necessary dependencies required by the project. If you don’t have PNPM installed, you can run the following command first:npm i -g pnpm. - To use your MongoDB Atlas database, simply add your connection URI to the
MONGODB_URIvariable in the.env.localfile. Alternatively, if you intend to use a MongoDB server running in Docker, you can start the MongoDB server by running the commanddocker-compose up -d. - Launch the Next.js development server by executing
pnpm dev. - Once the Next.js dev server is up and running, open the application in your web browser and explore the features to create, edit, and delete todo items in the MongoDB database.
Setting up the Next.js Project
To get started, you can create a new Next.js project by running the following command:
# For PNPM
pnpm create next-app nextjs13-mongodb-setup

# For NPM
npm create-next-app@latest nextjs13-mongodb-setup

# For Yarn
yarn create next-app nextjs13-mongodb-setup
After running the command, you’ll be prompted to enable certain features. For the purpose of this article, choose ‘Yes‘ for all the prompts. Once the project is set up, you can install the necessary libraries for working with MongoDB, including Mongoose and Typegoose. Run the following command to install these dependencies:
# For PNPM
pnpm add mongoose @typegoose/typegoose

# For Yarn
yarn add mongoose @typegoose/typegoose

# For NPM
npm i mongoose @typegoose/typegoose
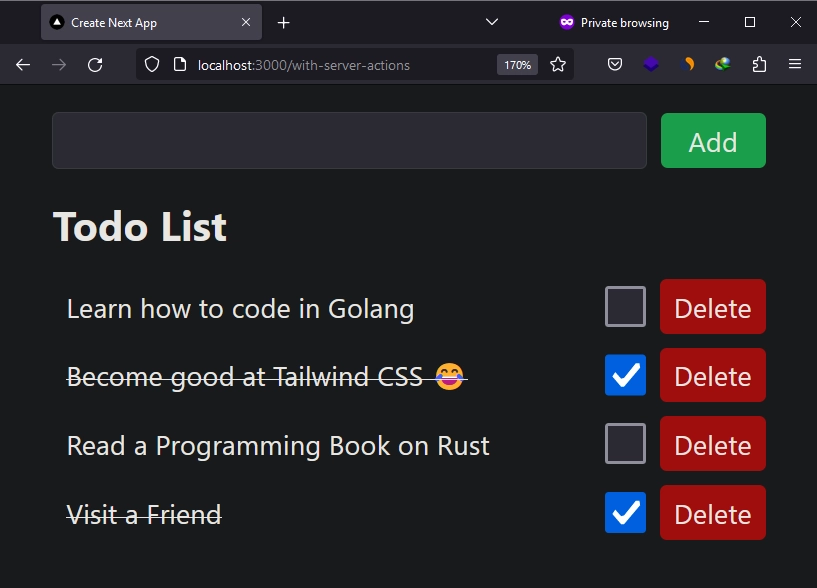
These libraries will provide us with the tools we need to interact with the MongoDB driver effectively. Here is a screenshot of the application we’ll be building to learn how to use MongoDB in the new Next.js 13 app directory.
Creating a MongoDB Database
In this section, I will guide you through the process of setting up a MongoDB server. There are two options available: running a MongoDB server in a Docker container or using MongoDB Atlas. Both options have their advantages, but if you plan to deploy the application we will create in this tutorial, I recommend using MongoDB Atlas.
Option 1: MongoDB Server running in Docker
Let’s start with the first option, which involves running a MongoDB server in a Docker container. This option is suitable for local development and testing purposes. If you choose this option, follow these steps:
- Create a
docker-compose.ymlfile in your project’s root directory. - Add the following Docker Compose configurations to the
docker-compose.ymlfile:
docker-compose.yml
version: '3'
services:
  mongo:
    image: mongo:latest
    container_name: mongo
    env_file:
      - ./.env.local
    volumes:
      - mongo:/data/db
    ports:
      - '6000:27017'

volumes:
  mongo:
To provide the necessary MongoDB credentials for building the MongoDB Docker image, create a .env.local file in the root directory of your project if it doesn’t already exist. Then, add the following environment variables to the .env.local file:
.env.local
MONGO_INITDB_ROOT_USERNAME=admin
MONGO_INITDB_ROOT_PASSWORD=password123
MONGO_INITDB_DATABASE=nextjs_mongodb

MONGODB_URI=mongodb://admin:password123@localhost:6000/nextjs_mongodb?authSource=admin
Once you have set up the environment variables in the .env.local file, you can start the MongoDB server by running the command docker-compose up -d.
Option 2: Cloud MongoDB Database with Atlas
If you prefer to use a MongoDB cloud database, I highly recommend MongoDB Atlas. MongoDB Atlas offers a generous free tier and provides a reliable and scalable cloud-based MongoDB solution. To set up MongoDB Atlas, follow these steps:
- Visit the MongoDB Atlas website at https://www.mongodb.com/atlas/database and sign up for an account if you haven’t already.
- Once you’re logged in, click on the “Build a New Cluster” button to create a new MongoDB cluster.
- Follow the on-screen instructions to configure your cluster. You can choose your preferred cloud provider, region, and cluster tier. For testing purposes, the free tier should be sufficient.
- After configuring your cluster, you can proceed to set up a database and add a user with appropriate permissions.
- Take note of the connection URI provided by MongoDB Atlas. This URI will be used to connect your Next.js application to the MongoDB cluster.
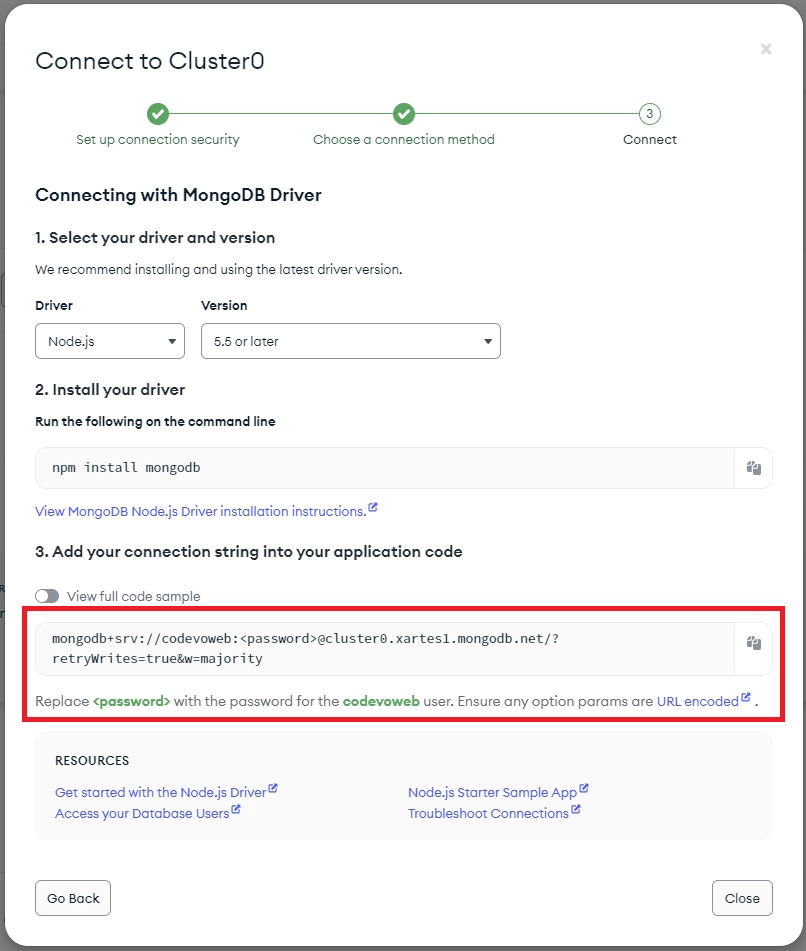
- Create a
.env.localfile at the root level of your project if it doesn’t already exist. Inside the file, define a variable namedMONGODB_URIand assign the connection URI of your MongoDB Atlas database as its value
Connecting to the MongoDB Database
To establish a connection with the MongoDB database, we need to write some code. Follow these steps:
- Create a new directory called
libwithin thesrcdirectory. - Inside the
libdirectory, create a file namedconnect-db.ts. - Open the
connect-db.tsfile and paste the following code:
src/lib/connect-db.ts
import _mongoose, { connect } from "mongoose";

declare global {
  var mongoose: {
    promise: ReturnType<typeof connect> | null;
    conn: typeof _mongoose | null;
  };
}

const MONGODB_URI = process.env.MONGODB_URI;

if (!MONGODB_URI || MONGODB_URI.length === 0) {
  throw new Error("Please add your MongoDB URI to .env.local");
}

/**
 * Global is used here to maintain a cached connection across hot reloads
 * in development. This prevents connections from growing exponentially
 * during API Route usage.
 */
let cached = global.mongoose;

if (!cached) {
  cached = global.mongoose = { conn: null, promise: null };
}

async function connectDB() {
  if (cached.conn) {
    console.log("🚀 Using cached connection");
    return cached.conn;
  }

  if (!cached.promise) {
    const opts = {
      bufferCommands: false,
    };

    cached.promise = connect(MONGODB_URI!, opts)
      .then((mongoose) => {
        console.log("✅ New connection established");
        return mongoose;
      })
      .catch((error) => {
        console.error("❌ Connection to database failed");
        throw error;
      });
  }

  try {
    cached.conn = await cached.promise;
  } catch (e) {
    cached.promise = null;
    throw e;
  }

  return cached.conn;
}

export default connectDB;
This code sets up a reusable database connection using Mongoose. It ensures that the connection is cached and reused to prevent excessive connections during development. Additionally, the code ensures that the application connects to the database only when the serverless function code starts, assuming that you are running the application in a serverless environment.
Creating the Database Model with Typegoose
In this section, we will use TypeScript classes and Typegoose to create the database model for our TodoList application. The model will allow us to perform CRUD operations on the MongoDB database.
Creating the Model
To create the Todo model, follow these steps:
- Create a
modelsfolder at the root level of your project. - Inside the
modelsfolder, create a file namedTodo.ts. - Open the
Todo.tsfile and add the following code:
src/models/Todo.ts
import {
  ModelOptions,
  Severity,
  getModelForClass,
  index,
  post,
  prop,
} from "@typegoose/typegoose";
import mongoose from "mongoose";

@post<TodoClass>("save", function (doc) {
  if (doc) {
    doc.id = doc._id.toString();
    doc._id = doc.id;
  }
})
@post<TodoClass[]>(/^find/, function (docs) {
  // @ts-ignore
  if (this.op === "find") {
    docs.forEach((doc) => {
      doc.id = doc._id.toString();
      doc._id = doc.id;
    });
  }
})
@ModelOptions({
  schemaOptions: {
    timestamps: true,
    collection: "todos",
  },
  options: {
    allowMixed: Severity.ALLOW,
  },
})
@index({ title: 1 })
class TodoClass {
  @prop({ required: true, unique: true })
  title: string;

  @prop({ default: false })
  completed: boolean;

  _id: mongoose.Types.ObjectId | string;

  id: string;
}

const Todo = getModelForClass(TodoClass);
export { Todo, TodoClass };
In the model definition, you may have noticed that we used Typegoose decorator hooks, specifically the @post() hook, to convert the _id field of each document returned from the database. This conversion is necessary because we will be sending these documents from the server to the client through Next.js Server Actions and Functions. The requirement is that the data transferred between the server and client should be serializable, and the ObjectId type is not serializable.
To ensure compatibility and avoid errors, we convert the _id field to a string using the @post() hook. This allows us to safely transfer the data between the server and client without any serialization issues.
Configuring TypeScript
By now, you might have encountered errors in the src/models/Todo.ts file. These errors occur because we haven’t added the necessary configurations to the tsconfig.json file. These configurations are specifically required when using Typegoose. To resolve this, open the tsconfig.json file and add the following configurations:
tsconfig.json
{
  "compilerOptions": {
    //...
    "experimentalDecorators": true,
    "emitDecoratorMetadata": true,
    "strictPropertyInitialization": false,
  }
}
After adding these configurations, the TypeScript errors in the src/models/Todo.ts file should disappear.
Creating the Next.js Server Functions
In the context of API development, it’s recommended to extract the code responsible for communicating with the database into separate functions, commonly referred to as services. However, when using these functions in Next.js Server Actions, we refer to them as Server Functions. Separating the code into functions not only promotes code reuse but also avoids repetition in Server Actions, Server Components, and API Route Handlers.
It’s important to note that Server Functions cannot be called directly in a React Client Component since they rely on server-specific libraries like Typegoose, which are not bundled with the client-side JavaScript.
To begin, let’s create a utility function that converts a MongoDB ObjectId to a string. Create a utils.ts file within the src/lib/ directory and add the following code:
src/lib/utils.ts
import mongoose from "mongoose";

export function stringToObjectId(id: string): mongoose.Types.ObjectId | null {
  if (mongoose.Types.ObjectId.isValid(id)) {
    return new mongoose.Types.ObjectId(id);
  } else {
    return null;
  }
}
Next, we’ll create the Server Functions. Create a todo-db.ts file within the src/lib/ directory and include the following code snippets:
src/lib/todo-db.ts
import { Todo } from "@/models/Todo";
import connectDB from "./connect-db";
import { stringToObjectId } from "./utils";

interface TodoFilter {
  page?: number;
  limit?: number;
}

export async function getTodos(filter: TodoFilter = {}) {
  try {
    await connectDB();

    const page = filter.page ?? 1;
    const limit = filter.limit ?? 10;
    const skip = (page - 1) * limit;

    const todos = await Todo.find().skip(skip).limit(limit).lean().exec();

    const results = todos.length;

    return {
      todos: todos,
      page,
      limit,
      results,
    };
  } catch (error) {
    return { error };
  }
}

export async function createTodo(title: string) {
  try {
    await connectDB();

    const todo = await Todo.create({ title });

    return {
      todo,
    };
  } catch (error) {
    return { error };
  }
}

export async function getTodo(id: string) {
  try {
    await connectDB();

    const parsedId = stringToObjectId(id);

    if (!parsedId) {
      return { error: "Todo not found" };
    }

    const todo = await Todo.findById(parsedId).lean().exec();
    if (todo) {
      return {
        todo,
      };
    } else {
      return { error: "Todo not found" };
    }
  } catch (error) {
    return { error };
  }
}

export async function updateTodo(
  id: string,
  { title, completed }: { title?: string; completed?: boolean }
) {
  try {
    await connectDB();

    const parsedId = stringToObjectId(id);

    if (!parsedId) {
      return { error: "Todo not found" };
    }

    const todo = await Todo.findByIdAndUpdate(
      parsedId,
      { title, completed },
      { new: true }
    )
      .lean()
      .exec();

    if (todo) {
      return {
        todo,
      };
    } else {
      return { error: "Todo not found" };
    }
  } catch (error) {
    return { error };
  }
}

export async function deleteTodo(id: string) {
  try {
    await connectDB();

    const parsedId = stringToObjectId(id);

    if (!parsedId) {
      return { error: "Todo not found" };
    }

    const todo = await Todo.findByIdAndDelete(parsedId).exec();

    if (todo) {
      return {};
    } else {
      return { error: "Todo not found" };
    }
  } catch (error) {
    return { error };
  }
}
These Server Functions perform different operations related to todos, including fetching todos, creating a todo, retrieving a single todo, updating a todo, and deleting a todo. In some of these functions, we invoke the .lean() method on the Models. This ensures that the returned data consists of plain JavaScript objects instead of Mongoose documents.
This is important because the data transferred from the Server Actions to the React components needs to be serializable. By using .lean(), we optimize the data transfer process by eliminating the additional features and functionality provided by Mongoose documents, focusing solely on the essential data itself.
Using Server Actions in Next.js
With the Next.js Server Functions defined, we can now leverage the power of Server Actions to interact with our todos in the database. Server Actions allow us to perform data mutations on the server, including editing, creating, and deleting todo items.
Before we proceed further, I want to clarify that in this section, I will focus primarily on MongoDB integration and avoid delving into every aspect of Next.js Server Actions. However, if you’re seeking a comprehensive guide on Next.js Server Actions and Mutations, I recommend referring to the article titled ‘Learn Next.js Server Actions and Mutations with Examples‘ for detailed information.
Enabling Server Actions in Next.js
To enable Server Actions in our Next.js project, we need to make a modification in the next.config.js file. This is necessary because, as of the time of writing this article, the Server Actions feature is still in experimental mode. Here’s an example of how to modify the next.config.js file:
next.config.js
/** @type {import('next').NextConfig} */
const nextConfig = {
    experimental: {
        serverActions: true,
        serverComponentsExternalPackages:['mongoose','@typegoose/typegoose']
    },
}

module.exports = nextConfig
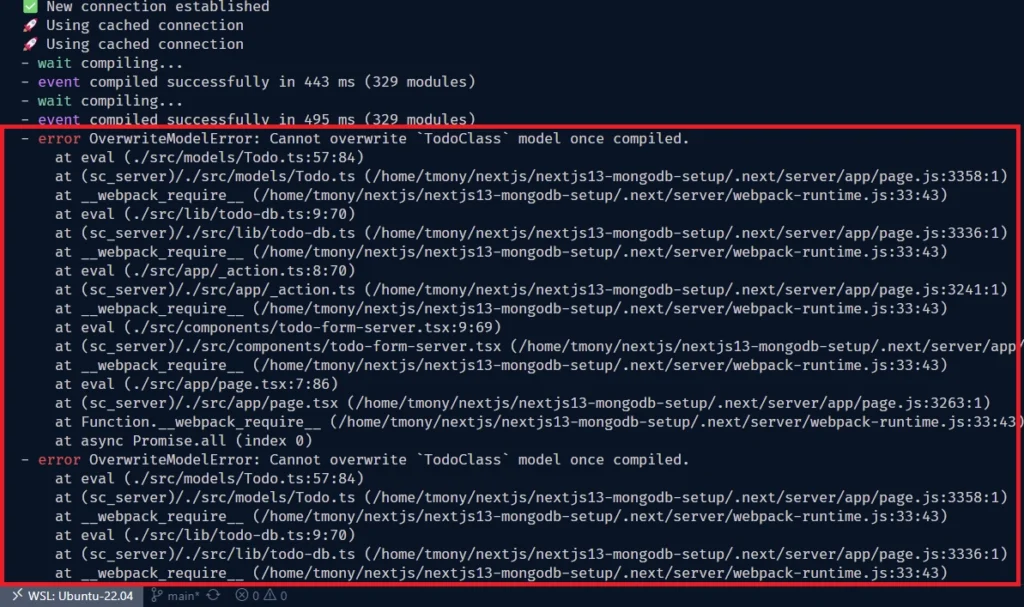
In the modified configuration, we have set serverActions to true to enable the Server Actions feature. Additionally, we have included the mongoose and @typegoose/typegoose libraries in the serverComponentsExternalPackages array. This ensures that these packages are properly handled when the files are saved and the development server restarts, preventing any potential errors.
Creating the Server Actions in Next.js
To create the Server Actions, create a new file named _action.ts in the src/app/ directory and add the following code:
src/app/_action.ts
"use server";

import { createTodo, deleteTodo, updateTodo } from "@/lib/todo-db";
import { revalidatePath } from "next/cache";

/**
 * Server Action: Create a new todo.
 */
export async function createTodoAction({
  title,
  path,
}: {
  title: string;
  path: string;
}) {
  await createTodo(title);
  revalidatePath(path);
}

/**
 * Server Action: Update an existing todo.
 */
export async function updateTodoAction(
  id: string,
  update: { tilte?: string; completed?: boolean },
  path: string
) {
  await updateTodo(id, update);
  revalidatePath(path);
}

/**
 * Server Action: Delete a todo.
 */
export async function deleteTodoAction({
  id,
  path,
}: {
  id: string;
  path: string;
}) {
  await deleteTodo(id);
  revalidatePath(path);
}
These asynchronous functions are referred to as Server Actions, and they allow us to perform data mutations on the server. The "use server" directive included at the top of the file indicates to Next.js that the functions defined in the file are Server Actions. It’s worth noting that, due to the "use server" directive, only asynchronous functions can be exported from the file. Each asynchronous function calls the corresponding Server Function we created earlier to modify the data in the database.
Creating the Todo Form Component
To enable the addition of new todos, let’s create a form component that works even when JavaScript is disabled in the browser. Follow these steps:
- Create a directory named
componentswithin thesrcfolder. - Inside the
componentsdirectory, create a file namedtodo-form-server.tsx. - Add the following code to the
todo-form-server.tsxfile:
src/components/todo-form-server.tsx
import { createTodoAction } from "@/app/_action";

export default function TodoForm() {
  async function action(data: FormData) {
    "use server";

    const title = data.get("title");
    if (!title || typeof title !== "string") {
      return;
    }

    // Invoke server action to add new todo
    await createTodoAction({ title, path: "/" });
  }

  return (
    <form
      action={action}
      key={Math.random()}
      className="flex items-center space-x-2 mb-4"
    >
      <input
        type="text"
        name="title"
        className="border rounded px-2 py-1 flex-1"
      />
      <button className="px-4 py-1 text-white rounded bg-green-500">Add</button>
    </form>
  );
}
In this code, we define a React functional component named TodoForm. Inside the component, we declare an asynchronous function named action, which will be invoked when the form is submitted. The function extracts the value of the title input field and calls the createTodoAction server action to add the new todo to the database. The form element uses the action prop to bind the action function to the form submission event.
Creating the Todo Item Component
Next, let’s create the component that will display the details of a todo item. This component will include a title, a checkbox, and a delete button.
To begin, let’s create the checkbox component. Create a checkbox.tsx file in the components directory and add the following code:
src/components/checkbox.tsx
"use client";

import { updateTodoAction } from "@/app/_action";
import { TodoClass } from "@/models/Todo";
import { useTransition } from "react";

type CheckBoxProps = {
  todo: TodoClass;
};

export default function CheckBox({ todo }: CheckBoxProps) {
  const [isPending, startTransition] = useTransition();

  return (
    <input
      type="checkbox"
      checked={todo.completed}
      name="completed"
      onChange={() =>
        startTransition(() =>
          updateTodoAction(
            todo.id,
            { completed: !todo.completed },
            "/with-server-actions"
          )
        )
      }
      disabled={isPending}
      className="h-6 w-6 border-gray-300 disabled:bg-gray-300 disabled:border-gray-300 disabled:cursor-not-allowed"
    />
  );
}
Now, let’s create the todo item component. Create a todo-item-server.tsx file in the components directory and include the following code:
src/components/todo-item-server.tsx
import { deleteTodoAction, updateTodoAction } from "@/app/_action";
import CheckBox from "./checkbox";
import { TodoClass } from "@/models/Todo";

interface TodoItemProps {
  todo: TodoClass;
}

const TodoItem: React.FC<TodoItemProps> = ({ todo }) => {
  return (
    <form className="flex items-center space-x-2 mb-2">
      <button
        className={`px-2 py-1 flex-1 text-left ${
          todo.completed ? "line-through" : ""
        }`}
        formAction={async () => {
          "use server";
          await updateTodoAction(todo.id, { completed: !todo.completed }, "/");
        }}
      >
        {todo.title}
      </button>
      <div className="flex items-center">
        <CheckBox todo={todo} />
        <button
          className="px-2 py-1 ml-2 text-white rounded bg-red-500 "
          formAction={async () => {
            "use server";
            await deleteTodoAction({
              id: todo.id,
              path: "/",
            });
          }}
        >
          Delete
        </button>
      </div>
    </form>
  );
};

export default TodoItem;
In the above code, we created a <form> element to hold the content of the todo item. By using the <form> element, we can utilize the formAction={} prop to invoke our Server Actions for updating and deleting the todo item. The checkbox component is responsible for changing the completion status of the todo item, while the delete button allows us to delete the item from the database. Additionally, clicking on the title will toggle the completion status of the todo item.
Adding the Components to a Page File
To complete the TodoList application, we need to include the components we created in the main page file. Open the src/app/page.tsx file and add the following code:
src/app/page.tsx
import TodoFormServerComponent from "@/components/todo-form-server";
import TodoItemServerComponent from "@/components/todo-item-server";
import { getTodos } from "@/lib/todo-db";

export default async function Home() {
  const { todos, results } = await getTodos();

  return (
    <div className="container mx-auto max-w-md p-4">
      <TodoFormServerComponent />
      <h1 className="text-2xl font-bold mb-4">Todo List</h1>
      {results === 0 ? (
        <p className="text-center">No Todos Found</p>
      ) : (
        todos?.map((todo) => (
          <TodoItemServerComponent key={todo.id} todo={todo} />
        ))
      )}
    </div>
  );
}
After saving the file, you can open the application in your browser. Now you should see the TodoList application, where you can add, edit, and delete todos. If you disable JavaScript in your browser, the application will still work, except for the checkbox component which relies on JavaScript.
Creating the API using Next.js API Route Handlers
Now, let’s create the API for the TodoList application and explore how the Server Functions, responsible for CRUD operations on the MongoDB database, can be utilized in the API route handlers.
To improve error handling and avoid duplicating code in multiple route handlers, we’ll create a createErrorResponse function. This function will help us handle errors more efficiently. Open the src/lib/utils.ts file and replace its current code with the following:
src/lib/utils.ts
import mongoose from "mongoose";
import { NextResponse } from "next/server";

export function stringToObjectId(id: string): mongoose.Types.ObjectId | null {
  if (mongoose.Types.ObjectId.isValid(id)) {
    return new mongoose.Types.ObjectId(id);
  } else {
    return null;
  }
}

export function createErrorResponse(
  message: string,
  statusCode: number
): NextResponse {
  const errorResponse = {
    status: statusCode >= 500 ? "error" : "fail",
    message,
  };

  return new NextResponse(JSON.stringify(errorResponse), {
    status: statusCode,
    headers: { "Content-Type": "application/json" },
  });
}
Creating GET and POST Route Handlers
Now, let’s create the route handlers for the /api/todos endpoint, which will handle the GET and POST requests. Here is an overview of the route handlers:
GET– This route handler will retrieve a paginated list of todo items and return it in the JSON response.POST– This route handler will add a new todo item to the database.
To create the route handlers, follow these steps:
- If it doesn’t already exist, create an
apidirectory inside thesrc/app/directory. - Inside the
apidirectory, create a new folder namedtodos. - Within the
todosfolder, create aroute.tsfile and add the following code:
src/app/api/todos/route.ts
import connectDB from "@/lib/connect-db";
import { createTodo, getTodos } from "@/lib/todo-db";
import { createErrorResponse } from "@/lib/utils";
import { NextRequest, NextResponse } from "next/server";

export async function GET(request: NextRequest) {
  try {
    await connectDB();

    const page_str = request.nextUrl.searchParams.get("page");
    const limit_str = request.nextUrl.searchParams.get("limit");

    const page = page_str ? parseInt(page_str, 10) : 1;
    const limit = limit_str ? parseInt(limit_str, 10) : 10;

    const { todos, results, error } = await getTodos({ page, limit });

    if (error) {
      throw error;
    }

    let json_response = {
      status: "success",
      results,
      todos,
    };
    return NextResponse.json(json_response);
  } catch (error: any) {
    return createErrorResponse(error.message, 500);
  }
}

export async function POST(request: Request) {
  try {
    await connectDB();

    const body = await request.json();

    if (!body.title) {
      return createErrorResponse("Todo must have a title", 400);
    }

    const { todo, error } = await createTodo(body.title);
    if (error) {
      throw error;
    }

    let json_response = {
      status: "success",
      data: {
        todo,
      },
    };
    return new NextResponse(JSON.stringify(json_response), {
      status: 201,
      headers: { "Content-Type": "application/json" },
    });
  } catch (error: any) {
    if (error.code === 11000) {
      return createErrorResponse("Todo with title already exists", 409);
    }

    return createErrorResponse(error.message, 500);
  }
}
Creating GET, PATCH, and DELETE Route Handlers
Next, let’s create the route handlers for the /api/todos/[id] endpoint, which will handle the GET, PATCH, and DELETE requests. These route handlers allow us to fetch a specific todo item, update its content, and delete it from the database.
To create the route handlers, follow these steps:
- Create a new folder named
[id]inside thesrc/app/api/todos/directory. - Within the
[id]folder, create a file namedroute.tsand add the following code:
src/app/api/todos/[id]/route.ts
import connectDB from "@/lib/connect-db";
import { deleteTodo, getTodo, updateTodo } from "@/lib/todo-db";
import { createErrorResponse } from "@/lib/utils";
import { NextResponse } from "next/server";

export async function GET(
  _request: Request,
  { params }: { params: { id: string } }
) {
  try {
    await connectDB();

    const id = params.id;
    const { todo, error } = await getTodo(id);

    if (error) {
      throw error;
    }

    let json_response = {
      status: "success",
      data: {
        todo,
      },
    };
    return NextResponse.json(json_response);
  } catch (error: any) {
    if (typeof error === "string" && error.includes("Todo not found")) {
      return createErrorResponse("Todo not found", 404);
    }

    return createErrorResponse(error.message, 500);
  }
}

export async function PATCH(
  request: Request,
  { params }: { params: { id: string } }
) {
  try {
    await connectDB();

    const id = params.id;
    let body = await request.json();

    const { todo, error } = await updateTodo(id, body);

    if (error) {
      throw error;
    }

    let json_response = {
      status: "success",
      data: {
        todo,
      },
    };
    return NextResponse.json(json_response);
  } catch (error: any) {
    if (typeof error === "string" && error.includes("Todo not found")) {
      return createErrorResponse("Todo not found", 404);
    }

    return createErrorResponse(error.message, 500);
  }
}

export async function DELETE(
  request: Request,
  { params }: { params: { id: string } }
) {
  try {
    await connectDB();

    const id = params.id;
    const { error } = await deleteTodo(id);

    if (error) {
      throw error;
    }

    return new NextResponse(null, { status: 204 });
  } catch (error: any) {
    if (typeof error === "string" && error.includes("Todo not found")) {
      return createErrorResponse("Todo not found", 404);
    }

    return createErrorResponse(error.message, 500);
  }
}
After saving the file, you can use API testing software such as Postman or the Thunder Client VS Code extension to send requests to the Next.js server and test the CRUD endpoints of the API. This allows you to interact with the API and verify its functionality by sending requests and observing the corresponding responses.
Conclusion
We have reached the end of our journey in this article! In this tutorial, we covered how to set up and use MongoDB in the new Next.js 13 App Router. We built a TodoList application using Next.js 13’s Server Actions feature, which allowed us to perform CRUD operations. Furthermore, we went a step further and created the API for our TodoList application.
I hope you found this article helpful and informative. If you have any questions or feedback, please feel free to share them in the comments section below. Your input is highly appreciated!
Could you please make a next js app having authentication and using getServerSideProps for private and protected routing
Absolutely! Thank you for the suggestion. I’ll be sure to add it to my list of topics to cover in future articles.
Incredible!
I could not find any proper posts or tutorials by googling for my latest version Next.js project.
But your blog gave me no error or warning but only a satisfaction.
Thanks for your posting and help.
Recommended.
I’m glad the article was helpful to you.
Loved your article, I learned about server actions and useTransition hook.
Just a question you have created a api routes, we can also do it by server actions na?
Yeah, you are correct. There was no need for the API route since it can be done using server actions. I only included the API route as another approach to achieving the same.