
In this article, you will learn how to integrate a FastAPI project into your Next.js application and deploy the entire project on Vercel. But that’s not all! We won’t stop at integration; we will take it a step further by building a simple Todo application. This application will serve as a practical demonstration of how the Next.js frontend app can effectively communicate with the FastAPI backend.
Traditionally, when developing Next.js applications, we relied on the API Routes feature within the App Router (app) to build the backend functionality. This involved using route Handlers to create custom request handlers for each route, using the Web Request and Response APIs.
Until recently, our only option within the route.ts file was to use JavaScript or TypeScript, depending on the file extension. Consequently, when deploying the project to Vercel, the code located in the src/app/api directory would be deployed to a Node.js runtime.
However, with recent advancements, we now have the flexibility to remove the api directory from the App Router and instead create a separate api folder within the root directory of the project. This new api directory will serve as the home for our FastAPI project, allowing us to write the backend code using Python. When deploying the entire project to Vercel, the platform automatically detects the Python project within the api directory and deploys it as a Python serverless function on Vercel.
More practice:
- JWT Authentication in Next.js 13 API Route Handlers
- User Registration and Login in Next.js 13 App Directory
- Build a Simple API in Next.js 13 App Directory
- Build a Simple Frontend App in Next.js 13 App Directory
- Next.js – Add Google and GitHub OAuth2 using NextAuth.js
- Next.js – Use Custom Login and SignUp Pages for NextAuth.js
- How to Setup Prisma ORM in Next.js 13 App Directory
- How to Setup and Use Apollo Client in Next.js 13 App Directory
- How to Setup React Context API in Next.js 13 App Directory
- How to Setup React Query in Next.js 13 App Directory
- How to Setup Redux Toolkit in Next.js 13 App Directory
- Setup tRPC Server and Client in Next.js 13 App Directory
- Setup and Use NextAuth.js in Next.js 13 App Directory

Running the FastAPI and Next.js Projects
To run the FastAPI server and Next.js application on your machine, simply follow the steps below:
- Download or clone the project from the GitHub repository: https://github.com/wpcodevo/nextjs-fastapi-framework. Open the source code in your preferred code editor.
- Create a virtual environment for the FastAPI project by running the command
python3 -m venv venv. This will set up a dedicated environment for the project. - Once the virtual environment is created, open the
api/index.pyfile. Your IDE should automatically activate the necessary extensions and the virtual environment. If your IDE doesn’t do it automatically, you can manually activate the virtual environment by runningsource venv/bin/activatein the terminal. - Make sure you have PNPM installed. If not, install it globally by running
npm i -g pnpm. - Run the command
pnpm installto install the dependencies required by the Next.js app. Make sure you are in the root directory of the project before executing the command. - Run the command
pnpm devin your terminal. This command uses theconcurrentlypackage to start both the Next.js and FastAPI servers concurrently. - Once the servers are up and running, open your browser and visit
http://localhost:3000to access the application. You can now add new todos, mark them as completed, and delete them as needed. These actions will trigger the Next.js frontend to send requests to the FastAPI backend, enabling seamless communication between the two.
Setup the FastAPI and Next.js Projects
In this section, I will walk through the process of generating the Next.js project, creating the FastAPI project, and configuring the Next.js project to proxy API requests to the FastAPI server.
But before we dive in, let’s take a moment to get a sneak peek at the final app we’ll be deploying on Vercel. The screenshot below showcases a Todo list application that utilizes Next.js for the frontend and FastAPI for the backend.

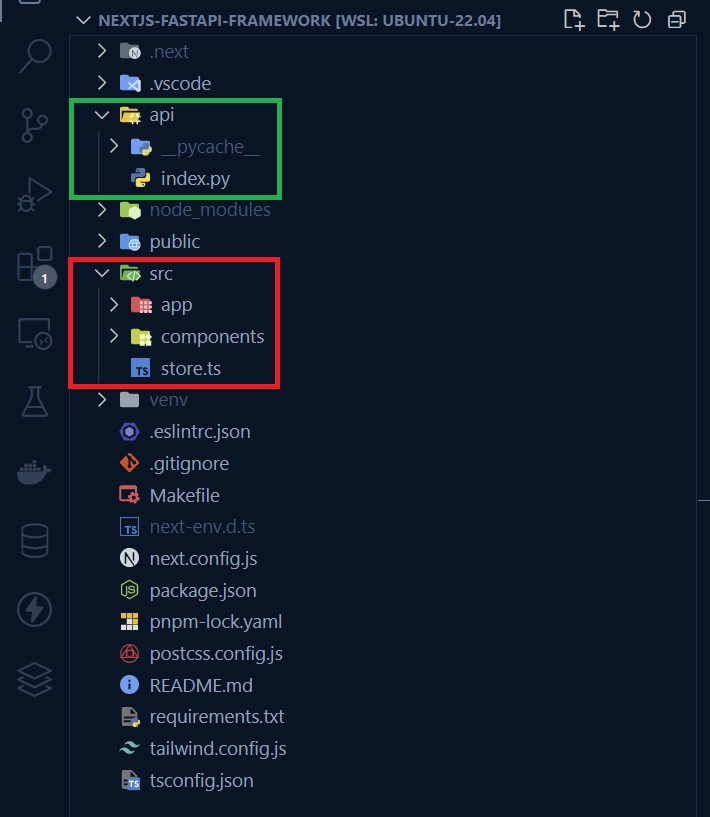
Additionally, I’ve provided a screenshot below that shows how the files and folders will look like when you finish the project. This visual guide will help you navigate through the tutorial and make sure you’re on the right track as we move forward.
Bootstrap the Next.js Project
If you don’t have a Next.js project already, you can easily generate one using the command that matches your preferred package manager. Simply run one of the following commands:
# For PNPM
pnpm create next-app nextjs-fastapi
# For NPX
npx create-next-app@latest nextjs-fastapi
# For Yarn
yarn create next-app nextjs-fastapi
Once you run the commands, a prompt will appear asking you to enable specific features. Make sure to select “Yes” for all prompts and choose the first import alias option. This ensures that the necessary features are enabled for your Next.js project.
After confirming the prompts, the Next.js project will be generated, and all the required dependencies will be automatically installed.
Once the installation process is finished, you can open the project in your preferred IDE or text editor.
Setup the FastAPI Project
Before creating the FastAPI project, we need to install the necessary modules and set up a virtual environment. To create the virtual environment, open the integrated terminal in your IDE and run the command python3 -m venv venv.
Once that is done, add the following code to the .gitignore file to exclude these specific files and directories from commits:
# Python
*.log
*.pyc
__pycache__
*.sqlite3

# Environments

.env
.venv
env/
venv/
ENV/
env.bak/
venv.bak/
Next, create a folder named api in the root directory. It’s crucial to use the name api since the Vercel platform expects this naming convention. Inside the api folder, create a new file called index.py. The file name index.py is significant because Vercel assumes it to be the entry point of the Python project.
Creating and opening the index.py file will automatically activate the required extensions and the virtual environment in your IDE or text editor. In case your IDE fails to activate the virtual environment, you can manually activate it by running source venv/bin/activate in the terminal.
With the virtual environment activated, open a new terminal and run the command below to install the necessary dependencies for your FastAPI project:
pip install fastapi 'uvicorn[standard]'
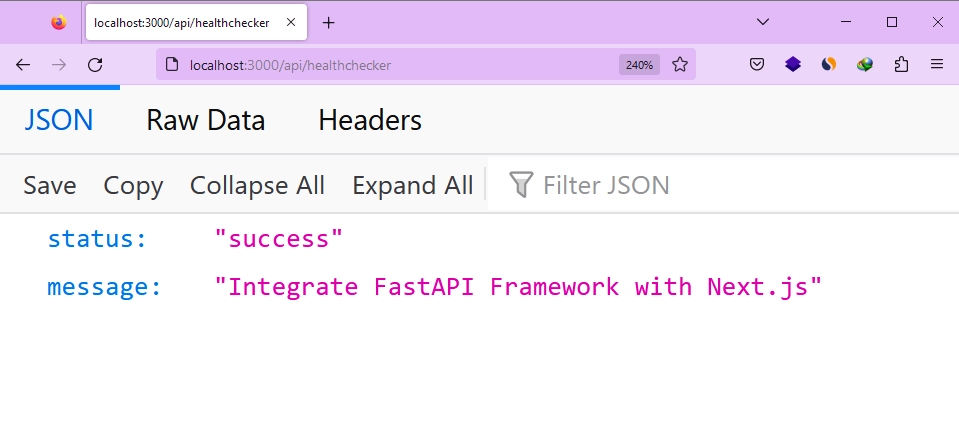
Now, let’s set up a basic FastAPI server with a single endpoint, the health checker endpoint. We’ll make requests to this endpoint to verify if the requests are being properly proxied to the FastAPI server. Open the api/index.py file and add the following code:
api/index.py
from fastapi import FastAPI

app = FastAPI(docs_url="/api/docs", openapi_url="/api/openapi.json")


@app.get("/api/healthchecker")
def healthchecker():
    return {"status": "success", "message": "Integrate FastAPI Framework with Next.js"}
Proxy Requests from Next.js to the FastAPI App
To enable proper handling of API requests and proxy them to the FastAPI server located in the /api folder, we need to configure the next.config.js file in our Next.js project.
Follow these steps to set up the necessary configurations:
- Open the
next.config.jsfile in your project. - Replace the existing content of the file with the following code snippet:
/** @type {import('next').NextConfig} */
const nextConfig = {
  rewrites: async () => {
    return [
      {
        source: "/api/:path*",
        destination:
          process.env.NODE_ENV === "development"
            ? "http://127.0.0.1:8000/api/:path*"
            : "/api/",
      },
    ];
  },
};

module.exports = nextConfig;
In the above code snippet, we define a rewrite rule within the rewrites property of the nextConfig object. This rule specifies that any request matching the pattern /api/:path* should be rewritten and redirected to a destination.
- During development, the destination URL will be set to
http://127.0.0.1:8000/api/:path*. This means that API requests made to the Next.js app will be proxied to the FastAPI server running locally onhttp://127.0.0.1:8000. - In a production environment, the destination URL will be set to
"/api/", indicating that API requests should be proxied to the same domain as the Next.js app itself. To make this configuration work, we will need to set up CORS on the FastAPI server to accept all requests proxied to it. We will cover this step later when creating the CRUD API for the Todo app.
Run the Projects in Development
Now it’s time to run the Next.js and FastAPI servers. We need a way to run them simultaneously instead of running the Next.js server in one terminal and the FastAPI server in another terminal. Fortunately, there is an NPM package called concurrently that allows us to run both servers concurrently, as the name suggests. Open your integrated terminal and execute one of the commands below, depending on your package manager:
# For PNPM
pnpm add concurrently

# For NPM
npm i concurrently

# For Yarn
yarn add concurrently
With the package installed, open the package.json file, and replace the existing dev script with the following:
{
 "scripts": {
    "fastapi-dev": "pip3 install -r requirements.txt && python3 -m uvicorn api.index:app --reload",
    "next-dev": "next dev",
    "dev": "concurrently \"pnpm run next-dev\" \"pnpm run fastapi-dev\""
  },
}
Make sure to replace pnpm with the appropriate package manager you are using. Here’s an explanation of each script:
fastapi-dev: This script installs the required Python packages specified in requirements.txt and starts the FastAPI server using Uvicorn with hot-reloading enabled. It ensures that any changes made to the FastAPI code are automatically reflected in the running server.next-dev: This script starts the Next.js development server using the ‘next dev‘ command. It enables hot-reloading and provides a convenient way to view and test the changes made to the Next.js application.dev– This is the main script that combines the execution of both the Next.js and FastAPI servers concurrently. It utilizes theconcurrentlypackage to run thenext-devandfastapi-devscripts simultaneously.
If you take a closer look at the fastapi-dev script, you’ll notice that we begin by installing the dependencies listed in the requirements.txt file before launching the FastAPI server. In order for this script to work correctly, we need to generate the requirements.txt file. To accomplish this, execute the following command:
pip freeze > requirements.txt
Running this command will generate a file named requirements.txt that contains a list of all the Python packages installed in the current virtual environment, along with their corresponding version numbers.
With that out of the way, you can run pnpm dev to start both the FastAPI and Next.js servers concurrently. Now that both servers are up and running, open your browser and navigate to http://localhost:3000/api/healthchecker. If you see the JSON object that we sent from the FastAPI server, it confirms that the Next.js app is correctly forwarding the requests to the FastAPI server.
Deploy the Projects to Vercel
Now that we have confirmed that Next.js is correctly forwarding the API requests to the FastAPI server, it’s time to deploy the project to Vercel and test if the same functionality works in a live environment. Deploying the project to Vercel is a straightforward process that even beginners can easily follow.
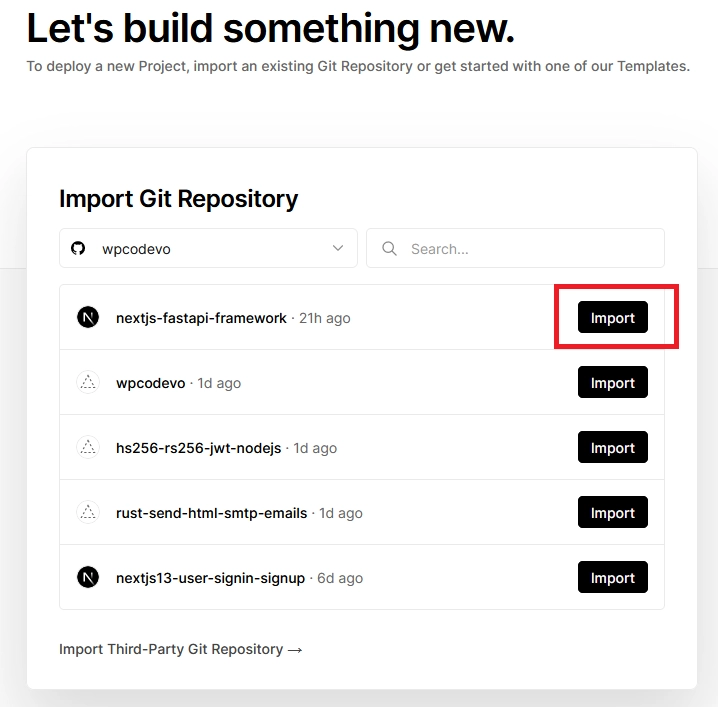
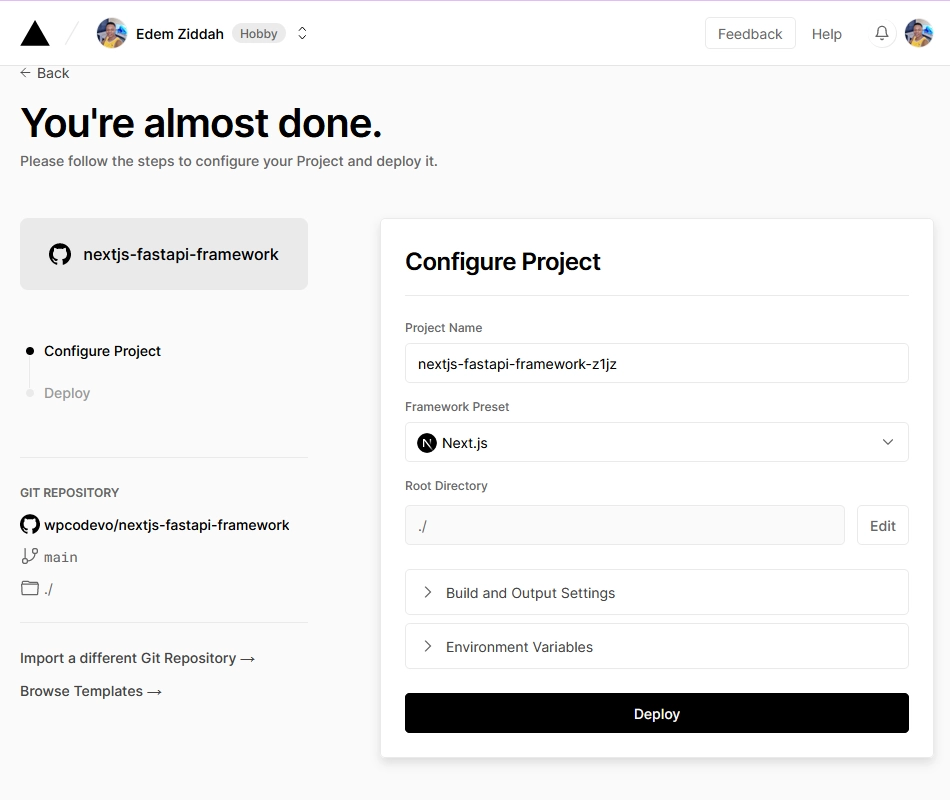
To begin, create a GitHub repository for your project and push the source code to the repository. Then, sign in to your Vercel account and click on the “Add New” button. A dropdown menu will appear, and from there, select the “Project” option. You will see a list of your recent GitHub repositories. Choose the repository where you pushed the source code by clicking the “Import” button next to it.
This action will take you to the configuration page, where you can customize the project settings such as the project name and framework. Vercel automatically detects the project as a Next.js project and provides default configurations. In most cases, you can leave the configurations as they are. Once you’re satisfied with the settings, click on the “Deploy” button.
Sit back and wait while Vercel builds the Next.js project and deploys the FastAPI server to the Python runtime. Once the deployment process is complete, you will be provided with a domain for your project. Visit this domain, and you should see your Next.js app live. Navigate to the /api/healthchecker endpoint, and you should see the JSON object that we sent from the FastAPI server.
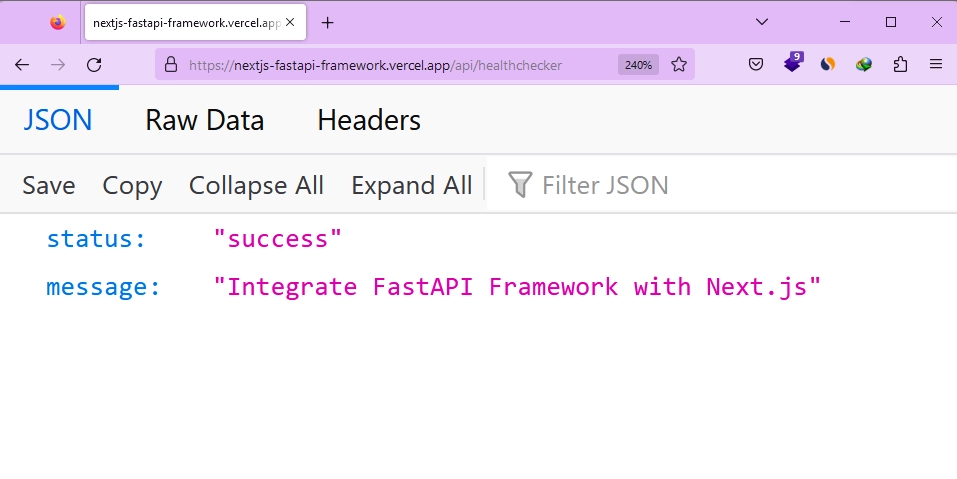
If you can successfully view the JSON object, it means that you have completed all the steps correctly and the project is working as expected.
Create a CRUD API with FastAPI
Let’s take the project to the next level by creating a Todo app API using FastAPI. I will assume that you already have a good understanding of FastAPI, so I won’t go into detail about the code.
Explaining the code would make the article even longer, considering its current length. So, let’s proceed with the instructions.
Open the api/index.py file and replace its content with the code snippet provided below:
api/index.py
from typing import Union

from fastapi import FastAPI
from fastapi.middleware.cors import CORSMiddleware
from pydantic import BaseModel

app = FastAPI(docs_url="/api/docs", openapi_url="/api/openapi.json")


@app.get("/api/healthchecker")
def healthchecker():
    return {"status": "success", "message": "Integrate FastAPI Framework with Next.js"}


app.add_middleware(
    CORSMiddleware,
    allow_origins=["*"],
    allow_credentials=True,
    allow_methods=["*"],
    allow_headers=["*"],
)


class TodoCreate(BaseModel):
    title: str


class TodoUpdate(BaseModel):
    title: Union[str, None] = None
    completed: Union[bool, None] = None


class TodoItem(BaseModel):
    id: int
    title: str
    completed: bool


# Define the TodoItem model
class TodoItem(BaseModel):
    id: int
    title: str
    completed: bool


# In-memory storage for todo items
todos = []

# Route to create a new todo item
@app.post("/api/todos")
def create_todo_item(todo: TodoCreate):
    new_todo = TodoItem(id=len(todos) + 1, title=todo.title, completed=False)
    todos.append(new_todo)
    return new_todo

# Route to get all todo items
@app.get("/api/todos")
def get_all_todo_items():
    return todos

# Route to get a specific todo item by ID
@app.get("/api/todos/{todo_id}")
def get_todo_item(todo_id: int):
    for todo in todos:
        if todo.id == todo_id:
            return todo
    return {"error": "Todo item not found"}

# Route to update a specific todo item by ID
@app.patch("/api/todos/{todo_id}")
def update_todo_item(todo_id: int, todo: TodoUpdate):
    for todo_item in todos:
        if todo_item.id == todo_id:
            todo_item.title = todo.title if todo.title is not None else todo_item.title
            todo_item.completed = todo.completed if todo.completed is not None else todo_item.completed
            return todo_item
    return {"error": "Todo item not found"}

# Route to delete a specific todo item by ID
@app.delete("/api/todos/{todo_id}")
def delete_todo_item(todo_id: int):
    for i, todo_item in enumerate(todos):
        if todo_item.id == todo_id:
            del todos[i]
            return {"message": "Todo item deleted"}
    return {"error": "Todo item not found"
In the code above, we’ve created a FastAPI app and defined CRUD endpoints to manage the data stored in memory. There’s nothing particularly extraordinary about it. However, you may have noticed that we have added CORS middleware to the FastAPI app. This step is crucial for enabling the FastAPI server to accept requests from Vercel URLs when the requests are forwarded.
Without implementing this CORS configuration, requests such as PATCH, POST, and DELETE, which involve data mutation on the server, would be blocked by the FastAPI server.
One notable difficulty I encountered was mistakenly using str | None = None instead of the correct Union[str, None] = None in the Pydantic models. During development, everything appeared to work fine. However, upon deploying the project to Vercel, any request to the FastAPI server would result in a frustrating 500 error.
The error message provided in Vercel’s server logs proved to be less helpful than desired, leading me to spend numerous hours debugging the issue. Eventually, I traced the issue back to the Pydantic models and realized that Vercel was utilizing Python version 3.6 or higher, which requires the use of the Union class to define optional attributes.
With this out of the way, you can proceed to run pnpm dev to start the development servers. Once the servers are up and running, you can utilize API testing software such as the Thunder Client VS Code extension or Postman to test the CRUD endpoints of the FastAPI server.
Create a CRUD App with Next.js
Now it’s time to create the frontend app with Next.js that will communicate with the FastAPI server. The frontend app will be responsible for tasks such as adding new todos, editing existing todos, and deleting todos.
Manage the Application State with Zustand
Let’s begin by creating a Zustand store that will allow us to manage the application states. This store will include asynchronous methods responsible for making requests to the FastAPI server and updating the store with the returned data. To get started, you’ll need to install the Zustand library by executing one of the following commands based on your package manager:
# For PNPM
pnpm add zustand

# For NPM
npm i zustand

# For Yarn
yarn add zustand
After successfully installing the Zustand package, navigate to the ‘src‘ directory and create a new file called store.ts. Inside the store.ts file, paste the following code:
src/store.ts
import { create } from "zustand";

type Todo = {
  id: number;
  title: string;
  completed: boolean;
};

type CreateTodo = {
  title: string;
};

type TodoStore = {
  todos: Todo[];
  fetchTodos: () => void;
  addTodo: (todo: CreateTodo) => void;
  updateTodo: (updatedTodo: Todo) => void;
  deleteTodo: (id: number) => void;
};

const URL = process.env.NEXT_PUBLIC_VERCEL_URL
  ? `https://${process.env.NEXT_PUBLIC_VERCEL_URL}/api`
  : "http://localhost:3000/api";

export const useStore = create<TodoStore>((set) => ({
  todos: [],
  fetchTodos: async () => {
    try {
      const response = await fetch(`${URL}/todos`);
      const todos = await response.json();
      set({ todos });
    } catch (error) {
      console.error("Error fetching todos:", error);
    }
  },
  addTodo: async (todo) => {
    try {
      const response = await fetch(`${URL}/todos`, {
        method: "POST",
        headers: {
          "Content-Type": "application/json",
        },
        body: JSON.stringify(todo),
      });
      const createdTodo = await response.json();
      set((state) => ({ todos: [...state.todos, createdTodo] }));
    } catch (error) {
      console.error("Error creating todo:", error);
    }
  },
  updateTodo: async (updatedTodo) => {
    try {
      const response = await fetch(`${URL}/todos/${updatedTodo.id}`, {
        method: "PATCH",
        headers: {
          "Content-Type": "application/json",
        },
        body: JSON.stringify(updatedTodo),
      });
      const updatedItem = await response.json();
      set((state) => ({
        todos: state.todos.map((todo) =>
          todo.id === updatedItem.id ? updatedItem : todo
        ),
      }));
    } catch (error) {
      console.error("Error updating todo:", error);
    }
  },
  deleteTodo: async (id) => {
    try {
      await fetch(`${URL}/todos/${id}`, {
        method: "DELETE",
      });
      set((state) => ({
        todos: state.todos.filter((todo) => todo.id !== id),
      }));
    } catch (error) {
      console.error("Error deleting todo:", error);
    }
  },
}));
Here is a summary of the available methods in the store:
fetchTodos– This method retrieves all the todo items from the FastAPI server and adds them to the Zustand store.addTodo– This method allows you to send a POST request to the FastAPI server to add a new todo item. Upon successful completion of the request, the newly added item will be included in the Zustand store.updateTodo– This method allows you to send a PATCH request to the FastAPI server to edit an existing todo item. If the request is successful, the corresponding todo item in the store will be updated with the new information.deleteTodo– This method allows you to send a DELETE request to the FastAPI server to remove a todo item by its ID. If the item is successfully deleted, it will also be removed from the Zustand store.
Create the Todo Form Component
Let’s proceed with the project by creating a form that will enable us to add new todo items. To do this, create a ‘components‘ folder within the ‘src‘ directory. Inside the components folder, create a TodoForm.tsx file and include the following code in it:
src/components/TodoForm.tsx
import { useStore } from "@/store";
import { useState } from "react";

export default function TodoForm() {
  const addTodo = useStore((state) => state.addTodo);
  const [loading, setLoading] = useState(false);
  const [newTodo, setNewTodo] = useState("");

  const handleCreateTodo = async () => {
    if (newTodo.length === 0) return alert("Todo input must not be empty");
    try {
      setLoading(true);
      const todo = { title: newTodo };
      await addTodo(todo);
      setNewTodo("");
    } catch (error) {
      console.error("Error creating todo item:", error);
    } finally {
      setLoading(false);
    }
  };

  return (
    <div className="flex items-center space-x-2 mb-4">
      <input
        type="text"
        value={newTodo}
        onChange={(e) => setNewTodo(e.target.value)}
        className="border rounded px-2 py-1 flex-1"
      />
      <button
        disabled={loading}
        className={`px-2 py-1 text-white rounded ${
          loading ? "bg-gray-400" : "bg-green-500"
        }`}
        onClick={handleCreateTodo}
      >
        Add
      </button>
    </div>
  );
}
This TodoForm component allows you to add new todo items. It uses the addTodo method from the Zustand store to send a request to the FastAPI server for adding a new todo. The form includes an input field where you can enter the title of the new todo item. Upon clicking the “Add” button, the handleCreateTodo function is called, which performs the necessary validations, sends the request, and updates the local state accordingly.
Create the Todo Item Component
Now we need to create the component that will display the information of the todo item. This component will also have a button for removing that specific todo item. Additionally, when the title is clicked, the todo item will be marked as completed. To create this component, follow these steps:
- Create a
TodoItem.tsxfile within thesrc/componentsdirectory. - Add the following code to the
TodoItem.tsxfile:
src/components/TodoItem.tsx
import { useStore } from "@/store";
import { useState } from "react";

interface TodoItemProps {
  todo: {
    id: number;
    title: string;
    completed: boolean;
  };
}

const TodoItem: React.FC<TodoItemProps> = ({ todo }) => {
  const [loading, setLoading] = useState(false);
  const updateTodo = useStore((state) => state.updateTodo);
  const deleteTodo = useStore((state) => state.deleteTodo);

  const handleToggleComplete = () => {
    setLoading(true);
    const updatedTodo = { ...todo, completed: !todo.completed };
    updateTodo(updatedTodo);
    setLoading(false);
  };

  const handleDelete = () => {
    setLoading(true);
    deleteTodo(todo.id);
    setLoading(false);
  };

  return (
    <div className="flex items-center space-x-2 mb-2">
      <span
        className={`text-gray-700 flex-1 ${
          todo.completed ? "line-through" : ""
        }`}
        onClick={handleToggleComplete}
      >
        {todo.title}
      </span>
      <button
        disabled={loading}
        className={`px-2 py-1 text-white rounded ${
          loading ? "bg-gray-400" : "bg-red-500"
        }`}
        onClick={handleDelete}
      >
        Delete
      </button>
    </div>
  );
};

export default TodoItem;
This component will render the todo item’s title, allowing it to be clicked to toggle its completion status. It also includes a button to delete the todo item.
Render the Components in a Page File
Finally, let’s bring everything together in a page file. This will allow us to render the components on the page. Since this page file is a server component, we need to include the "use client"; directive at the top of the file because we are importing client components into it. Without including this directive, we will encounter errors since the components contain hooks that are only available in the browser and not on the server.
To accomplish this, open the src/app/page.tsx file and replace its existing content with the following code:
src/app/page.tsx
"use client";

import TodoForm from "@/components/TodoForm";
import TodoItem from "@/components/TodoItem";
import { useStore } from "@/store";
import { useEffect } from "react";

const Home: React.FC = () => {
  const todos = useStore((state) => state.todos);
  const fetchTodos = useStore((state) => state.fetchTodos);

  useEffect(() => {
    fetchTodos();
  }, []);

  return (
    <div className="container mx-auto max-w-md p-4">
      <TodoForm />
      <h1 className="text-2xl font-bold mb-4">Todo List</h1>
      {todos.length === 0 ? (
        <p className="text-center">No Todos Found</p>
      ) : (
        todos.map((todo) => <TodoItem key={todo.id} todo={todo} />)
      )}
    </div>
  );
};

export default Home;
To complete the project, make sure you remove all CSS styles from the src/app/globals.css file, except for the Tailwind CSS directives. Once that is done, you can start the development servers by running pnpm dev. Access the app in your browser, and you’ll be able to add, edit, and delete todo items seamlessly.
Redeploy the Project to Vercel
Now that we have made changes to the source code, it’s time to redeploy the project to Vercel so that the changes can take effect. The process with Vercel is straightforward. Simply push the changes to the project’s GitHub repository, and Vercel will automatically detect the update. It will initiate the build process, and once the build is complete, Vercel will deploy the updated project. You can then access the app in its production state by visiting the URL provided by Vercel.
Conclusion
And we are done! Throughout this article, you have learned how to integrate FastAPI with Next.js and deploy the project on Vercel. We even went a step further by creating a todo application with FastAPI and Next.js. The backend was built in Python using FastAPI, and the frontend was built with Next.js in TypeScript.
I hope you enjoyed this article and found it helpful. If you have any questions or feedback, please feel free to leave them in the comments section. Thank you for reading!
Dear Team,
Thank you very much for your article, it has helped me a lot.
I just have a question, the documentation auto-generated by fastapi from which path is accessible? How can it be visualized in Production?
Thank you.
Thanks,
Leonardo
I’m glad to hear that my article was helpful to you.
Typically, the FastAPI auto-generated documentation is accessible through the
/docspath. However, in our case, since the API can only be accessed through the/api/:path*path, you’ll need to configure the FastAPI instance accordingly.To achieve this, you can set up your FastAPI instance like this:
app = FastAPI(docs_url="/api/docs", openapi_url="/api/openapi.json").This configuration ensures that the Swagger documentation is available at
/api/docs, and the OpenAPI JSON file can be accessed at/api/openapi.json.Once you deploy your application to production, you can simply access the documentation by visiting the
/api/docsURL.If you’d like to see it in action, you can visit https://nextjs-fastapi-framework.vercel.app/api/docs to explore the documentation for the Todo List API project that we created in the article. Initially, I didn’t include this configuration in the article, but since you asked, I made the necessary additions and tested it.
I hope this clarifies your question. If you have any further inquiries, feel free to ask.
Thank you very much. It has worked for me. Something I have been trying and researching for 2 days, thanks to your response today has been accomplished. Thank you very much. Gracias
TYSM! This was extremely helpful and it made sense. Would it be possible to have 2 backends though? Let’s say the FastAPI lies in `api/python/index.py` and the backend of NextJS is in it’s normal path (`src/app/api/route.ts`)? So to call the FastAPI you run `domain.com/api/python` and the NextJS backend `domain.com/api`. That would be cool and useful to do for my use case so what do you think? Is it possible?
The project you are working on is a hybrid application that includes both Python and JavaScript code. As part of the project structure, you are only allowed to have a single
/apidirectory in the project. To illustrate this, follow these steps:/apidirectory.pnpm create next-app .api/. Either try using a new directory name, or remove the files listed above.”/apidirectory can exist in the Next.js project.To avoid potential conflicts, the project generation stage no longer includes the API directory
(src/app/api/)in the project by default. This decision was made due to the possibility of conflicts when creating an/apidirectory in the root folder while already having an API directory in thesrc/app/folder.I was actually able to make it work: You can check out the implementation here: https://github.com/psycho-baller/nextjs-fastapi-starter.
And I’m also using it in my project here: https://github.com/psycho-baller/snipTube
Thanks for sharing!
Hey I’m back here to ask if you would know if it’s possible to do the same thing but instead of fastAPI, we use NestJS. Have you ever dabbled with that?
Hi Thanks for the article. I am having an issue where once my website it deployed on vercel, I get a 404 error when I go to the /api/healthcheck url. Im not sure how to solve this issue
thanks for this tut, how if we implement auth in fastapi? we must store with localstorage to use in every request?
It’s not recommended to store anything related to authentication in localStorage. If you are referring to JSON Web Tokens, it would be best to send them from the FastAPI backend as HTTP-Only cookies so that they can be stored in the browser or API client.
Then, you can configure the Next.js frontend app to send along the cookies to the FastAPI backend on every request.
Thanks for this article,
I have one question related to accessing Vercel’s environmental variables in the fast API app., for instance, the MongoDB connection string; how can I use an environmental variable and call it in Python code?
thanks for helping