

In this tutorial, you’ll learn how to create a frontend application in the new Next.js 13 app directory. Specifically, we’ll be building a feedback application that allows users to create and delete feedback. While we’ve already covered the backend API in a previous article titled ‘Build a Simple API in Next.js 13 App Directory‘, this tutorial will focus solely on the frontend.
With the release of Next.js 13.4, I was blown away by the amazing new features and improvements that have been added to the already fantastic framework. Developers can now take their web development to new heights with the latest version of Next.js.
It’s worth noting that I’ve already built this same feedback application using Rust. This means that the backend server is written in Rust and the frontend is built using the popular Rust web framework, Yew.rs. You can read more about the process in the article titled ‘Build a Full Stack App with Rust, Yew.rs, and Actix Web‘.
Before we dive into the tutorial, I’d like to give a shout-out to Brad Traversy, who initially created this application in Svelte. So, be sure to show him some love. Without further ado, let’s jump into the tutorial.
More practice:
- Build a Simple API in Next.js 13 App Directory
- Next.js – Add Google and GitHub OAuth2 using NextAuth.js
- Next.js – Use Custom Login and SignUp Pages for NextAuth.js
- How to Setup Prisma ORM in Next.js 13 App Directory
- How to Setup React Context API in Next.js 13 App Directory
- How to Setup React Query in Next.js 13 App Directory
- How to Setup Redux Toolkit in Next.js 13 App Directory
- Setup tRPC Server and Client in Next.js 13 App Directory
- Setup and Use NextAuth.js in Next.js 13 App Directory

Run the Full-Stack Next.js 13 Project Locally
Follow these instructions to run the Full-Stack Next.js 13 project on your local machine:
- Confirm that you have PNPM installed on your system. If not, you can follow the installation guide provided at https://pnpm.io/installation.
- Download or clone the project’s source code from the GitHub repository located at https://github.com/wpcodevo/nextjs13-simple-app and open it in your preferred IDE or text editor.
- Install the project’s dependencies by running the command
pnpm install. - Apply the database migrations by running the command
pnpm prisma db push. - Launch the Next.js development server by running the command
pnpm devand visit the URLhttp://localhost:3000/in your web browser to view the app. - Experiment with the various features of the app, such as creating and deleting feedback items to test its functionality.
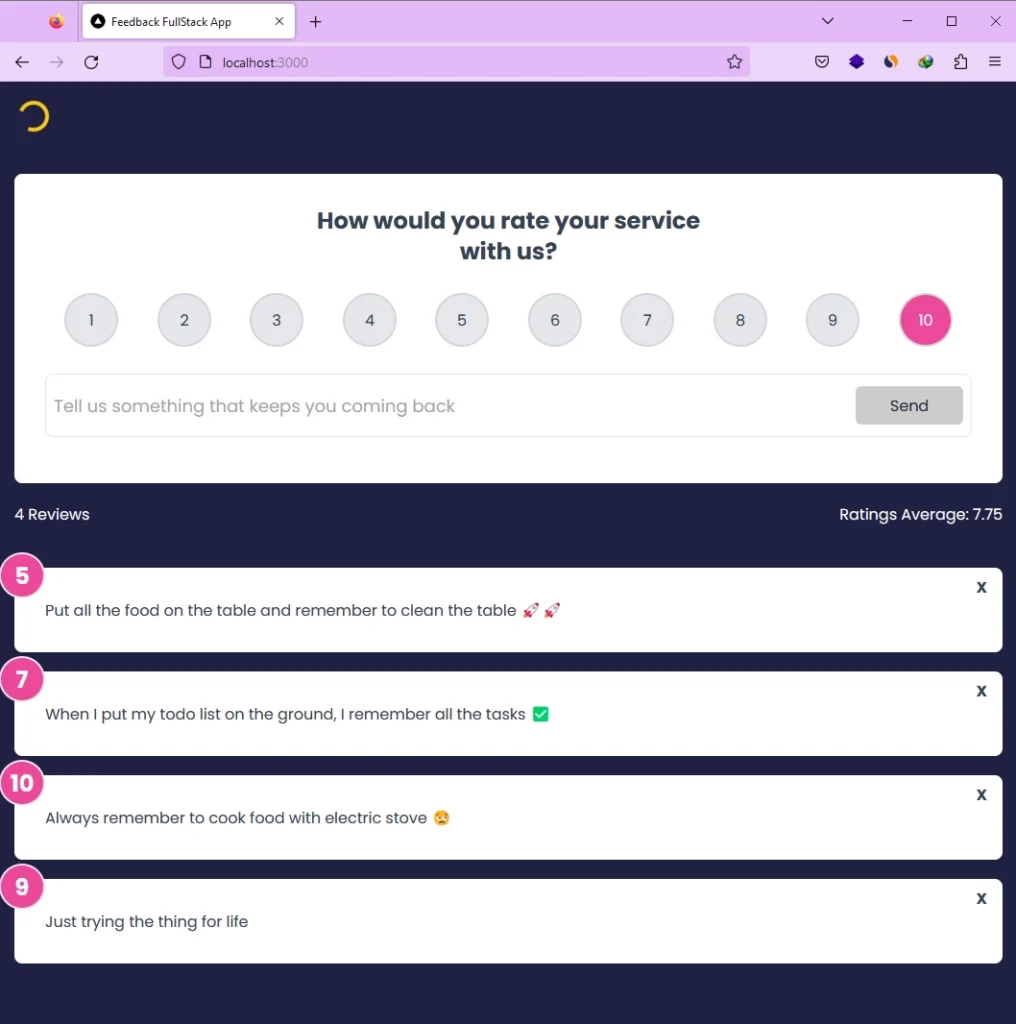
Testing the Feedback Application
Before we begin coding, let me provide you with a brief summary of the feedback application we’ll be building. The feedback application will feature a form that allows users to add new feedback.
Each feedback item will have a delete icon that, when clicked, prompts the user to confirm their action since the DELETE operation is irreversible. Once the user confirms the action, the item will be removed from both the database and the UI.
Install Dependencies and Configure Tailwind CSS
First things first, before we dive into building our application, we need to install some dependencies and configure Tailwind CSS. Luckily, Next.js 13 already comes pre-configured with Tailwind CSS, so there’s no need to install the library and its peer dependencies.
To install the dependencies necessary for our project, you can open the integrated terminal of your IDE and enter one of the following commands based on your preferred package manager:
npm i react-toastify tailwind-merge zustand
# or
yarn add react-toastify tailwind-merge zustand
# or
pnpm add react-toastify tailwind-merge zustand
react-toastify– A library for displaying alert notifications when a user performs certain actions.tailwind-merge– This library enables us to merge Tailwind CSS classes without conflicts, making it easier to style our components.zustand– A state management library that allows us to manage the application state globally. This means we can easily share data between components and avoid prop drilling.
Now, let’s move on to configuring Tailwind CSS. We’ll start by customizing the font and adjusting the container property available in the theme options. To do this, open your tailwind.config.js file and replace its contents with the following code:
tailwind.config.js
/** @type {import('tailwindcss').Config} */
module.exports = {
  content: [
    './src/pages/**/*.{js,ts,jsx,tsx,mdx}',
    './src/components/**/*.{js,ts,jsx,tsx,mdx}',
    './src/app/**/*.{js,ts,jsx,tsx,mdx}',
  ],
   theme: {
    extend: {
      fontFamily: {
        Poppins: ['Poppins, sans-serif'],
      },
      container: {
        center: true,
        padding: '1rem',
        screens: {
          lg: '1125px',
          xl: '1125px',
          '2xl': '1125px',
        },
      },
    },
  },
  plugins: [],
}
To ensure that the CSS we define for our application doesn’t conflict with the default styles that come with Next.js, we need to update the global CSS file. Open the file located at src/app/globals.css and replace its content with the following CSS rules:
src/app/globals.css
@import url('https://fonts.googleapis.com/css2?family=Poppins:wght@300;400;500;600;700&display=swap');

@tailwind base;
@tailwind components;
@tailwind utilities;

html {
  font-family: 'Poppins', sans-serif;
}

body {
  background-color: #202142;
}
Create the HTTP Request Functions
In this section, we’ll create a separate module called api-requests.ts to hold functions responsible for making API requests to the backend server. By putting these functions in a separate file, we can keep our components clean and simple, and make it easier to write integration and unit tests for the application.
Let’s start by creating a new file named api-requests.ts in the ‘src‘ directory, and add the following code to it:
src/api-requests.ts
import { Feedback } from "@prisma/client";

export type ErrorResponse = {
  status: string;
  message: string;
};
export type FeedbackListResponse = {
  status: string;
  results: number;
  feedbacks: Feedback[];
};

export type FeedbackResponse = {
  status: string;
  data: { feedback: Feedback };
};

const SERVER_ENDPOINT = process.env.SERVER_ENDPOINT || "http://localhost:3000";

async function handleResponse<T>(response: Response): Promise<T> {
  const contentType = response.headers.get("Content-Type") || "";
  const isJson = contentType.includes("application/json");
  const data = isJson ? await response.json() : await response.text();

  if (!response.ok) {
    const message = isJson
      ? data.message || response.statusText
      : response.statusText;
    throw new Error(message);
  }

  return data as T;
}

export async function apiCreateFeedback(
  feedbackData: string
): Promise<Feedback> {
  const response = await fetch(`${SERVER_ENDPOINT}/api/feedbacks/`, {
    method: "POST",
    headers: {
      "Content-Type": "application/json",
    },
    body: feedbackData,
  });

  return handleResponse<FeedbackResponse>(response).then(
    (data) => data.data.feedback
  );
}

export async function apiFetchSingleFeedback(
  feedbackId: string
): Promise<Feedback> {
  const response = await fetch(
    `${SERVER_ENDPOINT}/api/feedbacks/${feedbackId}`
  );

  return handleResponse<FeedbackResponse>(response).then(
    (data) => data.data.feedback
  );
}

export async function apiFetchFeedbacks(
  page: number,
  limit: number
): Promise<Feedback[]> {
  const response = await fetch(
    `${SERVER_ENDPOINT}/api/feedbacks?page=${page}&limit=${limit}`
  );

  return handleResponse<FeedbackListResponse>(response).then(
    (data) => data.feedbacks
  );
}

export async function apiDeleteFeedback(feedbackId: string): Promise<void> {
  const response = await fetch(
    `${SERVER_ENDPOINT}/api/feedbacks/${feedbackId}`,
    {
      method: "DELETE",
    }
  );

  if (response.status !== 204) {
    const errorResponse: ErrorResponse = await response.json();
    if (errorResponse) {
      throw new Error(errorResponse.message);
    } else {
      throw new Error(`API error: ${response.status}`);
    }
  }
}
apiCreateFeedback– This function sends a POST request to create a new feedback with the given data and returns the created feedback object.apiFetchSingleFeedback– This function sends a GET request to fetch a single feedback with the given ID and returns the feedback object.apiFetchFeedbacks– This function sends a GET request to fetch a list of feedbacks with pagination and returns an array of feedback objects.apiDeleteFeedback– This function sends a DELETE request to delete the feedback with the given ID and returns nothing.
Setup Application State with Zustand
In this section, we’ll establish a global state using Zustand to efficiently manage the data for our feedback application. If you’re not yet familiar with Zustand, it’s a state management library that simplifies and streamlines the process of managing application states in React.
The store will contain states and setter functions that we can use to update the application’s states, making it easy to manage and manipulate data. For those who are already familiar with Redux, the Zustand setter functions can be thought of as dispatch functions. Here is a list of the states and their respective setter functions:
page_loading: a boolean value that indicates whether the page is loading or notsetPageLoading: a function that sets the value ofpage_loadingpropertyfeedbacks: an array ofFeedbackobjectsaddFeedback: a function that adds a newFeedbackobject to the feedbacks arraysetFeedbackList: a function that sets the entirefeedbacksarray with a new list of Feedback objectsdeleteFeedback: a function that removes aFeedbackobject with a given ID from the feedbacks array
To create the store, create a file named store.ts in the src directory and add the following code:
src/store.ts
import { Feedback } from "@prisma/client";
import { create } from "zustand";

type initialState = {
  page_loading: boolean;
  setPageLoading: (loading: boolean) => void;
  feedbacks: Feedback[];
  addFeedback: (feedback: Feedback) => void;
  setFeedbackList: (feedbacks: Feedback[]) => void;
  deleteFeedback: (id: string) => void;
};

const useFeedbackStore = create<initialState>((set) => ({
  page_loading: false,
  feedbacks: [],
  setPageLoading: (loading: boolean) =>
    set((state) => ({ ...state, page_loading: loading })),
  addFeedback: (feedback: Feedback) =>
    set((state) => ({
      ...state,
      feedbacks: [feedback, ...state.feedbacks],
    })),
  setFeedbackList: (feedbacks: Feedback[]) =>
    set((state) => ({ ...state, feedbacks })),
  deleteFeedback: (id: string) =>
    set((state) => ({
      ...state,
      feedbacks: state.feedbacks.filter((feedback) => feedback.id != id),
    })),
}));

export default useFeedbackStore;
Create the Client-Side Components
Now, let’s start creating the client-side components in our Next.js app. To mark these components as client-side components, we will add the "use client"; directive at the beginning of their parent component. Adding this directive to the parent component only is enough because Next.js will automatically know that the components imported in this component hierarchy should only be rendered in the browser since their parent component is marked as a client-side component.
The components we will create are as follows:
Rating– This component will allow users to rate a feedback item by rendering a group of radio buttons.FeedbackStats– This component will display feedback statistics, including the number of reviews and the average rating.FeedbackForm– This component will contain a form for users to submit new feedback items.FeedbackItem– This component will represent a single feedback item.FeedbackList– This component will display a list of feedback items.FeedbackComponents– This parent component will render the other components in the browser and is marked as a client-side component using the"use client";directive.
Create the Rating Component
Let’s dive into the Rating component, which allows users to rate a feedback item on a scale from 1 to 10. The component takes two optional props: selected, which represents the currently selected rating, and onchange, which is a function called when the user selects a rating.
To display the rating options, we will render an unordered list with ten list items, each containing a radio button and a label with a number from 1 to 10.
To create the Rating component, follow these steps: navigate to the src directory, create a new folder called ‘components‘, and within it, create a file named rating.tsx. Then, add the following code to the file.
src/components/rating.tsx
interface RatingProps {
  selected?: number;
  onchange?: (selected: number) => void;
}

function Rating({ selected = 0, onchange = () => {} }: RatingProps) {
  return (
    <ul className="list-none flex items-center justify-around my-7">
      {[...Array(10).keys()].map((i) => {
        const label = (i + 1).toString();
        const id = `num${i + 1}`;
        const isSelected = selected === i + 1;

        return (
          <li
            key={i}
            className={`relative w-14 h-14 p-3 text-center rounded-full border-gray-300 border-2 transition duration-300 ${
              isSelected ? "bg-pink-500 text-white" : "bg-gray-200"
            }`}
          >
            <input
              type="radio"
              className="opacity-0"
              id={id}
              name="rating"
              value={i + 1}
              checked={isSelected}
              onChange={() => onchange(i + 1)}
            />
            <label
              htmlFor={id}
              className="absolute w-full h-full flex items-center justify-center rounded-full top-1/2 left-1/2 transform -translate-x-1/2 -translate-y-1/2 cursor-pointer hover:bg-pink-500 hover:text-white transition duration-300"
            >
              {label}
            </label>
          </li>
        );
      })}
    </ul>
  );
}

export default Rating;
When you save the file, you may encounter an error that says, “Type ‘IterableIterator’ can only be iterated through when using the ‘–downlevelIteration’ flag or with a ‘–target’ of ‘es2015’ or higher”. This means that the object you are trying to iterate through is not compatible with the current version of TypeScript.
To fix this error, you can add "downlevelIteration": true to the compilerOptions section in your tsconfig.json file. This option enables the iterator to work with the TypeScript version you’re using. Here’s an example of how to do this in your tsconfig.json file:
tsconfig.json
{
  "compilerOptions": {
    ...,

    "downlevelIteration": true,
    ...
  },
  "include": ["next-env.d.ts", "**/*.ts", "**/*.tsx", ".next/types/**/*.ts"],
  "exclude": ["node_modules"]
}
Create the Statistics Component
In order to show statistics for feedback items, we’ll create a new component called FeedbackStats. This component retrieves the feedbacks stored in the Zustand store and calculates the number of feedbacks and the average of the ratings.
We will start by importing the useFeedbackStore hook from the store module and the useMemo hook from React. Then, we will use these hooks to compute the necessary values and display them in the JSX.
To define the FeedbackStats component, create a new file named feedback-stats.tsx in the ‘components‘ directory and copy the code below:
src/components/feedback-stats.tsx
import useFeedbackStore from "@/store";
import { useMemo } from "react";

export default function FeedbackStats() {
  const store = useFeedbackStore();
  const feedbacks = store.feedbacks;
  const count = useMemo(() => feedbacks.length, [feedbacks]);
  const sum = useMemo(
    () => feedbacks.reduce((acc, feedback) => acc + feedback.rating, 0),
    [feedbacks]
  );
  let average = useMemo(
    () => (count > 0 ? (sum / count).toFixed(2) : (0.0).toFixed(2)),
    [count, sum]
  );

  return (
    <div className="flex justify-between items-center mb-11 text-white">
      <h4>{count} Reviews</h4>
      <h4>Ratings Average: {average}</h4>
    </div>
  );
}
Create the Form Component
To enable users to add new feedback, we’ll create a component called FeedbackForm. The form will consist of one input field and a rating selector. The input field will have a simple validation logic requiring users to input at least 10 characters before they can submit the form.
When the user submits the form, we’ll extract the rating and text input data and use the apiCreateFeedback function to submit it to the backend server. If the request is successful, we’ll call the store.addFeedback() function to add the new feedback to the Zustand store.
To define the FeedbackForm component, create a new file named feedback-form.tsx in the components directory and copy the code below:
src/components/feedback-form.tsx
import { useRef, useState } from "react";
import { twMerge } from "tailwind-merge";
import { toast } from "react-toastify";
import Rating from "./rating";
import useFeedbackStore from "@/store";
import { apiCreateFeedback } from "@/api-requests";

export default function FeedbackForm() {
  const [text, setText] = useState("");
  const [message, setMessage] = useState<string | null>(null);
  const [rating, setRating] = useState(10);
  const store = useFeedbackStore();
  const minTextLength = 10;

  const textInputRef = useRef<HTMLInputElement>(null);

  const handleRatingSelect = (value: number) => {
    setRating(value);
  };

  const handleInput = (event: React.ChangeEvent<HTMLInputElement>) => {
    const value = event.target.value;
    setMessage(null);
    setText(value);
  };

  const onSubmit = async (event: React.FormEvent<HTMLFormElement>) => {
    event.preventDefault();
    store.setPageLoading(true);

    if (text.trim().length < minTextLength) {
      setMessage("Text must be at least 10 characters");
      store.setPageLoading(false);
      return;
    }

    const feedbackData = JSON.stringify({
      text: text,
      rating: rating,
    });

    try {
      const feedback = await apiCreateFeedback(feedbackData);
      store.addFeedback(feedback);
      store.setPageLoading(false);
      toast.info("Feedback added successfully");
      setText("");
      setRating(10);
      if (textInputRef.current) {
        textInputRef.current.value = "";
      }
    } catch (error: any) {
      toast.error(error.toString());
      console.error(error);
      store.setPageLoading(false);
    }
  };

  return (
    <div className="bg-white text-gray-700 rounded-lg p-8 my-5 relative">
      <header className="max-w-md mx-auto">
        <h2 className="text-center text-2xl font-bold">
          How would you rate your service with us?
        </h2>
      </header>
      <form onSubmit={onSubmit}>
        <Rating selected={rating} onchange={handleRatingSelect} />
        <div className="flex border rounded-lg my-4 px-2 py-3">
          <input
            type="text"
            ref={textInputRef}
            onInput={handleInput}
            className="flex-grow border-none text-lg focus:outline-none"
            placeholder="Tell us something that keeps you coming back"
          />
          <button
            type="submit"
            disabled={store.page_loading}
            className={twMerge(
              "border-0 rounded-md w-28 h-10 cursor-pointer hover:bg-indigo-500",
              store.page_loading
                ? "bg-[#ccc] text-gray-800"
                : "bg-indigo-600 text-white"
            )}
          >
            Send
          </button>
        </div>

        {message && (
          <div className="pt-3 text-center text-purple-600">{message}</div>
        )}
      </form>
    </div>
  );
}
Create the Feedback Item Component
To display individual feedback, we will create a component named FeedbackItem that takes a prop called feedback representing the feedback data.
Additionally, this component will have the code for deleting feedback from the database. When the delete icon is clicked, a confirmation dialog box will appear asking the user to confirm their action. If the user confirms, the apiDeleteFeedback function will be used to send a DELETE request to the backend server.
If the deletion is successful, the deleted item will be removed from the Zustand store using the store.deleteFeedback() function. This change will be reflected in the UI.
To define the FeedbackItem component, create a new file named feedback-item.tsx in the components directory and add the code below to it.
src/components/feedback-item.tsx
import { apiDeleteFeedback } from "@/api-requests";
import useFeedbackStore from "@/store";
import { Feedback } from "@prisma/client";
import { MouseEvent, useCallback } from "react";
import { toast } from "react-toastify";

interface Props {
  feedback: Feedback;
}

function confirmDelete(message: string): boolean {
  return window.confirm(message);
}

export function FeedbackItem({ feedback }: Props): JSX.Element {
  const store = useFeedbackStore();

  const onDelete = useCallback(
    (event: MouseEvent<HTMLButtonElement>) => {
      const confirmed = confirmDelete(
        "Do you really want to delete this item?"
      );

      if (confirmed) {
        store.setPageLoading(true);
        apiDeleteFeedback(feedback.id)
          .then(() => {
            store.setPageLoading(false);
            toast.info("Feedback deleted successfully");
            store.deleteFeedback(feedback.id);
          })
          .catch((error: any) => {
            toast.error(error.toString());
            store.setPageLoading(false);
          });
      }
    },
    [feedback.id]
  );

  return (
    <div className="bg-white text-gray-700 rounded-lg p-8 my-5 relative">
      <div className="bg-pink-500 text-white rounded-full border-2 border-gray-200 w-12 h-12 flex items-center justify-center text-2xl font-bold absolute top-0 left-0 -mt-4 -ml-4">
        {feedback.rating}
      </div>
      <button
        type="button"
        className="absolute font-bold top-2 right-4 cursor-pointer bg-transparent border-none"
        onClick={onDelete}
      >
        X
      </button>
      <p>{feedback.text}</p>
    </div>
  );
}
Create the Feedback List Component
Now, let’s turn our attention to defining the FeedbackList component that will be responsible for rendering the feedback items retrieved from the backend server using the FeedbackItem component we just defined.
When the FeedbackList component mounts, it will invoke the apiFetchFeedbacks function to retrieve a paginated list of feedback items from the backend server. If the request is successful, the store.setFeedbackList() function will be called to add the list of feedbacks to the Zustand store.
The FeedbackList component will then map over the list of feedback items and render each using the FeedbackItem component. If there are no feedback items, a message will be displayed to inform the user that no feedbacks were found.
To define this component, create a feedback-list.tsx file and add the code below to it.
src/components/feedback-list.tsx
import React, { useEffect } from "react";
import { toast } from "react-toastify";
import { FeedbackItem } from "./feedback-item";
import { apiFetchFeedbacks } from "@/api-requests";
import useFeedbackStore from "@/store";

const FeedbackList: React.FC = () => {
  const store = useFeedbackStore();
  const feedbackList = store.feedbacks;

  const fetchFeedbacks = async () => {
    const page = 1;
    const limit = 10;

    store.setPageLoading(true);

    try {
      const feedbacks = await apiFetchFeedbacks(page, limit);
      store.setFeedbackList(feedbacks);
    } catch (error: any) {
      toast.error(error.toString());
    }

    store.setPageLoading(false);
  };

  useEffect(() => {
    fetchFeedbacks();
    window.addEventListener("focus", fetchFeedbacks);
    return () => {
      window.removeEventListener("focus", fetchFeedbacks);
    };
  }, []);

  return (
    <div>
      {feedbackList.map((feedback) => {
        const key = feedback.id.toString();
        return <FeedbackItem key={key} feedback={feedback} />;
      })}

      {feedbackList.length === 0 && (
        <p className="max-w-md mx-auto py-6 text-center text-lg rounded-md bg-white">
          No feebacks found
        </p>
      )}
    </div>
  );
};

export default FeedbackList;
Group the Client-Side Components Together
To render the components we have created only in the browser, we will create a parent component that will include the "use client"; directive. This will tell Next.js that all the components imported in this file should only be rendered in the browser, as their parent component is marked with the "use client"; directive.
Create a new file named feedback-components.tsx in the ‘components‘ directory and add the following code to it.
src/components/feedback-components.tsx
"use client";

import { ToastContainer } from "react-toastify";
import useFeedbackStore from "@/store";
import FeedbackForm from "./feedback-form";
import FeedbackList from "./feedback-list";
import FeedbackStats from "./feedback-stats";

export default function FeedbackComponents() {
  const store = useFeedbackStore();
  return (
    <>
      <main className="md:container mt-24 px-5">
        <FeedbackForm />
        <FeedbackStats />
        <FeedbackList />
      </main>
      {store.page_loading && (
        <div
          className="fixed top-5 left-5 inline-block h-8 w-8 animate-spin rounded-full border-4 border-solid border-yellow-400 border-r-transparent align-[-0.125em] text-warning motion-reduce:animate-[spin_1.5s_linear_infinite]"
          role="status"
        >
          <span className="!absolute !-m-px !h-px !w-px !overflow-hidden !whitespace-nowrap !border-0 !p-0 ![clip:rect(0,0,0,0)]">
            Loading...
          </span>
        </div>
      )}
      <ToastContainer />
    </>
  );
}
Render the Feedback Components in a Server-Side File
We’ve finished creating all the client-side components for our feedback system, and now it’s time to render them in a page component. By default, all components in the Next.js app directory are server-rendered but since we’ve marked our FeedbackComponents component as a client-side component using the "use client"; directive, we won’t encounter any errors.
To do this, navigate to the src/app/page.tsx file and replace its existing code with the following:
src/app/page.tsx
import FeedbackComponents from "@/components/feedback-components";

export default function Home() {
  return <FeedbackComponents />;
}
By importing and rendering the FeedbackComponents component in our page component, Next.js will know to only render the components in the browser and not during server rendering.
We’re almost finished! We just need to do a few more things to complete the project. First, we need to add the CSS for the React Toastify library to our root layout component. Second, we need to remove some of the code added by Next.js during the project setup.
To do this, you can simply replace the existing content of the src/app/layout.tsx file with the code below.
src/app/layout.tsx
import "./globals.css";
import "react-toastify/dist/ReactToastify.css";

export const metadata = {
  title: "Feedback FullStack App",
  description:
    "Learn how to build a full-stack feedback application in Next.js 13 app directory",
};

export default function RootLayout({
  children,
}: {
  children: React.ReactNode;
}) {
  return (
    <html lang="en">
      <body>{children}</body>
    </html>
  );
}
Great job on building a frontend application in the new Next.js 13 app directory! To ensure the Prisma migrations are applied to the database before starting the development server, run the command pnpm prisma db push first.
After that, start the development server by running pnpm dev and head over to http://localhost:3000/ in your browser to start interacting with the feedback app. Have fun!
Conclusion
Congratulations! You have successfully built the frontend of a feedback application using the latest Next.js 13 App Router. I hope you found this tutorial helpful and informative. If you have any questions or feedback, please don’t hesitate to leave a comment. Thank you for reading and happy coding!
IN
export default function FeedbackStats() {
const store = useFeedbackStore();
const feedbacks = store.feedbacks; // i am getting feedbacks.length 0 even it exist in database
Can you please help me understand what am i doing wrong ? or what could be possible reason that i am getting 0 in return
I have created this differently FeedbackStats is part of dashboard so no other components will render after that……
I was thinking like because you have created everything in single page that’s why you’re getting correct stats count because if i only call that component
then this `store.setFeedbackList(feedbacks)` will not be triggered which means there will be no feedbacks in the feedbacks[] ………
Am i thinking this right ? i just started learning NEXT.JS
I have no idea what i am doing :p
Without reviewing your code, it’s difficult to determine the exact reason for the issue. Double-check your data retrieval logic and verify the implementation of the feedback store to ensure it correctly fetches and updates the feedbacks array.