
In this article, you will learn how to build a REST API with CRUD functionalities in TypeScript using the SvelteKit framework. This marks the first part of a two-part series where we’ll create a full-stack feedback application. In this installment, our focus will be on creating the API aspect of the feedback application. In the subsequent tutorial, we’ll tackle the frontend part, enabling it to interact seamlessly with the API.
It’s worth noting that in a previous article, we created a similar API using Next.js. You may observe similarities between the Next.js and SvelteKit implementations, as both frameworks utilize the Web Request and Response APIs.
Before we proceed, I’d like to give a special shoutout to Brad Traversy, who initially created this feedback application in Svelte. In our endeavor, we’ll take it a step further by adding new functionalities and integrating a database into the flow. If you’re interested, you can watch his video where he builds the original application. Be sure to subscribe to his channel and leave a like on the video!
Getting More Practice:
- Learn Next.js Server Actions and Mutations with Examples
- Integrate FastAPI Framework with Next.js and Deploy
- Integrate Python Flask Framework with Next.js and Deploy
- JWT Authentication in Next.js 13 API Route Handlers
- User Registration and Login in Next.js 13 App Directory
- Build a Simple API in Next.js 13 App Directory
- Build a Simple Frontend App in Next.js 13 App Directory
- Next.js – Add Google and GitHub OAuth2 using NextAuth.js
- Next.js – Use Custom Login and SignUp Pages for NextAuth.js
- How to Setup Prisma ORM in Next.js 13 App Directory
Running the SvelteKit App on Your Machine
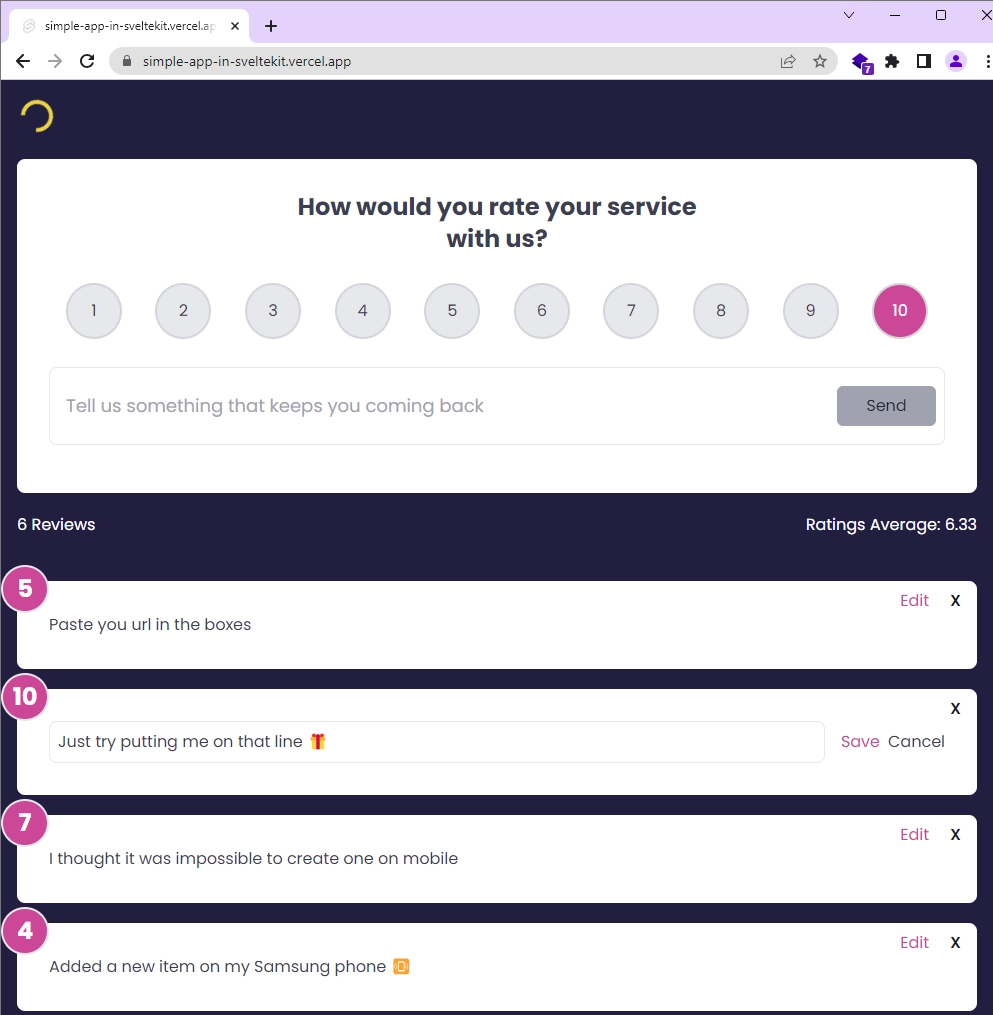
Below is a sneak peek of the feedback application that we’ll build throughout this two-part tutorial series. The top section consists of a card with radio buttons for feedback ratings and an input field for adding feedback text. Beneath the card, you’ll find statistics displaying the total number of reviews and the average ratings.
Following that, there’s a list of cards displaying the feedback items. Each card comes with Edit and Delete buttons. Clicking the Edit button reveals an input field for editing the feedback text, while the Delete button prompts a confirmation before removing the feedback item from both the database and the UI.
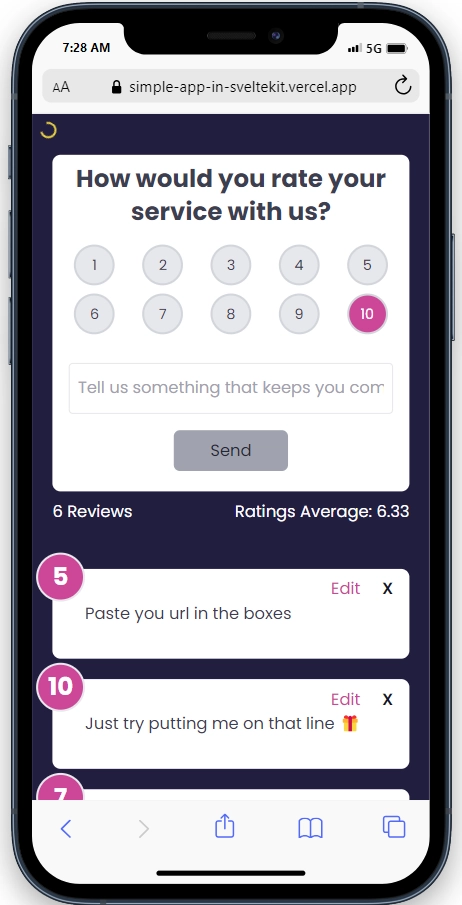
Here is a preview of the application viewed on a mobile device, indicating that it is fully responsive and can easily adapt to all screen sizes.
To run the SvelteKit feedback app on your local machine, follow these steps:
- Download and Set Up:
- Download or clone the project from its GitHub repository at https://github.com/wpcodevo/simple-app-in-sveltekit.
- Open the source code in your preferred IDE or code editor.
- Install Dependencies:
- In your terminal, run
pnpm installto install all the necessary dependencies. If you don’t have the PNPM package manager installed, you can install it by runningnpm i -g pnpm.
- In your terminal, run
- Database Configuration:
- Duplicate the
.env.examplefile and rename the copy to.env. - Inside the
.envfile, add your cloud Postgres database URL to theDATABASE_URLvariable. You can obtain a cloud PostgreSQL URL from Supabase.
- Duplicate the
- Optional: Use Docker for PostgreSQL:
- If you don’t have a cloud PostgreSQL database, you can use Docker to set up a local PostgreSQL server in a Docker container. Ensure you have Docker installed on your machine.
- Run
docker-compose up -din the terminal to start the PostgreSQL server.
- Start the Development Server:
- Run the command
pnpm dev --port 3000in the terminal. This will generate the Prisma Client, apply migrations to the database, and start the SvelteKit development server.
- Run the command
- Access the Application:
- Visit the provided URL in your web browser to access the application.
- Feel free to explore and interact with the application’s features, such as adding, editing, and deleting feedback items.
- If you wish to test the API using an API client, you can import the
Feedback App API.postman_collection.jsonfile, which is provided in the source code, into tools like Postman or the Thunder Client VS Code extension. Once imported, you can utilize the pre-defined requests to interact with the SvelteKit API, allowing you to perform actions such as adding, editing, retrieving, and deleting feedback items.
Setting up the SvelteKit Application
To begin building our SvelteKit application, we’ll first need to create a new project. If you already have one, feel free to skip this step. Navigate to the directory where you’d like to keep the source code and choose one of the following commands based on your preferred package manager. In my case, I’ll be using PNPM.
# For PNPM
pnpm create svelte@latest simple-app-in-sveltekit

# For Yarn
yarn create svelte@latest simple-app-in-sveltekit

# For NPM
npm create svelte@latest simple-app-in-sveltekit
After running the command, you’ll be prompted to select a template. Opt for the “skeleton project” option. Next, choose “Yes, using TypeScript syntax” for TypeScript type checking. For additional options, use the spacebar to select both ESLint and Prettier. Once you’ve made your selections, hit the Enter key to generate the project.
With the project created, navigate to the project directory and run pnpm install to install all the necessary dependencies. Once the installation is complete, you can open the project in your preferred IDE.
Setting up a PostgreSQL Database
In this section, we’ll set up a PostgreSQL database. You have two options: you can either use Docker or a Postgres server running in the cloud. If you plan to deploy the project, I recommend using a cloud PostgreSQL database for better scalability and ease of management.
Using a Cloud Platform
To use a cloud Postgres database, I’ll guide you through obtaining the connection URL from Supabase. However, feel free to opt for any other provider. Follow these straightforward steps:
- Sign up at https://supabase.com/dashboard/sign-up using your GitHub account.
- Create a new project. Once the project is set up, click on the settings icon located in the left sidebar.
- In the settings page, select “Database” and scroll down to the “Connection string” section. Under this, choose the “URI” tab and copy the provided URI.
- Create a
.envfile at the root level of your project, and paste the copied connection string as the value for theDATABASE_URLvariable. Don’t forget to replace the[YOUR-PASSWORD]placeholder with the actual password of your Postgres database, which was provided when you created the new project on Supabase.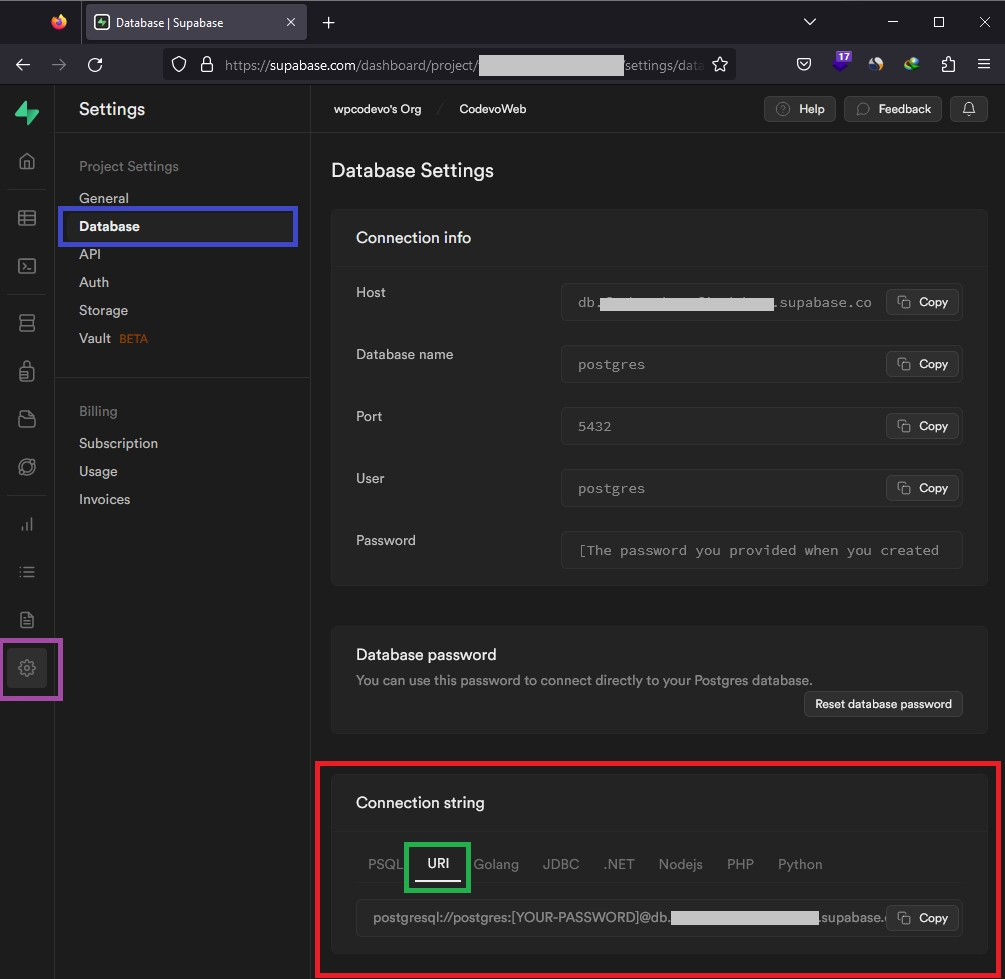
.env
# -----------------------------------------------------------------------------
# Database (PostgreSQL - Supabase)
# -----------------------------------------------------------------------------

DATABASE_URL=paste_cloud_postgres_uri_here
Optional: Using Docker
To set up a Postgres server in Docker, begin by creating a docker-compose.yml file at the root level of your project. Then, add the following configurations to the file:
docker-compose.yml
services:
  postgres:
    image: postgres
    container_name: postgres
    ports:
      - 6500:5432
    env_file:
      - ./.env
    volumes:
      - postgres:/var/lib/postgresql/data
  pgadmin:
    image: dpage/pgadmin4
    container_name: pgadmin
    ports:
      - "5050:80"
    env_file:
      - ./.env
    volumes:
      - pgadmin-data:/var/lib/pgadmin
    restart: always
volumes:
  postgres:
  pgadmin-data:
In the configuration, we referenced a .env file in the env_file field which will contain the credentials needed to build the PostgreSQL image. To make these credentials available, create a .env file in the project’s root directory and add the following environment variables:
.env
# -----------------------------------------------------------------------------
# PostgreSQL Credentials for Docker Compose
# -----------------------------------------------------------------------------
POSTGRES_HOST=127.0.0.1
POSTGRES_USER=admin
POSTGRES_PASSWORD=password123
POSTGRES_DB=sveltekit_feedback_app
POSTGRES_PORT=6500

# -----------------------------------------------------------------------------
# pgAdmin4 Credentials for Docker Compose
# -----------------------------------------------------------------------------
PGADMIN_DEFAULT_EMAIL=admin@admin.com
PGADMIN_DEFAULT_PASSWORD=password123
PGADMIN_LISTEN_PORT=80


# -----------------------------------------------------------------------------
# Database (PostgreSQL - Docker)
# -----------------------------------------------------------------------------
DATABASE_URL=postgresql://admin:password123@localhost:6500/sveltekit_feedback_app?schema=public
With the environment variables set, run the command docker-compose up -d to start both the PostgreSQL and pgAdmin servers in their respective containers.
Setting up Prisma ORM for Database Access
Now that our PostgreSQL database is up and running, let’s integrate Prisma ORM into the project. Begin by installing the Prisma CLI and Client with the following command:
# For PNPM
pnpm add @prisma/client && pnpm add -D prisma

# For Yarn
yarn add @prisma/client && yarn add -D prisma

# For NPM
npm i @prisma/client && npm i -D prisma
Once the packages are installed, initialize Prisma in the project using the command below:
# For PNPM
pnpm prisma init --datasource-provider postgres

# For Yarn
yarn prisma init --datasource-provider postgres

# For NPM
npx prisma init --datasource-provider postgres
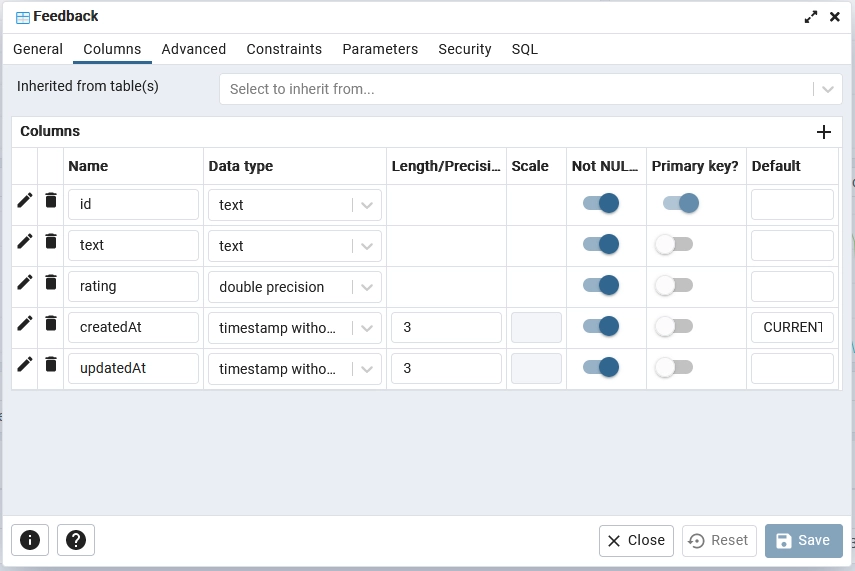
Now, open the prisma/schema.prisma file and replace its content with the following snippet, which defines the Feedback model with fields representing the structure of a feedback item:
prisma/schema.prisma
// This is your Prisma schema file,
// learn more about it in the docs: https://pris.ly/d/prisma-schema

generator client {
  provider = "prisma-client-js"
}

datasource db {
  provider = "postgres"
  url      = env("DATABASE_URL")
}

model Feedback {
  id        String   @id @default(uuid())
  text      String   @unique
  rating    Float
  createdAt DateTime @default(now())
  updatedAt DateTime @updatedAt
}
Once you’ve updated the schema, run the following command to connect to the running PostgreSQL database, generate schema migrations based on the Feedback model, synchronize the migrations with the schema of the Postgres database, and generate the Prisma Client in the node_modules folder:
# For PNPM
pnpm prisma migrate dev --name init

# For Yarn
yarn prisma migrate dev --name init

# For NPM
npx prisma migrate dev --name init
To view the tables added to the PostgreSQL database, access the pgAdmin GUI by visiting http://localhost:5050/ in your web browser. Make sure your Docker container is running.
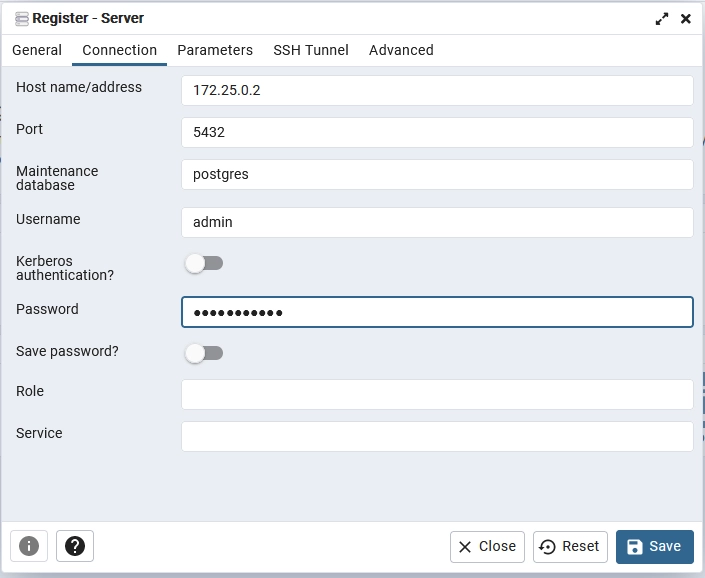
Next, sign in to pgAdmin using the credentials provided in the .env file. Once logged in, on the pgAdmin dashboard, add a new server using the PostgreSQL credentials from the .env file. Use the default Postgres port (5432) instead of the one provided in the .env file.
To get the IP of the running Postgres server, you can use the following steps:
- Run the command
docker psto list all running Docker containers. - Find the container ID of the PostgreSQL container from the output.
- Run the command
docker inspect <container_id>, replacing<container_id>with the actual container ID from the previous step. - In the output, scroll down to the “NetworkSettings” section and copy the value of the “IPAddress” field.
Now that you have registered the Postgres server in pgAdmin, navigate to the sveltekit_feedback_app -> Schemas -> Tables to inspect the properties of the Feedback table.
If you are using Supabase, you can get the connection info from the “Database Settings” page provided by Supabase.
Creating a Singleton Prisma Client
With the Prisma migrations synchronized with the database schema, we can now utilize the Prisma Client to interact with the database. However, we need to take an important step before proceeding. When using SvelteKit’s development server, it hot reloads whenever we make changes to the source code. To avoid creating a new instance of the Prisma Client for each hot reload, which would result in additional connections to the database, we must store the Prisma Client as a global variable during development.
Let’s get started. First, open your src/app.d.ts file and add a new variable called prisma, defining it as type PrismaClient. Here’s how it should look:
src/app.d.ts
// See https://kit.svelte.dev/docs/types#app

import type { PrismaClient } from '@prisma/client';

// for information about these interfaces
declare global {
	namespace App {
		// interface Error {}
		// interface Locals {}
		// interface PageData {}
		// interface Platform {}
	}
	var prisma: PrismaClient;
}

export {};
Next, navigate to the src/lib/ directory and create a new folder named server. Inside the server folder, create a prisma.ts file and add the following code:
src/lib/server/prisma.ts
import { PrismaClient } from '@prisma/client';

const prisma =
	globalThis.prisma ??
	new PrismaClient({
		log: ['query']
	});

if (process.env.NODE_ENV != 'production') globalThis.prisma = prisma;

export { prisma };
By placing the prisma.ts file within a server directory, we inform SvelteKit that the content of the file should only be used on the server. Alternatively, we could have directly indicated this in the file name as prisma.server.ts, which would achieve the same result as the folder approach.
Creating the SvelteKit API Endpoints
SvelteKit indeed simplifies the process of creating API endpoints by providing built-in support for the Web Request and Response APIs. You achieve this by using a special file named +server.(js|ts), which is also known as an ‘API route’ or ‘endpoint’. In this file, you define functions that handle various types of HTTP requests, such as GET for retrieving data, POST for saving data, PATCH or PUT for updating data, and DELETE for deleting data. These functions are responsible for processing incoming requests from users and returning the appropriate responses.
GET /hello: Returns a Simple Message in JSON
To set up a basic “hello” API endpoint that returns a simple message in JSON format for a GET request to the /api/hello URL, follow these steps:
- Go to the
routesdirectory and create a folder namedapi. - Inside the
apifolder, create another folder calledhello, representing thehelloendpoint. - Within the
hellofolder, create a+server.tsfile since we are using TypeScript in the project. - In the
+server.tsfile, export a function namedGETto handle incoming GET requests for the/api/helloendpoint.
Here’s how the +server.ts file should look like:
src/routes/api/hello/+server.ts
import { json } from '@sveltejs/kit';

export function GET() {
	const responseBody = {
		status: 'success',
		message: 'Hello, SvelteKit'
	};

	return json(responseBody);

	// return new Response(JSON.stringify(responseBody), {
	// 	status: 200,
	// 	headers: { 'Content-Type': 'application/json' }
	// });
}
In the GET function, we define the response object that we want to send to the user, which includes a “status” and “message” property. To return a JSON response, we use SvelteKit’s json function, passing the response object as an argument. The json function takes care of properly setting the response headers and converting the object to a JSON string.
Using the json function saves you a lot of time compared to manually creating the Response instance, and it ensures the correct content type, application/json, is set automatically. This simplifies the code and makes it more readable, as you don’t need to worry about setting headers and stringifying the response object yourself.
GET /feedbacks: Fetches a Paginated List of Feedback
Let’s continue building the Feedback API by creating a route handler to handle GET requests for /api/feedbacks?page=1&limit=10&orderBy=asc. This API endpoint supports pagination, which allows users to fetch a specific list of feedback items from the database and order them in ascending or descending order. This approach helps us avoid sending massive JSON payloads to users, especially when dealing with large databases containing millions of records.
To create the API handler, follow these steps:
- Navigate to the
src/routes/api/directory and create a new folder namedfeedbacks. - Within the
feedbacksdirectory, create a+server.tsfile and add the following code:
src/routes/api/feedbacks/+server.ts
import { json } from '@sveltejs/kit';
import { prisma } from '$lib/server/prisma';

export async function GET({ url }) {
	try {
		const pageQueryParam = url.searchParams.get('page');
		const limitQueryParam = url.searchParams.get('limit');
		const orderBy = url.searchParams.get('orderBy') === 'asc' ? 'asc' : 'desc';

		const page = pageQueryParam ? parseInt(pageQueryParam, 10) : 1;
		const limit = limitQueryParam ? parseInt(limitQueryParam, 10) : 10;
		const skip = (page - 1) * limit;

		const [totalFeedbacks, feedbacks] = await Promise.all([
			prisma.feedback.count(),
			prisma.feedback.findMany({
				skip,
				take: limit,
				orderBy: {
					createdAt: orderBy
				}
			})
		]);

		const totalPages = Math.ceil(totalFeedbacks / limit);
		const hasNextPage = page < totalPages;
		const hasPreviousPage = page > 1;

		const json_response = {
			status: 'success',
			pagination: {
				totalPages,
				currentPage: page,
				totalResults: totalFeedbacks,
				hasNextPage,
				hasPreviousPage
			},
			feedbacks
		};
		return json(json_response);
	} catch (error: any) {
		const error_response = {
			status: 'error',
			message: error.message
		};
		return json(error_response, { status: 500 });
	}
}
In the above code, we extract the page, limit, and orderBy query parameters from the request URL and assign default values for flexibility. If the user omits these query parameters, the API will return the first 10 feedback records in descending order of the createdAt field.
Next, we execute two Prisma queries: one to get the total number of feedback items and another to retrieve the feedback items based on the skip and take arguments. We use the Promise.all function to execute both queries concurrently. Finally, we return the feedback items in a JSON response along with pagination information.
POST /feedbacks: Adds a New Feedback
Continuing in the same src/routes/api/feedbacks/+server.ts file, we’ll define another API handler, this time for POST requests to the /api/feedbacks URL. This handler is responsible for adding new feedback items. Copy and paste the following code into the /api/feedbacks/+server.ts file:
src/routes/api/feedbacks/+server.ts
export async function POST({ request }) {
	try {
		const requestData = await request.json();

		const feedback = await prisma.feedback.create({
			data: requestData
		});

		const json_response = {
			status: 'success',
			data: {
				feedback
			}
		};
		return json(json_response, { status: 201 });
	} catch (error: any) {
		if (error.code === 'P2002') {
			const error_response = {
				status: 'fail',
				message: 'Feedback with title already exists'
			};
			return json(error_response, { status: 409 });
		}

		const error_response = {
			status: 'error',
			message: error.message
		};
		return json(error_response, { status: 500 });
	}
}
The POST function is simple. When called, it first extracts the request body using the request.json() method. Then, it uses prisma.feedback.create() to add the feedback data from the request to the database. If the operation is successful, the newly-added feedback item will be returned in the JSON response with a status of 201 (Created).
In case a unique constraint is violated (indicated by the error code P2002), we handle the error in the catch block and return an appropriate JSON response with a status of 409 (Conflict). For any other errors, a generic error response with a status of 500 (Internal Server Error) is sent to prevent the application from crashing.
GET /feedbacks/[id]: Retrieves a Single Feedback by ID
Now, let’s create the API handler to retrieve a single feedback item by its ID from the /feedbacks/[id] URL. The id in the URL represents the unique identifier of the feedback item we want to retrieve. Follow these steps to create the route handler:
- Navigate to the
src/routes/api/feedbacks/directory and create a new folder named[id]. - Inside the newly created
[id]folder, create a file named+server.ts. - Add the following code to the
+server.tsfile:
src/routes/api/feedbacks/[id]/+server.ts
import { prisma } from '$lib/server/prisma';
import { json } from '@sveltejs/kit';

export async function GET({ params }) {
	try {
		const feedbackId = params.id;

		const feedback = await prisma.feedback.findUnique({
			where: {
				id: feedbackId
			}
		});

		if (!feedback) {
			const message = 'No Feedback with the Provided ID Found';
			return json({ message},{ status: 404 });
		}

		const json_response = {
			status: 'success',
			data: {
				feedback
			}
		};
		return json(json_response);
	} catch (error: any) {
		return json({ message: error.message},{ status: 500 });
	}
}
In this code, we first extract the id parameter from the params object, which represents the ID of the feedback item from the URL. We then use prisma.feedback.findUnique() to retrieve the feedback item from the database based on the provided ID.
If the feedback item is found, we return a JSON response with the feedback item and a status of 200 (OK). If the feedback item is not found, we return a JSON response with a 404 (Not Found) status and a message indicating that no feedback with the provided ID was found.
In case of any other errors, a generic error response with a status of 500 (Internal Server Error) is sent to handle unexpected issues gracefully.
PATCH /feedbacks/[id]: Edits a Feedback by ID
Subsequently, we will create the API handler to edit a feedback item by its ID from the /feedbacks/[id] URL using the PATCH method. The id in the URL represents the unique identifier of the feedback item we want to update. To implement the route handler, follow these steps:
- Open the
src/routes/api/feedbacks/[id]/+server.tsfile. - Add the following code to the file:
src/routes/api/feedbacks/[id]/+server.ts
export async function PATCH({ request, params }) {
	try {
		const feedbackId = params.id;
		const feedbackData = await request.json();

		const updated_feedback = await prisma.feedback.update({
			where: { id: feedbackId },
			data: feedbackData
		});

		const json_response = {
			status: 'success',
			data: {
				feedback: updated_feedback
			}
		};
		return json(json_response);
	} catch (error: any) {
		if (error.code === 'P2025') {
			const message = 'No Feedback with the Provided ID Found';
			return json({ message},{ status: 404 });
		}

		return json({ message: error.message},{ status: 500 });
	}
}
In this code, we first extract the id parameter from the params object, which represents the ID of the feedback item from the URL. We then extract the feedback data from the request body using await request.json().
Next, we use prisma.feedback.update() to update the feedback item in the database based on the provided ID and the data from the request body.
If the feedback item with the provided ID is found and successfully updated, we return a JSON response with the updated feedback item and a status of 200 (OK).
If the feedback item with the provided ID is not found, we return a JSON response with a 404 (Not Found) status and a message indicating that no feedback with the provided ID was found.
In case of any other errors, a generic error response with a status of 500 (Internal Server Error) is sent to handle unexpected issues gracefully.
DELETE /feedbacks/[id]: Deletes a Feedback by ID
For handling the DELETE request to the /feedbacks/[id] URL, we will create the API handler in the src/routes/api/feedbacks/[id]/+server.ts file. This handler will delete a feedback item based on its unique ID. Follow these steps to implement the route handler:
- Open the
src/routes/api/feedbacks/[id]/+server.tsfile. - Add the following code to the file:
src/routes/api/feedbacks/[id]/+server.ts
export async function DELETE({ params }) {
	try {
		const feedbackId = params.id;

		await prisma.feedback.delete({
			where: { id: feedbackId }
		});

		return new Response(null, { status: 204 });
	} catch (error: any) {
		if (error.code === 'P2025') {
			const message = 'No Feedback with the Provided ID Found';
			return json({ message}, {status: 404 });
		}

		return json({ message: error.message},{ status: 500 });
	}
}
In this code, we first extract the id parameter from the params object, which represents the ID of the feedback item from the URL.
Next, we use prisma.feedback.delete() to delete the feedback item from the database based on the provided ID.
If the feedback item with the provided ID is found and successfully deleted, we return a 204 (No Content) status with an empty response body. This indicates that the operation was successful, but there is no content to send in the response.
If the feedback item with the provided ID is not found, we return a JSON response with a 404 (Not Found) status and a message indicating that no feedback with the provided ID was found.
Conclusion
And with that, we have reached the end of this comprehensive tutorial. Throughout this guide, you’ve gained valuable insights into building a RESTful API in TypeScript using the powerful SvelteKit framework. I sincerely hope you found this tutorial helpful and valuable for your development journey.
If you have any questions or feedback, please don’t hesitate to share them in the comments section below. Your input is highly appreciated, and I’ll be more than happy to assist you further. Happy coding!