

In this tutorial, I’ll walk you through setting up authentication in your Next.js 13 app directory using NextAuth.js. It’s worth noting that while we use the NextAuth package in this tutorial, you may be using the Auth.js package by the time you read this, as the libraries are now interchangeable.
For authentication, we’ll use the credential provider, which requires a username or email and a password. First, we’ll validate and authenticate the credentials included in the request body against our database, which in this case is PostgreSQL. However, you can easily switch to another Prisma-supported database if needed.
Once we’ve authenticated the user, we’ll explore different methods for retrieving and modifying session information, as well as how to protect private routes in your application.
By following this tutorial, you’ll gain a solid understanding of how to implement NextAuth.js in your Next.js 13 app directory for authentication.
To set up NextAuth in Next.js 14, refer to the article titled ‘Setup and Use NextAuth.js in Next.js 14 App Directory‘.
More practice:
- Next.js – Use Custom Login and SignUp Pages for NextAuth.js
- How to Setup React Context API in Next.js 13 App Directory
- How to Setup React Query in Next.js 13 App Directory
- How to Setup Redux Toolkit in Next.js 13 App Directory
- React Query and Axios: User Registration and Email Verification
- Forgot/Reset Passwords with React Query and Axios

Setup the Next.js 13 Project
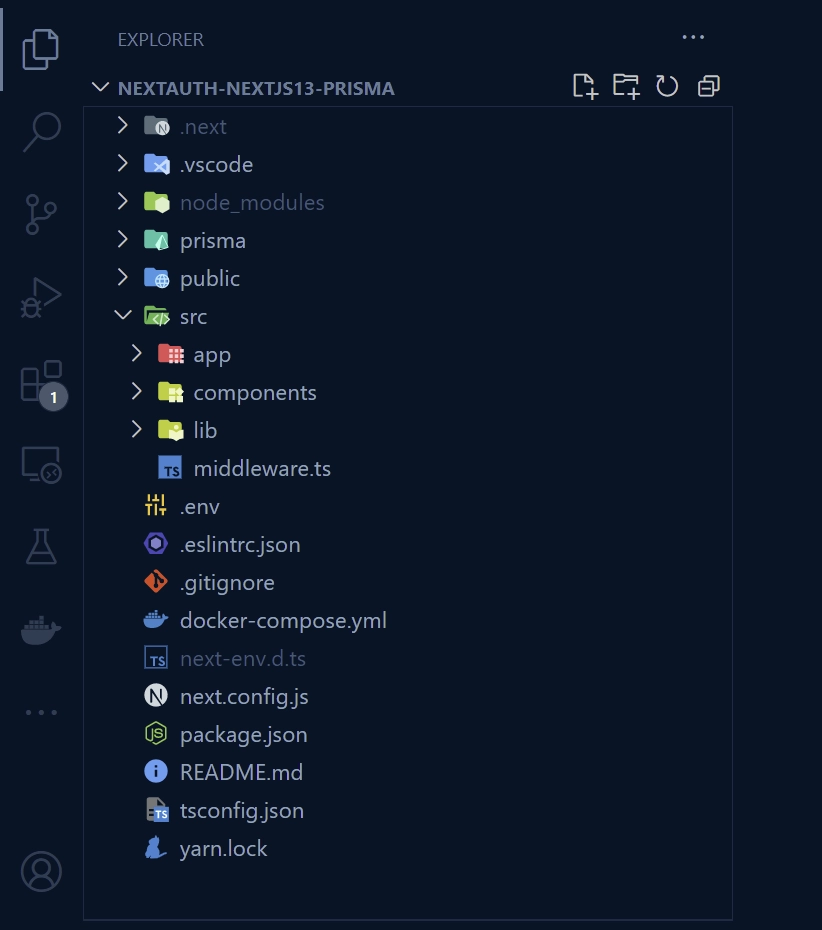
After completing this guide, your file and folder organization will resemble the one shown in the screenshot below.
Begin by choosing a suitable location on your machine and opening a terminal window in that directory. From there, you can start the process of setting up your Next.js 13 project by running one of the commands below, depending on your preferred package manager.
yarn create next-app nextauth-nextjs13-prisma
# or
npx create-next-app@latest nextauth-nextjs13-prisma
# or
pnpm create next-app nextauth-nextjs13-prisma
As you go through the setup process, you’ll encounter a few prompts that you need to respond to. First, you’ll be asked whether to enable TypeScript and ESLint; choose “Yes” for both. Then, select “Yes” for both the experimental app/ directory and src/ directory options. Finally, you’ll be prompted to choose an import alias. Press the Tab key to select the first option, and then hit Enter.
After you’ve provided your responses to the prompts, the project will be created and all required dependencies will be automatically installed. Once the installation process is complete, you’re ready to open the project in your favourite IDE or text editor and start working.
Setup Next Auth API Route
To begin implementing the authentication logic, we’ll need to install the NextAuth package. For now, we’ll install a specific build from a pull request that includes the added functionality we need to work in the app directory.
However, by the time you’re reading this article, this functionality should have been added to a beta or stable release. To install the NextAuth package, choose the appropriate command based on your package manager and run it.
yarn add next-auth@0.0.0-pr.6777.c5550344
# or
npm i next-auth@0.0.0-pr.6777.c5550344
# or
pnpm add next-auth@0.0.0-pr.6777.c5550344
Let’s move on to defining the NextAuth options. Initially, we defined and exported the NextAuth options in the src/app/api/auth/[...nextauth]/route.ts file. However, some users encountered export errors when running the code. To address this issue, we can define and export the NextAuth options in a separate file, such as the lib/auth.ts file. I wasn’t initially aware of this solution, but a developer named Kevin mentioned it in the comment section. You can read more about the export errors in the comments.
To implement this solution, navigate to the src directory and create a new folder called lib. Inside the lib folder, create a file named auth.ts and copy the following NextAuth configuration code into it.
src/lib/auth.ts
import type { NextAuthOptions } from "next-auth";
import CredentialsProvider from "next-auth/providers/credentials";

export const authOptions: NextAuthOptions = {
  session: {
    strategy: "jwt",
  },
  providers: [
    CredentialsProvider({
      name: "Sign in",
      credentials: {
        email: {
          label: "Email",
          type: "email",
          placeholder: "example@example.com",
        },
        password: { label: "Password", type: "password" },
      },
      async authorize(credentials) {
        const user = { id: "1", name: "Admin", email: "admin@admin.com" };
        return user;
      },
    }),
  ],
};
The above code demonstrates the process of setting up authentication in a Next.js 13 app using the NextAuth library. We first imported the CredentialsProvider module, which we’ll use for validation. Then, we defined an object called ‘authOptions‘ that contains the configuration for our authentication process.
In the credentials key of the CredentialsProvider() method, we listed the email and password fields, which will be available on the sign-in form. For the authorization step, we’re currently using a simple mock implementation that returns a fixed user object.
The next step is to create an API route that can handle authentication requests from NextAuth. We’ll use the NextAuth() method to create an API handler and then export it as GET and POST functions for use in our application.
To get started, navigate to the api directory within the src/app folder. Within the api directory, create a new folder called auth. Inside the ‘auth‘ folder, create a folder named [...nextauth]. Finally, create a new file named route.ts within the ‘[…nextauth]’ folder and add the code provided below.
When copying and pasting the URL below, please ensure that you manually retype the three dots (
...) in[...nextauth]. This is important because WordPress may automatically convert the three dots into ellipses, even though I used real three dots in the path when creating the article. This automatic conversion can cause errors. To avoid any issues, kindly ensure that the three dots are accurately represented in the URL path.
src/app/api/auth/[…nextauth]/route.ts
import { authOptions } from "@/lib/auth";
import NextAuth from "next-auth";

const handler = NextAuth(authOptions);
export { handler as GET, handler as POST };
Create Reusable Buttons
To make navigating between pages in the application easier, we’ll create buttons instead of manually typing URLs in the browser. Start by creating a “components” folder inside the “src” directory. Inside “components“, create a buttons.component.tsx file and add the following code:
src/components/buttons.component.tsx
"use client";

import { signIn, signOut } from "next-auth/react";
import Link from "next/link";

export const LoginButton = () => {
  return (
    <button style={{ marginRight: 10 }} onClick={() => signIn()}>
      Sign in
    </button>
  );
};

export const RegisterButton = () => {
  return (
    <Link href="/register" style={{ marginRight: 10 }}>
      Register
    </Link>
  );
};

export const LogoutButton = () => {
  return (
    <button style={{ marginRight: 10 }} onClick={() => signOut()}>
      Sign Out
    </button>
  );
};

export const ProfileButton = () => {
  return <Link href="/profile">Profile</Link>;
};
After that, you can import the buttons into the src/app/page.tsx file and use them in the JSX code to display them in the user interface.
src/app/page.tsx
import {
  LoginButton,
  LogoutButton,
  ProfileButton,
  RegisterButton,
} from "@/components/buttons.component";

export default function Home() {
  return (
    <main
      style={{
        display: "flex",
        justifyContent: "center",
        alignItems: "center",
        height: "70vh",
      }}
    >
      <div>
        <LoginButton />
        <RegisterButton />
        <LogoutButton />
        <ProfileButton />
      </div>
    </main>
  );
}
Before testing the authentication flow, we need to configure the required environment variables for NextAuth to function properly. These variables include a secret for JWT encryption and the root URL of your application.
Although it’s possible to avoid setting these variables if you’re only working with client-side logic, we must set them since we’ll be working with server-side rendering. To set these variables, create a .env file in the root directory and add the following environment variables to it.
.env
NEXTAUTH_SECRET=my_ultra_secure_nextauth_secret
NEXTAUTH_URL=http://localhost:3000
After completing the basic setup, it’s important to make a small adjustment to the src/app/layout.tsx file. Removing the import "./globals.css"; line is necessary to prevent the CSS code that comes with Next.js 13 from being applied.
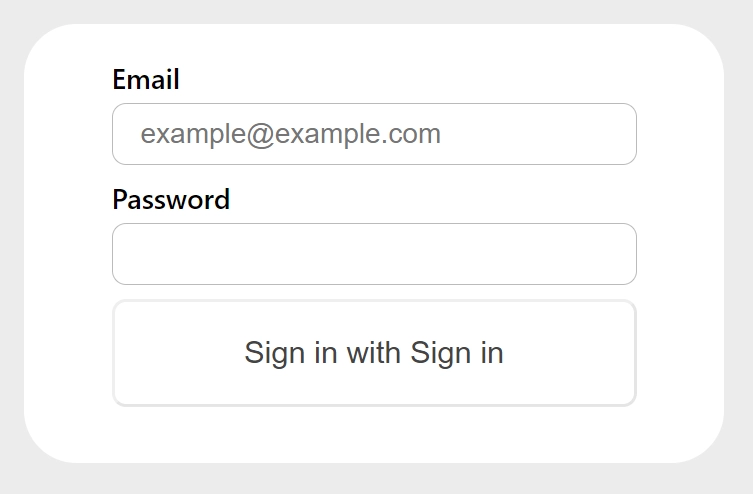
Once this adjustment is made, you can start the development server to build the project and visit http://localhost:3000/ to access the application. From the home page, you can click on the “sign in” button. If you are correctly redirected to the default NextAuth sign-in page, you are ready to proceed.
On the sign-in page, enter your email and password and click the button to submit the form data to the API endpoint. Since we are using mock authorization, you can enter any random email and password. Once the authentication is successful, you will be redirected back to the homepage.
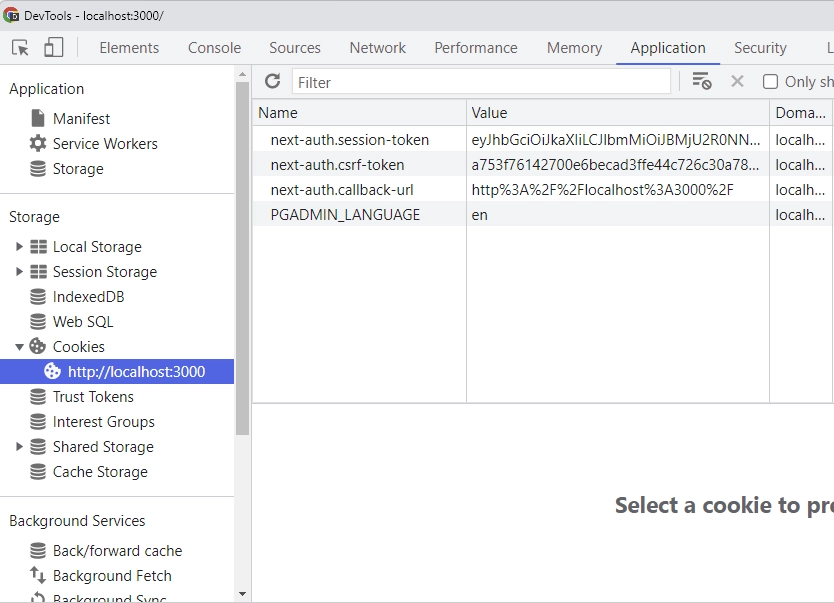
To view the cookies sent by NextAuth, you can open the Application tab of your browser’s developer tool and click on http://localhost:3000/ in the Cookies section.
Here, you will see various cookies including the session token that NextAuth uses for authentication. Another cookie you’ll see is the CSRF token, which is a security feature used by NextAuth to prevent cross-site request forgery attacks. Finally, you’ll also find a callback URL cookie, which is crucial for NextAuth to redirect users to the correct page after authentication.
Three Ways of Getting the NextAuth Session Data
Now that authentication is complete, we need a way to access the session data to make use of it. There are three locations where we can obtain the session data. The first is server-side in a React server component, the second is also server-side in any API route, and the last is on the client-side. This implies that two of the places are server-side, while one is client-side.
In the latest version of NextAuth, obtaining the session information on the server-side has become significantly easier, but acquiring it on the client-side takes a bit of preparation.
Get the Session in a Server Component
Now let’s demonstrate how to retrieve session information on the server-side using a React server component. This can be done by calling the getServerSession function and providing the ‘authOptions‘ object that was exported from the lib/auth.ts file during the NextAuth setup.
To implement this, simply replace the content of src/app/page.tsx with the code snippet below. Once you’ve done this, start the Next.js development server and navigate to http://localhost:3000/ to view the session data output on the screen.
src/app/page.tsx
import {
  LoginButton,
  LogoutButton,
  ProfileButton,
  RegisterButton,
} from "@/components/buttons.component";
import { getServerSession } from "next-auth";
import { authOptions } from "@/lib/auth";

export default async function Home() {
  const session = await getServerSession(authOptions);
  console.log(session);

  return (
    <main
      style={{
        display: "flex",
        justifyContent: "center",
        alignItems: "center",
        height: "70vh",
      }}
    >
      <div>
        <LoginButton />
        <RegisterButton />
        <LogoutButton />
        <ProfileButton />

        <h1>Server Session</h1>
        <pre>{JSON.stringify(session)}</pre>
      </div>
    </main>
  );
}
Get the Session in an API Route
Let’s move on to retrieving the session data in an API route, which also operates on the server. To accomplish this, we’ll use the getServerSession function and provide the authOptions to acquire the session data.
Create a route.ts file in a new “session” directory within the src/app/api folder. Here’s the code to include:
src/app/api/session/route.ts
import { getServerSession } from "next-auth";
import { authOptions } from "@/lib/auth";
import { NextResponse } from "next/server";

export async function GET(request: Request) {
  const session = await getServerSession(authOptions);

  return NextResponse.json({
    authenticated: !!session,
    session,
  });
}
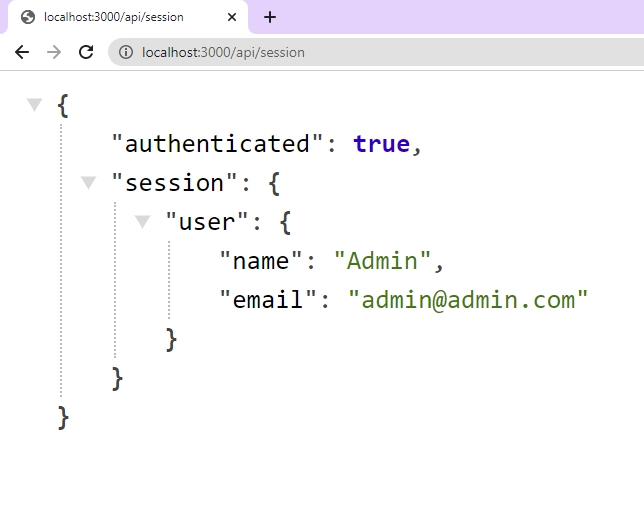
Once you are done, navigate to http://localhost:3000/api/session and you’ll find the session data printed on the screen in a JSON object.
Get the Session in a Client Component
Lastly, let’s dive into retrieving the session data in a client-side component. For this, NextAuth requires a session provider to be set up on the client-side. Once the provider is in place and wraps around your application, you can use a client-side hook called useSession to obtain the session information.
Since the client can’t decode the JSON Web Token (JWT) on its own, the useSession hook makes an HTTP request to the server to retrieve the session information. The server decodes the JWT and sends it back, and NextAuth stores the session data in the provider, which the useSession hook can then access.
It’s worth noting that there may be some latency added when making the session request for the first time, as the server needs to decode the JWT. But once the data is stored in the provider, subsequent requests will be fast and seamless.
To create the session provider, simply create a providers.tsx file in the “src/app” directory and add the following code.
src/app/providers.tsx
"use client";

import { SessionProvider } from "next-auth/react";

type Props = {
  children?: React.ReactNode;
};

export const NextAuthProvider = ({ children }: Props) => {
  return <SessionProvider>{children}</SessionProvider>;
};
After creating the session provider, wrap it around {children} in the src/app/layout.tsx file so that all client-side components can access the session data. Here’s the code you can use:
src/app/layout.tsx
import { NextAuthProvider } from "./providers";

export const metadata = {
  title: "Create Next App",
  description: "Generated by create next app",
};

export default function RootLayout({
  children,
}: {
  children: React.ReactNode;
}) {
  return (
    <html lang="en">
      <body>
        <NextAuthProvider>{children}</NextAuthProvider>
      </body>
    </html>
  );
}
Now, we’ll create a new component that will allow us to use the useSession hook to retrieve the session data and display it on the client-side. First, navigate to the ‘components‘ directory and create a new file named user.component.tsx. Then, paste the following code into the new file.
src/components/user.component.tsx
"use client";

import { useSession } from "next-auth/react";

export const User = () => {
  const { data: session } = useSession();

  return (
    <>
      <h1>Client Session</h1>
      <pre>{JSON.stringify(session)}</pre>
    </>
  );
};
To display the user’s session information on the page, we need to import the User component into src/app/page.tsx and include it in the JSX code.
src/app/page.tsx
import {
  LoginButton,
  LogoutButton,
  ProfileButton,
  RegisterButton,
} from "@/components/buttons.component";
import { getServerSession } from "next-auth";
import { authOptions } from "@/lib/auth";
import { User } from "@/components/user.component";

export default async function Home() {
  const session = await getServerSession(authOptions);
  console.log(session);

  return (
    <main
      style={{
        display: "flex",
        justifyContent: "center",
        alignItems: "center",
        height: "70vh",
      }}
    >
      <div>
        <LoginButton />
        <RegisterButton />
        <LogoutButton />
        <ProfileButton />

        <h1>Server Session</h1>
        <pre>{JSON.stringify(session)}</pre>

        <User />
      </div>
    </main>
  );
}
When you visit the homepage and refresh the browser, you’ll notice that the session data displayed in the React server component appears instantly. However, the session data displayed in the client-side component takes a bit longer to appear since the client needs to make an HTTP request to the server to decode the JWT.
Integrate a Database
With a high-level understanding of the authentication process, it’s time to integrate a database to verify users’ identities instead of using a hard-coded object. This involves looking up the user’s information and checking their hashed password against the one stored in the database.
Setup PostgreSQL
Here, we will set up a PostgreSQL server using Docker. To do this, you can create a docker-compose.yml file and add the following Docker Compose configurations.
docker-compose.yml
version: '3'
services:
  postgres:
    image: postgres:latest
    container_name: postgres
    ports:
      - '6500:5432'
    volumes:
      - progresDB:/var/lib/postgresql/data
    env_file:
      - ./.env
volumes:
  progresDB:
Now it’s time to configure the .env file with the necessary environment variables for the Postgres Docker image. Once you’ve added them, run docker-compose up -d to start the Postgres server in the Docker container.
.env
NEXTAUTH_SECRET=my_ultra_secure_nextauth_secret
NEXTAUTH_URL=http://localhost:3000


POSTGRES_HOST=127.0.0.1
POSTGRES_PORT=6500
POSTGRES_USER=admin
POSTGRES_PASSWORD=password123
POSTGRES_DB=nextauth_prisma

DATABASE_URL=postgresql://admin:password123@localhost:6500/nextauth_prisma?schema=public
Setup Prisma ORM
Let’s proceed with setting up Prisma to enable us to communicate with the Postgres database. First, open your terminal and install the necessary dependencies by running the following commands based on your package manager.
yarn add @prisma/client bcryptjs && yarn add -D ts-node prisma @types/bcryptjs
# or
npm i @prisma/client bcryptjs && npm i -D ts-node prisma @types/bcryptjs
# or
pnpm add @prisma/client bcryptjs && pnpm add -D ts-node prisma @types/bcryptjs
To set up Prisma and connect to your Postgres database, run the following command to initialize Prisma in your project and create a datasource for Postgres in the prisma/schema.prisma file:
yarn prisma init --datasource-provider postgresql
# or
npx prisma init --datasource-provider postgresql
# or
pnpm prisma init --datasource-provider postgresql
Now you’ll need to create a User model in your prisma/schema.prisma file. You can use the code below as a reference, or create your own.
prisma/schema.prisma
// This is your Prisma schema file,
// learn more about it in the docs: https://pris.ly/d/prisma-schema

generator client {
  provider = "prisma-client-js"
}

datasource db {
  provider = "postgresql"
  url      = env("DATABASE_URL")
}

model User {
  id       String @id @default(uuid())
  name     String
  email    String @unique
  password String
}
NextAuth doesn’t provide a built-in way to handle user registration, as this is unnecessary for certain authentication methods such as magic links, email login, or OAuth. However, when using credential authentication, it’s necessary to create a user account first, usually through a registration page.
In this tutorial, to save time, we’ll seed the database with a test user account rather than implementing a registration flow. Note that we’ll return to user registration at the end of this tutorial.
To get started, create a seed.ts file in the prisma directory and copy the following code into it.
prisma/seed.ts
import { PrismaClient } from "@prisma/client";
import { hash } from "bcryptjs";

const prisma = new PrismaClient();

async function main() {
  const password = await hash("password123", 12);
  const user = await prisma.user.upsert({
    where: { email: "admin@admin.com" },
    update: {},
    create: {
      email: "admin@admin.com",
      name: "Admin",
      password,
    },
  });
  console.log({ user });
}
main()
  .then(() => prisma.$disconnect())
  .catch(async (e) => {
    console.error(e);
    await prisma.$disconnect();
    process.exit(1);
  });
To enable us to easily seed the database with a test user, we’ll add a script to the package.json file. Open the package.json file and add the following script:
package.json
{
"prisma": {
    "seed": "ts-node --compiler-options {\"module\":\"CommonJS\"} prisma/seed.ts"
  },
}
With Prisma set up, it’s time to generate the migration scripts and push the schema to the PostgreSQL database. To create the migration files, run the command npx prisma migrate dev --name init. This command will not only generate the Prisma migration files but also create the Prisma client in the node_modules folder.
After generating the migration files, use the command npx prisma db seed to add the test user to the database.
Next, we’ll create a global PrismaClient instance using the @prisma/client package, which will enable us to communicate with the PostgreSQL database. To do this, we need to create a file named prisma.ts within the “lib” directory and add the following code to it.
src/lib/prisma.ts
import { PrismaClient } from "@prisma/client";

const globalForPrisma = global as unknown as { prisma: PrismaClient };

export const prisma =
  globalForPrisma.prisma ||
  new PrismaClient({
    log: ["query"],
  });

if (process.env.NODE_ENV !== "production") globalForPrisma.prisma = prisma;
Implement the NextAuth Authentication Code
With Prisma and Postgres set up, let’s implement the authentication logic. In the API route, replace the existing code with the updated code below. We made changes to the async authorize(credentials) {} function to first verify if the email and password information were included in the request body.
Then, we retrieve the user with the provided email address and use Bcrypt to verify their password against the hashed one. The user object is returned upon successful verification.
src/lib/auth.ts
import { prisma } from "@/lib/prisma";
import { compare } from "bcryptjs";
import type { NextAuthOptions } from "next-auth";
import CredentialsProvider from "next-auth/providers/credentials";

export const authOptions: NextAuthOptions = {
  session: {
    strategy: "jwt",
  },
  providers: [
    CredentialsProvider({
      name: "Sign in",
      credentials: {
        email: {
          label: "Email",
          type: "email",
          placeholder: "example@example.com",
        },
        password: { label: "Password", type: "password" },
      },
      async authorize(credentials) {
        if (!credentials?.email || !credentials.password) {
          return null;
        }

        const user = await prisma.user.findUnique({
          where: {
            email: credentials.email,
          },
        });

        if (!user || !(await compare(credentials.password, user.password))) {
          return null;
        }

        return {
          id: user.id,
          email: user.email,
          name: user.name,
          randomKey: "Hey cool",
        };
      },
    }),
  ],
};
After modifying the NextAuth configuration options, if you encounter an error in the browser, it may indicate that Next.js is trying to include the Bcrypt module in the client bundle, which is not necessary since we only use it on the server.
To prevent certain packages from being included in the client bundle, we can add their names to the serverComponentsExternalPackages array in the ‘experimental‘ key of the next.config.js file. In this case, we need to add @prisma/client and bcryptjs to the array. Here’s an example code for the next.config.js file:
next.config.js
/** @type {import('next').NextConfig} */
const nextConfig = {
  experimental: {
    appDir: true,
    serverComponentsExternalPackages: ["@prisma/client", "bcryptjs"]
  },
}

module.exports = nextConfig
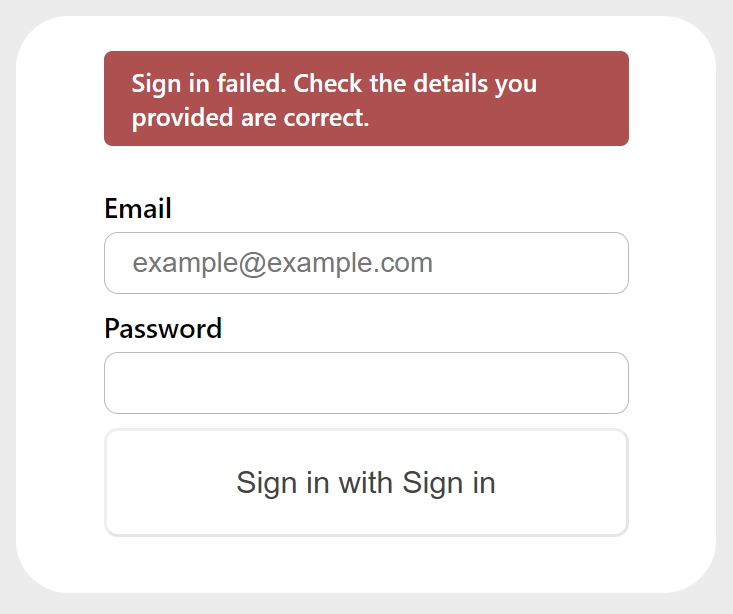
Now that we’ve incorporated the database into the authentication process, attempting to log in with incorrect email or password credentials will result in an error. To successfully sign in, you’ll need to use the login credentials of the test user that we previously seeded into the database.
Store Custom Keys in the JWT
You may have noticed that when we printed out the session object in both the React server and client components, the user’s ID was missing. This could be frustrating if you want to use it for other tasks later on. Fortunately, NextAuth provides two handy callbacks – jwt and session – that allows us to add our own custom information to the session object.
To add your custom keys, you can modify these two callbacks in the callbacks property of the NextAuth configuration. This way, you can include the information you need in the session object and JWT, and access it anytime and anywhere in your application.
src/lib/auth.ts
import { prisma } from "@/lib/prisma";
import { compare } from "bcryptjs";
import type { NextAuthOptions } from "next-auth";
import CredentialsProvider from "next-auth/providers/credentials";

export const authOptions: NextAuthOptions = {
  session: {
    strategy: "jwt",
  },
  providers: [
    CredentialsProvider({
      name: "Sign in",
      credentials: {
        email: {
          label: "Email",
          type: "email",
          placeholder: "example@example.com",
        },
        password: { label: "Password", type: "password" },
      },
      async authorize(credentials) {
        if (!credentials?.email || !credentials.password) {
          return null;
        }

        const user = await prisma.user.findUnique({
          where: {
            email: credentials.email,
          },
        });

        if (!user || !(await compare(credentials.password, user.password))) {
          return null;
        }

        return {
          id: user.id,
          email: user.email,
          name: user.name,
          randomKey: "Hey cool",
        };
      },
    }),
  ],
  callbacks: {
    session: ({ session, token }) => {
      console.log("Session Callback", { session, token });
      return {
        ...session,
        user: {
          ...session.user,
          id: token.id,
          randomKey: token.randomKey,
        },
      };
    },
    jwt: ({ token, user }) => {
      console.log("JWT Callback", { token, user });
      if (user) {
        const u = user as unknown as any;
        return {
          ...token,
          id: u.id,
          randomKey: u.randomKey,
        };
      }
      return token;
    },
  },
};
I added the
randomKeyto the configuration simply to demonstrate that any additional information can be included in the session. It doesn’t have a specific purpose or functionality within the code. Its purpose is solely to illustrate the flexibility of including custom data or variables in the session.
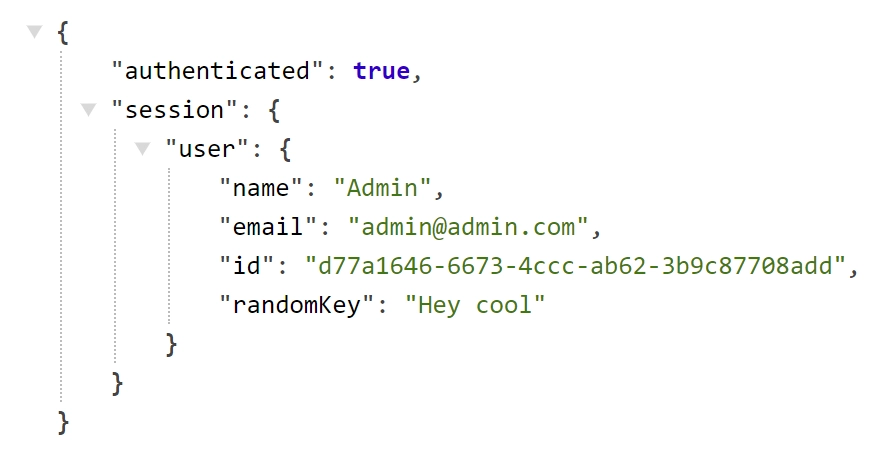
Want to see the custom keys you added to the session object? Just follow these steps: go to the homepage and sign out by clicking on the “Sign Out” button. Then sign in again, and you’ll notice that the custom keys are now included in the session object printed in both the server and client components. Additionally, you can view the arbitrary keys by visiting the http://localhost:3000/api/session API route that we created earlier.
Different Ways to Protect Routes
We’re almost done with the tutorial now, and we’ve seen how to add custom information to the NextAuth session object. One of the most crucial parts of any authentication system is protecting certain routes, whether it’s a whole section of your app, a single page, or an API endpoint. In Next.js, there are four main ways to implement route protection: in a server component, in a client component, in an API route, or using middleware.
While all four methods are possible, it’s generally recommended to use server-side protection or middleware. We’ll delve into these approaches shortly.
Client-Side Route Protection
The first way to implement protected routes is to use the useSession hook in a client-side component to load the session. This approach is similar to what we’ve seen before, but this time we’ll add an onUnauthenticated() method to the object passed to the hook, which will be called when the user is not logged in.
Keep in mind that the first time this hook is called, there might be some latency as it needs to decode the JWT server-side and retrieve the session information. In the onUnauthenticated() method, we can add the logic to redirect the user to the sign-in page if they’re not logged in.
To see this in action, let’s create a new folder called “profile” inside the “src/app” directory. Inside the “profile” folder, create a page.tsx file and add the following code. This page will serve as our private page that only authenticated users can access. Once the user is authenticated, a list of users will be displayed.
src/app/profile/page.tsx
"use client";

import { redirect } from "next/navigation";
import { useSession } from "next-auth/react";
import { cache, use } from "react";

type User = {
  id: number;
  name: string;
  email: string;
};

const getUsers = cache(() =>
  fetch("https://jsonplaceholder.typicode.com/users").then((res) => res.json())
);

export default function Profile() {
  const { status } = useSession({
    required: true,
    onUnauthenticated() {
      redirect("/api/auth/signin");
    },
  });

  if (status === "loading") {
    return <p>Loading....</p>;
  }

  let users = use<User[]>(getUsers());

  return (
    <main style={{ maxWidth: 1200, marginInline: "auto", padding: 20 }}>
      <div
        style={{
          display: "grid",
          gridTemplateColumns: "1fr 1fr 1fr 1fr",
          gap: 20,
        }}
      >
        {users.map((user) => (
          <div
            key={user.id}
            style={{ border: "1px solid #ccc", textAlign: "center" }}
          >
            <img
              src={`https://robohash.org/${user.id}?set=set2&size=180x180`}
              alt={user.name}
              style={{ height: 180, width: 180 }}
            />
            <h3>{user.name}</h3>
          </div>
        ))}
      </div>
    </main>
  );
}
To test this feature, go back to the homepage and sign out. Then, try accessing the profile page at http://localhost:3000/profile. You will immediately be redirected to the sign-in page. However, there will be a brief loading period because the useSession hook needs to make an HTTP request to the server to decode the JWT.
After it receives the result from the server, it will check if you have a valid session. If you do not, it will trigger the onUnauthenticated() method, which in turn will call the redirect() function to redirect you to the sign-in page.
Server-Side Route Protection
The next method for implementing protected routes is by using a React server component. This approach is relatively straightforward, as we’ll utilize the getServerSession function to retrieve the session information, and then use an if statement to check if the session was successfully retrieved. If the user isn’t logged in, null will be returned, and we can redirect them to the sign-in page.
To see this in action, navigate to the src/app/profile/page.tsx file and replace its contents with the code provided below.
src/app/profile/page.tsx
import { getServerSession } from "next-auth";
import { authOptions } from "@/lib/auth";
import { redirect } from "next/navigation";

type User = {
  id: number;
  name: string;
  email: string;
};

export default async function Profile() {
  const session = await getServerSession(authOptions);

  if (!session) {
    redirect("/api/auth/signin");
  }

  const users: User[] = await fetch(
    "https://jsonplaceholder.typicode.com/users"
  ).then((res) => res.json());

  return (
    <main style={{ maxWidth: 1200, marginInline: "auto", padding: 20 }}>
      <div
        style={{
          display: "grid",
          gridTemplateColumns: "1fr 1fr 1fr 1fr",
          gap: 20,
        }}
      >
        {users.map((user) => (
          <div
            key={user.id}
            style={{ border: "1px solid #ccc", textAlign: "center" }}
          >
            <img
              src={`https://robohash.org/${user.id}?set=set2&size=180x180`}
              alt={user.name}
              style={{ height: 180, width: 180 }}
            />
            <h3>{user.name}</h3>
          </div>
        ))}
      </div>
    </main>
  );
}
To test this approach, ensure that you have signed out from your account on the homepage. Then, try to access the profile page again. You will be redirected to the signin page, but unlike the previous approach, there won’t be any loading period. This is because the server component immediately checks if the user is authenticated before serving the page. This creates a seamless and secure user experience.
Protect an API Route
The next approach involves protecting an API route, and it is also straightforward as we already have access to the session on the server-side. To achieve this, we can use the getServerSession function to obtain the session information and check if it exists. If it doesn’t, we can return an unauthorized error with the message “You are not logged in“.
src/app/api/session/route.ts
import { getServerSession } from "next-auth";
import { authOptions } from "@/lib/auth";
import { NextResponse } from "next/server";

export async function GET(request: Request) {
  const session = await getServerSession(authOptions);

  if (!session) {
    return new NextResponse(
      JSON.stringify({ status: "fail", message: "You are not logged in" }),
      { status: 401 }
    );
  }

  return NextResponse.json({
    authenticated: !!session,
    session,
  });
}
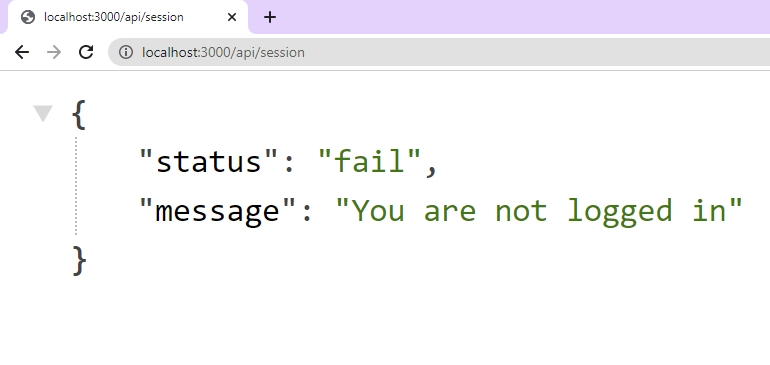
To test this approach, first sign out from your account on the homepage. Then, visit the API route at http://localhost:3000/api/session. If you are not logged in, you should see an unauthorized error sent by the server, which includes a message stating “You are not logged in“. This confirms that the API route is properly protected and unauthorized users cannot access it.
Middleware Route Protection
The final and most preferable approach to protecting routes is by using middleware. This is the best way because it enables you to protect an entire subdirectory or all pages of your application, rather than adding route protection logic to each individual page.
To protect all pages of your Next.js application with NextAuth, you can simply create a middleware.ts file in your src directory and export the default middleware wrapper provided by NextAuth using the following line of code:
src/middleware.ts
export { default } from "next-auth/middleware";
If you need to protect single or multiple pages, or API routes, you can export a config object with a matcher key. The matcher is an array that can contain the routes you want to protect. In the code below, we added "/((?!register|api|login).*)" to the matcher array. This ensures that any route other than those for the register, login, and api directories will be protected.
src/middleware.ts
export { default } from "next-auth/middleware";

export const config = {
  // matcher: ["/profile"],
  matcher: ["/((?!register|api|login).*)"],
};
To finalize the setup, navigate to the src/app/profile/page.tsx file and remove the route protection logic, as we are now using the middleware approach for route protection. Once you have logged out, attempt to access the profile page. If successful, you should be redirected to the sign-in page, confirming that the middleware is effectively safeguarding the route.
src/app/profile/page.tsx
type User = {
  id: number;
  name: string;
  email: string;
};

export default async function Profile() {
  const users: User[] = await fetch(
    "https://jsonplaceholder.typicode.com/users"
  ).then((res) => res.json());

  return (
    <main style={{ maxWidth: 1200, marginInline: "auto", padding: 20 }}>
      <div
        style={{
          display: "grid",
          gridTemplateColumns: "1fr 1fr 1fr 1fr",
          gap: 20,
        }}
      >
        {users.map((user) => (
          <div
            key={user.id}
            style={{ border: "1px solid #ccc", textAlign: "center" }}
          >
            <img
              src={`https://robohash.org/${user.id}?set=set2&size=180x180`}
              alt={user.name}
              style={{ height: 180, width: 180 }}
            />
            <h3>{user.name}</h3>
          </div>
        ))}
      </div>
    </main>
  );
}
Implement the Account Registration Logic
Having learned about NextAuth, the next step is to implement user registration logic. While NextAuth provides authentication functionality, it does not include a built-in solution for user registration.
Create the API Route to Register Users
Now, let’s create an API route to handle user registration. We’ll define a route handler that extracts the user’s credentials from the request body, hashes the password, and saves the user to the database using Prisma.
To do this, navigate to the src/app/api directory and create a new subdirectory called ‘register‘. Within this directory, create a route.ts file and add the following code:
src/app/api/register/route.ts
import { prisma } from "@/lib/prisma";
import { hash } from "bcryptjs";
import { NextResponse } from "next/server";

export async function POST(req: Request) {
  try {
    const { name, email, password } = (await req.json()) as {
      name: string;
      email: string;
      password: string;
    };
    const hashed_password = await hash(password, 12);

    const user = await prisma.user.create({
      data: {
        name,
        email: email.toLowerCase(),
        password: hashed_password,
      },
    });

    return NextResponse.json({
      user: {
        name: user.name,
        email: user.email,
      },
    });
  } catch (error: any) {
    return new NextResponse(
      JSON.stringify({
        status: "error",
        message: error.message,
      }),
      { status: 500 }
    );
  }
}
Create the Form Component
Now that we have the API logic in place, let’s create a form component for user registration. Since we’ll be handling the form using hooks and DOM events, it’s important to make sure this component is only rendered in the browser. You can achieve this by adding the "use client"; flag at the top of the file.
The registration form will allow users to input their registration details and submit them to the API. To get started, create a ‘register‘ directory within the ‘src/app‘ directory. Then, inside the ‘register‘ directory, create a file called form.tsx. This file will contain the code for the registration form.
src/app/register/form.tsx
"use client";

import { signIn } from "next-auth/react";
import { ChangeEvent, useState } from "react";

export const RegisterForm = () => {
  let [loading, setLoading] = useState(false);
  let [formValues, setFormValues] = useState({
    name: "",
    email: "",
    password: "",
  });

  const onSubmit = async (e: React.FormEvent) => {
    e.preventDefault();
    setLoading(true);

    try {
      const res = await fetch("/api/register", {
        method: "POST",
        body: JSON.stringify(formValues),
        headers: {
          "Content-Type": "application/json",
        },
      });

      setLoading(false);
      if (!res.ok) {
        alert((await res.json()).message);
        return;
      }

      signIn(undefined, { callbackUrl: "/" });
    } catch (error: any) {
      setLoading(false);
      console.error(error);
      alert(error.message);
    }
  };

  const handleChange = (event: ChangeEvent<HTMLInputElement>) => {
    const { name, value } = event.target;
    setFormValues({ ...formValues, [name]: value });
  };

  return (
    <form
      onSubmit={onSubmit}
      style={{
        display: "flex",
        flexDirection: "column",
        width: 500,
        rowGap: 10,
      }}
    >
      <label htmlFor="name">Name</label>
      <input
        required
        type="text"
        name="name"
        value={formValues.name}
        onChange={handleChange}
        style={{ padding: "1rem" }}
      />
      <label htmlFor="email">Email</label>
      <input
        required
        type="email"
        name="email"
        value={formValues.email}
        onChange={handleChange}
        style={{ padding: "1rem" }}
      />
      <label htmlFor="password">Password</label>
      <input
        required
        type="password"
        name="password"
        value={formValues.password}
        onChange={handleChange}
        style={{ padding: "1rem" }}
      />
      <button
        style={{
          backgroundColor: `${loading ? "#ccc" : "#3446eb"}`,
          color: "#fff",
          padding: "1rem",
          cursor: "pointer",
        }}
        disabled={loading}
      >
        {loading ? "loading..." : "Register"}
      </button>
    </form>
  );
};
Create the Account Registration Page
To complete the registration feature, we need to create a page that will render the registration form. Inside the src/app/register directory, create a file called page.tsx. In this file, import the Register component we created earlier, and use it in the JSX to render it on the page.
src/app/register/page.tsx
import { RegisterForm } from "./form";

export default function RegisterPage() {
  return (
    <div
      style={{
        display: "flex",
        height: "70vh",
        justifyContent: "center",
        alignItems: "center",
      }}
    >
      <div>
        <h1>Register</h1>
        <RegisterForm />
      </div>
    </div>
  );
}
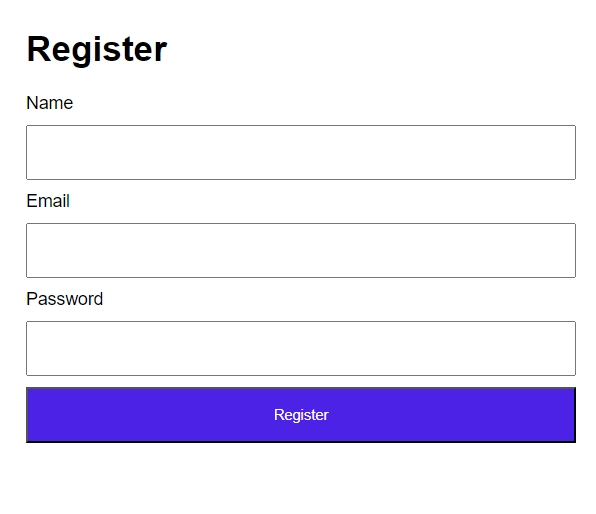
After completing the setup, navigate to the registration page at http://localhost:3000/register to create a new account.
After successfully completing the registration process, you will be redirected to the default NextAuth sign-in page. There, you need to sign in using the same credentials you used during the account creation. Once signed in, NextAuth will redirect you to the homepage as specified by the callback function signIn(undefined, { callbackUrl: "/" }) in the registration form.
Conclusion
That’s it! The source code for this Next.js 13 and NextAuth project is available on GitHub.
In this tutorial, you’ve learned how to integrate NextAuth into the new Next.js 13 app structure. I hope you found this article informative and enjoyable. If you have any feedback or questions, please feel free to leave a comment.
Please create a post on how to setup trpc api in app directory next js
Thank you for your excellent suggestion! I appreciate your input and am excited to get started on creating a post that covers how to set up a tRPC client and server within the Next.js 13 app directory. Keep an eye out for it!
Thanks so much
That’s a great suggestion!
I don’t understand why but I always get in session user { name=“name”, email=“my@email”, image=“image.png” } not my custom items
Thanks for your comment! Based on the information provided, it sounds like there may be an issue with your NextAuth configuration that’s causing the authorized user’s custom items to not be included in the session.
To troubleshoot this, you’ll want to check the logic in the
authorizecallback of theCredentialsProvider()in your API route.In this callback, you can customize the user object returned by the authentication provider to include the custom items you want to see in the session.
Make sure that the custom items are being correctly fetched from the authentication provider and passed to the
session.userobject in your callback.Here’s an example of how this could look: GitHub Link
I am having the same issue. My custom data is able to be read client side, but server side I am only able to see the same name, email and image properties… I created a stackoverflow ticket, but no help was provided yet.
https://stackoverflow.com/questions/76740190/next-auth-getserversession-not-retrieving-user-data-in-nextjs-13-4-api-route
check this fix: https://stackoverflow.com/a/64595973/14536846
How can you export authOptions? If I try to build the project, next.js will complain:
Type error: Route “src/app/api/auth/[…nextauth]/route.ts” does not match the required types of a Next.js Route.
“authOptions” is not a valid Route export field.
How do you resolve this issue? Thank you!
It’s strange that you’re experiencing that error. I just updated all the packages to their current versions except for the
next-authpackage and I didn’t encounter any errors while running the project.One change I made was to modify the way the
NextAuthOptionsinterface was imported. I’ve pushed the change to GitHub, so you can check the repository and apply the same change to see if it resolves the error.By the way, are you using Next.js 13?
Amazing post! Thank you!
I actually get the same error when I try to build the project. Any ideas?
“`
app/api/auth/[…nextauth]/route.ts
Type error: Route “app/api/auth/[…nextauth]/route.ts” does not match the required types of a Next.js Route.
“authOptions” is not a valid Route export field.
“`
What version of Next.js and NextAuth are you using?
The solution is to remove the `export` in this line https://github.com/wpcodevo/nextauth-nextjs13-prisma/blob/844a3cb85cdfe20fc7ebf5c0b2ee0db5f6c49463/
Thanks for the awesome article, it’s one of the few on the web right now.
Stefan’s comment put me on the right track. The key is to structure route.ts like this example:
https://github.com/shadcn/taxonomy/blob/main/app/api/auth/route.ts
The author defines `authOptions` in a separate file (e.g. under lib/auth/) and exports it. Then route.ts and wherever else the authOptions are required (e.g. login components) import from the separate file.
This way there is no “invalid export field” (`export const authOptions…`) in the route.ts file and other files such as a component that needs it for `getServerSession(authOptions)` can import it from the separate file as well.
I have no idea how some examples like https://github.com/steven-tey/precedent/blob/51f3e01fae51c367d74633ece309917caf684555/app/api/route.ts are getting away without an error even when I match the package versions in my project.
Thank you so much for taking the time to share your thoughts! Your feedback is really valuable and will definitely help other people who read the article.
I’ve taken your feedback into account and made the necessary changes to the article to prevent others from running into the same problem.
Dude! Great post! The only thing I had to look elsewhere was how to extend the Session and JWT types with the custom key (https://authjs.dev/getting-started/typescript). I don’t usually comment on posts, but I thought you did such great job that I had to thank you!
Absolutely! It’s fantastic to know that you found my post informative. I must admit, I did overlook extending the Session and JWT types in the project, but your suggestion to refer to https://authjs.dev/getting-started/typescript will surely benefit other readers.
I truly value your feedback, and I’m grateful for you taking the time to leave a comment.
I wish I could pay you for making this tutorial! This is hands down so much better and more intuitive than the official NextAuth docs, especially regarding how to correctly set up the SessionProvider and get user session data on the client side. Thank you so much!
I really appreciate your kind words, thank you!
I use Nextjs 13.2.4 in my project and I use for authentication next-auth 4.22.0:
I have a problem when I submit the login form ,The problem is in the SignIn function, I got this error .(SingOut and SignIn )
SyntaxError: Unexpected token ‘<', "<!DOCTYPE "… is not valid JSON
While setting up my project, I faced errors when trying to use the latest version of NextAuth in the Next.js 13 app directory.
To work around this issue, the NextAuth team recommended a specific pull request.
You could try using
"next-auth": "0.0.0-pr.6777.c5550344"instead to see if this resolves the error.Edem,
I am creating a Login server component to put into the Header component (this component is displayed on all pages), but the problem is that all pages, including static ones, become server-rendered pages. Can I solve this using getServerSession or is using useSession/getSession the only way out?
My component:
import SignInButton from ‘./SignInButton’
import Dropdown from ‘./Dropdown’
import { getServerSession } from ‘next-auth’
import { authOptions } from ‘pages/api/auth/[…nextauth]’
const Login = async () => {
const session = await getServerSession(authOptions)
return (
{session ? (
) : (
)}
)
}
export default Login
Based on my understanding of Next.js 13, you need to include a client-side component within a server-side component, not the other way around.
Therefore, if your Header Component is a client-side component, it would make more sense to make the Login Component a client-side component as well. Once both the Login and Header Components are client-side components, you can use the
useSessionhook to retrieve the session information.If you plan to use the
getServerSessionfunction in a client-side component such as the Login Component, you will need to utilize the new Next.js 13 Server Actions. You can find more information about this feature on https://nextjs.org/blog/next-13-4#server-actions-alpha.Hello, I can orient myself in this guide but, integrating Prisma with Supabase, doesn’t it change so much ?
I think I would not have to use Docker.
If you don’t want to use a PostgreSQL database running in Docker, no worries! Supabase provides a free PostgreSQL database that you can use instead. Simply obtain the database connection URL from Supabase and add it to your
.envfile.Once you’ve done that, the project should work as expected. If you need any further help with this, just let me know.
hello i have been following all the steps, buti get an error when i run npm prisma db push this error code: ‘MODULE_NOT_FOUND’,
requireStack: [
‘/Users/l…/t…/prisma/imaginaryUncacheableRequireResolveScript’
]
}
Node.js v20.0.0
An error occurred while running the seed command:
Error: Command failed with exit code 1: ts-node –compiler-options {“module”:”CommonJS”} prisma/seed.ts. I tried to reisntall node module but it didnt work any idea? thanks so much
I’m sorry to hear that you’re encountering an error. It seems like there may be an issue with the module installation or configuration. One thing you could try is running
npx prisma db pushinstead ofnpm prisma db pushto see if that resolves the issue. Let me know if that works or if you need further assistance with debugging.thanks so much for you reply, when irun npx prisma db push it seem works properly Lucas-Mac-mini:$ npx prisma db push
Environment variables loaded from .env
Prisma schema loaded from prisma/schema.prisma
Datasource “db”: PostgreSQL database “postgres”, schema “public” at “localhost:5432”
The database is already in sync with the Prisma schema.
✔ Generated Prisma Client (4.14.0 | library) to ./node_modules/@prisma/client in 37ms
then when i run the npx prisma db seed i recevied the message error i posted before! should i avoid using the seeds command and can i procced without or is something i must do before following the nexts steps
? thanks again
Seeding the database is not a required step. If you wish to create a new user or register an account, you can directly jump to the section that shows how to create the account registration component and link it with NextAuth.
However, if you want to experiment with different scripts for seeding the database, you can follow the instructions given on the official Prisma documentation at https://www.prisma.io/docs/guides/migrate/seed-database.
Awesome articles!!! Could you write post with django rest + nextjs + next-auth registration and authorization?
Regarding your suggestion, that sounds like a great topic for a future article. I will definitely consider it for future content.
Hi, I took the code from your repo. I am trying to use session-based login and persist the users who are logged in via Google, in your current example in the repo. Users can login via Google but not saved in db. I am following this https://authjs.dev/reference/adapter/prisma. But facing lot of issues. Can you add an example to use prisma adapter?
You can refer to this example repository, https://github.com/shadcn/taxonomy/blob/main/lib/auth.ts, which shows how to add the Prisma adapter to your NextAuth configurations.
In case you face any difficulties or have any questions, feel free to let me know.
Hey ! Thanks for your article.
I’m facing an issue, every time I’m using next auth in the app directory. First, when using next-auth’s middleware, the user is redirected but nothing happens when he clicks on an OAuth provider like google. It simply redirects to the same path with `?csrf=true` at the end.
I tried, creating my own button with the `signIn(“google”)` method. Also, here nothing happens. In the console, this error appears:
“Uncaught (in promise) SyntaxError: Unexpected token ‘<', "<!DOCTYPE "… is not valid JSON"
Please help me.
I wasn’t able to reproduce this error. Could you please raise an issue on the NextAuth GitHub page? The experts there will be able to assist you better with this problem.
Hi, I see this line used at various places, but there is no auth file in the lib directory, can you please explain this? Thanks!
import { authOptions } from “@/lib/auth”;
Apologies for the oversight. I initially thought I had pushed the changes in the main branch to GitHub, but upon double-checking, I realized that I forgot to push the commits for the main branch. All the other branches are up to date.
To access the recent changes, please run
git pullin the terminal of the root project directory. This will update your local copy with the latest changes from the main branch.Thank you for bringing this to my attention by leaving a comment.
I loved your article, very intuitive and it worked just fine.
I have some doubts, more for understanding.
Why do we have to use the […nextauth] folder with a route.ts file inside it?
Is there a way to modify it?
I tried to create a file called […nextauth] but then it gives a 400 error.
This doubt is more for me to understand how it works even if you can help me
again your post was wonderful
In Next.js 13 and above, the routing system for API routes has changed. Instead of directly creating files for each route, you now define an API route using folders.
For example, if you have an endpoint
/api/products, you need to create a folder named products within thesrc/app/apidirectory. Inside theproductsfolder, you will have a file calledroute.tswhere you define the route handlers using the Web Request and Response API. This new routing structure is similar to how the routing system works in SvelteKit.Regarding NextAuth, previously you would create a file named
[...nextauth].tsto set up NextAuth in the Next.jspagesdirectory. However, with the release of Next.js 13, the approach has changed.Now, you need to create a folder named
[...nextauth]and within it, you define theroute.tsfile that contains the route handlers for NextAuth.I hope this clarifies the changes in the routing system and how NextAuth is set up in Next.js 13.
Thank you very much for replying, now I understand everything. I started my studies with next 13, so I didn’t even know about these changes.
Again thank you very much for the article and the explanation, your work is incredible much better than the official documentation
Let me also say thanks for this tutorial!
I had to add `secret: process.env.AUTH_SECRET` after line 7 of my `auth.ts`. Without this, I got a `decryption operation failed` error when trying to use `getServerSession`
Incredibly helpful, thanks a lot
You are welcome! Cheers and happy coding!
How do i stop users jumping directly to /login when the users is already authenticated?
There are different ways to prevent users from accessing the
/loginpage directly when they are already authenticated.One common approach is to retrieve the session data in the login component using the
useSession()hook and check for its existence. If a session is found, you can redirect the user to either the home page or a protected page.📝 Fantastic article on NextAuth in Next 13! 🌟
Kudos to the author for an outstanding piece on NextAuth. I found it incredibly informative and comprehensive, covering everything I needed to know about NextAuth. It’s amazing how this authentication library is revolutionizing the way we handle authentication in Next.js applications. The article left me feeling well-equipped and excited to implement NextAuth in my projects. Thank you for sharing such valuable insights!
Thank you so much for your kind words! While reading your comment, I couldn’t help but smile, and I’m extremely happy that the article was helpful to you.
Amazing post.
Amazing guide. I am so thankful for it. If you get this error then make sure you are using three dots rather than the single “…” which looks the same as three dots but next.js will not register it.
[next-auth][error][MISSING_NEXTAUTH_API_ROUTE_ERROR]
https://next-auth.js.org/errors#missing_nextauth_api_route_error Cannot find […nextauth].{js,ts} in `/pages/api/auth`. Make sure the filename is written correctly. MissingAPIRoute [MissingAPIRouteError]: Cannot find […nextauth].{js,ts} in `/pages/api/auth`. Make sure the filename is written correctly.
Edem, if you can update your guide to have three real dots rather than the “…” character you might save some confusion for those blindly copying
https://github.com/nextauthjs/next-auth/issues/7632
Adam, thank you for pointing that out.
I have taken the necessary steps to type the three dots in the path and have tested it against the repository linked to the article. Everything appears to be working correctly. It seems that when I copied the relative path to the
route.tsfile and pasted it into the article, the appearance of the three dots changed unexpectedly.However, I have now made the required correction in the article, and I am confident that no one will encounter this issue again. Once again, thank you for bringing it to my attention.
Hi.
I’m wondering what RandomKey is used for ?
Regards.
I added the
randomKeyto the configuration simply to demonstrate that any additional information can be included in the session. It doesn’t have a specific purpose or functionality within the code. Its purpose is solely to illustrate the flexibility of including custom data or variables in the session.Nice article. Very detailed explanation.
Wow. Best tutorial out there about how to effectively protect routes/pages with NextAuth in the new App router version of Next.js. Congrats and THANKS!
You’re welcome! I’m glad the tutorial was helpful for you.
Whenever I try to recreate lib/auth.ts for initializing authOptions I get
Individual declarations in merged declaration ‘AzureADProvider’ must be all exported or all local.ts(2395)
Import declaration conflicts with local declaration of ‘AzureADProvider’.ts(2440)
Do you know what I should be doing to fix this?
I’m not entirely sure what could be causing the specific error you mentioned. However, I would recommend raising an issue on the NextAuth GitHub page. The experts and community there would be better equipped to help you diagnose and resolve the problem you’re facing.
Hi Edem,
Wonderful article! You have explained everything with such details.
Is it possible to implement SMS based 2FA with Next-Auth? I have been struggling to figure out how to get it to work.
Yes, it is possible, but I have not tried it before. You can refer to this GitHub repository that has a 2FA implementation with NextAuth, although they used an email provider in their case. You can examine their implementation and then replace the email provider with an SMS provider. I believe the flow should be similar.
Hey Edem, this is a great tutorial!
I would like to share some thoughts though. Is it possible to combine email/password credentials with any other passworless provider? Because NextAuth actually discourages using password for login and, at the same time, the session strategy by default is “database” if you have set an adapter, and here you are changing that. It may affects the other login providers maybe? Not sure to be honest, I’m still new in Next so I’m trying to understand all the moving parts.
Keep up the good work and thanks again!
You’re right that combining email/password credentials with passwordless providers is not the recommended approach in NextAuth. While it’s true, it’s worth noting that many well-known websites still use a combination of both approaches.
Ultimately, the decision to combine different authentication methods depends on the specific requirements and preferences of your application. In the tutorial, I included the email/password credentials provider along with the OAuth providers for demonstration purposes and to showcase different authentication options.
If I were working on my own project, I would consider using email magic links in combination with the OAuth providers, as it provides a passwordless and secure authentication experience
Very Helpful!! Thank you!
This was super helpful! we mgirated from pages -> app (proj was still in early development) and going through the implementation following this article, it really helped solidify my understanding of app vs pages rotuer.
some side notes:
if you are using an external API to manage users instead of directly using a plugin adapter like prisma, you will need to build your own next-auth adapter from scratch (not in the authoptions/callbacks)
Hi Edem, thank you for the amazing tutorial. Did you encounter about a Can’t resolve ‘crypto’ problem in your app? It occurs when I build the app but it seems to work when I run it.
I just built the app on my machine, which is Windows WSL2, without running into any problems. Please clone the GitHub repository attached to this article and try building the project on your machine to see if you encounter the “crypto” problem.
I have seen this type of error before, and it happens when you try to use certain Node.js libraries in the
middleware.tsfile. Since this file is runs in a serverless environment where certain Node.js modules are not available, using them will result in such errors.This article is very useful!
Hi, this website is pure gold! , Its posible to protect API routes based on type of request? Like protect POST, DELETE and UPDATE? I tried to create a custom middleware with your logic but it doesnt work, only works if i put that code in every function like you did, this is my code : import { getServerSession } from ‘next-auth/next’;
import { authOptions } from ‘@/lib/auth’;
import { NextResponse } from ‘next/server’;
const authProtect = async () => {
const session = await getServerSession(authOptions);
console.log(session);
if (!session || session?.user?.role !== ‘ADMIN’) {
return NextResponse.json(
{ status: ‘fail’, message: ‘You are not authorized!’ },
{ status: 401 }
);
} else {
return NextResponse.next();
}
};
export { authProtect };
this function its used on the request I want to protect but it works only if I put the code directly in the API function:
export async function GET(request: NextRequest) {
const session = await getServerSession(authOptions);
console.log(session);
if (!session || session?.user?.role !== ‘ADMIN’) {
return NextResponse.json(
{ status: ‘fail’, message: ‘You are not authorized!’ },
{ status: 401 }
);
}
const page_str = request.nextUrl.searchParams.get(‘page’);
const limit_str = request.nextUrl.searchParams.get(‘limit’);
const page = page_str ? parseInt(page_str, 10) : 1;
const limit = limit_str ? parseInt(limit_str, 10) : 10;
const skip = (page – 1) * limit;
const users = await prisma.user.findMany({
skip,
take: limit,
});
return NextResponse.json(
{
status: ‘success’,
results: users.length,
users,
},
{
status: 201,
headers: { ‘Content-Type’: ‘application/json’ },
}
);
}
if I call there await authProtect(); it runs ok but the request works anyways, Im missing something? Its possible do it this way? or I need to do it in the main ‘middleware’ option? Thanks in advance!
Hi!
I’m a bit confused about the section where you create the `NextAuthProvider` in order to make the session data available in client components.
So, you create the provider like this, basically just wrapping the `SessionProvider` from NextAuth.js:
“`
“use client”;
import { SessionProvider } from “next-auth/react”;
type Props = {
children?: React.ReactNode;
};
export const NextAuthProvider = ({ children }: Props) => {
return {children};
};
“`
Then you put this `NextAuthProvider` (which is a client component) into the root layout, making all of the other components in your app its children:
“`
export default function RootLayout({
children,
}: {
children: React.ReactNode;
}) {
return (
{children}
);
}
“`
Now consider this bit from the [Next.js docs](https://nextjs.org/docs/getting-started/react-essentials):
> “use client” sits between server-only and client code. It’s placed at the top of a file, above imports, to define the cut-off point where it crosses the boundary from the server-only to the client part. Once “use client” is defined in a file, all other modules imported into it, including child components, are considered part of the client bundle.
So, I might misunderstand how exactly this boundary between client and server components works exactly, but doesn’t that mean that you basically turned all of the components in your app into client components by making them children of your `NextAuthProvider`?
When you wrap a client-side provider around the
childrenof the root layout component, Next.js will still treat all the components in the app directory as server components.You only explicitly mark a component as client if you include the
"use client"directive at the top of the file. Any other component imported into the client component will be treated as a client component.This means that if you have child client components to be used in a parent client component, you only need to include the
"use client"directive in the parent.You can omit the
"use client"directive in the child client components since Next.js will automatically consider them as part of the client bundle, given that they were used in a client component—specifically, the parent in this case.remember, children in react are handled differently than imported stuff in a comp
look how this gets rendered
“`
import “./styles.css”;
import React, { useState } from “react”;
const Other1 = () => {
console.log(“other-1 renders”);
return other-1;
};
const Other2 = () => {
console.log(“other-2 renders”);
return other-2;
};
const Client = ({ children }) => {
console.log(“client renders”);
const [count, setCount] = useState(0);
return (
React Counter
Count: {count}
setCount(count + 1)}>Increment
setCount(count – 1)}>Decrement
setCount(0)}>Reset
{children}
);
};
export default function App() {
return (
Hello CodeSandbox
Start editing to see some magic happen!
);
}
“`
only Client and Other2 will render when you change Client components state
the passed in children (Other1) wont
“Thank you for this great tutorial!
The session having a certain validity (1 month for example), when I delete the user from the database, they can still use the application if they don’t log out.
How do you handle this situation?”
I think we handled this in the
authorizemethod of the NextAuth configuration, where we checked if the user exists before returning the session. In the case where you delete a user from the database but the user still has a valid session, the user will be able to do client-side navigation without being kicked out since the Next.js middleware only runs on the server.If the user visits a page that needs to be rendered on the server, that’s when the middleware will run and prevent the user from accessing the page.
Great tutorial 🙌🏻 Lot of effort you put in it 🦸🏻♂️
you may want to add “Part 1:”, “Part 2:”, “Part 3:, etc. in the series to know what is the recommended order to follow.
Thanks for the suggestion!
Thanks for this great guide! How i can add in my login remember me and save cookies for one year, but not remember me i save cookies for one day?
This was helpful
I’m glad you found the article helpful.
Hello , this is great post. I am a newbie in next js. Trying to learn and also struggling a lot. I would like to know which code to refer. I followed your GitHub code. setup all . I am using next js 14 version. Here I am facing error while submitting for either sign up or login. In sign up data is inserted in db but throwing error “Error: This action with HTTP GET is not supported by NextAuth.js” . While for login after hitting submit button it throws the same above error.
I would like to know where I am facing this error. I am using credential provider , no github or google. I have setup auth secret also. I would like to get some help, your help is much appreciated.
Thanks
Did you setup the Next.js routes required by NextAuth correctly?
Thank you , I have used your next js 14 code and it is working fine. thank you once again.
You are welcome!