

In this article, we will explore everything you need to know about Server Actions. If you’re not already familiar with Server Actions, here’s a simple description. Server Actions are a newly introduced feature in Next.js 13 that enables us to directly mutate data on the server from the frontend. The introduction of Server Actions eliminates the need for an additional API layer, simplifying the data mutation process.
I’m really excited that Next.js introduced this feature because it’s already present in other frameworks like Remix and SvelteKit. In the context of Remix, you can think of Server Actions as Form Actions that can be used on both the Server and Client, similar to tRPC. This means we get type safety out of the box.
Here’s the roadmap we will follow: we will start by slowly exploring Server Actions through the creation of a simple counter application in two ways. The first version of the counter application will work even if JavaScript is unavailable or disabled in the browser, while the other version will require JavaScript to function.
Then, we will take things to the next level and build a TodoList application that will involve storing data in a database. For the data access layer, we will use Prisma ORM with a SQLite database. So, without further delay, let’s dive into the article and explore Server and Client Actions in Next.js.
More practice:
- Integrate FastAPI Framework with Next.js and Deploy
- Integrate Python Flask Framework with Next.js and Deploy
- JWT Authentication in Next.js 13 API Route Handlers
- User Registration and Login in Next.js 13 App Directory
- Build a Simple API in Next.js 13 App Directory
- Build a Simple Frontend App in Next.js 13 App Directory
- Next.js – Add Google and GitHub OAuth2 using NextAuth.js
- Next.js – Use Custom Login and SignUp Pages for NextAuth.js
- How to Setup Prisma ORM in Next.js 13 App Directory
- How to Setup and Use Apollo Client in Next.js 13 App Directory
- How to Setup React Context API in Next.js 13 App Directory
- How to Setup React Query in Next.js 13 App Directory
- How to Setup Redux Toolkit in Next.js 13 App Directory
- Setup tRPC Server and Client in Next.js 13 App Directory
- Setup and Use NextAuth.js in Next.js 13 App Directory

Running the Next.js Project on Your Computer
To run the Next.js project on your local machine and explore the various ways server actions can be used in Next.js, you can follow these steps:
- Download or clone the project from its GitHub repository at https://github.com/wpcodevo/nextjs-server-action-app and open it in your preferred code editor.
- Open the integrated terminal of your code editor and execute the command
pnpm ito install all the necessary dependencies required by the project. If you don’t have PNPM installed, you can run the following command first:npm i -g pnpm. - Apply the Prisma migrations to the SQLite database and generate the Prisma Client by running the command
pnpm prisma migrate dev. - Launch the Next.js development server by executing
pnpm dev. - Open the application in your web browser and use the provided links on the homepage to access different pages demonstrating the various server action implementations in Next.js.
Terminologies
Before we proceed, let’s familiarize ourselves with some of the terminologies related to server actions. Take a moment to review the following list to gain an understanding of these terms:
- Actions – Actions are an experimental feature in React that allows you to pass an asynchronous function directly to the
actionprop on an element. In most cases, it will be theactionprop on an HTML form. - Server Actions – Server Actions are a new feature in Next.js that enable you to directly create or modify data on the server without going through an API endpoint. In simple terms, they are asynchronous functions that run only on the server but can be invoked from both server-side and client-side components to perform data mutations on the server.
When it comes to defining server actions, you have two options: within a React Server Component or in a separate file. - Client Actions – Client actions are also asynchronous functions that do not include the
"use server"directive within the function body. Instead, they invoke a server action within the function body. You cannot define server actions in a client component, but you can import and use them in the client component. - Form Actions – Form actions are integrated into the web standard
<form>API and provide progressive enhancement and loading state capabilities out-of-the-box. - Server Functions – These are functions that run on the server but can be called from the client. They are typically used within server actions to perform server-side logic.
- Server Mutations – Server mutations refer to the process of modifying data on the server using server actions. In this case, server actions use
revalidatePathorrevalidateTagto invalidate the HTTP cache, telling Next.js to refetch the most recent data from the server.
Different Ways to Invoke Server Actions
Having familiarized yourself with the terminologies related to Server Actions, let’s explore the various methods through which you can invoke them:
- Using the
actionprop: This prop allows you to invoke a Server Action on a form element. By specifying the Server Action as the value of theactionprop, you can trigger the action when the form is submitted. - Utilizing the
formActionprop: With this prop, you can invoke a Form Action on specific elements such as buttons or input elements with submit and image types. This is particularly useful when you need to handle multiple Server Actions within the same form. It’s important to note that theformActionprop takes precedence over the form’sactionprop. - Leveraging the
startTransitionfunction: ThestartTransitionfunction is obtained from theuseTransitionhook. It allows you to invoke Server Actions asynchronously without blocking the rendering of the UI. This approach is beneficial when you need to trigger Server Actions outside of forms, buttons, or inputs.
Setting up the Next.js Project
If you don’t already have a Next.js project, you can quickly bootstrap one by running any of these commands. This will ensure that we are all on the same page:
# For PNPM
pnpm create next-app nextjs-server-action-app

# For NPM
npm create-next-app@latest nextjs-server-action-app

# For Yarn
yarn create next-app nextjs-server-action-app
After executing the command, you will be presented with prompts to enable various features. For the sake of this project, select “Yes” for all the prompts. Once you have provided your responses, a new Next.js project will be created and saved in a directory named nextjs-server-action-app.
To proceed, you need to install some dependencies required for the project. Run the following commands in your terminal:
# For PNPM
pnpm add -D prisma
pnpm add @prisma/client
pnpm add zod react-hook-form @hookform/resolvers

# For NPM
npm i -D prisma
npm i @prisma/client
npm i zod react-hook-form @hookform/resolvers

# For Yarn
yarn add -D prisma
yarn add @prisma/client
yarn add zod react-hook-form @hookform/resolvers
Enable the Experimental Server Actions
At the time of writing this article, Server Actions is still an experimental feature. To use Server Actions, you need to enable the experimental serverActions flag in the next.config.js file. It’s important to note that using Server Actions means you are opting into running the React experimental channel.
To enable the serverActions flag, follow these steps:
- Locate the
next.config.jsfile in your project and open it. - Inside the configuration object, add or modify the
experimentalproperty to include theserverActionsflag. It should look like this:
next.config.js
/** @type {import('next').NextConfig} */
const nextConfig = {
    experimental: {
        serverActions: true
    }
}

module.exports = nextConfig
Where to Use Server and Client Actions
In this section, we will gradually explore how to use Server Actions in both React Server and Client components. We’ll start by building a simple Counter application in two different ways: one using only a React Server Component and the other using a Client Component.
Please note that in this section, I won’t delve into explaining all the concepts in detail. However, as we progress to creating the TodoList application, I will provide more detailed explanations.
In a Server Component
Let’s begin by utilizing Server Actions in a React Server Component. This approach ensures that the counter component remains functional even if JavaScript is disabled. To create the counter component, open the src/app/page.tsx file and replace its current content with the following code snippet:
src/app/page.tsx
import { revalidatePath } from "next/cache";

let count = 0;

const Home = async () => {
  const increment = async (path: string = "/") => {
    "use server";
    count++;
    revalidatePath(path);
  };

  const decrement = async (path: string = "/") => {
    "use server";
    count--;
    revalidatePath(path);
  };

  return (
    <div className="container mx-auto max-w-lg p-4">
      <form className="flex space-x-5">
        <button
          className={incre_button_classes}
          formAction={async () => {
            "use server";
            increment();
          }}
        >
          Increment
        </button>
        <p className="text-center text-2xl font-bold my-4">{count}</p>
        <button
          className={decre_button_classes}
          formAction={async () => {
            "use server";
            decrement();
          }}
        >
          Decrement
        </button>
      </form>
    </div>
  );
};

const incre_button_classes =
  "bg-blue-500 hover:bg-blue-600 text-white font-bold py-2 px-4 rounded";
const decre_button_classes =
  "bg-red-500 hover:bg-red-600 text-white font-bold py-2 px-4 rounded";

export default Home;
In the above code, we defined a count variable outside of the page component to keep track of the count value in the counter application. Inside the page component, we created two Server Actions: increment and decrement. The increment action increases the value of count when called, while the decrement action decreases it when invoked.
As we are mutating data that is only available on the server, we needed a way to ensure that the counter component fetches the latest value of the count variable after each Server Action completes. To achieve this, we used the revalidatePath function within the Server Actions.
Within the JSX, we included a <form> element to manage the state of the count variable, which is available on the server. Typically, we would pass the Server Action to the action prop of the form element. However, in this case, as we want to invoke two different actions within the form, we used the formAction prop on each button instead. This allows us to trigger the respective Server Action for incrementing and decrementing the count variable.
To test the counter application, start the Next.js development server and open the application in the browser. You can then increment and decrement the count variable to see the changes reflect in the UI.
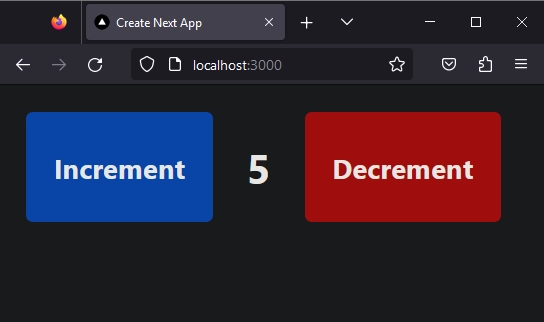
It’s worth noting that since we passed the Server Actions directly to the formAction props, the counter component will continue to function even if JavaScript is disabled in your browser.
In a Separate File
Let’s proceed to see another way we can define Server Actions, which is in a separate file. This approach is most useful when you need to define actions that you can reuse in multiple places. Also, since we can’t create Server Actions in a Client Component, defining them in a separate file that has the "use server" directive at the top of the file is our only option.
In this simple counter application, we need to keep track of a count variable. You might be wondering why we don’t define the count variable in the same file where we will define the Server Actions. Well, this will work, but we need to export the count variable so that we can display its value. However, doing so will result in errors since only asynchronous functions can be exported from the file that contains the Server Actions.
Instead, we will create a separate file, which you can think of as a utility or library file, that will contain the count variable. This is a good place to also define functions that directly mutate the count variable, instead of putting that logic in the Server Actions. These functions that mutate the count variable are referred to as Server Functions, which means we can invoke them in Server Actions or in React Server Components.
To do this, go into the src directory and create a new folder named lib. Then, within the lib folder, create a file named counter.ts and include the following in it.
src/lib/counter.ts
let count = 0;

export async function getCountAsync() {
  return count;
}

export async function incrementAsync() {
  return ++count;
}

export async function decrementAsync() {
  return --count;
}
With the Server Functions now defined in the src/lib/counter.ts file, we can now create Server Actions that use them to mutate the count variable on the server. To define these Server Actions, we need to create a new file that will have the "use server" directive at the top. You can give any name to this file, but the convention is to use _action.ts. The underscore (_) at the beginning of the file name is just a naming convention in Next.js which offsets the file from the default Next.js routing system.
To create the Server Actions, navigate to the src/app/ directory and create a file named _action.ts. Within the _action.ts file, add the following code to it:
src/app/_action.ts
"use server";

import { decrementAsync, incrementAsync } from "@/lib/counter";

export const incrementCountAction = async () => {
  const count = await incrementAsync();
  return count;
};

export const decrementCountAction = async () => {
  const count = await decrementAsync();
  return count;
};
If you take a closer look at the Server Actions above, you will notice that we didn’t use revalidatePath to invalidate the HTTP cache after the Server Functions have executed. This is because we will only use the Server Actions in a Client Component in this simple counter application. However, if you intend to use the Server Actions in a React Server Component as well, then you need to use revalidatePath after calling the Server Functions.
In a Client Component
Now that we have defined the Server Actions in the src/app/_action.ts file, we can import and utilize them within a Client-Side Component. To manage the state of the counter component based on the value returned by the Server Actions, we need to use the useState hook. In order to access this hook, we must convert the component into a Client-Side Component using the "use client" directive.
Since we only need the interactions for the form element and its content, we can extract that code into a countForm.tsx file located within the src/components/ directory.
Here is the code for the countForm.tsx file:
src/components/countForm.tsx
"use client";

import { decrementCountAction, incrementCountAction } from "@/app/_action";
import { useState } from "react";

interface CountFormProps {
  count: number;
}

export default function CountForm({ count }: CountFormProps) {
  const [newCount, setNewCount] = useState(count);

  return (
    <form className="flex space-x-5">
      <button
        className={incre_button_classes}
        formAction={async () => {
          const result = await incrementCountAction();
          setNewCount(result);
        }}
      >
        Increment
      </button>
      <p className="text-center text-2xl font-bold my-4">{newCount}</p>
      <button
        className={decre_button_classes}
        formAction={async () => {
          const result = await decrementCountAction();
          setNewCount(result);
        }}
      >
        Decrement
      </button>
    </form>
  );
}

const incre_button_classes =
  "bg-blue-500 hover:bg-blue-600 text-white font-bold py-2 px-4 rounded";
const decre_button_classes =
  "bg-red-500 hover:bg-red-600 text-white font-bold py-2 px-4 rounded";
You can see that the CountForm component accepts only a single prop, which is the count variable. Since we are not utilizing the revalidatePath function within the Server Actions, we could have alternatively defined the Server Actions within the React Server Component where the CountForm component will be used and passed them down as props to the CountForm component. However, for our purposes, we will stick with the option of importing the Server Actions.
Open the src/app/page.tsx file and replace its current contents with the following code:
src/app/page.tsx
import CountForm from "@/components/countForm";
import { getCountAsync } from "@/lib/counter";

const Home = async () => {
  const count = await getCountAsync();
  return (
    <div className="container mx-auto max-w-lg p-4">
      <CountForm count={count} />
    </div>
  );
};

export default Home;
Once you have saved the changes, you should be able to mutate the count variable on the server from the Client Component. However, it’s important to note that the CountForm component relies on JavaScript, so it will not work as intended if JavaScript is disabled in the browser. This is the only limitation to keep in mind.
At this point, you now have an overview of how Server Actions work by building a simple counter application. Now, we can take things to the next level by building a TodoList application that stores data in a database.
Create the Database Layer
Let’s start with the database layer. For the sake of simplicity, we will be using a SQLite database, but you can use any Prisma-supported database instead.
Setup Prisma ORM
Open your terminal and execute one of the commands below, depending on your preferred package manager, to initialize Prisma in your project:
# For PNPM
pnpm prisma init --datasource-provider sqlite

# For Yarn
yarn prisma init --datasource-provider sqlite

# For NPM
npx prisma init --datasource-provider sqlite
With Prisma now initialized in your project, open the prisma/schema.prisma file and replace its contents with the following code. This code will define the model for the Todo application.
prisma/schema.prisma
generator client {
  provider = "prisma-client-js"
}

datasource db {
  provider = "sqlite"
  url      = env("DATABASE_URL")
}

model Todo {
  id        String   @id @unique @default(cuid())
  title     String
  completed Boolean  @default(false)
  createdAt DateTime @default(now()) @map(name: "created_at")
  updatedAt DateTime @updatedAt @map(name: "updated_at")

  @@map(name: "todos")
}
Next, execute the following command in your terminal to generate the database migrations based on the schema changes, apply the changes to the database, and generate the Prisma Client.
# For PNPM
pnpm prisma migrate dev --name 'initial migration'

# For Yarn
yarn prisma migrate dev --name 'initial migration'

# For NPM
npx prisma migrate dev --name 'initial migration'
Instantiate the Prisma Client
Let’s proceed with instantiating the Prisma Client in the project, enabling us to use it for querying and mutating the database. To accomplish this, please follow the steps below:
src/lib/prisma.ts
import { PrismaClient } from "@prisma/client";

const globalForPrisma = global as unknown as { prisma: PrismaClient };

export const prisma =
  globalForPrisma.prisma ||
  new PrismaClient({
    log: ["query"],
  });

if (process.env.NODE_ENV !== "production") globalForPrisma.prisma = prisma;
Create Functions to Query and Mutate the Database
Now, let’s proceed to create utility functions that will be used for querying and mutating the data stored in the database. In the context of API development, these functions can be referred to as services. However, in the context of Next.js, they are commonly known as Server Functions.
To create these Server Functions, follow these steps:
- Create a
todos_db.tsfile within thesrc/lib/folder. - Add the following code to the
todos_db.tsfile:
src/lib/todos_db.ts
import { prisma } from "./prisma";

interface TodoFiler {
  page?: number;
  limit?: number;
}

export async function getTodos(filter: TodoFiler = {}) {
  try {
    const page = filter.page ?? 1;
    const limit = filter.limit ?? 10;
    const skip = (page - 1) * limit;

    const todos = await prisma.todo.findMany({
      take: limit,
      skip,
    });

    return {
      todos,
      page,
      limit,
      results: todos.length,
    };
  } catch (error) {
    return { error };
  }
}

export async function createTodo(title: string) {
  try {
    const todo = await prisma.todo.create({
      data: { title },
    });

    return { todo };
  } catch (error) {
    return { error };
  }
}

export async function getTodo(id: string) {
  try {
    const todo = await prisma.todo.findUnique({
      where: { id },
    });
    return { todo };
  } catch (error) {
    return { error };
  }
}

export async function updateTodo(
  id: string,
  { title, completed }: { title?: string; completed?: boolean }
) {
  try {
    const todo = await prisma.todo.update({
      where: { id },
      data: {
        title,
        completed,
      },
    });
    return { todo };
  } catch (error) {
    return { error };
  }
}

export async function deleteTodo(id: string) {
  try {
    await prisma.todo.delete({ where: { id } });
  } catch (error) {
    return { error };
  }
}
It’s important to understand that Server Functions cannot be directly invoked within Client-Side Components. You might wonder why that is the case. Well, if you take a closer look at the code provided above, you’ll notice that all these functions depend on the Prisma Client to establish communication with the database. However, the Prisma Client is designed for server-side usage only.
Thus, if you attempt to invoke any of these functions within a browser environment, you will encounter an error because the Prisma Client is not included in the JavaScript bundle shipped to the browser.
Define the Zod Schema Validations
One of the most critical aspects of this project is data validation. When data is passed to the Server Actions from the browser or the client side, it’s essential to approach it with caution and avoid blindly trusting its integrity. Instead, it’s crucial to validate and sanitize the data within the Server Action or before invoking it. This ensures that the data being transmitted to our Server Actions maintains its integrity and validity.
While there are several approaches and validation libraries available for this task, in this article, our focus will be on utilizing Zod.
To define the schema, follow these steps:
- Create a file named
schema.tswithin thesrc/lib/directory. - Add the following code to the
schema.tsfile:
src/lib/schema.ts
import { TypeOf, boolean, object, string } from "zod";

export const TodoSchema = object({
  title: string({ required_error: "Todo title is required" }).min(
    1,
    "Todo title is required"
  ),
  completed: boolean().optional(),
});

export type TodoSchemaType = TypeOf<typeof TodoSchema>;
Define the Server Actions in a Separate File
With the Server Functions and Zod validation schemas already implemented, we can now proceed to create the Server Actions. To do this, open the src/app/_action.ts file and replace its current content with the following code snippet:
src/app/_action.ts
"use server";

import { TodoSchema } from "@/lib/schema";
import { createTodo, deleteTodo, updateTodo } from "@/lib/todos_db";
import { revalidatePath } from "next/cache";
import { ZodError } from "zod";

export async function createTodoAction({
  title,
  path,
}: {
  title: string;
  path: string;
}) {
  await createTodo(title);
  revalidatePath(path);
}

interface ZodFormatValidationError {
  error: Record<string, { _errors: string[] }>;
}

export async function createTodoActionWithValidation({
  data,
  path,
}: {
  data: FormData;
  path: string;
}): Promise<ZodFormatValidationError | null> {
  try {
    const body = Object.fromEntries(data);
    const { title } = TodoSchema.parse(body);
    await createTodo(title);
    revalidatePath(path);
    return null;
  } catch (error: unknown) {
    if (error instanceof ZodError) {
      return { error: error.format() as any };
    }
    throw new Error(String(error));
  }
}

export async function updateTodoAction(
  id: string,
  update: { tilte?: string; completed?: boolean },
  path: string
) {
  await updateTodo(id, update);
  revalidatePath(path);
}

export async function deleteTodoAction({
  id,
  path,
}: {
  id: string;
  path: string;
}) {
  await deleteTodo(id);
  revalidatePath(path);
}
By extracting the database access code into separate functions, you can see how clean and simple the Server Actions have become. One important aspect to note is the inclusion of the revalidatePath function, which we invoke in each Server Action after the corresponding Server Function has executed. This function is essential for invalidating the HTTP cache, especially since these actions will be utilized in Server Components.
You may have noticed the createTodoActionWithValidation function, which includes some validation logic. Don’t worry if it appears unfamiliar at the moment, as I will provide an explanation when we dive into the data validation section of this article.
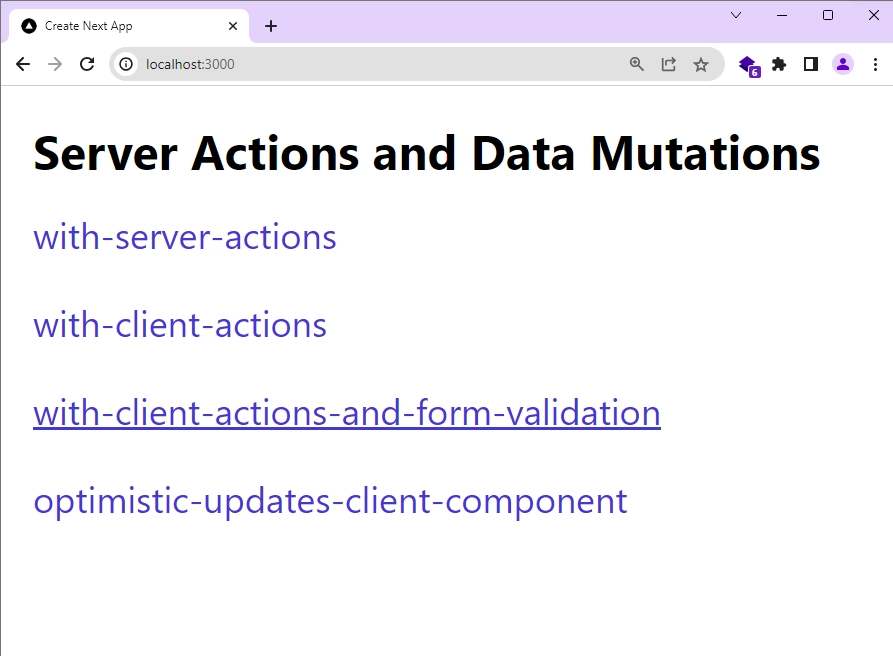
Create Links to the Page Components
To enhance the navigation experience between different implementations of the Server Actions, let’s create links to each of the pages. This will allow us to easily switch between the various implementations.
To add these links, open the src/app/page.tsx file and replace its content with the following code:
src/app/page.tsx
import Link from "next/link";

const Home = async () => {
  return (
    <div className="container mx-auto max-w-lg p-4">
      <h1 className="text-2xl font-bold mb-3">
        Server Actions and Data Mutations
      </h1>
      <div className="flex space-y-4 flex-col text-blue-700 text-lg">
        <Link href="/with-server-actions" className="hover:underline" prefetch>
          with-server-actions
        </Link>
        <Link href="/with-client-actions" className="hover:underline" prefetch>
          with-client-actions
        </Link>
        <Link
          href="/with-client-actions-and-form-validation"
          className="hover:underline"
          prefetch
        >
          with-client-actions-and-form-validation
        </Link>
        <Link
          href="/optimistic-updates-client-component"
          className="hover:underline"
          prefetch
        >
          optimistic-updates-client-component
        </Link>
      </div>
    </div>
  );
};

export default Home;
Once you save the file and navigate to the homepage, you will see a preview that is similar to the screenshot provided below:
Explore Server Actions in a React Server Component
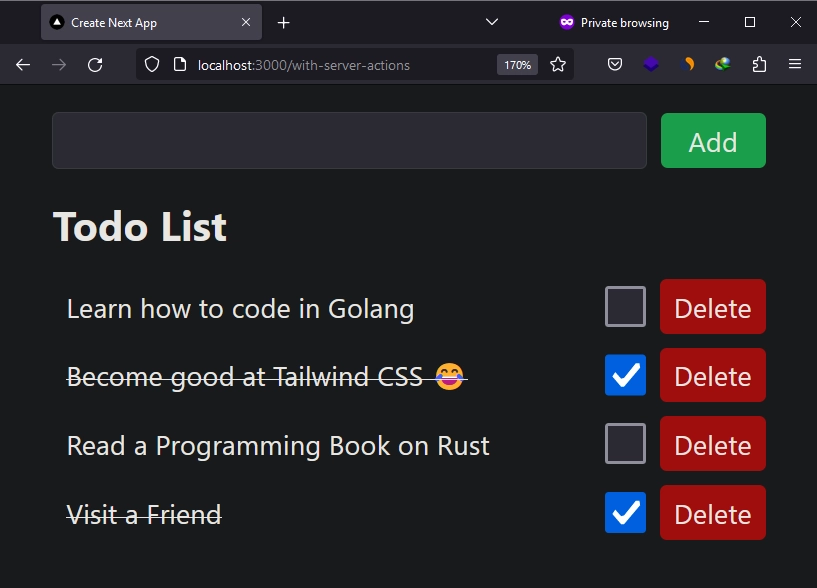
Let’s dive into the implementation of Server Actions within a React Server Component. Our objective is to build a TodoList application that remains functional even when JavaScript is disabled in the browser. This means users will be able to add, edit, and delete todos regardless of their JavaScript settings.
Create the Page File
As usual, let’s begin by creating the page component, which is straightforward and doesn’t require much explanation. To create this page file, navigate to the src/app/ directory and create a new folder called with-server-actions. The name of the folder clearly indicates the purpose of its contents. Inside the with-server-actions folder, create a file named page.tsx and add the following code:
src/app/with-server-actions/page.tsx
import TodoFormServerComponent from "@/components/TodoFormServerComponent";
import TodoItemServerComponent from "@/components/TodoItemServerComponent";
import { getTodos } from "@/lib/todos_db";

const Page = async () => {
  const { todos, results } = await getTodos();

  return (
    <div className="container mx-auto max-w-md p-4">
      <TodoFormServerComponent />
      <h1 className="text-2xl font-bold mb-4">Todo List</h1>
      {results === 0 ? (
        <p className="text-center">No Todos Found</p>
      ) : (
        todos?.map((todo) => (
          <TodoItemServerComponent key={todo.id} todo={todo} />
        ))
      )}
    </div>
  );
};

export default Page;
As you can see, we have invoked the getTodos Server Function from within the page component in order to retrieve the list of todos. This serves as a reminder that Server Functions can only be called within a Server Component or a Server Action.
Please ignore any import warnings that may appear at the moment. We will handle them as we create the required components in the following steps.
Create the Todo Form Component
Let’s proceed with creating the form component that will allow us to add new todos. This form will be implemented as a Server Component, which means we won’t rely on any browser-specific hooks or events. Our goal is to ensure that the form remains functional even if JavaScript is disabled. Follow the steps below to create the form:
- Create a
componentsfolder within thesrcdirectory. - Inside the
componentsfolder, create a new file namedTodoFormServerComponent.tsx. - Copy and paste the code below into the newly created
TodoFormServerComponent.tsxfile.
src/components/TodoFormServerComponent.tsx
import { createTodoAction } from "@/app/_action";

export default function TodoForm() {
  async function action(data: FormData) {
    "use server";

    const title = data.get("title");
    if (!title || typeof title !== "string") {
      return;
    }

    // call server action
    await createTodoAction({ title, path: "/with-server-actions" });
  }

  return (
    <form
      action={action}
      className="flex items-center space-x-2 mb-4"
    >
      <input
        type="text"
        name="title"
        className="border rounded px-2 py-1 flex-1"
      />
      <button className="px-4 py-1 text-white rounded bg-green-500">Add</button>
    </form>
  );
}
In the code snippet above, you’ll notice that we didn’t directly pass the createTodoAction function to the action prop of the form element. This is because we wanted to perform some additional validation checks. Specifically, we checked if the user provided a title before invoking the createTodoAction.
Despite the fact that the file exporting the createTodoAction function already includes the "use server" directive, we still needed to include the "use server" directive in the action function. This is necessary because the component will also run in the browser, and we need to explicitly inform Next.js that the action function should only run on the server. Without this directive, an error would occur.
Create the Todo Item Component
Before we proceed with creating the Todo item, let’s consider the requirements. The Todo item will consist of a title that can be clicked to toggle its completed state, a checkbox that can be clicked to toggle the completed state as well, and a button to delete the Todo item.
While most of the functionality will be handled on the server, we need to address the checkbox behavior. We want to keep track of its checked and unchecked states, which requires us to use the onChange prop. It’s important to note that the change event occurs only in the browser environment. Therefore, we’ll extract the checkbox code into a separate Client Component and import and utilize it within the TodoItem component, which is a Server Component.
This allows us to combine the server-side functionality with the client-side interactivity needed for the checkbox behavior. It’s worth mentioning that the checkbox functionality will not work if JavaScript is disabled in the browser.
To create the CheckBox component, follow these steps:
- Navigate to the
src/components/directory. - Create a new file named
CheckBox.tsx. - Open the newly-created file and paste the code provided below:
src/components/CheckBox.tsx
"use client";

import { updateTodoAction } from "@/app/_action";
import { Todo } from "@prisma/client";
import { useTransition } from "react";

type CheckBoxProps = {
  todo: Todo;
};

export default function CheckBox({ todo }: CheckBoxProps) {
  const [isPending, startTransition] = useTransition();

  return (
    <input
      type="checkbox"
      checked={todo.completed}
      name="completed"
      onChange={() =>
        startTransition(() =>
          updateTodoAction(
            todo.id,
            { completed: !todo.completed },
            "/with-server-actions"
          )
        )
      }
      disabled={isPending}
      className="h-6 w-6 border-gray-300 disabled:bg-gray-300 disabled:border-gray-300 disabled:cursor-not-allowed"
    />
  );
}
In the code snippet above, we utilized the startTransition function, which is provided by the useTransition hook. This allowed us to handle the Server Action invocation when the checkbox state changes. You might be wondering why we opted for this approach instead of directly calling the action within the onChange callback.
The reason behind it is that we wanted to introduce some additional functionality, such as tracking the state of the Server Action and providing visual feedback to the user. By using the startTransition function, we were able to disable the checkbox while the action is being processed.
With that taken care of, you can now proceed to create the TodoItem component. To do so, create a file named TodoItemServerComponent.tsx within the src/components/ directory and include the following code:
src/components/TodoItemServerComponent.tsx
import { deleteTodoAction, updateTodoAction } from "@/app/_action";
import { Todo } from "@prisma/client";
import CheckBox from "./CheckBox";

interface TodoItemProps {
  todo: Todo;
}

const TodoItem: React.FC<TodoItemProps> = ({ todo }) => {
  return (
    <form className="flex items-center space-x-2 mb-2">
      <button
        className={`px-2 py-1 flex-1 text-left ${
          todo.completed ? "line-through" : ""
        }`}
        formAction={async () => {
          "use server";
          await updateTodoAction(
            todo.id,
            { completed: !todo.completed },
            "/with-server-actions"
          );
        }}
      >
        {todo.title}
      </button>
      <div className="flex items-center">
        <CheckBox todo={todo} />
        <button
          className="px-2 py-1 ml-2 text-white rounded bg-red-500 "
          formAction={async () => {
            "use server";
            await deleteTodoAction({
              id: todo.id,
              path: "/with-server-actions",
            });
          }}
        >
          Delete
        </button>
      </div>
    </form>
  );
};

export default TodoItem;
After saving the file, open your browser and navigate to the /with-server-actions path. This will take you to the TodoList application where you can perform various actions such as adding, editing, and deleting todos.
To test the functionality of the TodoList without JavaScript, access your browser’s developer tools and disable JavaScript. Refresh the page and attempt to perform the same operations of creating, editing, and deleting todos. You will observe that these functionalities still work even without JavaScript enabled. However, please note that the checkbox functionality will not work in this case since it relies on JavaScript to function properly.
Clear the Form Fields After the Form Submission
You may have noticed that after submitting the form in the TodoList application, the entered data remains in the input field. Since the TodoForm is a Server Component and doesn’t have access to React hooks for clearing the input field, we need an alternative solution.
To address this, we can add a key prop with a unique value to the <form> element. By doing so, React will automatically clear the input field upon form submission.
Here’s an example of how you can implement this technique:
src/components/TodoFormServerComponent.tsx
export default function TodoForm() {
  async function action(data: FormData) {
    "use server";
    // Perform form submission logic
  }

  return (
    <form
      action={action}
      // Unique key to reset the form
      key={Math.random()}
    >
      {/* Content */}
    </form>
  );
}
Handle the Pending Form Status
Another issue you may have noticed is the lack of visual feedback when submitting the form. Currently, there is no indication that the data is being sent to the server. To address this, we can disable the button while the Server Action is in progress. However, achieving this requires using a hook, which can only be done on the client-side.
To solve this, we’ll extract the button code into a separate component, which will be a client-side component responsible for handling the logic. Then, we can import this button component into the TodoForm component and render it accordingly.
To get started, create a new file named Button.tsx in the src/components/ directory and include the following code:
src/components/Button.tsx
"use client";

import React from "react";
import { experimental_useFormStatus as useFormStatus } from "react-dom";

interface ButtonProps {
  children: React.ReactNode;
}

export default function Button({ children }: ButtonProps) {
  const { pending } = useFormStatus();
  return (
    <button
      className="px-4 py-1 text-white rounded bg-green-500 disabled:bg-gray-400"
      disabled={pending}
    >
      {children}
    </button>
  );
}
In this implementation, we utilize the useFormStatus hook to track the pending status of the form submission and disable the button while the Server Action is running. While there are alternative options like showing a loading spinner, disabling the button is enough for our simple TodoList application.
Now you can import and use the Button component in the TodoForm component.
src/components/TodoFormServerComponent.tsx
import { createTodoAction } from "@/app/_action";
import Button from "./Button";

export default function TodoForm() {
  async function action(data: FormData) {
    "use server";

    const title = data.get("title");
    if (!title || typeof title !== "string") {
      return;
    }

    // call server action
    await createTodoAction({ title, path: "/with-server-actions" });
  }

  return (
    <form
      action={action}
      key={Math.random()}
      className="flex items-center space-x-2 mb-4"
    >
      <input
        type="text"
        name="title"
        className="border rounded px-2 py-1 flex-1"
      />
      {/* <button className="px-4 py-1 text-white rounded bg-green-500">Add</button> */}
      <Button>Add</Button>
    </form>
  );
}
Once you save the file and proceed to add new todos in the TodoList application, you will see that the input field gets cleared after submitting the form. Additionally, the button will be disabled while the Server Action is being executed in the background.
It’s important to note that if you disable JavaScript, the disabled state of the button will not take effect because the useFormStatus hook used in the Button component relies on JavaScript to function properly. However, despite being a client-side component, clicking on the Button will still submit the form even if JavaScript is disabled.
Using Server Actions in a React Client-Side Component
Now, let’s explore how to utilize Server Actions in a Client-Side Component. This approach is suitable when you require additional logic that relies on JavaScript functionality. In the case of our TodoList application, if JavaScript is disabled, certain functionalities such as adding, editing, or deleting todos will not be available.
Create the Page File
To begin, let’s create a page file for the Client-Side Components. Follow these steps:
- Create a folder named
with-client-actionswithin thesrc/app/directory. - Inside the
with-client-actionsfolder, create a file namedpage.tsxand include the following code:
src/app/with-client-actions/page.tsx
import TodoFormClientComponent from "@/components/TodoFormClientComponent";
import TodoItemClientComponent from "@/components/TodoItemClientComponent";
import { getTodos } from "@/lib/todos_db";

const Page = async () => {
  const { todos, results } = await getTodos();

  return (
    <div className="container mx-auto max-w-md p-4">
      <TodoFormClientComponent />
      <h1 className="text-2xl font-bold mb-4">Todo List</h1>
      {results === 0 ? (
        <p className="text-center">No Todos Found</p>
      ) : (
        todos?.map((todo) => (
          <TodoItemClientComponent key={todo.id} todo={todo} />
        ))
      )}
    </div>
  );
};

export default Page;
Create the Todo Form Component
Let’s create the client-side form component that will enable us to add new todos. To do this, follow these steps:
- Create a file named
TodoFormClientComponent.tsxwithin thesrc/components/directory. - Copy and paste the following code into the
TodoFormClientComponent.tsxfile:
src/components/TodoFormClientComponent.tsx
"use client";

import { createTodoAction } from "@/app/_action";
import { useRef, useState, useTransition } from "react";

export default function TodoForm() {
  const formRef = useRef<HTMLFormElement>(null);
  const [isPending, startTransition] = useTransition();
  const [error, setError] = useState<string | null>(null);

  async function action(data: FormData) {
    const title = data.get("title");
    if (!title || typeof title !== "string") {
      setError("Todo title is required");
      return;
    }

    setError(null);

    // reset form
    formRef.current?.reset();

    startTransition(async () => {
      try {
        // call server action
        await createTodoAction({ title, path: "/with-client-actions" });
      } catch (error) {
        setError("Failed to create todo");
      }
    });
  }

  return (
    <>
      <form
        ref={formRef}
        action={action}
        // key={Math.random()}
        className="flex items-center space-x-2 mb-2"
      >
        <input
          type="text"
          name="title"
          className="border rounded px-2 py-1 flex-1"
        />
        <button
          className="px-4 py-1 text-white rounded bg-green-500 disabled:bg-slate-400"
          disabled={isPending}
        >
          Add
        </button>
      </form>
      <p className="text-sm text-red-500  mb-4">{error && error}</p>
    </>
  );
}
You can see that the code above shares similarities with the TodoFormServerComponent.tsx file we used to implement Server Actions in the React Server Component. However, in this case, we are utilizing React hooks because the component will be rendered exclusively in the browser. This allows us to take advantage of browser APIs and React hooks to enhance the functionality of the component even further.
Instead of relying on the key prop on the <form> element to automatically clear the input field upon form submission, we have opted for an alternative approach using the useRef hook. This allows us to manually reset the form by accessing the reset() method through the form reference.
Additionally, we have implemented validation logic on the form data using an if statement before triggering the Server Action. While this approach is effective, it can become cumbersome when dealing with numerous input fields that require validation.
Use React-Hook-Form with Server Actions
Let’s explore an enhanced version of the TodoFormClientComponent.tsx component that uses the React-Hook-Form library along with Zod for input field validation, replacing the need for if statements in the Client Action. This approach is particularly beneficial when dealing with numerous input fields that require validation.
To implement this, replace the contents of TodoFormClientComponent.tsx with the code provided below:
src/components/TodoFormClientComponent.tsx
"use client";

import { createTodoAction } from "@/app/_action";
import { useEffect, useTransition } from "react";
import { useForm, SubmitHandler } from "react-hook-form";
import { zodResolver } from "@hookform/resolvers/zod";
import { TodoSchema, type TodoSchemaType } from "@/lib/schema";

export default function TodoForm() {
  const [isPending, startTransition] = useTransition();

  const {
    register,
    handleSubmit,
    reset,
    formState: { errors, isSubmitSuccessful },
  } = useForm<TodoSchemaType>({
    resolver: zodResolver(TodoSchema),
  });

  const onSubmit: SubmitHandler<TodoSchemaType> = async (data) => {
    startTransition(async () => {
      await createTodoAction({
        title: data.title,
        path: "/with-client-actions",
      });
    });
  };

  useEffect(() => {
    reset();
  }, [isSubmitSuccessful]);

  return (
    <>
      <form
        onSubmit={handleSubmit(onSubmit)}
        className="flex items-center space-x-2 mb-2"
      >
        <input
          type="text"
          className="border rounded px-2 py-1 flex-1"
          {...register("title")}
        />
        <button
          className="px-4 py-1 text-white rounded bg-green-500 disabled:bg-slate-400"
          disabled={isPending}
        >
          Add
        </button>
      </form>
      <p className="text-sm text-red-500  mb-4">
        {errors.title && (errors.title.message as string)}
      </p>
    </>
  );
}
You may have noticed that we have taken a different approach in invoking the Server Action in the TodoForm component. Instead of using the action prop of the <form> element, we utilize the handleSubmit function provided by the useForm hook. This allows us to handle the form submission and trigger the Server Action within the onSubmit function.
By using the startTransition function from the useTransition hook, we ensure that the Server Action is executed smoothly without blocking the rendering of the UI.
Create the Todo Item Component
To complete the implementation of Server Actions in a Client-Side Component, follow these steps:
- Go to the
src/components/directory and create a new file namedTodoItemClientComponent.tsx. - Copy and paste the code below into the
TodoItemClientComponent.tsxfile:
src/components/TodoItemClientComponent.tsx
"use client";

import { deleteTodoAction, updateTodoAction } from "@/app/_action";
import { Todo } from "@prisma/client";
import { useTransition } from "react";

interface TodoItemProps {
  todo: Todo;
}

const TodoItem: React.FC<TodoItemProps> = ({ todo }) => {
  const [isPending, startTransition] = useTransition();

  return (
    <div className="flex items-center space-x-2 mb-2">
      <span
        className={`text-gray-700 flex-1 ${
          todo.completed ? "line-through" : ""
        }`}
        onClick={() =>
          startTransition(() =>
            updateTodoAction(
              todo.id,
              { completed: !todo.completed },
              "/with-client-actions"
            )
          )
        }
      >
        {todo.title}
      </span>
      <div className="flex items-center">
        <input
          type="checkbox"
          checked={todo.completed}
          name="completed"
          onChange={() =>
            startTransition(() =>
              updateTodoAction(
                todo.id,
                { completed: !todo.completed },
                "/with-client-actions"
              )
            )
          }
          disabled={isPending}
          className="h-6 w-6 border-gray-300"
        />
        <button
          disabled={isPending}
          className={`px-2 py-1 ml-2 text-white rounded ${
            isPending ? "bg-gray-400" : "bg-red-500"
          }`}
          onClick={() =>
            startTransition(() =>
              deleteTodoAction({ id: todo.id, path: "/with-client-actions" })
            )
          }
        >
          Delete
        </button>
      </div>
    </div>
  );
};

export default TodoItem;
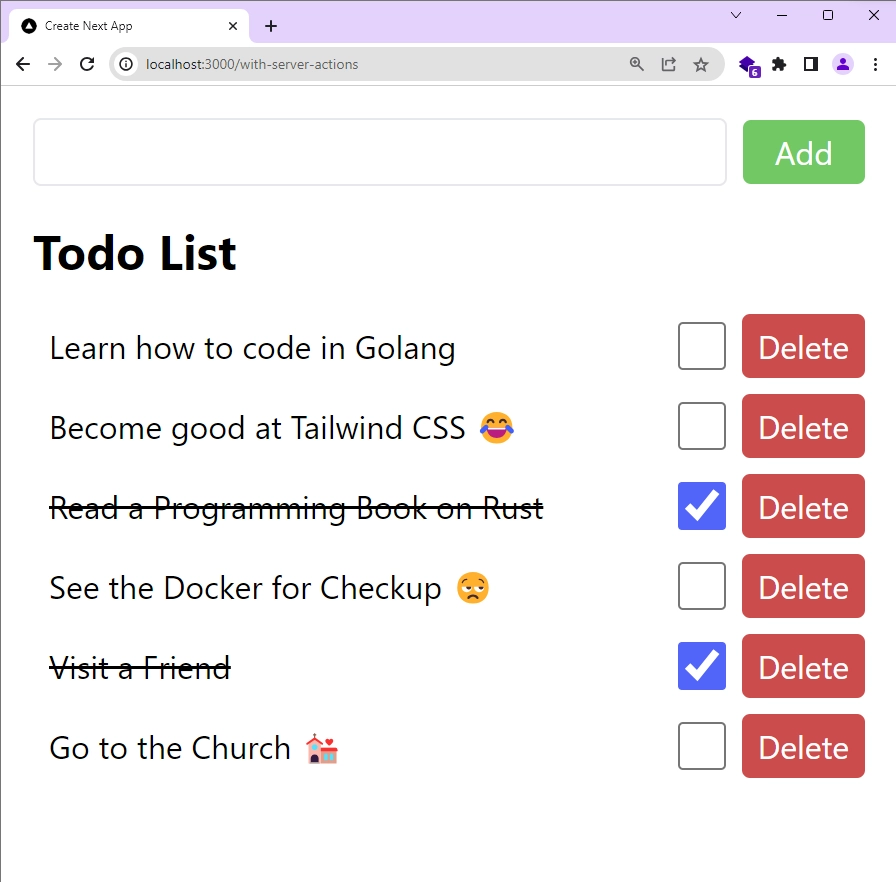
After saving the file, you can access the /with-client-actions path in your browser to view the Client-Side implementation of the TodoList application. Here, you will have the ability to add, edit, and delete todos. However, it’s important to note that these functionalities rely on JavaScript, so if JavaScript is disabled in your browser, these features will not be available.
When you attempt to add a new todo without entering any data in the input field, you should see the validation error.
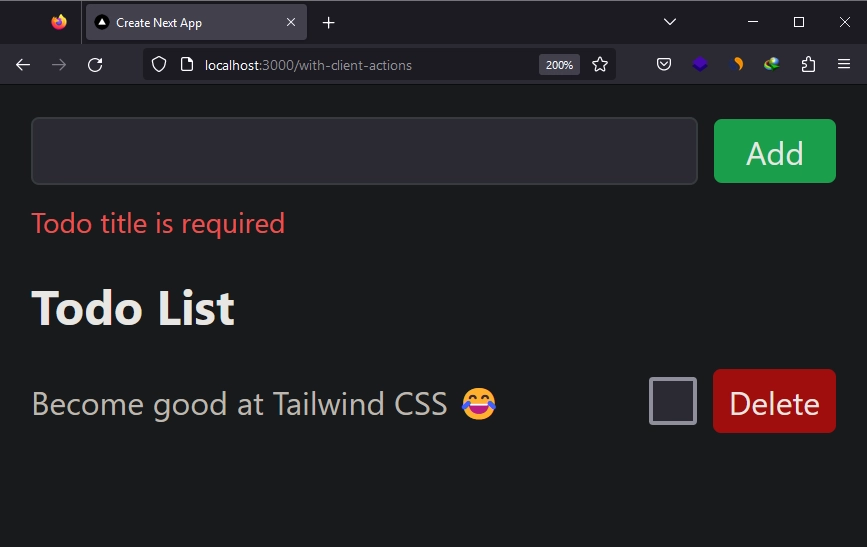
Explore Form Validation with Server Actions
In this section, we will discuss how to handle data validation for Server Actions. There are two primary approaches we can take: the first involves creating a higher-order component that wraps around the Server Action and validates the data before executing it, while the second approach, which we will focus on in this article, entails including the validation logic directly within the Server Action itself.
Create the Page File
Let’s begin by creating a page for this implementation. Follow the steps below:
- Create a
with-client-actions-and-form-validationdirectory within thesrc/app/folder. - Inside the
with-client-actions-and-form-validationdirectory, create apage.tsxfile. - Include the following code in the
page.tsxfile:
src/app/with-client-actions-and-form-validation/page.tsx
import TodoFormClientComponentWithFormValidation from "@/components/TodoFormClientComponentWithValidation";
import TodoItemClientComponent from "@/components/TodoItemClientComponent";
import { getTodos } from "@/lib/todos_db";

const Page = async () => {
  const { todos, results } = await getTodos();

  return (
    <div className="container mx-auto max-w-md p-4">
      <TodoFormClientComponentWithFormValidation />
      <h1 className="text-2xl font-bold mb-4">Todo List</h1>
      {results === 0 ? (
        <p className="text-center">No Todos Found</p>
      ) : (
        todos?.map((todo) => (
          <TodoItemClientComponent key={todo.id} todo={todo} />
        ))
      )}
    </div>
  );
};

export default Page;
Validate Form Data in a Server Action
In order to showcase the validation of data passed to the Server Action, we will focus on the createTodo Server Function, which is responsible for inserting new todos into the database. To implement this, follow the steps below:
- Open the
src/app/_action.tsfile. - Add the following code to the file:
src/app/_action.ts
"use server";

import { TodoSchema } from "@/lib/schema";
import { createTodo } from "@/lib/todos_db";
import { revalidatePath } from "next/cache";
import { ZodError } from "zod";

interface ZodFormatValidationError {
  error: Record<string, { _errors: string[] }>;
}

export async function createTodoActionWithValidation({
  data,
  path,
}: {
  data: FormData;
  path: string;
}): Promise<ZodFormatValidationError | null> {
  try {
    const body = Object.fromEntries(data);
    const { title } = TodoSchema.parse(body);
    await createTodo(title);
    revalidatePath(path);
    return null;
  } catch (error: unknown) {
    if (error instanceof ZodError) {
      return { error: error.format() as any };
    }
    throw new Error(String(error));
  }
}
In the code snippet above, we have defined the ZodFormatValidationError interface, which represents the structure of the error that will be returned to the client in case of a validation failure.
The createTodoActionWithValidation function is responsible for validating the form data passed to the Server Action. It checks if the data adheres to the validation rules defined in the Zod schema. If any of the validation rules are violated, the function returns the appropriate validation errors to the client.
Create the Todo Form Component
Now that we have defined the Server Action with the validation logic, we can incorporate it into our TodoForm component. It’s important to note that we need to use the "use client" directive at the top of the file containing the TodoForm component. This directive ensures that the component is only rendered in the browser since we’ll be utilizing the useState hook to manage the validation errors returned by the Server Action. By using this hook, the form component can dynamically render and display the validation error.
To implement this, create a TodoFormClientComponentWithValidation.tsx file within the src/components/ directory and include the following code:
src/components/TodoFormClientComponentWithValidation.tsx
"use client";

import { createTodoActionWithValidation } from "@/app/_action";
import { useRef, useState } from "react";

type ValidationError = Record<string, { _errors: string[] }>;

export default function TodoForm() {
  const [validationError, setValidationError] =
    useState<ValidationError | null>(null);
  const formRef = useRef<HTMLFormElement>(null);

  async function action(data: FormData) {
    setValidationError(null);
    const results = await createTodoActionWithValidation({
      data,
      path: "/with-client-actions-and-form-validation",
    });
    if (results?.error) {
      setValidationError(results.error);
    }
    formRef?.current?.reset();
  }

  return (
    <>
      <form
        action={action}
        ref={formRef}
        className="flex items-center space-x-2 mb-2"
      >
        <input
          type="text"
          name="title"
          className="border rounded px-2 py-1 flex-1"
        />
        <button className="px-4 py-1 text-white rounded bg-green-500">
          Add
        </button>
      </form>
      <p className="text-sm text-red-500  mb-4">
        {validationError?.title && validationError.title._errors.join(", ")}
      </p>
    </>
  );
}
Explore Optimistic Updates with Server Actions
In this section, we will explore the usage of the useOptimistic hook provided by React to implement optimistic updates. By utilizing this hook, we can update the user interface immediately to reflect the expected outcome of the Server Action, rather than waiting for the response from the Server Action.
Create the Page File
To get started, create a optimistic-updates-client-component folder within the src/app/ directory. Inside the optimistic-updates-client-component folder, create a page.tsx file and add the following code to it:
src/app/optimistic-updates-client-component/page.tsx
import TodoFormClientComponent from "@/components/TodoFormClientComponent";
import OptimisticTodoItemClientComponent from "@/components/OptimisticTodoItemClientComponent";
import { getTodos } from "@/lib/todos_db";

const Page = async () => {
  const { todos, results } = await getTodos();

  return (
    <div className="container mx-auto max-w-md p-4">
      <TodoFormClientComponent />
      <h1 className="text-2xl font-bold mb-4">Todo List</h1>
      {results === 0 ? (
        <p className="text-center">No Todos Found</p>
      ) : (
        todos?.map((todo) => (
          <OptimisticTodoItemClientComponent key={todo.id} todo={todo} />
        ))
      )}
    </div>
  );
};

export default Page;
Create the Todo Item Component
For our simple TodoList application, we will implement optimistic updates to toggle the completed state of a todo item. Although there are other scenarios where optimistic updates can be useful, we will focus on the toggling of the completed state for simplicity.
To see this feature in action, create a file named OptimisticTodoItemClientComponent.tsx within the src/components/ directory and include the provided code.
src/components/OptimisticTodoItemClientComponent.tsx
"use client";

import { deleteTodoAction, updateTodoAction } from "@/app/_action";
import { Todo } from "@prisma/client";
import { experimental_useFormStatus as useFormStatus } from "react-dom";
import {
  experimental_useOptimistic as useOptimistic,
  useTransition,
} from "react";

interface TodoItemProps {
  todo: Todo;
}

const TodoItem: React.FC<TodoItemProps> = ({ todo }) => {
  // For the Update Operation
  const { pending } = useFormStatus();
  const [optimisticTodo, addOptimisticTodo] = useOptimistic(
    todo,
    (state: Todo, completed: boolean) => ({ ...state, completed })
  );

  // For the Delete Operation
  const [isPending, startTransition] = useTransition();

  async function handleOnChangeOrOnClick() {
    addOptimisticTodo(!todo.completed);
    await updateTodoAction(
      todo.id,
      { completed: !todo.completed },
      "/optimistic-updates-client-component"
    );
  }

  return (
    <div className="flex items-center space-x-2 mb-2">
      <span
        className={`text-gray-700 flex-1 ${
          optimisticTodo.completed ? "line-through" : ""
        }`}
        onClick={handleOnChangeOrOnClick}
      >
        {todo.title}
      </span>
      <div className="flex items-center">
        <input
          type="checkbox"
          checked={optimisticTodo.completed}
          name="completed"
          onChange={handleOnChangeOrOnClick}
          disabled={pending}
          className="h-6 w-6 border-gray-300 disabled:bg-gray-300 disabled:border-gray-300 disabled:cursor-not-allowed"
        />
        <button
          disabled={isPending}
          className="px-2 py-1 ml-2 text-white rounded bg-red-500 disabled:bg-gray-400"
          onClick={() =>
            startTransition(() =>
              deleteTodoAction({
                id: todo.id,
                path: "/optimistic-updates-client-component",
              })
            )
          }
        >
          Delete
        </button>
      </div>
    </div>
  );
};

export default TodoItem;
After saving the file, navigate to the /optimistic-updates-client-component path to see the optimistic update feature in action. When you interact with a todo item by clicking on its title or checkbox, you will notice an immediate visual change indicating the completion status. This means that the todo item is visually updated as completed without waiting for a response from the Server Actions.
To better observe this behavior, keep an eye on the terminal where the Next.js server is running. Then, in the UI, mark a todo item as completed by checking its checkbox. You will see that the item is visually marked as completed in the UI even before the request is sent to the server.
How to Reverse the Optimistic Updates on Error
Assuming an error occurs on the server or the Server Action returns an error, you may wonder how to reverse the optimistic update. The good news is that you don’t need to take any manual steps. React will automatically handle the process of undoing the changes for you.
To test this behavior, you can open the src/lib/todos_db.ts file and replace the updateTodo function with the code snippet below:
src/lib/todos_db.ts
export async function updateTodo(
  id: string,
  { title, completed }: { title?: string; completed?: boolean }
) {
  try {
    throw new Error("Hey just testing");
    const todo = await prisma.todo.update({
      where: { id },
      data: {
        title,
        completed,
      },
    });
    return { todo };
  } catch (error) {
    return { error };
  }
}
In the above function, we simply threw an error to see how React handles the reversal of the optimistic update. After saving the file, return to the TodoList application. Try marking a todo item as completed by clicking on its title or checking the checkbox. You will notice that the todo item is immediately visually marked as completed. However, once React recognizes that the Server Action has returned an error, it will automatically undo the change, resulting in the todo item reverting to its original state of being incomplete.
Conclusion
And that concludes our article. Throughout this guide, you have learned how to effectively use Server Actions in both server and client components. We even went the extra mile by implementing optimistic updates to enhance the user experience.
I hope you found this guide informative and engaging. If you have any questions or feedback, please don’t hesitate to share them in the comment section below. Thank you for taking the time to read this article.
Hi! just found your blog… you have great content here and very well explained! Thanks for your contribution!
I’m glad you found the content valuable.
this was helpful thank you
Thank you for doing such a clear job of breaking down server actions and how they relate to both server and client components. I’m still a little confused on how react-hook-form fit in, both of which I’ve not used. I did do a little side reading while I was going through your post and I can see the value. I also notice that for your file structure, you seem to just put server components in your /app folder and client components in /components. Is that by plan? I’m still a little confused on where the actions go.
There is no specific reason for the folder structure. If you need a recommended way to structure your files and folders, you can refer to the AI Chat Bot project created by the Vercel team at https://github.com/vercel-labs/ai-chatbot.
Thanks. Do you know what of all this is part of React and what is part of the actual React code? LeeRob mentioned react-hook-form is part of future react. I could not find it in the latest React Repo on daily checkins.
I believe it might be included in a future React release, possibly in a candidate or beta version.