

In this article, we will delve into the implementation of JWT authentication in the new Next.js 13 API route handlers. We will cover various aspects, including generating and verifying JWTs, setting up a Prisma-supported database, handling authentication errors, and protecting sensitive API endpoints.
While there are multiple approaches to securing API endpoints, our focus will be solely on utilizing the Next.js middleware. This middleware offers the advantage of protecting both API routes and pages from a single file. However, we will encounter a challenge due to the middleware operating in an Edge runtime environment where certain Node.js APIs are unavailable.
Consequently, we won’t be able to use the jsonwebtoken package in the middleware file to verify JWTs, as it relies on the crypto module, which is inaccessible. Instead, we will install an alternative package that enables JWT verification within the middleware without encountering any errors.
It’s important to note that this tutorial will primarily focus on the API implementation of JWT authentication. In an upcoming tutorial, we will build the frontend application that will utilize the API we create. This frontend application will leverage exciting features introduced in Next.js 13, such as React Server Components (RSC) model, UI loading, and more.
For those who are familiar with Next.js 12 and below, you’ll be interested to know that Next.js 13 now allows us to create request handlers using the Web Request and Response APIs in the app directory. By the end of this article, you’ll have a comprehensive understanding of how to create API handlers, work with cookies, and return JSON responses using the new Web Request and Response APIs.
More practice:
- Build a Simple API in Next.js 13 App Directory
- Build a Simple Frontend App in Next.js 13 App Directory
- Next.js – Add Google and GitHub OAuth2 using NextAuth.js
- Next.js – Use Custom Login and SignUp Pages for NextAuth.js
- How to Setup Prisma ORM in Next.js 13 App Directory
- How to Setup and Use Apollo Client in Next.js 13 App Directory
- How to Setup React Context API in Next.js 13 App Directory
- How to Setup React Query in Next.js 13 App Directory
- How to Setup Redux Toolkit in Next.js 13 App Directory
- Setup tRPC Server and Client in Next.js 13 App Directory
- Setup and Use NextAuth.js in Next.js 13 App Directory

Running the Next.js 13 JWT API Project Locally
To run the Next.js 13 JWT API project on your computer, follow the steps below:
- Ensure you have PNPM installed. If not, follow the installation guide at https://pnpm.io/installation.
- Download or clone the Next.js project from its GitHub repository at https://github.com/wpcodevo/nextjs13-user-signin-signup and open the source code in your preferred IDE or text editor.
- Switch to the Git branch
nextjs13-jwt-authentication, which contains the source code for the implementation of JWT authentication in the Next.js 13 App Router. - Install all required dependencies by running
pnpm install. - Once the package installation is complete, synchronize the database with the Prisma schema and generate the Prisma Client in the node modules folder by running the command
pnpm prisma migrate dev. - Build and serve the application by starting the Next.js development server with the command
pnpm dev. - Import the
Next.js HS256 JWT.postman_collection.jsonfile included in the source code into either Postman or the Thunder Client VS Code extension. This will provide access to an API collection that contains pre-defined requests. Make API requests to the Next.js API to test the JWT authentication flow with the collection at hand.
Setup the Next.js Project
Let’s kick off by generating a fresh Next.js 13 project. Navigate to the desired location where you’d like to store the source code and open a terminal there. Next, execute one of the commands below based on your preferred package manager:
pnpm create next-app nextjs13-user-signin-signup
# or
yarn create next-app nextjs13-user-signin-signup
# or
npx create-next-app@latest nextjs13-user-signin-signup
During the setup, you will be presented with several prompts. It is recommended to select “Yes” for all the options and choose the first option for the import alias. Once the setup is complete, you’ll find the newly generated Next.js project in the nextjs13-user-signin-signup folder, and all the necessary dependencies will be installed automatically.
After the project dependencies have been successfully installed, you can proceed to open the project in your preferred IDE or text editor. Next, access the integrated terminal within your IDE and execute the following commands to install the necessary dependencies for the project:
pnpm add @prisma/client zod bcryptjs jose
pnpm add -D prisma @types/bcryptjs
# or
yarn add @prisma/client zod bcryptjs jose
yarn add -D prisma @types/bcryptjs
# or
npm i @prisma/client zod bcryptjs jose
npm i -D prisma @types/bcryptjs
@prisma/client– A library that connects to the Prisma server and allows for reading, writing, and streaming data in the database.prisma– A command-line interface for interacting with a Prisma project.zod– A TypeScript-first schema validation library.bcryptjs– A library for hashing and comparing passwords.@types/bcryptjs– A library that provides type definitions for thebcryptjspackage.jose– A library for generating and verifying JSON Web Tokens (JWTs) and encrypting and decrypting data using JSON Web Encryption (JWE).
Setup Prisma in the Next.js Project
Now, let’s proceed with setting up Prisma in your project. To simplify the setup process, we will be utilizing a SQLite database with Prisma, which eliminates the need for any additional configuration. Prisma will automatically generate the SQLite database for us. However, if you prefer to use a different Prisma-supported database, you’re welcome to do so.
To initialize Prisma in your project, execute the following command:
pnpm prisma init --datasource-provider sqlite
# or
yarn prisma init --datasource-provider sqlite
# or
npx prisma init --datasource-provider sqlite
By running this command, Prisma will be initialized in your project, and it will create the necessary files and folders to interact with the database.
Define the Database Model and Run Migrations
After generating the Prisma schema, we can now define the structure of the user record by utilizing the Prisma model. To get started, open the prisma/schema.prisma file in your project and replace its content with the following code:
prisma/schema.prisma
generator client {
  provider = "prisma-client-js"
}

datasource db {
  provider = "sqlite"
  url      = env("DATABASE_URL")
}

model User {
  id        String    @id @unique @default(uuid())
  name      String
  email     String    @unique
  password  String
  role      String?   @default("user")
  photo     String?   @default("default.png")
  verified  Boolean?  @default(false)
  createdAt DateTime? @default(now())
  updatedAt DateTime? @updatedAt
}
To ensure that the changes made in the Prisma schema file are reflected in the database, we need to generate and apply migrations. This can be achieved by running the following command, which also generates the Prisma client:
pnpm prisma migrate dev --name init
# or
yarn prisma migrate dev --name init
# or
npx prisma migrate dev --name init
Instantiate the Prisma Client
Now, let’s establish a connection to the database by creating a singleton instance of the Prisma Client. This instance will serve as our gateway for querying and manipulating data. To set it up, create a new directory named ‘lib‘ inside the src folder. Within the src/lib/ directory, create a file called prisma.ts and add the code below to it.
src/lib/prisma.ts
import { PrismaClient } from "@prisma/client";

const globalForPrisma = global as unknown as { prisma: PrismaClient };

export const prisma =
  globalForPrisma.prisma ||
  new PrismaClient({
    log: ["query"],
  });

if (process.env.NODE_ENV !== "production") globalForPrisma.prisma = prisma;
You might be wondering why we don’t simply create an instance of the Prisma Client whenever we need it. Well, while that approach works, it leads to creating a new database connection for every interaction.
This can be inefficient and resource-intensive. In contrast, by creating a singleton instance of the Prisma Client, we establish a single connection that is reused throughout the application. This optimizes performance, minimizes overhead, and ensures consistent and efficient database operations.
Create the Request Validation Schemas
In my previous tutorials, I received valuable feedback regarding the usage of separate Zod schemas for frontend and backend validation, especially when using Next.js. Taking this feedback into consideration, we will adopt a new approach by creating the validation schemas in a library directory and sharing them between the frontend and backend.
To begin, navigate to the src/lib/ directory and create a new folder called ‘validations‘. This folder will serve as a container for all our validation schemas. Within the ‘validations‘ directory, create a file named user.schema.ts and simply copy the provided code into it.
src/lib/validations/user.schema.ts
import { z } from "zod";

export const RegisterUserSchema = z
  .object({
    name: z
      .string({
        required_error: "Name is required",
      })
      .min(1, "Full name is required"),
    email: z
      .string({
        required_error: "Email is required",
      })
      .min(1, "Email is required")
      .email("Email is invalid"),
    photo: z.string().optional(),
    password: z
      .string({
        required_error: "Password is required",
      })
      .min(1, "Password is required")
      .min(8, "Password must be more than 8 characters")
      .max(32, "Password must be less than 32 characters"),
    passwordConfirm: z
      .string({
        required_error: "Confirm your password",
      })
      .min(1, "Confirm your password"),
  })
  .refine((data) => data.password === data.passwordConfirm, {
    path: ["passwordConfirm"],
    message: "Passwords do not match",
  });

export const LoginUserSchema = z.object({
  email: z
    .string({
      required_error: "Email is required",
    })
    .min(1, "Email is required")
    .email("Email is invalid"),
  password: z
    .string({
      required_error: "Password is required",
    })
    .min(1, "Password is required")
    .min(8, "Password must be at least 8 characters"),
});

export type LoginUserInput = z.infer<typeof LoginUserSchema>;
export type RegisterUserInput = z.infer<typeof RegisterUserSchema>;
By following these steps, we’ll establish a unified validation schema, promoting consistency and reducing code duplication between the frontend and backend components.
Create Some Utility Functions
In this section, we will create two utility functions: getEnvVariable and getErrorResponse. The getEnvVariable function retrieves an environment variable from the .env file, while the getErrorResponse function constructs a JSON response and returns it.
To get started, create a file named helpers.ts inside the src/lib/ folder and include the following import statements:
src/lib/helpers.ts
import { NextResponse } from "next/server";
import { ZodError } from "zod";
Function to Get an Environment Variable
This function serves the purpose of retrieving the value of an environment variable from the process.env object. It takes a key parameter representing the specific variable to retrieve. If the value is not found or empty, it will log an error message and throw an error to indicate that the environment variable is not set. Otherwise, it will return the retrieved value.
To use this function in your project, simply add the following code to the src/lib/helpers.ts file:
src/lib/helpers.ts
type EnvVariableKey = "JWT_SECRET_KEY" | "JWT_EXPIRES_IN";

export function getEnvVariable(key: EnvVariableKey): string {
  const value = process.env[key];

  if (!value || value.length === 0) {
    console.error(`The environment variable ${key} is not set.`);
    throw new Error(`The environment variable ${key} is not set.`);
  }

  return value;
}
It is recommended to update the EnvVariableKey type whenever you add new environment variables to your .env file. By adding the corresponding keys to the EnvVariableKey type, you can benefit from IntelliSense, which provides auto-completion and type-checking when passing a key to the getEnvVariable function.
Function to Return a Next.js API Response
While working on the project, I noticed that handling error responses within the API route handlers was becoming cumbersome due to their repetition across multiple locations. This redundancy led me to contemplate an alternative approach. I thought, why not create a function that can generate error responses dynamically based on the provided arguments?
Although you have the flexibility to include the JSON response for errors directly in your API route handlers, I strongly believe that encapsulating this functionality within a dedicated function would greatly improve manageability and adhere to the DRY (Don’t Repeat Yourself) principle.
To proceed, simply add the following code snippet to the src/lib/helpers.ts file:
src/lib/helpers.ts
export function getErrorResponse(
  status: number = 500,
  message: string,
  errors: ZodError | null = null
) {
  return new NextResponse(
    JSON.stringify({
      status: status < 500 ? "fail" : "error",
      message,
      errors: errors ? errors.flatten() : null,
    }),
    {
      status,
      headers: { "Content-Type": "application/json" },
    }
  );
}
Create Functions to Sign and Verify the JWTs
Now, it’s time to dive into an important phase of our project. We’re going to create some handy helper functions that will play a crucial role in generating and verifying JSON Web Tokens (JWTs). Specifically, we’ll be creating two functions: signJWT responsible for signing the JWT, and verifyJWT dedicated to verifying the JWT’s authenticity.
To proceed, navigate to the src/lib/ directory and create a new file named token.ts. Don’t forget to include the following import statements in the file before moving forward.
src/lib/token.ts
import { getEnvVariable } from "./helpers";
import { SignJWT, jwtVerify } from "jose";
Next, we’ll add the necessary JWT secret and expiration time variables into our environment variables file. These variables are needed for signing and verifying the JWTs. To do this, open the .env file and include the following environment variables within it.
.env
JWT_SECRET_KEY=my_ultra_secure_jwt_secret_key
JWT_EXPIRES_IN=60
Typically, when working with JWTs in JavaScript projects, we often rely on the widely used jsonwebtoken package. However, while testing the application, I encountered an issue related to the crypto module not being found. This problem arose because I was utilizing the jsonwebtoken package for JWT verification within the Next.js middleware.
It is worth noting that the middleware operates in an Edge runtime environment where several Node.js APIs are unavailable. To address this challenge, I discovered a package called jose, which offers similar functionalities as jsonwebtoken but operates without relying on the crypto module under the hood.
Sign the JWT using HS256 Algorithm
Let’s begin with the signJWT function, which is responsible for generating a JWT based on the provided arguments and returning the token. Here’s how the function works:
When the ‘signJWT‘ function is called, it first retrieves the JWT secret key by using the getEnvVariable function. The key is then encoded using the TextEncoder for compatibility.
Next, the function signs the JWT with the provided options using the HS256 algorithm and returns the generated token. To implement this function, add the following code to the src/lib/token.ts file:
src/lib/token.ts
export const signJWT = async (
  payload: { sub: string },
  options: { exp: string }
) => {
  try {
    const secret = new TextEncoder().encode(getEnvVariable("JWT_SECRET_KEY"));
    const alg = "HS256";
    return new SignJWT(payload)
      .setProtectedHeader({ alg })
      .setExpirationTime(options.exp)
      .setIssuedAt()
      .setSubject(payload.sub)
      .sign(secret);
  } catch (error) {
    throw error;
  }
};
Create a Function to Verify the JWT
Let’s move on to the verifyJWT function, which serves the purpose of validating and decoding a JWT token. Here’s an overview of how this function operates:
When the verifyJWT function is called, it first retrieves the JWT_SECRET_KEY stored in the environment variables. The key is then encoded using the TextEncoder to ensure compatibility. The function proceeds to verify the provided token using the jose.jwtVerify() function.
If the token verification is successful, the payload of the decoded token is returned with a type of T. However, if an error occurs during the verification process, it is caught in the catch block. The error is logged to the console for debugging purposes, and a new Error instance is thrown with the message “Your token has expired”.
To utilize the verifyJWT function in your project, you can add the following code snippet:
src/lib/token.ts
export const verifyJWT = async <T>(token: string): Promise<T> => {
  try {
    return (
      await jwtVerify(
        token,
        new TextEncoder().encode(process.env.JWT_SECRET_KEY)
      )
    ).payload as T;
  } catch (error) {
    console.log(error);
    throw new Error("Your token has expired.");
  }
};
You might be curious as to why we didn’t utilize the getEnvVariable function to fetch the JWT secret key. The reason is that we’ll be using this function within the Next.js middleware, where environment variables can only be accessed using the dot notation rather than the square bracket notation. If you attempt to retrieve the environment variable using square brackets within the middleware, you’ll encounter an error specifically indicating that the JWT_SECRET_KEY is unavailable.
Create a Next.js Middleware to Protect Routes
Let’s create a Next.js middleware to safeguard the private routes in our API. Initially, the intention was to protect only the API routes, but I have expanded the functionality to include certain private page components as well. This means that accessing these routes or components will require a valid JWT.
When the middleware is invoked, it first tries to retrieve the token from the Cookies object. If it is not found there, it checks the Authorization header. If the token is not present in either location and the request is made to an API route, an Error response is returned to indicate that the token was not provided.
However, if the request is to access a protected page, the user will be redirected to the login page. Additionally, if the user already has a valid JWT and is attempting to access the login page, they will be redirected to a protected page, which in this case is the profile page.
To implement the middleware, create a file named middleware.ts within the ‘src’ directory and include the following code snippet.
src/middleware.ts
import { NextRequest, NextResponse } from "next/server";
import { verifyJWT } from "./lib/token";
import { getErrorResponse } from "./lib/helpers";

interface AuthenticatedRequest extends NextRequest {
  user: {
    id: string;
  };
}

let redirectToLogin = false;
export async function middleware(req: NextRequest) {
  let token: string | undefined;

  if (req.cookies.has("token")) {
    token = req.cookies.get("token")?.value;
  } else if (req.headers.get("Authorization")?.startsWith("Bearer ")) {
    token = req.headers.get("Authorization")?.substring(7);
  }

  if (req.nextUrl.pathname.startsWith("/login") && (!token || redirectToLogin))
    return;

  if (
    !token &&
    (req.nextUrl.pathname.startsWith("/api/users") ||
      req.nextUrl.pathname.startsWith("/api/auth/logout"))
  ) {
    return getErrorResponse(
      401,
      "You are not logged in. Please provide a token to gain access."
    );
  }

  const response = NextResponse.next();

  try {
    if (token) {
      const { sub } = await verifyJWT<{ sub: string }>(token);
      response.headers.set("X-USER-ID", sub);
      (req as AuthenticatedRequest).user = { id: sub };
    }
  } catch (error) {
    redirectToLogin = true;
    if (req.nextUrl.pathname.startsWith("/api")) {
      return getErrorResponse(401, "Token is invalid or user doesn't exists");
    }

    return NextResponse.redirect(
      new URL(`/login?${new URLSearchParams({ error: "badauth" })}`, req.url)
    );
  }

  const authUser = (req as AuthenticatedRequest).user;

  if (!authUser) {
    return NextResponse.redirect(
      new URL(
        `/login?${new URLSearchParams({
          error: "badauth",
          forceLogin: "true",
        })}`,
        req.url
      )
    );
  }

  if (req.url.includes("/login") && authUser) {
    return NextResponse.redirect(new URL("/profile", req.url));
  }

  return response;
}

export const config = {
  matcher: ["/profile", "/login", "/api/users/:path*", "/api/auth/logout"],
};
Create API Route Handlers to Handle the JWT Authentication
Oops, it seems like we’ve covered quite a bit of code. Now, let’s dive into the API route handlers responsible for handling authentication requests. We’ll create separate handlers for user registration, user login, user logout, and retrieving user credentials. It’s important to note that the last route will be protected by the Next.js middleware, ensuring that only users with valid JWTs can access it.
To give you a clear picture, here’s a tree structure illustrating the API routes we’ll be working with:
📦api
 ┣ 📂auth
 ┃ ┣ 📂login
 ┃ ┃ ┗ 📜route.ts
 ┃ ┣ 📂logout
 ┃ ┃ ┗ 📜route.ts
 ┃ ┗ 📂register
 ┃ ┃ ┗ 📜route.ts
 ┗ 📂users
 ┃ ┗ 📂me
 ┃ ┃ ┗ 📜route.ts
Account Registration API Route Handler
This route handler is responsible for handling POST requests for user registration. Here’s how it works:
When this handler is called, it extracts the JSON payload from the request and validates it against the predefined Zod schema. This ensures that the user’s data meets the specified validation rules.
After validation, the plain-text password included in the request body is securely hashed. This step helps protect the user’s password by transforming it into an irreversible hashed form.
Next, the prisma.user.create() function is invoked to add the new user to the database. If a user with the provided email address already exists, a 409 Conflict error is returned to the client, indicating that a user with the same email already exists.
To implement this route handler in your project, follow these steps:
- Create an
apidirectory within thesrc/app/directory if it doesn’t already exist. - Within the
src/app/api/folder, create another folder namedauth. - Inside the
src/app/api/auth/folder, create a new folder namedregister. This folder represents the endpoint where the user will send the registration request. - Finally, create a
route.tsfile within theregisterfolder and add the code below to it.
src/app/api/auth/register/route.ts
import { getErrorResponse } from "@/lib/helpers";
import { prisma } from "@/lib/prisma";
import {
  RegisterUserInput,
  RegisterUserSchema,
} from "@/lib/validations/user.schema";
import { hash } from "bcryptjs";
import { NextRequest, NextResponse } from "next/server";
import { ZodError } from "zod";

export async function POST(req: NextRequest) {
  try {
    const body = (await req.json()) as RegisterUserInput;
    const data = RegisterUserSchema.parse(body);

    const hashedPassword = await hash(data.password, 12);

    const user = await prisma.user.create({
      data: {
        name: data.name,
        email: data.email,
        password: hashedPassword,
        photo: data.photo,
      },
    });

    return new NextResponse(
      JSON.stringify({
        status: "success",
        data: { user: { ...user, password: undefined } },
      }),
      {
        status: 201,
        headers: { "Content-Type": "application/json" },
      }
    );
  } catch (error: any) {
    if (error instanceof ZodError) {
      return getErrorResponse(400, "failed validations", error);
    }

    if (error.code === "P2002") {
      return getErrorResponse(409, "user with that email already exists");
    }

    return getErrorResponse(500, error.message);
  }
}
Account Login API Route Handler
Now let’s proceed to the next route handler. This handler is responsible for handling POST requests made to the /api/auth/login endpoint.
When this handler is triggered, it first extracts the login credentials from the request and validates them against the predefined rules specified in the LoginUserSchema using Zod.
Subsequently, the handler queries the database to verify if a user with the provided email address exists. If no matching user is found or if the provided password doesn’t match the hashed password stored in the database, a 401 Unauthorized error response is returned to the client, indicating that either the email or password is invalid.
However, if the authentication process is successful, a new JSON Web Token (JWT) is generated. This token is included in the response as a JSON object, and a copy of the token is also stored in a cookie.
To create this route handler in your project, navigate to the src/app/api/auth/ directory and create a new folder named ‘login‘. Inside this folder, create a route.ts file and insert the following code snippet into it.
src/app/api/auth/login/route.ts
import { getEnvVariable, getErrorResponse } from "@/lib/helpers";
import { prisma } from "@/lib/prisma";
import { signJWT } from "@/lib/token";
import { LoginUserInput, LoginUserSchema } from "@/lib/validations/user.schema";
import { compare } from "bcryptjs";
import { NextRequest, NextResponse } from "next/server";
import { ZodError } from "zod";

export async function POST(req: NextRequest) {
  try {
    const body = (await req.json()) as LoginUserInput;
    const data = LoginUserSchema.parse(body);

    const user = await prisma.user.findUnique({
      where: { email: data.email },
    });

    if (!user || !(await compare(data.password, user.password))) {
      return getErrorResponse(401, "Invalid email or password");
    }

    const JWT_EXPIRES_IN = getEnvVariable("JWT_EXPIRES_IN");

    const token = await signJWT(
      { sub: user.id },
      { exp: `${JWT_EXPIRES_IN}m` }
    );

    const tokenMaxAge = parseInt(JWT_EXPIRES_IN) * 60;
    const cookieOptions = {
      name: "token",
      value: token,
      httpOnly: true,
      path: "/",
      secure: process.env.NODE_ENV !== "development",
      maxAge: tokenMaxAge,
    };

    const response = new NextResponse(
      JSON.stringify({
        status: "success",
        token,
      }),
      {
        status: 200,
        headers: { "Content-Type": "application/json" },
      }
    );

    await Promise.all([
      response.cookies.set(cookieOptions),
      response.cookies.set({
        name: "logged-in",
        value: "true",
        maxAge: tokenMaxAge,
      }),
    ]);

    return response;
  } catch (error: any) {
    if (error instanceof ZodError) {
      return getErrorResponse(400, "failed validations", error);
    }

    return getErrorResponse(500, error.message);
  }
}
In the code snippets above, you might have noticed that we include two cookies: logged-in and token. While both cookies have the same expiration time, there is a difference in their properties. The logged-in cookie is intentionally set as non-HTTPOnly, allowing us to access it from the React component.
Upon closer examination, I discovered that the Next.js middleware only runs when the server is rendering the page, not when the user is navigating between pages on the client side.
To work around this limitation, I came up with an idea. I added a non-HTTPOnly logged-in cookie that we can access from the application itself. This cookie helps us check if the user has a valid token while moving between pages. If the token cookie is missing, it means the logged-in cookie is also missing. In such cases, we immediately redirect the user to the login page.
I want to clarify that the detailed implementation of this feature will be covered in the next article, where we’ll focus on building the frontend for the API. I wanted to explain this to ensure a clear understanding of the process.
Account Logout API Route Handler
Let’s move on to the next route handler, responsible for handling user logout functionality. This handler is triggered when a GET request is made to the /api/auth/logout endpoint.
The purpose of this handler is to invalidate the user’s authentication token and log them out. It achieves this by returning an expired JSON Web Token (JWT) with the same name as the one provided to the user during the login process. By sending this expired token in the response, the user’s browser or API client will effectively delete it.
To implement this route handler in your project, follow these steps:
- Create a new folder called
logoutwithin thesrc/app/api/auth/directory. - Inside the
logoutfolder, create a file namedroute.ts. - Copy and paste the code below into the
route.tsfile.
src/app/api/auth/logout/route.ts
import { NextRequest, NextResponse } from "next/server";

export async function GET(req: NextRequest) {
  const response = new NextResponse(JSON.stringify({ status: "success" }), {
    status: 200,
    headers: { "Content-Type": "application/json" },
  });

  await Promise.all([
    response.cookies.set({
      name: "token",
      value: "",
      maxAge: -1,
    }),
    response.cookies.set({
      name: "logged-in",
      value: "",
      maxAge: -1,
    }),
  ]);

  return response;
}
Fetch Authenticated User Route Handler
Let’s proceed with implementing the final API route handler, responsible for returning the authenticated user’s credentials. This handler is triggered by a GET request to the /api/users/me endpoint.
If you recall, we added the logic for protecting this API route within the Next.js middleware, ensuring that only users with valid JSON Web Tokens (JWTs) can gain access. Once a user successfully completes the authentication steps in the middleware, their unique ID is securely stored in the request headers as X-USER-ID.
Therefore, in this route function, our task is straightforward. We will retrieve the value of X-USER-ID from the headers and query the database for the user’s information. Finally, we will include this information in the JSON response.
To implement this route handler, follow these steps:
- Create a new folder called
userswithin thesrc/app/api/directory. - Inside the
usersfolder, create another folder namedme. - Within the ‘me’ folder, create a file named
route.ts. - Copy and paste the following code into the
route.tsfile.
src/app/api/users/me/route.ts
import { getErrorResponse } from "@/lib/helpers";
import { prisma } from "@/lib/prisma";
import { NextRequest, NextResponse } from "next/server";

export async function GET(req: NextRequest) {
  const userId = req.headers.get("X-USER-ID");

  if (!userId) {
    return getErrorResponse(
      401,
      "You are not logged in, please provide token to gain access"
    );
  }

  const user = await prisma.user.findUnique({ where: { id: userId } });

  return NextResponse.json({
    status: "success",
    data: { user: { ...user, password: undefined } },
  });
}
Congratulations! We have successfully completed the API aspect of the application by implementing essential endpoints for user registration, login, logout, and retrieving the credentials of the authenticated user.
Test the JWT Authentication
Now that we have completed the implementation of JWT authentication, it’s time to test its flow. Start by launching the Next.js development server. Once the server is running, you can use an API testing software to send HTTP requests directly to the Next.js server and observe how the authentication process works in practice.
If you would like to utilize the pre-configured API collection that was used for testing the API, you can download the project’s source code. Within the downloaded source code, you will find the Next.js HS256 JWT.postman_collection.json file, which can be imported into either Postman or the Thunder Client VS Code extension. This collection contains pre-defined requests that will assist you in testing your API endpoints effectively.
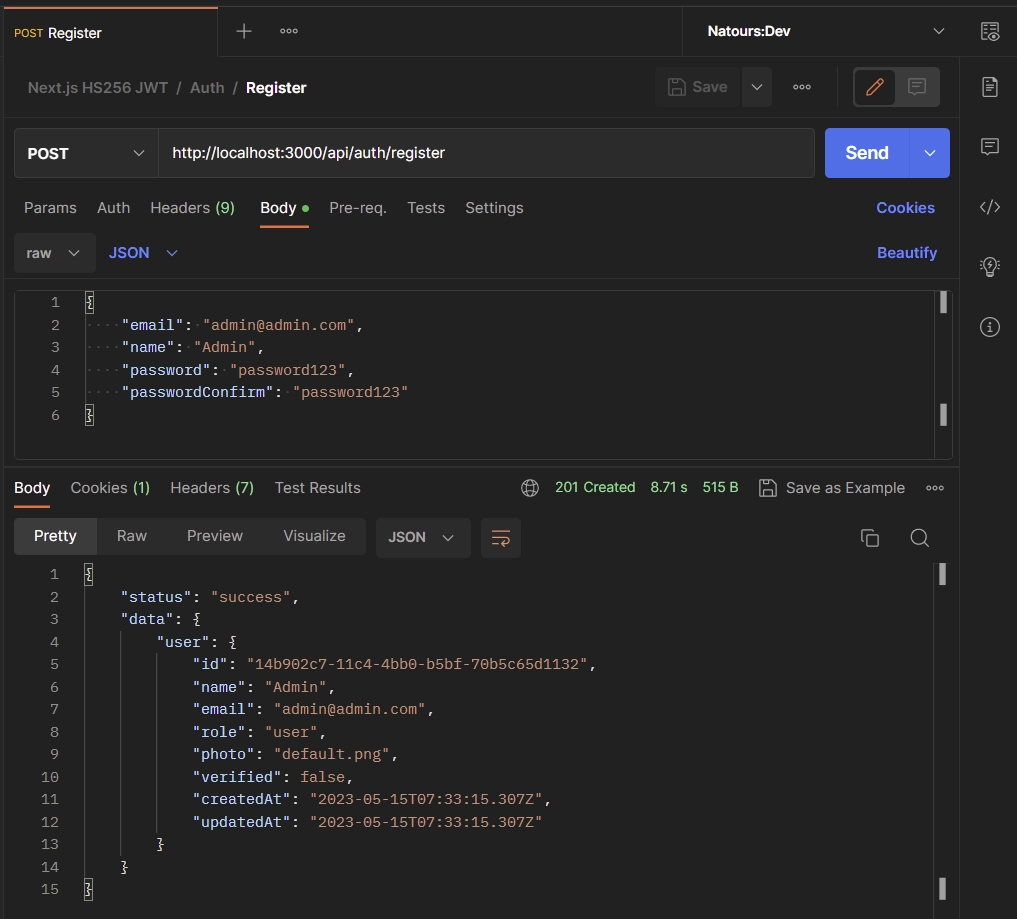
Register an Account
To create a new account, provide your name, email, password, and password confirmation credentials in the request body and make a POST request to the /api/auth/register endpoint. Here is an example JSON object that includes the required credentials for registration:
{
    "email": "admin@admin.com",
    "name": "Admin",
    "password": "password123",
    "passwordConfirm": "password123"
}
Once you submit your registration details to the API, it will check and store the information securely in the database. If everything goes well, you will receive a confirmation with a 201 response status, indicating that your registration was successful.
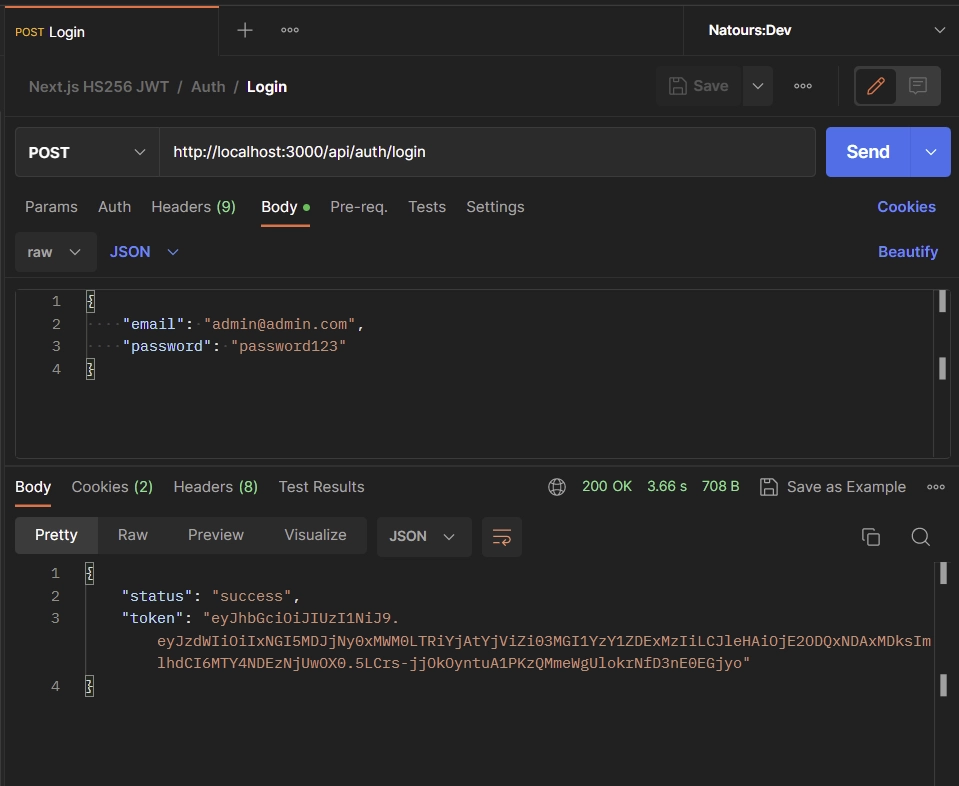
Sign in to your Account
Now that you have successfully registered an account, it’s time to sign in to the API using your credentials. To proceed with the sign-in process, make sure to include your email and password in the request body. Then, send a POST request to the /api/auth/login endpoint.
{
    "email": "admin@admin.com",
    "password": "password123"
}
Upon successful authentication, you will receive a token in the JSON response as well as a cookie. This token allows you to access protected routes within the API.
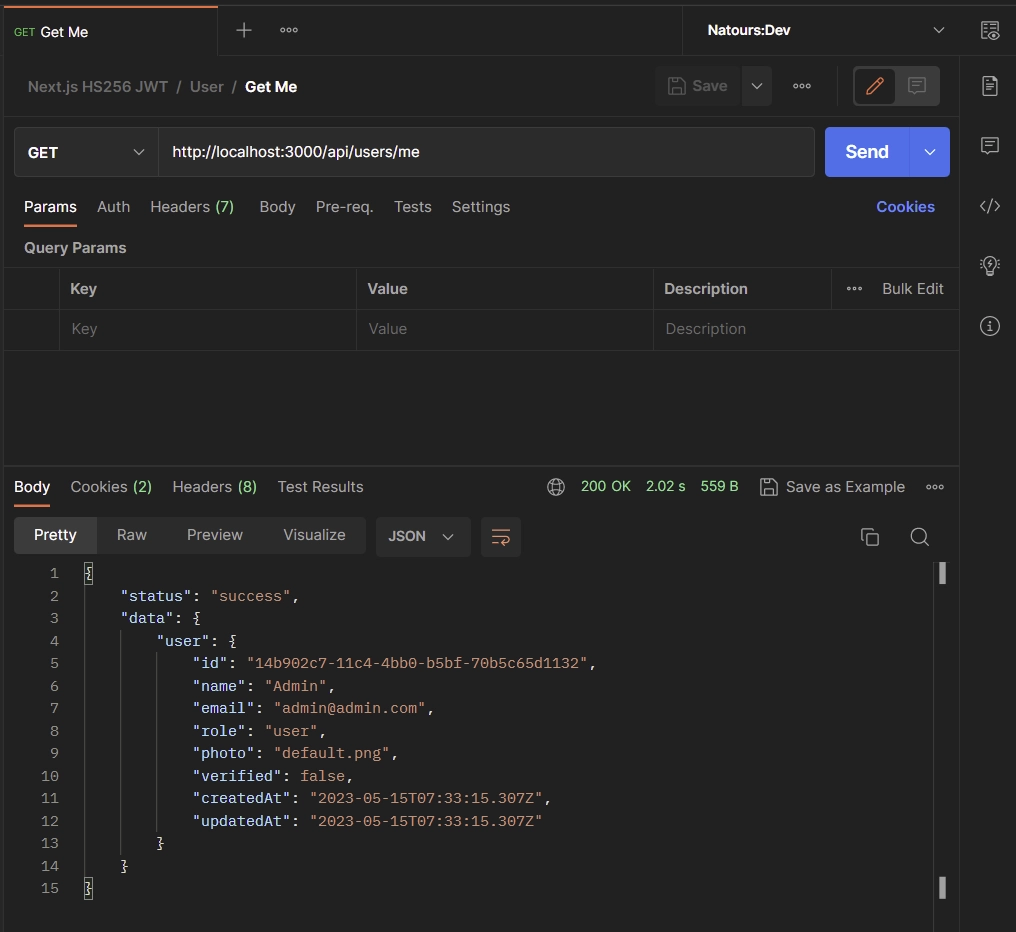
Get your Account Credentials
With the token at your disposal, you can retrieve your account credentials by making a GET request to the /api/users/me endpoint. It’s important to remember that this endpoint is protected, and you need to ensure that the token is included in the Authorization header of your request.
Alternatively, you can allow your API client to automatically send the token along with each request, saving you the manual step of including it.
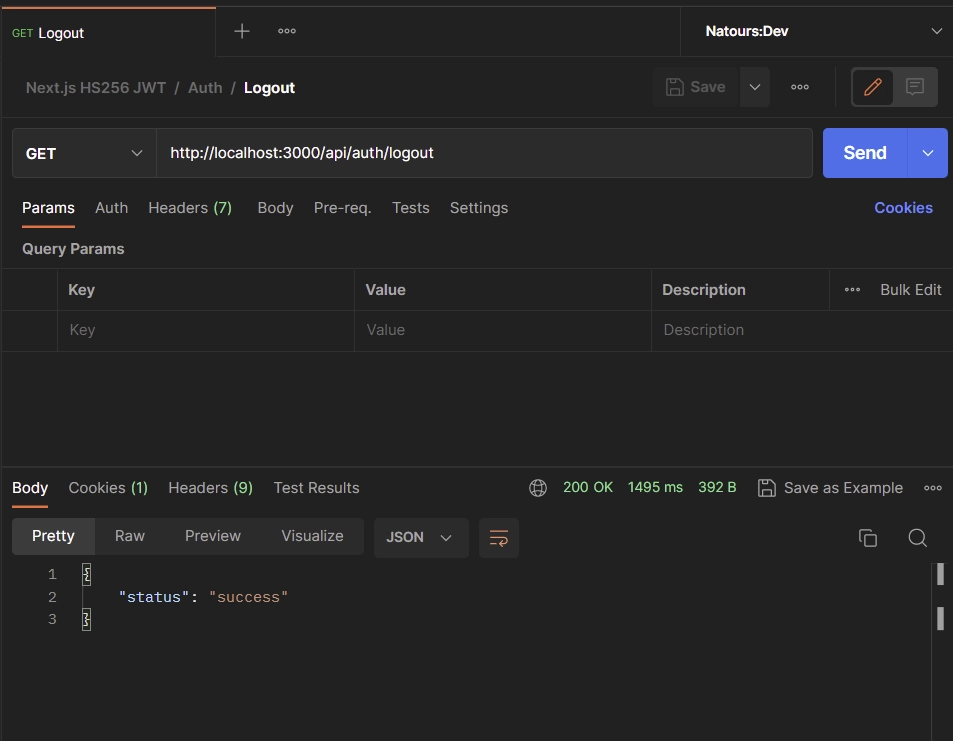
Logout from your Account
To sign out of your account, simply send a GET request to the /api/auth/logout endpoint. It’s important to note that this endpoint is also protected, which means you’ll need to have the token either stored in the cookies or included in the Authorization header of your request.
Upon a successful request, the existing cookie associated with the token will be deleted from your API client.
Conclusion
And there you have it! Throughout this article, we explored how to build a JWT-authenticated API using the new Next.js 13 app directory. We covered everything from setting up the Prisma data layer to defining validation schemas with Zod, protecting private routes, and implementing API route handlers.
I trust that you found this tutorial both valuable and practical. If you have any questions or feedback, don’t hesitate to share them in the comments section below. Happy coding!
i am facing error , i am unable to retrieve user credentials ,”userID” in “api/users/me/route.js” file is “null”
If the
userIdis null, there may be a logic error in thesrc/middleware.tsfile. I just tested the backend API and even created the frontend for the API, and everything seems to work correctly.Please compare the code you have in the
src/middleware.tsfile against the one provided in the source code assigned to this article to see where the mistake is coming from.Let me know if you are still facing the same issue.
Same problem, but I found I put the middleware.ts to `src/app/middleware.ts`,
The right path is `src/middleware`
Thank you, sir. Is the same way to manage the JWT token when using next auth?
Thank You So Much, This tutorial helped me build a quick application. Keep doing the good work.