

In this article, you will learn how to integrate a Flask API project with Next.js and deploy them on Vercel. Traditionally, Vercel primarily supported a Node.js serverless runtime, which required writing API logic in JavaScript or TypeScript. However, Vercel has recently introduced support for other runtimes, including Golang, Ruby, and Python.
Since this article focuses on the Flask framework, our main emphasis will be on the Python serverless runtime. With this runtime, we can build the API in Python using Flask or other Python frameworks. When we deploy the project to Vercel, the platform automatically detects the Python project and hosts it on the Python serverless runtime.
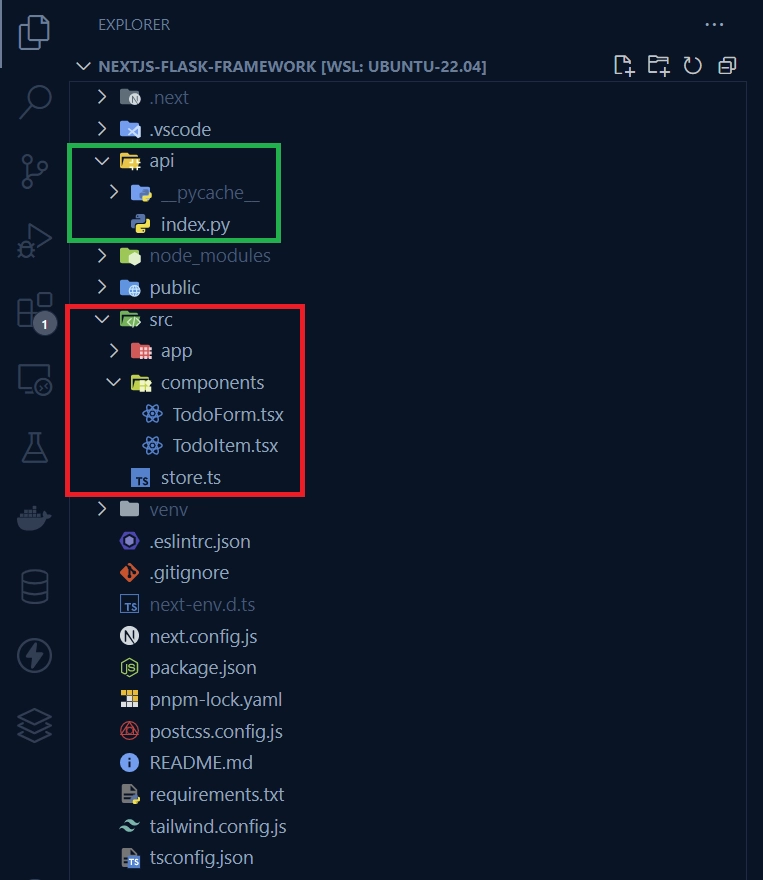
To build the API for the Next.js project using Python, you simply need to remove the existing api/ directory within the src/app directory (if it exists) and instead create a new api/ folder at the root level. Within this folder, you will create an index.py file, which Vercel will recognize as the entry point for the Python project. It’s important to note that Vercel expects the Python project to be located in an api/ directory in the root directory, and within the api/ directory, there should be an index.py file that serves as the entry point for the Python project.
Here is the flow we will follow in this article:
- We will start by setting up the Next.js project.
- Next, we will create the API directory for the Flask server. Additionally, we will add a health checker endpoint to the Flask server. This endpoint will help us verify if the Flask server is receiving requests from the Next.js app.
- After that, we will configure Next.js to forward API requests to the Flask server.
- Then, we will test the integration by making a request to the health checker endpoint on the Flask server from the Next.js domain. This will allow us to confirm if the Next.js app properly forwards the request to the Flask server.
- To ensure that the Flask integration with Next.js works in a production environment, we will deploy the projects on Vercel. We will then make a request to the health checker route from the Vercel URL to verify if Next.js correctly proxies the request to the Flask server.
- We will take things further by creating a Todo List API using Flask. Additionally, we will build a frontend for this API using Next.js.
- Finally, we will redeploy the projects on Vercel to ensure that all the changes we made take effect and the applications continue to function properly.
More practice:
- Integrate FastAPI Framework with Next.js and Deploy
- JWT Authentication in Next.js 13 API Route Handlers
- User Registration and Login in Next.js 13 App Directory
- Build a Simple API in Next.js 13 App Directory
- Build a Simple Frontend App in Next.js 13 App Directory
- Next.js – Add Google and GitHub OAuth2 using NextAuth.js
- Next.js – Use Custom Login and SignUp Pages for NextAuth.js
- How to Setup Prisma ORM in Next.js 13 App Directory
- How to Setup and Use Apollo Client in Next.js 13 App Directory
- How to Setup React Context API in Next.js 13 App Directory
- How to Setup React Query in Next.js 13 App Directory
- How to Setup Redux Toolkit in Next.js 13 App Directory
- Setup tRPC Server and Client in Next.js 13 App Directory
- Setup and Use NextAuth.js in Next.js 13 App Directory
Running the Flask and Next.js Projects
To run the Flask and Next.js projects on your machine without writing a single line of code, follow these steps:
- Download or clone the project from the GitHub repository: https://github.com/wpcodevo/nextjs-flask-framework. Open the source code in your preferred code editor.
- Create a virtual environment for the Flask project by running the command
python3 -m venv venv. This will set up a dedicated environment for the project. - Once the virtual environment is created, open the
api/index.pyfile. This will trigger your IDE to automatically activate the necessary extensions and the virtual environment. If your IDE doesn’t do it automatically, you can manually activate the virtual environment by runningsource venv/bin/activatein the terminal. - Make sure you have PNPM installed. If not, install it globally by running
npm i -g pnpm. - Install the dependencies required by the Next.js app by running the command
pnpm installin the terminal of the root directory. - Run the command
pnpm devin your terminal. This command uses theconcurrentlypackage to start both the Next.js and FastAPI servers concurrently. - After starting the servers, you can access the application by opening your browser and visiting
http://localhost:3000. From there, you have the ability to add new todos, mark them as completed, and delete them as necessary. These actions will initiate requests from the Next.js frontend to the Flask backend.
Setting up the Next.js and Flask Projects
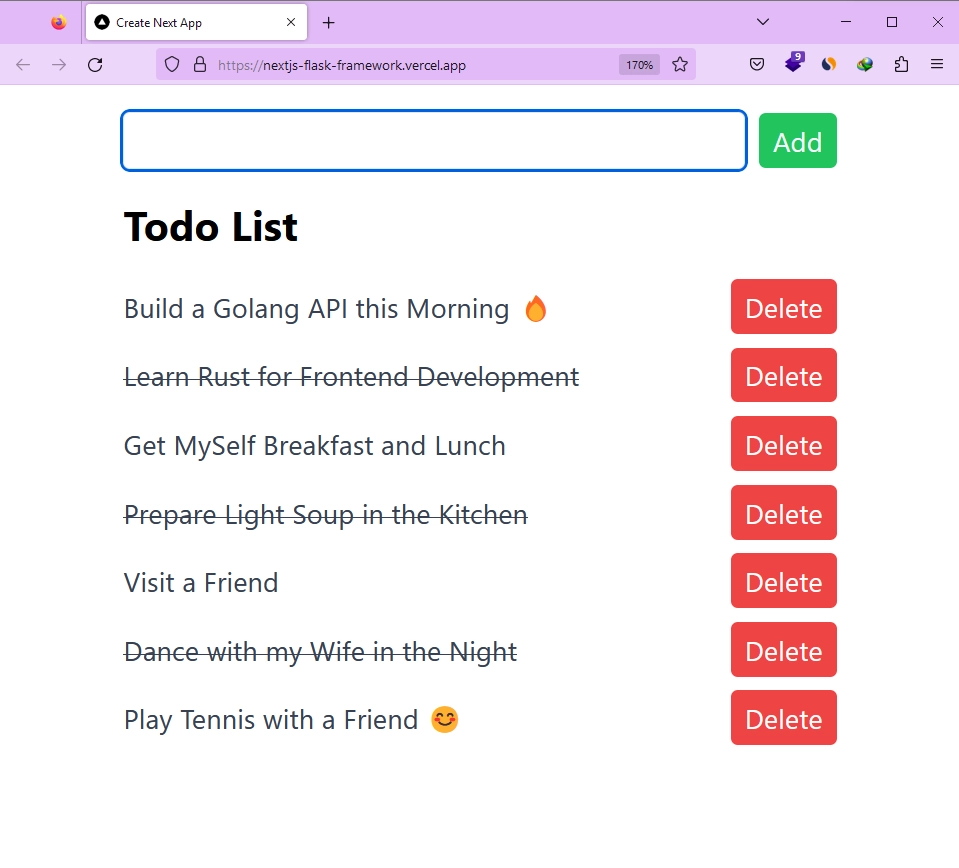
Before we dive into running commands and writing code, let me give you a sneak peek of the Todo List application we’ll be building throughout this tutorial. The app consists of a form used to add new todos, and below the form is a list displaying the todo items. Each todo item has a title and a delete button at the other end.
To mark a todo as completed, all you need to do is click on its title. Likewise, to remove a todo, simply click on the corresponding delete button.
After completing the instructions in this tutorial, your file and folder structure should resemble the example below:
Setting up the Next.js Project
As always, we need to start by generating a new Next.js project. If you already have a Next.js project, you can skip this section. Otherwise, run one of the commands below based on your preferred package manager:
# For PNPM
pnpm create next-app nextjs-flask-framework

# For NPX
npx create-next-app@latest nextjs-flask-framework

# For Yarn
yarn create next-app nextjs-flask-framework
Once you run the command mentioned above, a series of prompts will appear, allowing you to enable or disable specific features. For this project, it is recommended to select “Yes” for all the features. By doing so, the Next.js project will be generated, tailored to the enabled features, and all the required dependencies will be installed.
Setting up the Flask Project
Now that we have generated the Next.js project, we can proceed to set up the Flask project. To do this, we need to create an api directory at the root of our Next.js project. Inside this api directory, we will create an index.py file, which will serve as the entry point for our Flask application.
You might be wondering why we didn’t create the api directory before generating the Next.js project. The reason is that it can result in a conflicting error in the terminal, as the Next.js project itself can contain an api directory for creating API logic using the web Request and Response APIs. However, I’ve noticed that the api directory doesn’t get generated by default anymore.
If, for any reason, an api directory was generated with the Next.js project, you should delete it, as we will be using the one at the root level to write the API logic using Python.
To start building the API with Flask, follow these steps:
- Create an
apidirectory at the root level of your Next.js project. - Inside the
apidirectory, create anindex.pyfile. - Add the following code to the
index.pyfile:
api/index.py
from flask import Flask
app = Flask(__name__)
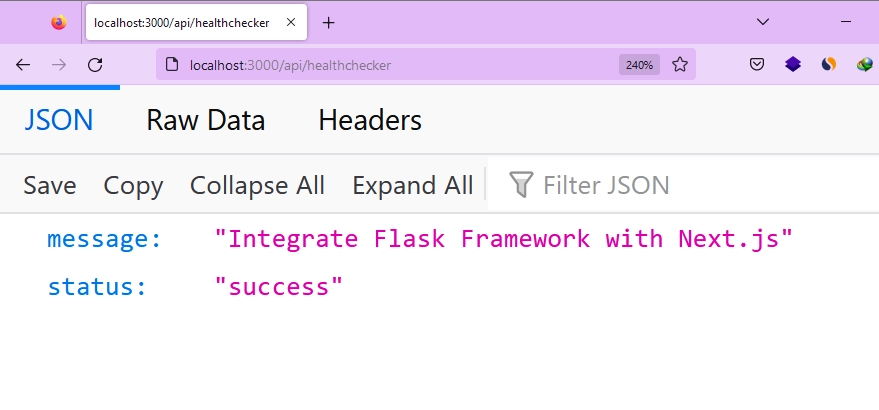
@app.route("/api/healthchecker", methods=["GET"])
def healthchecker():
return {"status": "success", "message": "Integrate Flask Framework with Next.js"}
if __name__ == "__main__":
app.run()
The code above creates a basic Flask application with a single endpoint, which is a health checker API endpoint. We will send requests to this endpoint through the Next.js domain to verify if Next.js will proxy the requests to the Flask server. Let me explain how the process works.
The Flask server will be running on http://127.0.0.1:8000, but instead of sending requests directly to that URL, we will send them to the URL of the Next.js application. To proxy a request to the Flask server, we simply need to append /api to the Next.js domain. In our specific case, if we want to send a request to the health checker route of the Flask server, we will send a GET request to http://localhost:3000/api/healthchecker. This tells Next.js to forward the request to the Flask server since the request path matches /api/:path*.
Forwarding Requests to the Flask App
Let’s proceed with configuring Next.js to forward API requests to the Flask application. We will accomplish this by using next.config.js rewrites to map any requests to /api/:path* to the Flask API, which is located in the /api folder. Below is the code that you need to add to your next.config.js file:
next.config.js
/** @type {import('next').NextConfig} */
const nextConfig = {
    rewrites: async () => {
        return [
        {
            source: '/api/:path*',
            destination:
            process.env.NODE_ENV === 'development'
                ? 'http://127.0.0.1:8000/api/:path*'
                : '/api/',
        },
        ]
  },
}

module.exports = nextConfig
In the provided code, we have defined a rewrite rule within the rewrites property of the nextConfig object. This rule specifies that any request matching the pattern /api/:path* should be rewritten and redirected to the designated destination.
- During the development phase, the destination URL is set to
http://127.0.0.1:8000/api/:path*. This configuration ensures that API requests made to the Next.js application are proxied to the locally running Flask API athttp://127.0.0.1:8000. - In a production environment, the destination URL is set to
/api/, indicating that the Next.js server should internally handle the API request. To make this configuration work, it is necessary to set up Cross-Origin Resource Sharing (CORS) on the Flask server to allow all requests that are proxied to it. We will cover this step in detail when we create the CRUD API for the Todo application.
Testing the Projects in the Development Environment
Now, we are ready to start the Next.js and Flask development servers. Instead of handling them separately in different terminals, we have a convenient solution. We can use the NPM package called concurrently, which enables us to run both servers simultaneously. To get started, open your integrated terminal and execute one of the commands below, depending on the package manager you are using:
# For PNPM
pnpm add concurrently

# For NPM
npm i concurrently

# For Yarn
yarn add concurrently
Once you have installed the package, the next step is to modify the dev script for Next.js in the package.json file. This modification allows us to run both the Flask and Next.js servers simultaneously. To proceed, navigate to the "scripts" property within the package.json file and replace the existing dev script with the following code:
package.json
{
 "scripts": {
     "flask-dev": "FLASK_DEBUG=1 pip3 install -r requirements.txt && python3 -m flask --app api/index run -p 8000 --reload",
    "next-dev": "next dev",
    "dev": "concurrently \"pnpm run next-dev\" \"pnpm run flask-dev\""
  },
}
Remember to replace pnpm in the scripts with the appropriate package manager you are using. Here is a breakdown of each script and its purpose:
flask-dev: This script installs the necessary Python packages specified in requirements.txt and starts the Flask development server with hot-reloading enabled. It ensures that any changes made to the Flask code are automatically reflected in the running server.next-dev: This script launches the Next.js development server using the commandnext dev. It enables hot-reloading and provides an easy way to view and test the changes made to the Next.js application.dev– This is the main script that allows us to run both the Next.js and Flask servers concurrently. It utilizes theconcurrentlypackage to execute thenext-devandflask-devscripts simultaneously.
If you take a closer look at the flask-dev script, you’ll notice that we begin by installing the dependencies listed in the requirements.txt file before launching the Flask server. In order for this script to work correctly, we need to generate the requirements.txt file. To do this, run the following command:
pip freeze > requirements.txt
Running this command will generate a file named requirements.txt that includes a list of all the Python packages installed in the current virtual environment, along with their respective version numbers.
With that step completed, you can now execute the command pnpm dev to simultaneously start the Flask and Next.js development servers. Once both servers are up and running, open your browser and visit http://localhost:3000/api/healthchecker. If you see the JSON object that was sent from the Flask server, it confirms that Next.js is correctly forwarding the requests to the Flask server.
Deploying the Projects to Vercel
Now that we have confirmed the correct forwarding of API requests from Next.js to the Flask server in the development environment, it’s time to deploy the project to Vercel and test if the same functionality persists in a production environment. Deploying the project to Vercel is a user-friendly process that even beginners can easily navigate.
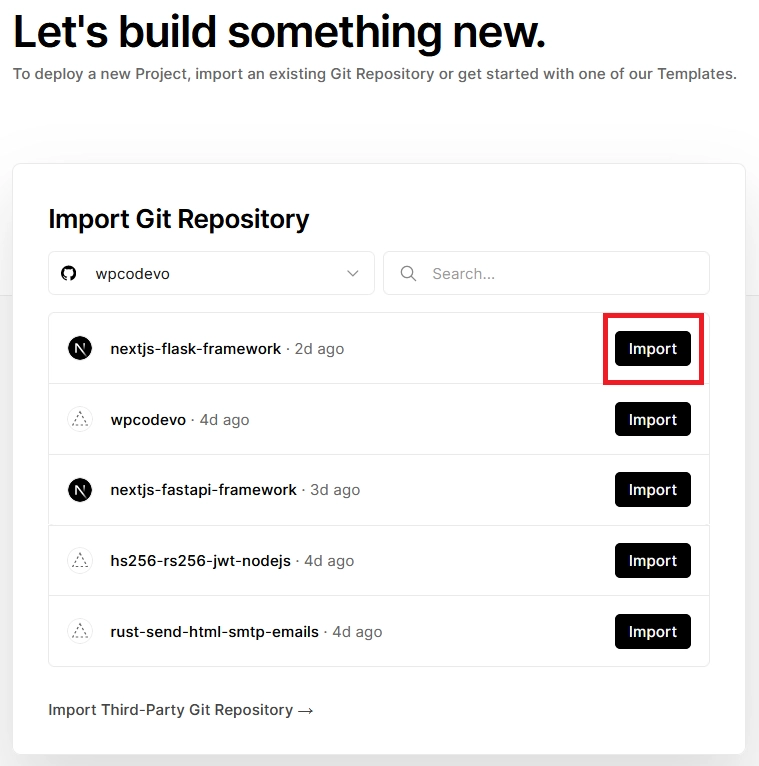
To begin, create a GitHub repository for your project and push the source code into it. Next, sign in to your Vercel account and click on the “Add New” button. From the dropdown menu, select the “Project” option. You will be presented with a list of your recent GitHub repositories. Choose the repository where you pushed the source code by clicking the “Import” button next to it.
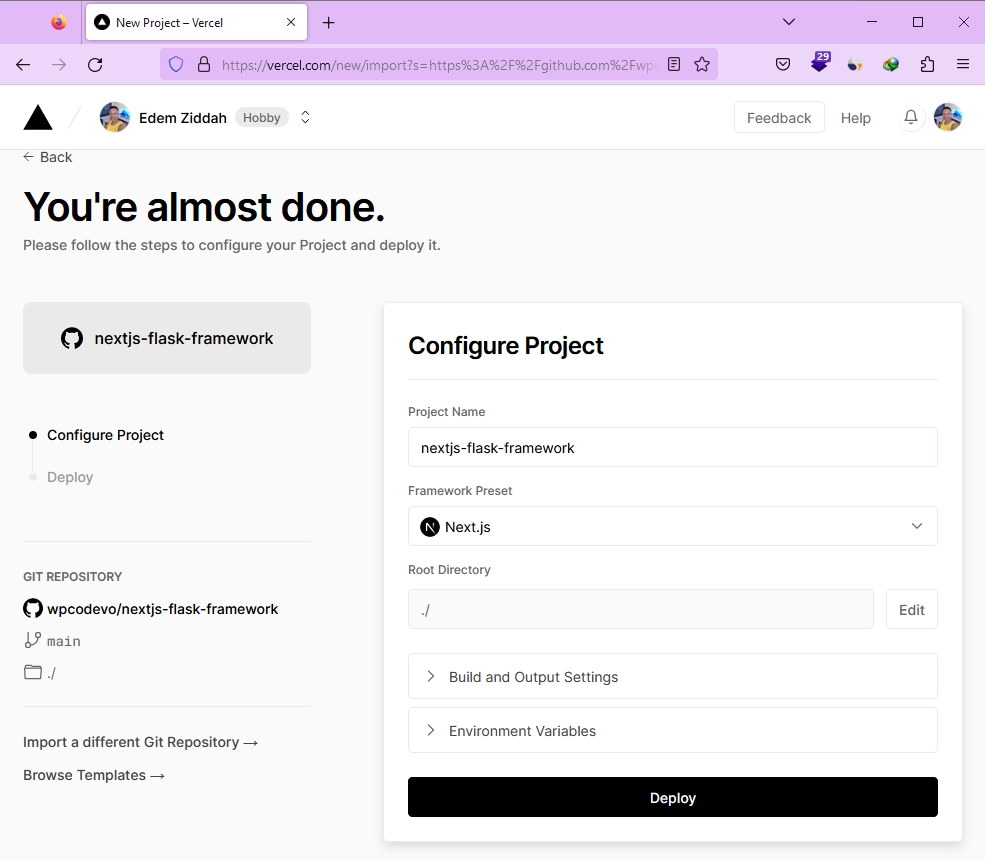
When you click the “Import” button, you will be directed to the configuration page. Here, you have the flexibility to customize various project settings, including the project name, environment variables, and framework selection. Vercel will automatically recognize your project as a Next.js project and offer default configurations, which usually work well. In most scenarios, you can proceed with the default settings. When you are content with the configurations, simply click the “Deploy” button to initiate the deployment process.
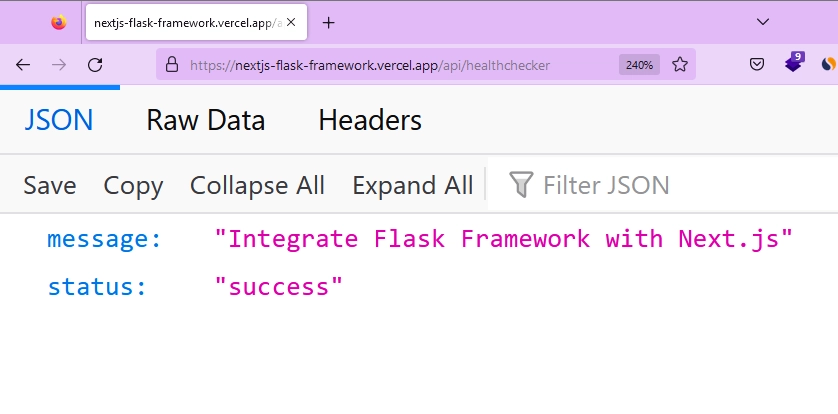
Take a moment to relax and allow Vercel to handle the building of your Next.js project and deployment of the Flask server to the Python runtime. Once the deployment process is finished, you will be given a domain specifically for your project. Access this domain, and you’ll be able to see your Next.js app live in action. Go to the /api/healthchecker endpoint within the domain, and you’ll see the JSON object that we sent from the Flask server.
Building a Todo List CRUD API with Flask
Now that we have confirmed the successful integration of the Flask project with Next.js in both development and production environments, we can now focus on building the Todo List application. In this section, our primary task is to build the API for the Todo List application using Flask. Instead of utilizing a database to store the data, we will store it in memory, specifically in a list, to keep the project relatively straightforward.
To create the API with endpoints that facilitate CRUD (Create, Read, Update, Delete) operations on the data stored in memory, open the api/index.py file and replace its current content with the following code snippet:
api/index.py
from flask import Flask, request
from flask_cors import CORS

app = Flask(__name__)
CORS(app)

todos = []
todo_id_counter = 1


@app.route("/api/todos", methods=["GET"])
def get_all_todo_items():
    return todos


@app.route("/api/todos/<int:todo_id>", methods=["GET"])
def get_todo_item(todo_id):
    todo = next((todo for todo in todos if todo["id"] == todo_id), None)
    if todo:
        return todo
    return {"error": "Todo item not found"}, 404


@app.route("/api/todos", methods=["POST"])
def create_todo_item():
    data = request.get_json()
    title = data.get("title")
    if not title:
        return {"error": "Title is required"}, 400

    global todo_id_counter
    todo = {
        "id": todo_id_counter,
        "title": title,
        "completed": False
    }
    todos.append(todo)
    todo_id_counter += 1
    return todo, 201


@app.route("/api/todos/<int:todo_id>", methods=["PATCH"])
def update_todo_item(todo_id):
    data = request.get_json()
    title = data.get("title")
    completed = data.get("completed")

    todo = next((todo for todo in todos if todo["id"] == todo_id), None)
    if todo:
        if title is not None:
            todo["title"] = title
        if completed is not None:
            todo["completed"] = completed
        return todo
    return {"error": "Todo item not found"}, 404


@app.route("/api/todos/<int:todo_id>", methods=["DELETE"])
def delete_todo_item(todo_id):
    global todos
    todos = [todo for todo in todos if todo["id"] != todo_id]
    return {"message": "Todo item deleted"}


@app.route("/api/healthchecker", methods=["GET"])
def healthchecker():
    return {"status": "success", "message": "Integrate Flask Framework with Next.js"}


if __name__ == "__main__":
    app.run()
In the provided code snippets, we have created a Flask app and defined CRUD endpoints to manage the data stored in memory. As you can see, it is a straightforward implementation without any complex features. However, one essential configuration we needed to perform was enabling CORS on the Flask app. This ensures that the server can accept requests from the origins specified by the Vercel URL, which acts as a proxy for the API requests to the Flask server. Without CORS configured, any requests involving data mutation, such as POST, PUT, PATCH, and DELETE, would be blocked.
Now that we have completed this setup, you can start the Next.js and Flask development servers by running the command pnpm dev. Once the servers are up and running, you can utilize an API testing software like Postman or the Thunder Client VS Code extension to make requests to the Flask server through the Next.js URL. This will allow you to test the CRUD endpoints. If you prefer a visual approach, you can continue reading the article to learn how to build the frontend for the API using Next.js.
Building the Todo List Frontend with Next.js
With the API now set up, we can proceed to create the frontend using Next.js. The frontend app will allow users to perform essential actions such as adding new todos, modifying existing todos, and removing todos.
Making HTTP Requests to the Flask Server
In this section, we will use Zustand to create a store that enables us to handle the application states. Zustand allows us to define asynchronous functions that not only facilitate CRUD requests to the Flask server but also update the store with the retrieved data. To get started, execute the following command to install the Zustand library:
# For PNPM
pnpm add zustand

# For NPM
npm i zustand

# For Yarn
yarn add zustand
Once you have installed the Zustand package, go into the ‘src‘ directory and create a new file named store.ts. Open the store.ts file and insert the following code snippet:
src/store.ts
import { create } from "zustand";

type Todo = {
  id: number;
  title: string;
  completed: boolean;
};

type CreateTodo = {
  title: string;
};

type TodoStore = {
  todos: Todo[];
  fetchTodos: () => void;
  addTodo: (todo: CreateTodo) => void;
  updateTodo: (updatedTodo: Todo) => void;
  deleteTodo: (id: number) => void;
};

const URL = process.env.NEXT_PUBLIC_VERCEL_URL
  ? `https://${process.env.NEXT_PUBLIC_VERCEL_URL}/api`
  : "http://localhost:3000/api";

export const useStore = create<TodoStore>((set) => ({
  todos: [],
  fetchTodos: async () => {
    try {
      const response = await fetch(`${URL}/todos`);
      const todos = await response.json();
      set({ todos });
    } catch (error) {
      console.error("Error fetching todos:", error);
    }
  },
  addTodo: async (todo) => {
    try {
      const response = await fetch(`${URL}/todos`, {
        method: "POST",
        headers: {
          "Content-Type": "application/json",
        },
        body: JSON.stringify(todo),
      });
      const createdTodo = await response.json();
      set((state) => ({ todos: [...state.todos, createdTodo] }));
    } catch (error) {
      console.error("Error creating todo:", error);
    }
  },
  updateTodo: async (updatedTodo) => {
    try {
      const response = await fetch(`${URL}/todos/${updatedTodo.id}`, {
        method: "PATCH",
        headers: {
          "Content-Type": "application/json",
        },
        body: JSON.stringify(updatedTodo),
      });
      const updatedItem = await response.json();
      set((state) => ({
        todos: state.todos.map((todo) =>
          todo.id === updatedItem.id ? updatedItem : todo
        ),
      }));
    } catch (error) {
      console.error("Error updating todo:", error);
    }
  },
  deleteTodo: async (id) => {
    try {
      await fetch(`${URL}/todos/${id}`, {
        method: "DELETE",
      });
      set((state) => ({
        todos: state.todos.filter((todo) => todo.id !== id),
      }));
    } catch (error) {
      console.error("Error deleting todo:", error);
    }
  },
}));
Quite a lot is happening in the above code, but I will only provide a summary of the setter methods in the store. These methods allow us to make CRUD requests to the Flask server. Here is a summary of the available setter methods in the store:
fetchTodos– This method sends a GET request to the Flask server to retrieve all the todo items. Upon successful completion of the request, the list of todo items will be added to the Zustand store.addTodo– Use this method to send a POST request to the Flask server and add a new todo item. Upon successful completion of the request, the newly added item will be included in the Zustand store.updateTodo– With this method, you can send a PATCH request to the Flask server and modify an existing todo item. If the request is successful, the corresponding todo item in the store will be updated with the new information.deleteTodo– This method enables you to send a DELETE request to the Flask server and delete a todo item based on its ID. If the item is successfully deleted, it will also be removed from the Zustand store.
Creating the Todo List Form Component
As usual, before we can add new todo items from the frontend application, we need to create a form. This form will consist of an input field and a button. Additionally, the form component will handle the logic for submitting the new todo item to the Flask server. To create the form component, follow these steps:
- Start by creating a ‘components‘ directory within the ‘src‘ directory.
- Inside the ‘components‘ folder, create a file named
TodoForm.tsx. - Copy and paste the code below into the
TodoForm.tsxfile:
src/components/TodoForm.tsx
import { useStore } from "@/store";
import { useState } from "react";

export default function TodoForm() {
  const addTodo = useStore((state) => state.addTodo);
  const [loading, setLoading] = useState(false);
  const [newTodo, setNewTodo] = useState("");

  const handleCreateTodo = async () => {
    if (newTodo.length === 0) return alert("Todo input must not be empty");
    try {
      setLoading(true);
      const todo = { title: newTodo };
      await addTodo(todo);
      setNewTodo("");
    } catch (error) {
      console.error("Error creating todo item:", error);
    } finally {
      setLoading(false);
    }
  };

  return (
    <div className="flex items-center space-x-2 mb-4">
      <input
        type="text"
        value={newTodo}
        onChange={(e) => setNewTodo(e.target.value)}
        className="border rounded px-2 py-1 flex-1"
      />
      <button
        disabled={loading}
        className={`px-2 py-1 text-white rounded ${
          loading ? "bg-gray-400" : "bg-green-500"
        }`}
        onClick={handleCreateTodo}
      >
        Add
      </button>
    </div>
  );
}
This code defines the TodoForm component, which includes the necessary logic for handling the creation of a new todo item. The form will validate the input, interact with the Zustand store, and provide visual feedback to the user.
Creating the Todo Item Component
Next, we need a component that will allow us to display the content of a todo item retrieved from the Flask API. This component will also include a delete button for removing a todo item if needed. Let’s call this component TodoItem.tsx. To create it, follow these steps:
- Create a file named
TodoItem.tsxwithin the ‘components‘ directory. - Inside the
TodoItem.tsxfile, add the following code:
src/components/TodoItem.tsx
import { useStore } from "@/store";
import { useState } from "react";

interface TodoItemProps {
  todo: {
    id: number;
    title: string;
    completed: boolean;
  };
}

const TodoItem: React.FC<TodoItemProps> = ({ todo }) => {
  const [loading, setLoading] = useState(false);
  const updateTodo = useStore((state) => state.updateTodo);
  const deleteTodo = useStore((state) => state.deleteTodo);

  const handleToggleComplete = () => {
    setLoading(true);
    const updatedTodo = { ...todo, completed: !todo.completed };
    updateTodo(updatedTodo);
    setLoading(false);
  };

  const handleDelete = () => {
    setLoading(true);
    deleteTodo(todo.id);
    setLoading(false);
  };

  return (
    <div className="flex items-center space-x-2 mb-2">
      <span
        className={`text-gray-700 flex-1 ${
          todo.completed ? "line-through" : ""
        }`}
        onClick={handleToggleComplete}
      >
        {todo.title}
      </span>
      <button
        disabled={loading}
        className={`px-2 py-1 text-white rounded ${
          loading ? "bg-gray-400" : "bg-red-500"
        }`}
        onClick={handleDelete}
      >
        Delete
      </button>
    </div>
  );
};

export default TodoItem;
The code above defines the TodoItem component, which is responsible for rendering a single todo item with its title and a delete button. It also includes functionality to toggle the completion status of the todo item. This component is reusable and can be used to display multiple todo items retrieved from the Flask API.
Displaying the Components in a Page File
With the TodoItem and TodoForm components now implemented, our next step is to import them into a page file where we can render them. Additionally, we will use the useEffect hook to fetch a list of todo items from the Flask API when the component mounts.
The page file is a React Server Component by default, so we must include the "use client"; pragma at the beginning of the file. This pragma ensures that the components, which rely on React hooks, are only rendered in the browser where the hooks are available. To proceed, follow these steps:
- Open the
src/app/page.tsxfile. - Replace its existing content with the following code:
src/app/page.tsx
"use client";

import TodoForm from "@/components/TodoForm";
import TodoItem from "@/components/TodoItem";
import { useStore } from "@/store";
import { useEffect } from "react";

const Home: React.FC = () => {
  const todos = useStore((state) => state.todos);
  const fetchTodos = useStore((state) => state.fetchTodos);

  useEffect(() => {
    fetchTodos();
  }, []);

  return (
    <div className="container mx-auto max-w-md p-4">
      <TodoForm />
      <h1 className="text-2xl font-bold mb-4">Todo List</h1>
      {todos.length === 0 ? (
        <p className="text-center">No Todos Found</p>
      ) : (
        todos.map((todo) => <TodoItem key={todo.id} todo={todo} />)
      )}
    </div>
  );
};

export default Home;
The code above imports the necessary components and hooks. It uses the fetchTodos method from the store to fetch the todo items from the Flask API. The retrieved todo items are then rendered using the TodoItem component. The useEffect hook ensures that the fetch operation is triggered when the component mounts.
To complete the project, open the src/app/globals.css file and remove the default CSS styles that come with the Next.js project, except for the Tailwind CSS directives. After making the necessary changes, ensure to save the globals.css file.
Once you have finished modifying the CSS file, you can start the Next.js and Flask development servers if you haven’t done so already. Finally, access the Todo List app in your browser to perform actions such as adding, editing, and deleting todo items.
Redeploying the Project to Vercel
Now that you’ve successfully tested the Todo List app in the development environment and made sure everything is working smoothly, it’s time to take the next step: pushing the changes to your GitHub repository. When you do this, Vercel will automatically detect the updates, fetch the latest changes from your repository, and proceed to build and deploy both the Flask and Next.js projects.
Once the deployment process for the new changes is complete, you can access the URL provided by Vercel to view the Todo List app in a production environment. From there, you can confidently add, edit, and delete todo items to verify that everything functions correctly.
Conclusion
And we’re done! You can access the complete source code of the project, which includes the Next.js and Flask app, in this GitHub repository: https://github.com/wpcodevo/nextjs-flask-framework.
Throughout this article, you’ve learned how to build a hybrid Next.js application that combines the power of Python for the API code and TypeScript for the frontend code. But we didn’t stop at just integration; we took it a step further and created a robust Todo List application that encompasses a Next.js frontend and a Flask API backend.
I hope you found this article to be helpful and valuable on your journey. If you have any questions or feedback, please don’t hesitate to share them in the comments section. Thank you for taking the time to read and explore this project.
Amazing! Thanks so much for this. One thing I had to change was the following:
“flask-dev”: “set FLASK_DEBUG=1 && pip install -r requirements.txt && python -m flask –app api/index run -p 5000 –reload”,
One question I have: How do I see python/flask errors in my logs in Vercel?
Thank you for sharing. I encountered a similar challenge when debugging my Flask application on the Vercel platform. Unfortunately, I couldn’t find detailed error logs within the Vercel platform itself. In this case, I recommend reaching out to the Vercel support team by raising an issue on their GitHub page.
They will have the necessary expertise to assist you in viewing Python/Flask errors in the Vercel logs.
I after going to
http://localhost:3000/api/healthcheckerI get “`Error: connect ECONNREFUSED 127.0.0.1:8000“`