
In this article, you will learn how to integrate Google and GitHub OAuth providers with NextAuth.js in the new Next.js 13 app directory. It’s worth noting that I am using a specific pull request recommended by the NextAuth team that is compatible with the new Next.js 13 app directory.
To add the pull request or the beta version of the Auth.js library to your Next.js project, you can simply add "next-auth": "0.0.0-pr.6777.c5550344" to your dependencies, or install it via your package manager. While we’re using the NextAuth library in this article, you may be using the Auth.js library by the time you read this. However, the two libraries are interchangeable, and the content of this article should remain valid, as we’re using the beta version of Auth.js.
For the purposes of this tutorial, am going to assume you already have your Google and GitHub client IDs and secrets. However, if you haven’t obtained them yet or are unfamiliar with the process, the last two sections of this article include step-by-step instructions to guide you through it.
More practice:
- Next.js – Use Custom Login and SignUp Pages for NextAuth.js
- How to Setup Prisma ORM in Next.js 13 App Directory
- How to Setup React Context API in Next.js 13 App Directory
- How to Setup React Query in Next.js 13 App Directory
- How to Setup Redux Toolkit in Next.js 13 App Directory
- Setup tRPC Server and Client in Next.js 13 App Directory
- Setup and Use NextAuth.js in Next.js 13 App Directory
- Build a Simple API in Next.js 13 App Directory
Run the NextAuth Project Locally
To view a demo of the application, you can follow the steps below:
- Navigate to the project’s repository located at https://github.com/wpcodevo/nextauth-nextjs13-prisma and clone or download it. Afterwards, open the source code in your preferred code editor.
- Within the
.envfile, add your client IDs and secrets for both GitHub and Google OAuth. If you need assistance obtaining these, follow the instructions outlined in the last two sections at the bottom of this article. - Launch a PostgreSQL server in a Docker container by running the command
docker-compose up -d. - Install all the required dependencies with
yarnoryarn install. - Apply the Prisma migrations to the Postgres database by executing
yarn prisma db push. This command will also generate the Prisma Client within the node modules folder. - Start the Next.js development server with the command
yarn dev. Wait for the project to build, then open the URL provided in your preferred browser. - Play around with the app’s functionalities by signing in using Google and GitHub OAuth. You can also create an account with your email and password and use them to access the app.
Explore the GitHub and Google OAuth Flow
Before we dive into the details of how to implement Google and GitHub OAuth with NextAuth, take a look at this demo that shows you how to sign into the app using your GitHub or Google account.
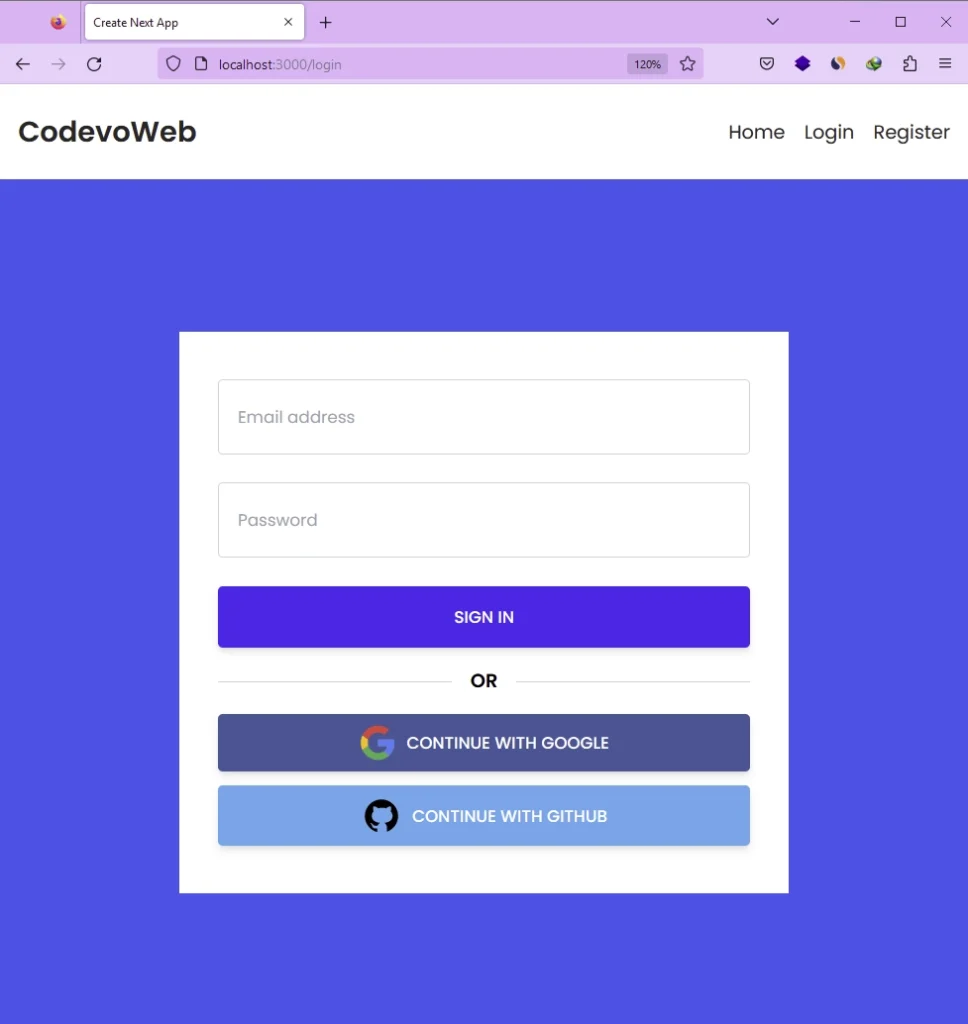
Sign in with Google OAuth2
To sign in with Google OAuth, simply click the “CONTINUE WITH GOOGLE” button on the login page.
Assuming you’ve correctly set up your Google OAuth client ID and secret in the .env file, you’ll be redirected to the Google OAuth consent screen where you can select your test Google account.
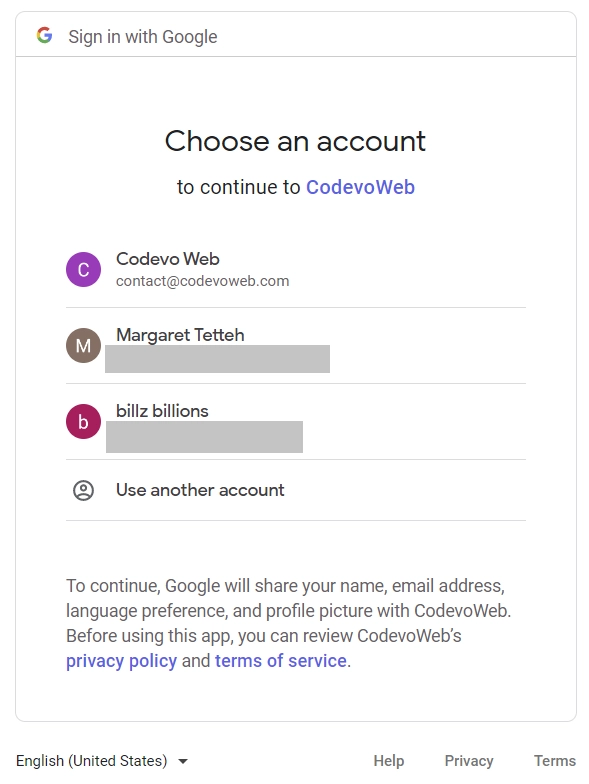
Once you’ve completed the authentication process, you’ll be redirected to the profile page where you can see your profile picture and other credentials.
Sign in with GitHub OAuth
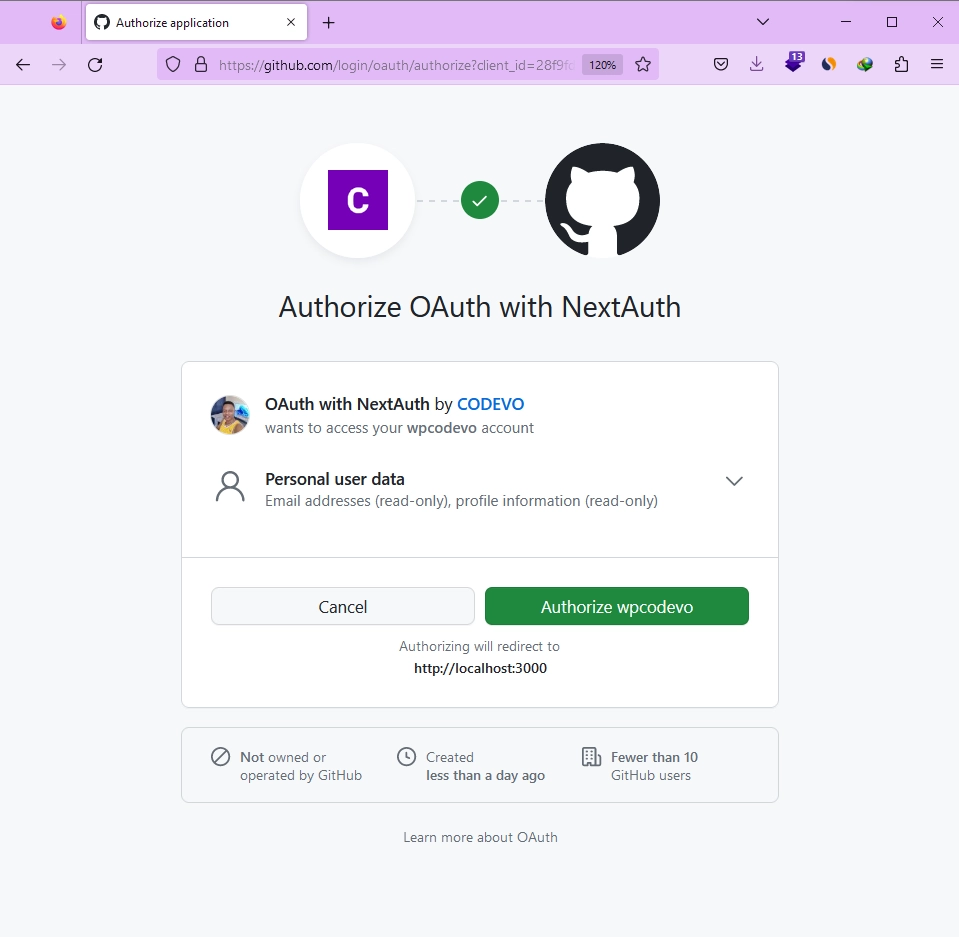
To sign in with GitHub OAuth, just click on the “CONTINUE WITH GITHUB” button on the login page. You’ll then be taken to the GitHub authorization consent screen, where you’ll need to authorize the Next.js application.
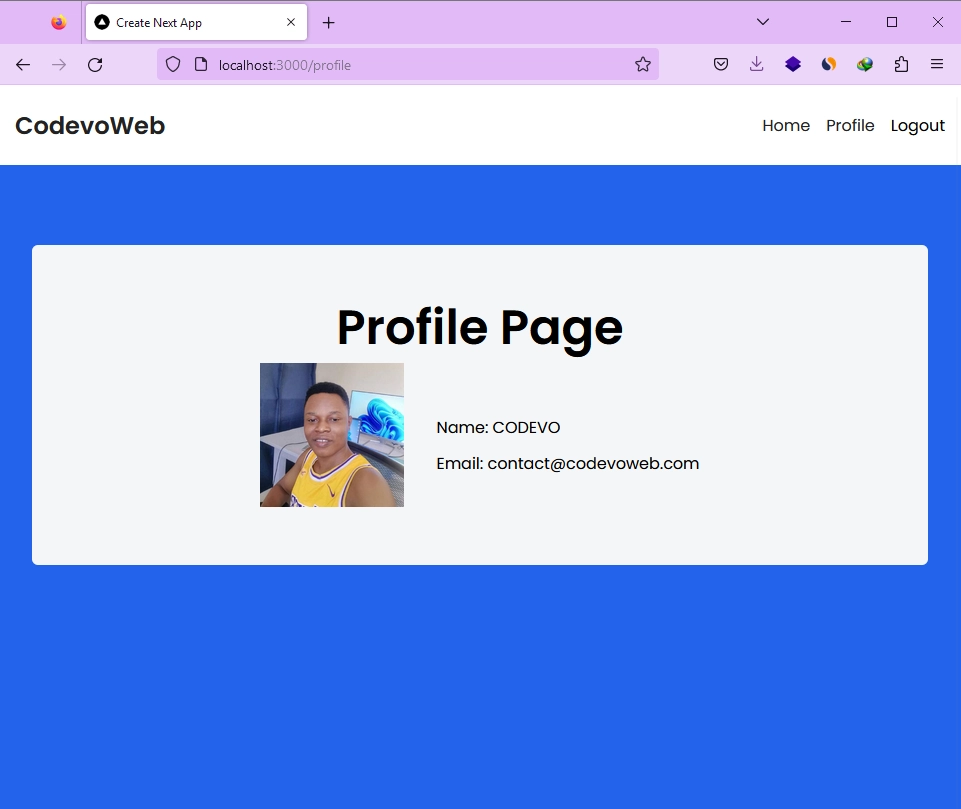
To do this, simply click on the green “authorize” button. Once the authentication is successful, you’ll be redirected to the profile page, where you can view your profile picture and other credentials.
On the profile page, you can view your GitHub profile picture along with your name and email.
Configure NextAuth with Google and GitHub OAuth
Now that you’ve seen the project in action, let’s explore how to implement Google and GitHub OAuth using NextAuth. To do this, we’ll simply add the relevant providers to the NextAuth configuration options and provide the necessary client IDs and secrets.
In some of my previous articles on NextAuth, some users have encountered export errors while trying to run the project when both the NextAuth options and API handlers are defined in the same file. To avoid this issue, we’ll separate the NextAuth configuration into a separate file.
To get started, create a new folder named lib inside the src directory. Inside the lib folder, create an auth.ts file and add the following NextAuth configurations to it.
src/lib/auth.ts
import type { NextAuthOptions } from "next-auth";
import CredentialsProvider from "next-auth/providers/credentials";
import GitHubProvider from "next-auth/providers/github";
import GoogleProvider from "next-auth/providers/google";

export const authOptions: NextAuthOptions = {
  pages: {
    signIn: "/login",
  },
  session: {
    strategy: "jwt",
  },
  providers: [
    GoogleProvider({
      clientId: process.env.GOOGLE_CLIENT_ID as string,
      clientSecret: process.env.GOOGLE_CLIENT_SECRET as string,
    }),
    GitHubProvider({
      clientId: process.env.GITHUB_ID as string,
      clientSecret: process.env.GITHUB_SECRET as string,
    }),
    CredentialsProvider({}),
  ],
};
The code above includes references to the OAuth client IDs and secrets for the Google and GitHub providers. To use these providers, you need to provide the corresponding IDs and secrets in your .env file. If you’re not sure how to obtain these values, don’t worry – at the bottom of the article, I’ve included two sections that will guide you through the process of obtaining the Google and GitHub OAuth client IDs and secrets.
With that out of the way, your api/auth/[...nextauth]/route.ts should now look like the one shown below.
src/app/api/auth/[…nextauth]/route.ts
import { authOptions } from "@/lib/auth";
import NextAuth from "next-auth";

const handler = NextAuth(authOptions);
export { handler as GET, handler as POST };
If you followed the previous article ‘Next.js – Use Custom Login and SignUp Pages for NextAuth.js‘, and have now added the Google and GitHub OAuth providers to your project, your NextAuthOptions configuration object should resemble the one shown below.
src/lib/auth.ts
import { prisma } from "@/lib/prisma";
import { compare } from "bcryptjs";
import NextAuth from "next-auth";
import type { NextAuthOptions } from "next-auth";
import CredentialsProvider from "next-auth/providers/credentials";
import GitHubProvider from "next-auth/providers/github";
import GoogleProvider from "next-auth/providers/google";

export const authOptions: NextAuthOptions = {
  pages: {
    signIn: "/login",
  },
  session: {
    strategy: "jwt",
  },
  providers: [
    GoogleProvider({
      clientId: process.env.GOOGLE_CLIENT_ID as string,
      clientSecret: process.env.GOOGLE_CLIENT_SECRET as string,
    }),
    GitHubProvider({
      clientId: process.env.GITHUB_ID as string,
      clientSecret: process.env.GITHUB_SECRET as string,
    }),
    CredentialsProvider({
      name: "Sign in",
      credentials: {
        email: {
          label: "Email",
          type: "email",
          placeholder: "example@example.com",
        },
        password: { label: "Password", type: "password" },
      },
      async authorize(credentials) {
        if (!credentials?.email || !credentials.password) {
          return null;
        }

        const user = await prisma.user.findUnique({
          where: {
            email: credentials.email,
          },
        });

        if (!user || !(await compare(credentials.password, user.password))) {
          return null;
        }

        return {
          id: user.id,
          email: user.email,
          name: user.name,
          randomKey: "Hey cool",
        };
      },
    }),
  ],
  callbacks: {
    session: ({ session, token }) => {
      return {
        ...session,
        user: {
          ...session.user,
          id: token.id,
          randomKey: token.randomKey,
        },
      };
    },
    jwt: ({ token, user }) => {
      if (user) {
        const u = user as unknown as any;
        return {
          ...token,
          id: u.id,
          randomKey: u.randomKey,
        };
      }
      return token;
    },
  },
};

const handler = NextAuth(authOptions);
export { handler as GET, handler as POST };
Implement the Google and GitHub OAuth2
With the Google and GitHub OAuth providers now added to the NextAuthOptions object, the next step is to implement the logic required to use them in the frontend application. It’s actually pretty straightforward. All you need to do is add the Google and GitHub OAuth buttons to your login form and then when a user clicks on them, you just call the signIn() function and pass in the provider type as the first argument.
Create the Client-Side Form
In Next.js 13.2, components in the app directory are automatically rendered as React Server Components. To use the onClick={} DOM attribute, which is only available in the browser, you need to add the "use client"; directive at the top of the file. This tells Next.js to render the form only in the browser, giving you full access to all the browser APIs.
By default, NextAuth adds a callbackUrl parameter to the URL upon user sign-out, which allows the user to be redirected to their previous page upon their next sign-in. To ensure that the user is redirected to the correct page after signing in, you should check for the presence of this parameter in the URL and pass it to the signIn() method.
To see how all the required parts of authentication are assembled, including the option to use the credential provider or either Google or GitHub OAuth, take a look at the form.tsx component below.
src/app/login/form.tsx
"use client";

import { signIn } from "next-auth/react";
import { useSearchParams, useRouter } from "next/navigation";
import { ChangeEvent, useState } from "react";

export const LoginForm = () => {
  const router = useRouter();
  const [loading, setLoading] = useState(false);
  const [formValues, setFormValues] = useState({
    email: "",
    password: "",
  });
  const [error, setError] = useState("");

  const searchParams = useSearchParams();
  const callbackUrl = searchParams.get("callbackUrl") || "/profile";

  const onSubmit = async (e: React.FormEvent) => {
    e.preventDefault();
    try {
      setLoading(true);
      setFormValues({ email: "", password: "" });

      const res = await signIn("credentials", {
        redirect: false,
        email: formValues.email,
        password: formValues.password,
        callbackUrl,
      });

      setLoading(false);

      console.log(res);
      if (!res?.error) {
        router.push(callbackUrl);
      } else {
        setError("invalid email or password");
      }
    } catch (error: any) {
      setLoading(false);
      setError(error);
    }
  };

  const handleChange = (event: ChangeEvent<HTMLInputElement>) => {
    const { name, value } = event.target;
    setFormValues({ ...formValues, [name]: value });
  };

  const input_style =
    "form-control block w-full px-4 py-5 text-sm font-normal text-gray-700 bg-white bg-clip-padding border border-solid border-gray-300 rounded transition ease-in-out m-0 focus:text-gray-700 focus:bg-white focus:border-blue-600 focus:outline-none";

  return (
    <form onSubmit={onSubmit}>
      {error && (
        <p className="text-center bg-red-300 py-4 mb-6 rounded">{error}</p>
      )}
      <div className="mb-6">
        <input
          required
          type="email"
          name="email"
          value={formValues.email}
          onChange={handleChange}
          placeholder="Email address"
          className={`${input_style}`}
        />
      </div>
      <div className="mb-6">
        <input
          required
          type="password"
          name="password"
          value={formValues.password}
          onChange={handleChange}
          placeholder="Password"
          className={`${input_style}`}
        />
      </div>
      <button
        type="submit"
        style={{ backgroundColor: `${loading ? "#ccc" : "#3446eb"}` }}
        className="inline-block px-7 py-4 bg-blue-600 text-white font-medium text-sm leading-snug uppercase rounded shadow-md hover:bg-blue-700 hover:shadow-lg focus:bg-blue-700 focus:shadow-lg focus:outline-none focus:ring-0 active:bg-blue-800 active:shadow-lg transition duration-150 ease-in-out w-full"
        disabled={loading}
      >
        {loading ? "loading..." : "Sign In"}
      </button>

      <div className="flex items-center my-4 before:flex-1 before:border-t before:border-gray-300 before:mt-0.5 after:flex-1 after:border-t after:border-gray-300 after:mt-0.5">
        <p className="text-center font-semibold mx-4 mb-0">OR</p>
      </div>

      <a
        className="px-7 py-2 text-white font-medium text-sm leading-snug uppercase rounded shadow-md hover:shadow-lg focus:shadow-lg focus:outline-none focus:ring-0 active:shadow-lg transition duration-150 ease-in-out w-full flex justify-center items-center mb-3"
        style={{ backgroundColor: "#3b5998" }}
        onClick={() => signIn("google", { callbackUrl })}
        role="button"
      >
        <img
          className="pr-2"
          src="/images/google.svg"
          alt=""
          style={{ height: "2rem" }}
        />
        Continue with Google
      </a>
      <a
        className="px-7 py-2 text-white font-medium text-sm leading-snug uppercase rounded shadow-md hover:shadow-lg focus:shadow-lg focus:outline-none focus:ring-0 active:shadow-lg transition duration-150 ease-in-out w-full flex justify-center items-center"
        style={{ backgroundColor: "#55acee" }}
        onClick={() => signIn("github", { callbackUrl })}
        role="button"
      >
        <img
          className="pr-2"
          src="/images/github.svg"
          alt=""
          style={{ height: "2.2rem" }}
        />
        Continue with GitHub
      </a>
    </form>
  );
};
Create the Server-Side Page Component
Now that you have created the login form component, it’s time to include it in a page component. Despite the page component being a React Server Component, you won’t encounter any issues since we have specified that the form component should only be rendered in the browser. We did this by including the "use client"; directive at the top of the form component.
src/app/login/page.tsx
import { LoginForm } from "./form";
import Header from "@/components/header.component";

export default function LoginPage() {
  return (
    <>
      <Header />
      <section className="bg-ct-blue-600 min-h-screen pt-20">
        <div className="container mx-auto px-6 py-12 h-full flex justify-center items-center">
          <div className="md:w-8/12 lg:w-5/12 bg-white px-8 py-10">
            <LoginForm />
          </div>
        </div>
      </section>
    </>
  );
}
How to Generate the Google OAuth2 Credentials
In this section, you’ll learn how to obtain the Google OAuth2 client ID and secret from the Google Cloud Console. Here are the steps to follow:
- Go to https://console.developers.google.com/ and make sure you’re signed in to your Google account.
- Click the dropdown menu at the top of the page to display a pop-up window. From there, you can choose an existing project or create a new one.
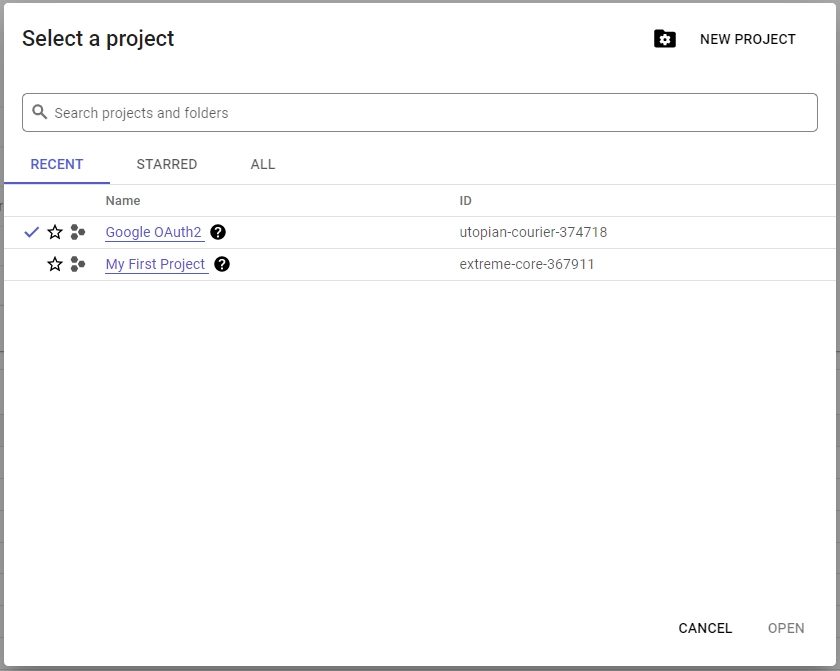
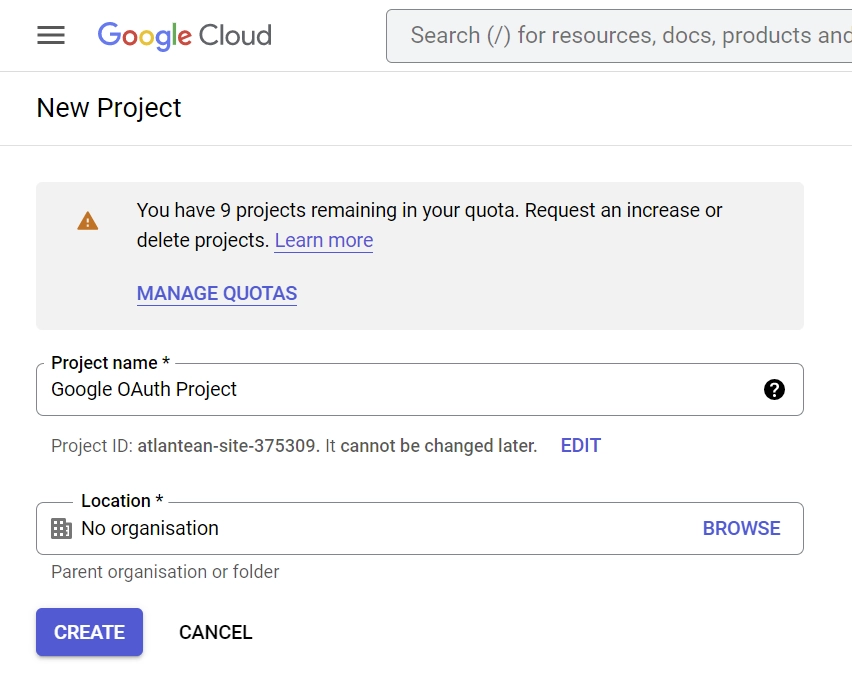
- To create a new project, click the “New Project” button in the top-right corner of the pop-up window. Enter a name for your project and click the “Create” button to complete the process.
- Once your project is created, click the “SELECT PROJECT” button from the notifications.

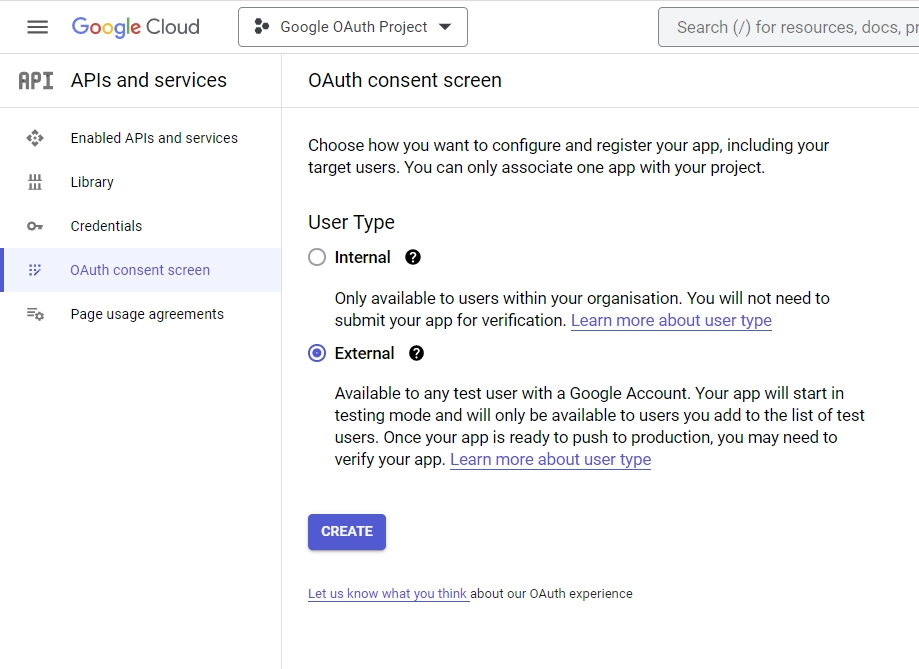
- Click the “OAuth consent screen” menu on the left sidebar. Choose “External” as the “User Type” and click on the “CREATE” button.
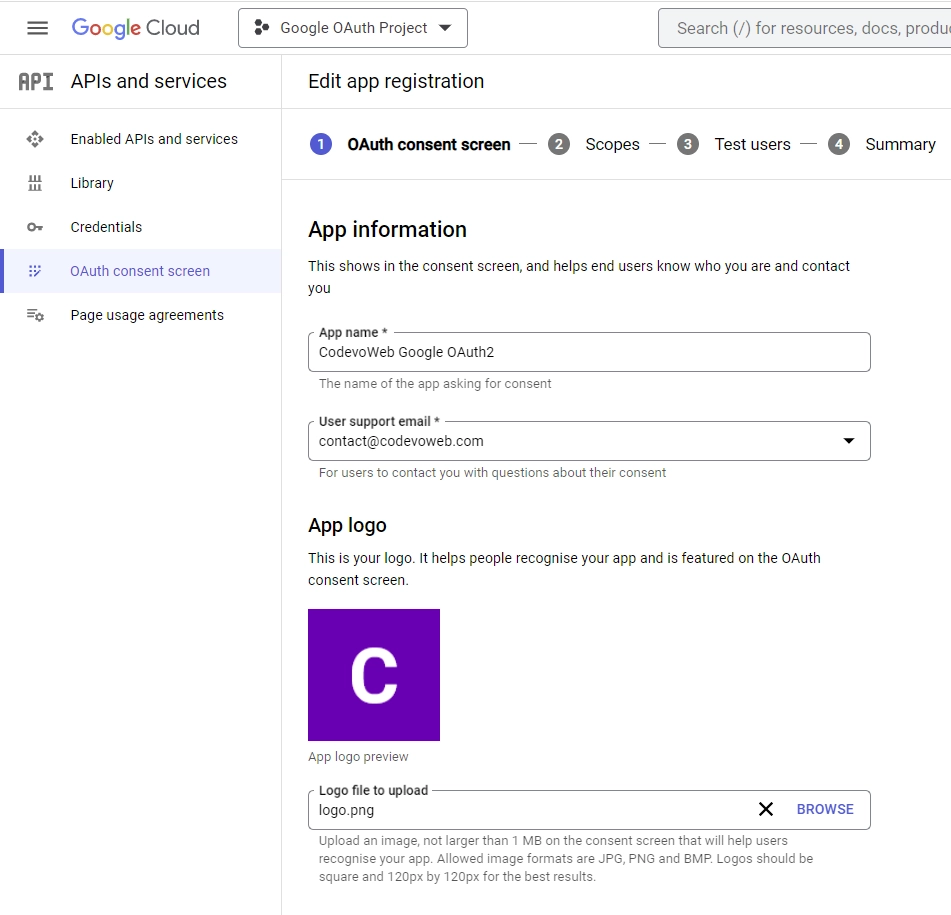
- On the “Edit app registration” screen, go to the “App information” section and fill in the required details, including a logo for the consent screen.
Under the “App domain” section, provide links to your homepage, privacy policy, and terms of service pages. Input your email address under the “Developer contact information” section and click on the “SAVE AND CONTINUE” button.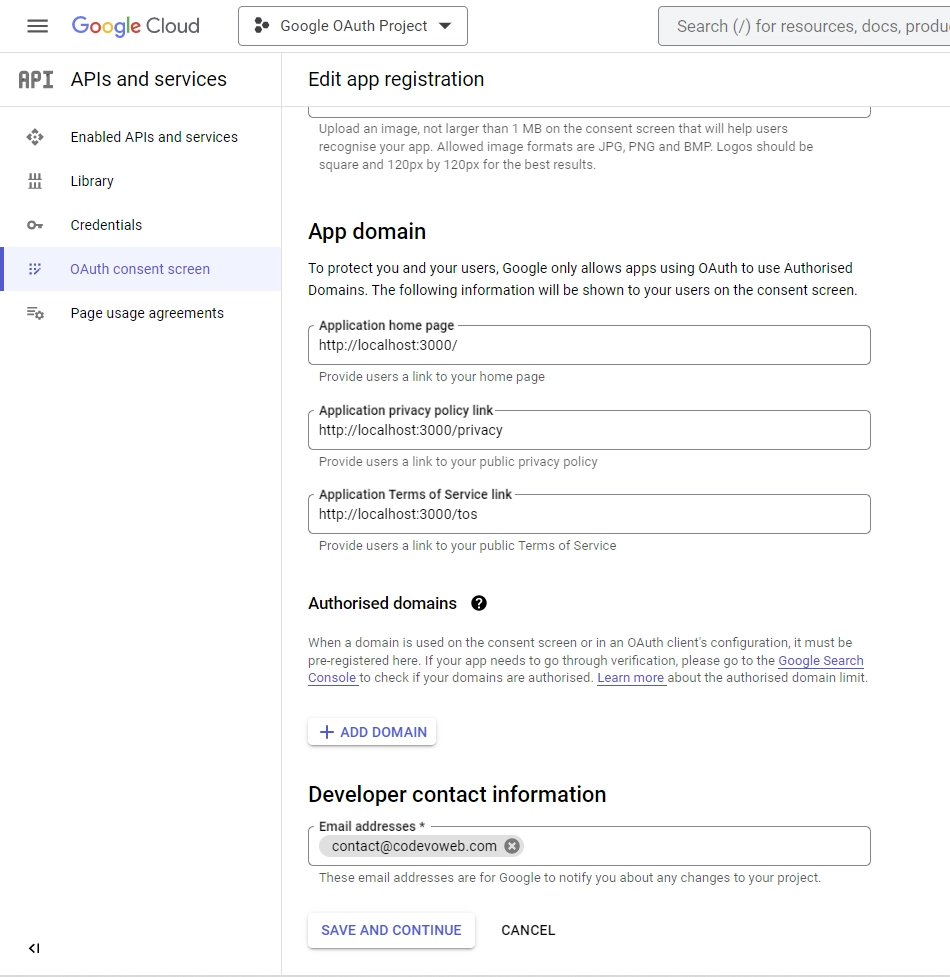
- On the “Scopes” screen, click on the “ADD OR REMOVE SCOPES” button, select
.../auth/userinfo.emailand.../auth/userinfo.profilefrom the list of options, and then click on the “UPDATE” button. Scroll down and click the “SAVE AND CONTINUE” button.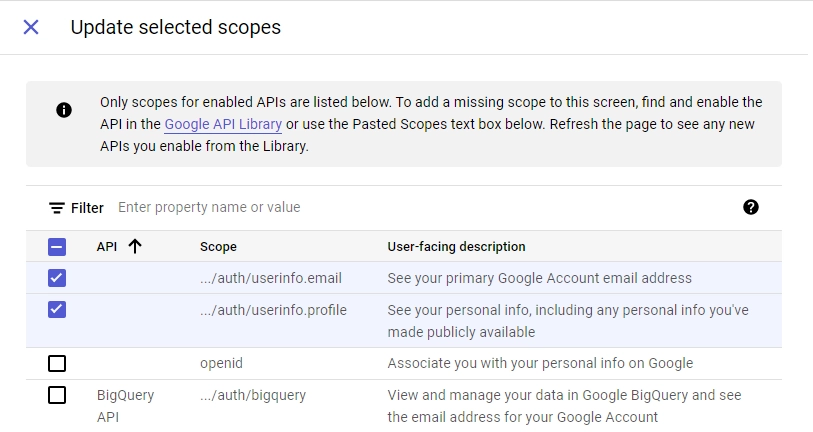
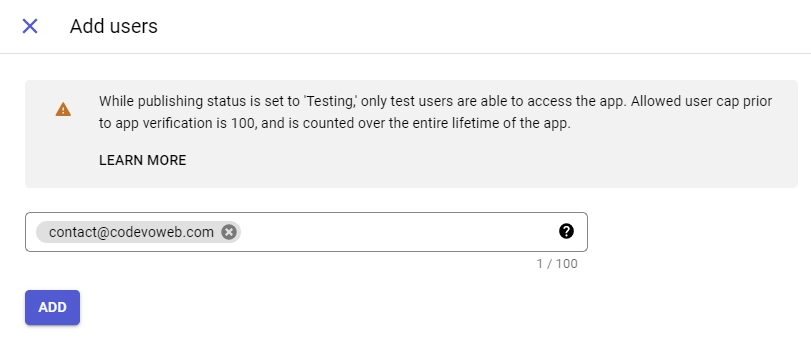
- On the “Test users” screen, add the email addresses of Google accounts that will be authorized to test your application while it is in sandbox mode. Click the “ADD USERS” button and input the email addresses. Click the “SAVE AND CONTINUE” button to proceed.
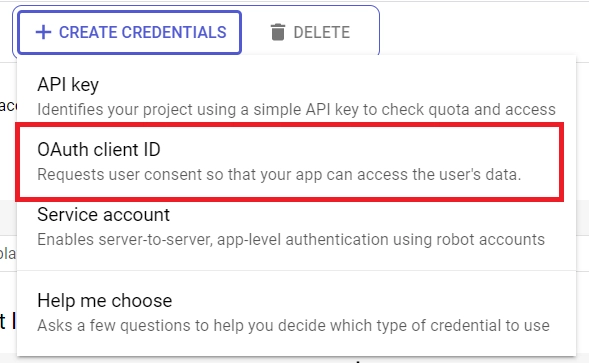
- Click on the “Credentials” option in the left sidebar. Select the “CREATE CREDENTIALS” button and choose “OAuth client ID” from the list of options provided.
- Choose “Web application” as the application type, and input a name for your app. Specify the authorized redirect URI as
http://localhost:3000/api/auth/callback/googleand click the “Create” button.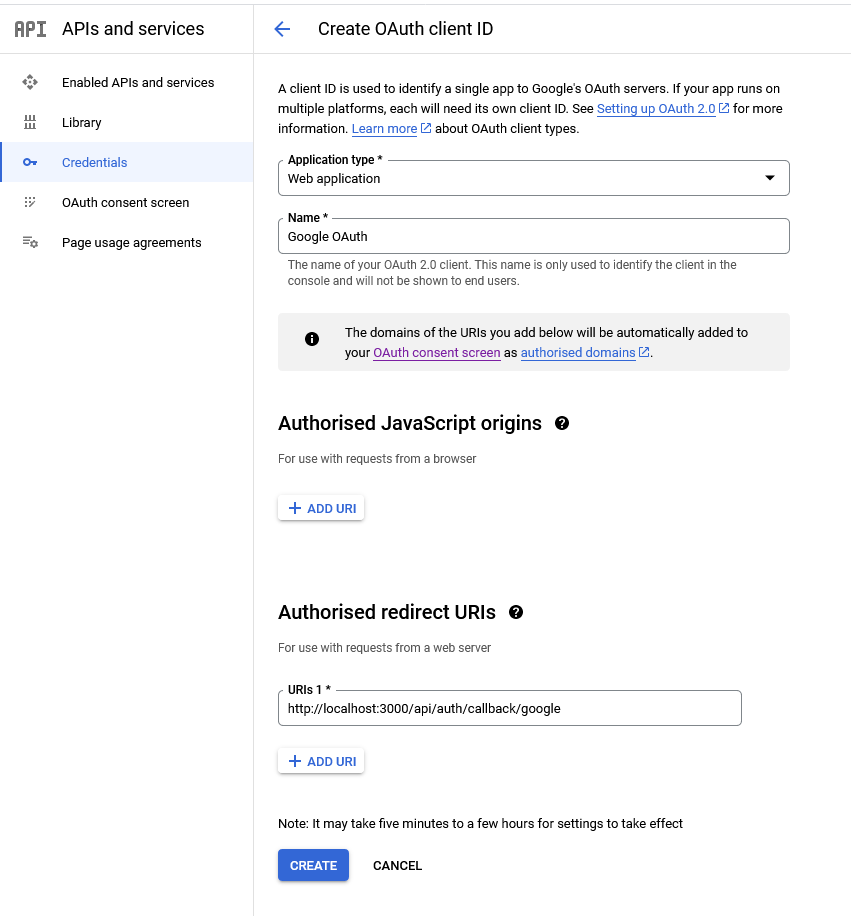
After the client ID has been created, copy the client ID and secret from the “Credentials” page and add them to the.envfile. Make sure to use the specific keys that NextAuth expects for the credentials. Here’s an example.envfile to guide you.
.env
NEXTAUTH_SECRET=my_ultra_secure_nextauth_secret
NEXTAUTH_URL=http://localhost:3000

GITHUB_ID=
GITHUB_SECRET=

GOOGLE_CLIENT_ID=
GOOGLE_CLIENT_SECRET=
How to Generate the GitHub OAuth Credentials
Follow these steps to register a GitHub OAuth app and obtain the Client ID and Secret.
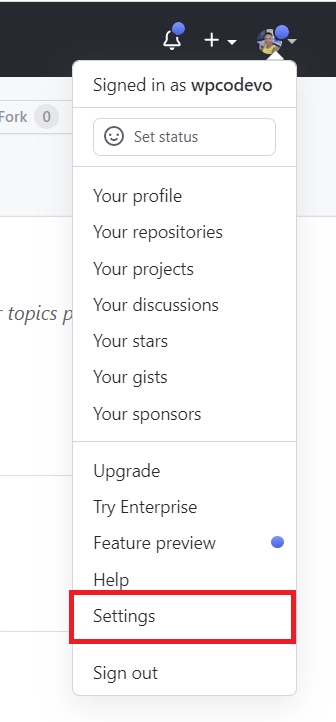
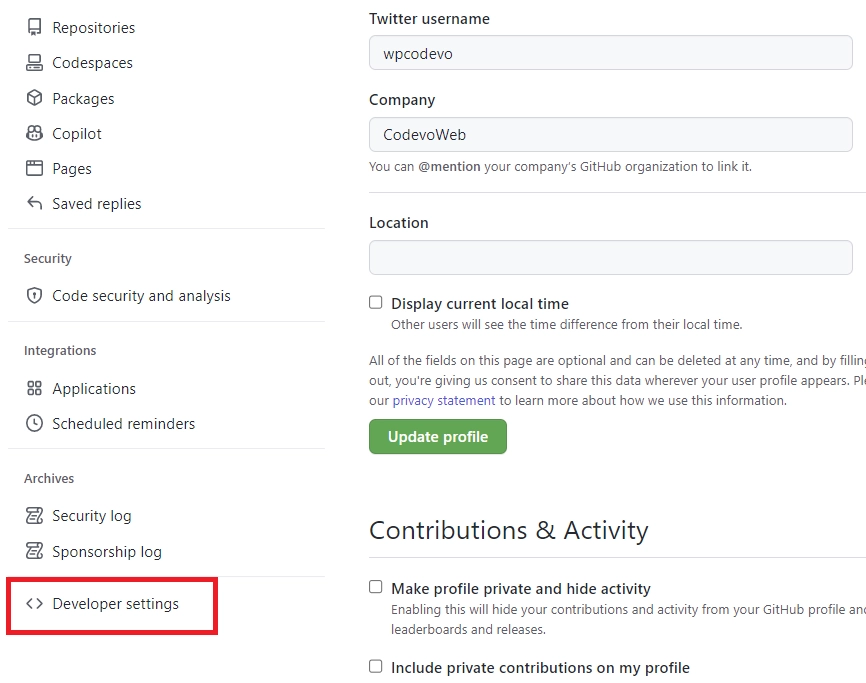
- Start by signing into your GitHub account. Click on your profile picture at the top right corner and select “Settings” from the dropdown menu. You’ll be taken to the GitHub Developer Settings page.
- Scroll down to find the “Developer settings” section and click on it.
- On the Developer settings page, look for “OAuth Apps” and click on it. Under the “OAuth Apps” section, click on the “New OAuth App” button.
- Fill in the “Application name” and “Homepage URL” input fields with the appropriate name and URL for your app. For the “Authorization callback URL”, enter the URL where GitHub will redirect users after they’ve authorized the app.
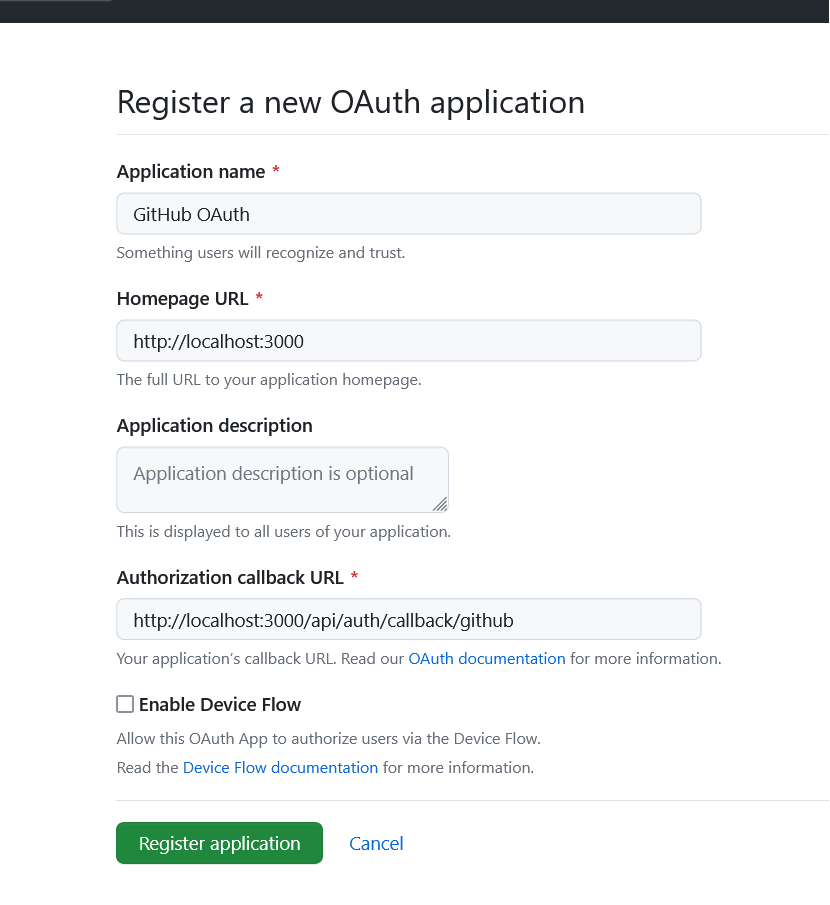
In this example, you need to enterhttp://localhost:3000/api/auth/callback/githubas the redirect URL. Once you’re finished, hit the “Register application” button to create the OAuth App. - Congrats, your application has been created! You’ll now be taken to the application details page where you can access the “Client ID” and generate the “Client Secret” keys.
To generate the OAuth client secret, click on the “Generate a new client secret” button. GitHub will then prompt you to confirm your identity before the client secret is generated.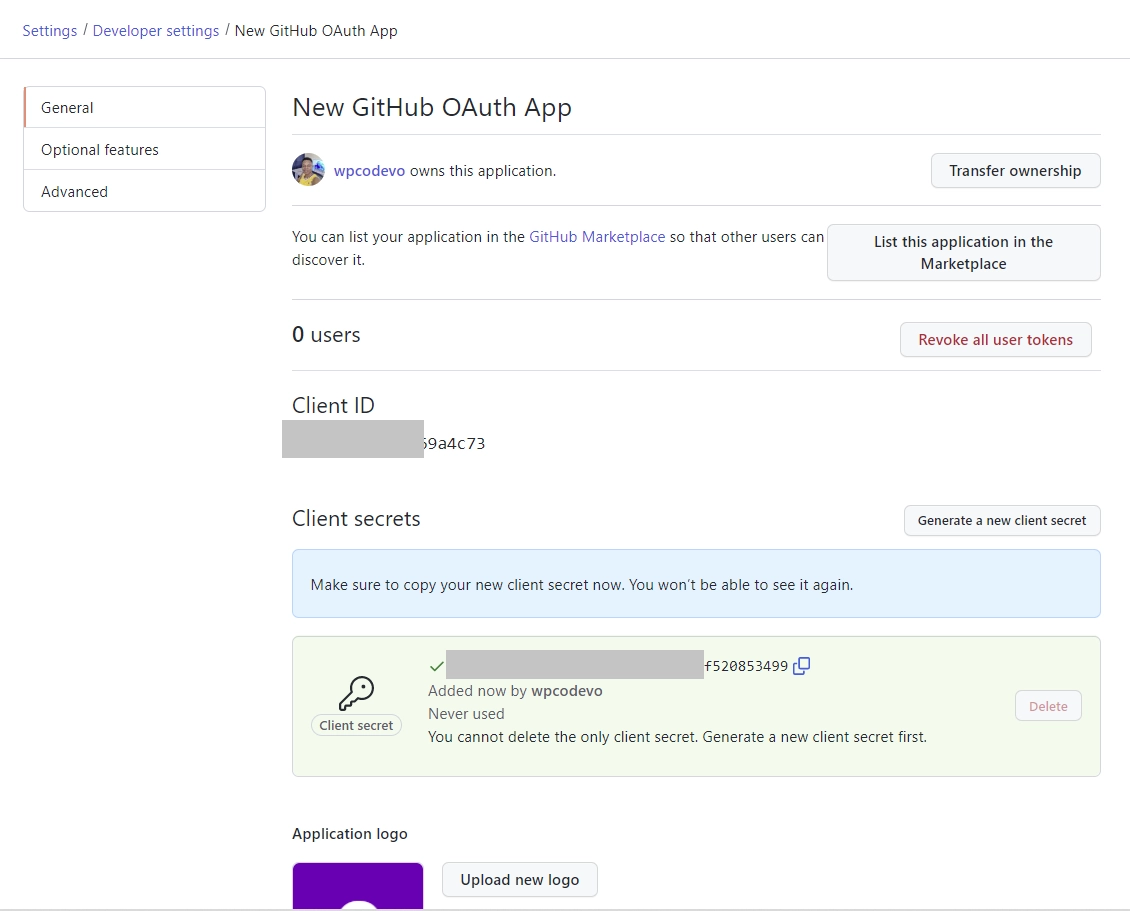
- With the GitHub OAuth client secret now generated, it’s time to add it, along with the client ID, to your
.envfile. Remember, NextAuth expects specific keys for these credentials. Check out this example.envfile to guide you.
.env
NEXTAUTH_SECRET=my_ultra_secure_nextauth_secret
NEXTAUTH_URL=http://localhost:3000

GITHUB_ID=
GITHUB_SECRET=

GOOGLE_CLIENT_ID=
GOOGLE_CLIENT_SECRET=
Conclusion
That’s it! In this tutorial, we went through the process of adding Google and GitHub OAuth authentication to a Next.js application using NextAuth. We also covered how to obtain the required OAuth client IDs and secrets from both Google and GitHub.
I hope you found this tutorial helpful and informative. If you have any feedback or questions, please don’t hesitate to leave them in the comments below. Thank you for reading!
Hi, that is a really wonderful article, helped me a lot.
I have a question though as I am still new to this, how do I add the user who signed in via google / github / any other provider to the db ?
To upsert the user in the database when using Google or GitHub OAuth, you need to add the database adapter to your NextAuth configurations. In our case, since we used Prisma, you need to add the Prisma adapter to the NextAuth config. This will allow NextAuth to take care of adding the user to the database if the user doesn’t already exist or update their credentials if they already exist in the database.
Someone else also asked this same question, so I have gone ahead and added the Prisma adapter to the NextAuth config. Additionally, this requires you to add some specific Prisma models to your schema. You can access the source code to see how I did it.
Nice tutorial, I would add this, to debug errors during OAuth:
export const authOptions: NextAuthOptions = {
logger: {
error(code, metadata) {
console.error(code, metadata)
},
warn(code) {
console.warn(code)
},
debug(code, metadata) {
console.debug(code, metadata)
}
},
….
the rest of auth.ts
Thanks for sharing!