

In this tutorial, you’ll learn how to set up and use Redux Toolkit and RTK Query in your Next.js 13 project. It’s worth noting that at the time of writing, Next.js 13 is still in beta.
Previously, React could only render on the client side, but with the release of React 18, a new feature called server components was introduced. Next.js 13 has adopted this feature and it’s located within the /app directory.
So, what exactly are server components? Simply put, they allow you to render components on the server, which reduces the amount of JavaScript that needs to be sent to the client. All components within the Next.js 13 /app directory are Server Components by default.
To demonstrate how we can use client-side rendering in Next.js 13, we’ll be creating a simple counter component that uses Redux Toolkit to manage its state. We’ll also use RTK Query to show you how to fetch data within the Next.js 13 app directory.
More practice:
- How to Setup tRPC API Server & Client with Next.js and Prisma
- Build tRPC API with Next.js & PostgreSQL: Access & Refresh Tokens
- Full-Stack Next.js tRPC App: User Registration & Login Example
- Build a tRPC CRUD API Example with Next.js
- Build a Full Stack tRPC CRUD App with Next.js

Setup the Next.js 13 Project
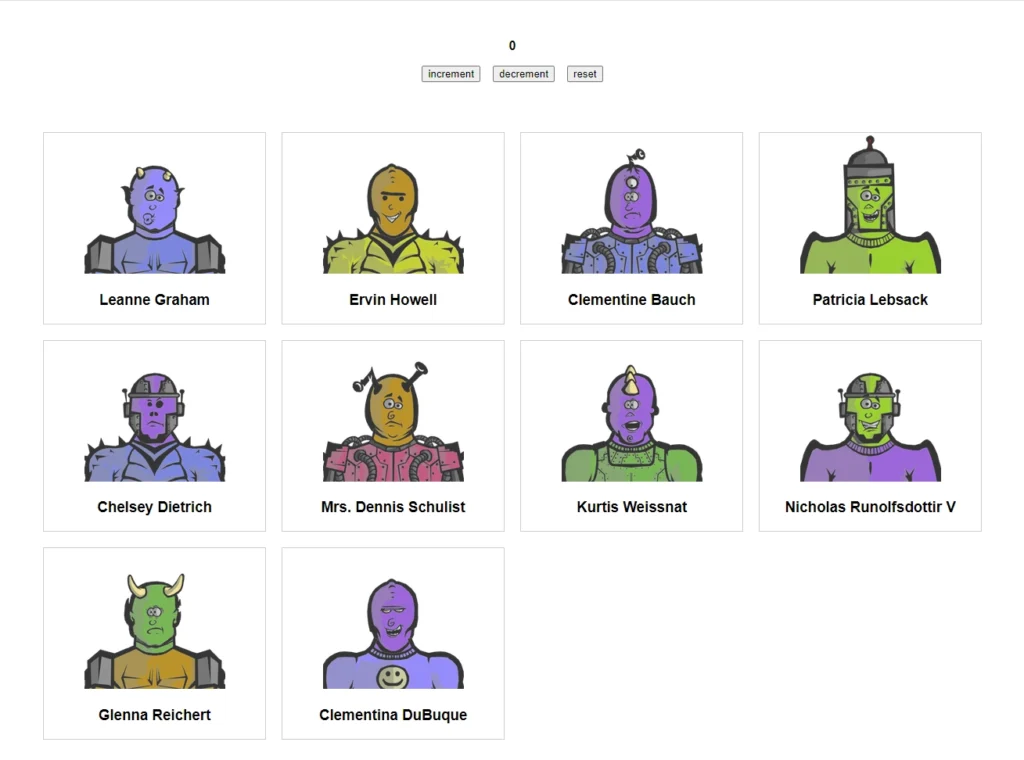
By following this tutorial, you’ll be able to create an app that looks like the preview screenshot below. The app includes a counter component and a list of users that are fetched from an API and displayed below the counter.
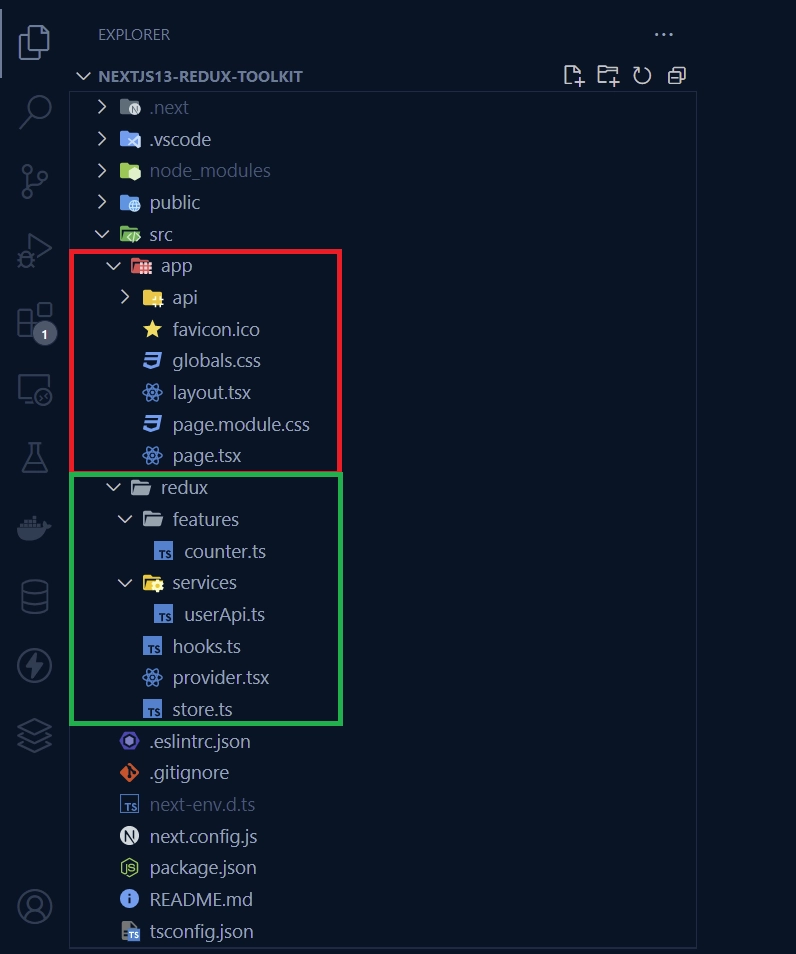
Also, the folder and file structure of your project will resemble the one shown in the screenshot below.
To begin, navigate to a location on your computer, such as your Desktop, and open a new terminal in that directory. From there, you can generate a new Next.js 13 project by running one of the following commands, depending on your preferred package manager.
yarn create next-app nextjs13-redux-toolkit
# or
npx create-next-app@latest nextjs13-redux-toolkit
After running the command, you’ll be prompted to enable some features before the project can be generated. Choose “Yes” for TypeScript and Eslint. You’ll then be asked if you want to use the src directory for the project, so select “Yes“.
Next, you’ll be prompted to enable the experimental app/ directory for the project, which is what we’ll be using in this tutorial, so choose “Yes“. Finally, you’ll be asked if you want to enable import alias, so press TAB to accept and then press Enter.
After answering all the questions, the Next.js 13 project will be generated and all necessary dependencies will be installed. Once the project is generated, you can open it in your preferred IDE. Before diving into how to use Redux Toolkit in the app directory, it’s a good idea to ensure everything is working correctly.
To do this, open the integrated terminal in your IDE and run either yarn dev or npm run dev depending on your package manager. This will start the Next.js dev server.
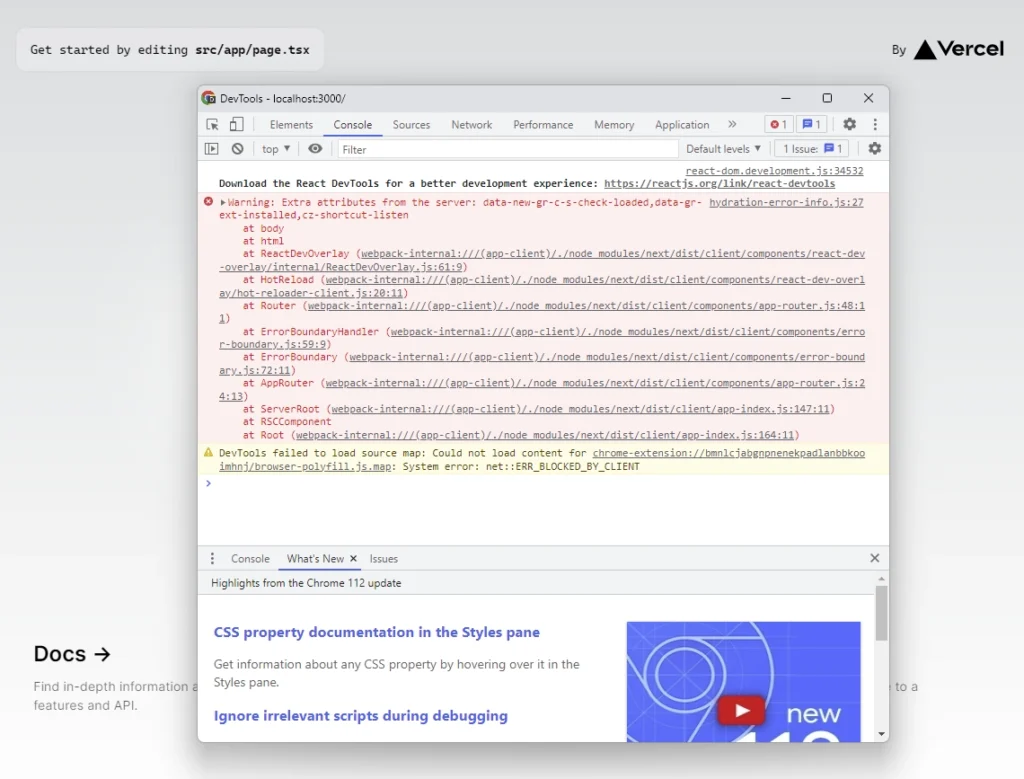
You can then view the project in your browser by navigating to http://localhost:3000/. However, you may notice an error in the Console tab of your browser dev tool related to hydration. Don’t worry, the Next.js team is likely to provide a solution to this error by the time you read this article.
Setup the Redux Store
With our Next.js 13 project set up, it’s time to move on to setting up the Redux store. Navigate to the “src” directory and create a new folder called “redux“. Inside this folder, create a file named store.ts and add the following code to it.
src/redux/store.ts
import { configureStore } from "@reduxjs/toolkit";

export const store = configureStore({
  reducer: {},
  devTools: process.env.NODE_ENV !== "production",
});

export type RootState = ReturnType<typeof store.getState>;
export type AppDispatch = typeof store.dispatch;
In the above code snippet, we utilized the configureStore function from the Redux Toolkit library to create a new instance of the Redux store. This function allows us to specify options and default middleware for the store. Here, we created an empty store with no middleware or reducers.
We also exported the store instance from the file so that other parts of the application could access it.
Finally, we extracted the RootState and Dispatch types from the store instance at the bottom of the file. By inferring these types from the store, we ensure that they stay up to date as we add new state slices or make changes to middleware settings.
Define Typed Hooks
Instead of importing the RootState and AppDispatch types into each component, it’s recommended to create typed versions of the useDispatch and useSelector hooks. This helps avoid potential circular import dependency issues and makes it easier to use these hooks across your application.
To do this, create a hooks.ts file within the “redux” directory and define the following hooks in it.
src/redux/hooks.ts
import { TypedUseSelectorHook, useDispatch, useSelector } from "react-redux";
import type { RootState, AppDispatch } from "./store";

export const useAppDispatch = () => useDispatch<AppDispatch>();
export const useAppSelector: TypedUseSelectorHook<RootState> = useSelector;
Define a Custom Provider
In earlier versions of Next.js, we would typically wrap the Redux provider around the main entry point of the application. However, with Next.js 13, every component is now a server-side component. This means we need to create a custom provider component that lives on the client-side and wrap it around the children nodes.
To create this custom provider component, we’ll create a new file named provider.tsx within the “redux” directory. We’ll use the "use client" flag at the top of the file to indicate that the provider component should live on the client-side. Once you’ve created the file, add the following code to it.
src/redux/provider.tsx
"use client";

import { store } from "./store";
import { Provider } from "react-redux";

export function Providers({ children }: { children: React.ReactNode }) {
  return <Provider store={store}>{children}</Provider>;
}
Provide the Redux Store to Next.js 13
Now that we have a custom provider component that runs on the client-side, we can incorporate it into the layout.tsx file, which acts as the template for our application layout. By wrapping the custom provider component around the children nodes, all of our components will be able to access the Redux store.
To accomplish this, navigate to the src/app/layout.tsx file and replace its existing code with the following block.
src/app/layout.tsx
// import "./globals.css";
import { Providers } from "@/redux/provider";

export const metadata = {
  title: "Create Next App",
  description: "Generated by create next app",
};

export default function RootLayout({
  children,
}: {
  children: React.ReactNode;
}) {
  return (
    <html lang="en">
      <body>
        <Providers>{children}</Providers>
      </body>
    </html>
  );
}
Create the Redux State Slice and Action Types
With the Redux store and provider component set up, we can now utilize Redux to manage the state of our application. To start, we will create a “slice” file that will be responsible for managing the state of a counter component.
Each slice file can be thought of as a specific piece of state in our application, and they are typically located within the “features” directory in the “redux” folder.
To create the counter slice, navigate to the “redux” directory and create a new folder called “features“. Inside the “features” folder, create a new file named counterSlice.ts and add the following code to it.
src/redux/features/counterSlice.ts
import { createSlice, PayloadAction } from "@reduxjs/toolkit";

type CounterState = {
  value: number;
};

const initialState = {
  value: 0,
} as CounterState;

export const counter = createSlice({
  name: "counter",
  initialState,
  reducers: {
    reset: () => initialState,
    increment: (state) => {
      state.value += 1;
    },
    decrement: (state) => {
      state.value -= 1;
    },
    incrementByAmount: (state, action: PayloadAction<number>) => {
      state.value += action.payload;
    },
    decrementByAmount: (state, action: PayloadAction<number>) => {
      state.value -= action.payload;
    },
  },
});

export const {
  increment,
  incrementByAmount,
  decrement,
  decrementByAmount,
  reset,
} = counter.actions;
export default counter.reducer;
Add the Slice Reducer to the Store
To enable Redux to manage the counter state, we need to incorporate the reducer function from the counter slice into our store. The reducer function will be responsible for handling all updates to the counter state.
To achieve this, we will import the reducer function from the counter slice into the src/redux/store.ts file and include it in the reducer parameter of the configureStore function. This will allow our Redux store to use the reducer function to manage updates to the counter state.
src/redux/store.ts
import { configureStore } from "@reduxjs/toolkit";
import counterReducer from "./features/counterSlice";

export const store = configureStore({
  reducer: {
    counterReducer,
  },
});

export type RootState = ReturnType<typeof store.getState>;
export type AppDispatch = typeof store.dispatch;
Use Redux State and Actions in the Next.js 13 App Directory
Let’s create a counter component that will use the counter slice to manage the state of our application. We’ll write this component in the src/app/page.tsx file, but first we need to indicate that this code should live on the client-side using the "use client" flag at the beginning of the file.
To get started, open the src/app/page.tsx file and replace its content with the following code.
src/app/page.tsx
"use client";

import { decrement, increment, reset } from "@/redux/features/counterSlice";
import { useAppDispatch, useAppSelector } from "@/redux/hooks";

export default function Home() {
  const count = useAppSelector((state) => state.counterReducer.value);
  const dispatch = useAppDispatch();

  return (
    <main style={{ maxWidth: 1200, marginInline: "auto", padding: 20 }}>
      <div style={{ marginBottom: "4rem", textAlign: "center" }}>
        <h4 style={{ marginBottom: 16 }}>{count}</h4>
        <button onClick={() => dispatch(increment())}>increment</button>
        <button
          onClick={() => dispatch(decrement())}
          style={{ marginInline: 16 }}
        >
          decrement
        </button>
        <button onClick={() => dispatch(reset())}>reset</button>
      </div>
    </main>
  );
}
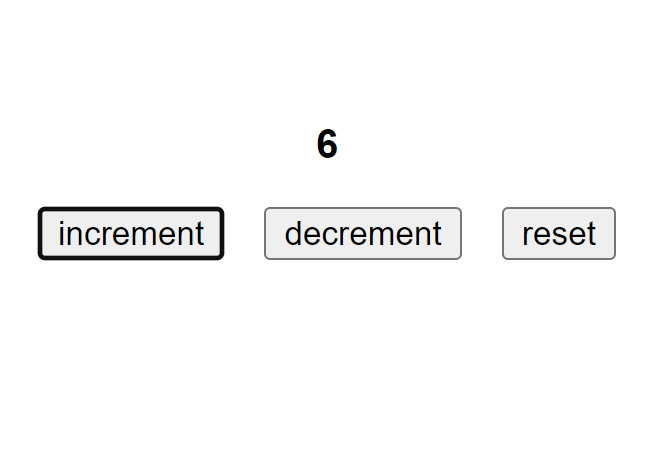
Once you have completed the previous steps, you can now start the Next.js development server and navigate to the root route at http://localhost:3000/ to begin interacting with the counter component.
Here, you’ll be able to increase, decrease, and reset the counter to test that Redux is effectively managing the state of the application.
Create the RTK Query API Service
Let’s see how we can use RTK Query to fetch data from an API and handle server-side state in our Next.js 13 project. Server-side state is usually defined in a “services” directory located within the “redux” folder.
To create the API service, we can simply create a userApi.ts file inside the “services” directory and copy the following code into it.
src/redux/services/userApi.ts
import { createApi, fetchBaseQuery } from "@reduxjs/toolkit/query/react";

type User = {
  id: number;
  name: string;
  email: number;
};

export const userApi = createApi({
  reducerPath: "userApi",
  refetchOnFocus: true,
  baseQuery: fetchBaseQuery({
    baseUrl: "https://jsonplaceholder.typicode.com/",
  }),
  endpoints: (builder) => ({
    getUsers: builder.query<User[], null>({
      query: () => "users",
    }),
    getUserById: builder.query<User, { id: string }>({
      query: ({ id }) => `users/${id}`,
    }),
  }),
});

export const { useGetUsersQuery, useGetUserByIdQuery } = userApi;
The userApi.ts file above defines two endpoints: getUsers and getUserById. The getUsers endpoint fetches a list of users from https://jsonplaceholder.typicode.com/, while the getUserById endpoint retrieves a user by their Id.
Additionally, we set refetchOnFocus: true to ensure that when the application window is refocused, all subscribed queries are refetched by RTK Query.
Add the RTK Query API Service to the Store
Now that we have defined our API service, we need to integrate it into our Redux store. This involves adding the service’s reducer to the reducer parameter and its middleware to the middleware parameter of the configureStore function.
In addition, we must call setupListeners(store.dispatch) to enable the refetchOnFocus feature.
To do this, open the src/redux/store.ts file and replace its contents with the following code snippets.
src/redux/store.ts
import { configureStore } from "@reduxjs/toolkit";
import counterReducer from "./features/counterSlice";
import { userApi } from "./services/userApi";
import { setupListeners } from "@reduxjs/toolkit/dist/query";

export const store = configureStore({
  reducer: {
    counterReducer,
    [userApi.reducerPath]: userApi.reducer,
  },
  devTools: process.env.NODE_ENV !== "production",
  middleware: (getDefaultMiddleware) =>
    getDefaultMiddleware({}).concat([userApi.middleware]),
});

setupListeners(store.dispatch);

export type RootState = ReturnType<typeof store.getState>;
export type AppDispatch = typeof store.dispatch;
Use RTK Query in the Next.js 13 App Directory
We’ve now created the counter slice and API service, so let’s put them to use within the src/app/page.tsx file. Open this file and replace its contents with the code provided below.
src/app/page.tsx
"use client";

import { useGetUsersQuery } from "@/redux/services/userApi";
import { decrement, increment, reset } from "@/redux/features/counterSlice";
import { useAppDispatch, useAppSelector } from "@/redux/hooks";

export default function Home() {
  const count = useAppSelector((state) => state.counterReducer.value);
  const dispatch = useAppDispatch();

  const { isLoading, isFetching, data, error } = useGetUsersQuery(null);

  return (
    <main style={{ maxWidth: 1200, marginInline: "auto", padding: 20 }}>
      <div style={{ marginBottom: "4rem", textAlign: "center" }}>
        <h4 style={{ marginBottom: 16 }}>{count}</h4>
        <button onClick={() => dispatch(increment())}>increment</button>
        <button
          onClick={() => dispatch(decrement())}
          style={{ marginInline: 16 }}
        >
          decrement
        </button>
        <button onClick={() => dispatch(reset())}>reset</button>
      </div>

      {error ? (
        <p>Oh no, there was an error</p>
      ) : isLoading || isFetching ? (
        <p>Loading...</p>
      ) : data ? (
        <div
          style={{
            display: "grid",
            gridTemplateColumns: "1fr 1fr 1fr 1fr",
            gap: 20,
          }}
        >
          {data.map((user) => (
            <div
              key={user.id}
              style={{ border: "1px solid #ccc", textAlign: "center" }}
            >
              <img
                src={`https://robohash.org/${user.id}?set=set2&size=180x180`}
                alt={user.name}
                style={{ height: 180, width: 180 }}
              />
              <h3>{user.name}</h3>
            </div>
          ))}
        </div>
      ) : null}
    </main>
  );
}
Congratulations! You’ve successfully integrated both the counter slice and API service in the src/app/page.tsx file. You can now start the Next.js dev server and go to http://localhost:3000/ to see the application in action.
On the page, you’ll find the counter component along with a grid displaying a list of users fetched from the https://jsonplaceholder.typicode.com/ API.
Conclusion
In this article, you’ve learned how to set up and use Redux Toolkit and RTK Query in your Next.js 13 app. Additionally, we’ve demonstrated how you can create a basic counter component to showcase the power of the Redux store within your Next.js project. By implementing these tools, you can effectively manage your application state and fetch data from an API in a more organized and efficient manner.
We hope you found this tutorial helpful. If you have any feedback or questions, please let us know in the comments. You can also find the source code for the project on GitHub.
Great article!
What if I want to use SSG and generate static HTML on the server side and serve it on the client side? Should I use getStaticProps as it was done in Next 12? Maybe could You provide a example of how to merge RTK query together with SSG in Next.js that will be priceless 🙂
It’s worth noting that the Next.js 13 app directory introduces simplified data fetching, thanks to the Next.js team’s innovative use of the native Fetch API that React 18 introduced for data fetching.
If you’re interested in getting a more in-depth understanding of how data fetching works in the new Next.js 13 app directory, be sure to check out a helpful video released by the Vercel team.
You can access the video by following this link: https://youtu.be/gSSsZReIFRk?t=293. Happy learning!
That’s an great information for recent update. But I have one question that where can we add ThemeProvider and Cssbaseline in latest nextjs update?? same in layout.js or anywhere else. Please let me know if have knowledge on this.
As you mentioned the
ThemeProviderandCssbaseline, I can relate them to Material UI. Material UI is a library that mainly works on the client-side of your application.This means that if you want to use the
ThemeProviderandCssbaseline, you’ll need to create a dedicated file with the"use client";pragma. Inside this file, you can define and configure theThemeProviderandCssbaselinecomponents.Once this file is set up, you can wrap the
childrenprop of the root layout component with theThemeProvidercomponent.To use the Material UI (MUI) components, make sure to include the
"use client";pragma at the beginning of each file where you want to utilize these components.It’s important to keep in mind that this approach does have a trade-off, as it may limit some of the benefits provided by React Server Component.
Another workaround that I’ve come across in GitHub issues is to create separate client-side components that return the respective Material UI components.
While this approach can reduce the load time, it may involve recreating the entire library
Great article, but i am getting an error which says: Error: could not find react-redux context value; please ensure the component is wrapped in a .
I am using it as you have done, in the root layout.
Did you make sure to include the
"use client";directive at the beginning of the file that contains the provider component wrapping around thechildrenprop of the root layout?Is it a best practice to include “use client” ?
No, using the
"use client"pragma is not considered a best practice. However, it is mandatory to include the"use client"directive in files that contain client components.This ensures that you can safely use the client component in a server component without encountering any errors.
My question is whether working in this way will transform our app into a primarily client-side app. This means that in this case, we will have very few components running on the server side. Is that correct?
That is not the case. When you include a client-side component in a React Server Component by using the
"use client;"directive, it doesn’t mean that your app becomes primarily client-side.On the initial request, all components, including the client-side component, undergo server-side rendering. This means that the server generates the HTML for the components and sends it to the browser.
Once the HTML reaches the browser, the client-side component is
hydrated. Hydration is the process of initializing the component with interactivity and providing access to the hooks offered by Next.js and React.js.After hydration is complete, and subsequent navigations occur within the app, the components will undergo client-side rendering. This means that the browser takes over the rendering process and handles the interactivity and dynamic updates.
However, it’s important to note that the initial rendering still involves server-side rendering, ensuring that the components are initially rendered on the server before being sent to the browser for hydration.
In summary, although you have a client-side component in your app, the overall rendering process combines server-side rendering and client-side rendering.
The server performs initial rendering, and the browser takes over for subsequent interactions, providing a smooth and interactive user experience.
Hey Edem, nice tutorial.
I’m not new to Next.js, and I’m also familiar with Redux.
Could you please explain why you prefer using RTK over a regular fetch to retrieve all users from “https://jsonplaceholder.typicode.com/users”?
Just to clarify my understanding:
Instead of making “app/page.tsx” a client component, you could have implemented it as a server component. You could have used a regular fetch on the server-side to retrieve all users and include a client component (“use client”) just for the button increment/decrement functionality. Am I correct in my understanding?
Thank you, and keep up the good work.
If I were working on my own project, considering the recent releases of
Next.js 13.4andReact.js 18, I would choose to use the Fetch API and React’s newusehook for data fetching instead of RTK Query.However, in this article, the primary focus was demonstrating the usage of Redux Toolkit in Next.js 13. That’s why I specifically utilized RTK Query to fetch the list of users. RTK Query provides advanced features such as cache normalization, automatic background data updates, error handling, and retries, which can be highly beneficial in complex scenarios.
It’s important to note that the Fetch API does not come with these advanced features built-in, so if you require functionalities like cache normalization, automatic background data updates, error handling, and retries, you would need to implement them manually.
You’re right that I could have kept the
app/page.tsxfile as a React Server Component and moved the code that uses Redux and React hooks to a separate client-side component. But I chose to keep things simple by putting all the code in theapp/page.tsxfile.Can you make a blog about how to integrate redux-persist and redux toolkit with nextjs13 app directory..?
Certainly! I’ll add that topic to my to-do list. In the meantime, you can check out this article on LogRocket’s blog: link. It provides a detailed guide on how to integrate
redux-persistandredux toolkitin a React project.Although the article is not specific to Next.js 13, the concepts and techniques discussed can still be applied in a Nextjs13 app directory.
Nicely done,
Thanks for the article. Just a suggestion; please next time that you’re gonna explain how to use RTK-Query/just sending an AJAX call to an API add the part on how to add the access token to the AJAX call since it is sometimes more trickier than it looks — e.x. https://github.com/reduxjs/redux-toolkit/issues/1331
Thank you for your suggestion! I appreciate your feedback and will take it into consideration for future articles.
I don’t think having
'use client'on the root component is what you want. By doing this, you are creating a SPA and, in that case, you don’t need Next.js at all.Though including the
"use client"pragma in the root component may lead to a more SPA-like behavior, Next.js remains valuable for its SSR capabilities, which can significantly improve SEO and provide a better user experience.Taking back a SPA part but about the first part ->
Once “use client” is defined in a file, all other modules imported into it, including child components, are considered part of the client bundle.
This way not effective because you using ‘use client’ as root component, so all children be client side which goes against NextJs 13 principles.
hy , is this Method Is Only For Client side Redux Provider.if one of my server Side Rendered Page want to Get some Redux State .How Can I do That ?
Great question! In Next.js, all the pages or components in the app directory undergo server-side rendering by default, regardless of whether they are React Server or Client Components.
I understand that you want to access your Redux state in a React Server Component. However, it’s important to note that the Redux state is only available in the browser and can only be accessed by client-side components.
To achieve this, you can extract the part of the code that needs access to the Redux state into a separate Client-Side component. Then, you can import and render this client component inside the React Server Component. This way, you’ll have access to the Redux state in your client-side component.
You actually can get state from the store, but you won’t be able to have interactivity with it, since you can’t update the state without using hooks. To get the state just import the store, it’ll have a method called getState(), from there it follows the same dot notation from the useSelector.
Example: store.getState().myState.myValue
You can also dispatch actions with store.dispatch, it’ll update the store, but not the page since you’re not using a hook, hence React won’t know to update the page.
Wow, this saved me good! Had some problems along the way, but just because I didn’t pay proper attention, like using “use client” in the Provider wrapper. Thank you for the help!
hello Edem, does this setup need to install next-redux-wrapper? I thought next-redux-wrapper is need for building redux in nextjs.
The use of the
next-redux-wrapperlibrary is not mandatory for this setup. Personally, I haven’t used it in my own Next.js projects before, but if it worked well for you in the past, feel free to use it.import React from ‘react’
import {store} from ‘../redux/store’
export default function Demo() {
const count =store.getState().counterReducer.value
console.log(count,”Counter”)
return (
Test : {count}
)
}
In SSR the count is not updated when i navigate from home screeen to demoscreeen count not updated but when i add ‘ use client ‘ then only it updates .Is it possible to fix with out using next-redux-wrapper