

Are you interested in using tRPC in the new Next.js 13 app directory? Look no further! In this article, I’ll walk you through the process of setting up a tRPC server and client in the Next.js 13 app directory step by step.
It’s worth noting that tRPC is not currently officially supported in React Server Components, which Next.js 13 has adopted. However, you can still use tRPC in Client Side Components by including the "use client" flag at the top of the files.
One challenge that you may encounter is how to hydrate a fetch call made in a client-side component that’s fetched through SSR and mounted on the client. Unfortunately, React Query doesn’t yet support this feature, but the tRPC team is working on a workaround to enable tRPC to be used in both React Server and Client components.
You can check out the experimental playground for tRPC + Next.js 13 at https://github.com/trpc/next-13, and also review discussions and possible workarounds for these issues at https://github.com/trpc/trpc/discussions/3185, https://github.com/trpc/trpc/issues/3297, and https://twitter.com/alexdotjs/status/1598240673211510784.
That being said, in this article, we’ll focus on setting up tRPC in Next.js 13 where only the client will make the RPC calls. So, let’s get started!
More practice:
- How to Setup React Context API in Next.js 13 App Directory
- How to Setup React Query in Next.js 13 App Directory
- How to Setup Redux Toolkit in Next.js 13 App Directory
- Setup and Use NextAuth.js in Next.js 13 App Directory
- React Query and Axios: User Registration and Email Verification
- Forgot/Reset Passwords with React Query and Axios
Setup the Next.js 13 Project
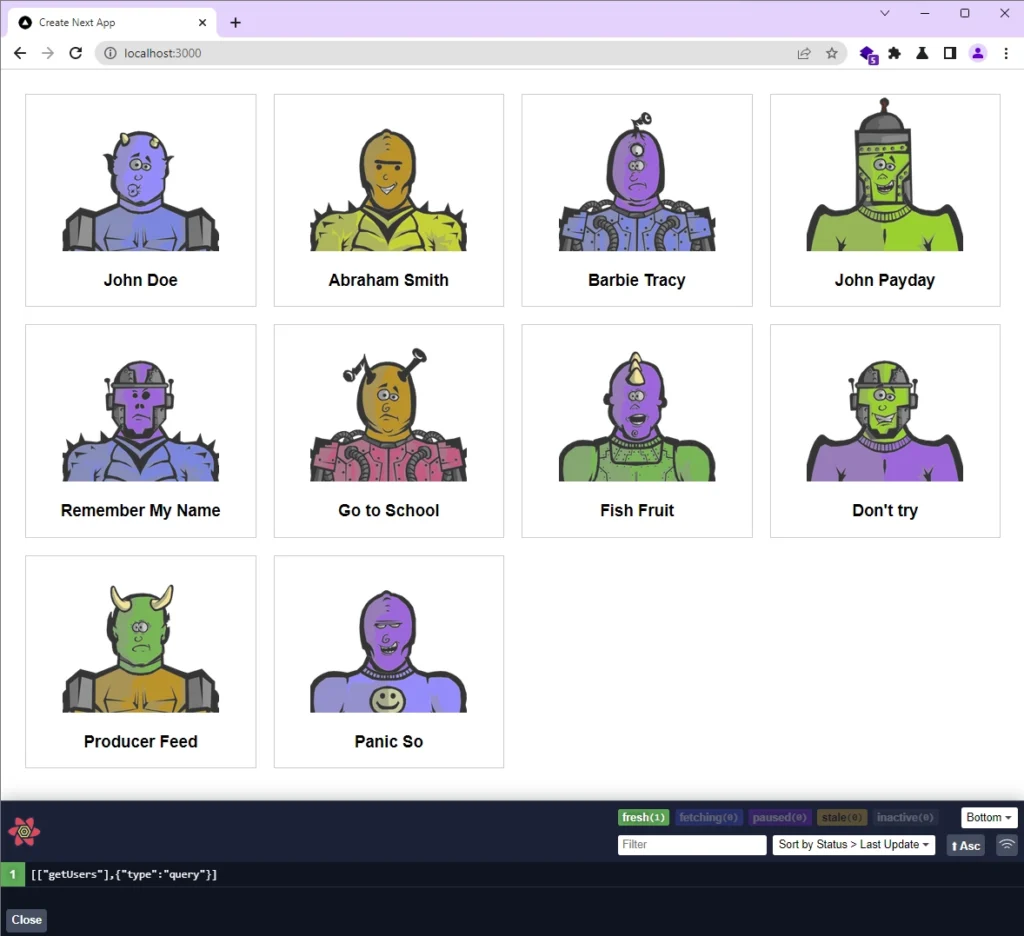
When you finish this tutorial, your app will resemble the screenshot below. The app will fetch a list of users from the tRPC backend through an RPC call made by the tRPC client. Once the request is successful, the app will display the fetched users on the page.
First, choose a directory on your computer to store the project source code. Then, depending on your preferred package manager, run one of the commands below to initiate the setup of your Next.js 13 project:
yarn create next-app nextjs13-trpc-setup
# or
npx create-next-app@latest nextjs13-trpc-setup
# or
pnpm create next-app nextjs13-trpc-setup
As you proceed through the setup process, you’ll encounter several prompts that require your attention. Firstly, you’ll be prompted to enable TypeScript and ESLint, and you should select “Yes” for both. Then, choose “Yes” for both the experimental app/ directory and src/ directory options. Lastly, you’ll be prompted to select an import alias, where you should press the Tab key to choose the first option and then press Enter.
After responding to these prompts, the project will be created, and all necessary dependencies will be automatically installed. Once the installation process is complete, you can open the project in your favourite IDE or text editor.
Create a Client-Side tRPC Provider
tRPC relies on React Query to communicate with the tRPC server. However, using React Query in a Server Component is not supported, and doing so will result in an error.
To address this limitation, we can create a custom Client Component to render both the QueryClient and tRPC providers on the client-side. By doing so, we can ensure that all subsequent client components have access to both the tRPC client and the query client.
In Next.js 13, creating a component that lives only on the client-side is as simple as adding the "use client" flag at the top of the file. This instructs the server to skip rendering the component on the server-side.
To create the custom component, start by creating a ‘utils‘ folder inside the ‘src‘ directory. Within the ‘utils‘ folder, create a trpc-provider.tsx file and add the following code.
src/utils/trpc-provider.tsx
"use client";

import { QueryClient, QueryClientProvider } from "@tanstack/react-query";
import { httpBatchLink, getFetch, loggerLink } from "@trpc/client";
import { useState } from "react";
import superjson from "superjson";
import { trpc } from "./trpc";
import { ReactQueryDevtools } from "@tanstack/react-query-devtools";

export const TrpcProvider: React.FC<{ children: React.ReactNode }> = ({
  children,
}) => {
  const [queryClient] = useState(
    () =>
      new QueryClient({
        defaultOptions: { queries: { staleTime: 5000 } },
      })
  );

  const url = process.env.NEXT_PUBLIC_VERCEL_URL
    ? `https://${process.env.NEXT_PUBLIC_VERCEL_URL}`
    : "http://localhost:3000/api/trpc/";

  const [trpcClient] = useState(() =>
    trpc.createClient({
      links: [
        loggerLink({
          enabled: () => true,
        }),
        httpBatchLink({
          url,
          fetch: async (input, init?) => {
            const fetch = getFetch();
            return fetch(input, {
              ...init,
              credentials: "include",
            });
          },
        }),
      ],
      transformer: superjson,
    })
  );
  return (
    <trpc.Provider client={trpcClient} queryClient={queryClient}>
      <QueryClientProvider client={queryClient}>
        {children}
        <ReactQueryDevtools />
      </QueryClientProvider>
    </trpc.Provider>
  );
};
Add the tRPC Provider to Next.js 13
Now that we have created a custom client-side provider that wraps around the React Query and tRPC providers, we need to ensure it’s rendered at the root of the app so that all client components can access it. This can be achieved by wrapping the provider around the {children} node in the src/app/layout.tsx file, which is the main entry point of the application.
As the Layout component is a Server Component, it will be able to directly render the provider since the provider component has been marked as a Client component.
To accomplish this, open the src/app/layout.tsx file and replace its contents with the following code.
src/app/layout.tsx
import { TrpcProvider } from "@/utils/trpc-provider";

export const metadata = {
  title: "Create Next App",
  description: "Generated by create next app",
};

export default function RootLayout({
  children,
}: {
  children: React.ReactNode;
}) {
  return (
    <html lang="en">
      <body>
        <TrpcProvider>{children}</TrpcProvider>
      </body>
    </html>
  );
}
Create the tRPC App Router
At this point, we’re ready to initialize the tRPC backend, create a tRPC router, and define an RPC that retrieves a list of users when invoked by the tRPC client. Originally, I had planned to include Prisma and PostgreSQL to store the user list, but I decided against it as it could make the project more complicated and introduce more variables. The focus of this tutorial is to showcase how tRPC can be used in the new Next.js 13 app directory.
To begin, navigate to the src/app/api directory and create a trpc folder. Inside the trpc folder, create a trpc-router.ts file and paste the following code.
src/app/api/trpc/trpc-router.ts
import { initTRPC } from "@trpc/server";
import superjson from "superjson";

const t = initTRPC.create({
  transformer: superjson,
});

export const appRouter = t.router({
  getUsers: t.procedure.query(({ ctx }) => {
    return userList;
  }),
});

export type AppRouter = typeof appRouter;

// The code below is kept here to keep things simple

interface User {
  id: string;
  name: string;
  email: string;
}

const userList: User[] = [
  {
    id: "1",
    name: "John Doe",
    email: "johndoe@gmail.com",
  },
  {
    id: "2",
    name: "Abraham Smith",
    email: "abrahamsmith@gmail.com",
  },
  {
    id: "3",
    name: "Barbie Tracy",
    email: "barbietracy@gmail.com",
  },
  {
    id: "4",
    name: "John Payday",
    email: "johnpayday@gmail.com",
  },
  {
    id: "5",
    name: "Remember My Name",
    email: "remembermyname@gmail.com",
  },
  {
    id: "6",
    name: "Go to School",
    email: "gotoschool@gmail.com",
  },
  {
    id: "7",
    name: "Fish Fruit",
    email: "fishfruit@gmail.com",
  },
  {
    id: "8",
    name: "Don't try",
    email: "donttry@gmail.com",
  },
  {
    id: "9",
    name: "Producer Feed",
    email: "producerfeed@gmail.com",
  },
  {
    id: "10",
    name: "Panic So",
    email: "panicso@gmail.com",
  },
];
Create the tRPC HTTP Handler
When creating the tRPC API, it’s important to note that the Next.js adaptor is not currently compatible with the Next.js 13 app directory. This means that the createNextApiHandler function cannot be used to create the API handler in the app router. To work around this limitation, we’ll use the fetch adaptor, which is built on top of the standard web Request and Response objects.
To create the tRPC API, navigate to the src/app/api/trpc directory and create a new dynamic directory named [trpc]. Within this directory, create a route.ts file and add the following code.
src/app/api/trpc/[trpc]/route.ts
import {
  FetchCreateContextFnOptions,
  fetchRequestHandler,
} from "@trpc/server/adapters/fetch";
import { appRouter } from "../trpc-router";

const handler = (request: Request) => {
  console.log(`incoming request ${request.url}`);
  return fetchRequestHandler({
    endpoint: "/api/trpc",
    req: request,
    router: appRouter,
    createContext: function (
      opts: FetchCreateContextFnOptions
    ): object | Promise<object> {
      return {};
    },
  });
};

export { handler as GET, handler as POST };
Create the tRPC Hooks
Now that the tRPC API has been created, it’s time to generate the tRPC hooks for the procedures defined on the server. However, since we’re using Next.js 13 and the @trpc/next package is not yet compatible with it, we can’t use the ‘createTRPCNext’ function to generate the hooks. Instead, we’ll use the createTRPCReact function provided by the @trpc/react-query package.
To generate the hooks, create a trpc.ts file in the src/utils folder and add the following code to it:
src/utils/trpc.ts
import type { AppRouter } from "@/app/api/trpc/trpc-router";
import { createTRPCReact } from "@trpc/react-query";

export const trpc = createTRPCReact<AppRouter>();
Make an API Request
With the new tRPC hook in place, you can now call the API from your React components. Since we only have one server procedure in this demo, we’ll use the hook to fetch the list of users. Keep in mind that we can’t make this RPC call directly from a Server Component, so we’ll create a client-side component and use the hook to make the call.
To get started, create a new file called ListUsers.tsx in the app directory and add the following code:
src/app/ListUsers.tsx
"use client";

import { trpc } from "@/utils/trpc";
import React from "react";

export default function ListUsers() {
  let { data: users, isLoading, isFetching } = trpc.getUsers.useQuery();

  if (isLoading || isFetching) {
    return <p>Loading...</p>;
  }

  return (
    <div
      style={{
        display: "grid",
        gridTemplateColumns: "1fr 1fr 1fr 1fr",
        gap: 20,
      }}
    >
      {users?.map((user) => (
        <div
          key={user.id}
          style={{ border: "1px solid #ccc", textAlign: "center" }}
        >
          <img
            src={`https://robohash.org/${user.id}?set=set2&size=180x180`}
            alt={user.name}
            style={{ height: 180, width: 180 }}
          />
          <h3>{user.name}</h3>
        </div>
      ))}
    </div>
  );
}
To render the ListUsers.tsx component we created earlier, we need to include it in the src/app/page.tsx file. To do this, open the src/app/page.tsx file and replace its contents with the following code.
src/app/page.tsx
import ListUsers from "./ListUsers";

export default function Home() {
  return (
    <main style={{ maxWidth: 1200, marginInline: "auto", padding: 20 }}>
      <ListUsers />
    </main>
  );
}
Congratulations! You have successfully integrated tRPC into your Next.js 13 app directory project. To see the application in action, start the Next.js development server and navigate to the root route. Keep in mind that the RPC call is made on the client-side, so you may experience a brief loading state before the list of users appears on the page.
Conclusion
The source code for the tRPC + Next.js 13 app directory project can be found on GitHub. I hope you found this tutorial helpful and enjoyable. If you have any feedback or questions, please feel free to leave a comment below.
By adding the ‘use client’ directive in the route app layout file, wouldn’t that mean all children components would be client side components, so we would loose the benefits of server side components?
It’s not generally recommended to use the
"use client";pragma in the root layout file, and I haven’t personally tried it.When you add the
"use client";pragma to a file, it signals to the Next.js bundler that there’s a Client Component in that file. When the server receives the initial request, Next.js will perform server-side rendering (SSR) on the Client Component before sending it to the browser for hydration.For example, if you use a provider that includes the
"use client";pragma, like the tRPC provider, it’s recommended that you wrap it as deep as possible to allow Next.js to perform the necessary optimizations for Server Components.This way, you can ensure that the benefits of Server Components are not lost.
Thanks for the reply, i was referring to this line in the blog
“This can be achieved by wrapping the provider around the {children} node in the src/app/layout.tsx file, which is the main entry point of the application.“
So this would mean next would render all children components as client components, as the provider would have to at the root of the tree. Meaning are whole app wouldn’t basically be a client side rendered app.
Or am I mistaken here?
I understand your point now. It’s important to note that Client Components can be rendered within Server Components as long as the
"use client";pragma is included in the files that have the Client Components.Wrapping the tRPC provider around the
{children}prop of the root layout component allows Next.js to make the hooks and components from the tRPC library available to all Client Components that are descendants of the root layout component.It’s important to remember that even though you’ve wrapped a provider component that has the
"use client";pragma around the{children}prop of the root layout component, Next.js will still render all components inside the app directory as Server Components.This means that the only way all your components will be Client Components is if you include the
"use client";directive at the beginning of the files that contain them.I hope this explanation clarifies things for you. If you have any further questions, please don’t hesitate to ask.
One more thing, why would i need to add “use client” in children components when we already have it at the top of the tree in the app/layout.tsx
The
"use client"directive is what triggers the compilation of a component as a Client Component, and this compilation happens on a per-file basis.So, wrapping a Client Component around the
{children}of the root layout component does not automatically make all child components Client Components. Each component needs to have the directive included in its own file for it to be compiled as a Client Component.This makes sense, thanks.
Exactly. By default, Next.js render its components on Server Side. So, if we declare “use client” on TrpcProvider file, it means only that file (components within those file) will be rendered as Client Side Component.
Following up on this conversation about client components vs server components. the NEXTJS docs say “Once “use client” is defined in a file, all other modules imported into it, including child components, are considered part of the client bundle.”
and “”use client” does not need to be defined in every file. The Client module boundary only needs to be defined once, at the “entry point”, for all modules imported into it to be considered a Client Component.”
I guess the confusion for me is does being wrapped in a Provider like this tRPC one fall under the “imported into it” or is being wrapped by a Client Component different. It may not make a huge performance issue since even client components can be generated on the server and then hydrated on the client (at least according to these docs)
Yeah, you’re right. When you have a parent component that contains other components, you only need to include the
"use client";directive in the parent component.Next.js will then treat all the components imported into the parent component as client components.
However, wrapping a provider around the children prop of the root layout doesn’t necessarily turn all components into client components.
Each individual component has to have the
"use client";directive included in its file to be considered a client component.Nonetheless, I’m glad you took the time to consult the documentation to find this information.
Can we apply context here? To make use of protected & unprotected router with trpc?
Yes, you can create a tRPC middleware to protect a procedure. Within the
createContext()function, you can perform the necessary authorization to restrict access to the protected tRPC procedure.Could you show how to do that? I was struggling couple of days and do nothing, since if we want to use trpc also on server components we need to use
appRouter.createCaller({}) <- we need to pass here context,
Another thing is that we need to use fetchRequestHandler from fetch adapter instead of createNextApiHandler (it's not working with the app directory)
and I'm also using Supabase thich requires from me types of createNextApiHandler to create a supabase instance so I have pretty big problem that I don't know how to resolve.
If you want to learn how to protect routes using tRPC, you can refer to the example at https://github.com/wpcodevo/trpc-nextjs-prisma/tree/master/src/server, specifically in the
createRouter.tsfile.Additionally, if you’re interested in using Supabase along with tRPC in the App Directory, you can find an example repository at https://github.com/Jaaneek/t3-supabase-app-router.
Thanks, I thought about that solution (creating pages/api dir just to make it work) but with this approach it’s impossible to make ssr I guess?
with fetch you can call trpc procedures in server components like so:
“`
import { Metadata } from ‘next’
import AddTodo from ‘@/app/(routes)/(account)/todo/_components/AddTodo’
import { TodoList } from ‘@/app/_components’
import { serverClient } from ‘@/app/_utils/api/serverClient’
export const metadata: Metadata = {
title: ‘Todos’,
description: ‘list of my todos’,
}
export default async function Todos() {
const initialTodos = await serverClient.todoService.getAll()
return (
Todo
)
}
“`
Also thanks for great article
Do you have an example of integrating TRPC with next js 13 app directory but the trpc/backend is a separate app.
I’ve got quite far with this tutorial as my GET requests are logged in my backend app terminal, but i keep getting CORS errors.
Thank you for reaching out! Unfortunately, I don’t have a specific example of integrating tRPC with the Next.js 13 app directory when the tRPC backend is a separate app.
However, to resolve the CORS errors you mentioned, you’ll need to implement CORS handling on the tRPC backend. This will allow the server to accept requests from the Next.js app.
Hi, this article was very useful, I really appreciate your contribution because I had a hard time finding the way to work with trpc in NextJS v.13.
I have a doubt, when you introduce to the project an authentication system (in my case I used the Clerk library) the requests throw a 401 error (unauthorized) when you try to call without a session (ie without being logged in), once you log in it does not happen. How can I make that they do not require session, that is to say, that they are requests open to the public?
Based on the information you provided, it seems like the issue you’re facing with the 401 error when making requests without a session could be related to how you have set up the tRPC routers in your project.
To make certain requests open to the public and not require a session, you can follow a common approach of having separate routers for public and protected routes. In the protected router, you can handle the authentication logic.
Here’s a suggestion for handling this scenario:
By the way, I have not used Clerk before, so I may not have specific insights into its behavior. If you have already implemented the solution I proposed above, please reply so that we can investigate further.
Great, I have solved the problem but now I have another problem, how can I make asynchronous requests with the method you have shown in this article? For example, if I want to make a request to trpc when I click on a button, how can I do it? useQuery() cannot be used wrapped in a normal function, it can only be used in the body of a component. Mutations are possible to do asynchronously like this:
const mutation = trpc.nameOfRoute.useMutation();
and then inside the function
await mutation.mutateAsync(…);
But how would it be done with the queries?
You can use the
queryClient.refetchQueries('yourQueryKey')method. Assuming you want to refetch a particular query, you can get the query key from the React Query devtool and add it to thequeryClient.refetchQueries([["getUsers"], { type: "query" }])method.I have just added an example in the
src\app\ListUsers.tsxfile, so you can view it on GitHub or pull the recent changes usinggit pull.