

In this tutorial, you’ll discover how to set up NextAuth v5 in Next.js 14, configure Prisma ORM for database interactions, implement user registration and login, and secure routes using Next.js middleware with NextAuth.
If you’ve felt a bit lost while navigating the NextAuth documentation, don’t worry—I’ve got you covered. This article will guide you from the basics to setting up credentials authentication with NextAuth in Next.js 14. By the end, you should have NextAuth up and running in your Next.js 14 project.
In an upcoming article, we will enhance the project to include additional providers like GitHub and Google OAuth. Without further delay, let’s dive into the article.
The tutorial’s source code is available on GitHub: https://github.com/wpcodevo/nextauth-nextjs14-prisma
More practice:
- Setup and Use NextAuth.js in Next.js 14 App Directory
- Implement Authentication with Supabase in Next.js 14
- Set up Google and GitHub OAuth with NextAuth in Next.js 14
- Setup Google and GitHub OAuth with Supabase in Next.js 14
- Implement Authentication with tRPC in Next.js 14
- Implement Authentication with tRPC API in Next.js 14
- Using tRPC with Next.js 14, React Query and Prisma
- How to Set Up and Use React Query in Next.js 14
- Using React Query with Supabase in Next.js App Router
- How to Setup React Query in Next.js 13 App Directory
- React Query and Axios: User Registration and Email Verification
- Forgot/Reset Passwords with React Query and Axios
Running the Project on Your Computer
To test the integration of NextAuth v5 with Next.js 14 on your computer, simply follow the steps below:
- Begin by downloading or cloning the project from its GitHub repository at https://github.com/wpcodevo/nextauth-nextjs14-prisma and open the source code in your preferred IDE or code editor.
- Open the integrated terminal in your IDE, and from the root directory, execute the command
pnpm installto install all the necessary dependencies. - Duplicate the
example.envfile and rename the copy to.env. - Launch the PostgreSQL server with Docker using the command
docker-compose up -d. - Synchronize the Prisma migrations with the PostgreSQL database schema and generate the Prisma Client by running the command
pnpm prisma migrate dev. - Start the Next.js development server by running the command
pnpm dev. Once the server is listening on port 3000 and ready to accept requests, open the application in your browser and explore the features to understand the authentication flow. - For the Google and GitHub OAuth sign-in options to work with NextAuth, you need to add their respective Client IDs and Secrets to the
.envfile. So, go to the Google Cloud Console and GitHub, register the OAuth application, and, once done, add the Client IDs and Secrets to the.envfile.
Demo of the Authentication Flow
Now that you have the application running on your machine, let’s explore its features to understand the authentication flow before we start implementing them in the tutorial. As in every application, you need to create an account first before accessing the protected routes or pages.
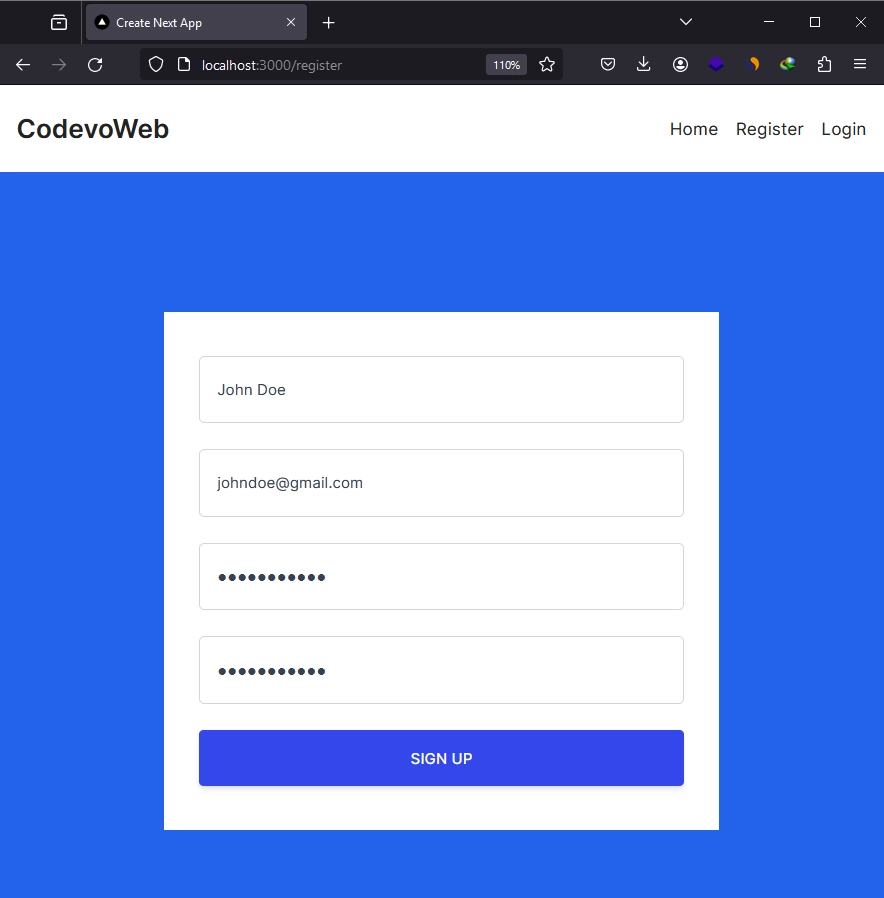
To do this, click on the ‘Register’ link in the navigation menu to access the registration page. There, provide your name, email, password, and confirm the password. Once done, click on the ‘SIGN UP’ button to submit the form. Assuming there were no validation errors, your credentials will be submitted to the backend API.
The backend API will also validate the credentials to ensure they adhere to the validation rules defined in the Zod schema. If valid, the password will be hashed and stored in the database along with the other credentials. If the operation is successful, you will be redirected to the login page.
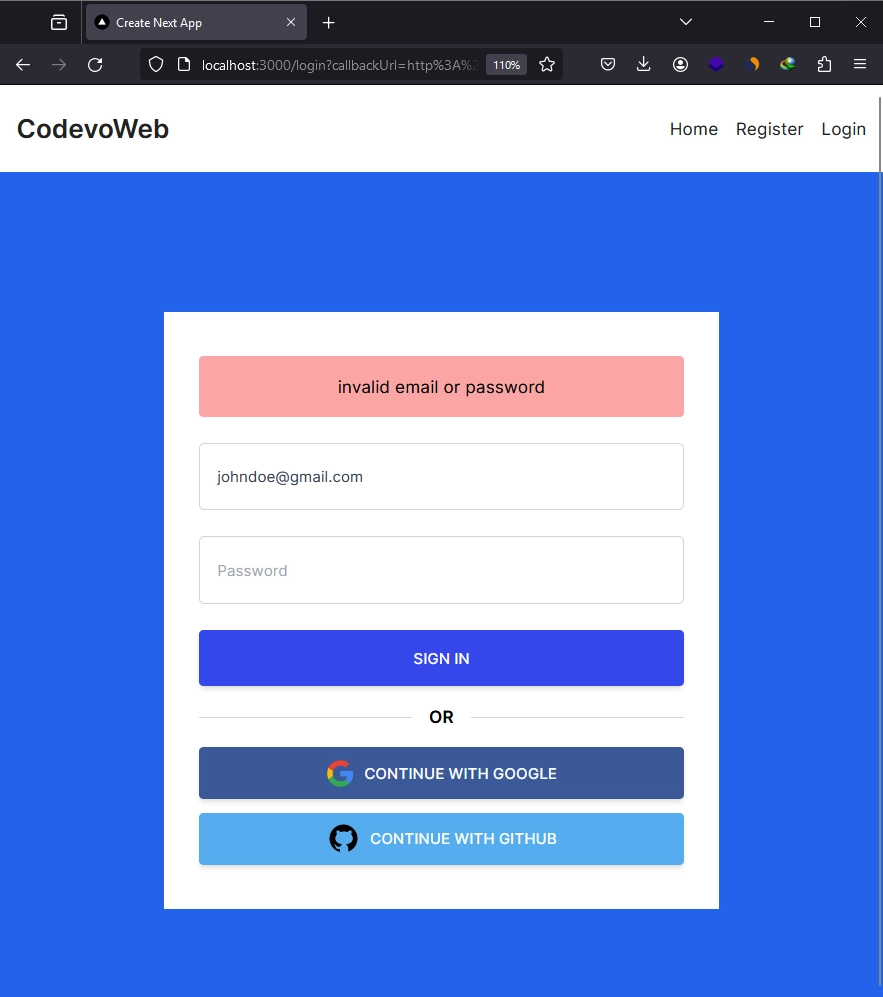
On the login page, provide the email and password and click on the ‘SIGN IN’ button. If there are no validation errors and the credentials are valid, NextAuth will generate a session token and send it back as a cookie to sign you into the application.
Assuming you have added both OAuth Client IDs and Secrets from Google and GitHub to the .env file, you can click on either the ‘CONTINUE WITH GOOGLE’ or ‘CONTINUE WITH GITHUB’ buttons to sign into the application without providing your email and password.
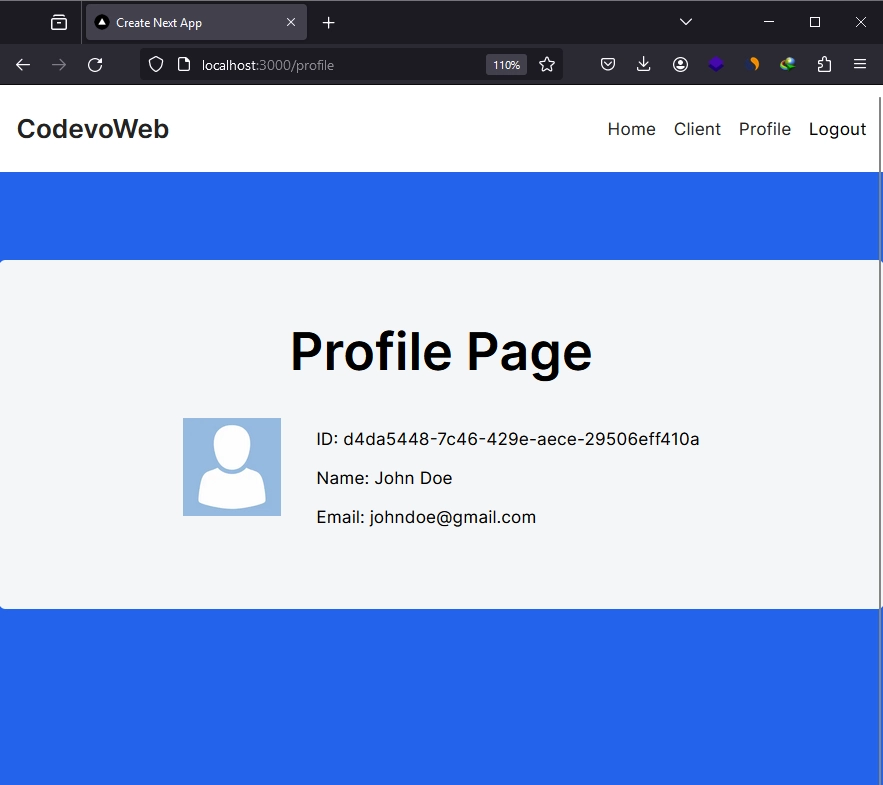
Once you’ve signed into the app, you can proceed to access protected pages, such as the profile page, where the NextAuth session data is displayed. To sign out, simply click the ‘Logout’ link in the navigation below.
Configuring Tailwind CSS
I’ll assume you already have a Next.js 14 project. If you don’t, you can run the command pnpm create next-app to generate one. Once done, open the tailwind.config.ts file and replace its existing content with the following code. This will give you access to the font, colors, and custom screen settings we will be using throughout the project.
tailwind.config.ts
import type { Config } from 'tailwindcss';

const config: Config = {
  content: [
    './pages/**/*.{js,ts,jsx,tsx,mdx}',
    './components/**/*.{js,ts,jsx,tsx,mdx}',
    './app/**/*.{js,ts,jsx,tsx,mdx}',
  ],
  theme: {
    extend: {
      colors: {
        'ct-dark-600': '#222',
        'ct-dark-200': '#e5e7eb',
        'ct-dark-100': '#f5f6f7',
        'ct-blue-600': '#2363eb',
        'ct-yellow-600': '#f9d13e',
      },
      fontFamily: {
        Poppins: ['Poppins, sans-serif'],
      },
      container: {
        center: true,
        padding: '1rem',
        screens: {
          lg: '1125px',
          xl: '1125px',
          '2xl': '1125px',
        },
      },
    },
  },
  plugins: [],
};
export default config;
Setting up a PostgreSQL Server with Docker Compose
Moving forward, let’s configure a PostgreSQL server using Docker Compose. If you already have a hosted PostgreSQL database, feel free to skip this step, but make sure to add the connection URL to the .env file.
To set up the PostgreSQL server with Docker, create a docker-compose.yml file at the root level of your project and include the following Docker Compose configurations.
docker-compose.yml
version: '3'
services:
  postgres:
    image: postgres:latest
    container_name: postgres
    ports:
      - '6500:5432'
    volumes:
      - progresDB:/var/lib/postgresql/data
    env_file:
      - ./.env
volumes:
  progresDB:
In the above, we utilized the env_file key to reference a .env file containing the necessary credentials for setting up the PostgreSQL server. To make these credentials accessible to Docker Compose, create a .env file in the root directory and include the following code:
.env
POSTGRES_HOST=127.0.0.1
POSTGRES_PORT=6500
POSTGRES_USER=admin
POSTGRES_PASSWORD=password123
POSTGRES_DB=nextauth_prisma

DATABASE_URL="postgresql://admin:password123@localhost:6500/nextauth_prisma?schema=public"
To start the PostgreSQL server using Docker Compose, execute the command docker-compose up -d.
Creating Prisma Models for NextAuth
NextAuth requires certain SQL tables to be defined in our Postgres database to handle the authentication of our application. To create these tables, we will be using the Prisma ORM. To begin, we need to install all the Prisma-related packages. Run the command below to install them.
pnpm add @prisma/client
pnpm add -D prisma

# or
yarn add @prisma/client
yarn add -D prisma

# or
npm i @prisma/client
npm i -D prisma
Next, execute the following command to initialize Prisma in the project. This action will generate a new directory named prisma in the root directory. Within this directory, you will find a schema.prisma file, where all the Prisma models will be defined.
pnpm prisma init --datasource-provider postgresql

# or
npx prisma init --datasource-provider postgresql
To define the Prisma models, which will later be converted into the SQL tables needed by NextAuth, open the prisma/schema.prisma file and add the following code. It’s not necessary to fully understand the Prisma models, but it’s crucial to define them for NextAuth to utilize the Prisma adapter. For additional details, you can refer to the Prisma adapter page: https://authjs.dev/reference/adapter/prisma
prisma/schema.prisma
// This is your Prisma schema file,
// learn more about it in the docs: https://pris.ly/d/prisma-schema

generator client {
  provider = "prisma-client-js"
}

datasource db {
  provider = "postgresql"
  url      = env("DATABASE_URL")
}

model User {
  id            String    @id @default(uuid())
  name          String
  email         String?   @unique
  password      String?
  emailVerified DateTime? @map("email_verified")
  image         String?
  createdAt     DateTime  @default(now())
  updatedAt     DateTime  @updatedAt
  accounts      Account[]
  sessions      Session[]

  @@map("users")
}

model Account {
  id                String   @id @default(cuid())
  userId            String   @map("user_id")
  type              String?
  provider          String
  providerAccountId String   @map("provider_account_id")
  token_type        String?
  refresh_token     String?  @db.Text
  access_token      String?  @db.Text
  expires_at        Int?
  scope             String?
  id_token          String?  @db.Text
  createdAt         DateTime @default(now())
  updatedAt         DateTime @updatedAt
  user              User     @relation(fields: [userId], references: [id], onDelete: Cascade)

  @@unique([provider, providerAccountId])
  @@map("accounts")
}

model Session {
  id           String   @id @default(cuid())
  userId       String?  @map("user_id")
  sessionToken String   @unique @map("session_token") @db.Text
  accessToken  String?  @map("access_token") @db.Text
  expires      DateTime
  user         User?    @relation(fields: [userId], references: [id], onDelete: Cascade)
  createdAt    DateTime @default(now())
  updatedAt    DateTime @updatedAt

  @@map("sessions")
}

model VerificationRequest {
  id         String   @id @default(cuid())
  identifier String
  token      String   @unique
  expires    DateTime
  createdAt  DateTime @default(now())
  updatedAt  DateTime @updatedAt

  @@unique([identifier, token])
}
Next, execute the following command to generate the SQL tables in the database. This command not only defines the tables in the database but also generates the Prisma Client, which will be used to interact with the database.
pnpm prisma migrate dev --name init

# or
npx prisma migrate dev --name init
Finally, let’s create a singleton instance of the Prisma Client that we can use throughout our application to interact with the database. To achieve this, create a prisma.ts file in the prisma directory and add the following code:
prisma/prisma.ts
import { PrismaClient } from '@prisma/client';

const prismaClientSingleton = () => {
  return new PrismaClient();
};

declare global {
  var prisma: undefined | ReturnType<typeof prismaClientSingleton>;
}

const prisma = globalThis.prisma ?? prismaClientSingleton();

export default prisma;

if (process.env.NODE_ENV !== 'production') globalThis.prisma = prisma;
Initializing NextAuth.js in Next.js 14
Now that we have defined the required SQL tables for NextAuth in the database, we can proceed to initialize NextAuth in the Next.js 14 project. To get NextAuth working in Next.js 14, we need to install two packages: next-auth@beta and @auth/prisma-adapter. Execute the following command to install them.
pnpm add next-auth@beta @auth/prisma-adapter

# or
yarn add next-auth@beta @auth/prisma-adapter

# or
npm i next-auth@beta @auth/prisma-adapter
Next, we must create an auth.ts file in the root directory, a requirement for NextAuth v5. This file acts as a centralized configuration source for NextAuth. To begin this process, create a auth.ts file in the root level of your project and include the following NextAuth boilerplate configurations.
auth.ts
import NextAuth from "next-auth";
import { PrismaAdapter } from "@auth/prisma-adapter";
import prisma from "./prisma/prisma";

export const { handlers, auth, signIn, signOut } = NextAuth({
  session: { strategy: "jwt" },
  adapter: PrismaAdapter(prisma),
  pages: {
    signIn: "/login",
  },
  providers: [

  ],
  callbacks: {

  },
});
With NextAuth successfully initialized in the project, it’s essential to configure the Next.js HTTP routes using the route handlers provided by NextAuth. Follow the steps below:
- Navigate to the
appdirectory and create a new folder namedapi. - Within the
apidirectory, create anauthfolder. - Inside the
authfolder, create a dynamic folder named[…nextauth]. - Conclude the process by creating a
route.tsfile inside the[…nextauth]directory and including the following code:
app/api/auth/[…nextauth]/route.ts
import { handlers } from '@/auth';

export const { GET, POST } = handlers;
Implementing Credentials Authentication with NextAuth
Now, let’s delve into setting up credentials authentication with NextAuth. In this authentication flow, we will compare the plain-text password with the hashed version stored in the database, and the recommended package for handling the hashing and comparison is Bcrypt. Open your terminal and install the Bcrypt library using the following command:
pnpm add bcryptjs
pnpm add -D @types/bcryptjs

# or
yarn add bcryptjs
yarn add -D @types/bcryptjs

# or
npm i bcryptjs
npm i -D @types/bcryptjs
Setting up credentials authentication with NextAuth is simply, thanks to the CredentialsProvider function provided by NextAuth. We can easily include it into the list of providers for this purpose. Below is an example of the setup, which uses Prisma as the database adaptor and utilizes a custom login page instead of the default one provided by NextAuth.
auth.ts
import NextAuth from "next-auth";
import { PrismaAdapter } from "@auth/prisma-adapter";
import prisma from "./prisma/prisma";
import CredentialsProvider from "next-auth/providers/credentials";
import bcrypt from "bcryptjs";

export const { handlers, auth, signIn, signOut } = NextAuth({
  session: { strategy: "jwt" },
  adapter: PrismaAdapter(prisma),
  pages: {
    signIn: "/login",
  },
  providers: [
    CredentialsProvider({
      name: "Sign in",
      id: "credentials",
      credentials: {
        email: {
          label: "Email",
          type: "email",
          placeholder: "example@example.com",
        },
        password: { label: "Password", type: "password" },
      },
      async authorize(credentials) {
        if (!credentials?.email || !credentials.password) {
          return null;
        }

        const user = await prisma.user.findUnique({
          where: {
            email: String(credentials.email),
          },
        });

        if (
          !user ||
          !(await bcrypt.compare(String(credentials.password), user.password!))
        ) {
          return null;
        }

        return {
          id: user.id,
          email: user.email,
          name: user.name,
          randomKey: "Hey cool",
        };
      },
    }),
  ],
  callbacks: {
    session: ({ session, token }) => {
      return {
        ...session,
        user: {
          ...session.user,
          id: token.id,
          randomKey: token.randomKey,
        },
      };
    },
    jwt: ({ token, user }) => {
      if (user) {
        const u = user as unknown as any;
        return {
          ...token,
          id: u.id,
          randomKey: u.randomKey,
        };
      }
      return token;
    },
  },
});
The actual user authentication takes place in the authorize function, where we verify the provided email and password credentials. If they match, we proceed to check the database for a user with the provided email address. If a match is found, we compare the plain-text password against the hashed one stored in the database. Assuming the user passes all authentication checks, we return an object containing the user’s credentials in the function.
Subsequently, since NextAuth doesn’t include the user’s ID in the session data by default, we utilized the session function within the callbacks object to modify the session data and assign other fields that our application requires. In this example, we added the ID and a random key to the session object.
For credentials authentication to work, NextAuth requires you to define the following environment variables in your .env file.
.env
AUTH_SECRET=my_ultra_secure_nextauth_secret
NEXTAUTH_URL=http://localhost:3000
Creating a Header Component
Now, let’s dynamically display navigation links based on the user’s authentication status. Certain links should only be visible to authenticated users. To minimize delays in link changes, we will make this component a server component and utilize the auth function exported from the auth.ts file to access the session data.
To implement this, create a ‘components‘ folder in the root directory. Inside the ‘components‘ folder, add a header.tsx file with the following code:
components/header.tsx
import { auth, signOut } from '@/auth';
import Link from 'next/link';

const Header = async () => {
  const session = await auth();
  const user = session?.user;

  const logoutAction = async () => {
    'use server';
    await signOut();
  };

  return (
    <header className='bg-white h-20'>
      <nav className='h-full flex justify-between container items-center'>
        <div>
          <Link href='/' className='text-ct-dark-600 text-2xl font-semibold'>
            CodevoWeb
          </Link>
        </div>
        <ul className='flex items-center space-x-4'>
          <li>
            <Link href='/' className='text-ct-dark-600'>
              Home
            </Link>
          </li>
          {!user && (
            <>
              <li>
                <Link href='/register' className='text-ct-dark-600'>
                  Register
                </Link>
              </li>
              <li>
                <Link href='/login' className='text-ct-dark-600'>
                  Login
                </Link>
              </li>
            </>
          )}
          {user && (
            <form action={logoutAction} className='flex'>
              <li>
                <Link href='/client-side' className='text-ct-dark-600'>
                  Client
                </Link>
              </li>
              <li className='ml-4'>
                <Link href='/profile' className='text-ct-dark-600'>
                  Profile
                </Link>
              </li>
              <li className='ml-4'>
                <button>Logout</button>
              </li>
            </form>
          )}
        </ul>
      </nav>
    </header>
  );
};

export default Header;
Creating Zod Validation Schemas
In API development, validating incoming data is crucial to prevent storing incorrect values in the database. To achieve this, we will utilize the Zod library to validate credentials during the sign-up and sign-in processes, ensuring that users provide the correct format of credentials. Begin by installing the Zod library using the following command:
pnpm add zod

# or
yarn add zod

# or
npm i zod
Next, create a ‘lib’ directory at the root level of your project. Inside the ‘lib’ directory, create a user-schema.ts file and add the following schema definitions. We place the schemas in a separate file so that we can reuse them in both frontend forms and the API.
lib/user-schema.ts
import { TypeOf, object, string } from "zod";

export const createUserSchema = object({
  name: string({ required_error: "Name is required" }).min(
    1,
    "Name is required"
  ),
  email: string({ required_error: "Email is required" })
    .min(1, "Email is required")
    .email("Invalid email"),
  photo: string().optional(),
  password: string({ required_error: "Password is required" })
    .min(1, "Password is required")
    .min(8, "Password must be more than 8 characters")
    .max(32, "Password must be less than 32 characters"),
  passwordConfirm: string({
    required_error: "Please confirm your password",
  }).min(1, "Please confirm your password"),
}).refine((data) => data.password === data.passwordConfirm, {
  path: ["passwordConfirm"],
  message: "Passwords do not match",
});

export const loginUserSchema = object({
  email: string({ required_error: "Email is required" })
    .min(1, "Email is required")
    .email("Invalid email or password"),
  password: string({ required_error: "Password is required" }).min(
    1,
    "Password is required"
  ),
});

export type LoginUserInput = TypeOf<typeof loginUserSchema>;
export type CreateUserInput = TypeOf<typeof createUserSchema>;
Implementing Account Registration
NextAuth, by default, doesn’t provide a way to register users when using the credentials provider. Instead, it leaves that part of the authentication for us to handle. So, with that in mind, we need to create an API responsible for registering users and a form for submitting the credentials to the API.
Alternatively, you can use Server Actions to process the registration, but in this tutorial, we will use an API layer instead.
Creating the Account Registration API Route
To implement the API responsible for registering new users, navigate to the app/api/ directory. Inside this directory, create a new directory named register. Within the register directory, add a route.ts file and include the following code. The ‘register‘ directory name will be utilized for the API path, while the code in the route.ts file will handle the requests.
app/api/register/route.ts
import { hash } from "bcryptjs";
import { NextResponse } from "next/server";
import prisma from "@/prisma/prisma";
import { createUserSchema } from "@/lib/user-schema";
import { ZodError } from "zod";

export async function POST(req: Request) {
  try {
    const { name, email, password } = createUserSchema.parse(await req.json());

    const hashed_password = await hash(password, 12);

    const user = await prisma.user.create({
      data: {
        name,
        email: email.toLowerCase(),
        password: hashed_password,
      },
    });

    return NextResponse.json({
      user: {
        name: user.name,
        email: user.email,
      },
    });
  } catch (error: any) {
    if (error instanceof ZodError) {
      return NextResponse.json(
        {
          status: "error",
          message: "Validation failed",
          errors: error.errors,
        },
        { status: 400 }
      );
    }

    if (error.code === "P2002") {
      return NextResponse.json(
        {
          status: "fail",
          message: "user with that email already exists",
        },
        { status: 409 }
      );
    }

    return NextResponse.json(
      {
        status: "error",
        message: error.message || "Internal Server Error",
      },
      { status: 500 }
    );
  }
}
Quite a lot is happening in the above code; let’s break it down:
- Firstly, we’ve defined a function named POST, which gets invoked when a POST request is made to the
/api/registerendpoint. - Within the function, we begin by validating the request body using the
createUserSchemato ensure the credentials adhere to the validation rules specified in the schema. - Following that, we hash the password and employ Prisma to store the credentials in the database.
- Lastly, we return the user object obtained from the query in the JSON response.
- In case of validation errors, an existing user with the provided email, or an internal server error, we respond with a JSON object containing the appropriate error information.
Creating the Account Registration Form
Now that we’ve implemented the API, we can proceed to create the form component responsible for collecting user credentials. But before that, open your terminal and install the following dependencies.
pnpm add @hookform/resolvers react-hook-form tailwind-merge
pnpm add react-hot-toast

# or
yarn add @hookform/resolvers react-hook-form tailwind-merge
yarn add react-hot-toast

# or
npm i @hookform/resolvers react-hook-form tailwind-merge
npm i react-hot-toast
After the installations are complete, open the app/layout.tsx file and include the <Toaster /> component provided by the react-hot-toast library. This is necessary for toast notifications to be displayed.
For the registration form, we will include four input fields: name, email, password, and password confirmation. The validation for these input fields will be handled using the React Hook Form library, along with the Zod schema we previously utilized to validate the request body in the API.
To create the form component, navigate to the ‘app‘ directory and create a new folder named ‘register‘. Inside the ‘register‘ folder, add a register-form.tsx file and include the following code:
app/register/register-form.tsx
"use client";

import { zodResolver } from "@hookform/resolvers/zod";
import { SubmitHandler, useForm } from "react-hook-form";
import toast from "react-hot-toast";
import { useState } from "react";
import { signIn } from "next-auth/react";
import { CreateUserInput, createUserSchema } from "@/lib/user-schema";

export const RegisterForm = () => {
  const [submitting, setSubmitting] = useState(false);

  const methods = useForm<CreateUserInput>({
    resolver: zodResolver(createUserSchema),
  });

  const {
    handleSubmit,
    register,
    formState: { errors },
  } = methods;

  const onSubmitHandler: SubmitHandler<CreateUserInput> = async (values) => {
    try {
      setSubmitting(true);
      const res = await fetch("/api/register", {
        method: "POST",
        body: JSON.stringify(values),
        headers: {
          "Content-Type": "application/json",
        },
      });

      if (!res.ok) {
        const errorData = await res.json();

        if (Array.isArray(errorData.errors) && errorData.errors.length > 0) {
          errorData.errors.forEach((error: any) => {
            toast.error(error.message);
          });

          return;
        }

        toast.error(errorData.message);
        return;
      }

      signIn(undefined, { callbackUrl: "/" });
    } catch (error: any) {
      toast.error(error.message);
    } finally {
      setSubmitting(false);
    }
  };

  const input_style =
    "form-control block w-full px-4 py-5 text-sm font-normal text-gray-700 bg-white bg-clip-padding border border-solid border-gray-300 rounded transition ease-in-out m-0 focus:text-gray-700 focus:bg-white focus:border-blue-600 focus:outline-none";

  return (
    <form onSubmit={handleSubmit(onSubmitHandler)}>
      <div className="mb-6">
        <input
          {...register("name")}
          placeholder="Name"
          className={`${input_style}`}
        />
        {errors["name"] && (
          <span className="text-red-500 text-xs pt-1 block">
            {errors["name"]?.message as string}
          </span>
        )}
      </div>
      <div className="mb-6">
        <input
          type="email"
          {...register("email")}
          placeholder="Email address"
          className={`${input_style}`}
        />
        {errors["email"] && (
          <span className="text-red-500 text-xs pt-1 block">
            {errors["email"]?.message as string}
          </span>
        )}
      </div>
      <div className="mb-6">
        <input
          type="password"
          {...register("password")}
          placeholder="Password"
          className={`${input_style}`}
        />
        {errors["password"] && (
          <span className="text-red-500 text-xs pt-1 block">
            {errors["password"]?.message as string}
          </span>
        )}
      </div>
      <div className="mb-6">
        <input
          type="password"
          {...register("passwordConfirm")}
          placeholder="Confirm Password"
          className={`${input_style}`}
        />
        {errors["passwordConfirm"] && (
          <span className="text-red-500 text-xs pt-1 block">
            {errors["passwordConfirm"]?.message as string}
          </span>
        )}
      </div>
      <button
        type="submit"
        style={{ backgroundColor: `${submitting ? "#ccc" : "#3446eb"}` }}
        className="inline-block px-7 py-4 bg-blue-600 text-white font-medium text-sm leading-snug uppercase rounded shadow-md hover:bg-blue-700 hover:shadow-lg focus:bg-blue-700 focus:shadow-lg focus:outline-none focus:ring-0 active:bg-blue-800 active:shadow-lg transition duration-150 ease-in-out w-full"
        disabled={submitting}
      >
        {submitting ? "loading..." : "Sign Up"}
      </button>
    </form>
  );
};
Upon submitting the form, the user’s credentials will undergo validation against the specified schema. If no validation errors are present, the credentials will be submitted to the account registration API. Following a successful registration, the signIn function provided by NextAuth will be invoked, redirecting the user to the login page.
Creating the Page Component
With the form component successfully created, the next step is to create a page file to render it. Within the app/register/ directory, create a page.tsx file and include the following code:
app/register/page.tsx
import Header from '@/components/header';
import { RegisterForm } from './register-form';

export default async function RegisterPage() {
  return (
    <>
      <Header />

      <section className='bg-ct-blue-600 min-h-screen pt-20'>
        <div className='container mx-auto px-6 py-12 h-full flex justify-center items-center'>
          <div className='md:w-8/12 lg:w-5/12 bg-white px-8 py-10'>
            <RegisterForm />
          </div>
        </div>
      </section>
    </>
  );
}
Implementing User Sign-in with NextAuth
At this point, we are ready to implement the login feature using NextAuth in Next.js 14. The process is quite similar to that of account registration: create a form component for collecting the credentials and render the form in a page component.
Creating the Account Login Form
The form component will consist of two fields: email and password. These fields will be validated using the React Hook Form library along with Zod. Below the input fields, there will be a submit button, and beneath the submit button are two other buttons – one for Google OAuth and the other for GitHub OAuth. Click on this link to download the images used in the buttons.
To create the form component, start by creating a ‘login‘ directory in the app folder. Inside the ‘login‘ directory, generate a login-form.tsx file and add the following code:
app/login/login-form.tsx
'use client';

import { zodResolver } from '@hookform/resolvers/zod';
import Image from 'next/image';
import { useRouter, useSearchParams } from 'next/navigation';
import { useState } from 'react';
import { SubmitHandler, useForm } from 'react-hook-form';
import toast from 'react-hot-toast';
import { signIn } from 'next-auth/react';
import { LoginUserInput, loginUserSchema } from '@/lib/user-schema';


export const LoginForm = () => {
  const router = useRouter();
  const [error, setError] = useState('');
  const [submitting, setSubmitting] = useState(false);

  const searchParams = useSearchParams();
  const callbackUrl = searchParams.get('callbackUrl') || '/profile';

  const methods = useForm<LoginUserInput>({
    resolver: zodResolver(loginUserSchema),
  });

  const {
    reset,
    handleSubmit,
    register,
    formState: { errors },
  } = methods;

  const onSubmitHandler: SubmitHandler<LoginUserInput> = async (values) => {
    try {
      setSubmitting(true);

      const res = await signIn('credentials', {
        redirect: false,
        email: values.email,
        password: values.password,
        redirectTo: callbackUrl,
      });

      setSubmitting(false);

      if (!res?.error) {
        toast.success('successfully logged in');
        router.push(callbackUrl);
      } else {
        reset({ password: '' });
        const message = 'invalid email or password';
        toast.error(message);
        setError(message);
      }
    } catch (error: any) {
      toast.error(error.message);
      setError(error.message);
    } finally {
      setSubmitting(false);
    }
  };

  const input_style =
    'form-control block w-full px-4 py-5 text-sm font-normal text-gray-700 bg-white bg-clip-padding border border-solid border-gray-300 rounded transition ease-in-out m-0 focus:text-gray-700 focus:bg-white focus:border-blue-600 focus:outline-none';

  return (
    <form onSubmit={handleSubmit(onSubmitHandler)}>
      {error && (
        <p className='text-center bg-red-300 py-4 mb-6 rounded'>{error}</p>
      )}
      <div className='mb-6'>
        <input
          type='email'
          {...register('email')}
          placeholder='Email address'
          className={`${input_style}`}
        />
        {errors['email'] && (
          <span className='text-red-500 text-xs pt-1 block'>
            {errors['email']?.message as string}
          </span>
        )}
      </div>
      <div className='mb-6'>
        <input
          type='password'
          {...register('password')}
          placeholder='Password'
          className={`${input_style}`}
        />
        {errors['password'] && (
          <span className='text-red-500 text-xs pt-1 block'>
            {errors['password']?.message as string}
          </span>
        )}
      </div>
      <button
        type='submit'
        style={{ backgroundColor: `${submitting ? '#ccc' : '#3446eb'}` }}
        className='inline-block px-7 py-4 bg-blue-600 text-white font-medium text-sm leading-snug uppercase rounded shadow-md hover:bg-blue-700 hover:shadow-lg focus:bg-blue-700 focus:shadow-lg focus:outline-none focus:ring-0 active:bg-blue-800 active:shadow-lg transition duration-150 ease-in-out w-full'
        disabled={submitting}
      >
        {submitting ? 'loading...' : 'Sign In'}
      </button>

      <div className='flex items-center my-4 before:flex-1 before:border-t before:border-gray-300 before:mt-0.5 after:flex-1 after:border-t after:border-gray-300 after:mt-0.5'>
        <p className='text-center font-semibold mx-4 mb-0'>OR</p>
      </div>

      <a
        className='px-7 py-2 text-white font-medium text-sm leading-snug uppercase rounded shadow-md hover:shadow-lg focus:shadow-lg focus:outline-none focus:ring-0 active:shadow-lg transition duration-150 ease-in-out w-full flex justify-center items-center mb-3'
        style={{ backgroundColor: '#3b5998' }}
        onClick={() => signIn('google', { callbackUrl })}
        role='button'
      >
        <Image
          className='pr-2'
          src='/images/google.svg'
          alt=''
          style={{ height: '2rem' }}
          width={35}
          height={35}
        />
        Continue with Google
      </a>
      <a
        className='px-7 py-2 text-white font-medium text-sm leading-snug uppercase rounded shadow-md hover:shadow-lg focus:shadow-lg focus:outline-none focus:ring-0 active:shadow-lg transition duration-150 ease-in-out w-full flex justify-center items-center'
        style={{ backgroundColor: '#55acee' }}
        onClick={() => signIn('github', { callbackUrl })}
        role='button'
      >
        <Image
          className='pr-2'
          src='/images/github.svg'
          alt=''
          width={40}
          height={40}
        />
        Continue with GitHub
      </a>
    </form>
  );
};
In the above code, we invoked the signIn('credentials', {}) method provided by NextAuth to sign in the user. Upon a successful login, the user will be redirected to the callback URL.
Creating the Page Component
To render the login form component, create a page.tsx file inside the app/login/ directory and add the code below:
app/login/page.tsx
import Header from '@/components/header';
import { LoginForm } from './login-form';
import { Suspense } from 'react';

export default async function LoginPage() {
  return (
    <>
      <Header />

      <section className='bg-ct-blue-600 min-h-screen pt-20'>
        <div className='container mx-auto px-6 py-12 h-full flex justify-center items-center'>
          <div className='md:w-8/12 lg:w-5/12 bg-white px-8 py-10'>
            <Suspense fallback={<>Loading...</>}>
              <LoginForm />
            </Suspense>
          </div>
        </div>
      </section>
    </>
  );
}
After following the above instructions, you should now be able to register an account, sign in to the application with your credentials, and sign out from the application.
Protecting Routes with NextAuth Middleware
Now, let’s explore how to protect routes when using NextAuth v5 with Next.js 14. Using the middleware approach allows us to protect multiple routes simultaneously. To begin this process, create a middleware.ts file and add the following code:
middleware.ts
export { auth as middleware } from './auth';

export const config = {
  matcher: ['/((?!api|_next/static|_next/image|favicon.ico).*)'],
};
Next, we need to include an authorized callback function in the callbacks object of the NextAuth configuration. Within this authorized function, we define the logic for route protection. Here is an example.
auth.ts
export const { handlers, auth, signIn, signOut } = NextAuth({
  session: { strategy: "jwt" },
  adapter: PrismaAdapter(prisma),
  pages: {
    signIn: "/login",
  },
  providers: [
    CredentialsProvider({}),
  ],
  callbacks: {
    authorized({ auth, request: { nextUrl } }) {
      const isLoggedIn = !!auth?.user;
      const paths = ["/profile", "/client-side"];
      const isProtected = paths.some((path) =>
        nextUrl.pathname.startsWith(path)
      );

      if (isProtected && !isLoggedIn) {
        const redirectUrl = new URL("/api/auth/signin", nextUrl.origin);
        redirectUrl.searchParams.append("callbackUrl", nextUrl.href);
        return Response.redirect(redirectUrl);
      }
      return true;
    },
    // Other code below
  },
});
In the above code, we are securing the /profile and /client-side routes against unauthenticated users. If a user is not authenticated, they will be redirected to the login page.
Creating a Protected Page
With the route protection logic now implemented, let’s proceed to create the profile page, accessible only to authenticated users. To accomplish this, create a ‘profile‘ folder inside the app directory. Within the ‘profile‘ directory, start by creating a page.tsx file and include the following code:
app/profile/page.tsx
import { auth } from "@/auth";
import Header from "@/components/header";
import Image from "next/image";
import { redirect } from "next/navigation";

export default async function ProfilePage() {
  const session = await auth();

  // if (!session?.user) {
  //   return redirect("/api/auth/signin");
  // }

  const user = session?.user;

  return (
    <>
      <Header />
      <section className="bg-ct-blue-600  min-h-screen pt-20">
        <div className="max-w-4xl mx-auto bg-ct-dark-100 rounded-md h-[20rem] flex justify-center items-center">
          <div>
            <p className="mb-3 text-5xl text-center font-semibold">
              Profile Page
            </p>
            <div className="flex items-center gap-8">
              <div>
                <Image
                  src={user?.image ? user.image : "/images/default.png"}
                  alt={`profile photo of ${user?.name}`}
                  width={90}
                  height={90}
                />
              </div>
              <div className="mt-8">
                <p className="mb-3">ID: {user?.id}</p>
                <p className="mb-3">Name: {user?.name}</p>
                <p className="mb-3">Email: {user?.email}</p>
              </div>
            </div>
          </div>
        </div>
      </section>
    </>
  );
}
In the above code, you can see that we retrieve the user’s session and display it on the screen. Simultaneously, there is an if statement checking if the user object exists in the session data, which, in turn, protects the page and allows access only to authenticated users. However, the if statement is commented out since we are protecting this page with the middleware approach instead.
Conclusion
And we are done! Throughout this tutorial, you learned how to set up NextAuth v5 in Next.js 14, configure Prisma ORM for database interaction, implement user registration and login with NextAuth, and protect routes using Next.js middleware.
I hope you found this tutorial helpful and enjoyable. If you have any questions or feedback, feel free to leave them in the comments section. Thanks for reading!