
In this comprehensive guide, we will explore the process of building a RESTful API in Python using the Flask framework. Whether you’re a beginner or an experienced developer, this step-by-step tutorial will walk you through the entire process, from setting up Flask to implementing CRUD (Create, Read, Update, Delete) functionality.
But wait, there’s more! I’ll provide you with an API collection that you can import into Postman for easy testing. This collection includes all the CRUD request details like endpoints, methods, and request bodies. And if you prefer a visual approach, I’ve got you covered. I’ll dedicate a section to guiding you through setting up a frontend application that can seamlessly interact with the Flask API, without requiring any frontend code.
Flask, being a micro-framework, focuses on simplicity and provides only the essential features needed for web application development. It’s an excellent choice for small to medium-sized projects with straightforward requirements. However, if you’re working on a complex web application, I highly recommend Django. Django is a full-featured framework that comes with batteries already included, providing extensive capabilities out of the box.
With that said, let’s dive into the world of Flask and start building our RESTful API!
More practice:
- Build CRUD API with Django REST framework
- Build a CRUD App with FastAPI and SQLAlchemy
- Build a CRUD App with FastAPI and PyMongo
- CRUD RESTful API Server with Python, FastAPI, and MongoDB
- Node.js, Express, TypeORM, PostgreSQL: CRUD Rest API
- Build CRUD RESTful API Server with Golang, Gin, and MongoDB
- Next.js Full-Stack App with React Query, and GraphQL-CodeGen
- Build Full-Stack tRPC CRUD Application with Node.js, and React.js
- GraphQL CRUD API with Next.js, MongoDB, and TypeGraphQL
Running the Flask Project on your Computer
- Download or clone the Flask project from the GitHub repository: https://github.com/wpcodevo/flask-note-taking-api. Open the source code in your preferred code editor.
- Create a virtual environment for the Flask project by running the command
python3 -m venv venv. This will set up a dedicated environment for the project. - Once the virtual environment is created, activate it. If you’re using a Unix-based system, run the command
source venv/bin/activate. For Windows users, runvenv\Scripts\activate. - Install the required dependencies for the Flask app by running the command
pip install -r requirements.txtin the terminal of the root directory. This will install all the necessary packages listed in therequirements.txtfile. - Launch a PostgreSQL server in a Docker container by running the command
docker-compose up -d. This will start the database server in the background. - After starting the PostgreSQL server, apply the SQLAlchemy migrations to the database by running the command
flask db upgrade. This will create the necessary tables and schema in the database. - Start the Flask development server with the command
flask run. The Flask app will be accessible athttp://localhost:8000. - Now that the Flask app is running, it’s time to test the endpoints. To simplify your life, I’ve included the API collection I used to test the Flask app in the source code. You can access it by importing the
Note App.postman_collection.jsonfile into either Postman or the Thunder Client VS Code extension.
Running the Flask App with a Frontend Application
Assuming you prefer using a frontend app to test the Flask application, I’ve got you covered. You can follow the steps below to set up a frontend app built with React.js that allows you to interact with the endpoints on the Flask app without writing a single line of React code. If you need a detailed guide on building the frontend application, refer to the article “Build a React.js CRUD App with JavaScript Fetch API“.
- Download or clone the React.js project from the repository: https://github.com/wpcodevo/react-crud-fetchapi-app. Open the project in your preferred IDE or text editor.
- In the terminal of the project’s root directory, run
yarnoryarn installto install all the project’s dependencies. - Start the app on port 3000 by running
yarn dev. - Open a new tab in your browser and enter
http://localhost:3000/to access the React app. Note that opening the app onhttp://127.0.0.1:3000may result in a “site can’t be reached” or CORS errors.
Setting up the Flask Project
In this section, we’ll prepare the development environment for your Flask project and install the required dependencies. To ensure that everything is set up correctly, we’ll start by creating a basic Flask server with a single endpoint called the health checker. This endpoint will allow us to make requests and verify the server’s health. By doing this, we can confirm that the initial configurations are correct before proceeding to add more functionality.
Before we begin, it’s important to ensure that you have Python 3 installed on your machine. If you’re using a recent version of a popular Linux/Unix operating system or macOS, Python 3 may already be installed by default. However, if you’re using Windows, you’ll likely need to install Python 3 manually, as it’s not included with the operating system.
To check if Python 3 is installed, you can run the following commands based on your operating system:
# For Unix or macOS
python3 --version

# For Windows
python --version
Upon executing the command, the console will display the Python version installed on your system. Please note that the exact version may vary depending on the specific binary you installed. However, what matters is that you have at least Python 3.7 or a newer version installed.
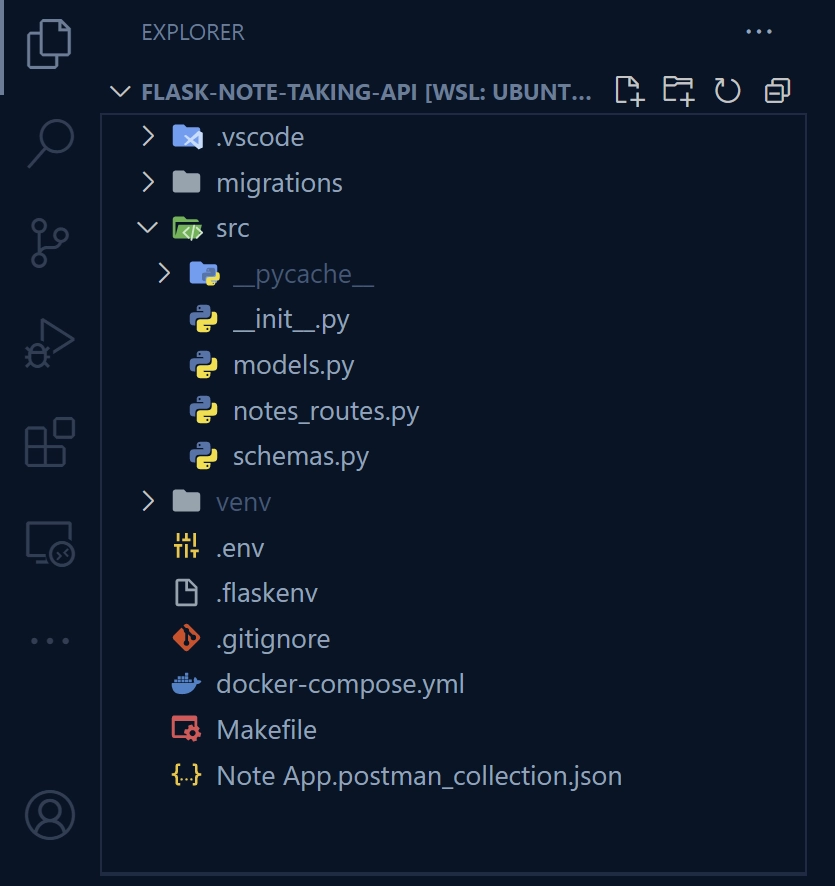
Project Structure
Below is a screenshot illustrating the project structure. It serves as a visual guide to help you navigate the folder hierarchy and ensure you’re on the right path. If you encounter any challenges during the tutorial, you can refer back to this image for guidance and clarity.
Setting Up the Flask Development Environment
Let’s get started with configuring the development environment for your Flask application. Follow these steps to proceed:
1. Create a Directory for Your Flask Project
Choose a location where you typically store your Python projects. If you don’t have a specific location in mind, you can create the project directly on your Desktop. Open a new terminal and execute the following commands:
mkdir flask-note-taking-api
cd flask-note-taking-api
Feel free to choose any name for the directory.
2. Set up a virtual environment for the project
Create a virtual environment for your project to keep its dependencies separate from your system-level Python installation. Execute the following command in the terminal:
# For Linux/Unix or macOS
python3 -m venv venv

# For Windows
python -m venv venv
Open the project in your preferred code editor.
3. Activate the virtual environment
In the integrated terminal of your code editor, activate the virtual environment using the appropriate command:
# For Linux/Unix or macOS
source venv/bin/activate

# For Windows
.\venv\Scripts\activate
To confirm that the virtual environment is activated, you can run the command env | grep VIRTUAL_ENV.
4. Install Flask and Dotenv
Now, let’s install Flask and the python-dotenv module by executing the following command:
pip install flask python-dotenv
flask– This module provides a simple and flexible way to handle routing, request handling, and rendering templates.python-dotenv– This module allows you to load variables from a configuration file into your application’s environment.
Building a Basic Flask Application
Now that you have created the project folder, set up the virtual environment, and installed the necessary dependencies, we can proceed to set up a basic Flask server to get started. In this tutorial, we will be using the factory pattern, which is the recommended approach for creating Flask applications. This pattern allows you to create multiple instances of the Flask application, such as for testing or deployment in different environments.
To begin, create a ‘src‘ directory in the root level of your project. Inside the src directory, create an __init__.py file and add the following code:
src/__init__.py
from flask import Flask


def create_app():
    app = Flask(__name__, instance_relative_config=True)

    @app.get('/api/healthchecker')
    def healthchecker():
        return {"status": "success", "message": "Build RESTful API with Flask and SQLAlchemy"}

    return app
This code sets up a Flask application using the factory pattern. The create_app() function creates an instance of the Flask application and defines a single endpoint /api/healthchecker that returns a JSON response with a success message.
To start the Flask development server, we need to inform Flask about the entry point of our Flask application. This ensures that Flask can locate and run the application when the server is started. There are a couple of ways to achieve this.
One approach is to manually set the FLASK_APP environment variable to the src directory by executing the command export FLASK_APP=src. This command sets the FLASK_APP environment variable to the desired directory. Afterwards, you can run the command flask run to start the server. While this method works, you would need to repeat the process if you open a new terminal.
To simplify this process, we can automate it by creating a special file named .flaskenv in the root directory. This file will contain the necessary Flask configurations, and Flask will execute the commands in this file automatically before starting the server. To proceed with this approach, follow these steps:
- Create a file named
.flaskenvin the root directory. - Add the following code to the
.flaskenvfile:
.flaskenv
export FLASK_ENV=development
export FLASK_APP=src
export FLASK_RUN_PORT=8000
export FLASK_RUN_HOST=0.0.0.0
Now, let’s start the Flask development server. Open your terminal and execute the command flask run --reload. This command not only launches the Flask server but also enables automatic reloading whenever changes are made to the source code. This means that you don’t need to manually restart the server after modifying any files.
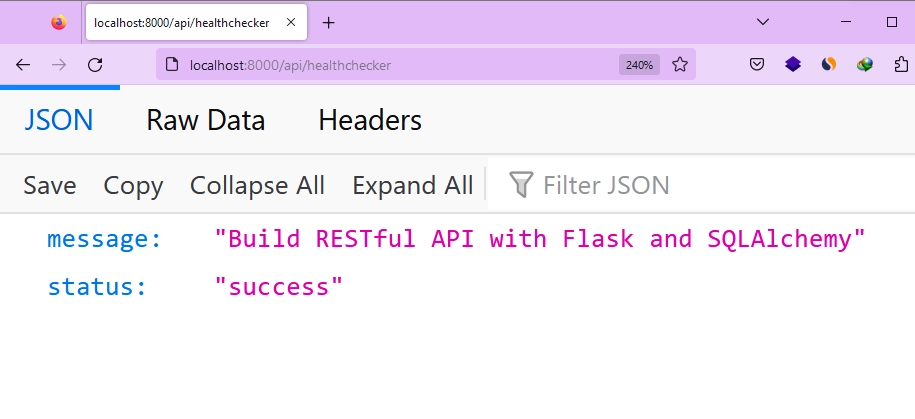
Once the server is up and running, you can access the health checker endpoint by visiting http://localhost:8000/api/healthchecker in your browser. This URL will send a GET request to the Flask server. Within a few milliseconds, you should receive a JSON response containing the information we returned from the health checker route.
Setting Up a PostgreSQL Database
In this section, we’ll use Docker to set up PostgreSQL and pgAdmin servers. Instead of manually installing the PostgreSQL and pgAdmin binaries, Docker allows us to run both servers with a single command. You might be wondering why we need both the PostgreSQL and pgAdmin servers. Well, pgAdmin is a handy graphical user interface (GUI) tool that lets us easily manage and interact with our PostgreSQL database.
If you don’t have Docker installed, follow the installation guide for your operating system at https://docs.docker.com/get-docker/.
Configuring Docker for PostgreSQL
When it comes to running Docker containers on our machine, there are multiple options available. However, for the sake of simplicity, we will utilize Docker Compose. This tool allows us to define the required configurations for containers and effortlessly start or stop them with a single command.
To get started, create a docker-compose.yml file in the root directory and include the following YAML configurations:
docker-compose.yml
version: "3"
services:
  postgres:
    image: postgres:latest
    container_name: postgres
    ports:
      - "6500:5432"
    volumes:
      - progresDB:/var/lib/postgresql/data
    env_file:
      - ./.env
  pgAdmin:
    image: dpage/pgadmin4
    container_name: pgAdmin
    env_file:
      - ./.env
    ports:
      - "5050:80"
volumes:
  progresDB:
The above configurations will pull the latest images of Postgres and pgAdmin from DockerHub if they do not already exist on your machine. It will then proceed to build the images using the credentials specified in a .env file. Finally, it will run the images in their respective Docker containers.
Running the PostgreSQL and pgAdmin Servers
Now it’s time to run the containers, but before that, we need to address one step. In the Docker Compose file, you’ll notice that a .env file is specified to provide the credentials required by the Postgres and pgAdmin images. Therefore, we need to create this file and make the credentials available. Follow these steps:
- Create a file named
.envin the root level of your project. - Add the following variables to the
.envfile:
.env
POSTGRES_HOST=127.0.0.1
POSTGRES_PORT=6500
POSTGRES_USER=admin
POSTGRES_PASSWORD=password123
POSTGRES_DB=flask_db

PGADMIN_DEFAULT_EMAIL=admin@admin.com
PGADMIN_DEFAULT_PASSWORD=password123
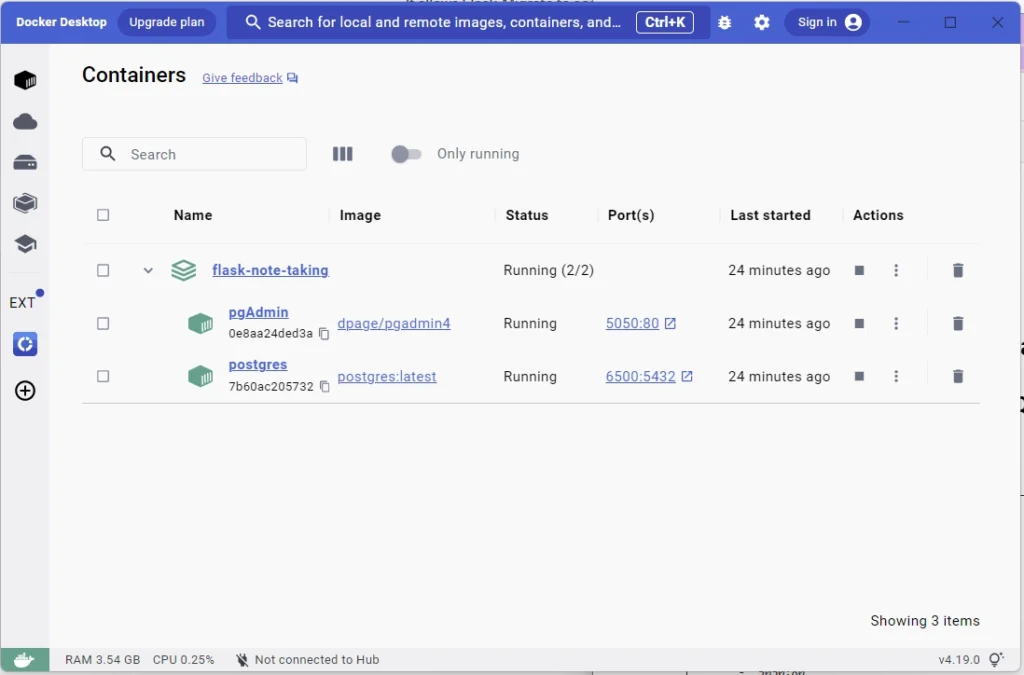
With the credentials in place, you can run the command docker-compose up -d in your terminal to launch the PostgreSQL and pgAdmin servers. This command will start the containers in the background, allowing you to continue working without being attached to their logs. Once the setup is complete, you can verify if the containers are running by using the Docker Desktop application or running the command docker ps in your terminal.
Creating the Database Model
At this stage, we have successfully set up a running PostgreSQL server. Now, the next step is to establish a connection between the Flask application and the running PostgreSQL server. To achieve this, we will be utilizing the SQLAlchemy ORM, which requires some initial configuration to get it up and running smoothly.
Fortunately, there is a Flask plugin called flask_sqlalchemy that simplifies the process by acting as a wrapper and seamlessly integrating with Flask. It’s important to note that SQLAlchemy relies on a Postgres driver to facilitate communication with the Postgres server. Therefore, you will also need to install the psycopg2-binary module separately.
To install both flask_sqlalchemy and psycopg2-binary, execute the following commands in your terminal:
pip install Flask-SQLAlchemy
pip install psycopg2-binary
flask_sqlalchemy– This plugin provides seamless integration of the SQLAlchemy ORM with Flaskpsycopg2-binary– A PostgreSQL adapter for Python.
With these dependencies installed, we can now start modelling the data required for the Flask application using SQLAlchemy. Since we are building a note-taking API, there are various models to consider, including User, Note, Tag, and more. However, for the sake of simplicity, we’ll focus on the Note model to enable CRUD operations. To proceed, create a models.py file in the src directory and add the following code to it:
src/models.py
from datetime import datetime
import uuid
from flask_sqlalchemy import SQLAlchemy

db = SQLAlchemy()

class Note(db.Model):
    __tablename__ = 'notes'

    id = db.Column(db.String(36), primary_key=True, default=str(uuid.uuid4()))
    title = db.Column(db.String(100), unique=True)
    content = db.Column(db.Text)
    category = db.Column(db.String(100), nullable=True)
    created_at = db.Column(db.DateTime, default=datetime.utcnow)
    updated_at = db.Column(
        db.DateTime, default=datetime.utcnow, onupdate=datetime.utcnow)
    published = db.Column(db.Boolean, default=False, nullable=True)

    def to_dict(self):
        return {
            'id': self.id,
            'title': self.title,
            'content': self.content,
            'category': self.category,
            'createdAt': self.created_at.isoformat(),
            'updatedAt': self.updated_at.isoformat(),
            'published': self.published
        }
In the code snippet above, we imported the SQLAlchemy class and created an instance of it. Using this instance, we defined the Note model by specifying its fields. We also included a to_dict method, which helps us convert the data retrieved from SQLAlchemy into a dictionary format. This makes it easier for us to work with the data in our application.
Database Migration
Now that we have defined the SQLAlchemy model, it’s important to generate migration files for it. These files allow us to keep track of any changes made to the database schema and provide the ability to roll back to previous versions if necessary.
Setting up Flask-Migrate
Normally, Alembic is used alongside SQLAlchemy to perform database migrations in Python projects. However, when working with Flask, we have the advantage of a convenient extension called Flask-Migrate that handles SQLAlchemy database migrations for us with ease.
It’s important to note that the Flask-Migrate extension utilizes Alembic behind the scenes, abstracting the setup process that would otherwise be required if using Alembic directly. To install the Flask-Migrate extension, simply run the command provided below in your terminal:
pip install Flask-Migrate
Once you have installed the Flask-Migrate extension, the next step is to instantiate it in your project. It is considered a best practice to perform this instantiation within the same module where you have defined your SQLAlchemy models. In our scenario, the models are defined in the src/models.py file. To accomplish this, open the src/models.py file and replace the existing code with the following updated code snippet:
src/models.py
from datetime import datetime
import uuid
from flask_sqlalchemy import SQLAlchemy
from flask_migrate import Migrate

db = SQLAlchemy()
migrate = Migrate()


class Note(db.Model):
    __tablename__ = 'notes'

    id = db.Column(db.String(36), primary_key=True, default=str(uuid.uuid4()))
    title = db.Column(db.String(100), unique=True)
    content = db.Column(db.Text)
    category = db.Column(db.String(100), nullable=True)
    created_at = db.Column(db.DateTime, default=datetime.utcnow)
    updated_at = db.Column(
        db.DateTime, default=datetime.utcnow, onupdate=datetime.utcnow)
    published = db.Column(db.Boolean, default=False, nullable=True)

    def to_dict(self):
        return {
            'id': self.id,
            'title': self.title,
            'content': self.content,
            'category': self.category,
            'createdAt': self.created_at.isoformat(),
            'updatedAt': self.updated_at.isoformat(),
            'published': self.published
        }
Generating and Applying Migrations
Before we can generate the migration files, we need to initialize the SQLAlchemy and Flask-Migrate extensions with our Flask application. To do this, we’ll perform the initializations in the src/__init__.py file, which serves as the entry point of our project.
src/__init__.py
import os
from flask import Flask
from dotenv import load_dotenv
from src.models import db, migrate


def create_app():
    app = Flask(__name__, instance_relative_config=True)

    load_dotenv()  # Load environment variables from .env file
    database_uri = os.getenv('SQLALCHEMY_DATABASE_URI')
    app.config['SQLALCHEMY_DATABASE_URI'] = database_uri

    db.init_app(app)
    migrate.init_app(app, db)

    @app.get('/api/healthchecker')
    def healthchecker():
        return {"status": "success", "message": "Build RESTful API with Flask and SQLAlchemy"}

    return app
In the provided code, we started by loading the environment variables from the .env file into the Python environment using the load_dotenv() method. This enables us to access these variables within the Flask application using the os.getenv() method.
Next, we obtained the SQLAlchemy database connection URL and added it to the application’s configuration object. This URL is crucial for SQLAlchemy to establish a connection with the PostgreSQL server and perform necessary database operations.
To complete the setup, we initialized both SQLAlchemy and Flask-Migrate extensions:
db.init_app(app): This line initializes the SQLAlchemy extension with the Flask application, allowing us to interact with the database using SQLAlchemy.migrate.init_app(app, db): This line initializes the Flask-Migrate extension with the Flask application and SQLAlchemy database. Flask-Migrate handles database migrations, keeping track of schema changes and allowing us to easily update the database structure when needed.
Before running the migration commands, it’s important to include the SQLALCHEMY_DATABASE_URI variable in the .env file. This variable should contain the connection URL to the PostgreSQL database that is currently running. Without setting this variable, the migration commands will not work properly. To address this, open the .env file and update its contents by adding the SQLALCHEMY_DATABASE_URI variable.
.env
POSTGRES_HOST=127.0.0.1
POSTGRES_PORT=6500
POSTGRES_USER=admin
POSTGRES_PASSWORD=password123
POSTGRES_DB=flask_db

PGADMIN_DEFAULT_EMAIL=admin@admin.com
PGADMIN_DEFAULT_PASSWORD=password123

SQLALCHEMY_DATABASE_URI=postgresql://admin:password123@localhost:6500/flask_db
Ensure that the PostgreSQL Docker container is running, and then use the following commands to generate migration files and synchronize the database schema:
flask db init
flask db migrate -m "Initial migration"
flask db upgrade
flask db init: This command initializes the database migration environment. It creates amigrationsdirectory in your project, which will store the migration scripts.flask db migrate -m "Initial migration": This command generates an initial migration script based on the changes detected in the models. The-moption is used to provide a descriptive message for the migration. It creates a new migration file in themigrations/versionsdirectory.flask db upgrade: This command applies the database migrations to the database. It executes the migration scripts that have not been applied yet. It updates the database schema according to the changes specified in the migration files.
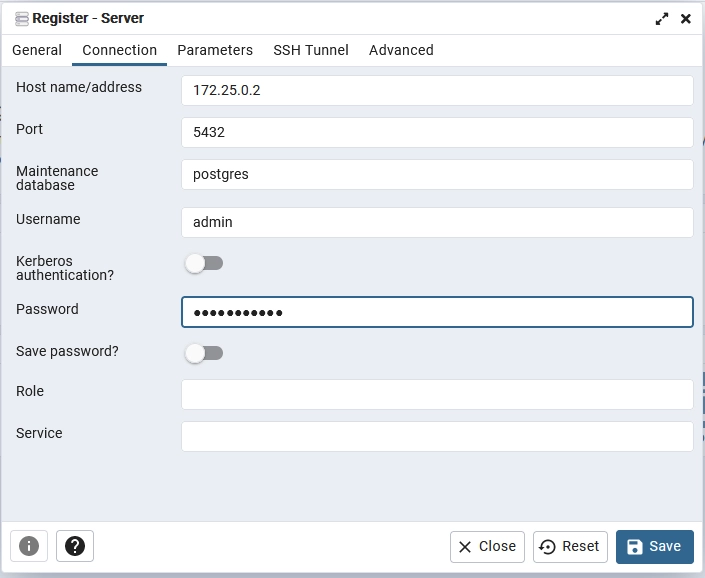
To log in to the PostgreSQL server from pgAdmin and verify if the commands executed previously created the notes table, follow these steps:
- Access the pgAdmin application running in the Docker container by visiting
http://localhost:5050/in your web browser. - Sign in to pgAdmin using the credentials specified in the
.envfile. - Once logged in, click on “Add New Server” to open a popup.
- In the popup, provide the necessary credentials for the PostgreSQL server running in the Docker container. Retrieve the password from the
.envfile. - To obtain the “Host name/address“, run the command
docker inspect postgresin your terminal. Scroll down to the bottom and copy the IP address specified in the “IPAddress” field. - Paste the copied IP address into the “Host name/address” field in the popup.
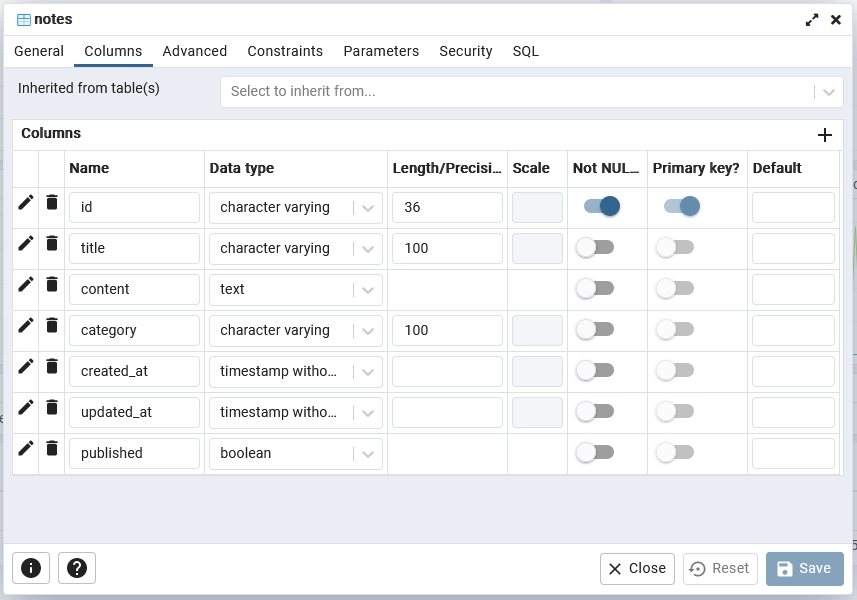
Once you have added the Postgres server to pgAdmin, navigate to the “Schemas” section and then to the “Tables” section within the flask_db database. You will find two tables: alembic_version and the ‘notes‘ table. The alembic_version table is specifically used by Alembic to keep track of the current migration version of the database. It helps Alembic manage and organize the database migrations effectively.
Creating the Request Validation Schemas
In API development, it is considered a best practice to validate incoming request bodies before they reach our route handlers. This helps filter out irrelevant or malicious data, preventing potential crashes in our application. Additionally, request body validation ensures that users provide the correct data types and adhere to the required validation rules. To define validation schemas, we will utilize the widely-used WTForms library.
To seamlessly integrate WTForms with our Flask app, we also need to install the Flask-WTF extension. Execute the command below to install both dependencies:
pip install WTForms Flask-WTF
WTFormsis a Python library that offers form validation and rendering capabilities. It simplifies the process of defining, validating, and rendering complex forms by providing reusable components.Flask-WTF– is an extension specifically designed for Flask applications. It seamlessly integrates the features of WTForms into Flask, allowing you to easily handle form validation and rendering within your Flask projects.
To define the validation schemas using the installed libraries, follow these steps:
- Create a new file named
schemas.pyinside thesrcdirectory. - Open the
schemas.pyfile and add the following code:
src/schemas.py
from flask_wtf import FlaskForm
from wtforms import StringField, TextAreaField, BooleanField
from wtforms.validators import DataRequired, Length, Optional


class CreateNoteForm(FlaskForm):
    title = StringField('Title', validators=[DataRequired(), Length(max=100)])
    content = TextAreaField('Content', validators=[DataRequired()])
    category = TextAreaField('Category', validators=[Optional()])
    published = BooleanField('Published', validators=[Optional()])


class UpdateNoteForm(FlaskForm):
    title = StringField('Title', validators=[Optional(), Length(max=100)])
    content = TextAreaField('Content', validators=[Optional()])
    category = TextAreaField('Category', validators=[Optional()])
    published = BooleanField('Published', validators=[Optional()])
In the above code, we import the necessary classes and functions from the flask_wtf and wtforms modules. We define two classes: CreateNoteForm and UpdateNoteForm, which inherit from FlaskForm. Each class represents a form and includes fields with their respective validators.
For the CreateNoteForm, the title and content fields are required and have a maximum length of 100 characters. The ‘category‘ and published fields are optional.
Similarly, for the UpdateNoteForm, all fields are optional. This allows for partial updates of the note data.
CRUD Route Handlers
Now it’s time to use SQLAlchemy to perform CRUD operations on the PostgreSQL database. To interact with the database, we will create the following route handlers in a notes_routes.py file within the src directory. These route handlers will handle different types of requests and enable us to manipulate the data:
- create_note: This route handler will handle POST requests to the
/api/notesendpoint. It will add new notes to the database. - update_note: This route handler will handle PATCH requests to the
/api/notes/<string:note_id>endpoint. It will edit an existing note in the database. - get_note: This route handler will handle GET requests to the
/api/notes/<string:note_id>endpoint. It will retrieve a single note from the database. - delete_note: This route handler will handle DELETE requests to the
/api/notes/<string:note_id>endpoint. It will delete a note from the database. - get_notes: – This route handler will handle GET requests to the
/api/notesendpoint. It will fetch a paginated list of notes from the database.
The Flask-WTF extension requires a CSRF token to be included in the request headers and body. This typically involves defining a separate server route to obtain the CSRF token. In our case, due to the small size of the project, we will omit this step and exempt the handlers from using CSRF protection. However, in a larger and more complex project, it is highly recommended to implement the necessary code for CSRF protection.
To implement this, create a new file named utils.py in the ‘src’ directory. Inside utils.py, add the following code snippet:
src/utils.py
from flask_wtf import CSRFProtect

csrf = CSRFProtect()
Next, create a notes_routes.py file in the src directory and include the following import statements.
src/notes_routes.py
from src.models import db, Note
from src.schemas import CreateNoteForm, UpdateNoteForm
from flask import request
from datetime import datetime
from flask_wtf.csrf import generate_csrf
from sqlalchemy.exc import IntegrityError
import src.utils as utils
Creating a Resource
Let’s take a look at the ‘create_note‘ function, which is responsible for handling the POST requests to the /api/notes endpoint in the Flask app.
Upon invocation, the function begins by initializing an instance of the CreateNoteForm and using it to validate the data provided in the request body. If the form validation fails, a response with a status code of 400 (Bad Request) is returned, including the validation errors obtained from the form.
To ensure CSRF (Cross-Site Request Forgery) protection, the function generates a CSRF token using the generate_csrf function provided by the Flask-WTF library. This token is then appended to the request body as the value of the csrf_token field. This mechanism ensures that the form submission includes a valid CSRF token for successful validation.
src/notes_routes.py
@utils.csrf.exempt
def create_note():
    body = CreateNoteForm()

    csrf_token = generate_csrf()
    body.csrf_token.data = csrf_token

    if body.validate_on_submit():
        try:
            note = Note(
                title=body.title.data,
                content=body.content.data,
            )
            if body.category.data:
                note.category = body.category.data

            db.session.add(note)
            db.session.commit()
            return {'status': 'success', 'data': {'note': note.to_dict()}}, 201
        except IntegrityError:
            db.session.rollback()
            return {'status': 'fail', 'message': 'Note with the same title already exists'}, 409

    else:
        return {'status': 'fail', 'errors': body.errors}, 400
Moving forward, the function adds the newly created Note object to the session and commits it to the database. In the event of an IntegrityError, indicating a conflict with an existing note title, a rollback operation is performed on the session. A response with a status code of 409 (Conflict) is returned, along with an appropriate error message.
On the other hand, if the note creation is successful, the function returns a JSON response with a status code of 201 (Created). The response body includes the data of the created note, allowing the client to access the newly created resource.
Updating a Resource
Here, you will create the update_note function, which handles PATCH requests to the /api/notes/<string:note_id> endpoint.
When this function is called, it begins by initializing an instance of the UpdateNoteForm. This form is then used to validate the data provided in the request body. To ensure successful form validation, the function generates a CSRF token and assigns it to the csrf_token field of the form.
Next, the function retrieves the note object from the database using the provided note_id. If the note exists, it proceeds to update the note’s attributes based on the data provided in the request body. Each attribute is individually checked, and if a corresponding value is present in the request body, the note’s attribute is updated accordingly. The changes are then committed to the database by invoking db.session.commit().
src/notes_routes.py
@utils.csrf.exempt
def update_note(note_id):
    body = UpdateNoteForm()

    csrf_token = generate_csrf()
    body.csrf_token.data = csrf_token

    if body.validate_on_submit():
        note = Note.query.get(note_id)

        if note:
            if body.title.data:
                note.title = body.title.data
            if body.content.data:
                note.content = body.content.data
            if body.category.data:
                note.category = body.category.data
            if body.published.data:
                note.published = body.published.data

            note.updated_at = datetime.utcnow()
            db.session.commit()

            return {'status': 'success', 'data': {'note': note.to_dict()}}
        else:
            return {"status": "fail", 'message': f'Note with id {note_id} not found'}, 404
    else:
        return {'status': 'fail', 'errors': body.errors}, 400
In the case of a successful note update, the function returns a JSON response with a status code of 200 (OK). The response body includes the updated note’s data in the note field.
However, if the note with the specified note_id is not found in the database, the function returns a response with a status code of 404 (Not Found).
Retrieving a Resource
Now let’s explore the get_note function, which is responsible for querying a single note from the database and returning the corresponding record. When this function is called, it performs a query to the database to fetch a note based on the provided note_id from the request.
If the note exists in the database, the function responds with a JSON object containing a status of “success” and includes the note’s data in the response body.
src/notes_routes.py
def get_note(note_id):
    note = Note.query.get(note_id)

    if note:
        return {"status": "success", 'data': {'note': note.to_dict()}}
    else:
        return {"status": "fail", 'message': f'Note with id {note_id} not found'}, 404
Deleting a Resource
Let’s now tackle the delete_note function. This function is responsible for deleting a note from the database based on the provided note_id.
When the function is called, it retrieves the note object from the database using the ‘note_id‘ parameter. If the note exists, it proceeds to delete the note by using the delete() method from the SQLAlchemy session. After deleting the note, the changes are committed to the database by calling db.session.commit().
If the note is successfully deleted, the function returns a JSON response with a status of “success” and a message indicating that the note was deleted successfully.
src/notes_routes.py
@utils.csrf.exempt
def delete_note(note_id):
    note = Note.query.get(note_id)

    if note:
        db.session.delete(note)
        db.session.commit()
        return {'status': 'success', 'message': 'Note deleted successfully'}
    else:
        return {"status": "fail", 'message': f'Note with id {note_id} not found'}, 404
Retrieving all Resources
In the subsection titled ‘Retrieving a Resource‘, we have completed the implementation of the first GET request, which allows us to retrieve a single note from the database. Now, let’s proceed with implementing another GET request that will enable us to fetch a list of note items. This new function, get_notes, incorporates pagination functionality to efficiently handle large datasets by limiting the number of results returned to the client.
Upon invocation, the function retrieves the values of the page and limit parameters from the request’s query parameters. If these parameters are not provided, default values of 1 for page and 10 for limit are used.
Next, the function executes a query to retrieve the notes from the database using the paginate method from the SQLAlchemy query object. The paginate method handles the pagination logic, including the specified page number and the number of notes per page.
The notes are then extracted from the paginated object by accessing the items attribute. For each note, the to_dict() method is called to convert it into a dictionary representation.
src/notes_routes.py
def get_notes():
    page = request.args.get('page', default=1, type=int)
    per_page = request.args.get('limit', default=10, type=int)

    notes = Note.query.paginate(page=page, per_page=per_page, error_out=False)

    note_list = [note.to_dict() for note in notes.items]
    result = {
        'status': 'success',
        'notes': note_list,
        'page': notes.pages,
        'limit': notes.per_page,
        'results': len(note_list)
    }

    return result
To provide additional context to the client, the function constructs a result object that encompasses the retrieved notes, along with supplementary metadata such as the total number of pages (pages attribute), the number of notes per page (per_page attribute), and the total number of results (len(note_list)).
Finally, the function returns the result object, indicating a successful operation with a status of “success”.
The Complete Code of the Route Handlers
src/notes_routes.py
from src.models import db, Note
from src.schemas import CreateNoteForm, UpdateNoteForm
from flask import request
from datetime import datetime
from flask_wtf.csrf import generate_csrf
from sqlalchemy.exc import IntegrityError
import src.utils as utils

@utils.csrf.exempt
def create_note():
    body = CreateNoteForm()

    csrf_token = generate_csrf()
    body.csrf_token.data = csrf_token

    if body.validate_on_submit():
        try:
            note = Note(
                title=body.title.data,
                content=body.content.data,
            )
            if body.category.data:
                note.category = body.category.data

            db.session.add(note)
            db.session.commit()
            return {'status': 'success', 'data': {'note': note.to_dict()}}, 201
        except IntegrityError:
            db.session.rollback()
            return {'status': 'fail', 'message': 'Note with the same title already exists'}, 409

    else:
        return {'status': 'fail', 'errors': body.errors}, 400

@utils.csrf.exempt
def update_note(note_id):
    body = UpdateNoteForm()

    csrf_token = generate_csrf()
    body.csrf_token.data = csrf_token

    if body.validate_on_submit():
        note = Note.query.get(note_id)

        if note:
            if body.title.data:
                note.title = body.title.data
            if body.content.data:
                note.content = body.content.data
            if body.category.data:
                note.category = body.category.data
            if body.published.data:
                note.published = body.published.data

            note.updated_at = datetime.utcnow()
            db.session.commit()

            return {'status': 'success', 'data': {'note': note.to_dict()}}
        else:
            return {"status": "fail", 'message': f'Note with id {note_id} not found'}, 404
    else:
        return {'status': 'fail', 'errors': body.errors}, 400


def get_note(note_id):
    note = Note.query.get(note_id)

    if note:
        return {"status": "success", 'data': {'note': note.to_dict()}}
    else:
        return {"status": "fail", 'message': f'Note with id {note_id} not found'}, 404

@utils.csrf.exempt
def delete_note(note_id):
    note = Note.query.get(note_id)

    if note:
        db.session.delete(note)
        db.session.commit()
        return {'status': 'success', 'message': 'Note deleted successfully'}
    else:
        return {"status": "fail", 'message': f'Note with id {note_id} not found'}, 404


def get_notes():
    page = request.args.get('page', default=1, type=int)
    per_page = request.args.get('limit', default=10, type=int)

    notes = Note.query.paginate(page=page, per_page=per_page, error_out=False)

    note_list = [note.to_dict() for note in notes.items]
    result = {
        'status': 'success',
        'notes': note_list,
        'page': notes.pages,
        'limit': notes.per_page,
        'results': len(note_list)
    }

    return result
Registering Routes in the App
To complete our setup, we will register the CRUD endpoints to invoke the route handler functions we created earlier. Additionally, since our frontend application will be running on a different domain and will interact with the Flask API, we need to configure the server with Cross-Origin Resource Sharing (CORS) to allow requests from our frontend app.
To get started, open your terminal and enter the following command to install the Flask-Cors package:
pip install flask-cors
In order for the CSRF protection to work, you need to add a SECRET_KEY variable to the .env file. This secret key will be used by the Flask-WTF extension to generate the CSRF token. To accomplish this, follow the steps below:
- Open the
.envfile. - Add a new line and enter
SECRET_KEY=<your_secret_key>, replacing<your_secret_key>with your desired secret key. - Save the changes to the
.envfile.
.env
POSTGRES_HOST=127.0.0.1
POSTGRES_PORT=6500
POSTGRES_USER=admin
POSTGRES_PASSWORD=password123
POSTGRES_DB=flask_db

PGADMIN_DEFAULT_EMAIL=admin@admin.com
PGADMIN_DEFAULT_PASSWORD=password123

SQLALCHEMY_DATABASE_URI=postgresql://admin:password123@localhost:6500/flask_db
SECRET_KEY=my_ultra_secure_secret
Finally, open the src/__init__.py file and replace its current content with the code provided below:
src/__init__.py
from src.notes_routes import get_note, get_notes, create_note, update_note, delete_note
from flask import Flask, request
from flask_cors import CORS
from dotenv import load_dotenv
import os
from src.models import db, migrate
import src.utils as utils


def handle_error(error):
    response = {
        'status': 'error',
        'message': str(error)
    }
    return response, 500


def create_app():
    app = Flask(__name__, instance_relative_config=True)

    load_dotenv()  # Load environment variables from .env file
    database_uri = os.getenv('SQLALCHEMY_DATABASE_URI')
    app.config['SECRET_KEY'] = os.getenv('SECRET_KEY')
    app.config['SQLALCHEMY_DATABASE_URI'] = database_uri

    db.app = app
    db.init_app(app)

    migrate.init_app(app, db)
    utils.csrf.init_app(app)

    @app.get('/api/healthchecker')
    def healthchecker():
        return {"status": "success", "message": "Build RESTful API with Flask and SQLAlchemy"}

    app.route('/api/notes', strict_slashes=False, methods=['GET'])(get_notes)
    app.route('/api/notes', strict_slashes=False,
              methods=['POST'])(create_note)
    app.route('/api/notes/<string:note_id>',
              methods=['PATCH'])(update_note)
    app.route('/api/notes/<string:note_id>', methods=['GET'])(get_note)
    app.route('/api/notes/<string:note_id>', methods=['DELETE'])(delete_note)

    CORS(app, resources={r"/*": {"origins": "http://localhost:3000",
                                 "methods": ["GET", "POST", "PATCH", "DELETE"],
                                 "supports_credentials": True}})

    app.register_error_handler(Exception, handle_error)

    @app.errorhandler(404)
    def handle_not_found_error(e):
        response = {
            'status': 'fail',
            'message': f"route: '{request.path}' not found on this server"
        }
        return response, 404

    return app
Let’s discuss the updates made to the src/__init__.py file:
- We imported the
csrfinstance from thesrc.utilsmodule and initialized it usingutils.csrf.init_app(app). This sets up the CSRF protection for the Flask app. - We registered the CRUD routes to their respective route handler functions. Each route is assigned the corresponding HTTP methods and endpoint.
- Additionally, we configured the Flask app with CORS to allow requests from the frontend application. The CORS configuration specifies the allowed origins, methods, and enables support for credentials.
Once you’ve made the necessary changes to the src/__init__.py file, you can start the Flask development server by running the command flask run. Before starting the server, ensure that the PostgreSQL Docker container is running and that you have successfully applied the SQLAlchemy migrations to the database.
To test the API endpoints individually, you can make use of the Note App.postman_collection.json file available in the project’s GitHub repository. You can download or clone the repository and import this Postman collection into either Postman or the Thunder Client VS Code extension. This collection includes all the requests used for testing the API.
If you prefer to test the API with a frontend application, please refer to the instructions provided in the “Running the Flask App with a Frontend Application” section.
Conclusion
And that concludes our tutorial! Throughout this article, we have explored the process of building a REST API in Flask with CRUD functionality. I hope you have found this guide informative and useful.
If you have any questions or feedback, please feel free to leave them in the comments section below. Your input is highly appreciated. Thank you for reading!