

In this comprehensive guide, you will learn how to set up Google and GitHub OAuth with NextAuth v5 in your Next.js 14 project. Incorporating OAuth sign-in options into your application can eliminate the need for users to sign in with their email and password. Consequently, they won’t have to remember the password used for your application, as many websites require users to use unique passwords.
With the release of NextAuth v5, a couple of breaking changes have been introduced, and getting NextAuth up and running in the latest release of Next.js, which is version 14, requires some setups.
In this article, I will guide you from scratch: from setting up the OAuth app on Google and GitHub, to configuring NextAuth with the providers, to modifying the JWT payload and session data to include custom information, to protecting routes using Next.js middleware with NextAuth.
The tutorial’s source code is available on GitHub: https://github.com/wpcodevo/nextauth-nextjs14-prisma
More practice:
- Setup and Use NextAuth.js in Next.js 14 App Directory
- Implement Authentication with NextAuth in Next.js 14
- Implement Authentication with Supabase in Next.js 14
- Setup Google and GitHub OAuth with Supabase in Next.js 14
- Implement Authentication with tRPC in Next.js 14
- Implement Authentication with tRPC API in Next.js 14
- Using tRPC with Next.js 14, React Query and Prisma
- How to Set Up and Use React Query in Next.js 14
- Using React Query with Supabase in Next.js App Router
- How to Setup React Query in Next.js 13 App Directory
- React Query and Axios: User Registration and Email Verification
- Forgot/Reset Passwords with React Query and Axios
- How to Setup tRPC API Server & Client with Next.js and Prisma
- tRPC Server API with Next.js & PostgreSQL: Access & Refresh Tokens
- Full-Stack Next.js tRPC App: User Registration & Login Example
- Build a tRPC CRUD API Example with Next.js

How to Run the Project on Your Computer
To explore the Google and GitHub OAuth integration with NextAuth v5 on your machine, follow these steps to get the project up and running:
- Download or clone the project from its GitHub repository at https://github.com/wpcodevo/nextauth-nextjs14-prisma and open the source code in your preferred IDE or code editor.
- Open the integrated terminal in your IDE, and from the root directory, execute the command
pnpm installto install all the necessary dependencies. - Duplicate the
example.envfile and rename the copy to.env. - Launch the PostgreSQL server with Docker using the command
docker-compose up -d. - Add your Google and GitHub OAuth client IDs and secrets to the respective variables in the
.envfile. If you don’t know how to obtain the OAuth client IDs and secrets, you can follow the instructions provided in the ‘Obtaining Google and GitHub OAuth Credentials’ section. - Synchronize the Prisma migrations with the PostgreSQL database schema and generate the Prisma Client by running the command
pnpm prisma migrate dev. - Start the Next.js development server by running the command
pnpm dev. Once the server is ready to accept requests, open the application in your browser and explore the features to understand the authentication flow
Demo of the OAuth Flow
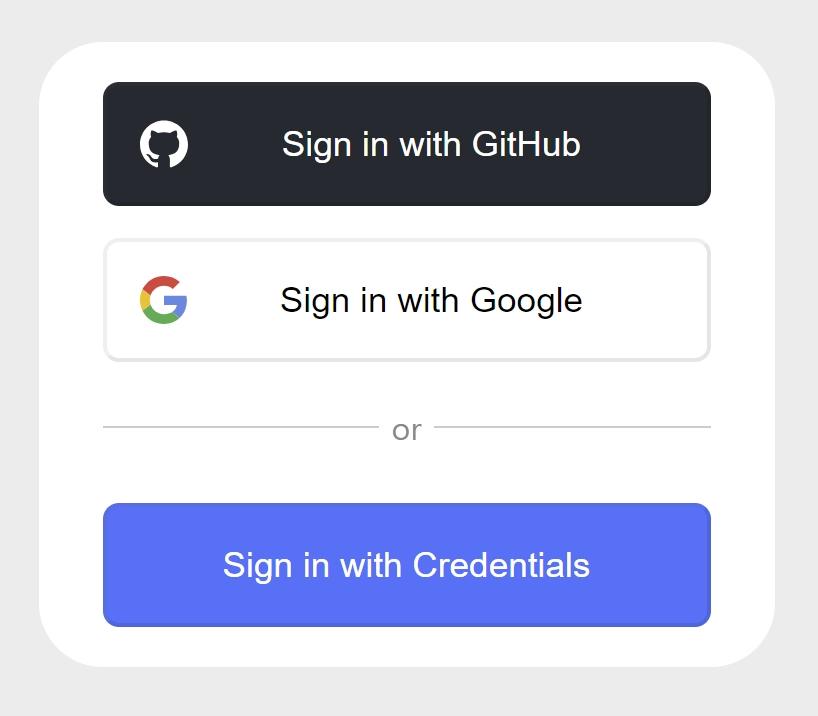
Now that you’ve got the project running on your computer, let’s proceed to explore its features to understand the OAuth flow. Below is the default NextAuth sign-in form, but in this application, we are using a custom login form page instead. To access this page, you need to comment out the pages option in the NextAuth configurations inside the auth.ts file.
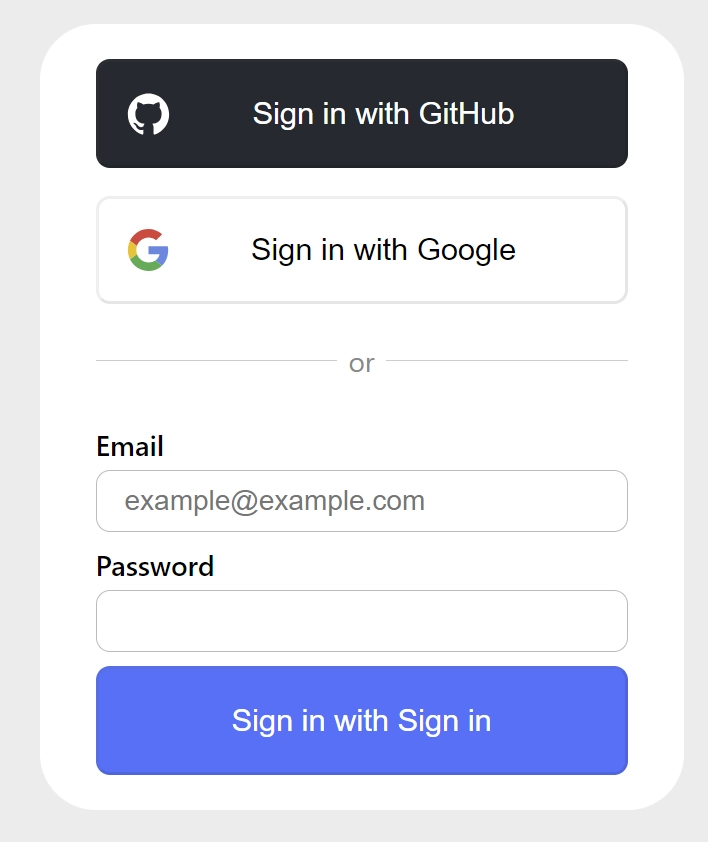
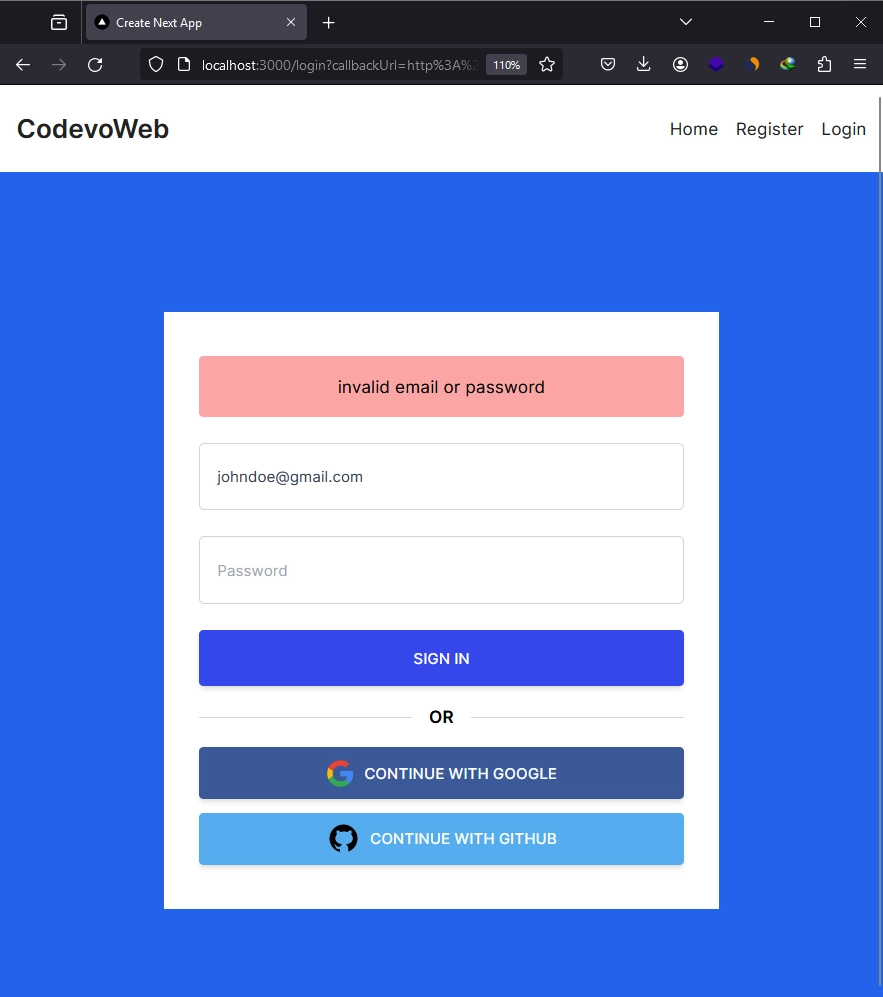
On the login form, you have three options to sign into the application: one using email and password, and the other two are social logins comprising Google and GitHub OAuth. For simplicity, I will demonstrate how Google OAuth works in our application, as the same process applies to the GitHub OAuth flow.
To sign in with your Google account, simply click on the ‘CONTINUE WITH GOOGLE‘ button. This action will cause NextAuth to generate the Google OAuth consent screen URL and redirect you to it.
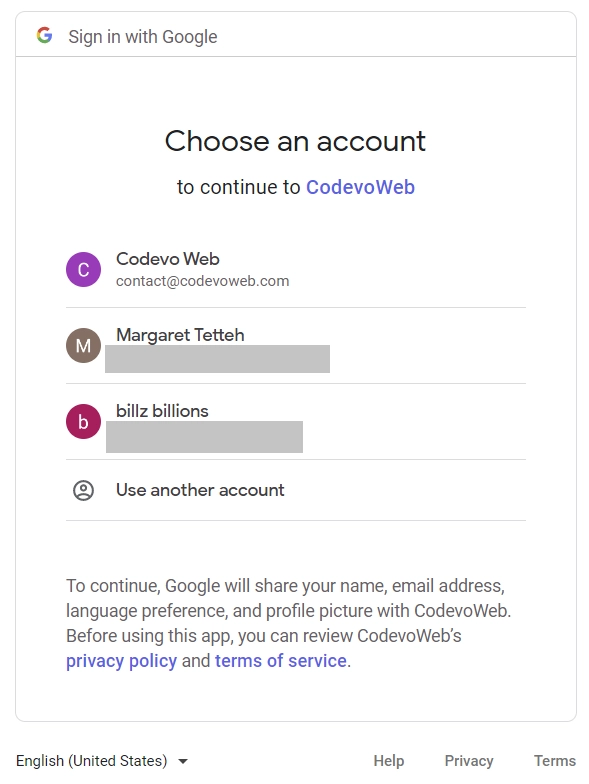
On the Google OAuth Consent screen, you will be prompted to select an account to continue. Since it’s your first time signing into the application, you will be asked to authorize access to the application. Select ‘Yes’ to grant access.
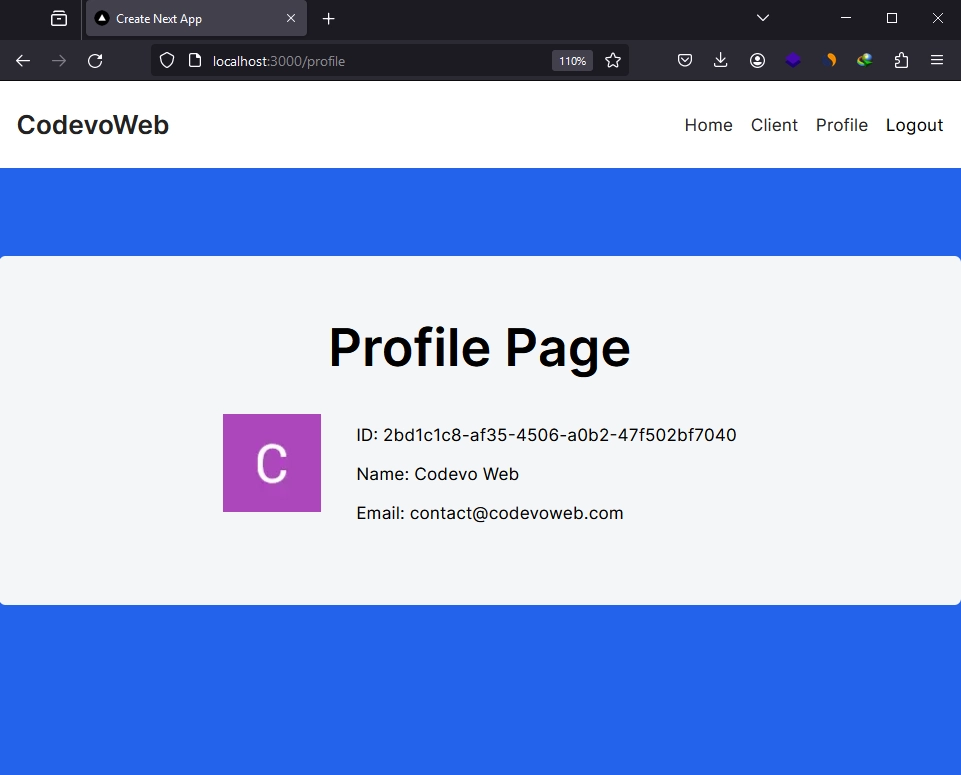
Once you’ve granted access to the Next.js app, you will be redirected back to the application page, and NextAuth will automatically sign you into the application. You can now access protected pages or routes like the /profile page where your account credentials are displayed.
Obtaining Google and GitHub OAuth Credentials
At this point, you have gained an overview of the OAuth flow. Let’s now delve deeper into the process by creating OAuth apps on both Google and GitHub. Then, utilize these credentials to configure the OAuth providers with NextAuth.
Google OAuth Client ID and Secret
In this section, you’ll learn how to obtain the Google OAuth2 client ID and secret from the Google Cloud Console. Here are the steps to follow:
- Visit https://console.developers.google.com/ and make sure you are logged into your Google account.
- Click the dropdown menu at the top of the page to display a pop-up window. From there, you can choose an existing project or create a new one.
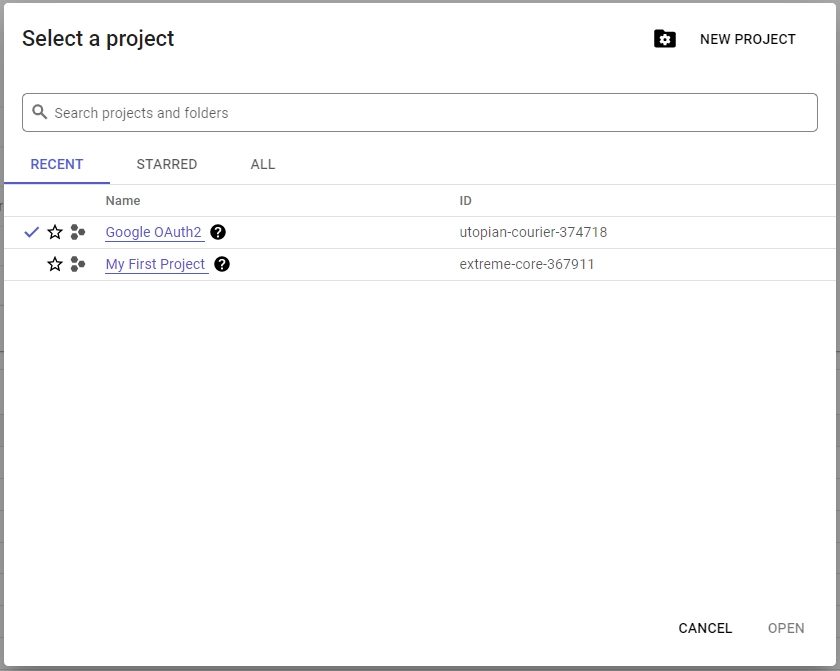
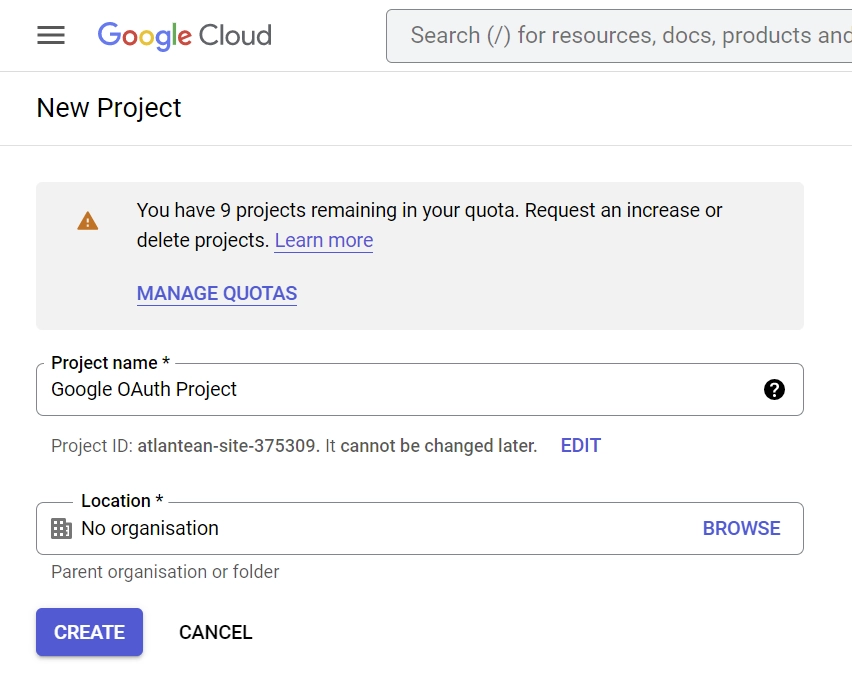
- To create a new project, click the “New Project” button in the top-right corner of the pop-up window. Enter a name for your project and click the “Create” button to complete the process.
- Once your project is created, click the “SELECT PROJECT” button from the notifications.

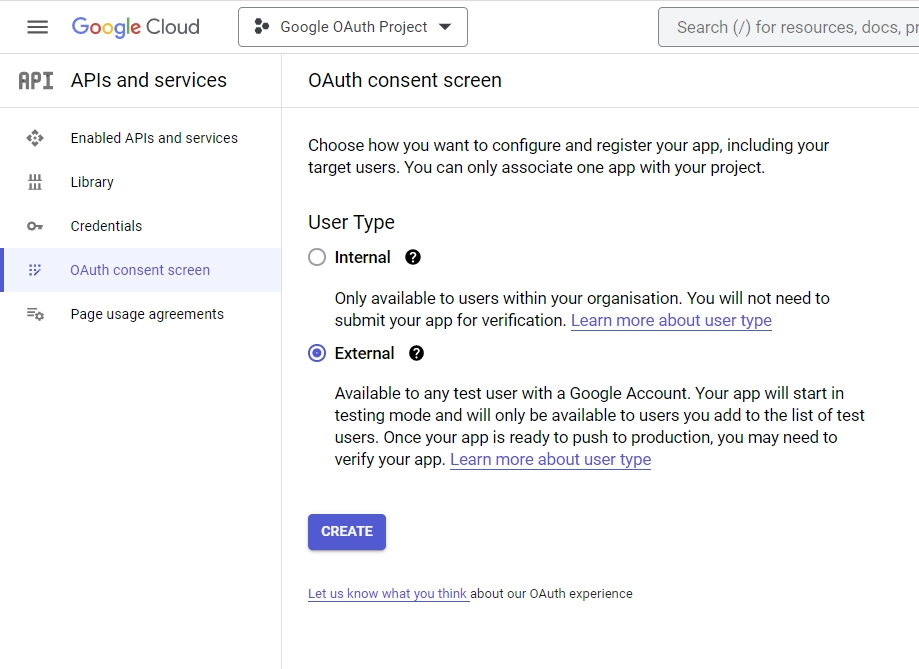
- Click the “OAuth consent screen” menu on the left sidebar. Choose “External” as the “User Type” and click on the “CREATE” button.
- On the “Edit app registration” screen, go to the “App information” section and fill in the required details, including a logo for the consent screen.
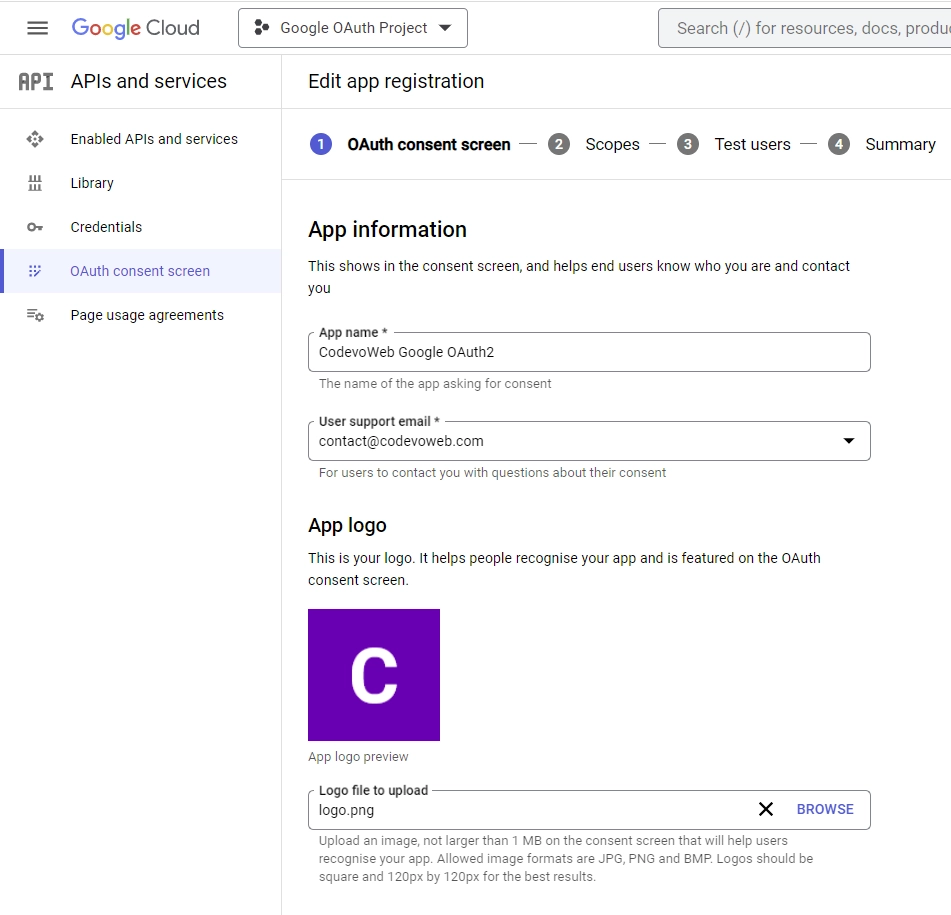
Under the “App domain” section, provide links to your homepage, privacy policy, and terms of service pages. Input your email address under the “Developer contact information” section and click the “SAVE AND CONTINUE” button.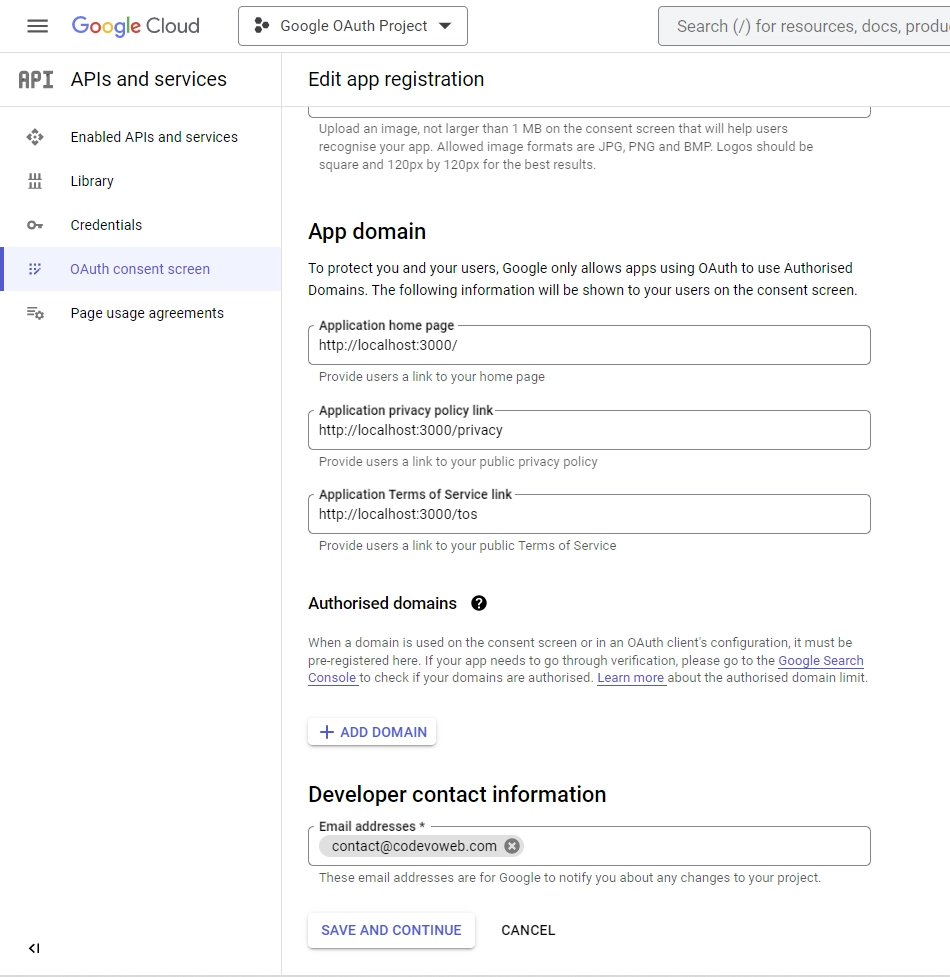
- On the “Scopes” screen, click on the “ADD OR REMOVE SCOPES” button, select
.../auth/userinfo.emailand.../auth/userinfo.profilefrom the list of options, and then click on the “UPDATE” button. Scroll down and click the “SAVE AND CONTINUE” button.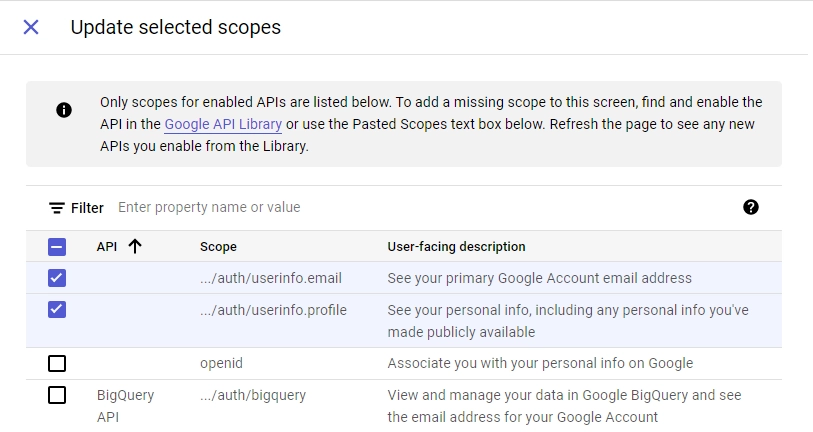
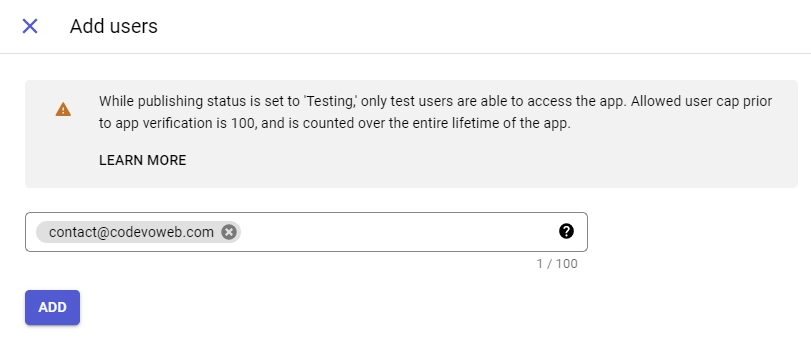
- On the “Test users” screen, add the email addresses of Google accounts that will be authorized to test your application while it is in sandbox mode. Click the “ADD USERS” button and input the email addresses. Click the “SAVE AND CONTINUE” button to proceed.
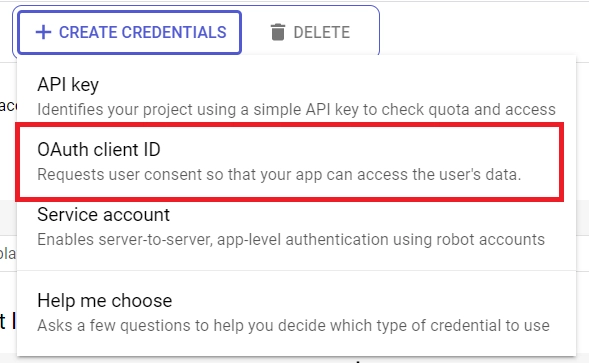
- Click on the “Credentials” option in the left sidebar. Select the “CREATE CREDENTIALS” button and choose “OAuth client ID” from the list of options provided.
- Choose “Web application” as the application type, and input a name for your app. Specify the authorized redirect URI as
http://localhost:3000/api/auth/callback/googleand click the “Create” button.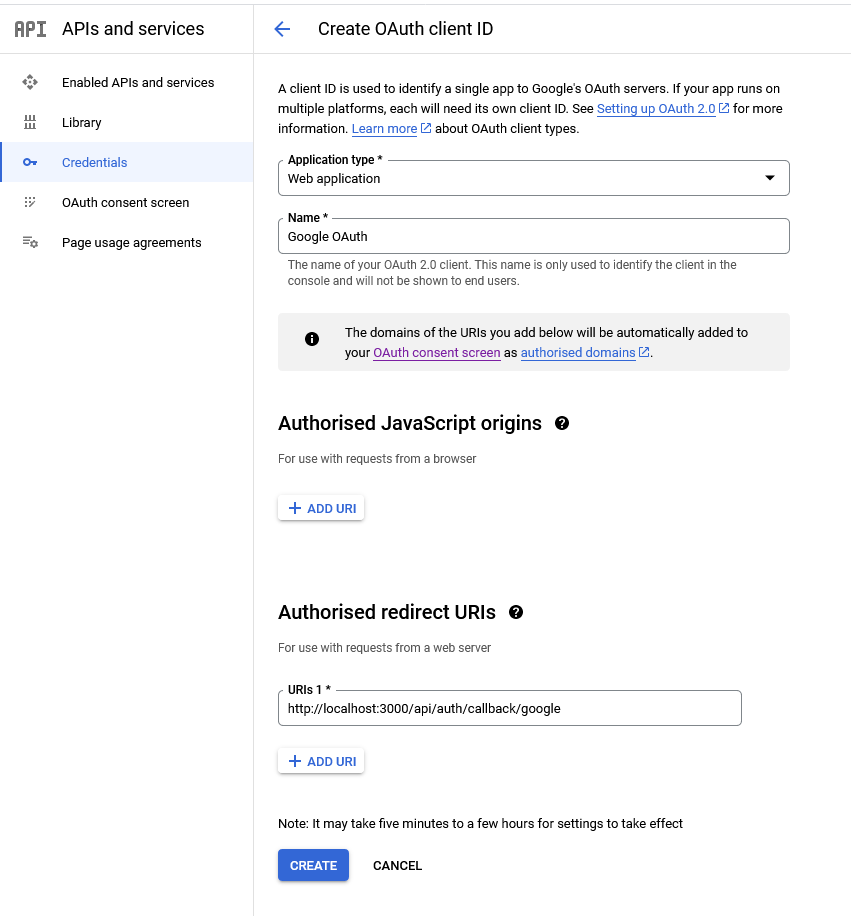
After the client ID has been created, copy the client ID and secret from the “Credentials” page and add them to the.envfile. Here’s an example.envfile to guide you.
.env
AUTH_GOOGLE_ID=
AUTH_GOOGLE_SECRET=
GitHub OAuth Client ID and Secret
Follow these steps to register an OAuth app on GitHub and obtain the Client ID and Secret.
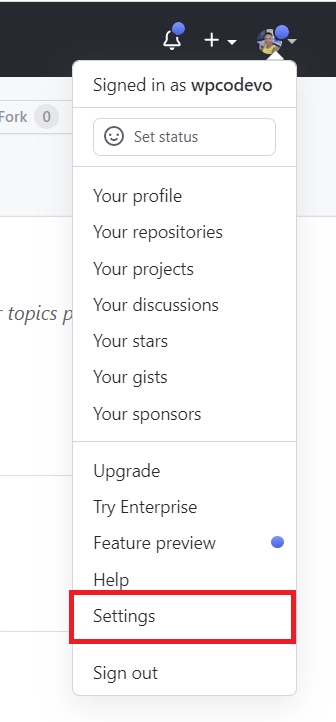
- Start by signing into your GitHub account. Click on your profile picture at the top right corner and select “Settings” from the dropdown menu. You’ll be taken to the GitHub Developer Settings page.
- Scroll down to find the “Developer settings” section and click on it.
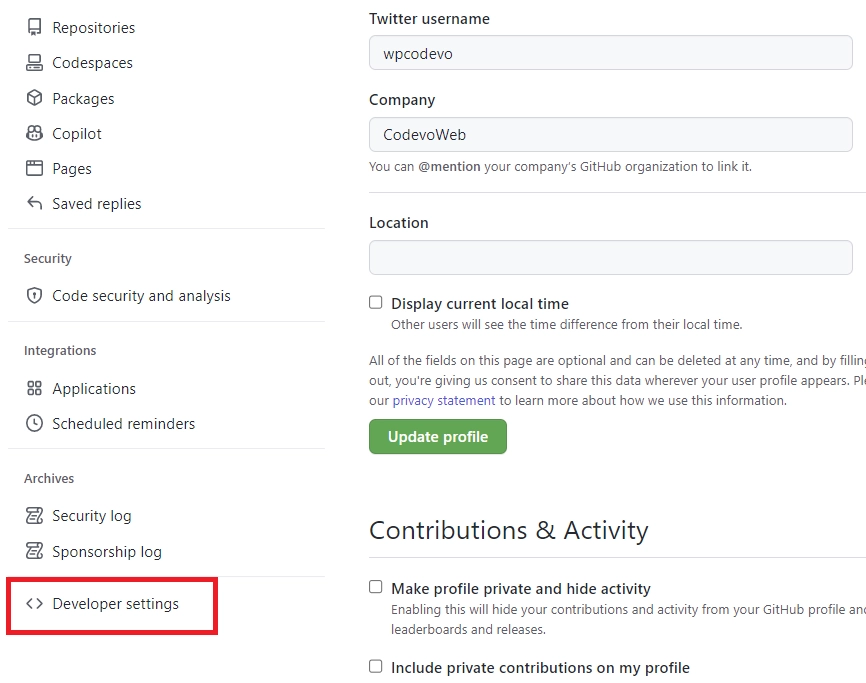
- On the Developer settings page, look for “OAuth Apps” and click on it. Under the “OAuth Apps” section, click on the “New OAuth App” button.
- Fill in the “Application name” and “Homepage URL” input fields with the appropriate name and URL for your app. For the “Authorization callback URL”, enter the URL where GitHub will redirect users after they’ve authorized the app.
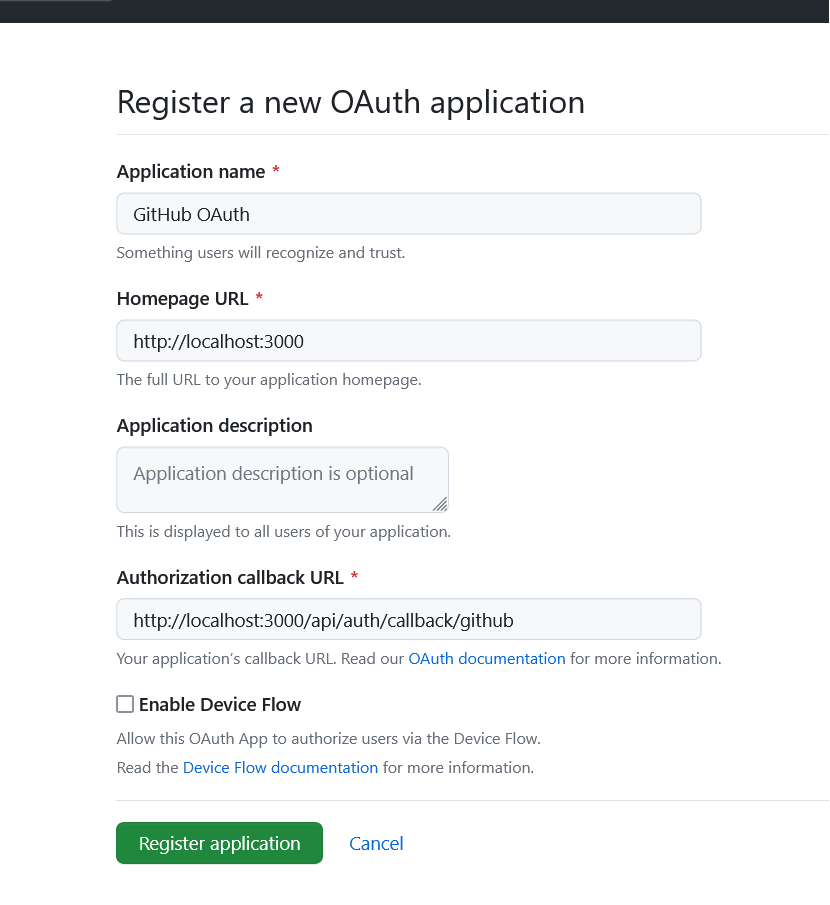
In this example, you need to enterhttp://localhost:3000/api/auth/callback/githubas the redirect URL. Once you’re finished, hit the “Register application” button to create the OAuth App. - You’ll now be taken to the application details page where you can access the “Client ID” and generate the “Client Secret” keys.
To generate the OAuth client secret, click on the “Generate a new client secret” button. GitHub will then prompt you to confirm your identity before the client secret is generated.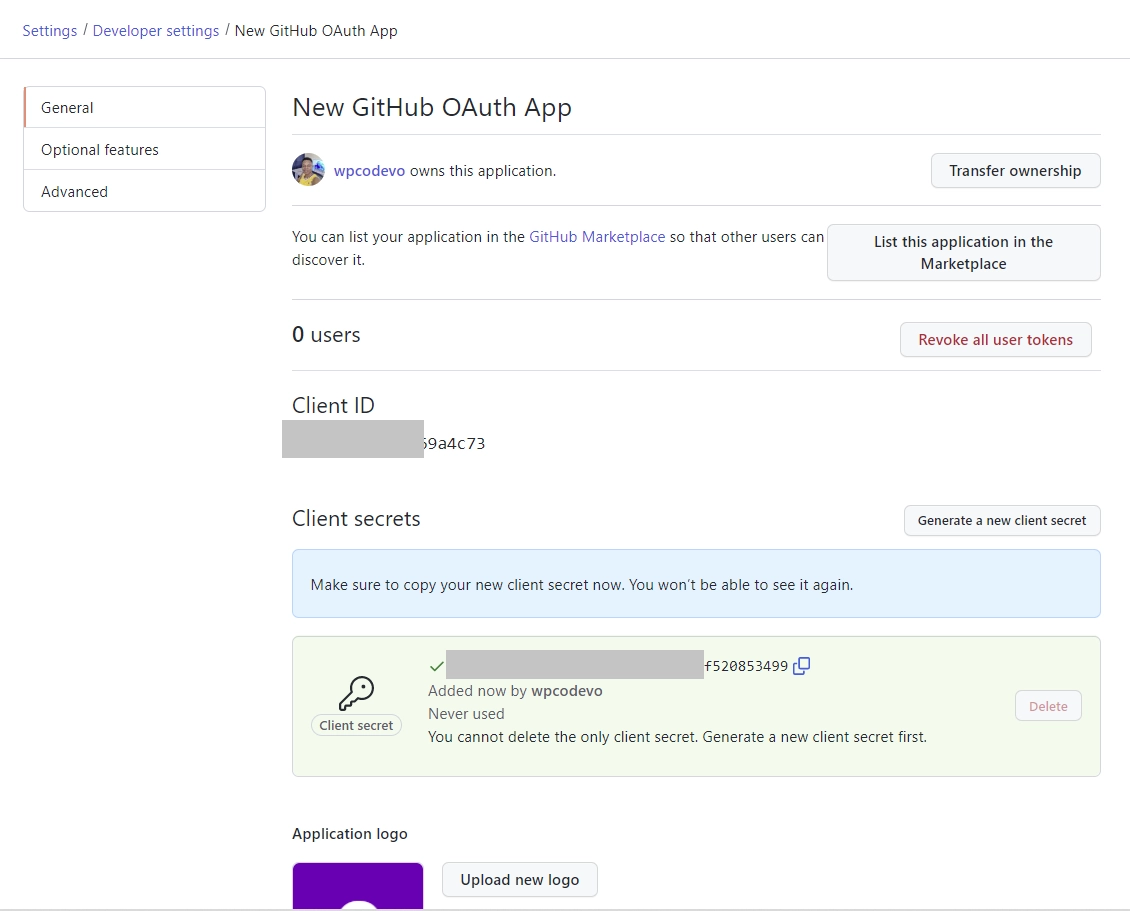
- With the GitHub OAuth client secret now generated, it’s time to add it, along with the client ID, to your
.envfile. Check out this example.envfile to guide you.
.env
AUTH_GITHUB_ID=
AUTH_GITHUB_SECRET=
Initializing NextAuth.js in Next.js 14
Now that you’ve added the OAuth credentials to your .env file, let’s proceed to initialize NextAuth in the Next.js 14 project if you haven’t already done so. To accomplish this, begin by installing the NextAuth beta package and the Prisma adapter using the commands below:
pnpm add next-auth@beta @auth/prisma-adapter

# or
yarn add next-auth@beta @auth/prisma-adapter

# or
npm i next-auth@beta @auth/prisma-adapter
Next, in the root level of your project, create an auth.ts file and include the following code. This code sets up NextAuth and exports a handlers function that we can use to set up the Next.js HTTP routes.
auth.ts
import NextAuth from "next-auth";
import { PrismaAdapter } from "@auth/prisma-adapter";
import prisma from "./prisma/prisma";

export const { handlers, auth, signIn, signOut } = NextAuth({
  session: { strategy: "jwt" },
  adapter: PrismaAdapter(prisma),
  pages: {
    signIn: "/login",
  },
  providers: [

  ],
  callbacks: {

  },
});
To set up the Next.js HTTP routes for NextAuth, follow the steps below:
- Navigate to the
appdirectory and create anapifolder. - Inside the
apifolder, create another directory namedauth. Then, within theauthfolder, create a dynamic route folder named[...nextauth]. - Finally, create a
route.tsfile in the[...nextauth]folder and add the code below:
app/api/auth/[…nextauth]/route.ts
import { handlers } from '@/auth';

export const { GET, POST } = handlers;
Next, include the AUTH_SECRET variable in the .env file, and utilize openssl rand -hex 32 to generate a unique string value for it. This secret will be used by NextAuth for signing and decoding the JSON Web Token.
.env
AUTH_SECRET=my_ultra_secure_nextauth_secret
Adding Google and GitHub Providers to NextAuth
At this point, we can now proceed to add the Google and GitHub OAuth providers to the NextAuth configurations. The process is simple: import the providers from the NextAuth package and include them in the providers array of the NextAuth config object. Here is an example.
auth.ts
import NextAuth from "next-auth";
import { PrismaAdapter } from "@auth/prisma-adapter";
import prisma from "./prisma/prisma";
import github from "next-auth/providers/github";
import google from "next-auth/providers/google";
import CredentialsProvider from "next-auth/providers/credentials";

export const { handlers, auth, signIn, signOut } = NextAuth({
  session: { strategy: "jwt" },
  adapter: PrismaAdapter(prisma),
  providers: [
    github,
    google,
    CredentialsProvider({}),
  ]
});
With that in place, when you visit the default NextAuth sign-in page at http://localhost:3000/api/auth/signin, you should see both the GitHub and Google OAuth sign-in options. You can click on either of them to sign into the application.
Assuming you have a route for returning the session data, you’ll notice that the user’s ID isn’t included. From what I’ve read online, NextAuth purposely omitted this for security reasons. However, we will explore how to manually include the ID and other fields in the session data.
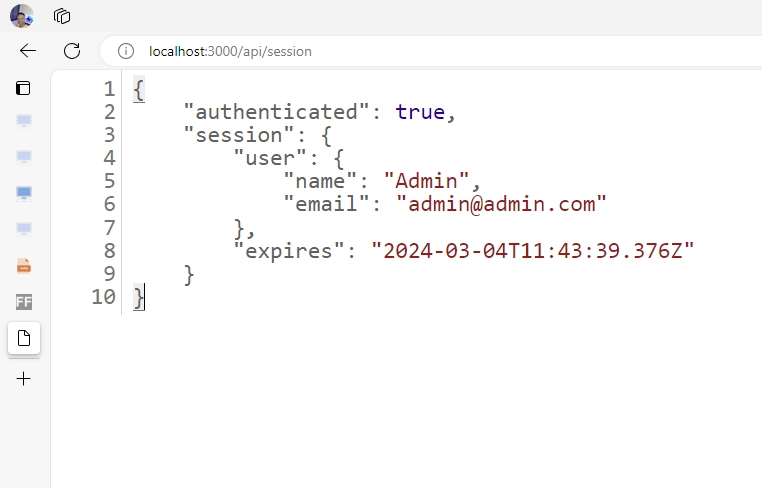
Here is the code for creating the API route that returns the session data in the JSON response:
app/api/session/route.ts
import { auth } from "@/auth";
import { NextResponse } from "next/server";

export async function GET(_request: Request) {
  const session = await auth();

  if (!session?.user) {
    return new NextResponse(
      JSON.stringify({ status: "fail", message: "You are not logged in" }),
      { status: 401 }
    );
  }

  return NextResponse.json({
    authenticated: !!session,
    session,
  });
}
Modifying the JWT Payload and Session Data
To modify the JSON Web Token payload and session data, NextAuth provides us with two handy callback functions named jwt and session. Using these two callbacks, we can add any necessary data to the session data and JWT payload that our application requires. Here is an example demonstrating how to modify the JWT payload and session data.
auth.ts
export const { handlers, auth, signIn, signOut } = NextAuth({
  session: { strategy: "jwt" },
  adapter: PrismaAdapter(prisma),
  providers: [github, google, CredentialsProvider({})],
  callbacks: {
    session: ({ session, token }) => {
      return {
        ...session,
        user: {
          ...session.user,
          id: token.id,
          randomKey: token.randomKey,
        },
      };
    },
    jwt: ({ token, user }) => {
      if (user) {
        const u = user as unknown as any;
        return {
          ...token,
          id: u.id,
          randomKey: u.randomKey,
        };
      }
      return token;
    },
  },
});
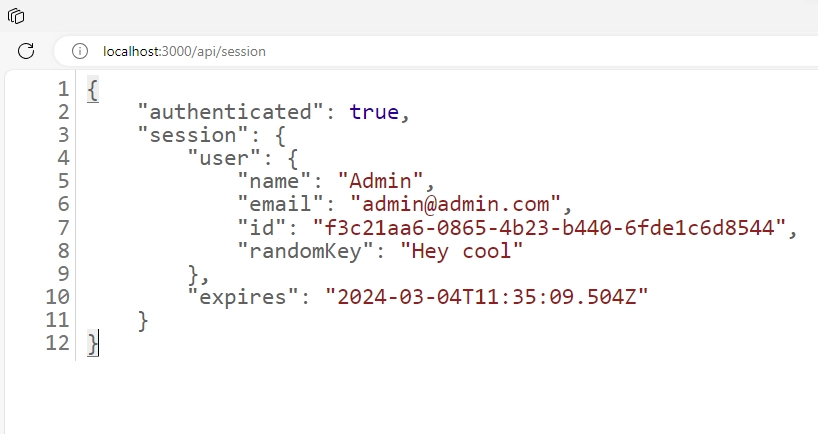
When you revisit the route, you should now see the ID included in the session object, along with any other data you added to the session.
Implementing Google and GitHub OAuth Sign-in Options
Let’s proceed to add the OAuth buttons to our sign-in form that users can click to initiate the OAuth sign-in process. The process is quite simple, as NextAuth provides a signIn function that we include on our button, with the provider type provided as the first argument.
For Google OAuth, you need to provide google as the first argument, and for GitHub OAuth, you need to provide github. Here is a simple example that uses the Google and GitHub OAuth providers.
app/login/login-form.tsx
'use client';

import Image from 'next/image';
import { useSearchParams } from 'next/navigation';
import { signIn } from 'next-auth/react';

export const LoginForm = () => {

  const searchParams = useSearchParams();
  const callbackUrl = searchParams.get('callbackUrl') || '/profile';

  return (
    <form>
      <a
        className=''
        style={{ }}
        onClick={() => signIn('google', { callbackUrl })}
        role='button'
      >
        <Image
          className='pr-2'
          src='/images/google.svg'
          alt=''
          style={{ height: '2rem' }}
          width={35}
          height={35}
        />
        Continue with Google
      </a>
      <a
        className=''
        style={{ }}
        onClick={() => signIn('github', { callbackUrl })}
        role='button'
      >
        <Image
          className='pr-2'
          src='/images/github.svg'
          alt=''
          width={40}
          height={40}
        />
        Continue with GitHub
      </a>
    </form>
  );
};
You can refer to the code below to see how to implement the credentials provider along with both the Google and GitHub OAuth providers.
app/login/login-form.tsx
'use client';

import { zodResolver } from '@hookform/resolvers/zod';
import Image from 'next/image';
import { useRouter, useSearchParams } from 'next/navigation';
import { useState } from 'react';
import { SubmitHandler, useForm } from 'react-hook-form';
import toast from 'react-hot-toast';
import { signIn } from 'next-auth/react';
import { LoginUserInput, loginUserSchema } from '@/lib/user-schema';


export const LoginForm = () => {
  const router = useRouter();
  const [error, setError] = useState('');
  const [submitting, setSubmitting] = useState(false);

  const searchParams = useSearchParams();
  const callbackUrl = searchParams.get('callbackUrl') || '/profile';

  const methods = useForm<LoginUserInput>({
    resolver: zodResolver(loginUserSchema),
  });

  const {
    reset,
    handleSubmit,
    register,
    formState: { errors },
  } = methods;

  const onSubmitHandler: SubmitHandler<LoginUserInput> = async (values) => {
    try {
      setSubmitting(true);

      const res = await signIn('credentials', {
        redirect: false,
        email: values.email,
        password: values.password,
        redirectTo: callbackUrl,
      });

      setSubmitting(false);

      if (!res?.error) {
        toast.success('successfully logged in');
        router.push(callbackUrl);
      } else {
        reset({ password: '' });
        const message = 'invalid email or password';
        toast.error(message);
        setError(message);
      }
    } catch (error: any) {
      toast.error(error.message);
      setError(error.message);
    } finally {
      setSubmitting(false);
    }
  };

  const input_style =
    'form-control block w-full px-4 py-5 text-sm font-normal text-gray-700 bg-white bg-clip-padding border border-solid border-gray-300 rounded transition ease-in-out m-0 focus:text-gray-700 focus:bg-white focus:border-blue-600 focus:outline-none';

  return (
    <form onSubmit={handleSubmit(onSubmitHandler)}>
      {error && (
        <p className='text-center bg-red-300 py-4 mb-6 rounded'>{error}</p>
      )}
      <div className='mb-6'>
        <input
          type='email'
          {...register('email')}
          placeholder='Email address'
          className={`${input_style}`}
        />
        {errors['email'] && (
          <span className='text-red-500 text-xs pt-1 block'>
            {errors['email']?.message as string}
          </span>
        )}
      </div>
      <div className='mb-6'>
        <input
          type='password'
          {...register('password')}
          placeholder='Password'
          className={`${input_style}`}
        />
        {errors['password'] && (
          <span className='text-red-500 text-xs pt-1 block'>
            {errors['password']?.message as string}
          </span>
        )}
      </div>
      <button
        type='submit'
        style={{ backgroundColor: `${submitting ? '#ccc' : '#3446eb'}` }}
        className='inline-block px-7 py-4 bg-blue-600 text-white font-medium text-sm leading-snug uppercase rounded shadow-md hover:bg-blue-700 hover:shadow-lg focus:bg-blue-700 focus:shadow-lg focus:outline-none focus:ring-0 active:bg-blue-800 active:shadow-lg transition duration-150 ease-in-out w-full'
        disabled={submitting}
      >
        {submitting ? 'loading...' : 'Sign In'}
      </button>

      <div className='flex items-center my-4 before:flex-1 before:border-t before:border-gray-300 before:mt-0.5 after:flex-1 after:border-t after:border-gray-300 after:mt-0.5'>
        <p className='text-center font-semibold mx-4 mb-0'>OR</p>
      </div>

      <a
        className='px-7 py-2 text-white font-medium text-sm leading-snug uppercase rounded shadow-md hover:shadow-lg focus:shadow-lg focus:outline-none focus:ring-0 active:shadow-lg transition duration-150 ease-in-out w-full flex justify-center items-center mb-3'
        style={{ backgroundColor: '#3b5998' }}
        onClick={() => signIn('google', { callbackUrl })}
        role='button'
      >
        <Image
          className='pr-2'
          src='/images/google.svg'
          alt=''
          style={{ height: '2rem' }}
          width={35}
          height={35}
        />
        Continue with Google
      </a>
      <a
        className='px-7 py-2 text-white font-medium text-sm leading-snug uppercase rounded shadow-md hover:shadow-lg focus:shadow-lg focus:outline-none focus:ring-0 active:shadow-lg transition duration-150 ease-in-out w-full flex justify-center items-center'
        style={{ backgroundColor: '#55acee' }}
        onClick={() => signIn('github', { callbackUrl })}
        role='button'
      >
        <Image
          className='pr-2'
          src='/images/github.svg'
          alt=''
          width={40}
          height={40}
        />
        Continue with GitHub
      </a>
    </form>
  );
};
Protecting Routes with NextAuth Middleware
Next, let’s explore how to secure API routes or pages with Next.js middleware along with NextAuth. To do this, we need to create a middleware.ts file in the root directory and include the following code:
middleware.ts
export { auth as middleware } from './auth';

export const config = {
  matcher: ['/((?!api|_next/static|_next/image|favicon.ico).*)'],
};
With the middleware code in place, we can proceed to implement the route protection within the authorized callback function available in the NextAuth config object. Here is an example of how to achieve route protection with NextAuth. In this example, we are only protecting two pages: /profile and /client-side.
auth.ts
export const { handlers, auth, signIn, signOut } = NextAuth({
  session: { strategy: "jwt" },
  adapter: PrismaAdapter(prisma),
  pages: {
    signIn: "/login",
  },
  providers: [
    github,
    google,
    CredentialsProvider({}),
  ],
  callbacks: {
    authorized({ auth, request: { nextUrl } }) {
      const isLoggedIn = !!auth?.user;
      const paths = ["/profile", "/client-side"];
      const isProtected = paths.some((path) =>
        nextUrl.pathname.startsWith(path)
      );

      if (isProtected && !isLoggedIn) {
        const redirectUrl = new URL("/api/auth/signin", nextUrl.origin);
        redirectUrl.searchParams.append("callbackUrl", nextUrl.href);
        return Response.redirect(redirectUrl);
      }
      return true;
    },
    session: ({ session, token }) => {
      return {
        ...session,
        user: {
          ...session.user,
          id: token.id,
          randomKey: token.randomKey,
        },
      };
    },
    jwt: ({ token, user }) => {
      if (user) {
        const u = user as unknown as any;
        return {
          ...token,
          id: u.id,
          randomKey: u.randomKey,
        };
      }
      return token;
    },
  },
});
Conclusion
Congratulations on reaching the end. Throughout this tutorial, you’ve learned how to set up Google and GitHub OAuth providers with NextAuth v5. We started from scratch, creating OAuth credentials on both Google and GitHub, configuring NextAuth to include OAuth sign-in options, modifying the JWT payload and session data, and protecting private routes.
I hope you found this article helpful and enjoyable. If you have any questions or feedback, feel free to leave them in the comment section. Thanks for reading!