
In this tutorial, you will learn how to set up NextAuth v5 in Next.js 14. With the release of NextAuth v5, a couple of breaking changes have been introduced, and getting NextAuth up and running in a Next.js 14 project requires a bit of setup. Navigating the NextAuth docs can be confusing, and without careful attention, it’s easy to get lost. However, this article will guide you through setting up NextAuth, integrating Prisma ORM, protecting routes, and retrieving session data in different locations.
But that’s not all – I will also demonstrate how to easily set up GitHub and Google OAuth with NextAuth v5. Since NextAuth doesn’t provide a built-in way to register users, I will show you how to create an API route and a registration form for user registration. Without further ado, let’s dive into the article.
The tutorial’s source code is available on GitHub: https://github.com/wpcodevo/nextauth-nextjs14-prisma
More practice:
- Implement Authentication with NextAuth in Next.js 14
- Implement Authentication with Supabase in Next.js 14
- Setup Google and GitHub OAuth with Supabase in Next.js 14
- Implement Authentication with tRPC in Next.js 14
- Implement Authentication with tRPC API in Next.js 14
- Using tRPC with Next.js 14, React Query and Prisma
- How to Set Up and Use React Query in Next.js 14
- Using React Query with Supabase in Next.js App Router
- How to Setup React Query in Next.js 13 App Directory
- React Query and Axios: User Registration and Email Verification
- Forgot/Reset Passwords with React Query and Axios
- How to Setup tRPC API Server & Client with Next.js and Prisma
- tRPC Server API with Next.js & PostgreSQL: Access & Refresh Tokens
- Full-Stack Next.js tRPC App: User Registration & Login Example
- Build a tRPC CRUD API Example with Next.js
How to Run the Next.js Application on Your Machine
Follow these steps to run the application on your machine:
- Begin by downloading or cloning the project from its GitHub repository at https://github.com/wpcodevo/nextauth-nextjs14-prisma. Open the source code in your preferred text editor.
- Access the integrated terminal of your IDE and execute the command
pnpm installto install all the necessary dependencies. - Duplicate the
example.envfile and rename the copy to.env. - Start the PostgreSQL database with Docker using the command
docker-compose up -d. - Apply the Prisma migrations to the database and generate the Prisma Client by running the command
pnpm prisma migrate dev. - Start the Next.js development server by running the command
pnpm dev. Once the server is up and running, open the application in your browser to interact with the authentication flow. - To enable the Google and GitHub sign-in options, specific configurations are required in NextAuth. Open the
.envfile and add the Client ID and secret for both the GitHub and Google OAuth providers.
Bootstrap the Next.js 14 Project
I’ll assume you already have a Next.js 14 project that you want to integrate with NextAuth.js v5. However, if you don’t, don’t worry—I’ve got you covered. Open a terminal in the directory where you want to store the source code and execute the following command:
yarn create nextauth-nextjs14-prisma
# or
npx create-next-app@latest nextauth-nextjs14-prisma
# or
pnpm create next-app nextauth-nextjs14-prisma
You’ll be prompted to configure the project. Opt for ‘Yes‘ for TypeScript and ESLint, ‘No‘ for the src/ directory, and ‘Yes‘ for the app/ directory. Also, choose “Yes” for Tailwind CSS and accept the default import alias by pressing Enter.
After responding to all questions, the Next.js 14 project will be generated, and the required dependencies will be installed. Once the installation is completed, open the project in your preferred IDE or text editor.
Install the Required Dependencies
To make NextAuth work in Next.js 14 alongside Prisma, you must install two libraries: the beta version of next-auth@beta and @auth/prisma-adapter. Open the terminal and execute the following commands to install them.
pnpm add next-auth@beta @auth/prisma-adapter

# or
yarn add next-auth@beta @auth/prisma-adapter

# or
npm i next-auth@beta @auth/prisma-adapter
Initialize NextAuth.js in Next.js 14
Once you have installed NextAuth v5 beta and the Prisma adapter for NextAuth, you can proceed to initialize NextAuth in your project. This is where you’ll configure NextAuth and include all the code related to the authentication providers. To do this, create an auth.ts file at the root level of your project and add the following boilerplate code:
auth.ts
import NextAuth from 'next-auth';

export const { handlers, auth, signIn, signOut } = NextAuth({
  session: { strategy: 'jwt' },
  pages: {

  },
  providers: [

  ],
  callbacks: {

  },
});
In the code above, we’ve exported a few functions. The handlers function is used to set up the Next.js HTTP routes for NextAuth. The auth function is a single method that can be utilized in server components to access the user’s session. Additionally, signIn and signOut functions can be used only in server components or server actions to facilitate user sign-in and sign-out operations, respectively.
Let’s now set up the Next.js HTTP routes that NextAuth will use to perform authentications within our application. The code in this file is quite simple. To create it, follow these steps:
- Navigate to the
appdirectory and create anapidirectory. - Inside the
apidirectory, create another folder namedauth. - Within the
authfolder, establish a catch-all routes folder named[…nextauth]specifically for NextAuth. - Subsequently, create a
route.tsfile in the[…nextauth]directory and add the following code:
app/api/auth/[…nextauth]/route.ts
import { handlers } from '@/auth';

export const { GET, POST } = handlers;
Set up Prisma for Database Interactions
Now that we have the basic setup for NextAuth, it’s time to set up Prisma ORM in our project, which NextAuth can use during the authentication process. To make it easier for everyone to run the project, we will use Docker to set up a PostgreSQL server.
Set up PostgreSQL with Docker
In the root directory of your project, create a docker-compose.yml file and include the following Docker Compose configurations:
docker-compose.yml
version: '3'
services:
  postgres:
    image: postgres:latest
    container_name: postgres
    ports:
      - '6500:5432'
    volumes:
      - progresDB:/var/lib/postgresql/data
    env_file:
      - ./.env
volumes:
  progresDB:
To make the PostgreSQL credentials available to Docker Compose, create a .env file in the root directory and add the following environment variables:
.env
POSTGRES_HOST=127.0.0.1
POSTGRES_PORT=6500
POSTGRES_USER=admin
POSTGRES_PASSWORD=password123
POSTGRES_DB=nextauth_prisma

DATABASE_URL="postgresql://admin:password123@localhost:6500/nextauth_prisma?schema=public"
After setting up the environment variables, you can start the PostgreSQL server by running the command docker-compose up -d.
Set up Prisma and Prisma Client
Let’s now initialize Prisma in the project, but before that, we need to install the Prisma-related packages. Open your terminal and run the command below to install them. The Bcrypt package will enable us to hash the user’s password when we are seeding data into the database using Prisma.
pnpm add @prisma/client
pnpm add bcryptjs
pnpm add -D prisma ts-node @types/bcryptjs

# or
yarn add @prisma/client
yarn add bcryptjs
yarn add -D prisma ts-node @types/bcryptjs

# or
npm i @prisma/client
npm i bcryptjs
npm i -D prisma ts-node @types/bcryptjs
Next, run the command below to initialize Prisma in the project. This command will generate a prisma/schema.prisma file in the root level of your project.
pnpm prisma init --datasource-provider postgresql

# or
npx prisma init --datasource-provider postgresql
To define all the Prisma models that NextAuth will use to handle authentication, open the prisma/schema.prisma file and include the following code. You don’t need to understand everything in this file. Just be aware that NextAuth requires these models to handle authentications. You can easily find the reference at https://authjs.dev/reference/adapter/prisma#create-the-prisma-schema-from-scratch.
prisma/schema.prisma
// This is your Prisma schema file,
// learn more about it in the docs: https://pris.ly/d/prisma-schema

generator client {
  provider = "prisma-client-js"
}

datasource db {
  provider = "postgresql"
  url      = env("DATABASE_URL")
}

model User {
  id            String    @id @default(uuid())
  name          String
  email         String?   @unique
  password      String?
  emailVerified DateTime? @map("email_verified")
  image         String?
  createdAt     DateTime  @default(now())
  updatedAt     DateTime  @updatedAt
  accounts      Account[]
  sessions      Session[]

  @@map("users")
}

model Account {
  id                String   @id @default(cuid())
  userId            String   @map("user_id")
  type              String?
  provider          String
  providerAccountId String   @map("provider_account_id")
  token_type        String?
  refresh_token     String?  @db.Text
  access_token      String?  @db.Text
  expires_at        Int?
  scope             String?
  id_token          String?  @db.Text
  createdAt         DateTime @default(now())
  updatedAt         DateTime @updatedAt
  user              User     @relation(fields: [userId], references: [id], onDelete: Cascade)

  @@unique([provider, providerAccountId])
  @@map("accounts")
}

model Session {
  id           String   @id @default(cuid())
  userId       String?  @map("user_id")
  sessionToken String   @unique @map("session_token") @db.Text
  accessToken  String?  @map("access_token") @db.Text
  expires      DateTime
  user         User?    @relation(fields: [userId], references: [id], onDelete: Cascade)
  createdAt    DateTime @default(now())
  updatedAt    DateTime @updatedAt

  @@map("sessions")
}

model VerificationRequest {
  id         String   @id @default(cuid())
  identifier String
  token      String   @unique
  expires    DateTime
  createdAt  DateTime @default(now())
  updatedAt  DateTime @updatedAt

  @@unique([identifier, token])
}
With that out of the way, ensure the PostgreSQL server is running and execute the command below to generate the Prisma migrations, apply the migrations to the PostgreSQL database, and generate the Prisma Client.
pnpm prisma migrate dev --name init

# or
npx prisma migrate dev --name init
Moving forward, we need to create a singleton instance of the Prisma Client that we can use throughout the entire application. This way, we avoid creating unnecessary connection pools to the database whenever we hot-reload the Next.js server in development. To achieve this, create a prisma.ts file within the prisma directory and add the following code:
prisma/prisma.ts
import { PrismaClient } from '@prisma/client';

const prismaClientSingleton = () => {
  return new PrismaClient();
};

declare global {
  var prisma: undefined | ReturnType<typeof prismaClientSingleton>;
}

const prisma = globalThis.prisma ?? prismaClientSingleton();

export default prisma;

if (process.env.NODE_ENV !== 'production') globalThis.prisma = prisma;
Hack Around the Account Registration
NextAuth is an authentication library; however, it doesn’t provide a built-in way to handle user registration, as it is unnecessary for certain authentication methods such as magic links, email login, or OAuth. Nevertheless, in cases where credentials authentication is used with NextAuth, creating a user first, typically through a registration form, becomes essential.
To keep things simple for now, we will seed the database with a test user account. Towards the end of this article, we will create a Next.js route responsible for user registration and a corresponding form component to submit user credentials to the API. To create the test user, go into the prisma directory and create a seed.ts file. Then, add the code below to the file:
prisma/seed.ts
import { PrismaClient } from '@prisma/client';
import { hash } from 'bcryptjs';

const prisma = new PrismaClient();

async function main() {
  const password = await hash('password123', 12);
  const user = await prisma.user.upsert({
    where: { email: 'admin@admin.com' },
    update: {},
    create: {
      email: 'admin@admin.com',
      name: 'Admin',
      password,
    },
  });
  console.log({ user });
}
main()
  .then(() => prisma.$disconnect())
  .catch(async (e) => {
    console.error(e);
    await prisma.$disconnect();
    process.exit(1);
  });
To enable Prisma to execute the code in the prisma/seed.ts file, we need to define a prisma field in our package.json file with a seed script. Open the package.json file and add the following script:
package.json
{
  "prisma": {
    "seed": "ts-node --compiler-options {\"module\":\"CommonJS\"} prisma/seed.ts"
  }
}
With the seed script defined, run the command below to add the test user to the database. You should also see the information of the test user printed in the terminal once the operation is successful.
pnpm prisma db seed

# or
npx prisma db seed
Implement Credentials Authentication
Let’s explore how to set up credentials authentication with NextAuth v5 in Next.js 14. To make this work, we first need to define the AUTH_SECRET variable in the .env file. NextAuth will use this secret to encode and decode the JSON Web Token.
.env
AUTH_SECRET=my_ultra_secure_nextauth_secret
To set up the credentials provider with NextAuth v5, open the auth.ts file and invoke the CredentialsProvider function provided by NextAuth within the ‘providers‘ array. Here’s an example of how the code should look:
auth.ts
import NextAuth from "next-auth";
import { PrismaAdapter } from "@auth/prisma-adapter";
import prisma from "./prisma/prisma";
import CredentialsProvider from "next-auth/providers/credentials";
import bcrypt from "bcryptjs";

export const { handlers, auth, signIn, signOut } = NextAuth({
  session: { strategy: "jwt" },
  adapter: PrismaAdapter(prisma),
  providers: [
    CredentialsProvider({
      name: "Sign in",
      id: "credentials",
      credentials: {
        email: {
          label: "Email",
          type: "email",
          placeholder: "example@example.com",
        },
        password: { label: "Password", type: "password" },
      },
      async authorize(credentials) {
        if (!credentials?.email || !credentials.password) {
          return null;
        }

        const user = await prisma.user.findUnique({
          where: {
            email: String(credentials.email),
          },
        });

        if (
          !user ||
          !(await bcrypt.compare(String(credentials.password), user.password!))
        ) {
          return null;
        }

        return {
          id: user.id,
          email: user.email,
          name: user.name,
          randomKey: "Hey cool",
        };
      },
    }),
  ],
});
In the above code, we set the session strategy to ‘jwt‘ and also included Prisma as an adapter. In the ‘credentials’ key of the CredentialsProvider() method, we listed the email and password fields, which will be available on the sign-in form. Subsequently, we implemented the sign-in authentication logic within the ‘authorize‘ callback function, where we find the user by email, compare their plain-text password against the hashed one stored in the database, and return the necessary fields in an object, assuming the authentication is successful.
To sign into the application, access the default NextAuth login form at http://localhost:3000/api/auth/signin. Once there, enter the email and password of the test user we seeded into the database and click the “Sign in” button. You should be redirected to the home page after the authentication is successful.
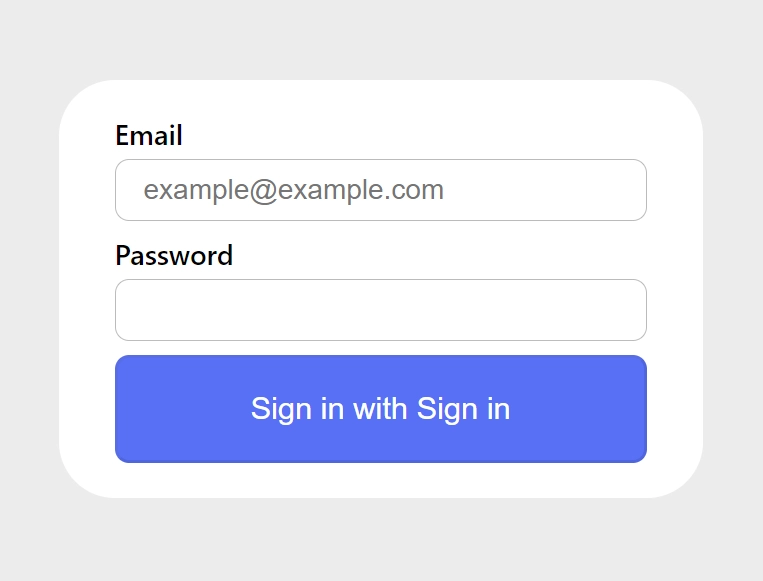
If you have a custom login page that you would like to use instead of the default one provided by NextAuth, all you need to do is define a ‘pages‘ field in the NextAuth configurations and point it to the path of your login page. Here is an example code:
export const { handlers, auth, signIn, signOut } = NextAuth({
  session: { strategy: "jwt" },
  adapter: PrismaAdapter(prisma),
  pages: {
    signIn: "/login",
  },
  providers: [

  ],
});
Implement Google and GitHub OAuth
With credentials authentication now set up, let’s explore how to set up Google and GitHub OAuth with NextAuth v5 in Next.js 14. The setup process is straightforward if you already have the Client IDs and secrets from both Google and GitHub. All you need to do is define the following environment variables in your .env file and assign the respective Client IDs and Secrets.
.env
AUTH_GITHUB_ID=your_github_client_id
AUTH_GITHUB_SECRET=your_github_client_secret

AUTH_GOOGLE_ID=your_google_client_id
AUTH_GOOGLE_SECRET=your_google_client_secret
Next, you need to import the Google and GitHub providers from the NextAuth library and add them to the list of providers. After adding them, your auth.ts file should now have the following code:
auth.ts
import NextAuth from "next-auth";
import { PrismaAdapter } from "@auth/prisma-adapter";
import prisma from "./prisma/prisma";
import github from "next-auth/providers/github";
import google from "next-auth/providers/google";
import CredentialsProvider from "next-auth/providers/credentials";
import bcrypt from "bcryptjs";

export const { handlers, auth, signIn, signOut } = NextAuth({
  session: { strategy: "jwt" },
  adapter: PrismaAdapter(prisma),
  providers: [
    github,
    google,
    CredentialsProvider({
      name: "Sign in",
      id: "credentials",
      credentials: {
        email: {
          label: "Email",
          type: "email",
          placeholder: "example@example.com",
        },
        password: { label: "Password", type: "password" },
      },
      async authorize(credentials) {
        if (!credentials?.email || !credentials.password) {
          return null;
        }

        const user = await prisma.user.findUnique({
          where: {
            email: String(credentials.email),
          },
        });

        if (
          !user ||
          !(await bcrypt.compare(String(credentials.password), user.password!))
        ) {
          return null;
        }

        return {
          id: user.id,
          email: user.email,
          name: user.name,
          randomKey: "Hey cool",
        };
      },
    }),
  ],
});
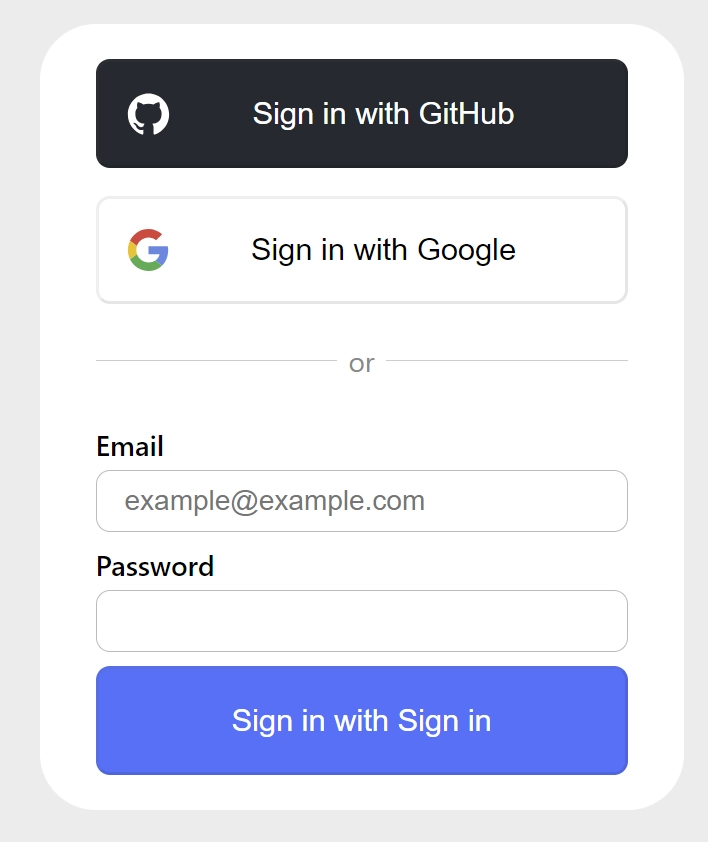
When you visit the default NextAuth login page, you should see both the GitHub and Google OAuth buttons added to the login form. Assuming the Client IDs and Secrets added to the .env file are valid, you should be able to sign into the application using either Google or GitHub OAuth.
If you intend to display images of Google and GitHub user accounts, you need to add the respective origins to the next.config.mjs file to avoid encountering errors.
next.config.mjs
/** @type {import('next').NextConfig} */
const nextConfig = {
  images: {
    remotePatterns: [
      {
        protocol: 'https',
        hostname: 'avatars.githubusercontent.com',
      },
      {
        protocol: 'https',
        hostname: 'lh3.googleusercontent.com',
      },
    ],
  },
};

export default nextConfig;
Three Ways of Fetching the NextAuth Session Data
Now that you have set up credential authentication along with the social logins, specifically GitHub and Google OAuth, we need a way to access the session data to make use of it.
There are three locations where we can obtain the session information. Two are server-side, inside a route or a React Server Component. The other is in client components. Accessing the session on the server is quite easy, however, accessing it on the client side requires a bit of setup.
Retrieving the Session in a React Server Component
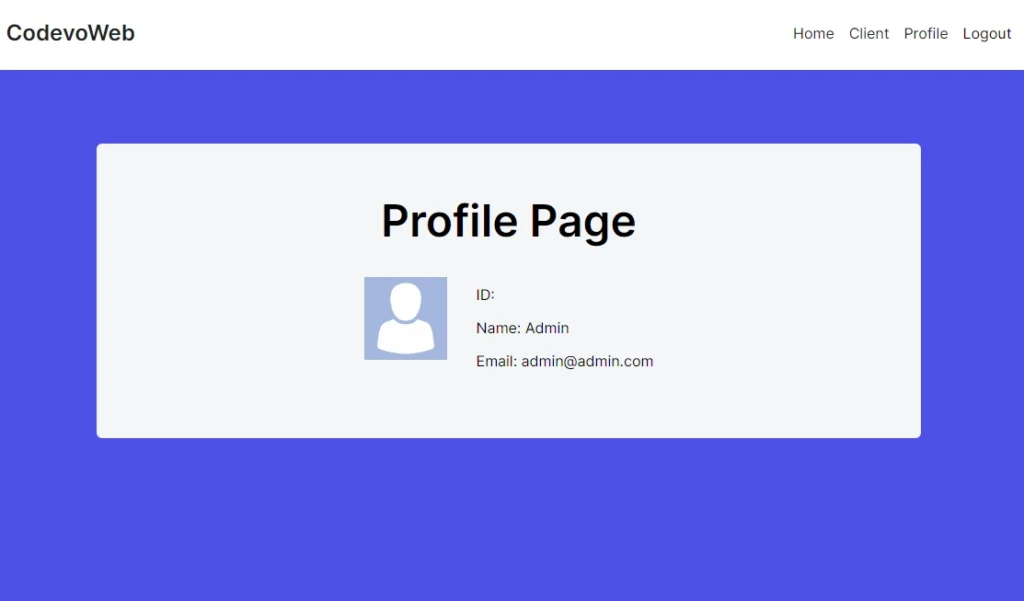
Let’s explore how to retrieve the session data in a React Server Component. Here, all we need to do is import the auth function exported from the auth.ts file and invoke it. This function returns a promise that we can await to access the session data. Below is an example code:
app/profile/page.tsx
import { auth } from '@/auth';
import Image from 'next/image';

export default async function ProfilePage() {
  const session = await auth();

  const user = session?.user;

  return (
    <div className='flex items-center gap-8'>
      <div>
        <Image
          src={user?.image ? user.image : '/images/default.png'}
          alt={`profile photo of ${user?.name}`}
          width={90}
          height={90}
        />
      </div>
      <div className='mt-8'>
        <p className='mb-3'>ID: {user?.id}</p>
        <p className='mb-3'>Name: {user?.name}</p>
        <p className='mb-3'>Email: {user?.email}</p>
      </div>
    </div>
  );
}
When you access the page where you’re rendering the session data, you’ll notice that the user’s ID is missing. From what I’ve read online, NextAuth, by default, omits the ID from the session for security reasons. But don’t worry; we’ll address that in a moment.
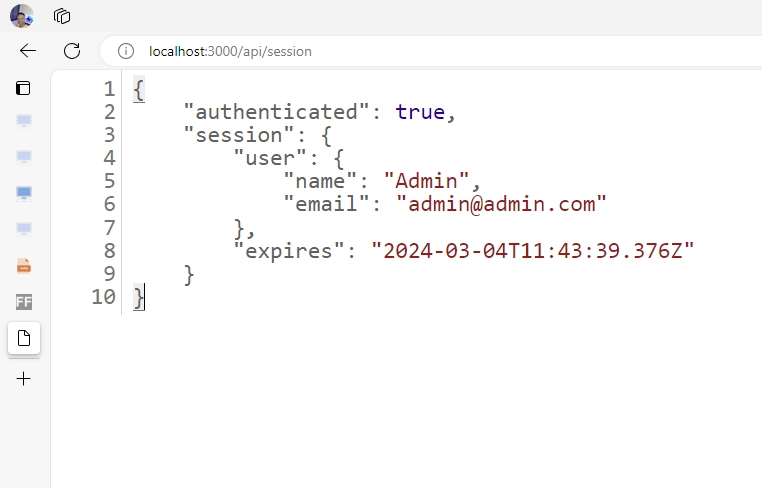
Retrieving the Session in an API Route
Continuing, let’s explore how to access the session data in a route file. The process is similar to that of the React Server Component: import the auth function and invoke it, then await the promise to access the session.
app/api/session/route.ts
import { auth } from '@/auth';
import { NextResponse } from 'next/server';

export async function GET(_request: Request) {
  const session = await auth();

  if (!session?.user) {
    return new NextResponse(
      JSON.stringify({ status: 'fail', message: 'You are not logged in' }),
      { status: 401 }
    );
  }

  return NextResponse.json({
    authenticated: !!session,
    session,
  });
}
In the code above, we retrieved the session and checked if the user object exists. If no user exists, we return a 401 unauthorized error. Otherwise, we return the session data in JSON format.
Retrieving the Session in a React Client Component
Now, let’s explore how to retrieve the session data in a client component. For this to work, NextAuth requires a session provider to be wrapped around the component accessing the session data. Since we want the ability to access the session from any client file, we will wrap the provider around the root of our application.
To do this, open the app/layout.tsx file and wrap the SessionProvider component provided by NextAuth around the {children}. This way, all client components within the component tree can access the session data.
app/layout.tsx
import type { Metadata } from "next";
import { Inter } from "next/font/google";
import "./globals.css";
import { Toaster } from "react-hot-toast";
import { SessionProvider } from "next-auth/react";

const inter = Inter({ subsets: ["latin"] });

export const metadata: Metadata = {
  title: "Create Next App",
  description: "Generated by create next app",
};

export default function RootLayout({
  children,
}: Readonly<{
  children: React.ReactNode;
}>) {
  return (
    <html lang="en">
      <body className={inter.className}>
        <SessionProvider>{children}</SessionProvider>
        <Toaster />
      </body>
    </html>
  );
}
Now, you can access the session data in a client component using the useSession hook provided by NextAuth.
app/client-side/page.tsx
'use client';

import { useSession } from 'next-auth/react';
import Image from 'next/image';
import { useRouter } from 'next/navigation';

export default function Profile() {
  const router = useRouter();
  const { data } = useSession({
    required: true,
    onUnauthenticated() {
      router.push('/api/auth/signin');
    },
  });

  const user = data?.user;

  return (
    <>
      {!user ? (
        <p>Loading...</p>
      ) : (
        <div className='flex items-center gap-8'>
          <div>
            <Image
              src={user.image ? user.image : '/images/default.png'}
              alt={`profile photo of ${user.name}`}
              width={90}
              height={90}
            />
          </div>
          <div className='mt-8'>
            <p className='mb-3'>ID: {user.id}</p>
            <p className='mb-3'>Name: {user.name}</p>
            <p className='mb-3'>Email: {user.email}</p>
          </div>
        </div>
      )}
    </>
  );
}
How to Add Custom Data to the Session Data
When we printed the session data, you noticed the ID field was missing. Now, let’s explore how we can modify the session to include the ID and any other fields you prefer to add to the session object. To achieve this, NextAuth provides two handy callback methods – jwt and session – that we can use to add custom information to the JSON Web Token payload and session object.
To access these callbacks, you need to define a callbacks field in the NextAuth configure object. Below is an example demonstrating how you can modify the JWT payload and session data.
auth.ts
export const { handlers, auth, signIn, signOut } = NextAuth({
  session: { strategy: "jwt" },
  adapter: PrismaAdapter(prisma),
  pages: {
    signIn: "/login",
  },
  providers: [
    github,
    google,
    CredentialsProvider({}),
  ],
  callbacks: {
    session: ({ session, token }) => {
      return {
        ...session,
        user: {
          ...session.user,
          id: token.id,
          randomKey: token.randomKey,
        },
      };
    },
    jwt: ({ token, user }) => {
      if (user) {
        const u = user as unknown as any;
        return {
          ...token,
          id: u.id,
          randomKey: u.randomKey,
        };
      }
      return token;
    },
  },
});
After adding your custom fields to the session object, when you access the API route, you should now see the custom fields included in the session object.
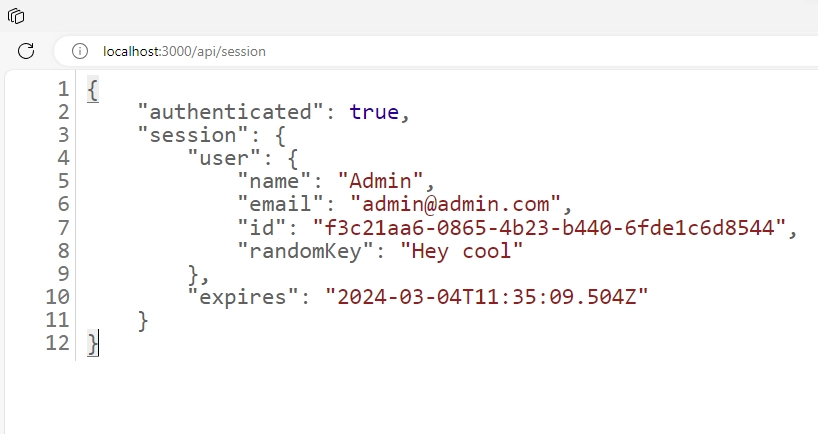
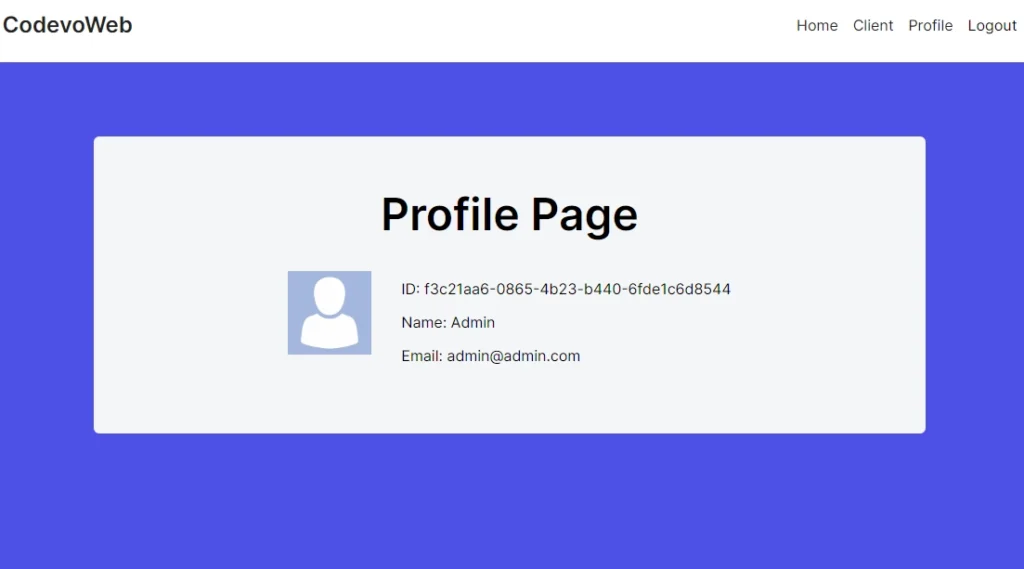
Subsequently, you should now see the ID field printed on the screen, along with the other session information.
Three Ways of Protecting Routes with NextAuth
At this point, we can explore the various methods to protect routes when using NextAuth v5 in Next.js 14. With NextAuth, there are three different locations to implement route protection: in a server component, in a client component, or using middleware.
Client-Side Route Protection
The first approach to implement route protection is by using the useSession hook provided by NextAuth in a client component. To achieve this, you need to pass the onUnauthenticated method to the object provided to the hook. NextAuth will invoke this method when the user is not logged in.
Keep in mind that the first time the hook is called, there might be some latency as it needs to make a request to the server to decode the JWT and retrieve the session information.
app/client-side/page.tsx
'use client';

import { useSession } from 'next-auth/react';
import Image from 'next/image';
import { useRouter } from 'next/navigation';

export default function Profile() {
  const router = useRouter();
  const { data } = useSession({
    required: true,
    onUnauthenticated() {
      router.push('/api/auth/signin');
    },
  });

  const user = data?.user;

  return (
    <>
      {!user ? (
        <p>Loading...</p>
      ) : (
        <div className='flex items-center gap-8'>
          <div>
            <Image
              src={user.image ? user.image : '/images/default.png'}
              alt={`profile photo of ${user.name}`}
              width={90}
              height={90}
            />
          </div>
          <div className='mt-8'>
            <p className='mb-3'>ID: {user.id}</p>
            <p className='mb-3'>Name: {user.name}</p>
            <p className='mb-3'>Email: {user.email}</p>
          </div>
        </div>
      )}
    </>
  );
}
Server-Side Route Protection
The second approach to implementing route protection is to use the auth method, which returns the session. Then, you can use an if statement to check if the session exists, and if it doesn’t, redirect the user to the login page.
app/profile/page.tsx
import { auth } from '@/auth';
import Image from 'next/image';
import { redirect } from 'next/navigation';

export default async function ProfilePage() {
  const session = await auth();

  if(!session?.user){
    return redirect("/api/auth/signin")
  }

  const user = session.user;

  return (
    <div className='flex items-center gap-8'>
      <div>
        <Image
          src={user.image ? user.image : '/images/default.png'}
          alt={`profile photo of ${user?.name}`}
          width={90}
          height={90}
        />
      </div>
      <div className='mt-8'>
        <p className='mb-3'>ID: {user.id}</p>
        <p className='mb-3'>Name: {user.name}</p>
        <p className='mb-3'>Email: {user.email}</p>
      </div>
    </div>
  );
}
Middleware Route Protection
The final and recommended approach is to use Next.js middleware with NextAuth. To implement this, create a middleware.ts file and include the following code:
middleware.ts
export { auth as middleware } from './auth';

export const config = {
  matcher: ['/((?!api|_next/static|_next/image|favicon.ico).*)'],
};
Next, add an authorized method to the callbacks object. Within this authorized function, you can define the route protection logic. It allows you to protect multiple routes simultaneously, but for this example, we are only securing the /profile, /client-side pages. With this setup, you can go to the profile components and remove the code responsible for redirecting unauthenticated users, as the middleware will now handle that task.
auth.ts
import NextAuth from 'next-auth';
import { PrismaAdapter } from '@auth/prisma-adapter';
import authConfig from './auth.config';
import prisma from './prisma/prisma';

export const { handlers, auth, signIn, signOut } = NextAuth({
  session: { strategy: 'jwt' },
  adapter: PrismaAdapter(prisma),
  pages: {
    signIn: '/login',
  },
  callbacks: {
    authorized({ auth, request: { nextUrl } }) {
      const isLoggedIn = !!auth?.user;
      const paths = ['/profile', '/client-side'];
      const isProtected = paths.some((path) =>
        nextUrl.pathname.startsWith(path)
      );

      if (isProtected && !isLoggedIn) {
        const redirectUrl = new URL('/api/auth/signin', nextUrl.origin);
        redirectUrl.searchParams.append('callbackUrl', nextUrl.href);
        return Response.redirect(redirectUrl);
      }
      return true;
    },
    session: ({ session, token }) => {
      return {
        ...session,
        user: {
          ...session.user,
          id: token.id,
          randomKey: token.randomKey,
        },
      };
    },
    jwt: ({ token, user }) => {
      if (user) {
        const u = user as unknown as any;
        return {
          ...token,
          id: u.id,
          randomKey: u.randomKey,
        };
      }
      return token;
    },
  },
  ...authConfig,
});
Creating a Custom Registration Page
Having covered nearly everything you need to know about NextAuth to get it up and running in Next.js 14, let’s now delve into implementing user registration.
Create the Account Registration API Route
First, we need to create an API route responsible for handling user registration requests. This route will extract the user credentials from the request body, hash the password, and save the user to the database using Prisma. It’s a good practice to validate credentials using a library like Zod, but for simplicity, we will skip that step.
app/api/register/route.ts
import { hash } from 'bcryptjs';
import { NextResponse } from 'next/server';
import prisma from '@/prisma/prisma';

export async function POST(req: Request) {
  try {
    const { name, email, password } = (await req.json()) as {
      name: string;
      email: string;
      password: string;
    };
    const hashed_password = await hash(password, 12);

    const user = await prisma.user.create({
      data: {
        name,
        email: email.toLowerCase(),
        password: hashed_password,
      },
    });

    return NextResponse.json({
      user: {
        name: user.name,
        email: user.email,
      },
    });
  } catch (error: any) {
    return new NextResponse(
      JSON.stringify({
        status: 'error',
        message: error.message,
      }),
      { status: 500 }
    );
  }
}
Create the Form Component
Next, create a form component that will collect the user’s credentials and submit them to the API. In this component, we define the validation schema using Zod and use it along with the React Hook Form library to add validations to the input elements. When the form is submitted and there are no validation errors, a POST request will be made to the API to register the new user.
app/register/register-form.tsx
'use client';

import { zodResolver } from '@hookform/resolvers/zod';
import { SubmitHandler, useForm } from 'react-hook-form';
import toast from 'react-hot-toast';
import { useRouter } from 'next/navigation';
import { useState } from 'react';
import { TypeOf, object, string } from 'zod';
import { signIn } from 'next-auth/react';

const createUserSchema = object({
  name: string({ required_error: 'Name is required' }).min(
    1,
    'Name is required'
  ),
  email: string({ required_error: 'Email is required' })
    .min(1, 'Email is required')
    .email('Invalid email'),
  photo: string().optional(),
  password: string({ required_error: 'Password is required' })
    .min(1, 'Password is required')
    .min(8, 'Password must be more than 8 characters')
    .max(32, 'Password must be less than 32 characters'),
  passwordConfirm: string({
    required_error: 'Please confirm your password',
  }).min(1, 'Please confirm your password'),
}).refine((data) => data.password === data.passwordConfirm, {
  path: ['passwordConfirm'],
  message: 'Passwords do not match',
});

type CreateUserInput = TypeOf<typeof createUserSchema>;

export const RegisterForm = () => {
  const [submitting, setSubmitting] = useState(false);
  const router = useRouter();

  const methods = useForm<CreateUserInput>({
    resolver: zodResolver(createUserSchema),
  });

  const {
    reset,
    handleSubmit,
    register,
    formState: { errors },
  } = methods;

  const onSubmitHandler: SubmitHandler<CreateUserInput> = async (values) => {
    try {
      setSubmitting(true);
      const res = await fetch('/api/register', {
        method: 'POST',
        body: JSON.stringify(values),
        headers: {
          'Content-Type': 'application/json',
        },
      });

      setSubmitting(false);
      if (!res.ok) {
        const message = (await res.json()).message;
        toast.error(message);
        return;
      }

      signIn(undefined, { callbackUrl: '/' });
    } catch (error: any) {
      setSubmitting(false);
      toast.error(error.message);
    }
  };

  const input_style =
    'form-control block w-full px-4 py-5 text-sm font-normal text-gray-700 bg-white bg-clip-padding border border-solid border-gray-300 rounded transition ease-in-out m-0 focus:text-gray-700 focus:bg-white focus:border-blue-600 focus:outline-none';

  return (
    <form onSubmit={handleSubmit(onSubmitHandler)}>
      <div className='mb-6'>
        <input
          {...register('name')}
          placeholder='Name'
          className={`${input_style}`}
        />
        {errors['name'] && (
          <span className='text-red-500 text-xs pt-1 block'>
            {errors['name']?.message as string}
          </span>
        )}
      </div>
      <div className='mb-6'>
        <input
          type='email'
          {...register('email')}
          placeholder='Email address'
          className={`${input_style}`}
        />
        {errors['email'] && (
          <span className='text-red-500 text-xs pt-1 block'>
            {errors['email']?.message as string}
          </span>
        )}
      </div>
      <div className='mb-6'>
        <input
          type='password'
          {...register('password')}
          placeholder='Password'
          className={`${input_style}`}
        />
        {errors['password'] && (
          <span className='text-red-500 text-xs pt-1 block'>
            {errors['password']?.message as string}
          </span>
        )}
      </div>
      <div className='mb-6'>
        <input
          type='password'
          {...register('passwordConfirm')}
          placeholder='Confirm Password'
          className={`${input_style}`}
        />
        {errors['passwordConfirm'] && (
          <span className='text-red-500 text-xs pt-1 block'>
            {errors['passwordConfirm']?.message as string}
          </span>
        )}
      </div>
      <button
        type='submit'
        style={{ backgroundColor: `${submitting ? '#ccc' : '#3446eb'}` }}
        className='inline-block px-7 py-4 bg-blue-600 text-white font-medium text-sm leading-snug uppercase rounded shadow-md hover:bg-blue-700 hover:shadow-lg focus:bg-blue-700 focus:shadow-lg focus:outline-none focus:ring-0 active:bg-blue-800 active:shadow-lg transition duration-150 ease-in-out w-full'
        disabled={submitting}
      >
        {submitting ? 'loading...' : 'Sign Up'}
      </button>
    </form>
  );
};
In the above code, we called the signIn(undefined, { callbackUrl: '/' }) function after successful registration. This method redirects the user to the sign-in page, and after the user successfully signs into the application, they will be redirected to the callback URL.
Create the Page Component
Finally, you can render the form component in a page file.
app/register/page.tsx
import Header from '@/components/header';
import { RegisterForm } from './register-form';

export default async function RegisterPage() {
  return (
    <>
      <Header />

      <section className='bg-ct-blue-600 min-h-screen pt-20'>
        <div className='container mx-auto px-6 py-12 h-full flex justify-center items-center'>
          <div className='md:w-8/12 lg:w-5/12 bg-white px-8 py-10'>
            <RegisterForm />
          </div>
        </div>
      </section>
    </>
  );
}
Conclusion
And we’re done! Throughout this tutorial, you’ve learned how to set up NextAuth.js v5 in Next.js 14. We even took a step further to integrate Prisma ORM for database interactions and implemented route protection, along with all the other benefits that come with NextAuth. I hope you found this article helpful and enjoyable. If you have any questions or feedback, feel free to leave them in the comment section. Thanks for reading!
hey, just wanna say thanks, its amazing and works flawlessly.
one humble request, if you can add next-themes (dark / light switch) via context theme provider , that would make template super awesome starting point. cheers,haseeb
> nextauth-nextjs14-prisma@0.1.0 build D:\workspace_nextjs\nextauth-nextjs14-prisma
> next build
▲ Next.js 14.1.0
– Environments: .env
Creating an optimized production build …
Compiler edge-server unexpectedly exited with code: null and signal: SIGTERM
✓ Compiled successfully
Linting and checking validity of types .Failed to compile.
./auth.ts:11:3
Type error: Type ‘import(“D:/workspace_nextjs/nextauth-nextjs14-prisma/node_modules/@auth/core/adapters”).Adapter’ is not assignable to type ‘import(“D:/workspace_nextjs/nextauth-nextjs14-prisma/node_modules/next-auth/node_modules/@auth/core/adapters”).Adapter’.
Types of property ‘linkAccount’ are incompatible.
Type ‘((account: import(“D:/workspace_nextjs/nextauth-nextjs14-prisma/node_modules/@auth/core/adapters”).AdapterAccount) => Promise | import(“D:/workspace_nextjs/nextauth-nextjs14-prisma/node_modules/@auth/core/types”).Awaitable Promise | import(“D:/workspace_nextjs/nextauth-nextjs14-prisma/node_modules/next-auth/node_modules/@auth/core/types”).Awaitable) | undefined’.
Type ‘(account: import(“D:/workspace_nextjs/nextauth-nextjs14-prisma/node_modules/@auth/core/adapters”).AdapterAccount) => Promise | import(“D:/workspace_nextjs/nextauth-nextjs14-prisma/node_modules/@auth/core/types”).Awaitable Promise | import(“D:/workspace_nextjs/nextauth-nextjs14-prisma/node_modules/next-auth/node_modules/@auth/core/types”).Awaitable’.
Type ‘Promise | import(“D:/workspace_nextjs/nextauth-nextjs14-prisma/node_modules/@auth/core/types”).Awaitable’ is not assignable to type ‘Promise | import(“D:/workspace_nextjs/nextauth-nextjs14-prisma/node_modules/next-auth/node_modules/@auth/core/types”).Awaitable’.
Type ‘AdapterAccount’ is not assignable to type ‘Promise | Awaitable’.
Type ‘AdapterAccount’ is missing the following properties from type ‘Promise’: then, catch, finally, [Symbol.toStringTag]
9 | export const { handlers, auth, signIn, signOut } = NextAuth({
10 | session: { strategy: ‘jwt’ },
> 11 | adapter: PrismaAdapter(prisma),
| ^
12 | pages: {
13 | signIn: ‘/login’,
14 | },
ELIFECYCLE Command failed with exit code 1.
Yeah, I encountered the same account linking error when I updated the Auth.js package to
5.0.0-beta.8, but I was able to resolve it by reverting to version5.0.0-beta.5. It seems there is an incompatibility of types between the Prisma adaptor and the Auth.js package.Thank you very much, it’s very helpful, I already use next.js before but that was a long time ago, now everything has changed, i need to refresh my knowledge how to implement the auth thing, and finally found this article which is perfect for me, thanks. One more, it seems like you also need provide how to sign out, because for those developer are new it might be overwhelming
Great article! Really helpful! Is there a way we could add additional data on the auth cookie? Something like a user role? I tried adding additional key-value pairs on the authorize function inside the providers list of NextAuth() but the session object is still the same, it only holds the name, email, and image.
That’s weird. You should be able to add custom key-value pairs to either the JWT or session object.
In the source code attached to this article, we added a
randomKeyto both the JWT and session object. You can review the source code to see how it’s done.Thanks that worked on the jwt and session callback. I thought if the randomKey and value are returned from the authorize callback it would persist on the session but it doesn’t.
Thank you so much for the article!
I still have a question that probably concerns everyone: how did you find it?
I couldn’t find any references to these features in the documentation.
I created a project from scratch, added next-auth and it didn’t work. Then I saw that you are using version 5 beta.
Have you studied the source code of next-auth?
I’ve written a couple of articles on Next Auth and came across those features during my exploration.
If I can remember vividly, while working on the project, I tried beta 7 and noticed some weird errors in my terminal.
Then I reverted to beta 6, and it wasn’t looking good; then I reverted to beta 5, and everything worked as expected.
In app/client-side/page.tsx you show User data (if user is looged)
You protect client-side and show it only for authorized users.
I do fork your code and not protect client-side route.
Next I do this flow: sign in/client-side/logout/client-side
And the problem is client-side show information from previous login (required:false)
Is any way to clear all data from SessionProvider after logout ?
The session data would become null when you invoke the `signOut` method provided by NextAuth
nice! thank for thisSaved me a lot of time, thank you!