
When we use TypeScript to build a full-stack application that consists of a RESTful API and web app, it becomes tedious to share types between the server and client.
Prior to the release of tRPC, GraphQL was the go-to library for building type-safety applications. This approach eliminated most of the flaws of REST (Representational State Transfer) architecture but it came at a price in the form of extra complexities.
Since GraphQL is a query language, it introduced more complexities and didn’t take full advantage of TypeScript. For these reasons, libraries and services were released to streamline the development process for developers.
In brief, we had to install extra libraries and depend on code generation to share the types between the client and server.
Due to the downsides of GraphQL, tRPC was released to use the full power of TypeScript to statically type API endpoints (procedures) and easily share the types between the frontend and backend apps.
This article will teach you how to secure a tRPC API server with JWT authentication using Next.js, PostgreSQL, Prisma, Redis, and Docker-compose.
tRPC API Server and Client with Next.js, PostgreSQL, and Prisma Series
- How to Setup tRPC API Server & Client with Next.js and Prisma
- tRPC Server API with Next.js & PostgreSQL: Access & Refresh Tokens
- Full-Stack Next.js tRPC App: User Registration & Login Example
- Build a tRPC CRUD API Example with Next.js
Related articles:
- Build tRPC API with React.js, Node.js & MongoDB: Project Setup
- Build tRPC API with React.js & Node.js: Access and Refresh Tokens
- Full-Stack App tRPC, React.js, & Node.js: JWT Authentication
- Build Full-Stack tRPC CRUD Application with Node.js, and React.js
Prerequisites
Before going further with this tutorial, you should:
- Have basic knowledge of Next.js and Node.js
- Have Docker, Docker-compose, and Node.js installed on your PC
- Be familiar with pgAdmin
- Have intermediate knowledge of Prisma, SQL, and how ORMs work
Step 1 – Set up the Project
We will be using Next.js, Prisma, PostgreSQL, Redis, and tRPC along with some extra dependencies to add the JSON Web Tokens functionalities to the tRPC API.
Also, we will use PostgreSQL as our primary database and Redis to store the currently logged-in user’s credentials. Despite implementing a stateless authentication, we still need to include Redis to add an extra layer of security to our application.
Follow the Next.js tRPC Project Setup tutorial to set up the tRPC project with PostgreSQL, Next.js and Prisma before continuing with this article.
Step 2 – Create the Database Models with Prisma
Prisma is a next-generation ORM (Object Relational Mapping) for Node.js and TypeScript applications.
At the time of creating this tutorial, Prisma supports databases like PostgreSQL, MySQL, SQLite, SQL Server, MongoDB, and CockroachDB – making it the go-to ORM for developers
If you landed on this article from a Google search, you need to catch up by following the How to Setup tRPC API Server & Client with Next.js and Prisma article.
Open the integrated terminal in your IDE or text editor and run this command to install the following dependencies:
yarn add -D prisma && yarn add @prisma/client
After installing the Prisma dependencies, run the init command with an optional --datasource-provider flag to set the database type.
By default, the Prisma init command uses a PostgreSQL database to initialize the project, however, you can pass a --datasource-provider flag to explicitly set the database type.
The --datasource-provider flag is not necessary since we are using PostgreSQL for this article.
npx prisma init --datasource-provider postgresql
The above command will generate a prisma directory and either create a .env file or update an existing one.
The schema.prisma file located in the prisma folder will contain the configurations to connect to the database and the models required to generate the SQL tables.
With that out of the way, let’s define the User model and provide it with all the necessary attributes:
prisma/schema.prisma
generator client {
provider = "prisma-client-js"
}
datasource db {
provider = "postgresql"
url = env("DATABASE_URL")
}
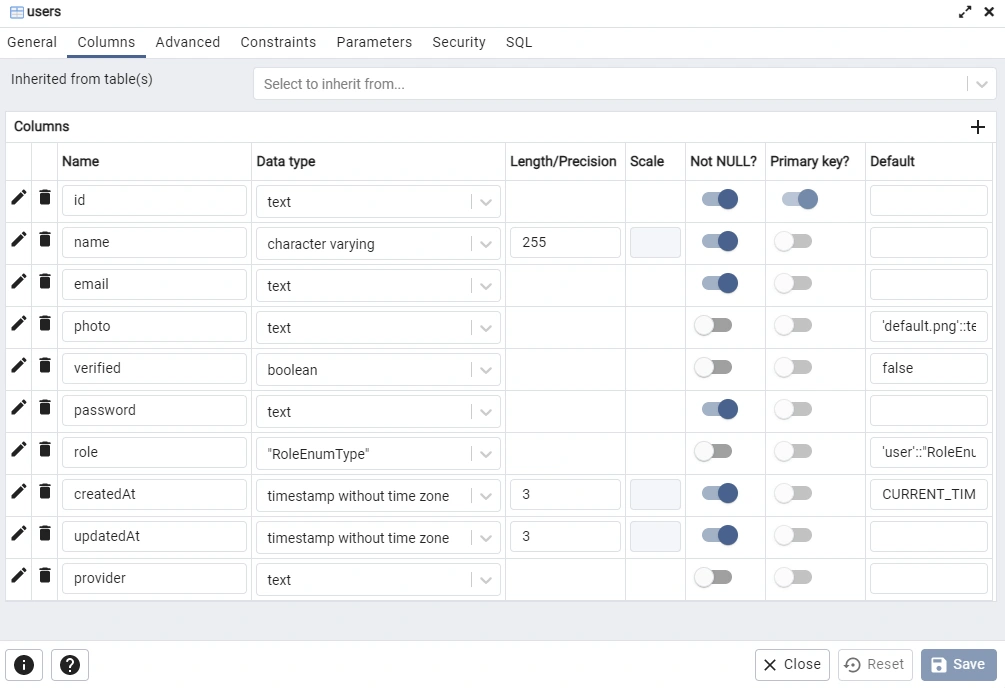
model User{
@@map(name: "users")
id String @id @default(uuid())
name String @db.VarChar(255)
email String @unique
photo String? @default("default.png")
verified Boolean? @default(false)
password String
role RoleEnumType? @default(user)
createdAt DateTime @default(now())
updatedAt DateTime @updatedAt
provider String?
}
enum RoleEnumType {
user
admin
}
Next, open the .env file and replace the credentials in the dummy DATABASE_URL added by the Prisma CLI with the PostgreSQL database credentials.
.env
DATABASE_PORT=6500
POSTGRES_PASSWORD=password123
POSTGRES_USER=postgres
POSTGRES_DB=trpc-nextjs
POSTGRES_HOST=postgres
POSTGRES_HOSTNAME=127.0.0.1

DATABASE_URL="postgresql://postgres:password123@localhost:6500/trpc-nexjs?schema=public"
Running the Database Migration with Prisma
Before we can run the Prisma migrate command, you need to make sure the PostgreSQL Docker container is running.
Follow the Next.js tRPC Project Setup article to set up the tRPC project with PostgreSQL, Next.js, Docker, and Prisma.
Now add the following Prisma scripts to the package.json file:
package.json
{
"scripts": {
    "db:migrate": "npx prisma migrate dev --name user-entity --create-only && yarn prisma generate",
    "db:push": "npx prisma db push"
  },
}
--name– this flag specifies the migration name. Don’t forget to change the migration name.--create-only– this flag tells Prisma not to apply the schema after generating the migration file.db:migrate– this script executes the Prismamigratecommand to generate the migration file. It also generates the TypeScript types based on the defined models.db:push– this script executes the Prismadbcommand to push the schema to the database. Thedbcommand also ensures that the database is in sync with the Prisma schema.
Now, open the integrated terminal and run these commands to generate the migration file and push the changes to the database.
yarn db:migrate && yarn db:push
Feel free to open the migration file to see the SQL code generated by Prisma.
Familiarity with pgAdmin is one of the prerequisites of this article. Open pgAdmin and log in with the PostgreSQL credentials defined in the .env file to see the table added by Prisma.
Step 3 – Create the Schemas with Zod
Out of the box, tRPC supports schema validation libraries like:
Also, tRPC allows you to use your custom validators to validate the request and response objects.
Install the Zod library with this command:
yarn add zod
Now create a src/server/schema/user.schema.ts file and add these schema definitions.
src/server/schema/user.schema.ts
import { object, string, TypeOf } from 'zod';

export const createUserSchema = object({
  name: string({ required_error: 'Name is required' }),
  email: string({ required_error: 'Email is required' }).email('Invalid email'),
  photo: string({ required_error: 'Photo is required' }),
  password: string({ required_error: 'Password is required' })
    .min(8, 'Password must be more than 8 characters')
    .max(32, 'Password must be less than 32 characters'),
  passwordConfirm: string({ required_error: 'Please confirm your password' }),
}).refine((data) => data.password === data.passwordConfirm, {
  path: ['passwordConfirm'],
  message: 'Passwords do not match',
});

export const loginUserSchema = object({
  email: string({ required_error: 'Email is required' }).email(
    'Invalid email or password'
  ),
  password: string({ required_error: 'Password is required' }).min(
    8,
    'Invalid email or password'
  ),
});

export type CreateUserInput = TypeOf<typeof createUserSchema>;
export type LoginUserInput = TypeOf<typeof loginUserSchema>;
Step 4 – Create Functions to Sign and Verify JWTs
Install the JSON Web Token package with this command:
yarn add jsonwebtoken && yarn add -D @types/jsonwebtoken
To learn more about JWT Authentication with React, check out React + Redux Toolkit: JWT Authentication and Authorization
To learn more about Refresh Tokens with React, check out React.js + Redux Toolkit: Refresh Tokens Authentication
How to Generate the JWT Private and Public Keys
Here, we need to generate private and public keys to sign the JSON Web Tokens since we will be using the RS256 algorithm.
To reduce the project complexity, I already added the base64 encoded private and public keys to the .env.local file but you can follow the steps below to generate them yourself.
Step 1: Generate the Private and Public Keys on this Website. Alternatively, you can use the Web Cryptography API to generate them with code.
Step 2: Copy the private key and convert it to base64 on the Base64 Encoding website.
Step 3: Copy the base64 encoded key and add it to the .env.local file as ACCESS_TOKEN_PRIVATE_KEY.
Step 4: Navigate back to the Private and Public Keys Generation Website and copy the corresponding public key.
Step 5: Encode the public key to base64 on the Base64 Encoding website and add it to the .env.local file as ACCESS_TOKEN_PUBLIC_KEY.
Step 6: Repeat the above steps for the refresh token private and public keys.
In the end, your .env.local file should look like this:
.env.local
NEXT_PUBLIC_TRPC_ENDPOINT=http://localhost:3000/api/trpc

ACCESS_TOKEN_PRIVATE_KEY=LS0tLS1CRUdJTiBSU0EgUFJJVkFURSBLRVktLS0tLQpNSUlCT1FJQkFBSkFYTDNua2tLdW13ZUlxbjUrRGVPY2VpcVZZT3huY0pXRkRlZ1IyMHhRMlpDYjBQdU4zbWFxCkNzWnc0anhVR2xmL3JabGZsWldITWJiZ2NJWmxYWjhYYlFJREFRQUJBa0F2TThqRlBJTTZESitXaDBNSk5xdlIKMGhLdGZpVTN2Q0k0YmNHSTZGTE9LSmxnT0RXaGlpaTBrY3g1aTA3ZDdWRlBHMnVWa1U5dnB2OWl4VkMvWEFhQgpBaUVBc2twVEtiNlFpT0xCOGdYMVQxTENXa1UvZEoxWlhUUHRlRHJpQy83RUo3VUNJUUNGS2c2YTROQVFodk5qClcrMFJMQzhseWNFRCsxd0ZvdDR5b0VFeDB5c1QyUUlnSWhzM3gzK045TEcwT2xGTGVTNHl3Y1FIZkk1eFB2UWwKRkYvblNEWW5YaFVDSUZiM0VISzFQeXlMOVlkK0VXU1ZwblRYUGVhTDBaMGNzRi8vcUpRUmhLQ0JBaUVBaXY0MwpDbWI5aUhFNGZ1OFVIeFNkTEszYmNtaEpZdEtLb1o5YnFiZWd5RFE9Ci0tLS0tRU5EIFJTQSBQUklWQVRFIEtFWS0tLS0t
ACCESS_TOKEN_PUBLIC_KEY=LS0tLS1CRUdJTiBQVUJMSUMgS0VZLS0tLS0KTUZzd0RRWUpLb1pJaHZjTkFRRUJCUUFEU2dBd1J3SkFYTDNua2tLdW13ZUlxbjUrRGVPY2VpcVZZT3huY0pXRgpEZWdSMjB4UTJaQ2IwUHVOM21hcUNzWnc0anhVR2xmL3JabGZsWldITWJiZ2NJWmxYWjhYYlFJREFRQUIKLS0tLS1FTkQgUFVCTElDIEtFWS0tLS0t

REFRESH_TOKEN_PRIVATE_KEY=LS0tLS1CRUdJTiBSU0EgUFJJVkFURSBLRVktLS0tLQpNSUlCT2dJQkFBSkFhOVFLM2xKNnEzQWFUeDU3M0pBTjIwZG5OUzNsSU9GT2c4RUR2TTZHTDdVT0ZjK2xOUjNQCjlQTnNiOTRvQTNLSVlWOUJlVFdNYmdKRUdJcXFlb21vVVFJREFRQUJBa0E1a042c2lvUUsrckpSQXdsRlczTEsKV25oekg2bHZ3RmxXWmJsRkYwejBNcFdBSlQrNzliQUhhMDh1ZXdHN3ltTE1wdDloZTFibGVuK3M1Yit1dlQ3eApBaUVBd1VEZFlnZC9pK2dZSVArcnJZVWl2dnFwQkdlRWlNVW9NWmxvTElURHR5TUNJUUNPMXE2bjl5dStVZ1VSCnRkWkpDbW1yVWxSbDdHb1kzMDdQZ2lzSXAxU1Qrd0loQUk5SDFsdXVENFRkYWJaZG1SMm56aUVtbTFXbW9uNzkKSGxYWDFZTGNWSGRkQWlCdHFPL0p6LzdyVEhqTDBmaERkeFVOREZYek1mOTZQT1o2ZFFxb3lCNHN4UUloQUl6UApLUStjWHdlTUp5YVB2SEJ0RjVSdnZ2R252WVdyN0plVE13c0t0dnBTCi0tLS0tRU5EIFJTQSBQUklWQVRFIEtFWS0tLS0t
REFRESH_TOKEN_PUBLIC_KEY=LS0tLS1CRUdJTiBQVUJMSUMgS0VZLS0tLS0KTUZzd0RRWUpLb1pJaHZjTkFRRUJCUUFEU2dBd1J3SkFhOVFLM2xKNnEzQWFUeDU3M0pBTjIwZG5OUzNsSU9GTwpnOEVEdk02R0w3VU9GYytsTlIzUDlQTnNiOTRvQTNLSVlWOUJlVFdNYmdKRUdJcXFlb21vVVFJREFRQUIKLS0tLS1FTkQgUFVCTElDIEtFWS0tLS0t
Next, create a src/server/config/default.ts file and add the variables of the .env.local file. This will enable us to provide the TypeScript types of the environment variables.
src/server/config/default.ts
const customConfig: {
  port: number;
  accessTokenExpiresIn: number;
  refreshTokenExpiresIn: number;
  origin: string;
  dbUri: string;
  accessTokenPrivateKey: string;
  refreshTokenPrivateKey: string;
  accessTokenPublicKey: string;
  refreshTokenPublicKey: string;
  redisCacheExpiresIn: number;
} = {
  port: 8000,
  accessTokenExpiresIn: 15,
  refreshTokenExpiresIn: 60,
  origin: 'http://localhost:3000',
  redisCacheExpiresIn: 60,

  dbUri: process.env.DATABASE_URL as string,
  accessTokenPrivateKey: process.env.ACCESS_TOKEN_PRIVATE_KEY as string,
  accessTokenPublicKey: process.env.ACCESS_TOKEN_PUBLIC_KEY as string,
  refreshTokenPrivateKey: process.env.REFRESH_TOKEN_PRIVATE_KEY as string,
  refreshTokenPublicKey: process.env.REFRESH_TOKEN_PUBLIC_KEY as string,
};

export default customConfig;
We are now ready to create the utility functions to sign and verify the JSON Web Tokens.
Create a src/server/utils/jwt.ts file and add the following helper functions:
Function to Sign the JWT Tokens
src/server/utils/jwt.ts
import jwt, { SignOptions } from 'jsonwebtoken';
import customConfig from '../config/default';

export const signJwt = (
  payload: Object,
  key: 'accessTokenPrivateKey' | 'refreshTokenPrivateKey',
  options: SignOptions = {}
) => {
  const privateKey = Buffer.from(customConfig[key], 'base64').toString('ascii');
  return jwt.sign(payload, privateKey, {
    ...(options && options),
    algorithm: 'RS256',
  });
};
Function to Verify the JWT Tokens
src/server/utils/jwt.ts
export const verifyJwt = <T>(
  token: string,
  key: 'accessTokenPublicKey' | 'refreshTokenPublicKey'
): T | null => {
  try {
    const publicKey = Buffer.from(customConfig[key], 'base64').toString(
      'ascii'
    );
    return jwt.verify(token, publicKey) as T;
  } catch (error) {
    console.log(error);
    return null;
  }
};
Step 5 – Create the Database Services
src/server/services/user.service.ts
import { Prisma, User } from '@prisma/client';
import customConfig from '../config/default';
import redisClient from '../utils/connectRedis';
import { signJwt } from '../utils/jwt';
import { prisma } from '../utils/prisma';

export const createUser = async (input: Prisma.UserCreateInput) => {
  return (await prisma.user.create({
    data: input,
  })) as User;
};

export const findUser = async (
  where: Partial<Prisma.UserCreateInput>,
  select?: Prisma.UserSelect
) => {
  return (await prisma.user.findFirst({
    where,
    select,
  })) as User;
};

export const findUniqueUser = async (
  where: Prisma.UserWhereUniqueInput,
  select?: Prisma.UserSelect
) => {
  return (await prisma.user.findUnique({
    where,
    select,
  })) as User;
};

export const updateUser = async (
  where: Partial<Prisma.UserWhereUniqueInput>,
  data: Prisma.UserUpdateInput,
  select?: Prisma.UserSelect
) => {
  return (await prisma.user.update({ where, data, select })) as User;
};

export const signTokens = async (user: Prisma.UserCreateInput) => {
  // 1. Create Session
  redisClient.set(`${user.id}`, JSON.stringify(user), {
    EX: customConfig.redisCacheExpiresIn * 60,
  });

  // 2. Create Access and Refresh tokens
  const access_token = signJwt({ sub: user.id }, 'accessTokenPrivateKey', {
    expiresIn: `${customConfig.accessTokenExpiresIn}m`,
  });

  const refresh_token = signJwt({ sub: user.id }, 'refreshTokenPrivateKey', {
    expiresIn: `${customConfig.refreshTokenExpiresIn}m`,
  });

  return { access_token, refresh_token };
};
Step 6 – Create the Authentication Controllers
Now that we have the services defined, let’s create the authentication controllers that will be evoked by the tRPC procedures to:
- Add a new user to the database
- Refresh the access token
- Sign in the registered user
- Log out the user
To begin, create a src/server/controllers/auth.controller.ts file and add the following cookie options and imports.
src/server/controllers/auth.controller.ts
// [...] Imports
import { TRPCError } from '@trpc/server';
import bcrypt from 'bcryptjs';
import { OptionsType } from 'cookies-next/lib/types';
import { getCookie, setCookie } from 'cookies-next';
import customConfig from '../config/default';
import { Context } from '../createContext';
import { CreateUserInput, LoginUserInput } from '../schema/user.schema';
import {
  createUser,
  findUniqueUser,
  findUser,
  signTokens,
} from '../services/user.service';
import redisClient from '../utils/connectRedis';
import { signJwt, verifyJwt } from '../utils/jwt';

// [...] Cookie options
const cookieOptions: OptionsType = {
  httpOnly: true,
  secure: process.env.NODE_ENV === 'production',
  sameSite: 'lax',
};

const accessTokenCookieOptions: OptionsType = {
  ...cookieOptions,
  expires: new Date(Date.now() + customConfig.accessTokenExpiresIn * 60 * 1000),
};

const refreshTokenCookieOptions: OptionsType = {
  ...cookieOptions,
  expires: new Date(
    Date.now() + customConfig.refreshTokenExpiresIn * 60 * 1000
  ),
};
Now install these dependencies:
yarn add bcryptjs cookies-next && yarn add -D @types/bcryptjs
bcryptjs– For hashing the passwordcookies-next– For setting and getting cookies
Register User tRPC Controller
In this section, we will create a function that will be evoked by the tRPC procedure or endpoint to add a new user to the database.
src/server/controllers/auth.controller.ts
// [...] Imports

// [...] Cookie options

// [...] Register user
export const registerHandler = async ({
  input,
}: {
  input: CreateUserInput;
}) => {
  try {
    const hashedPassword = await bcrypt.hash(input.password, 12);
    const user = await createUser({
      email: input.email,
      name: input.name,
      password: hashedPassword,
      photo: input.photo,
      provider: 'local',
    });

    return {
      status: 'success',
      data: {
        user,
      },
    };
  } catch (err: any) {
    if (err.code === 'P2002') {
      throw new TRPCError({
        code: 'CONFLICT',
        message: 'Email already exists',
      });
    }
    throw err;
  }
};
Here, we hashed the plain-text password and called the createUser() service we defined above to add the user to the database.
At the moment, we are returning the newly-created user to the tRPC client but later we will send an email verification code to the user’s email address and return a success message to the tRPC client.
Login User tRPC Controller
Since we have the logic to register a user, let’s create a function that will be evoked to sign in the registered user.
src/server/controllers/auth.controller.ts
// [...] Imports

// [...] Cookie options

// [...] Register user

// [...] Login user
export const loginHandler = async ({
  input,
  ctx: { req, res },
}: {
  input: LoginUserInput;
  ctx: Context;
}) => {
  try {
    // Get the user from the collection
    const user = await findUser({ email: input.email });

    // Check if user exist and password is correct
    if (!user || !(await bcrypt.compare(input.password, user.password))) {
      throw new TRPCError({
        code: 'BAD_REQUEST',
        message: 'Invalid email or password',
      });
    }

    // Create the Access and refresh Tokens
    const { access_token, refresh_token } = await signTokens(user);

    // Send Access Token in Cookie
    setCookie('access_token', access_token, {
      req,
      res,
      ...accessTokenCookieOptions,
    });
    setCookie('refresh_token', refresh_token, {
      req,
      res,
      ...refreshTokenCookieOptions,
    });
    setCookie('logged_in', 'true', {
      req,
      res,
      ...accessTokenCookieOptions,
      httpOnly: false,
    });

    // Send Access Token
    return {
      status: 'success',
      access_token,
    };
  } catch (err: any) {
    throw err;
  }
};
Quite a lot going on in the above, let’s break it down:
- First, we evoked the
findUser()service to check if a user with that email address exists in the database. - Next, we verified the user’s password by comparing it to the hashed one in the database.
- Then we generated the access and refresh tokens by calling the
signTokens()service. - Lastly, we returned the access and refresh tokens to the tRPC client as HTTPOnly cookies.
Refresh Access Token tRPC Controller
In this section, you will create a function that will be evoked to refresh the expired access token.
src/server/controllers/auth.controller.ts
// [...] Imports

// [...] Cookie options

// [...] Register user

// [...] Login user

// [...] Refresh tokens
export const refreshAccessTokenHandler = async ({
  ctx: { req, res },
}: {
  ctx: Context;
}) => {
  try {
    // Get the refresh token from cookie
    const refresh_token = getCookie('refresh_token', { req, res }) as string;

    const message = 'Could not refresh access token';
    if (!refresh_token) {
      throw new TRPCError({ code: 'FORBIDDEN', message });
    }

    // Validate the Refresh token
    const decoded = verifyJwt<{ sub: string }>(
      refresh_token,
      'refreshTokenPublicKey'
    );

    if (!decoded) {
      throw new TRPCError({ code: 'FORBIDDEN', message });
    }

    // Check if the user has a valid session
    const session = await redisClient.get(decoded.sub);
    if (!session) {
      throw new TRPCError({ code: 'FORBIDDEN', message });
    }

    // Check if the user exist
    const user = await findUniqueUser({ id: JSON.parse(session).id });

    if (!user) {
      throw new TRPCError({ code: 'FORBIDDEN', message });
    }

    // Sign new access token
    const access_token = signJwt({ sub: user.id }, 'accessTokenPrivateKey', {
      expiresIn: `${customConfig.accessTokenExpiresIn}m`,
    });

    // Send the access token as cookie
    setCookie('access_token', access_token, {
      req,
      res,
      ...accessTokenCookieOptions,
    });
    setCookie('logged_in', 'true', {
      req,
      res,
      ...accessTokenCookieOptions,
      httpOnly: false,
    });

    // Send response
    return {
      status: 'success',
      access_token,
    };
  } catch (err: any) {
    throw err;
  }
};
Let’s evaluate the code above:
- We evoked the
getCookie()function provided by thecookies-nextlibrary to retrieve the refresh token from the request headers. - Next, we called the
verifyJwt()utility function to validate the refresh token. - Then we queried the Redis database to see if the user has a valid session.
- Next, we called the
findUniqueUser()service to check if the user belonging to the token still exists in the database. - Lastly, we generated the access token and returned it to the tRPC client as an HTTPOnly cookie.
Logout User tRPC Controller
Finally, let’s create a function to delete the user’s session in the Redis database and return expired cookies to the tRPC client.
Returning expired cookies to the tRPC client will clear the cookies from the user’s browser.
src/server/controllers/auth.controller.ts
// [...] Imports

// [...] Cookie options

// [...] Register user

// [...] Login user

// [...] Refresh tokens

// [...] Logout user
const logout = ({ ctx: { req, res } }: { ctx: Context }) => {
  setCookie('access_token', '', { req, res, maxAge: -1 });
  setCookie('refresh_token', '', { req, res, maxAge: -1 });
  setCookie('logged_in', '', { req, res, maxAge: -1 });
};

export const logoutHandler = async ({ ctx }: { ctx: Context }) => {
  try {
    const user = ctx.user;
    await redisClient.del(String(user?.id));
    logout({ ctx });
    return { status: 'success' };
  } catch (err: any) {
    throw err;
  }
};
Complete tRPC Controllers Code
src/server/controllers/auth.controller.ts
// [...] Imports
import { TRPCError } from '@trpc/server';
import bcrypt from 'bcryptjs';
import { OptionsType } from 'cookies-next/lib/types';
import { getCookie, setCookie } from 'cookies-next';
import customConfig from '../config/default';
import { Context } from '../createContext';
import { CreateUserInput, LoginUserInput } from '../schema/user.schema';
import {
  createUser,
  findUniqueUser,
  findUser,
  signTokens,
} from '../services/user.service';
import redisClient from '../utils/connectRedis';
import { signJwt, verifyJwt } from '../utils/jwt';

// [...] Cookie options
const cookieOptions: OptionsType = {
  httpOnly: true,
  secure: process.env.NODE_ENV === 'production',
  sameSite: 'lax',
};

const accessTokenCookieOptions: OptionsType = {
  ...cookieOptions,
  expires: new Date(Date.now() + customConfig.accessTokenExpiresIn * 60 * 1000),
};

const refreshTokenCookieOptions: OptionsType = {
  ...cookieOptions,
  expires: new Date(
    Date.now() + customConfig.refreshTokenExpiresIn * 60 * 1000
  ),
};

// [...] Register user
export const registerHandler = async ({
  input,
}: {
  input: CreateUserInput;
}) => {
  try {
    const hashedPassword = await bcrypt.hash(input.password, 12);
    const user = await createUser({
      email: input.email,
      name: input.name,
      password: hashedPassword,
      photo: input.photo,
      provider: 'local',
    });

    return {
      status: 'success',
      data: {
        user,
      },
    };
  } catch (err: any) {
    if (err.code === 'P2002') {
      throw new TRPCError({
        code: 'CONFLICT',
        message: 'Email already exists',
      });
    }
    throw err;
  }
};

// [...] Login user
export const loginHandler = async ({
  input,
  ctx: { req, res },
}: {
  input: LoginUserInput;
  ctx: Context;
}) => {
  try {
    // Get the user from the collection
    const user = await findUser({ email: input.email });

    // Check if user exist and password is correct
    if (!user || !(await bcrypt.compare(input.password, user.password))) {
      throw new TRPCError({
        code: 'BAD_REQUEST',
        message: 'Invalid email or password',
      });
    }

    // Create the Access and refresh Tokens
    const { access_token, refresh_token } = await signTokens(user);

    // Send Access Token in Cookie
    setCookie('access_token', access_token, {
      req,
      res,
      ...accessTokenCookieOptions,
    });
    setCookie('refresh_token', refresh_token, {
      req,
      res,
      ...refreshTokenCookieOptions,
    });
    setCookie('logged_in', 'true', {
      req,
      res,
      ...accessTokenCookieOptions,
      httpOnly: false,
    });

    // Send Access Token
    return {
      status: 'success',
      access_token,
    };
  } catch (err: any) {
    throw err;
  }
};

// [...] Refresh tokens
export const refreshAccessTokenHandler = async ({
  ctx: { req, res },
}: {
  ctx: Context;
}) => {
  try {
    // Get the refresh token from cookie
    const refresh_token = getCookie('refresh_token', { req, res }) as string;

    const message = 'Could not refresh access token';
    if (!refresh_token) {
      throw new TRPCError({ code: 'FORBIDDEN', message });
    }

    // Validate the Refresh token
    const decoded = verifyJwt<{ sub: string }>(
      refresh_token,
      'refreshTokenPublicKey'
    );

    if (!decoded) {
      throw new TRPCError({ code: 'FORBIDDEN', message });
    }

    // Check if the user has a valid session
    const session = await redisClient.get(decoded.sub);
    if (!session) {
      throw new TRPCError({ code: 'FORBIDDEN', message });
    }

    // Check if the user exist
    const user = await findUniqueUser({ id: JSON.parse(session).id }, {});

    if (!user) {
      throw new TRPCError({ code: 'FORBIDDEN', message });
    }

    // Sign new access token
    const access_token = signJwt({ sub: user.id }, 'accessTokenPrivateKey', {
      expiresIn: `${customConfig.accessTokenExpiresIn}m`,
    });

    // Send the access token as cookie
    setCookie('access_token', access_token, {
      req,
      res,
      ...accessTokenCookieOptions,
    });
    setCookie('logged_in', 'true', {
      req,
      res,
      ...accessTokenCookieOptions,
      httpOnly: false,
    });

    // Send response
    return {
      status: 'success',
      access_token,
    };
  } catch (err: any) {
    throw err;
  }
};

// [...] Logout user
const logout = ({ ctx: { req, res } }: { ctx: Context }) => {
  setCookie('access_token', '', { req, res, maxAge: -1 });
  setCookie('refresh_token', '', { req, res, maxAge: -1 });
  setCookie('logged_in', '', { req, res, maxAge: -1 });
};

export const logoutHandler = async ({ ctx }: { ctx: Context }) => {
  try {
    const user = ctx.user;
    await redisClient.del(String(user?.id));
    logout({ ctx });
    return { status: 'success' };
  } catch (err: any) {
    throw err;
  }
};
Step 7 – Create a User Controller
Now that we have all the authentication controllers defined, let’s create a function that will be evoked to return the currently authenticated user’s profile information.
src/server/controllers/user.controller.ts
import { TRPCError } from '@trpc/server';
import type { Context } from '../createContext';

export const getMeHandler = ({ ctx }: { ctx: Context }) => {
  try {
    const user = ctx.user;
    return {
      status: 'success',
      data: {
        user,
      },
    };
  } catch (err: any) {
    throw new TRPCError({
      code: 'INTERNAL_SERVER_ERROR',
      message: err.message,
    });
  }
};
Step 8 – Create the tRPC Authentication Guard
To protect private resources on the tRPC server, let’s create a middleware to validate the access token and authenticate the user.
src/server/middleware/deserializeUser.ts
import { TRPCError } from '@trpc/server';
import { NextApiRequest, NextApiResponse } from 'next';
import { findUniqueUser } from '../services/user.service';
import redisClient from '../utils/connectRedis';
import { verifyJwt } from '../utils/jwt';

export const deserializeUser = async ({
  req,
  res,
}: {
  req: NextApiRequest;
  res: NextApiResponse;
}) => {
  try {
    // Get the token
    let access_token;
    if (
      req.headers.authorization &&
      req.headers.authorization.startsWith('Bearer')
    ) {
      access_token = req.headers.authorization.split(' ')[1];
    } else if (req.cookies.access_token) {
      access_token = req.cookies.access_token;
    }

    const notAuthenticated = {
      req,
      res,
      user: null,
    };

    if (!access_token) {
      return notAuthenticated;
    }

    // Validate Access Token
    const decoded = verifyJwt<{ sub: string }>(
      access_token,
      'accessTokenPublicKey'
    );

    if (!decoded) {
      return notAuthenticated;
    }

    // Check if user has a valid session
    const session = await redisClient.get(decoded.sub);

    if (!session) {
      return notAuthenticated;
    }

    // Check if user still exist
    const user = await findUniqueUser({ id: JSON.parse(session).id });

    if (!user) {
      return notAuthenticated;
    }

    return {
      req,
      res,
      user: { ...user, id: user.id },
    };
  } catch (err: any) {
    throw new TRPCError({
      code: 'INTERNAL_SERVER_ERROR',
      message: err.message,
    });
  }
};
Step 9 – Create the tRPC Endpoints
We now have all our controllers defined. Let’s create the tRPC mutations and queries to evoke them. Before that, open the src/server/createRouter.ts file and replace its content with the following.
src/server/createRouter.ts
import { initTRPC, TRPCError } from "@trpc/server";
import superjson from "superjson";
import { Context } from "./createContext";

export const t = initTRPC.context<Context>().create({
  transformer: superjson,
});

const isAuthed = t.middleware(({ next, ctx }) => {
  if (!ctx.user) {
    throw new TRPCError({
      code: "UNAUTHORIZED",
      message: "You must be logged in to access this resource",
    });
  }
  return next();
});

export const protectedProcedure = t.procedure.use(isAuthed);
We created a middleware that will check if the user is authenticated before delegating the request to the next procedure in the middleware pipeline.
Add the Authentication Routes
This router will contain the following endpoints (procedures):
registermutation – this procedure will be evoked to register a user.loginmutation – this procedure will be evoked to sign in the registered user.logoutmutation – this procedure will be evoked to log out the authenticated user.refreshquery – this procedure will be evoked to refresh the expired access token.
src/server/routers/auth.routes.ts
import {
  loginHandler,
  logoutHandler,
  refreshAccessTokenHandler,
  registerHandler,
} from "../controllers/auth.controller";
import { t } from "../createRouter";
import { createUserSchema, loginUserSchema } from "../schema/user.schema";

const authRouter = t.router({
  registerUser: t.procedure
    .input(createUserSchema)
    .mutation(({ input }) => registerHandler({ input })),
  loginUser: t.procedure
    .input(loginUserSchema)
    .mutation(({ input, ctx }) => loginHandler({ input, ctx })),
  logoutUser: t.procedure.mutation(({ ctx }) => logoutHandler({ ctx })),
  refreshAccessToken: t.procedure.query(({ ctx }) =>
    refreshAccessTokenHandler({ ctx })
  ),
});

export default authRouter;
Add the User Routes
In the router below, we added a tRPC middleware to check if the user is authenticated before turning the credentials to the tRPC client.
src/server/routers/user.routes.ts
import { protectedProcedure, t } from "../createRouter";
import { getMeHandler } from "../controllers/user.controller";

const userRouter = t.router({
  getMe: protectedProcedure.query(({ ctx }) => getMeHandler({ ctx })),
});

export default userRouter;
Step 10 – Merge the tRPC Routes
src/server/routers/app.routes.ts
import { t } from "../createRouter";
import redisClient from "../utils/connectRedis";
import authRouter from "./auth.routes";
import userRouter from "./user.routes";

const publicRouter = t.router({
  getHello: t.procedure.query(async ({ ctx }) => {
    const message = await redisClient.get("tRPC");
    return { message };
  }),
});

export const appRouter = t.mergeRouters(publicRouter, authRouter, userRouter);

export type AppRouter = typeof appRouter;
Step 11 – Add the tRPC Routes to the Next.js Router
src/pages/api/trpc[trpc].ts
import * as trpcNext from "@trpc/server/adapters/next";
import { appRouter } from "~/server/routers/app.routes";
import { createContext } from "~/server/createContext";

export default trpcNext.createNextApiHandler({
  router: appRouter,
  createContext,
});
Conclusion
Congratulations on reaching the end. In this article, you learned how to secure a tRPC API with access and refresh tokens using Next.js, PostgreSQL, Prisma, Docker-compose, and Redis.
Check out the tRPC Server and Client Source Code:
Hello There; Thanks for this wonderful series,
While reading through I feel like hearing your voice in my ears, well done.
But I saw a problem { Property ‘user’ does not exist on type ‘{ req: NextApiRequest; res: NextApiResponse; }’}, I slve it by including user when creating a context, and the error went away;
I was wondering, will it cause a problem, me adding it? because you didn’t add it. Or ?
Thank you for reviewing my code and bringing the problem to my attention. I appreciate your efforts in improving the code.
I’m aware of the warning in the
src/server/createContext.tsfile, but my current setup doesn’t seem to be triggering any errors or warnings from TypeScript IntelliSense. ThecreateContext()function is expected to automatically infer the user property from thedeserializeUser()function.To better understand the solution you have found, could you please send me a screenshot of the
createContext.tsfile via the contact form on my website?Thanks for the quick reply. This website do not allow me to paste the code and I don’t see any feature to allow attaching a photo,
Will it cause trouble down the road? because I plan to read your next post too
But, on createContext function, I passed req, res, and user (user is of type User form Prisma); then createContext return an object with res, req, and user,
the rest of the file, exporting context , stays the same
Manually adding the
usertype to the context will not result in any future errors.I once solved that warning or error through the same approach. However, since TypeScript was able to accurately determine the type of the
userproperty, I chose to overlook it.