
This comprehensive guide will teach you how to implement JSON Web Token (JWT) authentication in a tRPC backend API using Next.js 14. With the release of Next.js 13 and 14, which introduces server and client components, handling authentication with tRPC to accommodate these changes also requires a bit of modification from the previous method.
If you are unfamiliar with tRPC, it’s a TypeScript-based RPC (Remote Procedure Call) library for building type-safe full-stack applications. Despite mentioning Full-Stack, we will only focus on building the API aspect of our application in this article.
Initially, I had wanted to write about building the frontend and backend in one article, but after looking at the steps involved, I decided to separate them. Including them in one article would make it too lengthy. However, the source code contains both the frontend and backend code that you can download and check out the features of the application.
The tutorial’s source code is available on GitHub: https://github.com/wpcodevo/nextjs14-trpc-authentication
More practice:
- Implement Authentication with tRPC in Next.js 14
- Using tRPC with Next.js 14, React Query and Prisma
- How to Set Up and Use React Query in Next.js 14
- Using React Query with Supabase in Next.js App Router
- How to Setup React Query in Next.js 13 App Directory
- React Query and Axios: User Registration and Email Verification
- Forgot/Reset Passwords with React Query and Axios
- How to Setup tRPC API Server & Client with Next.js and Prisma
- tRPC Server API with Next.js & PostgreSQL: Access & Refresh Tokens
- Full-Stack Next.js tRPC App: User Registration & Login Example
- Build a tRPC CRUD API Example with Next.js
Setup the Next.js 14 Project
Let’s begin by creating a new Next.js 14 project. Open a terminal in the directory where you want to store the source code and execute the following command:
yarn create nextjs14-trpc-authentication
# or
npx create-next-app@latest nextjs14-trpc-authentication
# or
pnpm create next-app nextjs14-trpc-authentication
You will be prompted to configure the project. Ensure you choose ‘Yes‘ for TypeScript and ESLint. Choose ‘No‘ for the src/ directory and ‘Yes‘ for the app/ directory. Additionally, choose “Yes” for Tailwind CSS. Accept the default import alias by pressing Enter.
After answering all the questions, the Next.js 14 project will be generated, and the necessary dependencies will be installed. Once the installation is complete, open the project in your preferred IDE or text editor.
Install the Necessary Dependencies
Let’s install the dependencies needed to build the tRPC API and implement JWT authentication. Open the integrated terminal of your IDE and run the following commands:
pnpm add @trpc/server
pnpm add superjson
pnpm add zod
pnpm add jsonwebtoken
pnpm add bcryptjs
pnpm add -D @types/jsonwebtoken @types/bcryptjs
pnpm add @prisma/client
pnpm add -D prisma

# or
yarn add @trpc/server
yarn add superjson
yarn add zod
yarn add jsonwebtoken
yarn add bcryptjs
yarn add -D @types/jsonwebtoken @types/bcryptjs
yarn add @prisma/client
yarn add -D prisma

# or
npm i @trpc/server
npm i superjson
npm i zod
npm i jsonwebtoken
npm i bcryptjs
npm i -D @types/jsonwebtoken @types/bcryptjs
npm i @prisma/client
npm i -D prisma
@trpc/server: Facilitates building the server side of a TypeScript RPC (tRPC) service.superjson: A serialization library that works with tRPC to handle serialization and deserialization of complex data types.zod: A TypeScript-first schema declaration and validation library.jsonwebtoken: A library for creating and verifying JSON Web Tokens (JWTs), commonly used for authentication.bcryptjs: A library for hashing passwords, commonly used for securely storing user passwords.@types/jsonwebtoken: TypeScript type definitions for thejsonwebtokenlibrary.@types/bcryptjs: TypeScript type definitions for thebcryptjslibrary.@prisma/client: The Prisma Client generated by Prisma, used for interacting with the database.prisma: The Prisma CLI, used for database migrations, seeding, and other database-related tasks during development.
Launch PostgreSQL Database with Docker Compose
In this section, we’ll set up PostgreSQL, an open-source relational database, and pgAdmin, a popular web-based database administration tool, using Docker Compose.
Start by creating a docker-compose.yml file in your project directory. This file will define the services, networks, and volumes needed for PostgreSQL and pgAdmin. Add the following configurations to the file:
docker-compose.yml
version: '3'
services:
  postgres:
    image: postgres:latest
    container_name: postgres
    ports:
      - '6500:5432'
    volumes:
      - progresDB:/var/lib/postgresql/data
    env_file:
      - ./.env
  pgAdmin:
    image: dpage/pgadmin4
    container_name: pgAdmin
    env_file:
      - ./.env
    ports:
      - '5050:80'
volumes:
  progresDB:
This configuration sets up two services: postgres for the PostgreSQL database and pgadmin for pgAdmin using the credentials provided in a .env file. To make these credentials available, create a .env file in the root level and add the following environment variables.
.env
POSTGRES_HOST=127.0.0.1
POSTGRES_PORT=6500
POSTGRES_USER=postgres
POSTGRES_PASSWORD=password123
POSTGRES_DB=trpc_prisma

DATABASE_URL=postgresql://postgres:password123@localhost:6500/trpc_prisma?schema=public

PGADMIN_DEFAULT_EMAIL=admin@admin.com
PGADMIN_DEFAULT_PASSWORD=password123
Run the following command in your terminal to start the containers after setting up the credentials.
docker-compose up -d
This command fetches the necessary images if they are not already on your machine and launches the containers in detached mode, allowing you to continue working in the terminal.
Perform Database Migrations with Prisma ORM
Implementing database migrations can be challenging; however, since we are using Prisma, we have a suite of tools to smoothly execute database migrations, ensuring that our database schema evolves alongside our application. Migrations are essential when introducing changes to your data model, such as adding new tables, modifying columns, or creating relationships.
Before delving into migrations, let’s initialize Prisma in the project. Run the following command to initialize Prisma:
pnpm prisma init --datasource-provider postgresql
# or
npx prisma init --datasource-provider postgresql
Executing this command will generate the necessary files, including prisma/schema.prisma, where you define your data model. Open the prisma/schema.prisma file and replace its content with the following to define a data model called User:
prisma/schema.prisma
// This is your Prisma schema file,
// learn more about it in the docs: https://pris.ly/d/prisma-schema

generator client {
  provider = "prisma-client-js"
}

datasource db {
  provider = "postgresql"
  url      = env("DATABASE_URL")
}

model User {
  id       String   @id @default(uuid())
  name     String   @db.VarChar(255)
  email    String   @unique
  photo    String?  @default("default.png")
  verified Boolean? @default(false)

  password String
  role     RoleEnumType? @default(user)

  createdAt DateTime @default(now())
  updatedAt DateTime @updatedAt

  provider String? @default("local")

  @@map(name: "users")
}

enum RoleEnumType {
  user
  admin
}
Having made changes to the Prisma schema file, we now need to generate a corresponding migration file. Execute the following command:
pnpm prisma migrate dev --name init
# or
npx prisma migrate dev --name init
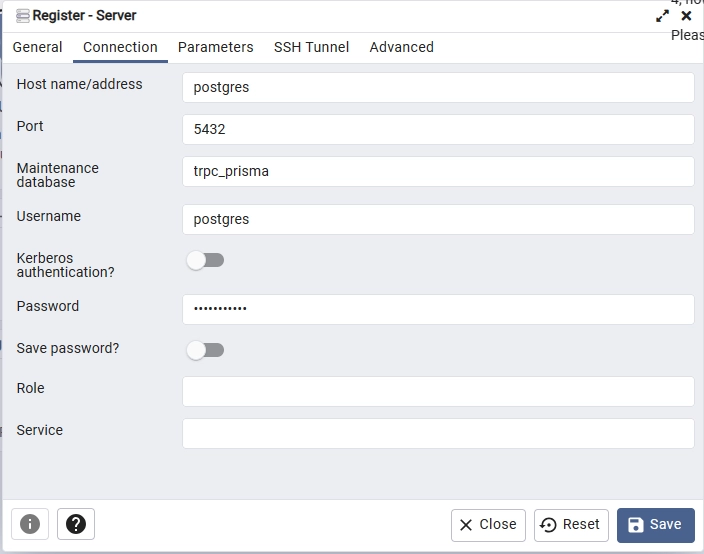
This command will establish a connection to the PostgreSQL database, generate the migrations, synchronize them with the database schema, and generate the Prisma Client. Upon completion, log in to pgAdmin at http://localhost:5050/login using the credentials from the .env file.
After signing in, add the PostgreSQL server. Use ‘postgres‘ as the hostname since both containers are running under the same network. Retrieve the remaining credentials from the .env file.
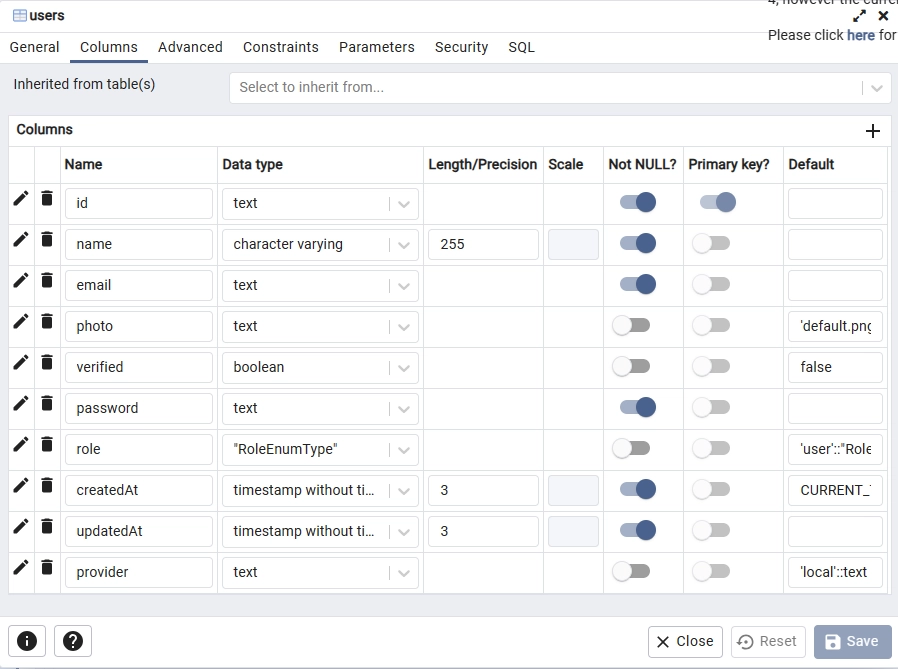
Navigate to the ‘Databases‘ -> ‘trpc_prisma‘ -> ‘Schemas‘ -> ‘Tables‘ section. You should find two tables: _prisma_migrations, which Prisma uses to track schema changes, and users, which represents the User model we defined. Right-click the ‘users‘ table, select ‘Properties‘, and then click on ‘Columns‘ in the popup. You should see the columns we defined for the User model in the Prisma schema file.
Next, let’s create a singleton instance of the Prisma Client for interacting with the PostgreSQL database. Create a lib folder in the root directory, and inside it, create a prisma.ts file. Add the following code to this file:
lib/prisma.ts
import { PrismaClient } from '@prisma/client';

const prismaClientSingleton = () => {
  return new PrismaClient();
};

declare global {
  var prisma: undefined | ReturnType<typeof prismaClientSingleton>;
}

const prisma = globalThis.prisma ?? prismaClientSingleton();

if (process.env.NODE_ENV !== 'production') globalThis.prisma = prisma;

export { prisma };
Create the Validation Schemas with Zod
Continuing, let’s utilize Zod to create validation schemas. We will share these schemas between the frontend and backend. For the frontend, as we are utilizing Next.js, the validation rules will guarantee that users provide the correct values in the input fields. On the backend, the validation rules defined in the schemas will ensure that incoming data adheres to the specified rules and format.
Create a user-schema.ts file in the lib directory and add the following code:
lib/user-schema.ts
import { object, string, TypeOf } from 'zod';

export const createUserSchema = object({
  name: string({ required_error: 'Name is required' }).min(
    1,
    'Name is required'
  ),
  email: string({ required_error: 'Email is required' })
    .min(1, 'Email is required')
    .email('Invalid email'),
  photo: string().optional(),
  password: string({ required_error: 'Password is required' })
    .min(1, 'Password is required')
    .min(8, 'Password must be more than 8 characters')
    .max(32, 'Password must be less than 32 characters'),
  passwordConfirm: string({
    required_error: 'Please confirm your password',
  }).min(1, 'Please confirm your password'),
}).refine((data) => data.password === data.passwordConfirm, {
  path: ['passwordConfirm'],
  message: 'Passwords do not match',
});

export const loginUserSchema = object({
  email: string({ required_error: 'Email is required' })
    .min(1, 'Email is required')
    .email('Invalid email or password'),
  password: string({ required_error: 'Password is required' }).min(
    1,
    'Password is required'
  ),
});

export type CreateUserInput = TypeOf<typeof createUserSchema>;
export type LoginUserInput = TypeOf<typeof loginUserSchema>;
Create the tRPC Authentication Middleware
In this section, we’ll create a tRPC authentication middleware that ensures only users with valid JWTs are allowed to access a particular procedure or RPC. This middleware will extract the token from the cookies object, validate it to ensure it wasn’t tampered with, query the database to ensure the user belonging to the token still exists, and finally return the user data, assuming the user passes all the validation checks.
To begin, update the .env file with the environment variables below, including the JWT_SECRET variable.
POSTGRES_HOST=127.0.0.1
POSTGRES_PORT=6500
POSTGRES_USER=postgres
POSTGRES_PASSWORD=password123
POSTGRES_DB=trpc_prisma

DATABASE_URL=postgresql://postgres:password123@localhost:6500/trpc_prisma?schema=public

PGADMIN_DEFAULT_EMAIL=admin@admin.com
PGADMIN_DEFAULT_PASSWORD=password123

JWT_SECRET=my_ultra_secure_jwt_secret
To set up the middleware, create a server folder in the root directory. Within this server directory, create a file named auth-middleware.ts and insert the following code into it.
server/auth-middleware.ts
import { TRPCError } from '@trpc/server';
import jwt from 'jsonwebtoken';
import { prisma } from '@/lib/prisma';
import { cookies } from 'next/headers';

export const deserializeUser = async () => {
  const cookieStore = cookies();
  try {
    let token;
    if (cookieStore.get('token')) {
      token = cookieStore.get('token')?.value;
    }

    const notAuthenticated = {
      user: null,
    };

    if (!token) {
      return notAuthenticated;
    }

    const secret = process.env.JWT_SECRET!;
    const decoded = jwt.verify(token, secret) as { sub: string };

    if (!decoded) {
      return notAuthenticated;
    }

    const user = await prisma.user.findUnique({ where: { id: decoded.sub } });

    if (!user) {
      return notAuthenticated;
    }

    const { password, ...userWithoutPassword } = user;
    return {
      user: userWithoutPassword,
    };
  } catch (err: any) {
    throw new TRPCError({
      code: 'INTERNAL_SERVER_ERROR',
      message: err.message,
    });
  }
};
The middleware attempts to retrieve the token from the cookies object. If it is absent, it returns an empty object with a ‘user‘ field of null. However, if a token is found, it uses the jwt.verify() function to validate it and extract the payload stored within.
Subsequently, it utilizes the payload along with Prisma to check if the user associated with the token still exists. If a user is found, the middleware omits the password field from the returned user object for security reasons and then returns the remaining fields encapsulated in an object as the ‘user‘.
Create the tRPC Procedure Handlers
At this juncture, we are prepared to create tRPC procedure handler functions. The tRPC router will delegate incoming requests to these handlers based on the invoked RPC. For authentication, we’ll implement three handler functions, each with its specific role:
registerHandler– Upon invocation, this handler function extracts user credentials from the request, hashes the password using the Bcrypt library, and persists the user data in the database using Prisma.loginHandler– When invoked, this handler function finds the user by email, and compares the plain-text password provided in the request payload with the hashed one stored in the database. Subsequently, it generates a JSON Web Token and includes it in the response object and as a cookie.logoutHandler– Upon invocation, this handler function responds with expired cookies, facilitating the deletion of existing cookies in the user’s browser.
server/auth-controller.ts
import { CreateUserInput, LoginUserInput } from '@/lib/user-schema';
import bcrypt from 'bcryptjs';
import { prisma } from '@/lib/prisma';
import { TRPCError } from '@trpc/server';
import jwt from 'jsonwebtoken';
import { cookies } from 'next/headers';

export const registerHandler = async ({
  input,
}: {
  input: CreateUserInput;
}) => {
  try {
    const hashedPassword = await bcrypt.hash(input.password, 12);
    const user = await prisma.user.create({
      data: {
        email: input.email,
        name: input.name,
        password: hashedPassword,
        photo: input.photo,
      },
    });

    const { password, ...userWithoutPassword } = user;
    return {
      status: 'success',
      data: {
        user: userWithoutPassword,
      },
    };
  } catch (err: any) {
    if (err.code === 'P2002') {
      throw new TRPCError({
        code: 'CONFLICT',
        message: 'Email already exists',
      });
    }
    throw err;
  }
};

export const loginHandler = async ({ input }: { input: LoginUserInput }) => {
  try {
    const user = await prisma.user.findUnique({
      where: { email: input.email },
    });

    if (!user || !(await bcrypt.compare(input.password, user.password))) {
      throw new TRPCError({
        code: 'BAD_REQUEST',
        message: 'Invalid email or password',
      });
    }

    const secret = process.env.JWT_SECRET!;
    const token = jwt.sign({ sub: user.id }, secret, {
      expiresIn: 60 * 60,
    });

    const cookieOptions = {
      httpOnly: true,
      path: '/',
      secure: process.env.NODE_ENV !== 'development',
      maxAge: 60 * 60,
    };
    cookies().set('token', token, cookieOptions);

    return {
      status: 'success',
      token,
    };
  } catch (err: any) {
    throw err;
  }
};

export const logoutHandler = async () => {
  try {
    cookies().set('token', '', {
      maxAge: -1,
    });
    return { status: 'success' };
  } catch (err: any) {
    throw err;
  }
};
Subsequently, let’s create another RPC handler function that will return the authenticated user’s credentials. This handler function will be protected by the JWT middleware, and only users with valid JWTs can access it. The logic involves extracting user data from the tRPC Context object and including it in the response. To implement this handler, create a user-controller.ts file in the ‘server‘ directory and add the following code:
server/user-controller.ts
import type { Context } from '@/utils/trpc-context';
import { TRPCError } from '@trpc/server';

export const getMeHandler = ({ ctx }: { ctx: Context }) => {
  try {
    const user = ctx.user;
    return {
      status: 'success',
      data: {
        user,
      },
    };
  } catch (err: any) {
    throw new TRPCError({
      code: 'INTERNAL_SERVER_ERROR',
      message: err.message,
    });
  }
};
Create the tRPC Context and Routes for the Procedures
Now that we have created the RPC handler functions, we can proceed to create routes that invoke them. To begin, let’s set up the tRPC context to utilize the JWT middleware function. Create a trpc-context.ts file in the ‘utils‘ directory and add the following code:
utils/trpc-context.ts
import { deserializeUser } from '@/server/auth-middleware';
import { inferAsyncReturnType } from '@trpc/server';

export const createContext = async () => deserializeUser();

export type Context = inferAsyncReturnType<typeof createContext>;
To set up RPC the tRPC procedures for user registration, login, and logout, create a auth-route.ts file in the “server‘ directory and include the following code:
server/auth-route.ts
import { createUserSchema, loginUserSchema } from '@/lib/user-schema';
import { protectedProcedure, pubicProcedure, t } from '@/utils/trpc-server';
import {
  loginHandler,
  logoutHandler,
  registerHandler,
} from './auth-controller';

const authRouter = t.router({
  registerUser: pubicProcedure
    .input(createUserSchema)
    .mutation(({ input }) => registerHandler({ input })),
  loginUser: pubicProcedure
    .input(loginUserSchema)
    .mutation(({ input }) => loginHandler({ input })),
  logoutUser: protectedProcedure.mutation(() => logoutHandler()),
});

export default authRouter;
This code defines a tRPC router called authRouter with procedures for user registration, login, and logout. It specifies the input schemas, authentication requirements, and the corresponding handler functions. The authRouter is then exported for use in your server setup, which we will create soon.
Create the tRPC and HTTP Routers
Oops, quite a lot of configurations. Now let’s create the tRPC and Next.js HTTP routers, but before that, let’s first initialize the tRPC server in the project. Go into the ‘utils‘ directory and create a file named trpc-server.ts. Then, add the following code to the file.
utils/trpc-server.ts
import { TRPCError, initTRPC } from '@trpc/server';
import SuperJSON from 'superjson';
import { Context } from './trpc-context';

export const t = initTRPC.context<Context>().create({
  transformer: SuperJSON,
});

const isAuthed = t.middleware(({ next, ctx }) => {
  if (!ctx.user) {
    throw new TRPCError({
      code: 'UNAUTHORIZED',
      message: 'You must be logged in to access this resource',
    });
  }
  return next();
});

export const pubicProcedure = t.procedure;
export const protectedProcedure = t.procedure.use(isAuthed);
Here comes the most important part of building the tRPC API, where we will create additional routers, merge them, and export the router for use in creating the Next.js HTTP routes. To create the tRPC app router, follow these steps:
- Navigate to the
appdirectory. - Create an
apidirectory within theappdirectory. - Inside the
apidirectory, create a folder namedtrpc - Within the
trpcfolder, create a file namedtrpc-router.ts - Add the provided code to the
trpc-router.tsfile.
app/api/trpc/trpc-router.ts
import authRouter from '@/server/auth-route';
import { getMeHandler } from '@/server/user-controller';
import { createContext } from '@/utils/trpc-context';
import { protectedProcedure, t } from '@/utils/trpc-server';

const healthCheckerRouter = t.router({
  healthchecker: t.procedure.query(() => {
    return {
      status: 'success',
      message: 'Welcome to trpc with Next.js 14 and React Query',
    };
  }),
});

const userRouter = t.router({
  getMe: protectedProcedure.query(({ ctx }) => getMeHandler({ ctx })),
});

export const appRouter = t.mergeRouters(
  healthCheckerRouter,
  authRouter,
  userRouter
);

export const createCaller = t.createCallerFactory(appRouter);

export const createAsyncCaller = async () => {
  const context = await createContext();
  return createCaller(context);
};

export type AppRouter = typeof appRouter;
The exported createAsyncCaller function in the file will play a crucial role in calling our procedures from within server components when building the frontend. It becomes particularly essential when fetching the authenticated user after a successful sign-in to the application. This ensures that the data is available before sending the HTML document to the browser.
Next, let’s proceed to create the tRPC HTTP routes in the Next.js route file. Navigate to the app/api/trpc/ directory, create a dynamic route folder named [trpc], and within this directory, create a route.ts file. Add the following code to the file:
app/api/trpc/[trpc]/route.ts
import { fetchRequestHandler } from '@trpc/server/adapters/fetch';
import { appRouter } from '../trpc-router';
import { createContext } from '@/utils/trpc-context';

const handler = (request: Request) => {
  console.log(`incoming request ${request.url}`);
  return fetchRequestHandler({
    endpoint: '/api/trpc',
    req: request,
    router: appRouter,
    createContext: createContext,
  });
};

export { handler as GET, handler as POST };
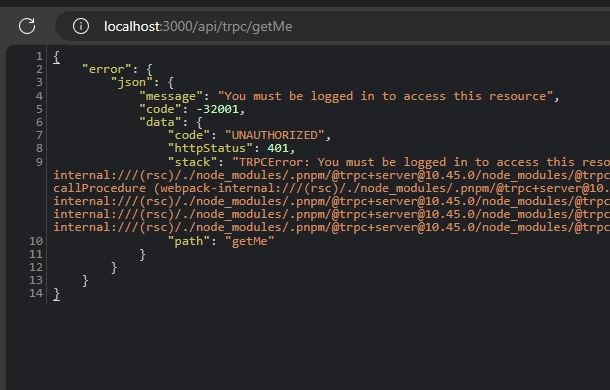
After following the instructions, launch the Next.js development server and attempt to retrieve the authenticated user by visiting the URL http://localhost:3000/api/trpc/getMe in your browser. You should encounter a 401 Unauthorized error from the tRPC server, signifying the functionality of the tRPC middleware. This occurs because the getMe RPC can only be accessed by authenticated users.
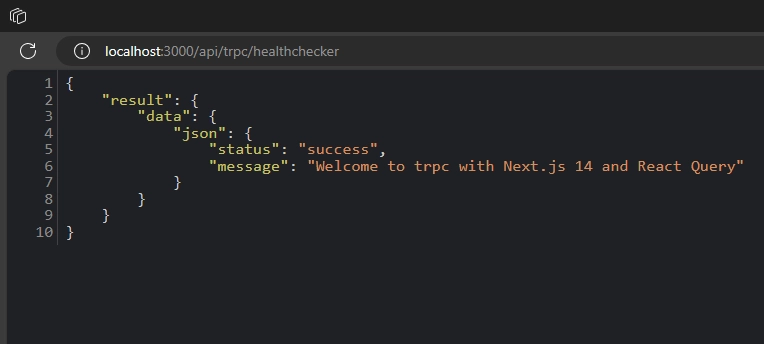
However, attempting to access the Healthchecker RPC by visiting the URL http://localhost:3000/api/trpc/healthchecker should result in a successful response, as this RPC is accessible to anyone.
Conclusion
And that concludes our guide! Throughout this tutorial, you acquired the skills to implement JWT authentication in a tRPC API using Next.js 14. In the upcoming article, we’ll dive into building the frontend app for the tRPC API, covering user registration, login, and logout functionalities. I trust you found this article both informative and engaging. If you have any questions or feedback, please don’t hesitate to share them in the comment section below.