Using a strong and unique password on the internet is a crucial requirement to secure our accounts. The majority of users who use unique passwords are more likely to forget their passwords. For this reason, it makes a lot of sense to add forgot/reset password feature to our Web, Mobile, and Desktop applications.
Accounting for a forgot/reset password feature will make it easy for users to reset their passwords when the passwords are found in data breaches.
This article will teach you how to implement a forgot/reset password functionality with React, Axios, React Query, Zustand, and TypeScript.
Related articles in this series:
- React Query and Axios: User Registration and Email Verification
- Forgot/Reset Passwords with React Query and Axios
More Practice:
- How to Setup tRPC API Server & Client with Next.js and Prisma
- tRPC Server API with Next.js & PostgreSQL: Access & Refresh Tokens
- Full-Stack Next.js tRPC App: User Registration & Login Example
- Build a tRPC CRUD API Example with Next.js
Prerequisites
To get the best out of this tutorial, you should have:
- Basic understanding of JavaScript and TypeScript
- Basic knowledge of React and React Query
- Basic understanding of CSS and Tailwind CSS
- Basic understanding of API design and how to interact with APIs
- Basic understanding of JWT authentication
Forgot/Reset Passwords Flow with React Query
This article will teach you how to forget/reset passwords with React Query. Below are the React routes defined in this project:
/login– a public route for authenticating users by signing them into their accounts/register– a public route for creating new users/verifyemail/:verificationCode– a public route for verifying a user’s email./profile– a private route that displays the authenticated user’s credentials./forgotpassword– a public route for getting the password reset link from the API/resetpassword/:resetCode– a public route for resetting the passwords/– a public route that displays a simple welcome message
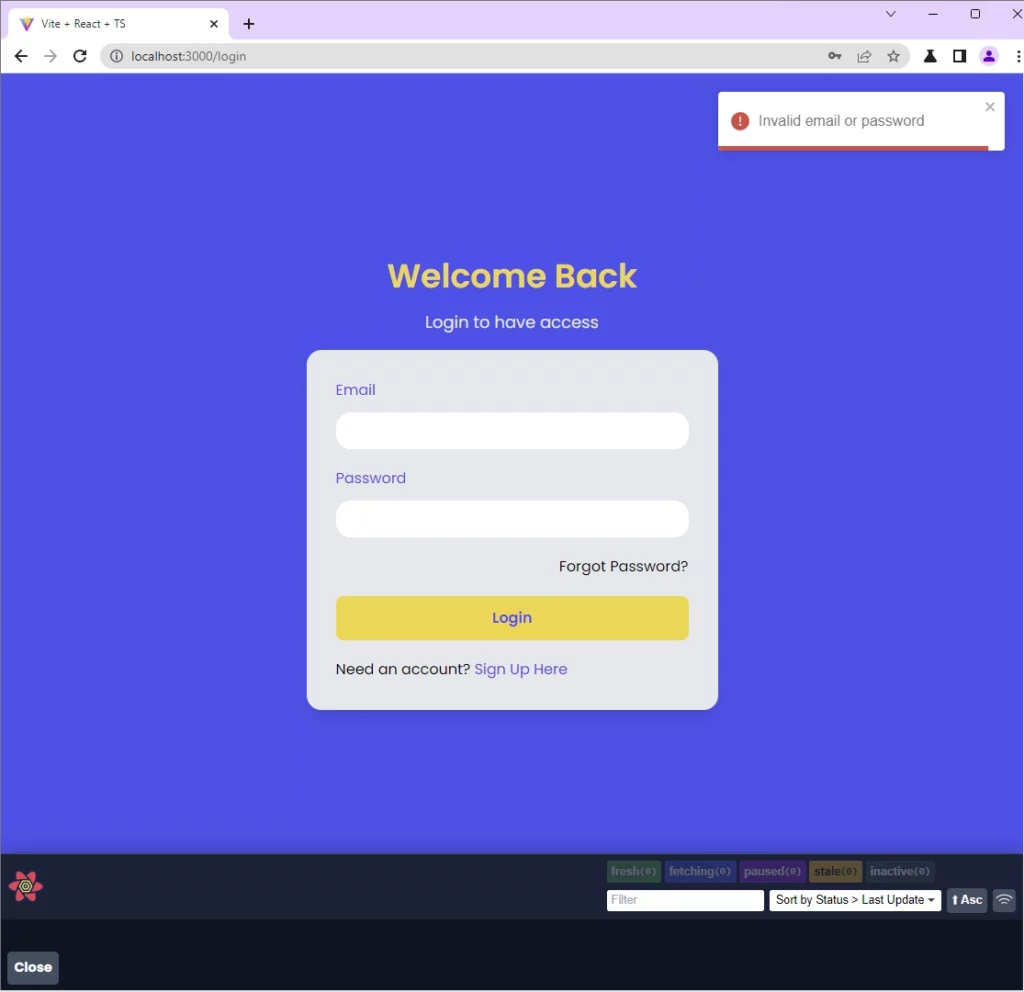
Failed Login
Upon several failed login attempts, the user can click on the Forgot Password link available on the login page to start the forgot/reset password process.
Get Password Reset Link
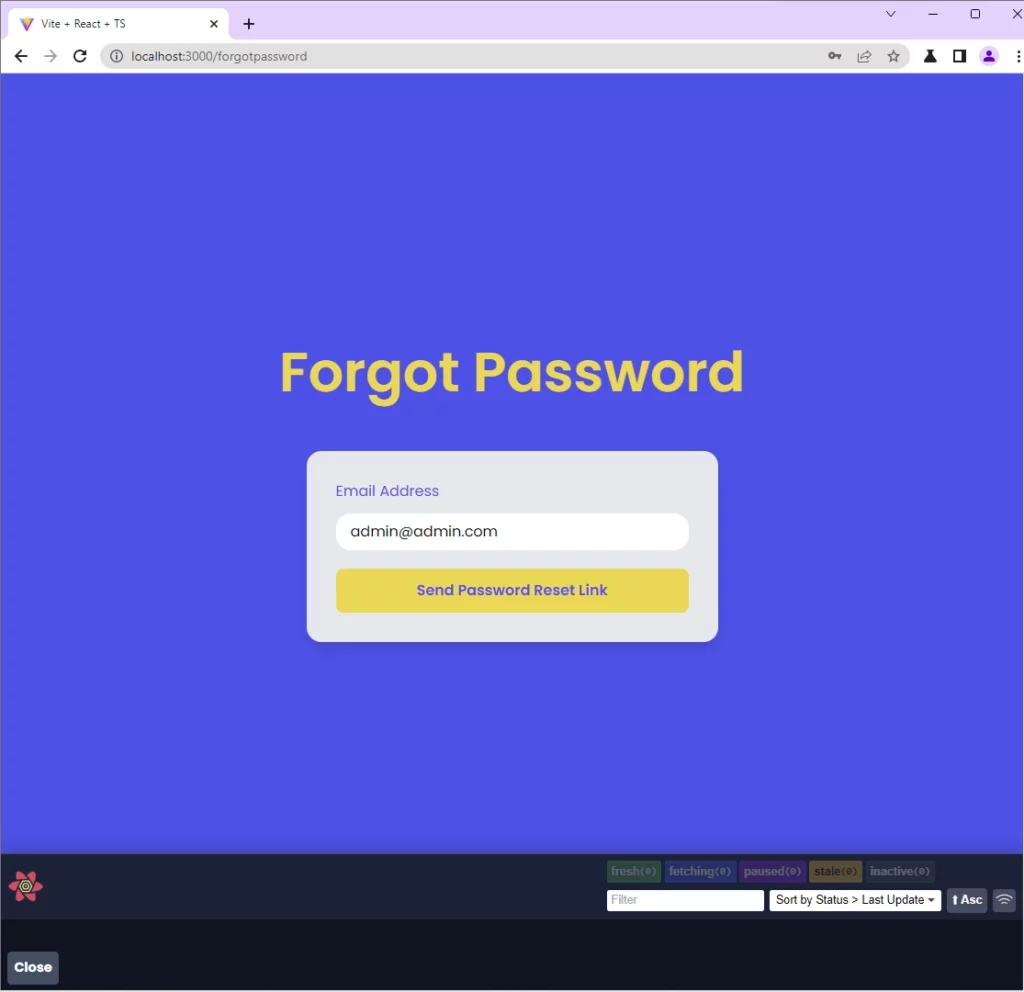
On the forgot password page, the user will provide the email address and click on the Send Password Reset Link button. React will fire a React Query mutation request with Axios to the /api/auth/forgotpassword endpoint.
The API will:
- Validate the request body with Zod
- Query the database to check if a user with that email exists
- Generate the HTML template and password reset code
- Send the password reset link to the user’s email inbox
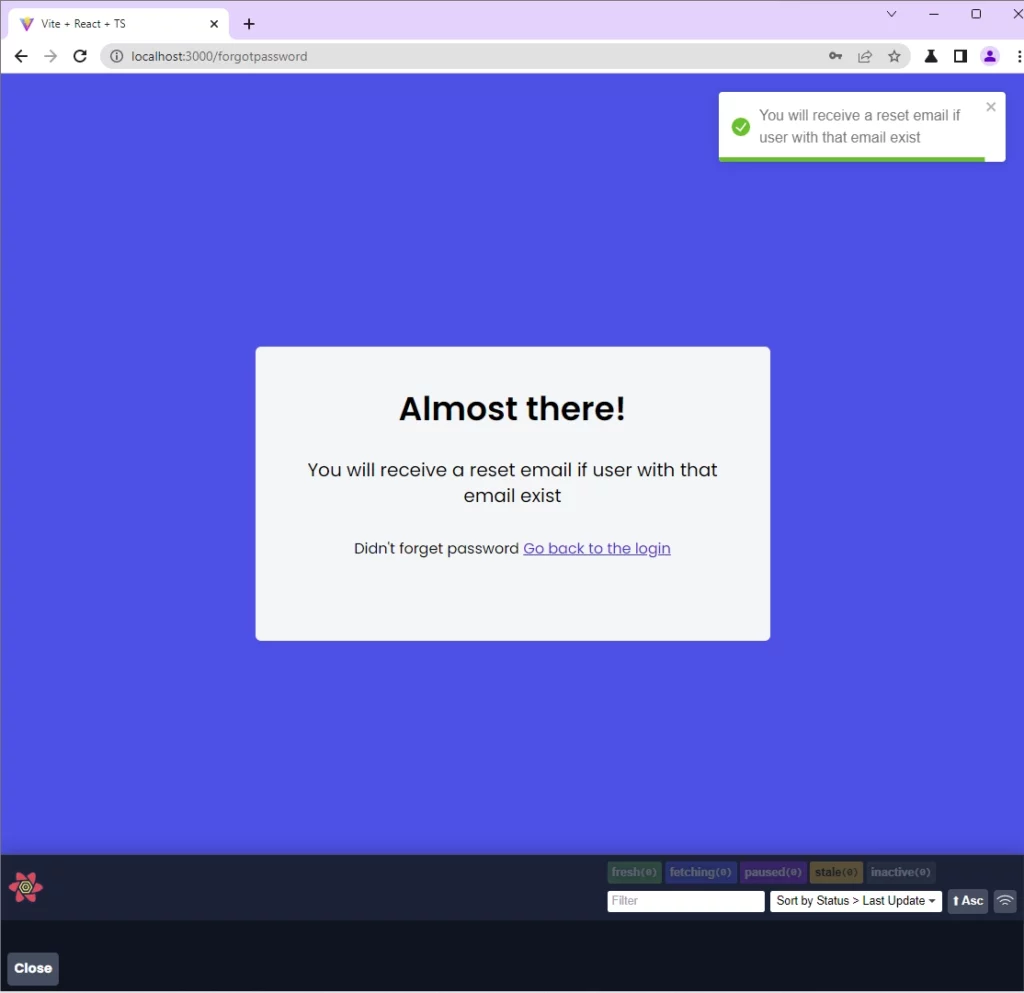
After React receives a response from the API, an alert notification will be shown and a message component will be rendered to display the success message sent by the server.
Reset Password
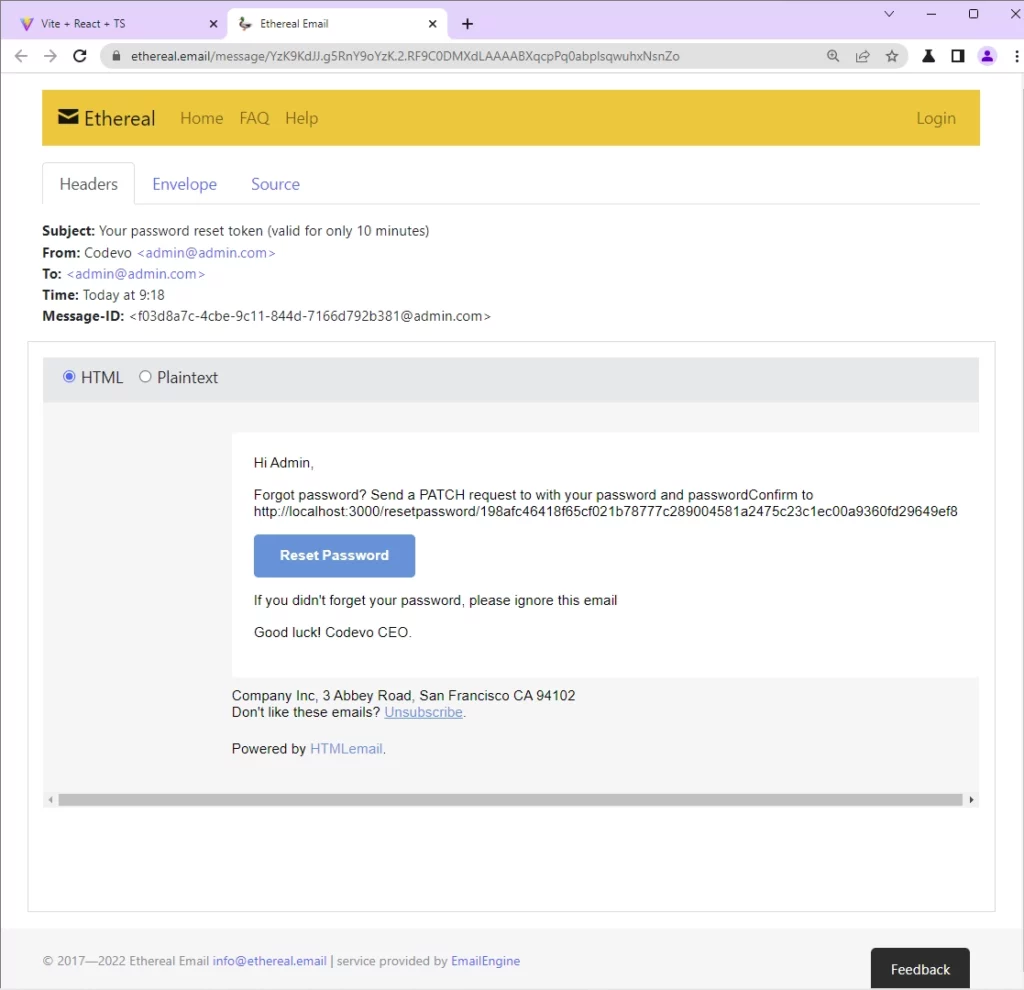
Below is a sample of the Email HTML template sent to the user’s email inbox. Once the user clicks the Reset Password button, the browser will redirect the user to the /resetpassword/:resetCode page.
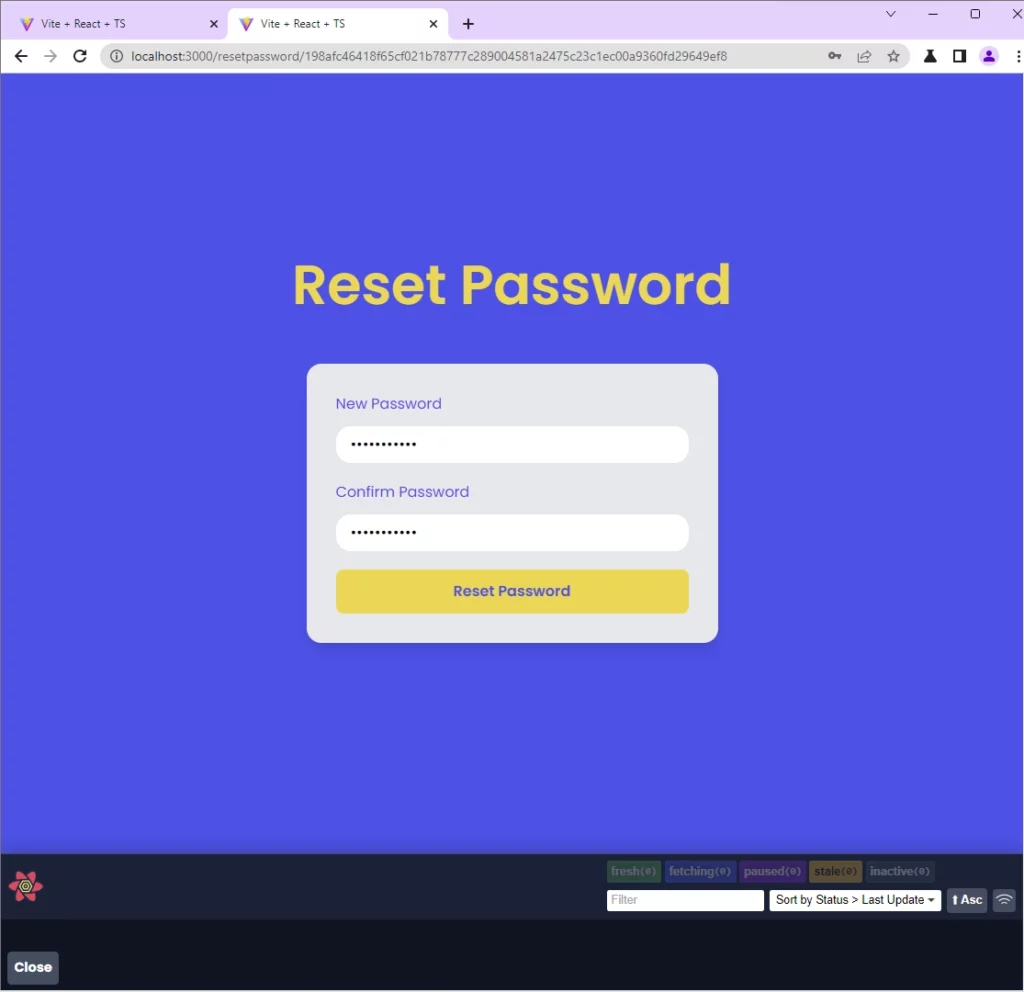
On the password reset route, the user will be required to input the new password and confirm it. When the user clicks the Reset Password button, React will make a mutation request with React Query to the /api/auth/resetpassword/:resetCode endpoint.
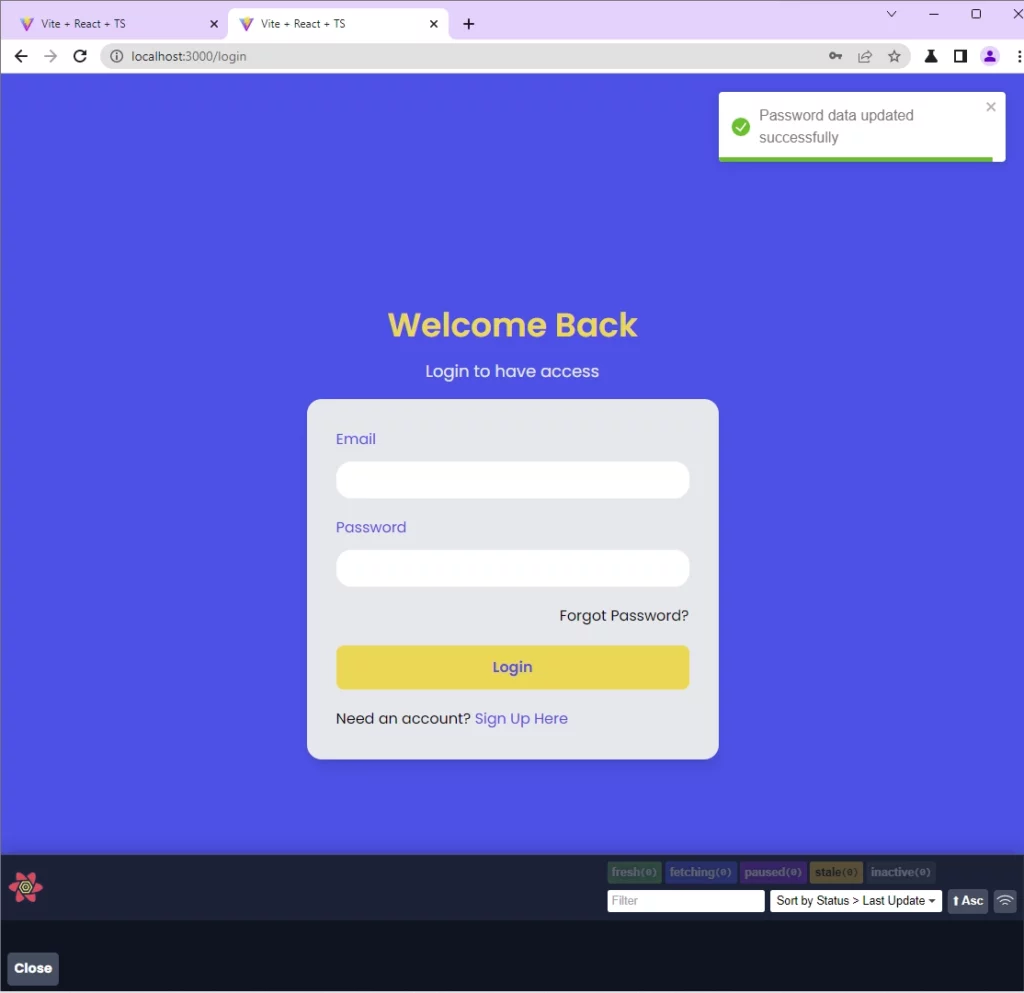
On success, React will automatically redirect the user to the login page and an alert notification will be displayed.
Login with New Passwords
On the login page, the user will provide the email address and the new password. Upon clicking the Login button, React will make a React Query mutation request to the /api/auth/login endpoint with the JSON object included in the request body.
On success, React will log the user into the app.
Run the Forgot/Reset Passwords with React Query Locally
- Get the project source code from https://github.com/wpcodevo/react-query-axios-tailwindcss
- Open the project with a text editor and change the Git branch to
react-query-tailwindcss-axios-reset-password. - Install all the dependencies by running
yarnoryarn installfrom the terminal in the root directory. - Run
yarn devto start the Vite development server. - Open a new tab in the browser and go to the application at localhost:3000.
Run the Backend API
Below are two APIs built with Node.js and Golang:
Forgot/Reset Passwords Backend Built with Golang
Read the post Forgot/Reset Passwords in Golang with SMTP HTML Email to get a full guide on how to build the forgot/reset password API with Golang.
Nevertheless, you can use the following steps to get the Golang API up and running:
- Download and install the latest version of Golang from https://go.dev/doc/install
- Download or clone the forgot/reset password API source code from https://github.com/wpcodevo/golang-mongodb-api.
- Open the project with an IDE and change the Git branch of the source code to
golang-mongodb-reset-password. - Install all the dependencies by running
go mod tidyfrom the terminal in the project root directory. - Start the MongoDB database server by running
docker-compose up -d. - Make a copy of the
example.envfile and rename the duplicated one toapp.env - Open the
app.envfile and add your SMTP credentials. Alternatively, create an account on mailtrap.io, add a new inbox, click the settings icon under Action on the newly-created inbox, copy the SMTP credentials, and add them to theapp.envfile. - Run
go run main.goto start the Golang Gin server.
Forgot/Reset Passwords Backend Built with Node.js
Read the post API with Node.js, Prisma & PostgreSQL: Forget/Reset Password to get full detail on how to create the forgot/reset password functionality with Node.js.
However, you can use the following steps to quickly set up and run the Node.js API.
- Download and install Node.js from https://nodejs.org/. Run
npm install --global yarnto install Yarn globally. - Get the forgot/reset password API source code from https://github.com/wpcodevo/node_prisma_postgresql.
- Open the source code with your IDE or text editor and change the Git branch to
forgot_reset_password. - Install all the required dependencies by running
yarn installoryarn - Make a copy of
example.envfile and rename the copied file to.env - Start the Redis and PostgreSQL servers by running
docker-compose up -din the terminal of the root project folder. - Run
yarn db:migrate && yarn db:pushto create the database migration file, generate the Prisma Client, and push the database schema to the PostgreSQL database. - Open the
.envfile and add your SMTP credentials. Alternatively, open the src/app.ts file, uncomment the Nodemailer code, and runyarn startto start the Node.js server. This will cause Nodemailer to generate SMTP test account credentials in the terminal. - Copy the SMTP credentials generated in the terminal and add them to the
.envfile. Once you are done, comment out the Nodemailer code in the src/app.ts file again and save the file to restart the Node.js server.
Step 1 – Create the API Requests with Axios
In this section, you will create a custom Axios instance and add some default configurations. Also, you will create Axios request functions that React Query will use behind the scene to make the mutation and query requests.
Out of the box, Axios comes configured with some default configurations, and since we want to customize the Axios instance with our own configurations, we will use the Axios.create() method and pass an object containing the parameters as an argument.
Using a custom Axios instance will help us reuse the provided configurations for all the API invocations made by the instance.
src/api/authApi.ts
import axios from 'axios';
import { LoginInput } from '../pages/login.page';
import { RegisterInput } from '../pages/register.page';
import { ResetPasswordInput } from '../pages/resetpassword.page';
import { GenericResponse, ILoginResponse, IUserResponse } from './types';

const BASE_URL = 'http://localhost:8000/api/';

export const authApi = axios.create({
  baseURL: BASE_URL,
  withCredentials: true,
});

authApi.defaults.headers.common['Content-Type'] = 'application/json';

export const signUpUserFn = async (user: RegisterInput) => {
  const response = await authApi.post<GenericResponse>('auth/register', user);
  return response.data;
};

export const loginUserFn = async (user: LoginInput) => {
  const response = await authApi.post<ILoginResponse>('auth/login', user);
  return response.data;
};

export const verifyEmailFn = async (verificationCode: string) => {
  const response = await authApi.get<GenericResponse>(
    `auth/verifyemail/${verificationCode}`
  );
  return response.data;
};

export const logoutUserFn = async () => {
  const response = await authApi.get<GenericResponse>('auth/logout');
  return response.data;
};

export const getMeFn = async () => {
  const response = await authApi.get<IUserResponse>('users/me');
  return response.data;
};

export const forgotPasswordFn = async (email: string) => {
  const response = await authApi.post<GenericResponse>('auth/forgotpassword',{email});
  return response.data;
};

export const resetPasswordFn = async (data: ResetPasswordInput, resetCode: string) => {
  const response = await authApi.patch<GenericResponse>(`auth/resetpassword/${resetCode}`, data);
  return response.data;
};
Quite a lot of Axios functions, let’s evaluate them:
signUpUserFn– This function will be used by React Query to register the new user by making a mutation request to the API.loginUserFn– This function will be used by React Query to authenticate the user by making a mutation request to the backend API.verifyEmailFn– This function will be evoked by React Query to verify the user’s email address.logoutUserFn– This function will be evoked by React Query to log out the user.getMeFn– This function will be evoked by React Query to retrieve the authenticated user’s information from the API.forgotPasswordFn– This function will be evoked by React Query to request the password reset link from the API.resetPasswordFn– This function will be used by React Query to reset the user’s password by firing a mutation request to the API.
Step 2 – Create the Forgot Password Component
In this step, you will create the React component that will fire a React Query mutation request with Axios to the /api/auth/forgotpassword endpoint.
This component will contain a form with email input and a button to submit the data. The validation schema will be defined with Zod and the form validation will be done with React-Hook-Form.
src/pages/forgotpassword.page.tsx
import { object, string, TypeOf } from "zod";
import { useEffect } from "react";
import { useForm, FormProvider, SubmitHandler } from "react-hook-form";
import { zodResolver } from "@hookform/resolvers/zod";
import FormInput from "../components/FormInput";
import { LoadingButton } from "../components/LoadingButton";
import { toast } from "react-toastify";
import useStore from "../store";
import { forgotPasswordFn } from "../api/authApi";
import { useMutation } from "@tanstack/react-query";
import Message from "../components/Message";
import { Link } from "react-router-dom";

const forgotPasswordSchema = object({
  email: string()
    .min(1, "Email verifciation code is required")
    .email("Email address is invalid"),
});

export type ForgotPasswordInput = TypeOf<typeof forgotPasswordSchema>;

const ForgotPasswordPage = () => {
  const store = useStore();

  const methods = useForm<ForgotPasswordInput>({
    resolver: zodResolver(forgotPasswordSchema),
  });

  const {
    mutate: forgotPassword,
    data,
    isSuccess,
  } = useMutation((email: string) => forgotPasswordFn(email), {
    onMutate(variables) {
      store.setRequestLoading(true);
    },
    onSuccess: (data) => {
      store.setRequestLoading(false);
      toast.success(data?.message);
    },
    onError(error: any) {
      store.setRequestLoading(false);
      if (Array.isArray((error as any).data.error)) {
        (error as any).data.error.forEach((el: any) =>
          toast.error(el.message, {
            position: "top-right",
          })
        );
      } else {
        toast.error((error as any).data.message, {
          position: "top-right",
        });
      }
    },
  });

  const {
    reset,
    handleSubmit,
    formState: { isSubmitSuccessful },
  } = methods;

  useEffect(() => {
    if (isSubmitSuccessful) {
      reset();
    }
    // eslint-disable-next-line react-hooks/exhaustive-deps
  }, [isSubmitSuccessful]);

  const onSubmitHandler: SubmitHandler<ForgotPasswordInput> = ({ email }) => {
    // ? Executing the forgotPassword Mutation
    forgotPassword(email);
  };

  return (
    <section className="bg-ct-blue-600 min-h-screen grid place-items-center">
      {data && isSuccess ? (
        <Message>
          <p className="text-xl">{data.message}</p>
          <p className="mt-8">
            Didn't forget password{" "}
            <Link to="/login" className="text-blue-700 underline">
              Go back to the login
            </Link>
          </p>
        </Message>
      ) : (
        <div className="w-full">
          <h1 className="text-4xl lg:text-6xl text-center font-[600] text-ct-yellow-600 mb-14">
            Forgot Password
          </h1>
          <FormProvider {...methods}>
            <form
              onSubmit={handleSubmit(onSubmitHandler)}
              className="max-w-md w-full mx-auto overflow-hidden shadow-lg bg-ct-dark-200 rounded-2xl p-8 space-y-5"
            >
              <FormInput label="Email Address" name="email" type="email" />
              <LoadingButton
                loading={store.requestLoading}
                textColor="text-ct-blue-600"
              >
                Send Password Reset Link
              </LoadingButton>
            </form>
          </FormProvider>
        </div>
      )}
    </section>
  );
};

export default ForgotPasswordPage;
You will notice we used React Query’s useMutation hook and passed the forgotPasswordFn function we created with Axios as the mutation function. When the mutate method which we renamed to forgotPassword is evoked, React Query will fire a mutation request to the /api/auth/forgotpassword endpoint on the API.
The API will then generate the password reset code and the HTML email template and send the password reset link to the user’s email inbox. On success, React will render the Message component to display the response sent by the API.
Step 3 – Create the Password Reset Component
Now that we are able to request the password reset email, let’s create the React component for resetting the password. This component will have a form with password and password confirmation inputs.
Because the password reset code is included in the URL, we will use React-Router-Dom’s useParams() hook to extract it from the URL. The password reset code will be required by the API to verify the user’s identity before the password data can be updated in the database.
src/pages/resetpassword.page.tsx
import { object, string, TypeOf } from "zod";
import { useEffect } from "react";
import { useForm, FormProvider, SubmitHandler } from "react-hook-form";
import { zodResolver } from "@hookform/resolvers/zod";
import FormInput from "../components/FormInput";
import { LoadingButton } from "../components/LoadingButton";
import { toast } from "react-toastify";
import { useNavigate, useParams } from "react-router-dom";
import useStore from "../store";
import { resetPasswordFn } from "../api/authApi";
import { useMutation } from "@tanstack/react-query";

const resetPasswordSchema = object({
  password: string()
    .min(1, "Password is required")
    .min(8, "Password must be at least 8 characters"),
  passwordConfirm: string().min(1, "Please confirm your password"),
});

export type ResetPasswordInput = TypeOf<typeof resetPasswordSchema>;

const ResetPasswordPage = () => {
  const store = useStore();
  const navigate = useNavigate();
  const { resetCode } = useParams();

  const methods = useForm<ResetPasswordInput>({
    resolver: zodResolver(resetPasswordSchema),
  });

  const { mutate: resetPassword } = useMutation(
    (data: ResetPasswordInput) => resetPasswordFn(data, resetCode!),
    {
      onMutate(variables) {
        store.setRequestLoading(true);
      },
      onSuccess: (data) => {
        store.setRequestLoading(false);
        toast.success(data?.message);
        navigate("/login");
      },
      onError(error: any) {
        store.setRequestLoading(false);
        if (Array.isArray((error as any).data.error)) {
          (error as any).data.error.forEach((el: any) =>
            toast.error(el.message, {
              position: "top-right",
            })
          );
        } else {
          toast.error((error as any).data.message, {
            position: "top-right",
          });
        }
      },
    }
  );

  const {
    reset,
    handleSubmit,
    formState: { isSubmitSuccessful },
  } = methods;

  useEffect(() => {
    if (isSubmitSuccessful) {
      reset();
    }
    // eslint-disable-next-line react-hooks/exhaustive-deps
  }, [isSubmitSuccessful]);

  const onSubmitHandler: SubmitHandler<ResetPasswordInput> = (values) => {
    resetPassword(values);
  };

  return (
    <section className="bg-ct-blue-600 min-h-screen grid place-items-center">
      <div className="w-full">
        <h1 className="text-4xl lg:text-6xl text-center font-[600] text-ct-yellow-600 mb-14">
          Reset Password
        </h1>
        <FormProvider {...methods}>
          <form
            onSubmit={handleSubmit(onSubmitHandler)}
            className="max-w-md w-full mx-auto overflow-hidden shadow-lg bg-ct-dark-200 rounded-2xl p-8 space-y-5"
          >
            <FormInput label="New Password" name="password" type="password" />
            <FormInput
              label="Confirm Password"
              name="passwordConfirm"
              type="password"
            />
            <LoadingButton
              loading={store.requestLoading}
              textColor="text-ct-blue-600"
            >
              Reset Password
            </LoadingButton>
          </form>
        </FormProvider>
      </div>
    </section>
  );
};

export default ResetPasswordPage;
When the resetPassword mutation method is evoked, React Query will fire a mutation request to submit the form data and the reset code to the API. On a successful password update, the user will be redirected to the login page to sign in with the new password.
Step 4 – Create the Login Component
The final step in the password reset process is to require the user to log in with the new password. This React component will contain a form with email and password inputs.
The form validation is done via React-Hook-Form with the rules defined in the Zod schema.
src/pages/login.page.tsx
import { object, string, TypeOf } from "zod";
import { useEffect } from "react";
import { useForm, FormProvider, SubmitHandler } from "react-hook-form";
import { zodResolver } from "@hookform/resolvers/zod";
import FormInput from "../components/FormInput";
import { LoadingButton } from "../components/LoadingButton";
import { toast } from "react-toastify";
import { Link, useLocation, useNavigate } from "react-router-dom";
import useStore from "../store";
import { loginUserFn } from "../api/authApi";
import { useMutation } from "@tanstack/react-query";

const loginSchema = object({
  email: string()
    .min(1, "Email address is required")
    .email("Email Address is invalid"),
  password: string()
    .min(1, "Password is required")
    .min(8, "Password must be more than 8 characters")
    .max(32, "Password must be less than 32 characters"),
});

export type LoginInput = TypeOf<typeof loginSchema>;

const LoginPage = () => {
  const navigate = useNavigate();
  const location = useLocation();

  const from = ((location.state as any)?.from.pathname as string) || "/profile";

  const methods = useForm<LoginInput>({
    resolver: zodResolver(loginSchema),
  });

  const store = useStore();

  //  API Login Mutation
  const { mutate: loginUser } = useMutation(
    (userData: LoginInput) => loginUserFn(userData),
    {
      onMutate(variables) {
        store.setRequestLoading(true);
      },
      onSuccess: () => {
        store.setRequestLoading(false);
        toast.success("You successfully logged in");
        navigate(from);
      },
      onError: (error: any) => {
        store.setRequestLoading(false);
        if (Array.isArray((error as any).response.data.error)) {
          (error as any).response.data.error.forEach((el: any) =>
            toast.error(el.message, {
              position: "top-right",
            })
          );
        } else {
          toast.error((error as any).response.data.message, {
            position: "top-right",
          });
        }
      },
    }
  );

  const {
    reset,
    handleSubmit,
    formState: { isSubmitSuccessful },
  } = methods;

  useEffect(() => {
    if (isSubmitSuccessful) {
      reset();
    }
    // eslint-disable-next-line react-hooks/exhaustive-deps
  }, [isSubmitSuccessful]);

  const onSubmitHandler: SubmitHandler<LoginInput> = (values) => {
    // ? Executing the loginUser Mutation
    loginUser(values);
  };

  return (
    <section className="bg-ct-blue-600 min-h-screen grid place-items-center">
      <div className="w-full">
        <h1 className="text-4xl xl:text-6xl text-center font-[600] text-ct-yellow-600 mb-4">
          Welcome Back
        </h1>
        <h2 className="text-lg text-center mb-4 text-ct-dark-200">
          Login to have access
        </h2>
        <FormProvider {...methods}>
          <form
            onSubmit={handleSubmit(onSubmitHandler)}
            className="max-w-md w-full mx-auto overflow-hidden shadow-lg bg-ct-dark-200 rounded-2xl p-8 space-y-5"
          >
            <FormInput label="Email" name="email" type="email" />
            <FormInput label="Password" name="password" type="password" />

            <div className="text-right">
              <Link to="/forgotpassword" className="">
                Forgot Password?
              </Link>
            </div>
            <LoadingButton
              loading={store.requestLoading}
              textColor="text-ct-blue-600"
            >
              Login
            </LoadingButton>
            <span className="block">
              Need an account?{" "}
              <Link to="/register" className="text-ct-blue-600">
                Sign Up Here
              </Link>
            </span>
          </form>
        </FormProvider>
      </div>
    </section>
  );
};

export default LoginPage;
Conclusion
Congrats on reaching the end. In this article, you learned how to add a forgot/reset password feature to a React.js application. Also, you learned how to make mutations and queries with React Query.
You can find the React Query forgot/reset password source code on this GitHub repository https://github.com/wpcodevo/react-query-axios-tailwindcss/tree/react-query-tailwindcss-axios-reset-password.

