

This tutorial guides you through the process of integrating Google and GitHub OAuth into your Next.js 14 project using Supabase. If you’ve ever struggled with managing multiple passwords for different websites, you understand the importance of simplifying the sign-in process.
By incorporating OAuth sign-in options into our application, users can effortlessly access our platform without the need to remember passwords. Implementing OAuth from scratch can be challenging, but with Supabase, the backend server has already implemented it using recommended best practices.
Our focus in this tutorial will be on configuring OAuth applications on both Google and GitHub, setting up the providers on Supabase, and implementing the OAuth feature in our Next.js 14 application.
The tutorial’s source code is available on GitHub: https://github.com/wpcodevo/nextjs14-supabase-ssr-authentication
More practice:
- Implement Authentication with Supabase in Next.js 14
- Implement Authentication with tRPC in Next.js 14
- Implement Authentication with tRPC API in Next.js 14
- Using tRPC with Next.js 14, React Query and Prisma
- How to Set Up and Use React Query in Next.js 14
- Using React Query with Supabase in Next.js App Router
- How to Setup React Query in Next.js 13 App Directory
- React Query and Axios: User Registration and Email Verification
- Forgot/Reset Passwords with React Query and Axios
- How to Setup tRPC API Server & Client with Next.js and Prisma
- tRPC Server API with Next.js & PostgreSQL: Access & Refresh Tokens
- Full-Stack Next.js tRPC App: User Registration & Login Example
- Build a tRPC CRUD API Example with Next.js

How to Run the Next.js Application on Your Machine
Follow these steps to run the application on your machine:
- Begin by either downloading or cloning the project from its GitHub repository at https://github.com/wpcodevo/nextjs14-supabase-ssr-authentication. Open the source code in your preferred text editor.
- Duplicate the
example.envfile and rename the copy to.env. Retrieve both the Supabase URL and Anon key from your Supabase project, and then insert them into the respective variables within the.envfile. If you’re uncertain about where to find these credentials, refer to the ‘Create a Project on Supabase’ section for guidance. - Access the integrated terminal of your IDE and execute the command
pnpm installto install all the necessary dependencies. - Start the Next.js development server by running the command
pnpm dev. Once the server is operational, access the application in your browser to interact with the authentication flow. - To enable the Google and GitHub sign-in options, specific configurations are required in Supabase. For detailed instructions, refer to the guidance provided in the ‘Set up OAuth with Supabase in Next.js 14’ section if you are unfamiliar with the process.
Demo of the Google and GitHub OAuth Flow
In the Next.js 14 Supabase application, users can choose between two social login options: Google OAuth and GitHub OAuth. For this demonstration, I’ll showcase the GitHub OAuth process, as it closely resembles the steps for Google OAuth.
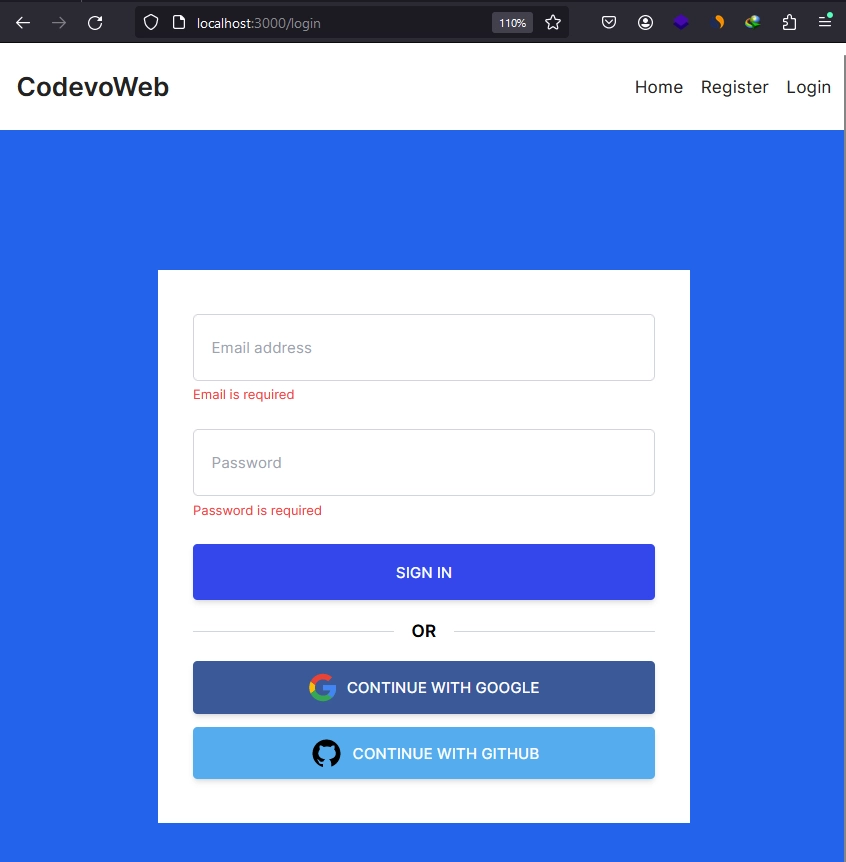
To log in using your GitHub account, click on the ‘Login‘ link in the navigation bar, which will take you to the login page. On this page, you’ll see a form with email and password input fields, accompanied by a submission button. Below the submit button, there are also buttons for Google and GitHub OAuth. Click on the ‘CONTINUE WITH GITHUB‘ button. Supabase will then generate the GitHub OAuth consent screen and redirect you to it.
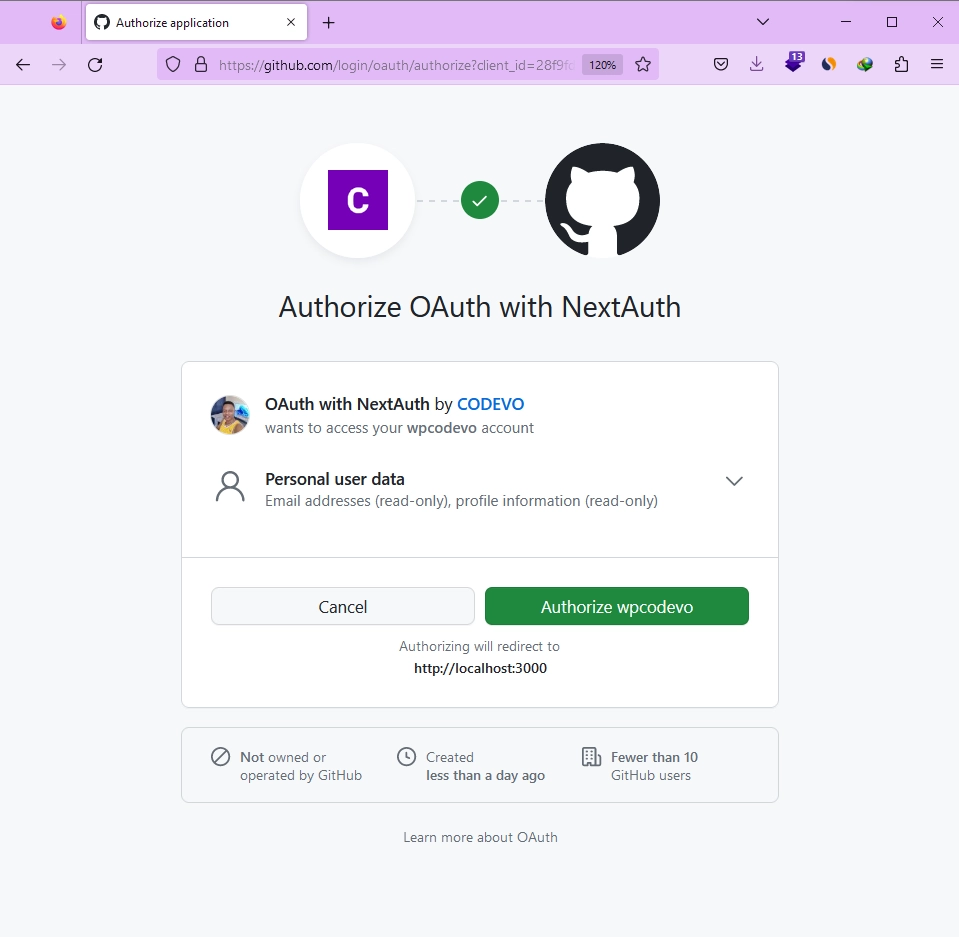
On the consent screen, assuming you are already logged into your GitHub account, you will be prompted to grant access to our application. Click on the green authorize button. Once you’ve completed this step, Supabase will upsert your credentials in their database.
Following that, they will redirect you to the /auth/callback route on our server. This route will extract a code that Supabase appended to the redirect URL and utilize it to make another request to Supabase, exchanging it for a session. Consequently, you will be automatically logged into the application.
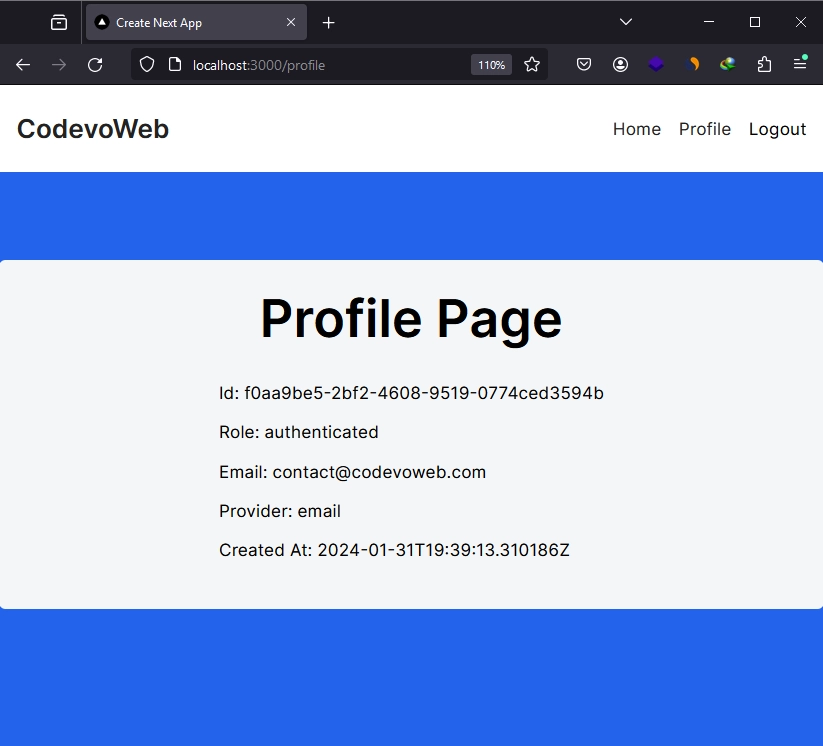
Now that you’ve successfully signed into the application, you can proceed to access protected pages, such as the profile page, where your account information is displayed. To log out, simply click on the ‘Logout‘ link in the navigation bar.
Create a Project on Supabase
I’ll assume you already have a Supabase project integrated with Next.js 14, and you want to add Google and GitHub OAuth to it. If you don’t have an existing project, you can follow the article ‘Implement Authentication with Supabase in Next.js 14‘. For those using an existing project, make sure to include your Supabase URL and Anon key in your .env file. If you’re unsure how to obtain them, follow these instructions:
- Visit the Supabase Website:
Open your web browser and go to the Supabase website. - Sign In:
Log in using your GitHub account. If you’re new to Supabase, visit the Sign Up page, and choose “Continue with GitHub” to create an account. - Create an Organization:
After signing up, log in to Supabase. You’ll be directed to the dashboard. Click “New Organization” to create one. Enter your organization name (e.g., your company name) and click “Create organization.” - Create a New Project:
Click “New Project” and select the organization. Provide a project name and generate a secure password. Once done, click “Create new project”. - Get the Project URL and Anon Key:
Return to your Next.js project and create a.envfile in the root directory. Copy the project URL and anon key from the Supabase project, then add them to the.envfile asNEXT_PUBLIC_SUPABASE_URLandNEXT_PUBLIC_SUPABASE_ANON_KEY. If you can’t locate them, click the Settings icon in the left sidebar. From the settings menu, select “API”, where you should find the Supabase URL and anon key.
.env
NEXT_PUBLIC_SUPABASE_ANON_KEY=
NEXT_PUBLIC_SUPABASE_URL=
Configure the Google and GitHub OAuth Providers on Supabase
Let’s take things to the next level and implement Google and GitHub OAuth in the authentication flow.
Generate the OAuth Credentials on GitHub
Follow these steps to register a GitHub OAuth app and obtain the Client ID and Secret for the Supabase project.
- Navigate to the “Authentication” section in the left sidebar of your Supabase project. Select ‘Providers’ from the authentication menu.
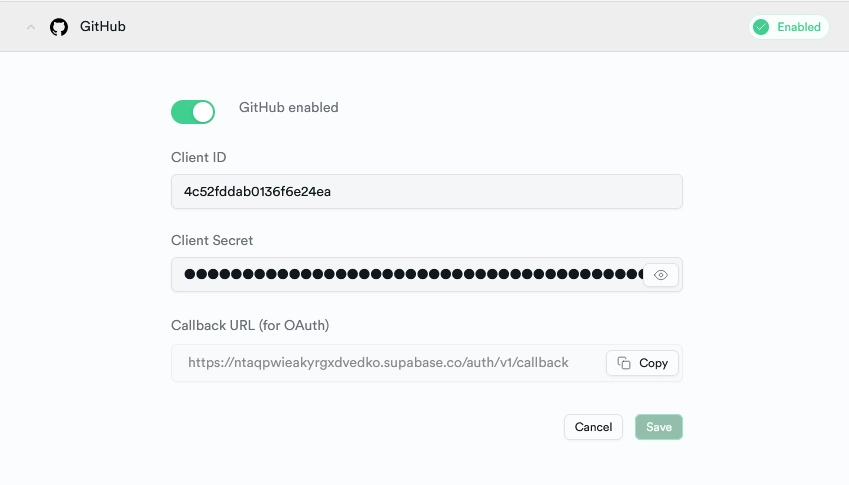
- Choose GitHub from the available providers to reveal a dropdown where you can configure the OAuth credentials. Enable it by toggling the radio button in the dropdown.
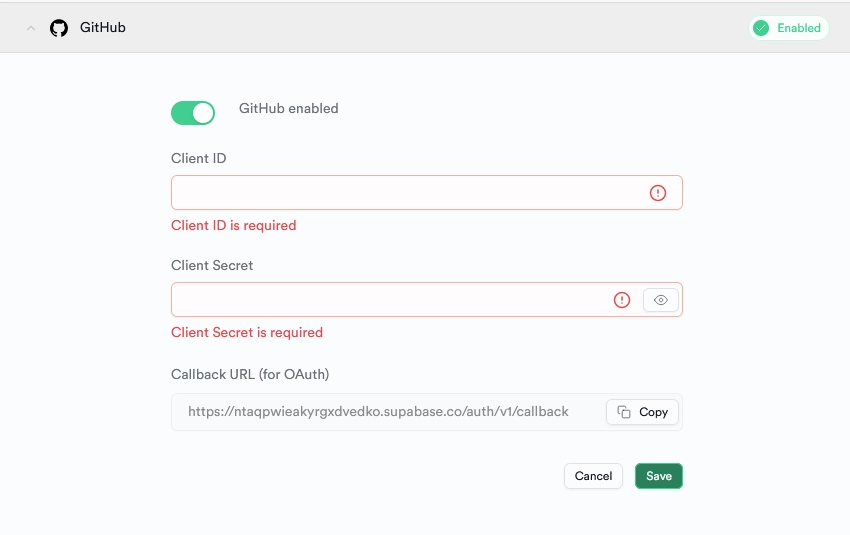
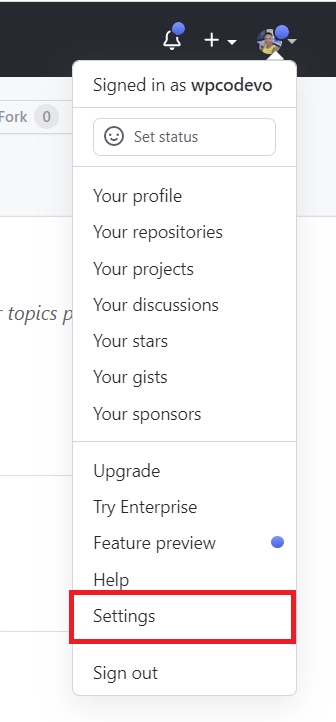
Take note of the Callback URL, as it will be needed to configure the OAuth app on GitHub. - Head to GitHub and sign in to your account if not already done. Click on your profile picture at the top right and choose “Settings” from the dropdown menu, redirecting you to the profile page.
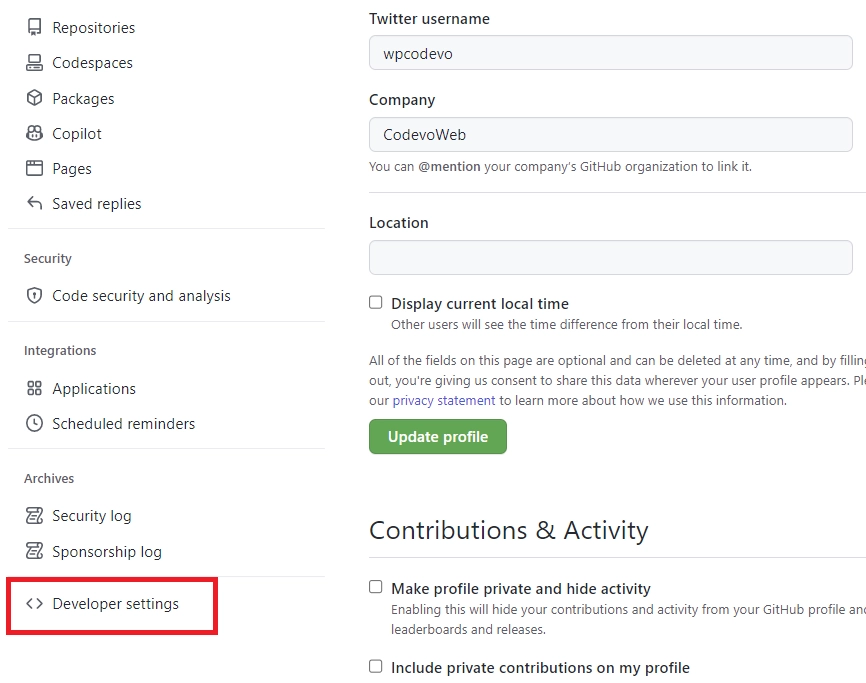
- Scroll down to locate the “Developer settings” section and click on it.
- On the Developer settings page, find “OAuth Apps” and select it. Under “OAuth Apps,” click the “New OAuth App” button.
- Complete the “Application name” and “Homepage URL” fields with the relevant information for your app. Copy the “Authorization callback URL” from the Supabase GitHub provider dropdown and paste it into the corresponding field. This URL is where GitHub redirects users after authorizing the app.
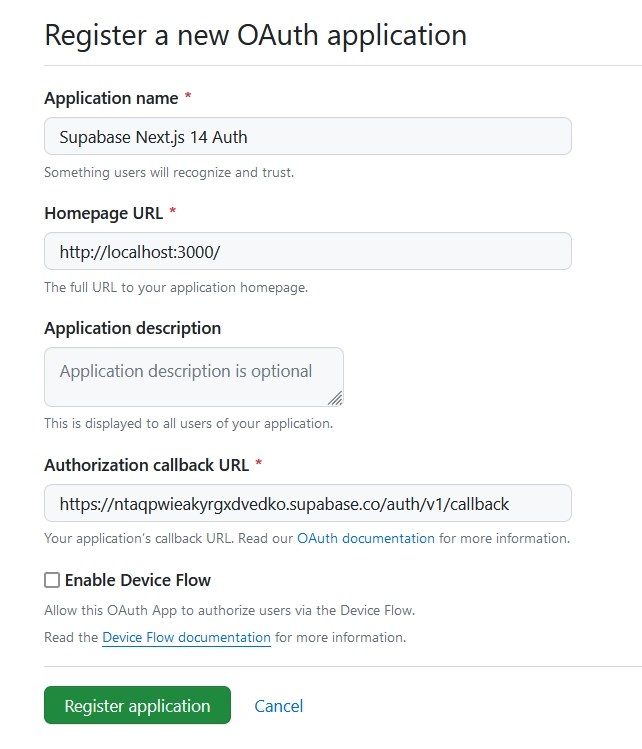
Once done, click “Register application” to create the OAuth App. - Congratulations, your application has been created! You’ll be redirected to the application details page, where you can access the “Client ID” and generate the “Client Secret” keys.
To generate the OAuth client secret, click “Generate a new client secret.” GitHub will prompt you to confirm your identity before generating the client secret.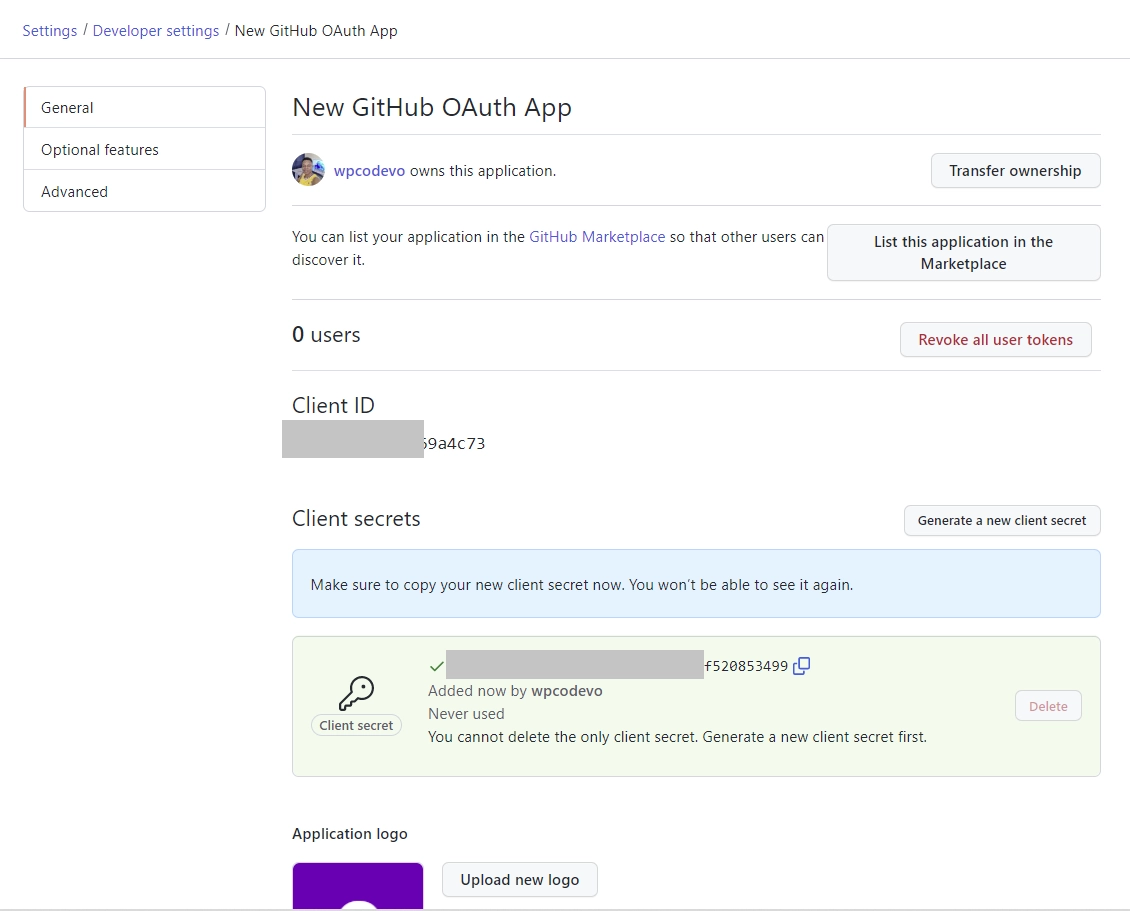
- Now that the GitHub OAuth client secret is generated, add it along with the client ID on Supabase. Enter the Client ID and secret in the GitHub dropdown on Supabase and click ‘save’.
Generate the OAuth Credentials on Google
In this section, you will learn how to acquire the Google OAuth2 client ID and secret from the Google Cloud Console and use them to configure the Google OAuth provider on Supabase. Follow these steps:
- Navigate to the “Authentication” section in the left sidebar of your Supabase project and select ‘Providers’. Choose Google from the list of available providers, unveiling a dropdown where you can input the Google OAuth credentials.
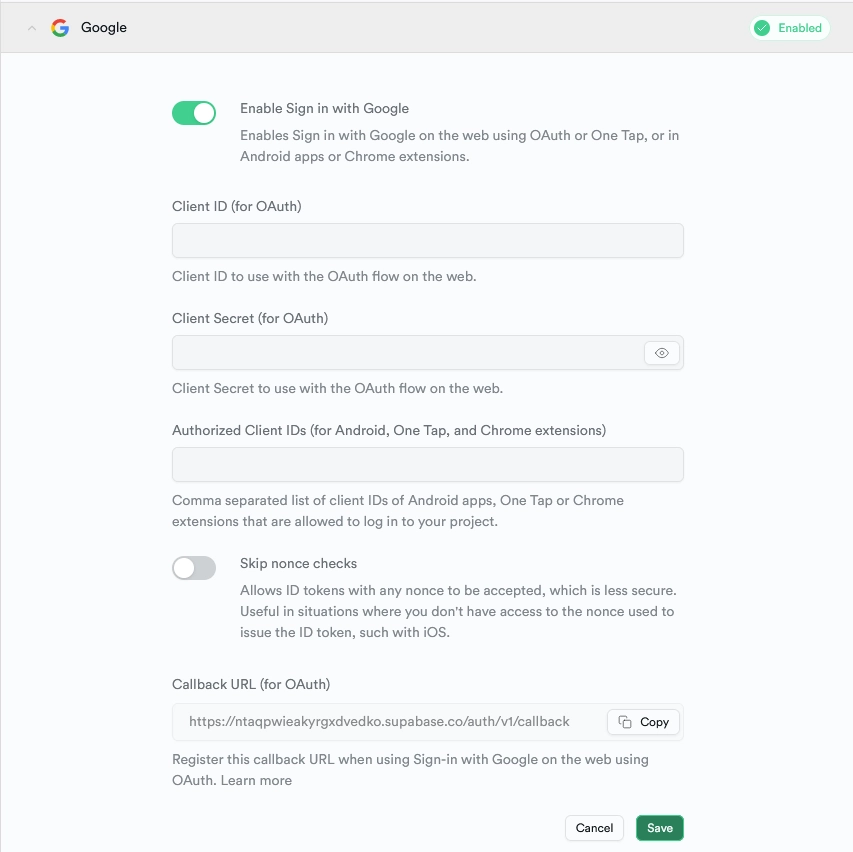
Take note of the callback URL, as it will be necessary when setting up OAuth on the Google Cloud Console. - Visit https://console.developers.google.com/ and ensure you are signed in to your Google account.
- Click the dropdown menu at the top of the page to reveal a pop-up window. From there, you can either select an existing project or create a new one.
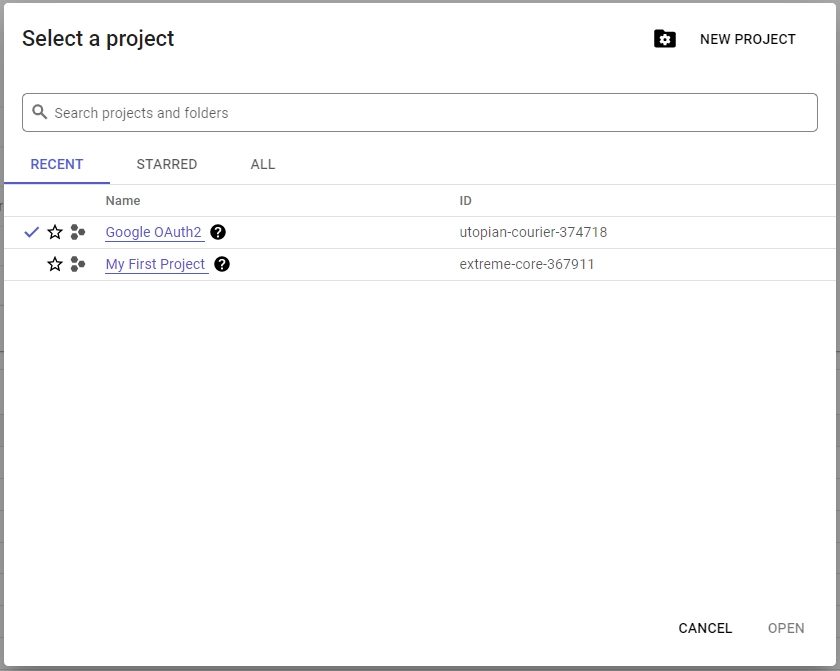
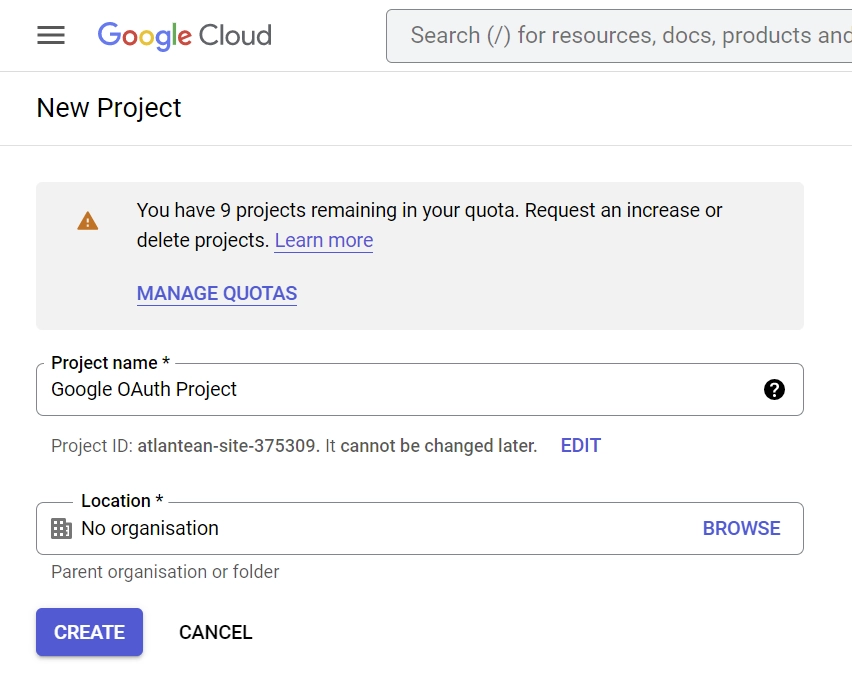
- To create a new project, click the “New Project” button in the top-right corner of the pop-up window. Provide a name for your project and click “Create” to finish the process.
- Once your project is created, click “SELECT PROJECT” from the notifications.

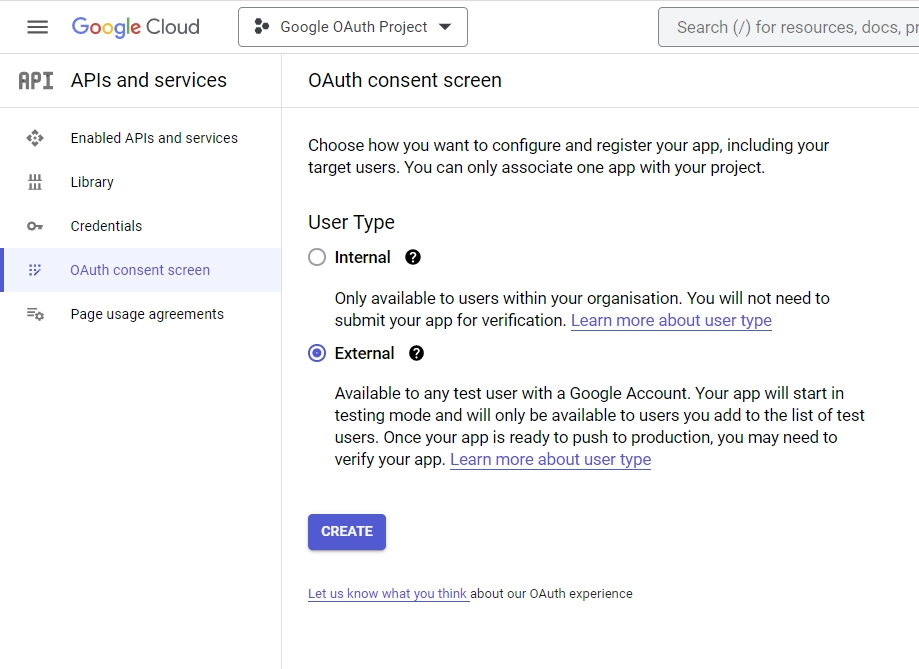
- Access the “OAuth consent screen” in the left sidebar. Choose “External” as the “User Type” and click “CREATE”.
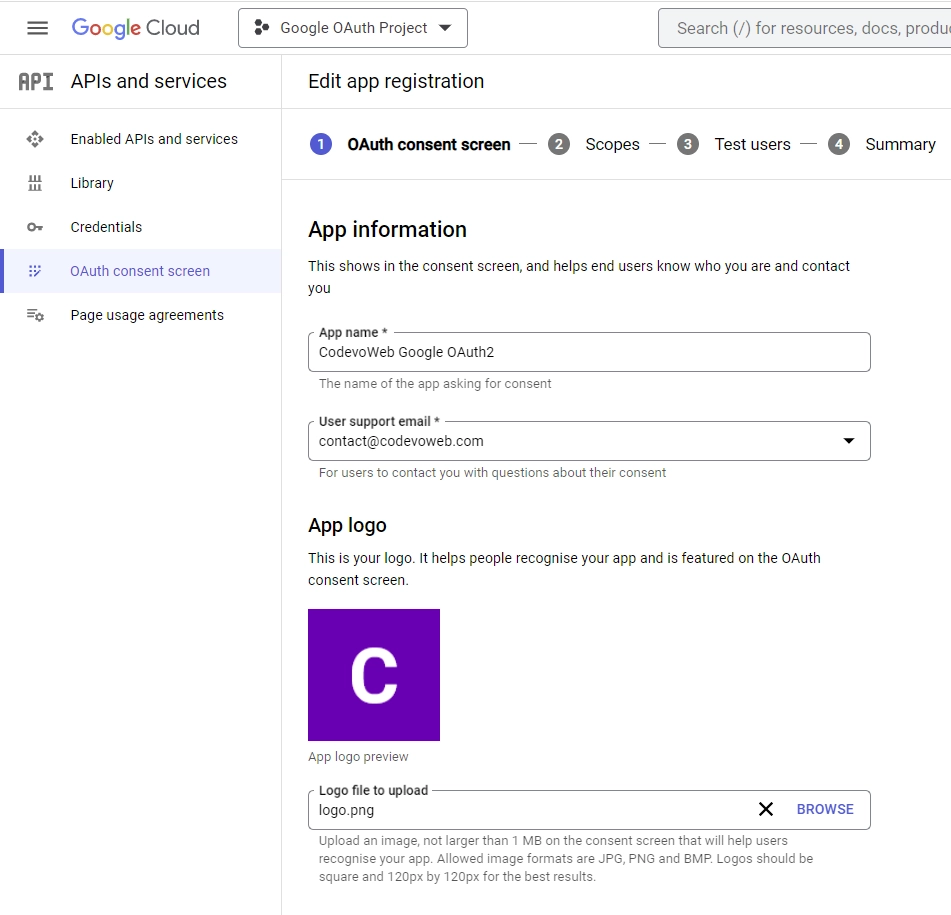
- On the “Edit app registration” screen, complete the necessary details in the “App information” section, including a logo for the consent screen.
Under “App domain,” provide links to your homepage, privacy policy, and terms of service pages. Add your email address in the “Developer contact information” section and click “SAVE AND CONTINUE”.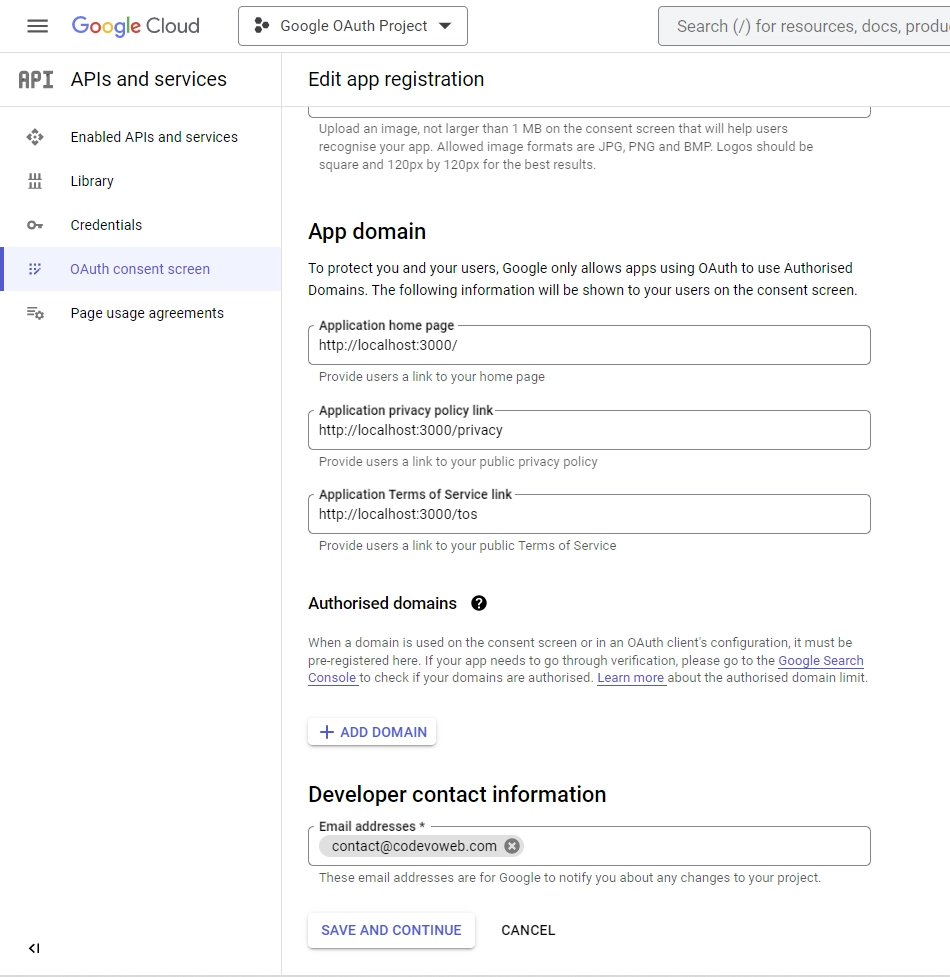
- On the “Scopes” screen, click “ADD OR REMOVE SCOPES,” select
.../auth/userinfo.emailand.../auth/userinfo.profile, and click “UPDATE.” Scroll down and click “SAVE AND CONTINUE”.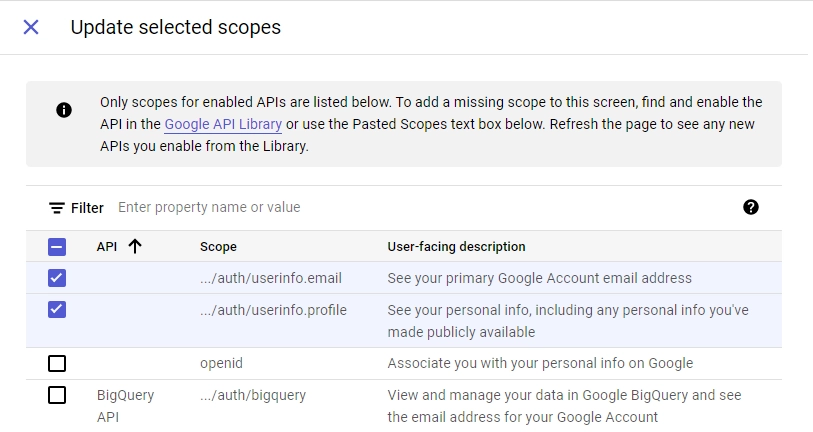
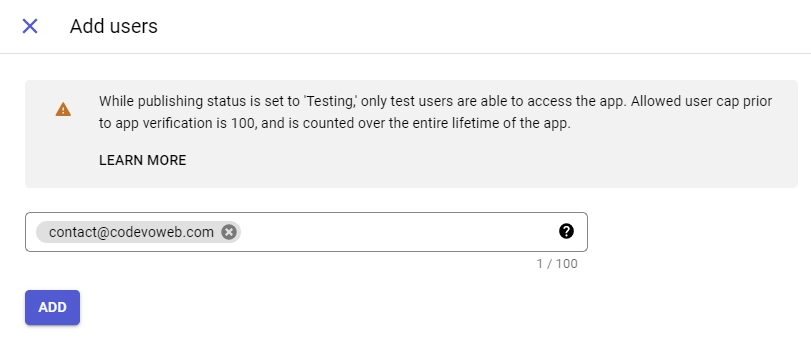
- On the “Test users” screen, include the email addresses of Google accounts authorized to test your app in sandbox mode. Click “ADD USERS”, input the email addresses, and click “SAVE AND CONTINUE”.
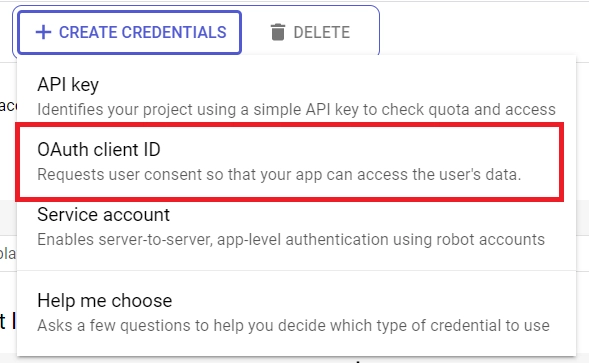
- Navigate to “Credentials” in the left sidebar. Click “CREATE CREDENTIALS” and choose “OAuth client ID”.
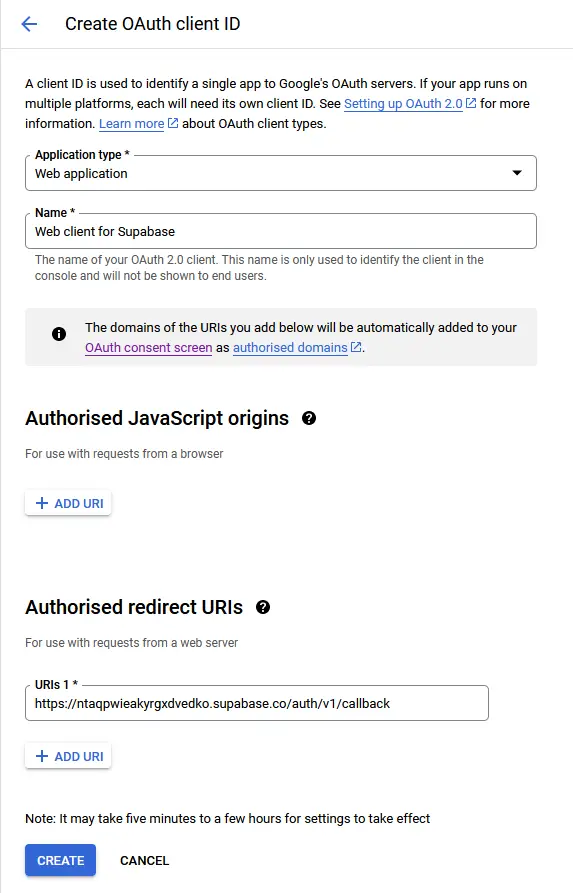
- Select “Web application” as the application type, provide a name for your app, and input the authorized callback URI from the Google OAuth provider dropdown on Supabase. Click “Create” once done.
Once the client ID is generated, copy both the client ID and secret from the “Credentials” page. Paste them into the Google provider dropdown on Supabase and click ‘Save’ to complete the process.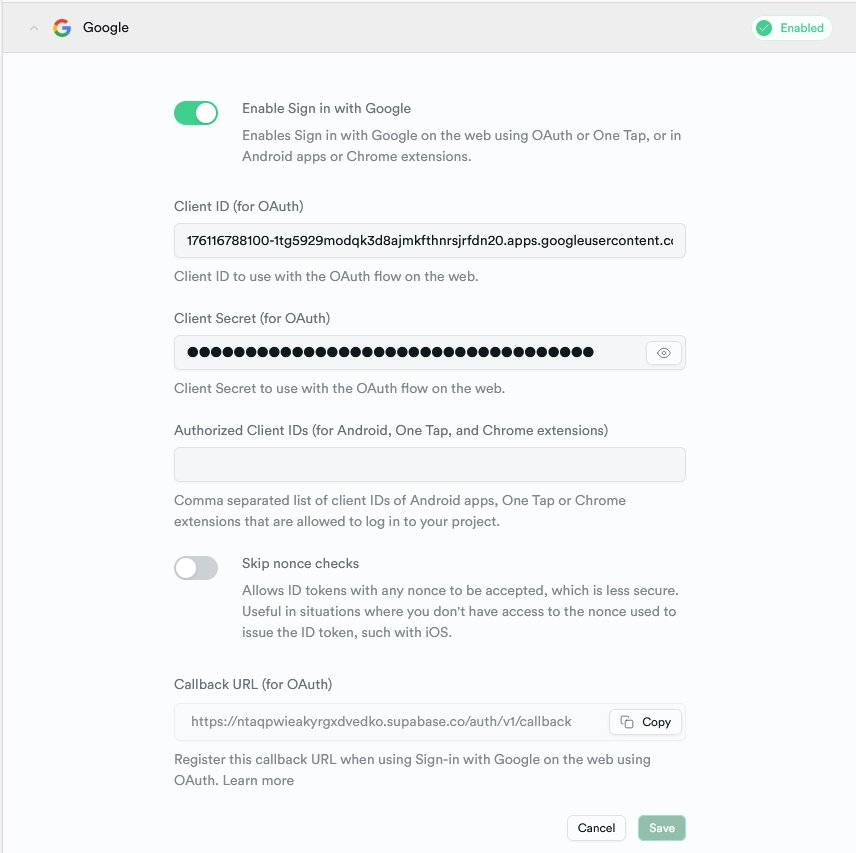
Create a Supabase Browser Client
Now that you have configured the Google and GitHub OAuth providers on Supabase, we can proceed to create a Supabase browser client that will enable us to integrate the OAuth sign-in options into our Next.js 14 application.
To set up the client, you first need to install the @supabase/ssr package if you haven’t already done so. Once installed, create a lib directory at the root level of your project. Inside the lib folder, create another folder named supabase. Then, within the supabase folder, create a client.ts file and add the following code:
lib/supabase/client.ts
import { useMemo } from 'react';
import { createBrowserClient } from '@supabase/ssr';

export function getSupabaseBrowserClient() {
  return createBrowserClient(
    process.env.NEXT_PUBLIC_SUPABASE_URL!,
    process.env.NEXT_PUBLIC_SUPABASE_ANON_KEY!
  );
}

function useSupabaseClient() {
  return useMemo(getSupabaseBrowserClient, []);
}

export default useSupabaseClient;
This client can only be used from within client components to interact with the Supabase backend for tasks such as authentication, database queries, and other Supabase-related operations. The useMemo hook ensures optimal performance and prevents unnecessary re-creation of the client during component re-renders.
Implement Google and GitHub OAuth
To integrate Google and GitHub OAuth providers into your Next.js 14 project using Supabase, open the client component where you render the OAuth buttons and create two functions: loginWithGitHub and loginWithGoogle. Below is an overview of both functions:
loginWithGoogle– This function uses thesupabase.auth.signInWithOAuthmethod and provides ‘google‘ as the provider. When invoked, it generates the Google OAuth consent URL and redirects the user to it.loginWithGitHub– This function is similar to theloginWithGooglefunction, except that it uses ‘github‘ as the provider. When invoked, it generates the GitHub OAuth consent screen URL and redirects the user accordingly.
app/login/login-form.tsx
'use client';

import { LoginUserInput, loginUserSchema } from '@/lib/user-schema';
import { zodResolver } from '@hookform/resolvers/zod';
import Image from 'next/image';
import { useRouter } from 'next/navigation';
import { useState, useTransition } from 'react';
import { SubmitHandler, useForm } from 'react-hook-form';
import { signInWithEmailAndPassword } from '../_actions';
import toast from 'react-hot-toast';
import useSupabaseClient from '@/lib/supabase/client';

export const LoginForm = () => {
  const router = useRouter();
  const [error, setError] = useState('');
  const [isPending, startTransition] = useTransition();
  const supabase = useSupabaseClient();

  const methods = useForm<LoginUserInput>({
    resolver: zodResolver(loginUserSchema),
  });

  const {
    reset,
    handleSubmit,
    register,
    formState: { errors },
  } = methods;

  const onSubmitHandler: SubmitHandler<LoginUserInput> = async (values) => {
    startTransition(async () => {
      const result = await signInWithEmailAndPassword(values);

      const { error } = JSON.parse(result);
      if (error?.message) {
        setError(error.message);
        toast.error(error.message);
        console.log('Error message', error.message);
        reset({ password: '' });
        return;
      }

      setError('');
      toast.success('successfully logged in');
      router.push('/');
    });
  };

  const loginWithGitHub = () => {
    supabase.auth.signInWithOAuth({
      provider: 'github',
      options: {
        redirectTo: `${location.origin}/auth/callback`,
      },
    });
  };

  const loginWithGoogle = () => {
    supabase.auth.signInWithOAuth({
      provider: 'google',
      options: {
        redirectTo: `${location.origin}/auth/callback`,
      },
    });
  };

  const input_style =
    'form-control block w-full px-4 py-5 text-sm font-normal text-gray-700 bg-white bg-clip-padding border border-solid border-gray-300 rounded transition ease-in-out m-0 focus:text-gray-700 focus:bg-white focus:border-blue-600 focus:outline-none';

  return (
    <form onSubmit={handleSubmit(onSubmitHandler)}>
      {error && (
        <p className='text-center bg-red-300 py-4 mb-6 rounded'>{error}</p>
      )}
      <div className='mb-6'>
        <input
          type='email'
          {...register('email')}
          placeholder='Email address'
          className={`${input_style}`}
        />
        {errors['email'] && (
          <span className='text-red-500 text-xs pt-1 block'>
            {errors['email']?.message as string}
          </span>
        )}
      </div>
      <div className='mb-6'>
        <input
          type='password'
          {...register('password')}
          placeholder='Password'
          className={`${input_style}`}
        />
        {errors['password'] && (
          <span className='text-red-500 text-xs pt-1 block'>
            {errors['password']?.message as string}
          </span>
        )}
      </div>
      <button
        type='submit'
        style={{ backgroundColor: `${isPending ? '#ccc' : '#3446eb'}` }}
        className='inline-block px-7 py-4 bg-blue-600 text-white font-medium text-sm leading-snug uppercase rounded shadow-md hover:bg-blue-700 hover:shadow-lg focus:bg-blue-700 focus:shadow-lg focus:outline-none focus:ring-0 active:bg-blue-800 active:shadow-lg transition duration-150 ease-in-out w-full'
        disabled={isPending}
      >
        {isPending ? 'loading...' : 'Sign In'}
      </button>

      <div className='flex items-center my-4 before:flex-1 before:border-t before:border-gray-300 before:mt-0.5 after:flex-1 after:border-t after:border-gray-300 after:mt-0.5'>
        <p className='text-center font-semibold mx-4 mb-0'>OR</p>
      </div>

      <a
        className='px-7 py-2 text-white font-medium text-sm leading-snug uppercase rounded shadow-md hover:shadow-lg focus:shadow-lg focus:outline-none focus:ring-0 active:shadow-lg transition duration-150 ease-in-out w-full flex justify-center items-center mb-3'
        style={{ backgroundColor: '#3b5998' }}
        onClick={loginWithGoogle}
        role='button'
      >
        <Image
          className='pr-2'
          src='/images/google.svg'
          alt=''
          style={{ height: '2rem' }}
          width={35}
          height={35}
        />
        Continue with Google
      </a>
      <a
        className='px-7 py-2 text-white font-medium text-sm leading-snug uppercase rounded shadow-md hover:shadow-lg focus:shadow-lg focus:outline-none focus:ring-0 active:shadow-lg transition duration-150 ease-in-out w-full flex justify-center items-center'
        style={{ backgroundColor: '#55acee' }}
        onClick={loginWithGitHub}
        role='button'
      >
        <Image
          className='pr-2'
          src='/images/github.svg'
          alt=''
          width={40}
          height={40}
        />
        Continue with GitHub
      </a>
    </form>
  );
};
The redirectTo option is where Supabase will redirect the user after the successful OAuth authentication. Supabase will also append a code to the URL, which our application can use to make another request to Supabase in exchange for the user’s session.
Create a Route to Exchange the OAuth Code for a Session
Now let’s move on to creating the route responsible for exchanging the code for the user’s session. As this route will run on the server, we need to create a Supabase server client to interact with the Supabase backend. To create the route, follow these steps:
- Navigate to the
appdirectory and create a new folder namedauth. - Inside the
authfolder, create a subdirectory calledcallback. - Within the
callbackfolder, create aroute.tsfile and add the following code.
app/auth/callback/route.ts
import { cookies } from 'next/headers';
import { NextResponse } from 'next/server';
import { type CookieOptions, createServerClient } from '@supabase/ssr';

export async function GET(request: Request) {
  const { searchParams, origin } = new URL(request.url);
  const code = searchParams.get('code');
  const next = searchParams.get('next') ?? '/';

  if (code) {
    const cookieStore = cookies();

    const supabase = createServerClient(
      process.env.NEXT_PUBLIC_SUPABASE_URL!,
      process.env.NEXT_PUBLIC_SUPABASE_ANON_KEY!,
      {
        cookies: {
          get(name: string) {
            return cookieStore.get(name)?.value;
          },
          set(name: string, value: string, options: CookieOptions) {
            cookieStore.set({ name, value, ...options });
          },
          remove(name: string, options: CookieOptions) {
            cookieStore.delete({ name, ...options });
          },
        },
      }
    );
    const { error } = await supabase.auth.exchangeCodeForSession(code);
    if (!error) {
      return NextResponse.redirect(`${origin}${next}`);
    }
  }

  // return the user to an error page with instructions
  return NextResponse.redirect(`${origin}/auth/auth-code-error`);
}
In the above code, we extract the code from the URL search parameters. Next, we initialize a Supabase server client and utilize this client to make an HTTP request to the Supabase backend to exchange the code for a user session.
Create Middleware to Refresh Expired Cookies
Finally, let’s create a Next.js middleware that will refresh expired cookies even before the route gets loaded. Typically, when a user leaves their browser tab open and their cookies expire, attempting to access a protected route may prompt them to authenticate, even though they were previously logged in. This occurs because the request made to Supabase was based on old cookies that have expired.
Therefore, the Next.js middleware will allow us to refresh the cookies and attach them to the response body. To implement this, create a middleware.ts file and add the following code:
middleware.ts
import { createServerClient, type CookieOptions } from '@supabase/ssr';
import { NextResponse, type NextRequest } from 'next/server';

export async function middleware(request: NextRequest) {
  let response = NextResponse.next({
    request: {
      headers: request.headers,
    },
  });

  const supabase = createServerClient(
    process.env.NEXT_PUBLIC_SUPABASE_URL!,
    process.env.NEXT_PUBLIC_SUPABASE_ANON_KEY!,
    {
      cookies: {
        get(name: string) {
          return request.cookies.get(name)?.value;
        },
        set(name: string, value: string, options: CookieOptions) {
          request.cookies.set({
            name,
            value,
            ...options,
          });
          response = NextResponse.next({
            request: {
              headers: request.headers,
            },
          });
          response.cookies.set({
            name,
            value,
            ...options,
          });
        },
        remove(name: string, options: CookieOptions) {
          request.cookies.set({
            name,
            value: '',
            ...options,
          });
          response = NextResponse.next({
            request: {
              headers: request.headers,
            },
          });
          response.cookies.set({
            name,
            value: '',
            ...options,
          });
        },
      },
    }
  );

  await supabase.auth.getUser();

  return response;
}

export const config = {
  matcher: [
    /*
     * Match all request paths except for the ones starting with:
     * - _next/static (static files)
     * - _next/image (image optimization files)
     * - favicon.ico (favicon file)
     * Feel free to modify this pattern to include more paths.
     */
    '/((?!_next/static|_next/image|favicon.ico).*)',
  ],
};
Conclusion
And there you have it! In this tutorial, you learned how to integrate Google and GitHub OAuth providers into your Next.js 14 application using Supabase. I hope you found this guide helpful and enjoyable. If you have any questions or feedback, feel free to leave them in the comment section. Thanks for reading!
what about using github or google for registration as well?
It’s the same process. You just need to include both the Google and GitHub OAuth buttons on the registration page.
Thanks for the response, yea i was just trying to figure out the response that oAuth gives you, cause i need to create a user off of the response. I was trying to figure out if its the same response so i can do a check against my user base for already registered users, and want to make sure there is no discrepancy in if they signed up with email or oAuth.