
When we build full-stack TypeScript apps that comprise a RESTful API and a frontend, it becomes challenging to statically type the API endpoints and share the types between the server and client.
Before the release of tRPC, GraphQL was the dominant library for building totally type-safe applications. This approach works amazing but we have to depend on code generation and extra dependencies for it to work.
In addition to the complexities associated with GraphQL, we still have to maintain the schemas defined on the backend and install extra dependencies to smoothen the process.
This article will teach you how to set up a tRPC API server and client with Next.js, PostgreSQL, React Query, Prisma, Redis, and Docker-compose.
tRPC API Server and Client with Next.js, PostgreSQL, and Prisma
- How to Setup tRPC API Server & Client with Next.js and Prisma
- Build tRPC API with Next.js & PostgreSQL: Access & Refresh Tokens
- Full-Stack Next.js tRPC App: User Registration & Login Example
- Build a tRPC CRUD API Example with Next.js
Related articles:
- Build tRPC API with React.js, Node.js & MongoDB: Project Setup
- Build tRPC API with React.js & Node.js: Access and Refresh Tokens
- Full-Stack App tRPC, React.js, & Node.js: JWT Authentication
- Build Full-Stack tRPC CRUD Application with Node.js, and React.js
Prerequisites
Before going further, you should:
- Have Node.js installed on your PC
- Have basic knowledge of JavaScript and TypeScript
- Have basic knowledge of SQL, how to use pgAdmin and how ORMs work
- Be comfortable with React.js and TailwindCss
What you will learn
- How to create a PostgreSQL database with Docker and Docker-compose
- Data modeling with Prisma
- How to create a simple tRPC server with Next.js
- How to use Next.js as a monolithic repository
- How to make tRPC requests with Next.js
Step 1 – Setup Next.js as a Monolithic Repository
In this section, you will generate a simple Next.js boilerplate application with the Next.js scaffolding tool and make some tweaks to convert the project to a monorepo.
In this example, you can name your project trpc-nextjs .
yarn create next-app trpc-nextjs --typescript
# or
npx create-next-app@latest trpc-nextjs --ts
Once the project has been generated, change the directory into it in the terminal and open it with your preferred text editor (VS Code):
cd trpc-nextjs
code .
Create an src folder and move the pages , styles and public folders into it. Once that is done, your src folder structure should look somewhat like this:
src/
├── pages/
│ ├── api/
│ │ └── hello.ts
│ ├── index.tsx
│ └── _app.tsx
├── public/
│ ├── favicon.ico
│ └── vercel.svg
└── styles/
  ├── globals.css
  └── Home.module.css
If you are contemplating why we moved the folders into a newly-created src folder, don’t worry since Next.js supports it. This will make your project easier to use and maintain throughout its life cycle.
After that, open the tsconfig.json file and replace its content with the following configurations recommended by the tRPC team.
tsconfig.json
{
  "compilerOptions": {
    "target": "es6",
    "lib": ["dom", "dom.iterable", "esnext"],
    "allowJs": true,
    "skipLibCheck": true,
    "strict": true,
    "strictNullChecks": true,
    "forceConsistentCasingInFileNames": true,
    "noEmit": true,
    "esModuleInterop": true,
    "module": "esnext",
    "moduleResolution": "node",
    "resolveJsonModule": true,
    "noUncheckedIndexedAccess": true,
    "isolatedModules": true,
    "jsx": "preserve",
    "incremental": true,
    "baseUrl": ".",
    "paths": {
      "~/*": ["src/*"]
    }
  },
  "include": [
    "next-env.d.ts",
    "**/*.ts",
    "**/*.tsx",
    "./*.js",
    "./src/**/*.js"
  ],
  "exclude": ["node_modules"]
}
Now run yarn dev or npm run dev to start the Next.js development server and open the URL in the browser to make sure everything is working correctly.
Step 2 – Setup Redis and PostgreSQL with Docker
In this step, you will set up Redis and PostgreSQL servers with Docker and Docker-compose. To do that, you will create a docker-compose.yml file and add the Docker-compose configurations needed to start the Redis and PostgreSQL Docker containers.
Adding the Docker-compose Configurations
Now create a docker-compose.yml file in the project folder and add the following configurations:
docker-compose.yml
version: '3'
services:
  postgres:
    image: postgres
    container_name: postgres
    ports:
      - '6500:5432'
    restart: always
    env_file:
      - ./.env
    volumes:
      - postgres-db:/var/lib/postgresql/data
  redis:
    image: redis:latest
    container_name: redis
    ports:
      - '6379:6379'
    volumes:
      - redis:/data
volumes:
  postgres-db:
  redis:
Adding the PostgreSQL Docker Image Credentials
Here, you will add the credentials required by the PostgreSQL Docker image to a .env file. This file will contain the Postgres user, database name, Postgres password, and Postgres host.
Create a .env file in the project folder and add the following environment variables.
.env
DATABASE_PORT=6500
POSTGRES_PASSWORD=password123
POSTGRES_USER=postgres
POSTGRES_DB=trpc-nextjs
POSTGRES_HOST=postgres
POSTGRES_HOSTNAME=127.0.0.1
Starting the Redis and PostgreSQL Docker Containers
In this section, you will start the Redis and PostgreSQL Docker containers. To do that, open your terminal and run the following command:
docker-compose up -d
You can run docker ps to see the running Docker containers in the terminal.
Also, you can stop the containers with this command:
docker-compose down
Step 3 – Setup Prisma with PostgreSQL
Prisma is an ORM used mostly in Node.js projects to query and mutate either SQL or NoSQL databases.
Now let’s install the Prisma client and CLI tool with the following command:
yarn add @prisma/client && yarn add -D prisma
# or
npm install @prisma/client && npm install -D prisma
Then initialize a new Prisma project with this command:
npx prisma init
# or
yarn prisma init
The above command will generate a prisma folder containing a schema.prisma file in the root project folder.
Also, the Prisma CLI will add the database URL to the .env file. Open the .env file and update the DATABASE_URL added by the Prisma CLI with the PostgreSQL credentials.
.env
DATABASE_PORT=6500
POSTGRES_PASSWORD=password123
POSTGRES_USER=postgres
POSTGRES_DB=trpc-nextjs
POSTGRES_HOST=postgres
POSTGRES_HOSTNAME=127.0.0.1

DATABASE_URL="postgresql://postgres:password123@localhost:6500/trpc-nexjs?schema=public"
Creating the Database Models with Prisma
For testing purposes, let’s create a simple model with Prisma. In the next tutorial, we will add more complex models to help us implement JWT authentication with Next.js.
// This is your Prisma schema file,
// learn more about it in the docs: https://pris.ly/d/prisma-schema
generator client {
provider = "prisma-client-js"
}
datasource db {
provider = "postgresql"
url = env("DATABASE_URL")
}
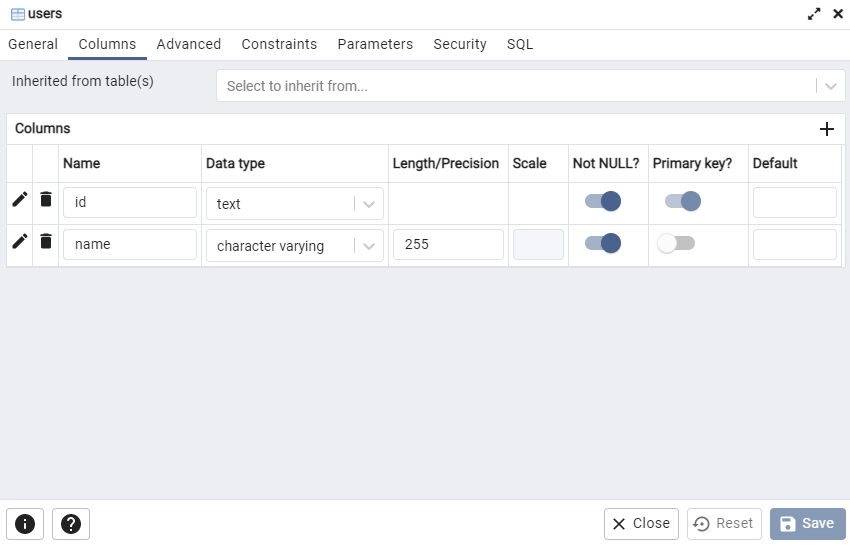
model User{
@@map(name: "users")
id String @id @default(uuid())
name String @db.VarChar(255)
}
In the above code, we created a User model and used the @@map(name: "users") Prisma attribute to change the table name in the SQL code.
Also, we added an ID and name columns to the users table. The @default(uuid()) Prisma attribute sets a default UUID value for the ID column in the Postgres database.
Migrating the Prisma Schema to the PostgreSQL Database
The Prisma CLI provides us with an imperative database schema migration tool that will enable us to:
- Keep the Prisma schema in sync with the database schema
- Maintain existing data in the database
Open the package.json file and add the following Prisma scripts:
package.json
{
"scripts": {
    "db:migrate": "npx prisma migrate dev --name user-entity --create-only && yarn prisma generate",
    "db:push": "npx prisma db push"
  },
}
--name– sets the name of the migration file. Feel free to change the migration name.--create-only– this command creates the migration without applying itdb:migrate– this command creates a new Prisma migration file based on the defined schema and also generates the TypeScript types.db:push– this command pushes the Prisma migration file to the PostgreSQL database.
Now make sure the PostgreSQL Docker container is running and execute the following command to create the Prisma migration and push the changes to the database.
yarn db:migrate && yarn db:push
# or
npm run db:migrate && npm run db:push
If you are familiar with pgAdmin, log in with the Postgres credentials defined in the .env file to see the SQL table added by Prisma.
Step 4 – Creating the Next.js tRPC Server
In this step, you will create the tRPC server and write the code needed to connect the tRPC server to the Redis and PostgreSQL Docker containers.
To do that, install the following dependencies:
Installing the tRPC dependencies
yarn add @trpc/server@next @trpc/next@next superjson redis
# or
npm install @trpc/server@next @trpc/next@next superjson redis
@trpc/server– a library for creating the tRPC procedures (endpoints) and routers@trpc/next– a tRPC binding that connects the tRPC router to Next.jssuperjson– used as the Next.js tRPC transformer to safely serialize JavaScript expressions to a superset of JSON.redis– a JavaScript library for communicating with a Redis server
Connecting to the Redis and PostgreSQL Containers
Now that we have the Redis and PostgreSQL Docker containers running, let’s create some utility functions to connect them to the Next.js tRPC server.
Connecting to the Redis Server
Create a src/server/utils/connectRedis.ts file and add the following code to connect the Next.js server to the Redis Docker container.
src/server/utils/connectRedis.ts
import { createClient } from 'redis';

const redisUrl = `redis://localhost:6379`;
const redisClient = createClient({
  url: redisUrl,
});

const connectRedis = async () => {
  try {
    await redisClient.connect();
    console.log('? Redis client connected...');
    redisClient.set(
      'tRPC',
      'Welcome to tRPC with Next.js, Prisma and Typescript!'
    );
  } catch (err: any) {
    console.log(err.message);
    process.exit(1);
  }
};

connectRedis();

redisClient.on('error', (err) => console.log(err));

export default redisClient;
In the above, we evoked the redisClient.set() method to add a message with a “tRPC” key to the Redis database. Later, we will retrieve the message and send it to the Next.js tRPC client.
Connecting to the PostgreSQL Server
Create a src/server/utils/prisma.ts file and add these code snippets to connect the Next.js server to the Postgres database.
src/server/utils/prisma.ts
import { PrismaClient } from '@prisma/client';

declare global {
  var prisma: PrismaClient | undefined;
}

export const prisma = global.prisma || new PrismaClient();

if (process.env.NODE_ENV !== 'production') {
  global.prisma = prisma;
}

async function connectDB() {
  try {
    await prisma.$connect();
    console.log('? Database connected successfully');
  } catch (error) {
    console.log(error);
    process.exit(1);
  } finally {
    await prisma.$disconnect();
  }
}

export default connectDB;
Creating the tRPC Context and Routes
With that out of the way, let’s create the tRPC context and the routes. The context is used to pass contextual data to the resolvers.
To be precise, the context function will be evoked for every incoming request and the results will be passed to all the resolvers.
Creating the tRPC Context
src/server/createContext.ts
import { inferAsyncReturnType } from "@trpc/server";
import { NextApiRequest, NextApiResponse } from "next";

export function createContext({
  req,
  res,
}: {
  req: NextApiRequest;
  res: NextApiResponse;
}) {
  return { req, res };
}

export type Context = inferAsyncReturnType<typeof createContext>;
In the above, we inferred the data types from the createContext() function. The inferred type will be passed as a generic to the tRPC router to get the typed context object.
Initialize the tRPC Server
At this point, we are now ready to initialize the tRPC server. To do this, we’ll evoke the initTRPC method, append the Context we created above, call the .create() method and pass superjson as the transformer.
src/server/createRouter.ts
import { initTRPC } from "@trpc/server";
import superjson from "superjson";
import { Context } from "./createContext";

export const t = initTRPC.context<Context>().create({
  transformer: superjson,
});
Create the tRPC Router
Here, let’s create a router to manage the tRPC endpoints. The router will enable us to add:
- Query procedures (endpoints) – to fetch data
- Mutation procedures (endpoints) – to modify data. This will allow us to perform the Create/Update/Delete operations.
- Subscription procedures (endpoints) – to subscribe to data via WebSockets
So, create a src/server/routers/app.routes.ts file and add the following code:
src/server/routers/app.routes.ts
import { t } from "../createRouter";
import redisClient from "../utils/connectRedis";
import connectDB from "../utils/prisma";

// Connect to Prisma
connectDB();

export const appRouter = t.router({
  getHello: t.procedure.query(async ({ ctx }) => {
    const message = await redisClient.get("trpc");
    return { message };
  }),
});

export type AppRouter = typeof appRouter;
Quite a lot happening in the above, let’s break it down:
- First, we evoked the
connectDB()utility function to connect the Next.js tRPC server to the Postgres database. - Next, we added a “getHello” query procedure to the router and returned the message we stored in the Redis database to the client.
- Lastly, we exported the AppRouter type that will be used by the tRPC client to know the different queries, mutations, and subscriptions available on the Next.js tRPC server.
Adding the tRPC Routes to the Next.js API Router
With all the above configurations in place, let’s create a dynamic Next.js API route for the tRPC router.
src/pages/api/trpc[trpc].ts
import * as trpcNext from "@trpc/server/adapters/next";
import { appRouter } from "~/server/routers/app.routes";
import { createContext } from "~/server/createContext";

export default trpcNext.createNextApiHandler({
  router: appRouter,
  createContext,
});
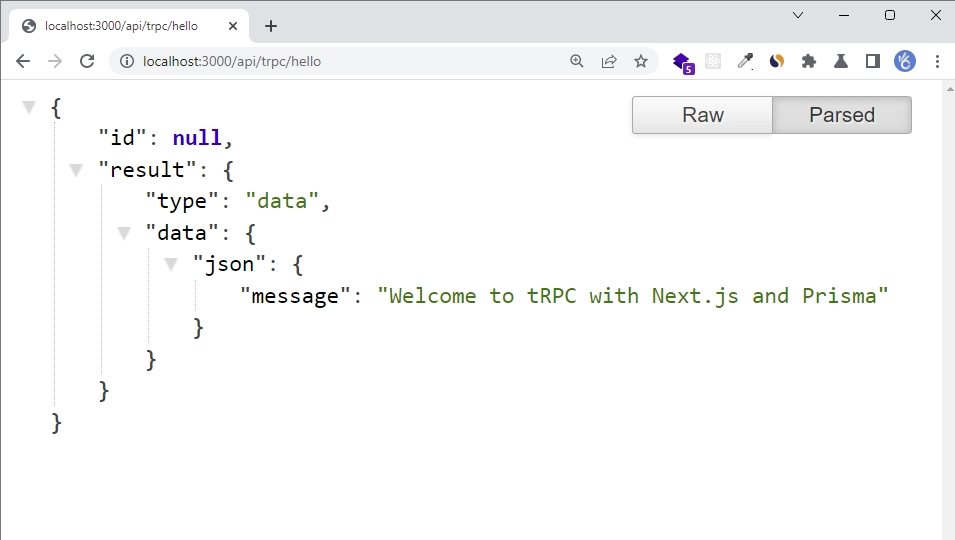
Testing the Next.js tRPC Server
We are now ready to test the tRPC server. Make sure the Docker containers are running and run yarn dev or npm run dev to start the Next.js tRPC server.
Enter this URL in the browser and within a few seconds, you should see the message we stored in the Redis database.
If by any chance the message field is null, refresh the browser for it to work.
Step 5 – Setup tailwindCss in Next.js
Follow the steps below to add tailwindCss to the Next.js tRPC client.
Step 1: Install the tailwindCss library
Run the command below to install TailwindCSS and its peer dependencies:
yarn add -D tailwindcss postcss autoprefixer
yarn tailwindcss init -p
The above command will also generate the tailwind.config.js and postcss.config.js configuration files
Step 2: Adding Template Paths
Open the tailwind.config.js file and add the path to the Next.js template files. Also, you can add your custom colors and fonts if any.
tailwind.config.js
/** @type {import('tailwindcss').Config} */
module.exports = {
  content: [
    './src/pages/**/*.{js,ts,jsx,tsx}',
    './src/client/components/**/*.{js,ts,jsx,tsx}',
  ],
  theme: {
    extend: {
      colors: {
        'ct-dark-600': '#222',
        'ct-dark-200': '#e5e7eb',
        'ct-dark-100': '#f5f6f7',
        'ct-blue-600': '#2363eb',
        'ct-yellow-600': '#f9d13e',
      },
      fontFamily: {
        Poppins: ['Poppins, sans-serif'],
      },
      container: {
        center: true,
        padding: '1rem',
        screens: {
          lg: '1125px',
          xl: '1125px',
          '2xl': '1125px',
        },
      },
    },
  },
  plugins: [],
};
Step 3: Add the tailwindCss directives
Now replace the content of the src/styles/globals.css file with the following TailwindCSS directives and CSS styles.
src/styles/globals.css
@import url('https://fonts.googleapis.com/css2?family=Poppins:wght@300;400;500;600;700&display=swap');

@tailwind base;
@tailwind components;
@tailwind utilities;

html {
  font-family: Poppins, sans-serif;
}
Step 2: Import the CSS file
To use the tailwindCss classes, you need to import the globals.css file into the src/pages/_app.tsx file.
src/pages/_app.tsx
import '../styles/globals.css';
// [...] other imports
Step 6 – Creating the Next.js tRPC Client
Now that we have the tRPC server running, let’s create the tRPC client to help us make the procedure calls to the server.
To begin install the following dependencies:
yarn add @trpc/react-query@next @trpc/client@next @tanstack/react-query @tanstack/react-query-devtools tailwind-merge
# or
npm install @trpc/react @trpc/client react-query@3 tailwind-merge
tailwind-merge– for merging tailwindCss classes in JS@tanstack/react-query– a server state management tool@tanstack/react-query-devtools– A GUI for@tanstack/react-query@trpc/react-query– serves as a thin wrapper around React Query@trpc/client– for creating the tRPC client
Now create a src/client/utils/trpc.ts file and add the following code to generate the tRPC hooks based on the queries, mutations, and subscriptions defined on the Next.js tRPC server.
src/client/utils/trpc.ts
import { getFetch, httpBatchLink } from "@trpc/client";
import { createTRPCNext } from "@trpc/next";
import superjson from "superjson";
import { AppRouter } from "~/server/routers/app.routes";

export const trpc = createTRPCNext<AppRouter>({
  config({ ctx }) {
    const url = process.env.NEXT_PUBLIC_VERCEL_URL
      ? `https://${process.env.NEXT_PUBLIC_VERCEL_URL}`
      : "http://localhost:3000/api/trpc/";

    return {
      queryClientConfig: {
        defaultOptions: {
          queries: {
            staleTime: 5 * 1000,
          },
        },
      },
      headers() {
        if (ctx?.req) {
          return {
            ...ctx.req.headers,
            "x-ssr": "1",
          };
        }
        return {};
      },
      links: [
        httpBatchLink({
          url,
          fetch: async (input, init?) => {
            const fetch = getFetch();
            return fetch(input, {
              ...init,
              credentials: "include",
            });
          },
        }),
      ],
      transformer: superjson,
    };
  },
  ssr: true,
});
Next, replace the content of the src/pages/_app.tsx file with the following:
src/pages/_app.tsx
import "../styles/globals.css";
import type { AppProps } from "next/app";
import { ReactQueryDevtools } from "@tanstack/react-query-devtools";
import { trpc } from "~/client/utils/trpc";

function MyApp({ Component, pageProps }: AppProps) {
  return (
    <>
      <Component {...pageProps} />
      <ReactQueryDevtools initialIsOpen={false} />
    </>
  );
}

export default trpc.withTRPC(MyApp);
We used the withTRPC higher-order component to configure the Next.js app to work with tRPC.
Now replace the content of the src/pages/index.tsx file with the following code.
src/pages/index.tsx
import type { NextPage } from "next";
import { trpc } from "~/client/utils/trpc";

const HomePage: NextPage = () => {
  const { data, isLoading, isFetching, error, isError } =
    trpc.getHello.useQuery();

  if (isLoading || isFetching) {
    return <p>Loading...</p>;
  }

  if (isError) {
    return <p>Error: {error.message}</p>;
  }

  return (
    <>
      <section className="bg-ct-blue-600 min-h-screen pt-20">
        <div className="max-w-4xl mx-auto bg-ct-dark-100 rounded-md h-[20rem] flex justify-center items-center">
          <p className="text-3xl font-semibold">{data?.message}</p>
        </div>
      </section>
    </>
  );
};

export default HomePage;
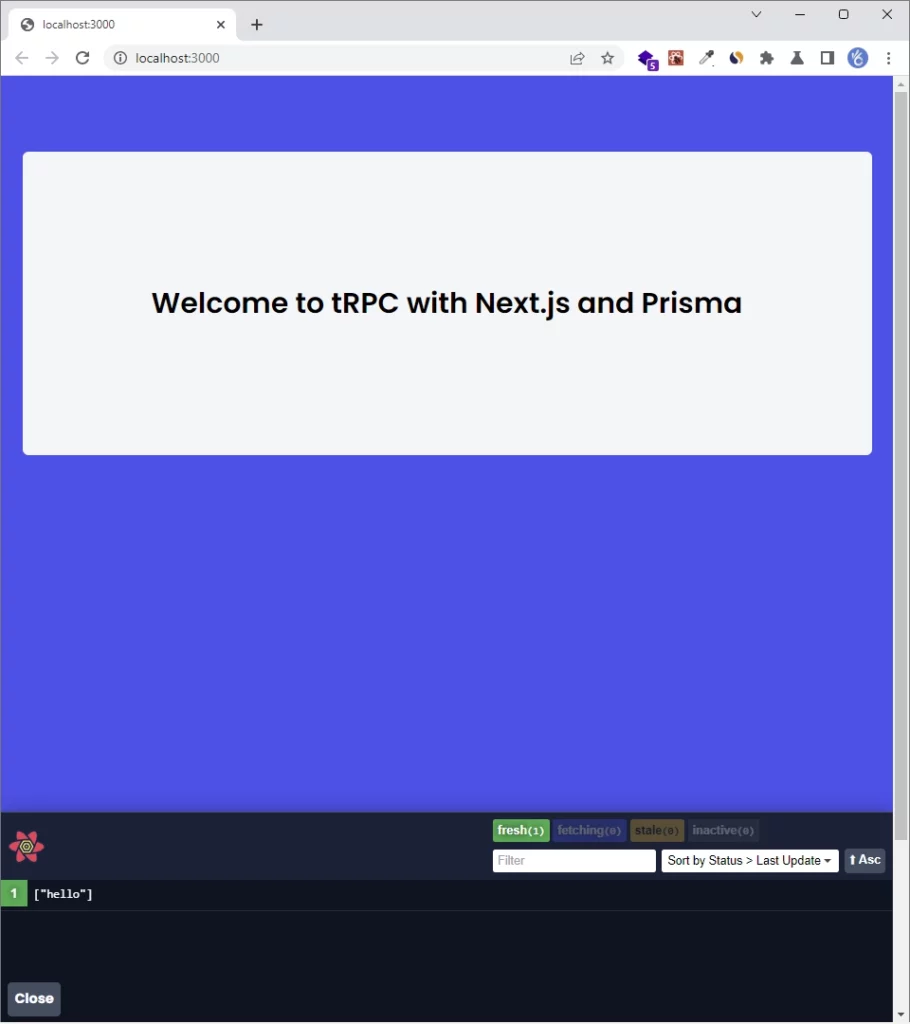
The above code will evoke the getHello procedure on the Next.js tRPC API to retrieve the message we stored in the Redis database and display it in the UI.
Run yarn dev or npm run dev and open the URL http://localhost:3000/ in the browser. Within a few seconds, you should see a preview like this.
Conclusion
With this tRPC client and server example in TypeScript, you’ve learned how to set up a tRPC client and server with Next.js, PostgreSQL, Prisma, React Query, and Redis.
You can find the source code of the Next.js tRPC client and server on my GitHub
Great tutorial! With the new Next13 now, do you have idea on how we can use tRPC in both Client & Server components? Or do we have to refactor our tRPC setup to only run on Server-side or both sides? According to this doc (https://trpc.io/docs/v10/server-side-calls), we seems to be able to make queries/mutations & use them on the server-side. But I don’t know whether we can combine both tRPC setup for client-side & server-side.
Basically running mutation on the client side (on Client component). Upon successful mutation, then we can invalidate queries immediately. And this query is on the server-side (running on Server component)
The tRPC team are still experimenting with the tRPC + Next 13 combo so we just have to wait for their recommendation. You can find the experiments on https://github.com/trpc/next-13.
After the setup of the docker-compose file, there’s a typo in the code snippet to install trpc server dependencies. Also had a conflict with peer deps so added flag.
should say
“`
npm install @trpc/server@next @trpc/next@next superjson redis –legacy-peer-deps
“`
Thanks for pointing that out, I’ll fix the typo right away.
I’ve not had a dependency conflict before because I always use Yarn. However, I’ll look into it and see if I can resolve the conflict with the peer dependencies.
Great content man !!! Thx for sharing your knowledge ^^
if i have trpc server outside nextjs stack i can set up the client without issue? anyone tried ?
Although you can run a tRPC server outside of the Next.js stack, the challenge lies in how to pass the inferred type of the tRPC router available on the server to the tRPC client running in Next.js.
The key to enabling the type safety feature of tRPC is providing the tRPC router type to the tRPC client so that it knows the different queries and mutations defined on the tRPC server and the required arguments when making procedure calls.
Additionally, tRPC provides an adapter that is specific to Next.js. If you build your tRPC server outside of the Next.js stack using another adapter, such as an Express.js adapter, you won’t be able to provide its router type to the tRPC client running in Next.js.
That’s why, when working with tRPC in Node.js and React, it’s common practice to utilize Yarn Workspace. By doing so, we can install the tRPC router type as a dependency in the React.js project, which then allows us to pass it to the tRPC client.