
tRPC is a remote procedure call framework that provides a type-safe environment to build APIs for TypeScript and JavaScript-based projects without relying on schema definitions or libraries for code generation.
Despite tRPC being another remote procedure call framework, its fundamental implementations differ greatly from gRPC which uses Protocol Buffer by default to serialize payload data via HTTP/2.
Before the release of tRPC, GraphQL was the prominent library used by most developers to build type-safe full-stack applications. Since GraphQL is a query language, developers had to learn the language first or use libraries that provided abstraction over the language before they can build projects with it.
With these flaws of GraphQL, tRPC was developed to take the good part of GraphQL and bring it to REST (REpresentational State Transfer) architecture to enable developers to build type-safe APIs and share the types between the client and server.
In this article, we’ll build a type-safe tRPC CRUD API with Next.js, PostgreSQL, and Prisma. This tRPC example in Next.js will showcase how to use tRPC on the backend and later we will consume the API on the frontend app.
Fullstack tRPC API Server and Client with Next.js, PostgreSQL, and Prisma Series:
- How to Setup tRPC API Server & Client with Next.js and Prisma
- tRPC Server API with Next.js & PostgreSQL: Access & Refresh Tokens
- Full-Stack Next.js tRPC App: User Registration & Login Example
- Build a tRPC CRUD API Example with Next.js
Related articles:
- Build tRPC API with React.js, Node.js & MongoDB: Project Setup
- Build tRPC API with React.js & Node.js: Access and Refresh Tokens
- Full-Stack App tRPC, React.js, & Node.js: JWT Authentication
- Build Full-Stack tRPC CRUD Application with Node.js, and React.js
Step 1 – Setup the tRPC Project with Next.js
Follow the How to Setup tRPC API Server & Client with Next.js and Prisma article to set up tRPC project.
Step 2 – Create the Database Models with Prisma
In this section, you will create a database model with Prisma and connect the Prisma client to the PostgreSQL database server.
Models are the foundation of any Object-Relational Mapping (ORM) library. Therefore, learning the syntax and principles of a particular ORM will give you enough knowledge to model any kind of data.
In layman’s terms, a model is a reflection of a record or entity in the database. Prisma provides an intuitive way to define models in a schema file and map them to the database using Prisma Migrate.
Create the Database Schema
To design the database models for the tRPC CRUD API, we will create two tables – posts and users. Then, we will establish a one-to-many relationship between the posts and the users tables.
prisma/schema.prisma
generator client {
  provider = "prisma-client-js"
}

datasource db {
  provider = "postgresql"
  url      = env("DATABASE_URL")
}

model User {
  id       String   @id @default(uuid())
  name     String   @db.VarChar(255)
  email    String   @unique
  photo    String?  @default("default.png")
  verified Boolean? @default(false)

  password String
  role     RoleEnumType? @default(user)

  createdAt DateTime @default(now())
  updatedAt DateTime @updatedAt

  provider String?
  posts    Post[]

  @@map(name: "users")
}

enum RoleEnumType {
  user
  admin
}

model Post {
  id        String   @id @default(uuid())
  title     String   @db.VarChar(255)
  content   String
  category  String
  image     String
  published Boolean  @default(false)
  user      User     @relation(fields: [userId], references: [id])
  userId    String
  createdAt DateTime @default(now())
  updatedAt DateTime @updatedAt

  @@map(name: "posts")
}
Migrate the Schema to the Database
Now that we have created the Prisma models, we will use the Prisma Migrate tool to generate the SQL representation of our models and use the db push command to push the schema to the database. The db push command will also ensure that the database schema is in sync with the Prisma schema.
With that out of the way, run the Prisma Migrate command below to create the migration file from the Prisma schema.
npx prisma migrate dev --name post-entity --create-only
Then, run the db push command to push the Prisma schema to the database.
npx prisma db push
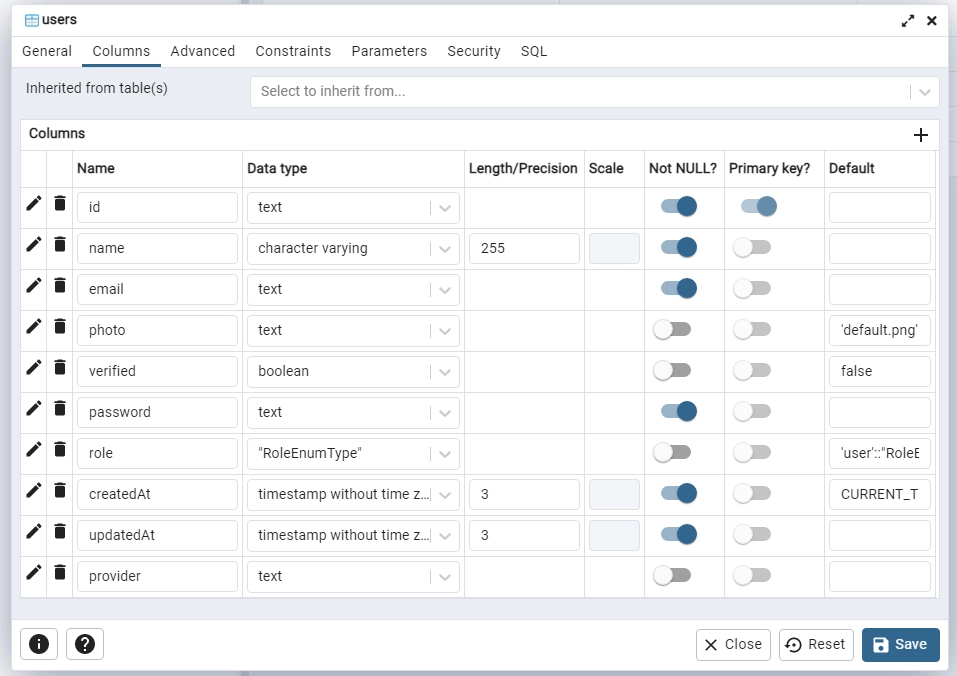
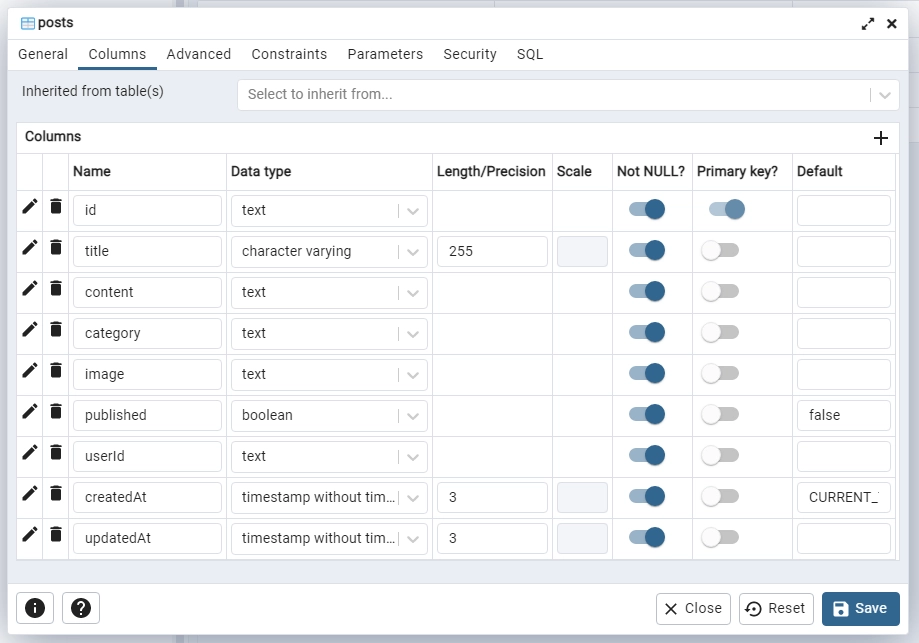
With the above command, Prisma will automatically perform an SQL query to the database to create the users and posts tables.
Now sign into any PostgreSQL client with the credentials provided in the .env file to see the SQL tables created by Prisma.
-The users table added by Prisma
-The posts table created by Prisma
Now run the Prisma generate command to generate the assets including the Prisma client based on the generator and data model blocks defined in your prisma/schema.prisma file.
npx prisma generate
The above command will generate the assets and output the result into the ./node_modules/.prisma/client folder.
Step 3 – Create the Validation Schemas
Similar to other API architectures, validating the request inputs and response outputs is recommended to ensure that the required fields are provided.
To validate the request and response data against a defined schema, we need to use a validator library that implements the JSON Schema specification.
Luckily for us, tRPC works out of the box with most of the popular validation libraries like Yup, Superstruct, Zod, and MyZod. In addition to that, tRPC also allows you to use your custom validators.
Despite having all these validators at hand, we will be using Zod because it’s a TypeScript-first schema validation library.
Install the Zod package with this command:
yarn add zod
# or
npm install zod
Next, create a src/server/schema/post.schema.ts file and add the following schemas to help us validate the tRPC requests.
src/server/schema/post.schema.ts
import { boolean, number, object, string, TypeOf } from 'zod';

export const createPostSchema = object({
  title: string({
    required_error: 'Title is required',
  }),
  content: string({
    required_error: 'Content is required',
  }),
  category: string({
    required_error: 'Category is required',
  }),
  image: string({
    required_error: 'Image is required',
  }),
  published: boolean({
    required_error: 'Published is required',
  }),
});

export const params = object({
  postId: string(),
});

export const updatePostSchema = object({
  params,
  body: object({
    title: string(),
    content: string(),
    category: string(),
    image: string(),
    published: boolean(),
  }).partial(),
});

export const filterQuery = object({
  limit: number().default(1),
  page: number().default(10),
});

export type CreatePostInput = TypeOf<typeof createPostSchema>;
export type ParamsInput = TypeOf<typeof params>;
export type UpdatePostInput = TypeOf<typeof updatePostSchema>['body'];
export type FilterQueryInput = TypeOf<typeof filterQuery>;
Step 4 – Create Reusable Database Services
In a typical API architecture, it’s recommended to create services that will be evoked to query and mutate the database. That means the controllers are not allowed to directly communicate with the database.
With the above explanation, let’s create the services that we will call in the controllers to query and mutate the database.
src/server/services/post.service.ts
import { Prisma, Post } from '@prisma/client';
import { prisma } from '../utils/prisma';

export const createPost = async (input: Prisma.PostCreateInput) => {
  return (await prisma.post.create({
    data: input,
  })) as Post;
};

export const findPost = async (
  where: Partial<Prisma.PostWhereInput>,
  select?: Prisma.PostSelect
) => {
  return (await prisma.post.findFirst({
    where,
    select,
  })) as Post;
};

export const findUniquePost = async (
  where: Prisma.PostWhereUniqueInput,
  select?: Prisma.PostSelect
) => {
  return (await prisma.post.findUnique({
    where,
    select,
  })) as Post;
};

export const findAllPosts = async (
  page: number, limit: number,
) => {
  const take = limit || 10;
  const skip = (page - 1 ) * limit
  return (await prisma.post.findMany({
    include: {user: true},
    skip,
    take,
  })) as Post[];
};


export const updatePost = async (
  where: Partial<Prisma.PostWhereUniqueInput>,
  data: Prisma.PostUpdateInput,
  select?: Prisma.PostSelect
) => {
  return (await prisma.post.update({ where, data, select })) as Post;
};

export const deletePost = async (where: Prisma.PostWhereUniqueInput)=> {
  return await prisma.post.delete({where})
}
The above CRUD operation functions will do:
createPost– Adds a new record.findPost– Retrieve a single record.findUniquePost– Retrieve a record with a unique field.findAllPosts– Fetch all the records or paginated lists of the results.updatePost– Updates a record.deletePost– Deletes a record.
Step 5 – Create the tRPC Procedure Controllers
Now that we have all the services defined, let’s create the tRPC procedure controllers or handlers to:
- Create a new record
- Update an existing record
- Retrieve a single record
- Retrieve all the records
- Delete a record
Create Mutation tRPC Procedure Handler
To begin, let’s create the tRPC procedure handler that will be evoked to add the new post to the database. Since there is a one-to-many relationship between the posts and the users tables, we need to reference the user’s ID in the post record to connect them together.
The ID of the user will be obtained from the user object added to the tRPC context after the JWT authentication is successful.
src/server/controllers/post.controller.ts
import { TRPCError } from '@trpc/server';
import { Context } from '../createContext';
import {
  CreatePostInput,
  FilterQueryInput,
  ParamsInput,
  UpdatePostInput,
} from '../schema/post.schema';
import {
  createPost,
  deletePost,
  findAllPosts,
  findUniquePost,
  updatePost,
} from '../services/post.service';

// [...] Create Post Handler
export const createPostHandler = async ({
  input,
  ctx,
}: {
  input: CreatePostInput;
  ctx: Context;
}) => {
  try {
    const {user} = await ctx;

    const post = await createPost({
      title: input.title,
      content: input.content,
      category: input.category,
      image: input.image,
      user: {connect: {id: user?.id}},
      published: input.published
    });

    return {
      status: 'success',
      data: {
        post,
      },
    };
  } catch (err: any) {
    if (err.code === 'P2002') {
      throw new TRPCError({
        code: 'CONFLICT',
        message: 'Post with that title already exists',
      });
    }
    throw err;
  }
};
We called the createPost() service we created in the src/server/services/post.service.ts file to add the new post to the database.
Since querying and mutating the database is an asynchronous task, we used a try-catch block to handle the errors if any.
In the Post model, we added a unique constraint to the title field and Prisma will return an error with a P2002 code when the unique constraint is violated. Therefore, we used a try-catch block to handle the error and return a well-formatted error message to the client.
Get Single Query tRPC Procedure Handler
Here, you will create the controller that will be evoked to retrieve a unique post from the database. To request a single record from the database, the user will make a tRPC query request with the ID of the post to the tRPC server.
src/server/controllers/post.controller.ts
// [...] Create Post Handler

// [...] Get Single Post Handler
export const getPostHandler = async ({
  paramsInput,
}: {
  paramsInput: ParamsInput;
}) => {
  try {
    const post = await findUniquePost({ id: paramsInput.postId });

    if (!post) {
      throw new TRPCError({
        code: 'NOT_FOUND',
        message: 'Post with that ID not found',
      });
    }

    return {
      status: 'success',
      data: {
        post,
      },
    };
  } catch (err: any) {
    throw err;
  }
};
Get All Records Query tRPC Procedure Handler
Similar to the getPostHandler, this controller will be called to return all the records in the database or a paginated results list.
src/server/controllers/post.controller.ts
// [...] Create Post Handler

// [...] Get Single Post Handler

// [...] Get All Posts Handler
export const getPostsHandler = async ({
  filterQuery,
}: {
  filterQuery: FilterQueryInput;
}) => {
  try {
    const posts = await findAllPosts(filterQuery.page, filterQuery.limit)

    return {
      status: 'success',
      results: posts.length,
      data: {
        posts,
      },
    };
  } catch (err: any) {
    throw new TRPCError({
      code: 'INTERNAL_SERVER_ERROR',
      message: err.message,
    });
  }
};
Querying a dense database could potentially return millions, if not billions, of records in an instance. Therefore, to improve the user experience of our API, we need to include a pagination feature to enable them to request a selected list of the records in the database.
Update Mutation tRPC Procedure Handler
Next, let’s create the procedure controller that will be evoked to update a record in the database.
src/server/controllers/post.controller.ts
// [...] Create Post Handler

// [...] Get Single Post Handler

// [...] Get All Posts Handler

// [...] Update Post Handler
export const updatePostHandler = async ({
  paramsInput,
  input,
}: {
  paramsInput: ParamsInput;
  input: UpdatePostInput;
}) => {
  try {
    const post = await updatePost({ id: paramsInput.postId }, input);

    if (!post) {
      throw new TRPCError({
        code: 'NOT_FOUND',
        message: 'Post with that ID not found',
      });
    }

    return {
      status: 'success',
      data: {
        post,
      },
    };
  } catch (err: any) {
    throw err;
  }
};
In the above, we called the updatePost() service and provided it with the ID and fields of the post to be updated.
Delete Mutation tRPC Procedure Handler
Finally, let’s create the controller that will be evoked to remove a record from the database.
Here, we will call the deletePost() service and provide it with the ID of the post to be deleted.
src/server/controllers/post.controller.ts
// [...] Create Post Handler

// [...] Get Single Post Handler

// [...] Get All Posts Handler

// [...] Update Post Handler

// [...] Delete Post Handler
export const deletePostHandler = async ({
  paramsInput,
}: {
  paramsInput: ParamsInput;
}) => {
  try {
    const post = await deletePost({ id: paramsInput.postId });

    if (!post) {
      throw new TRPCError({
        code: 'NOT_FOUND',
        message: 'Post with that ID not found',
      });
    }

    return {
      status: 'success',
      data: null,
    };
  } catch (err: any) {
    throw err;
  }
};
Complete tRPC Procedure Handlers
src/server/controllers/post.controller.ts
import { TRPCError } from '@trpc/server';
import { Context } from '../createContext';
import {
  CreatePostInput,
  FilterQueryInput,
  ParamsInput,
  UpdatePostInput,
} from '../schema/post.schema';
import {
  createPost,
  deletePost,
  findAllPosts,
  findUniquePost,
  updatePost,
} from '../services/post.service';

export const createPostHandler = async ({
  input,
  ctx,
}: {
  input: CreatePostInput;
  ctx: Context;
}) => {
  try {
    const {user} = await ctx;

    const post = await createPost({
      title: input.title,
      content: input.content,
      category: input.category,
      image: input.image,
      user: {connect: {id: user?.id}},
      published: input.published
    });

    return {
      status: 'success',
      data: {
        post,
      },
    };
  } catch (err: any) {
    if (err.code === 'P2002') {
      throw new TRPCError({
        code: 'CONFLICT',
        message: 'Post with that title already exists',
      });
    }
    throw err;
  }
};

export const getPostHandler = async ({
  paramsInput,
}: {
  paramsInput: ParamsInput;
}) => {
  try {
    const post = await findUniquePost({ id: paramsInput.postId });

    if (!post) {
      throw new TRPCError({
        code: 'NOT_FOUND',
        message: 'Post with that ID not found',
      });
    }

    return {
      status: 'success',
      data: {
        post,
      },
    };
  } catch (err: any) {
    throw err;
  }
};

export const getPostsHandler = async ({
  filterQuery,
}: {
  filterQuery: FilterQueryInput;
}) => {
  try {
    const posts = await findAllPosts(filterQuery.page, filterQuery.limit)

    return {
      status: 'success',
      results: posts.length,
      data: {
        posts,
      },
    };
  } catch (err: any) {
    throw new TRPCError({
      code: 'INTERNAL_SERVER_ERROR',
      message: err.message,
    });
  }
};

export const updatePostHandler = async ({
  paramsInput,
  input,
}: {
  paramsInput: ParamsInput;
  input: UpdatePostInput;
}) => {
  try {
    const post = await updatePost({ id: paramsInput.postId }, input);

    if (!post) {
      throw new TRPCError({
        code: 'NOT_FOUND',
        message: 'Post with that ID not found',
      });
    }

    return {
      status: 'success',
      data: {
        post,
      },
    };
  } catch (err: any) {
    throw err;
  }
};

export const deletePostHandler = async ({
  paramsInput,
}: {
  paramsInput: ParamsInput;
}) => {
  try {
    const post = await deletePost({ id: paramsInput.postId });

    if (!post) {
      throw new TRPCError({
        code: 'NOT_FOUND',
        message: 'Post with that ID not found',
      });
    }

    return {
      status: 'success',
      data: null,
    };
  } catch (err: any) {
    throw err;
  }
};
Step 6 – Create the tRPC Procedure Routes
Having all the controllers defined, let’s create the query and mutation endpoints to evoke them.
A tRPC query is used to read or fetch records while a mutation is used to write or mutate records.
Creating the tRPC Procedure Endpoints
Now let’s create the queries and mutations to call the controllers. When the tRPC client evokes a query or mutation procedure, the request will be delegated to the appropriate controller to handle the request.
After the controller has finished processing the request, the result or error will be returned to the tRPC client.
Since a mutation involves the writing of data, we need to validate the request input against the schemas we defined in the src/server/schema/post.schema.ts file before the request gets to the controller.
src/server/routers/post.routes.ts
import { protectedProcedure, t } from "../createRouter";
import {
  createPostSchema,
  filterQuery,
  params,
  updatePostSchema,
} from "../schema/post.schema";
import {
  createPostHandler,
  deletePostHandler,
  getPostHandler,
  getPostsHandler,
  updatePostHandler,
} from "../controllers/post.controller";

const postRouter = t.router({
  createPost: protectedProcedure
    .input(createPostSchema)
    .mutation(({ input, ctx }) => createPostHandler({ input, ctx })),
  updatePost: protectedProcedure
    .input(updatePostSchema)
    .mutation(({ input }) =>
      updatePostHandler({ paramsInput: input.params, input: input.body })
    ),
  deletePost: protectedProcedure
    .input(params)
    .mutation(({ input }) => deletePostHandler({ paramsInput: input })),
  getPost: protectedProcedure
    .input(params)
    .query(({ input }) => getPostHandler({ paramsInput: input })),
  getPosts: protectedProcedure
    .input(filterQuery)
    .query(({ input }) => getPostsHandler({ filterQuery: input })),
});

export default postRouter;
In the above, we added a middleware to ensure that the user is authenticated before accessing the queries and mutations.
Merging the tRPC Endpoints
Since we have the API routers separated into different files, let’s merge them into the main app router.
To add a router to the main app router, we need to use the merge() method and provide it with the namespace 'posts.' of the router followed by the name postRouter .
src/server/routers/app.routes.ts
import { t } from "../createRouter";
import redisClient from "../utils/connectRedis";
import authRouter from "./auth.routes";
import postRouter from "./post.routes";
import userRouter from "./user.routes";

const publicRouter = t.router({
  getHello: t.procedure.query(async ({ ctx }) => {
    const message = await redisClient.get("tRPC");
    return { message };
  }),
});

export const appRouter = t.mergeRouters(
  publicRouter,
  authRouter,
  userRouter,
  postRouter
);

export type AppRouter = typeof appRouter;
Add the tRPC Endpoints to the Next.js Router
Finally, create a dynamic Next.js route file src/pages/api/trpc[trpc].ts to register the tRPC router and the context.
src/pages/api/trpc[trpc].ts
import * as trpcNext from "@trpc/server/adapters/next";
import { appRouter } from "~/server/routers/app.routes";
import { createContext } from "~/server/createContext";

export default trpcNext.createNextApiHandler({
  router: appRouter,
  createContext,
});
Conclusion
In this tutorial, you created two Prisma models and migrated the schema to the database. You also created CRUD operation services to query and mutate the data stored in the database. Finally, you created tRPC procedure controllers that will be evoked to create, read, update, and delete data in the database.
To learn more about tRPC, check out the product documentation.
You can find the source codes:
When I’m uploading the image appears this error:
TypeError: Cannot read properties of undefined (reading ‘secure_url’)
in the file FileUpload.tsx
this lines:
if (data.secure_url) {
field.onChange(data.secure_url);
}
It appears that you made some modifications to the
FileUpload.tsxfile. This error message means that thesecure_urlproperty is either not defined or is undefined in thedataobject.To troubleshoot this issue, you can add a console log statement to check if the
dataobject has thesecure_urlproperty and what its value is. This will help you identify the root cause of the error and fix it.First of all, thanks for all tutorials, are amazing, I would like to ask if you have some tutorial that have posts and categories, I mean that create categories and posts, and each post may have one category.
Thank you for your kind words and for your question! I’m glad to hear that you’ve found my tutorials helpful.
Unfortunately, I don’t currently have a tutorial that covers posts and categories with database model associations. However, I am planning to create a project like that and write an article about it in the future.
I am currently waiting for tRPC to be fully compatible with the Next.js 13 app directory, which is still in beta.
Once it’s fully compatible, I’ll be able to create a project that meets your needs and write a tutorial on it.