

In this comprehensive guide, we will explore the process of integrating tRPC, React Query v5, and Prisma within the Next.js 14 App Router. tRPC is a modern RPC framework that allows you to define your API using TypeScript interfaces and generates both server and client code for you.
With the recent changes in Next.js 14, where all components are treated as server components, setting up tRPC requires a series of steps. However, this article covers the entire journey, from initializing a new Next.js 14 project to configuring tRPC and React Query for data fetching and mutation, all the way to using Prisma for PostgreSQL database interaction.
Our goal is to build a simple full-stack application that showcases the integration of tRPC in the new Next.js 14 App Router. You will gain insights into data prefetching using hydration with tRPC and React Query. Without further ado, let’s dive into the details of this tutorial.
The tutorial’s source code is available on GitHub: https://github.com/wpcodevo/nextjs14-trpc-react-query
More practice:
- How to Set Up and Use React Query in Next.js 14
- Implement Authentication with tRPC API in Next.js 14
- Using React Query with Supabase in Next.js App Router
- How to Setup React Query in Next.js 13 App Directory
- React Query and Axios: User Registration and Email Verification
- Forgot/Reset Passwords with React Query and Axios
- How to Setup tRPC API Server & Client with Next.js and Prisma
- tRPC Server API with Next.js & PostgreSQL: Access & Refresh Tokens
- Full-Stack Next.js tRPC App: User Registration & Login Example
- Build a tRPC CRUD API Example with Next.js
Bootstrapping the Next.js 14 Project
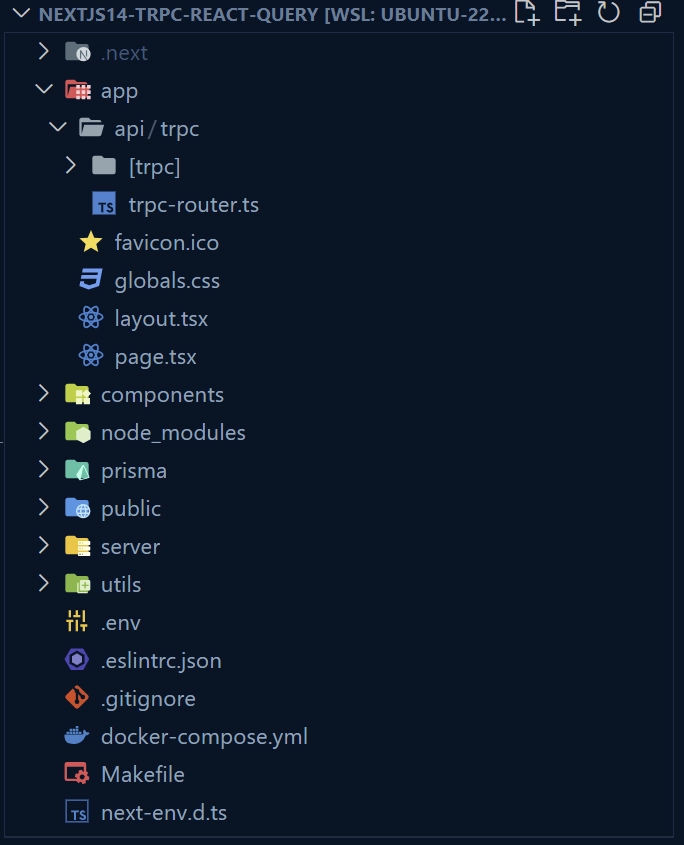
By the end of this tutorial, you will have a folder structure that resembles the screenshot below. You can compare your folder structure with the image to ensure that you are following the instructions correctly.
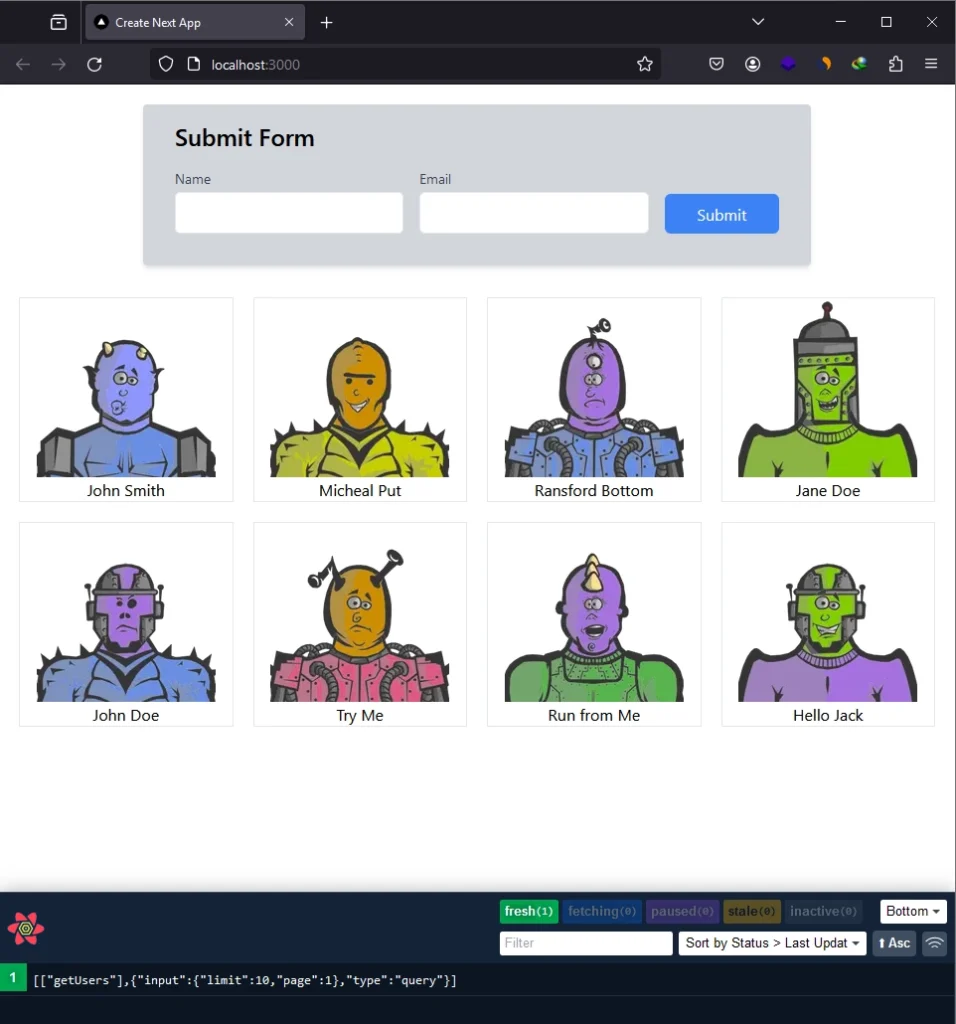
The image below showcases the application we’re about to create, covering all the steps required to set up and use tRPC with Next.js 14. The app consists of two components: one serving as a form for data mutation through tRPC, and the other for querying users using tRPC and displaying the results.
Let’s begin by creating a new Next.js 14 project. Open a terminal in the directory where you want to store the source code and execute the following command:
yarn create nextjs14-trpc-react-query
# or
npx create-next-app@latest nextjs14-trpc-react-query
# or
pnpm create next-app nextjs14-trpc-react-query
You’ll be prompted to configure the project. Make sure to select ‘Yes‘ for TypeScript and ESLint. Choose ‘No‘ for the src/ directory and ‘Yes‘ for the app/ directory in the project structure. Accept the default import alias by pressing Enter.
Once all questions are answered, the Next.js 14 project will be generated, and the dependencies will be installed. Open the project in your preferred IDE or text editor after the installation is completed.
Next, navigate to the app/globals.css file and remove all CSS styles, leaving only the Tailwind CSS directives.
pnpm add @tanstack/react-query@4.18.0
pnpm add @tanstack/react-query-devtools@4.18.0
pnpm add -D @tanstack/eslint-plugin-query

pnpm add @trpc/server
pnpm add @trpc/client
pnpm add @trpc/react-query
pnpm add superjson
pnpm add zod

pnpm add @prisma/client
pnpm add -D prisma
# or
yarn add @tanstack/react-query@4.18.0
yarn add @tanstack/react-query-devtools@4.18.0
yarn add -D @tanstack/eslint-plugin-query

yarn add @trpc/server
yarn add @trpc/client
yarn add @trpc/react-query
yarn add superjson
yarn add zod

yarn add @prisma/client
yarn add -D prisma
# or
npm i @tanstack/react-query@4.18.0
npm i @tanstack/react-query-devtools@4.18.0
npm i -D @tanstack/eslint-plugin-query

npm i @trpc/server
npm i @trpc/client
npm i @trpc/react-query
npm i superjson
npm i zod

npm i @prisma/client
npm i -D prisma
Note: It’s important to install
@tanstack/react-queryversion 4.18.0 since the@trpc/react-querypackage depends on this specific version as of the time of writing this article.
@tanstack/react-query: This package provides hooks and utilities for managing and caching asynchronous data.@tanstack/react-query-devtools: A tool for debugging and inspecting the state of React Query queries.@tanstack/eslint-plugin-query: A plugin aiding in catching bugs and inconsistencies while working with React Query.@trpc/server: Facilitates building the server side of a TypeScript RPC (tRPC) service.@trpc/client: Generates TypeScript types and hooks for calling tRPC methods on the client.@trpc/react-query: Integrates tRPC with React Query.superjson: Serialization library that works with tRPC for handling complex data type serialization and deserialization.zod: A TypeScript-first schema declaration and validation library.@prisma/client: Prisma Client generated by Prisma, offering type-safe database access for TypeScript.prisma: The Prisma CLI used for database migrations, seeding, and other database-related tasks during development.
Setting up PostgreSQL with Docker
With all the dependencies installed, let’s proceed to set up a PostgreSQL server using Docker. To do this, create a docker-compose.yml file in the root level of your project and add the following Docker Compose configurations.
docker-compose.yml
version: '3'
services:
  postgres:
    image: postgres:latest
    container_name: postgres
    ports:
      - '6500:5432'
    volumes:
      - progresDB:/var/lib/postgresql/data
    env_file:
      - ./.env
  pgAdmin:
    image: dpage/pgadmin4
    container_name: pgAdmin
    env_file:
      - ./.env
    ports:
      - '5050:80'
volumes:
  progresDB:
In the Docker Compose file, we use the env_file property to read the PostgreSQL and pgAdmin credentials from a .env file. To make these credentials available, create a .env file in the root directory and add the following environment variables.
.env
POSTGRES_HOST=127.0.0.1
POSTGRES_PORT=6500
POSTGRES_USER=postgres
POSTGRES_PASSWORD=password123
POSTGRES_DB=trpc_prisma

DATABASE_URL=postgresql://postgres:password123@localhost:6500/trpc_prisma?schema=public

PGADMIN_DEFAULT_EMAIL=admin@admin.com
PGADMIN_DEFAULT_PASSWORD=password123
To start the PostgreSQL and pgAdmin servers in their dedicated Docker containers, execute the following command.
docker-compose up -d
Setting up Prisma ORM
Now let’s set up Prisma to help us in querying and mutating data in the PostgreSQL database. Open your terminal and execute this command to initialize Prisma in the project.
pnpm prisma init --datasource-provider postgresql
# or
npx prisma init --datasource-provider postgresql
Moving on, let’s define our Prisma schema. For this simple application, we will define a User model with basic fields like name, email, and role. There won’t be a password field since we won’t be handling authentication. To define the Prisma model, open the prisma/schema.prisma file and replace its existing content with the following.
prisma/schema.prisma
generator client {
  provider = "prisma-client-js"
}

datasource db {
  provider = "postgresql"
  url      = env("DATABASE_URL")
}

model User {
  id        Int   @id @default(autoincrement())
  name      String
  email    String @unique
  role String @default("user")
  createdAt DateTime @default(now())
  updatedAt DateTime @updatedAt
}
Execute the following command to generate the Prisma migration file, create the Prisma client, and synchronize the migrations with the PostgreSQL schema.
pnpm prisma migrate dev --name init
# or
npx prisma migrate dev --name init
Now, we need to create a singleton instance of the Prisma Client that we can use throughout the application to communicate with the PostgreSQL database. To achieve this, create a prisma-client.ts file within the prisma directory and include the following code:
prisma/prisma-client.ts
import { PrismaClient } from '@prisma/client';

const prismaClientSingleton = () => {
  return new PrismaClient();
};

declare global {
  var prisma: undefined | ReturnType<typeof prismaClientSingleton>;
}

const prisma = globalThis.prisma ?? prismaClientSingleton();

export default prisma;

if (process.env.NODE_ENV !== 'production') globalThis.prisma = prisma;
Setting up tRPC Client and Server
At this stage, we’re prepared to configure the tRPC client and server within the Next.js 14 project. The initial setup is straightforward, and we’ll progressively enhance it as we introduce additional features.
Creating React Query Client
To create the React Query Client for managing queries and mutations in the application, follow these steps:
- In the root directory, create a folder named
utils. - Within the
utilsfolder, create a file namedquery-client.ts. - Add the code below to the
query-client.tsfile.
utils/query-client.ts
import { QueryClient } from '@tanstack/react-query';

const queryClient = new QueryClient({
  defaultOptions: { queries: { staleTime: 5 * 1000 } },
});
export default queryClient;
This code creates a centralized instance of the React Query QueryClient with default options, including a staleTime of 5 seconds.
Initializing tRPC Server
Next in our setup, we’ll create an instance of the tRPC server. This instance plays a crucial role in defining the tRPC API and handling incoming requests. To get started, go ahead and create a file named trpc-server.ts within the utils directory. Populate this file with the following code:
utils/trpc-server.ts
import { initTRPC } from '@trpc/server';
import SuperJSON from 'superjson';

export const t = initTRPC.create({
  transformer: SuperJSON,
});
Creating the tRPC API
Now, let’s utilize the tRPC server instance to define an RPC called healthchecker that returns a simple JSON object with status and message fields. This will allow us to test if our setup is correct. To accomplish this, follow these steps:
- Create an
apidirectory within theappdirectory. - Inside the
apidirectory, create another folder namedtrpc. - Within the
trpcdirectory, create a file namedtrpc-router.ts. - Add the following code to the
trpc-router.tsfile:
app/api/trpc/trpc-router.ts
import { t } from "@/utils/trpc-server";

export const appRouter = t.router({
  healthchecker: t.procedure.query(({ ctx }) => {
    return {
      status: "success",
      message: "Welcome to trpc with Next.js 14 and React Query",
    };
  }),
});

export type AppRouter = typeof appRouter;
To proceed, let’s create the tRPC HTTP handlers. Navigate to the app/api/trpc/ directory. Inside this directory, create a new folder named [trpc]. Within the [trpc] directory, create a route.ts file, and include the following code.
app/api/trpc/[trpc]/route.ts
import {
  FetchCreateContextFnOptions,
  fetchRequestHandler,
} from '@trpc/server/adapters/fetch';
import { appRouter } from '../trpc-router';

const handler = (request: Request) => {
  console.log(`incoming request ${request.url}`);
  return fetchRequestHandler({
    endpoint: '/api/trpc',
    req: request,
    router: appRouter,
    createContext: function (
      opts: FetchCreateContextFnOptions
    ): object | Promise<object> {
      return {};
    },
  });
};

export { handler as GET, handler as POST };
Initializing the tRPC Client
Now, let’s proceed to initialize the tRPC client, allowing us to communicate with the tRPC backend. Create a trpc.ts file in the utils folder and add the following code:
utils/trpc.ts
import type { AppRouter } from '@/app/api/trpc/trpc-router';
import { createTRPCReact } from '@trpc/react-query';

export const trpc = createTRPCReact<AppRouter>();
Creating the tRPC Provider
With the tRPC client instance in place, let’s utilize it to create the tRPC provider. Later, we’ll wrap it around the root node of our application to ensure that all children nodes have access to both the tRPC client and a React Query client. Create a trpc-provider.tsx file within the utils directory and add the following code:
utils/trpc-provider.tsx
'use client';

import { QueryClientProvider } from '@tanstack/react-query';
import { httpBatchLink, getFetch, loggerLink } from '@trpc/client';
import { useState } from 'react';
import superjson from 'superjson';
import { trpc } from './trpc';
import queryClient from './query-client';
import { ReactQueryDevtools } from '@tanstack/react-query-devtools';

export const TrpcProvider: React.FC<{ children: React.ReactNode }> = ({
  children,
}) => {
  const url = process.env.NEXT_PUBLIC_VERCEL_URL
    ? `https://${process.env.NEXT_PUBLIC_VERCEL_URL}`
    : 'http://localhost:3000/api/trpc/';

  const [trpcClient] = useState(() =>
    trpc.createClient({
      links: [
        loggerLink({
          enabled: () => true,
        }),
        httpBatchLink({
          url,
          fetch: async (input, init?) => {
            const fetch = getFetch();
            return fetch(input, {
              ...init,
              credentials: 'include',
            });
          },
        }),
      ],
      transformer: superjson,
    })
  );
  return (
    <trpc.Provider client={trpcClient} queryClient={queryClient}>
      <QueryClientProvider client={queryClient}>
        {children}
        <ReactQueryDevtools />
      </QueryClientProvider>
    </trpc.Provider>
  );
};
To make the tRPC client and React Query client accessible to all components in the component tree, open the app/layout.tsx file and wrap the tRPC provider we created earlier around the {children} node.
app/layout.tsx
import type { Metadata } from 'next';
import { Inter } from 'next/font/google';
import './globals.css';
import { TrpcProvider } from '@/utils/trpc-provider';

const inter = Inter({ subsets: ['latin'] });

export const metadata: Metadata = {
  title: 'Create Next App',
  description: 'Generated by create next app',
};

export default function RootLayout({
  children,
}: {
  children: React.ReactNode;
}) {
  return (
    <html lang='en'>
      <body className={inter.className}>
        <TrpcProvider>
          <div>{children}</div>
        </TrpcProvider>
      </body>
    </html>
  );
}
Testing the tRPC Server and Client
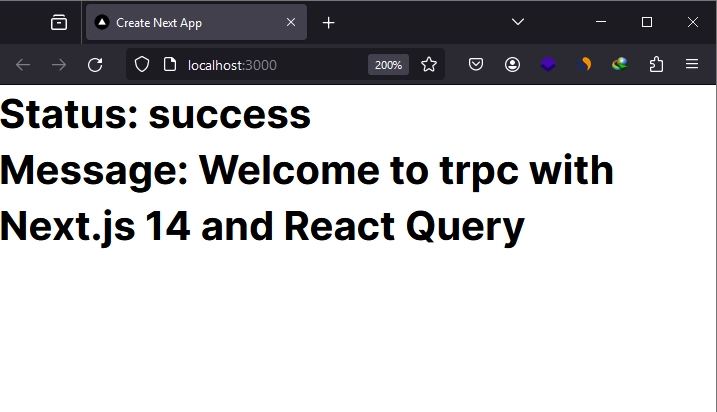
Finally, let’s test both the tRPC client and server. To do this, we will make an RPC call to the healthchecker procedure defined on the backend and display the result. Open the app/page.tsx file and replace its content with the following code:
app/page.tsx
'use client';

import { trpc } from '@/utils/trpc';

export default function Home() {
  let { data, isLoading, isFetching } = trpc.healthchecker.useQuery();
  if (isLoading || isFetching) return <p>Loading...</p>;

  return (
    <div className='text-xl font-bold'>
      <h1>Status: {data?.status}</h1>
      <h1>Message: {data?.message}</h1>
    </div>
  );
}
Start the Next.js development server if you haven’t already and visit the root URL in your browser. You’ll notice a brief loading state while the tRPC client invokes the healthchecker procedure. Once the call is successful, the status and message should be displayed on the screen.
Creating the tRPC Backend
Now that we’ve confirmed our tRPC server and client can communicate without errors, let’s enhance the functionality by creating two additional RPCs—one for adding new users to the database and another for retrieving users.
Creating Validation Schemas
To ensure the integrity of data stored in the database, we’ll use Zod to create validation schemas. These schemas guarantee that users provide accurate data with the correct data types in the JSON payload. Begin by creating a serverdirectory at the root level. Within the server directory, create a file named user-schema.ts and add the following code:
server/user-schema.ts
import { TypeOf, number, object, string } from 'zod';

export const createUserSchema = object({
  name: string({ required_error: 'Name is required' }),
  email: string({ required_error: 'Email is required' }).email('Invalid email'),
});

export const filterQuery = object({
  limit: number().default(1),
  page: number().default(10),
});

export type CreateUserInput = TypeOf<typeof createUserSchema>;
export type FilterQueryInput = TypeOf<typeof filterQuery>;
Creating tRPC Procedure Handlers
With the validation schemas prepared, let’s proceed to create the two RPC handlers responsible for managing requests and interacting with the database. Here’s a concise overview of each handler:
createUserHandler: This RPC adds a new user to the database using Prisma and responds with the newly added user.getUsersHandler: When invoked, this RPC queries the database for a paginated list of users and returns them as a response.
server/user-controller.ts
import prisma from '@/prisma/prisma-client';
import { TRPCError } from '@trpc/server';
import { CreateUserInput, FilterQueryInput } from './user-schema';

export const createUserHandler = async ({
  input,
}: {
  input: CreateUserInput;
}) => {
  try {
    const user = await prisma.user.create({
      data: input,
    });

    return {
      status: 'success',
      data: {
        user,
      },
    };
  } catch (err: any) {
    throw new TRPCError({
      code: 'INTERNAL_SERVER_ERROR',
      message: err.message,
    });
  }
};

export const getUsersHandler = async ({
  filterQuery,
}: {
  filterQuery: FilterQueryInput;
}) => {
  try {
    const { limit, page } = filterQuery;
    const take = limit || 10;
    const skip = (page - 1) * limit;

    const users = await prisma.user.findMany({
      skip,
      take,
    });

    return {
      status: 'success',
      results: users.length,
      data: {
        users,
      },
    };
  } catch (err: any) {
    throw new TRPCError({
      code: 'INTERNAL_SERVER_ERROR',
      message: err.message,
    });
  }
};
Creating tRPC Router
To invoke the tRPC handlers we created above, we need to create a tRPC router and define RPC procedures to call them. To do this, create a user-route.ts file within the server directory, and include the code below:
server/user-route.ts
import { createUserSchema, filterQuery } from './user-schema';
import { createUserHandler, getUsersHandler } from './user-controller';
import { t } from '@/utils/trpc-server';

const userRouter = t.router({
  createUser: t.procedure
    .input(createUserSchema)
    .mutation(({ input }) => createUserHandler({ input })),
  getUsers: t.procedure
    .input(filterQuery)
    .query(({ input }) => getUsersHandler({ filterQuery: input })),
});

export default userRouter;
Merging tRPC Routers
To complete the tRPC backend setup, we need to integrate or register the userRouter with the main tRPC router. This ensures that the tRPC server correctly directs requests to the specified tRPC procedures when they are invoked. Open the trpc-router.ts file in the app/api/trpc/ directory and add the following code:
app/api/trpc/trpc-router.ts
import userRouter from '@/server/user-route';
import { t } from '@/utils/trpc-server';

const healthCheckerRouter = t.router({
  healthchecker: t.procedure.query(({ ctx }) => {
    return {
      status: 'success',
      message: 'Welcome to trpc with Next.js 14 and React Query',
    };
  }),
});

export const appRouter = t.mergeRouters(userRouter, healthCheckerRouter);

export type AppRouter = typeof appRouter;
Creating the tRPC Frontend
Now, let’s begin building the tRPC frontend. The frontend will comprise two components: one for invoking the RPC responsible for inserting new users into the database, and the other for invoking the RPC responsible for retrieving users.
Performing Query with tRPC
To interact with the getUsers procedure, we’ll create a client component named ListUsers. Inside this component, we invoke the getUsers RPC to fetch a paginated list of users from the tRPC server. Once the data is retrieved, the component displays them in a grid format.
To implement this, begin by creating a ‘components‘ directory at the root level. Within the ‘components‘ folder, create a list-users.tsx file and add the following code.
components/list-user.tsx
'use client';

import { trpc } from '@/utils/trpc';
import Image from 'next/image';

export default function ListUsers() {
  const { data } = trpc.getUsers.useQuery({ limit: 10, page: 1 });

  return (
    <>
      {data?.data.users.length === 0 ? (
        <p className='text-center'>No Users Found</p>
      ) : (
        <div
          style={{
            display: 'grid',
            gridTemplateColumns: '1fr 1fr 1fr 1fr',
            gap: 20,
          }}
        >
          {data?.data.users?.map((user) => (
            <div
              key={user.id}
              className='flex flex-col justify-center items-center border-gray-200 border'
            >
              <Image
                src={`https://robohash.org/${user.id}?set=set2&size=180x180`}
                alt={user.name}
                width={180}
                height={180}
                className='block'
              />
              <h3>{user.name}</h3>
            </div>
          ))}
        </div>
      )}
    </>
  );
}
In the above code, we fetch user images from an external source, https://robohash.org/. To ensure this works seamlessly without errors, it’s essential to add the necessary configurations in the next.config.js file. Open the next.config.js file and replace its existing content with the following code:
next.config.js
/** @type {import('next').NextConfig} */
const nextConfig = {
  images: {
    remotePatterns: [
      {
        protocol: 'https',
        hostname: 'robohash.org',
      },
    ],
  },
};

module.exports = nextConfig;
Performing Mutation with tRPC
Let’s create a form to trigger the createUser RPC, which is responsible for mutating the database by adding new users. Navigate to the ‘components‘ directory and create a file named user-form.tsx. Populate the file with the following code:
components/user-form.tsx
'use client';

import queryClient from '@/utils/query-client';
import { trpc } from '@/utils/trpc';
import React, { useState } from 'react';

const UserForm = () => {
  const [name, setName] = useState('');
  const [email, setEmail] = useState('');

  const { mutate } = trpc.createUser.useMutation({
    onSettled: () => {
      setName('');
      setEmail('');
    },
    onSuccess: async () => {
      await queryClient.invalidateQueries({
        queryKey: [
          ['getUsers'],
          { input: { limit: 10, page: 1 }, type: 'query' },
        ],
      });
    },
  });

  const handleSubmit = async (e: React.FormEvent<HTMLFormElement>) => {
    e.preventDefault();
    mutate({ name, email });
  };

  return (
    <div className='bg-gray-300 p-8 pt-4 rounded shadow-md max-w-2xl w-full'>
      <h2 className='text-2xl font-semibold mb-4'>Submit Form</h2>

      <form onSubmit={handleSubmit} className='space-y-4'>
        <div className='flex space-x-4 items-end'>
          <div className='w-1/2'>
            <label
              htmlFor='name'
              className='block text-sm font-medium text-gray-700'
            >
              Name
            </label>
            <input
              type='text'
              id='name'
              name='name'
              value={name}
              onChange={(e) => setName(e.target.value)}
              className='mt-1 p-2 w-full border rounded-md'
              required
            />
          </div>

          <div className='w-1/2'>
            <label
              htmlFor='email'
              className='block text-sm font-medium text-gray-700'
            >
              Email
            </label>
            <input
              type='email'
              id='email'
              name='email'
              value={email}
              onChange={(e) => setEmail(e.target.value)}
              className='mt-1 p-2 w-full border rounded-md'
              required
            />
          </div>
          <div className='w-1/4'>
            <button
              type='submit'
              className='w-full block align-bottom bg-blue-500 text-white py-2 rounded-md hover:bg-blue-600'
            >
              Submit
            </button>
          </div>
        </div>
      </form>
    </div>
  );
};

export default UserForm;
When the form is submitted, we extract the name and email values, passing them to the mutate function. This function invokes the createUser RPC, inserting the provided data into the database. Upon successful mutation, the getUsers RPC is triggered to fetch the latest list of users. If you’re curious about the lengthy query key, I simply copied it from the React Query devtool for convenience.
Prefetching Data with tRPC and React Query
For SEO optimization, we’ll prefetch the list of users on the server and leverage React Query’s <Hydrate /> component to provide the data to the component responsible for displaying them. In essence, you’ll discover how to prefetch data using tRPC and React Query in Next.js 14.
Creating a React Query Hydration Component
As we’ll be prefetching data in a server component where the <Hydrate /> component can’t be used directly, we need to create a client component that renders <Hydrate /> the component. Then, we can use the client component in the server component. Create a hydrate-client.tsx file and include the following code:
utils/hydrate-client.tsx
'use client';

import { Hydrate as RQHydrate, HydrateProps } from '@tanstack/react-query';

function Hydrate(props: HydrateProps) {
  return <RQHydrate {...props} />;
}

export default Hydrate;
Creating a tRPC Server-Side Caller
To implement server-side data prefetching using tRPC and React Query in Next.js 14, we utilize the createServerSideHelpers function provided by the @trpc/react-query library. This function returns an object containing methods that allow direct invocation of tRPC procedures on the server, eliminating the need for an HTTP request. These server-side helpers enable us to prefetch queries on the server, add them to the cache, dehydrate the cache, and send the data to the client.
Consequently, these queries are readily available on the client without the need for initial fetching. To create the server-side helpers, navigate to the trpc-router.ts file in the app/api/trpc/ directory and replace its existing content with the code below. This modified code exports the server-side helpers as a function.
app/api/trpc/trpc-router.ts
import userRouter from '@/server/user-route';
import { t } from '@/utils/trpc-server';
import { createServerSideHelpers } from '@trpc/react-query/server';
import SuperJSON from 'superjson';

const healthCheckerRouter = t.router({
  healthchecker: t.procedure.query(({ ctx }) => {
    return {
      status: 'success',
      message: 'Welcome to trpc with Next.js 14 and React Query',
    };
  }),
});

export const appRouter = t.mergeRouters(userRouter, healthCheckerRouter);

export const createSSRHelper = () =>
  createServerSideHelpers({
    router: appRouter,
    transformer: SuperJSON,
    ctx: () => {},
  });

export type AppRouter = typeof appRouter;
Within the app/page.tsx file, leverage the server-side helpers to prefetch the user list by invoking the getUsers procedure. Then, utilize the <Hydrate /> client component to ensure proper hydration and dehydration, making the data accessible to the <ListUsers /> client component.
app/page.tsx
import UserForm from '@/components/user-form';
import ListUsers from '@/components/list-user';
import { dehydrate } from '@tanstack/react-query';
import Hydrate from '@/utils/hydrate-client';
import { createSSRHelper } from './api/trpc/trpc-router';

export default async function Home() {
  const helpers = createSSRHelper();
  await helpers.getUsers.prefetch({ limit: 10, page: 1 });

  return (
    <Hydrate state={dehydrate(helpers.queryClient)}>
      <main style={{ maxWidth: 1200, marginInline: 'auto', padding: 20 }}>
        <div className='w-full flex justify-center mb-8'>
          <UserForm />
        </div>
        <ListUsers />
      </main>
    </Hydrate>
  );
}
Launch the Next.js development server and navigate to the root URL to interact with the application. Here, you can add new users and witness their immediate addition to the page.
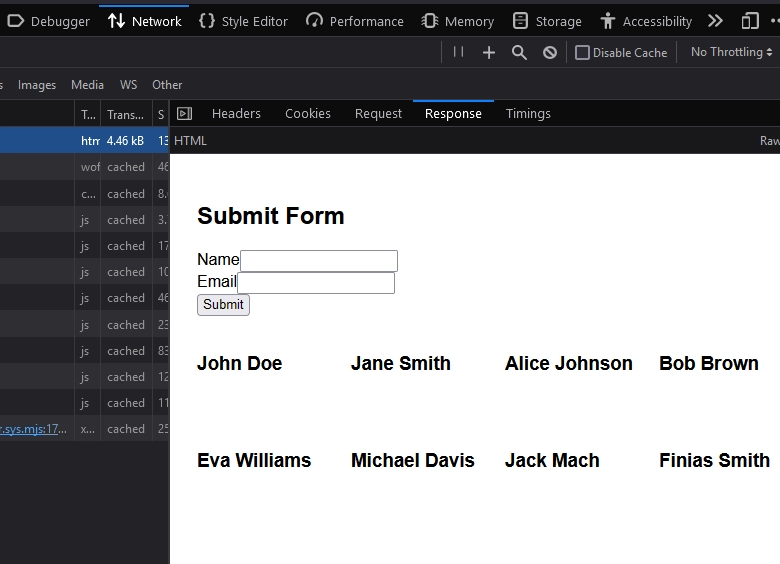
When inspecting the HTML document in the Network tab, you will notice that the list of users is already included, indicating that the prefetching code is working as expected.
Conclusion
And we’re done! Throughout this article, you learned how to set up and use tRPC with React Query in Next.js 14. I hope you found this helpful and enjoyable. If you have any questions or feedback, feel free to leave them in the comment section below. Thanks for reading!
Thank you, your project help me to finally be able to use NextJS14, trpc and react-query. Being a junior still in formation, it was hard to change from the trcp without react-query but in the final with lots of help from copilot I could replicate for another table in my database.
Your code seems very well done with all the important technologies in place in 2024.
Thanks again.
I’m glad you found the article helpful.
Man! this is huge! I am just learning trpc and this is overwhelming. Great job, I am just following and trying to get better. Thank you very much!
You are welcome.
Why can’t move component folder into app folder ?
If application scale, I think we should move component into app folder
Thanks bro. It helped a lot.
Congratulations on the content, it helped me a lot, and for people who are having the problem: Attempted import error: ‘createRecursiveProxy’ is not exported from ‘@trpc/server/shared’ (imported as ‘createRecursiveProxy’).
Just leave the same version of the client and server,
this was a common mistake for me
I’m glad you found the article helpful