
In this article, you’ll learn how to integrate Supabase with Next.js 14 for email and password authentication, as well as Google and GitHub OAuth. The tutorial covers protecting pages to ensure only authenticated users can access them, fetching the user’s session in a React Server Component, and automatically refreshing cookies in the background when the user’s session expires.
The Next.js App Router simplifies both server-side and client-side functionalities, such as redirecting users based on permissions or subscribing to real-time events in the database. Previously, Supabase used local storage for storing user sessions by default. However, with the introduction of the @supabase/ssrpackage, it now utilizes cookies to store user sessions.
In this tutorial, we’ll configure Supabase to use cookies-based authentication, enhancing the overall security and user experience. Let’s dive into the tutorial without further delay.
The tutorial’s source code is available on GitHub: https://github.com/wpcodevo/nextjs14-supabase-ssr-authentication
More practice:
- Setup Google and GitHub OAuth with Supabase in Next.js 14
- Implement Authentication with tRPC in Next.js 14
- Implement Authentication with tRPC API in Next.js 14
- Using tRPC with Next.js 14, React Query and Prisma
- How to Set Up and Use React Query in Next.js 14
- Using React Query with Supabase in Next.js App Router
- How to Setup React Query in Next.js 13 App Directory
- React Query and Axios: User Registration and Email Verification
- Forgot/Reset Passwords with React Query and Axios
- How to Setup tRPC API Server & Client with Next.js and Prisma
- tRPC Server API with Next.js & PostgreSQL: Access & Refresh Tokens
- Full-Stack Next.js tRPC App: User Registration & Login Example
- Build a tRPC CRUD API Example with Next.js

Running the Supabase and Next.js 14 Authentication App
Follow these steps to run the application on your machine:
- Download or clone the project from its GitHub repository at https://github.com/wpcodevo/nextjs14-supabase-ssr-authentication and open the source code in your preferred text editor.
- Duplicate the
example.envfile and rename the copy to.env. Copy both the Supabase URL and Anon key from your Supabase project, then add them to the corresponding variables in the.envfile. If you’re unsure where to find them, refer to the ‘Create a Project on Supabase‘ section for guidance. - Open the integrated terminal of your IDE and execute the command
pnpm installto install all the necessary dependencies. - Run the command
pnpm devto launch the Next.js development server. Once the server is up and running, access the application in your browser to engage with the authentication flow. - To use the Google and GitHub sign-in options, you will need to perform specific configurations on Supabase. Refer to the instructions in the ‘Set up OAuth with Supabase in Next.js 14‘ section if you are unfamiliar with the process.
Demo of the tRPC Application
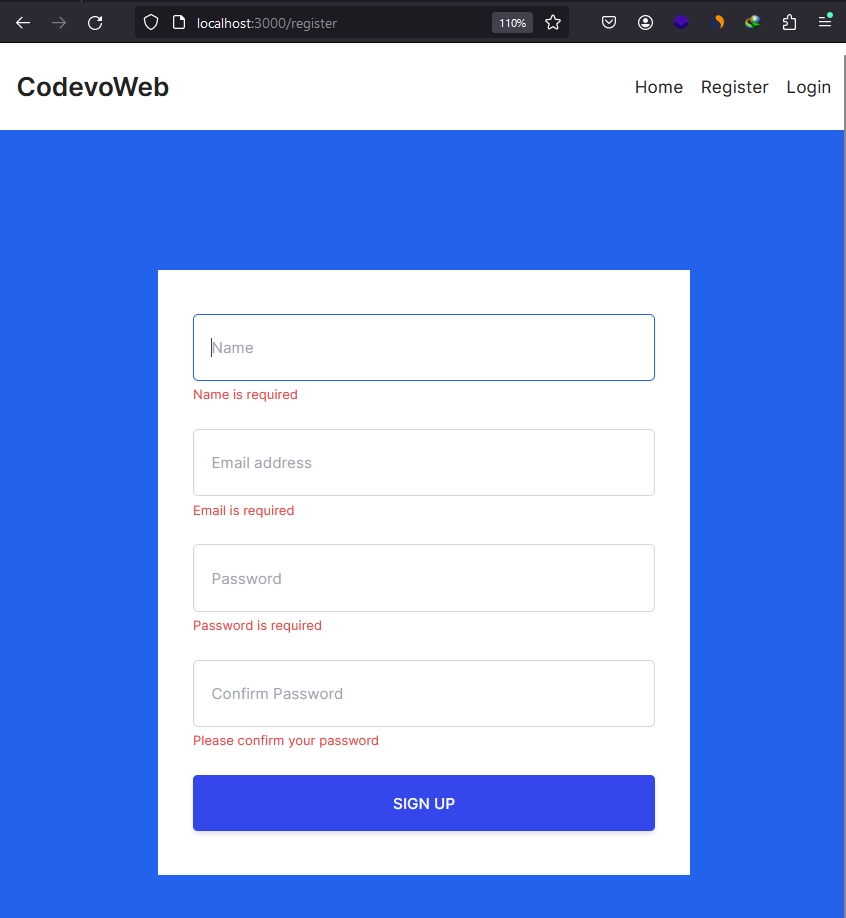
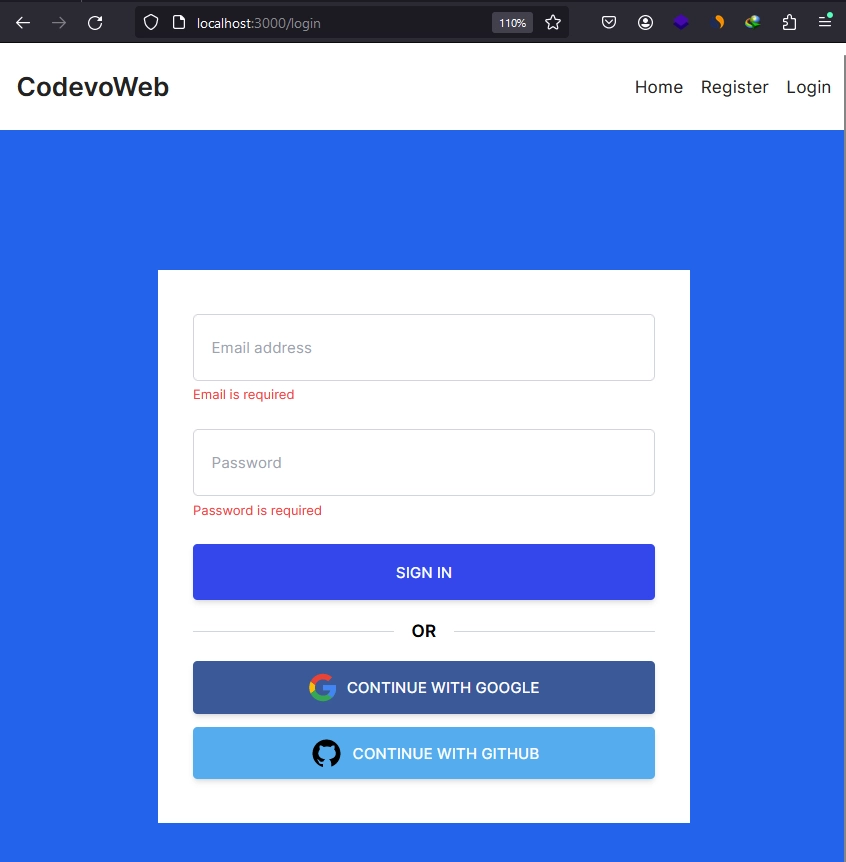
Before delving into the tutorial, let me provide you with an overview of the authentication flow with Supabase using Next.js 14. On the home page, click the ‘Register‘ link to access the registration page where you will need to provide your credentials. Enter your name, email address, password, and confirm the password.
Upon completion, click the ‘SIGN UP‘ button. You will see a loading state on the button while the request is being made to the Supabase servers. After Supabase registers your account, you will be redirected to the ‘Login‘ page. However, attempting to log in with your credentials will result in an error message stating that you need to verify your email address.
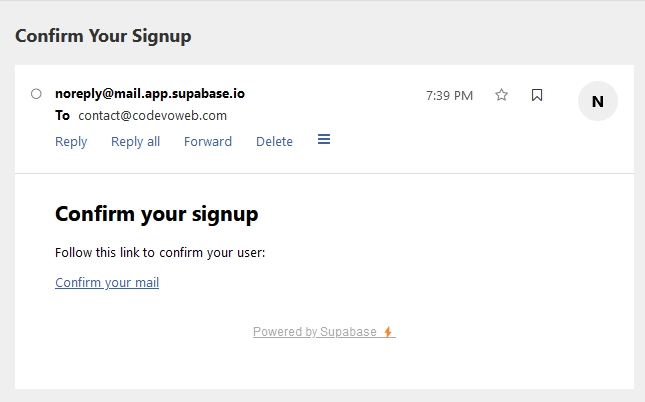
Head to your mailbox and open the Supabase verification email. Click on the ‘Confirm your mail‘ link, and a request will be sent to Supabase to verify your email. Upon successful verification, you will be redirected to the app, and the code appended in the redirect URL will be exchanged for a session. This implies that you will be automatically logged in once the email verification is successful.
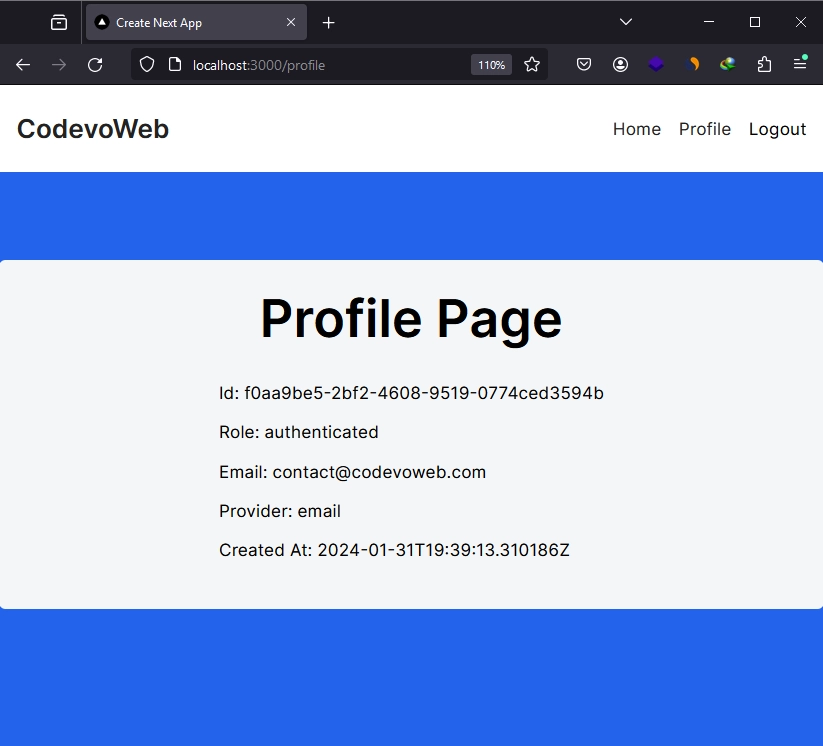
To access your account information, click on the ‘Profile’ link in the navigation menu, which will take you to the profile page displaying your account credentials. When you’ve completed your session, click on the ‘Logout’ button in the navigation menu to sign out.
Alternatively, if you prefer not to sign in with your email and password but instead use either Google or GitHub OAuth, simply click on the respective options on the login page. This will lead you to the OAuth consent screen, where you will be prompted to grant the application access to your OAuth account. Once you grant access, you should be automatically signed into the application.
Set up the Next.js 14 Project
Let’s begin by creating a new Next.js 14 project. Open a terminal in the directory where you want to store the source code and execute the following command:
yarn create nextjs14-supabase-ssr-authentication
# or
npx create-next-app@latest nextjs14-supabase-ssr-authentication
# or
pnpm create next-app nextjs14-supabase-ssr-authentication
You’ll receive prompts to configure the project. Opt for ‘Yes‘ for TypeScript and ESLint, ‘No‘ for the src/ directory, and ‘Yes‘ for the app/ directory. Also, choose “Yes” for Tailwind CSS and accept the default import alias by pressing Enter.
After responding to all questions, the Next.js 14 project will be generated, and the required dependencies will be installed. Once the installation is completed, open the project in your preferred IDE or text editor.
Navigate to app/globals.css and delete all default CSS styles, retaining only the Tailwind CSS directives.
@tailwind base;
@tailwind components;
@tailwind utilities;
Next, open the tailwind.config.ts file and replace its current content with the following, which includes the font, container settings, and colors to be utilized across the entire project.
tailwind.config.ts
import type { Config } from 'tailwindcss';

const config: Config = {
  content: [
    './pages/**/*.{js,ts,jsx,tsx,mdx}',
    './components/**/*.{js,ts,jsx,tsx,mdx}',
    './app/**/*.{js,ts,jsx,tsx,mdx}',
  ],
  theme: {
    extend: {
      colors: {
        'ct-dark-600': '#222',
        'ct-dark-200': '#e5e7eb',
        'ct-dark-100': '#f5f6f7',
        'ct-blue-600': '#2363eb',
        'ct-yellow-600': '#f9d13e',
      },
      fontFamily: {
        Poppins: ['Poppins, sans-serif'],
      },
      container: {
        center: true,
        padding: '1rem',
        screens: {
          lg: '1125px',
          xl: '1125px',
          '2xl': '1125px',
        },
      },
    },
  },
  plugins: [],
};
export default config;
Install the Necessary Dependencies
With that out of the way, let’s proceed to install all the dependencies we will need throughout the tutorial. Open your terminal from the root directory of your project and run the commands below to install them.
pnpm add @supabase/ssr
pnpm add zod @hookform/resolvers react-hook-form
pnpm add react-hot-toast

# or
yarn add @supabase/ssr
yarn add zod @hookform/resolvers react-hook-form
yarn add react-hot-toast

# or
npm i @supabase/ssr
npm i zod @hookform/resolvers react-hook-form
npm i react-hot-toast
@supabase/ssr– This package configures Supabase to use Cookieszod– TypeScript-first schema declaration and validation library@hookform/resolvers– Provides additional validation resolvers to enhance the functionality of forms when using React Hook Form.react-hook-form– This library simplifies the process of handling and validating forms by utilizing React hooks.react-hot-toast– A simple and customizable toast notification library for React applications.
Create a Project on Supabase
As usual, we need to create a new project on the Supabase website. Feel free to use an existing project if you have one. However, if you haven’t set up one yet, follow the steps outlined below.
- Visit the Supabase Website:
Open your web browser and navigate to the Supabase website. - Sign In:
Sign in using your GitHub account. If you’re new to Supabase, head to the Sign Up page, and click “Continue with GitHub” to create an account. - Create an Organization:
After signing up, log in to Supabase. You’ll be directed to the dashboard. Click “New Organization” to create one. Provide your organization name (e.g. your company name) and click “Create organization“. - Create a New Project:
Click “New Project” and select the organization. Provide a project name and generate a secure password. Once you are done, click on the “Create new project” button. - Get the Project URL and Anon Key:
Go back to the Next.js project and create a.envfile in the root directory. Copy the project URL and anon key from the Supabase project, and then add them to the.envfile asNEXT_PUBLIC_SUPABASE_URLandNEXT_PUBLIC_SUPABASE_ANON_KEY. If you can’t find them, click on the Settings icon in the left sidebar. From the settings menu, click on “API“, and you should see the Supabase URL and anon key there.
If you choose to use an existing Supabase project, create a .env file at the root level of your project and include the following environment variables with their respective values.
.env
NEXT_PUBLIC_SUPABASE_ANON_KEY=
NEXT_PUBLIC_SUPABASE_URL=
Create a Supabase Server Client
Now, we need to create a Supabase server client using the Supabase URL and Anon key stored in the .env file, along with the createServerClient function provided by @supabase/ssr. This will enable us to interact with the Supabase services from within server components. To achieve this, follow these steps:
- Create a
libdirectory at the root level of your project. - Inside the
libdirectory, create a folder namedsupabase. - Within the
supabasedirectory, create aserver.tsfile and include the code below.
lib/supabase/server.ts
'use server';

import { createServerClient, type CookieOptions } from '@supabase/ssr';
import { cookies } from 'next/headers';

export default async function createSupabaseServerClient() {
  const cookieStore = cookies();

  return createServerClient(
    process.env.NEXT_PUBLIC_SUPABASE_URL!,
    process.env.NEXT_PUBLIC_SUPABASE_ANON_KEY!,
    {
      cookies: {
        get(name: string) {
          return cookieStore.get(name)?.value;
        },
        set(name: string, value: string, options: CookieOptions) {
          cookieStore.set({ name, value, ...options });
        },
        remove(name: string, options: CookieOptions) {
          cookieStore.set({ name, value: '', ...options });
        },
      },
    }
  );
}
We configured the createServerClient not only to facilitate obtaining cookies but also to set cookies when the user signs in and remove them when the user signs out.
Create the Validation Schemas
Moving forward, let’s create validation schemas using Zod. These schemas will enable us to validate user input against pre-defined rules, ensuring users meet the required criteria during account registration and login. Navigate to the lib directory and create a user-schema.ts file. Subsequently, add the following code to the file.
lib/user-schema.ts
import { object, string, TypeOf } from 'zod';

export const createUserSchema = object({
  name: string({ required_error: 'Name is required' }).min(
    1,
    'Name is required'
  ),
  email: string({ required_error: 'Email is required' })
    .min(1, 'Email is required')
    .email('Invalid email'),
  photo: string().optional(),
  password: string({ required_error: 'Password is required' })
    .min(1, 'Password is required')
    .min(8, 'Password must be more than 8 characters')
    .max(32, 'Password must be less than 32 characters'),
  passwordConfirm: string({
    required_error: 'Please confirm your password',
  }).min(1, 'Please confirm your password'),
}).refine((data) => data.password === data.passwordConfirm, {
  path: ['passwordConfirm'],
  message: 'Passwords do not match',
});

export const loginUserSchema = object({
  email: string({ required_error: 'Email is required' })
    .min(1, 'Email is required')
    .email('Invalid email or password'),
  password: string({ required_error: 'Password is required' }).min(
    1,
    'Password is required'
  ),
});

export type CreateUserInput = TypeOf<typeof createUserSchema>;
export type LoginUserInput = TypeOf<typeof loginUserSchema>;
Create Server Actions to Handle SignUp and Login
Now that the Supabase server client is set up, let’s utilize it to create two additional server actions—one for signing up users and the other for signing in users. Navigate to the app directory and create a new file named _actions.ts. Then, add the following code to the file:
app/_actions.ts
'use server';

import createSupabaseServerClient from '@/lib/supabase/server';
import { CreateUserInput, LoginUserInput } from '@/lib/user-schema';

export async function signUpWithEmailAndPassword({
  data,
  emailRedirectTo,
}: {
  data: CreateUserInput;
  emailRedirectTo?: string;
}) {
  const supabase = await createSupabaseServerClient();
  const result = await supabase.auth.signUp({
    email: data.email,
    password: data.password,
    options: {
      emailRedirectTo,
    },
  });
  return JSON.stringify(result);
}

export async function signInWithEmailAndPassword(data: LoginUserInput) {
  const supabase = await createSupabaseServerClient();
  const result = await supabase.auth.signInWithPassword({
    email: data.email,
    password: data.password,
  });
  return JSON.stringify(result);
}
The emailRedirectTo option passed to the supabase.auth.signUp function allows Supabase to redirect the user to the specified URL after email verification. In this example, the redirect URL will be set to /auth/callback, a route that we’ll create shortly.
This route will extract the code appended to the URL by Supabase and make another request to Supabase to exchange the code for the user’s account details. Consequently, the user will be automatically signed into the application upon successful email address verification.
Get the Authenticated User’s Session
Let’s create a server action to retrieve the user’s session. This action will allow us to secure pages or routes based on the presence or absence of a session. Navigate to the lib directory and create a file named getUserSession.ts. Then, add the following code to the file:
lib/getUserSession.ts
'use server';

import createSupabaseServerClient from './supabase/server';

export default async function getUserSession() {
  const supabase = await createSupabaseServerClient();
  return supabase.auth.getSession();
}
Create a Header Component with Logout Functionality
Now, let’s work on our Header component. In this component, we will attempt to retrieve the user’s session and use the result to dynamically render the navigation links based on whether a session exists or not. Unauthenticated users will see the register and login links, while the profile and logout links will only be visible to authenticated users. All of this will occur on the server, eliminating any delay in link changes within the browser.
To create the Header component, start by creating a ‘components‘ directory at the root level. Inside the ‘components’ directory, create a header.tsx file and add the following code:
components/header.tsx
import Link from 'next/link';
import getUserSession from '@/lib/getUserSession';
import createSupabaseServerClient from '@/lib/supabase/server';

const Header = async () => {
  const { data } = await getUserSession();

  const logoutAction = async () => {
    'use server';
    const supabase = await createSupabaseServerClient();
    await supabase.auth.signOut();
  };

  return (
    <header className='bg-white h-20'>
      <nav className='h-full flex justify-between container items-center'>
        <div>
          <Link href='/' className='text-ct-dark-600 text-2xl font-semibold'>
            CodevoWeb
          </Link>
        </div>
        <ul className='flex items-center space-x-4'>
          <li>
            <Link href='/' className='text-ct-dark-600'>
              Home
            </Link>
          </li>
          {!data.session && (
            <>
              <li>
                <Link href='/register' className='text-ct-dark-600'>
                  Register
                </Link>
              </li>
              <li>
                <Link href='/login' className='text-ct-dark-600'>
                  Login
                </Link>
              </li>
            </>
          )}
          {data.session && (
            <form action={logoutAction} className='flex'>
              <li>
                <Link href='/profile' className='text-ct-dark-600'>
                  Profile
                </Link>
              </li>
              <li>
                <button className='ml-4'>Logout</button>
              </li>
            </form>
          )}
        </ul>
      </nav>
    </header>
  );
};

export default Header;
In the above code, we’ve also implemented a form action named logoutAction and assigned it to the action prop of the form element. This action is responsible for handling the logout functionality.
Register an Account with Supabase in Next.js 14
With all the necessary server actions now defined, let’s proceed to implement the account registration feature using Supabase in Next.js 14. Components in the app directory are, by default, server components, which means they do not have access to hooks or browser APIs for handling form validation and submission. To address this, we’ll adopt a two-step approach.
Firstly, we’ll extract the form component into its own separate client component file, where we’ll manage all the validation logic. Following that, we will create a server component specifically to render the form component.
Create the Registration Form
Let’s begin by creating the registration form. The form will include four fields: name, email, password, and password confirmation. All these input elements will undergo validation by the React-Hook-Form library, and the validation rules will be defined using the Zod library.
To create the form component, enter the app directory and create a new directory named ‘register‘. Then, create a register-form.tsx file within it and include the following code:
app/register/register-form.tsx
'use client';

import { CreateUserInput, createUserSchema } from '@/lib/user-schema';
import { zodResolver } from '@hookform/resolvers/zod';
import { SubmitHandler, useForm } from 'react-hook-form';
import { signUpWithEmailAndPassword } from '../_actions';
import toast from 'react-hot-toast';
import { useRouter } from 'next/navigation';
import { useTransition } from 'react';

export const RegisterForm = () => {
  const [isPending, startTransition] = useTransition();
  const router = useRouter();

  const methods = useForm<CreateUserInput>({
    resolver: zodResolver(createUserSchema),
  });

  const {
    reset,
    handleSubmit,
    register,
    formState: { errors },
  } = methods;

  const onSubmitHandler: SubmitHandler<CreateUserInput> = (values) => {
    startTransition(async () => {
     const result = await signUpWithEmailAndPassword({
        data: values,
        emailRedirectTo: `${location.origin}/auth/callback`,
      });
      const { error } = JSON.parse(result);
      if (error?.message) {
        toast.error(error.message);
        console.log('Error message', error.message);
        reset({ password: '' });
        return;
      }

      toast.success('registered successfully');
      router.push('/login');
    });
  };

  const input_style =
    'form-control block w-full px-4 py-5 text-sm font-normal text-gray-700 bg-white bg-clip-padding border border-solid border-gray-300 rounded transition ease-in-out m-0 focus:text-gray-700 focus:bg-white focus:border-blue-600 focus:outline-none';

  return (
    <form onSubmit={handleSubmit(onSubmitHandler)}>
      <div className='mb-6'>
        <input
          {...register('name')}
          placeholder='Name'
          className={`${input_style}`}
        />
        {errors['name'] && (
          <span className='text-red-500 text-xs pt-1 block'>
            {errors['name']?.message as string}
          </span>
        )}
      </div>
      <div className='mb-6'>
        <input
          type='email'
          {...register('email')}
          placeholder='Email address'
          className={`${input_style}`}
        />
        {errors['email'] && (
          <span className='text-red-500 text-xs pt-1 block'>
            {errors['email']?.message as string}
          </span>
        )}
      </div>
      <div className='mb-6'>
        <input
          type='password'
          {...register('password')}
          placeholder='Password'
          className={`${input_style}`}
        />
        {errors['password'] && (
          <span className='text-red-500 text-xs pt-1 block'>
            {errors['password']?.message as string}
          </span>
        )}
      </div>
      <div className='mb-6'>
        <input
          type='password'
          {...register('passwordConfirm')}
          placeholder='Confirm Password'
          className={`${input_style}`}
        />
        {errors['passwordConfirm'] && (
          <span className='text-red-500 text-xs pt-1 block'>
            {errors['passwordConfirm']?.message as string}
          </span>
        )}
      </div>
      <button
        type='submit'
        style={{ backgroundColor: `${isPending ? '#ccc' : '#3446eb'}` }}
        className='inline-block px-7 py-4 bg-blue-600 text-white font-medium text-sm leading-snug uppercase rounded shadow-md hover:bg-blue-700 hover:shadow-lg focus:bg-blue-700 focus:shadow-lg focus:outline-none focus:ring-0 active:bg-blue-800 active:shadow-lg transition duration-150 ease-in-out w-full'
        disabled={isPending}
      >
        {isPending ? 'loading...' : 'Sign Up'}
      </button>
    </form>
  );
};
We utilized the useTransition hook to invoke our server action signUpWithEmailAndPassword, responsible for interacting with Supabase to register new users. This hook also assists in monitoring the pending state of the server action, which we applied to the button to disable it when the user submits the form. This provides a visual cue to users that the request is currently being processed.
Create the Registration Page
To display the form component, we must create a page file to import and render it. Additionally, this file will include the Header component at the top, allowing users to navigate easily between different pages while on the registration page.
Therefore, create a page.tsx file in the app/register directory and include the following code:
app/register/page.tsx
import Header from '@/components/header';
import { RegisterForm } from './register-form';

export default async function RegisterPage() {
  return (
    <>
      <Header />

      <section className="bg-ct-blue-600 min-h-screen pt-20">
        <div className="container mx-auto px-6 py-12 h-full flex justify-center items-center">
          <div className="md:w-8/12 lg:w-5/12 bg-white px-8 py-10">
            <RegisterForm />
          </div>
        </div>
      </section>
    </>
  );
}
Login with Supabase in Next.js 14
Moving on, let’s now implement the account login feature using Supabase in Next.js 14. The process is similar to the registration feature, except that the number of input fields will be reduced, and a different server action will be invoked.
Create the Login Form
To create the login form, go into the app directory and create a ‘login‘ directory. Within this directory, create a login-form.tsx file and include the following code:
app/login/login-form.tsx
'use client';

import { LoginUserInput, loginUserSchema } from '@/lib/user-schema';
import { zodResolver } from '@hookform/resolvers/zod';
import Image from 'next/image';
import { useRouter } from 'next/navigation';
import { useState, useTransition } from 'react';
import { SubmitHandler, useForm } from 'react-hook-form';
import { signInWithEmailAndPassword } from '../_actions';
import toast from 'react-hot-toast';
import useSupabaseClient from '@/lib/supabase/client';

export const LoginForm = () => {
  const router = useRouter();
  const [error, setError] = useState('');
  const [isPending, startTransition] = useTransition();

  const methods = useForm<LoginUserInput>({
    resolver: zodResolver(loginUserSchema),
  });

  const {
    reset,
    handleSubmit,
    register,
    formState: { errors },
  } = methods;

  const onSubmitHandler: SubmitHandler<LoginUserInput> = async (values) => {
    startTransition(async () => {
      const result = await signInWithEmailAndPassword(values);

      const { error } = JSON.parse(result);
      if (error?.message) {
        setError(error.message);
        toast.error(error.message);
        console.log('Error message', error.message);
        reset({ password: '' });
        return;
      }

      setError('');
      toast.success('successfully logged in');
      router.push('/');
    });
  };

  const input_style =
    'form-control block w-full px-4 py-5 text-sm font-normal text-gray-700 bg-white bg-clip-padding border border-solid border-gray-300 rounded transition ease-in-out m-0 focus:text-gray-700 focus:bg-white focus:border-blue-600 focus:outline-none';

  return (
    <form onSubmit={handleSubmit(onSubmitHandler)}>
      {error && (
        <p className='text-center bg-red-300 py-4 mb-6 rounded'>{error}</p>
      )}
      <div className='mb-6'>
        <input
          type='email'
          {...register('email')}
          placeholder='Email address'
          className={`${input_style}`}
        />
        {errors['email'] && (
          <span className='text-red-500 text-xs pt-1 block'>
            {errors['email']?.message as string}
          </span>
        )}
      </div>
      <div className='mb-6'>
        <input
          type='password'
          {...register('password')}
          placeholder='Password'
          className={`${input_style}`}
        />
        {errors['password'] && (
          <span className='text-red-500 text-xs pt-1 block'>
            {errors['password']?.message as string}
          </span>
        )}
      </div>
      <button
        type='submit'
        style={{ backgroundColor: `${isPending ? '#ccc' : '#3446eb'}` }}
        className='inline-block px-7 py-4 bg-blue-600 text-white font-medium text-sm leading-snug uppercase rounded shadow-md hover:bg-blue-700 hover:shadow-lg focus:bg-blue-700 focus:shadow-lg focus:outline-none focus:ring-0 active:bg-blue-800 active:shadow-lg transition duration-150 ease-in-out w-full'
        disabled={isPending}
      >
        {isPending ? 'loading...' : 'Sign In'}
      </button>

      <div className='flex items-center my-4 before:flex-1 before:border-t before:border-gray-300 before:mt-0.5 after:flex-1 after:border-t after:border-gray-300 after:mt-0.5'>
        <p className='text-center font-semibold mx-4 mb-0'>OR</p>
      </div>

      <a
        className='px-7 py-2 text-white font-medium text-sm leading-snug uppercase rounded shadow-md hover:shadow-lg focus:shadow-lg focus:outline-none focus:ring-0 active:shadow-lg transition duration-150 ease-in-out w-full flex justify-center items-center mb-3'
        style={{ backgroundColor: '#3b5998' }}
        onClick={() => alert('Not Implemented yet')}
        role='button'
      >
        <Image
          className='pr-2'
          src='/images/google.svg'
          alt=''
          style={{ height: '2rem' }}
          width={35}
          height={35}
        />
        Continue with Google
      </a>
      <a
        className='px-7 py-2 text-white font-medium text-sm leading-snug uppercase rounded shadow-md hover:shadow-lg focus:shadow-lg focus:outline-none focus:ring-0 active:shadow-lg transition duration-150 ease-in-out w-full flex justify-center items-center'
        style={{ backgroundColor: '#55acee' }}
        onClick={() => alert('Not Implemented yet')}
        role='button'
      >
        <Image
          className='pr-2'
          src='/images/github.svg'
          alt=''
          width={40}
          height={40}
        />
        Continue with GitHub
      </a>
    </form>
  );
};
Create the Login Page
Let’s create a page component for the LoginForm component. Create a page.tsx inside the app/login/ directory and add the following code:
app/login/page.tsx
import Header from '@/components/header';
import { LoginForm } from './login-form';

export default async function LoginPage() {
  return (
    <>
      <Header />

      <section className='bg-ct-blue-600 min-h-screen pt-20'>
        <div className='container mx-auto px-6 py-12 h-full flex justify-center items-center'>
          <div className='md:w-8/12 lg:w-5/12 bg-white px-8 py-10'>
            <LoginForm />
          </div>
        </div>
      </section>
    </>
  );
}
Create the Home Page and a Protected Page
At this point, we are now ready to create the home page for our application. To do this, open the app/page.tsx file and replace its existing content with the following:
app/page.tsx
import Header from '@/components/header';

export default function Home() {
  return (
    <>
      <Header />
      <section className='bg-ct-blue-600 min-h-screen pt-20'>
        <div className='max-w-4xl mx-auto bg-ct-dark-100 rounded-md h-[20rem] flex justify-center items-center'>
          <p className='text-3xl font-semibold'>
            Implement Authentication with Supabase in Next.js 14
          </p>
        </div>
      </section>
    </>
  );
}
Next, let’s create the ‘profile‘ page to display information about the user. This page will be protected, and accessible only to authenticated users. Start by creating a new directory named ‘profile‘ in the app directory. Inside the ‘profile‘ folder, create a page.tsx file and add the following code:
app/profile/page.tsx
import Header from '@/components/header';
import getUserSession from '@/lib/getUserSession';
import { redirect } from 'next/navigation';

export default async function ProfilePage() {
  const {
    data: { session },
  } = await getUserSession();

  if (!session) {
    return redirect('/login');
  }

  const user = session.user;

  return (
    <>
      <Header />
      <section className='bg-ct-blue-600  min-h-screen pt-20'>
        <div className='max-w-4xl mx-auto bg-ct-dark-100 rounded-md h-[20rem] flex justify-center items-center'>
          <div>
            <p className='mb-3 text-5xl text-center font-semibold'>
              Profile Page
            </p>
            <div className='mt-8'>
              <p className='mb-3'>Id: {user.id}</p>
              <p className='mb-3'>Role: {user.role}</p>
              <p className='mb-3'>Email: {user.email}</p>
              <p className='mb-3'>Provider: {user.app_metadata['provider']}</p>
              <p className='mb-3'>Created At: {user.created_at}</p>
            </div>
          </div>
        </div>
      </section>
    </>
  );
}
We utilized the getUserSession server action created earlier to retrieve the user’s session. If there isn’t any session, we immediately redirect the user to the login page.
Oops, quite a lot of code and configurations. Now you can start the Next.js development server, and you should be able to register an account using your email and password and sign into the application using them.
Set up OAuth with Supabase in Next.js 14
Let’s take things to the next level and implement Google and GitHub OAuth in the authentication flow.
Generate the OAuth Credentials on GitHub
Follow these steps to register a GitHub OAuth app and obtain the Client ID and Secret for the Supabase project.
- On Supabase, click on “Authentication” in the left sidebar of your project and select ‘Providers’ from the authentication menu.
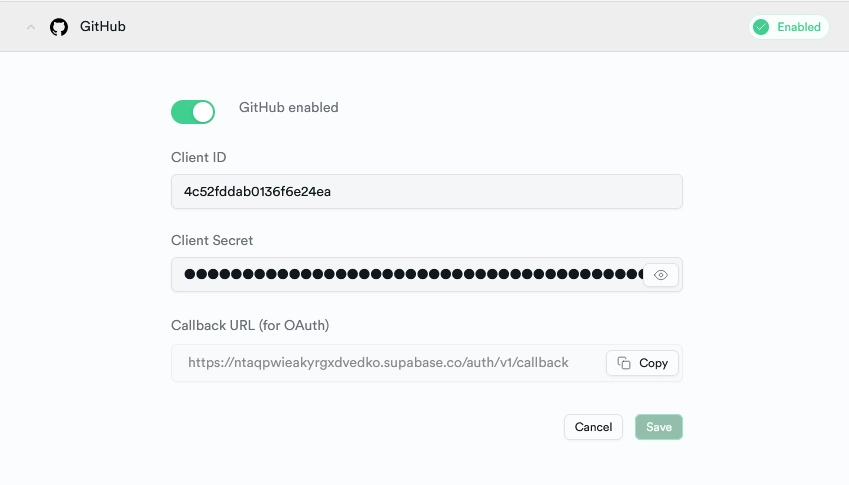
- Click on GitHub from the available providers to collapse a dropdown where you can configure the OAuth credentials. In the dropdown, enable it by turning on the radio button.
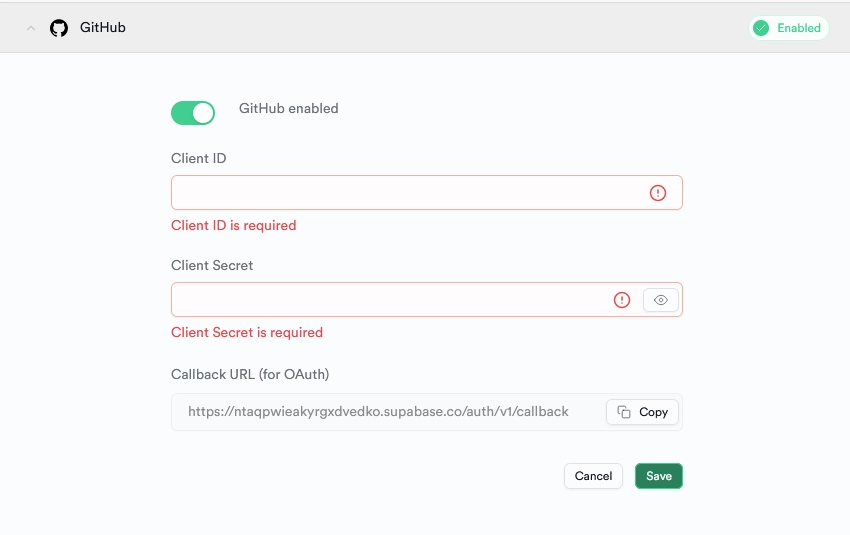
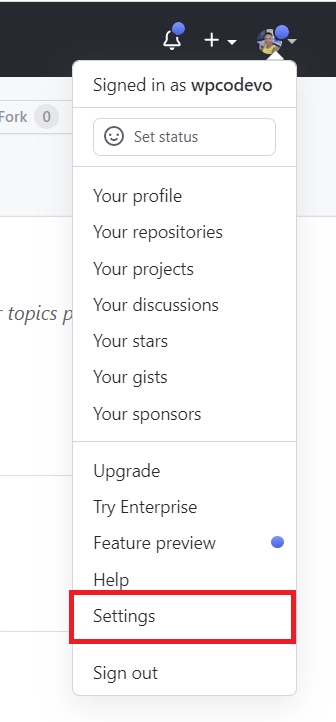
Take note of the Callback URL because we will be using it to configure the OAuth app on GitHub. - Go to GitHub and sign in to your GitHub account if you haven’t already done so. Once signed in, click on your profile picture at the top right corner and select “Settings” from the dropdown menu. You’ll be taken to the profile page.
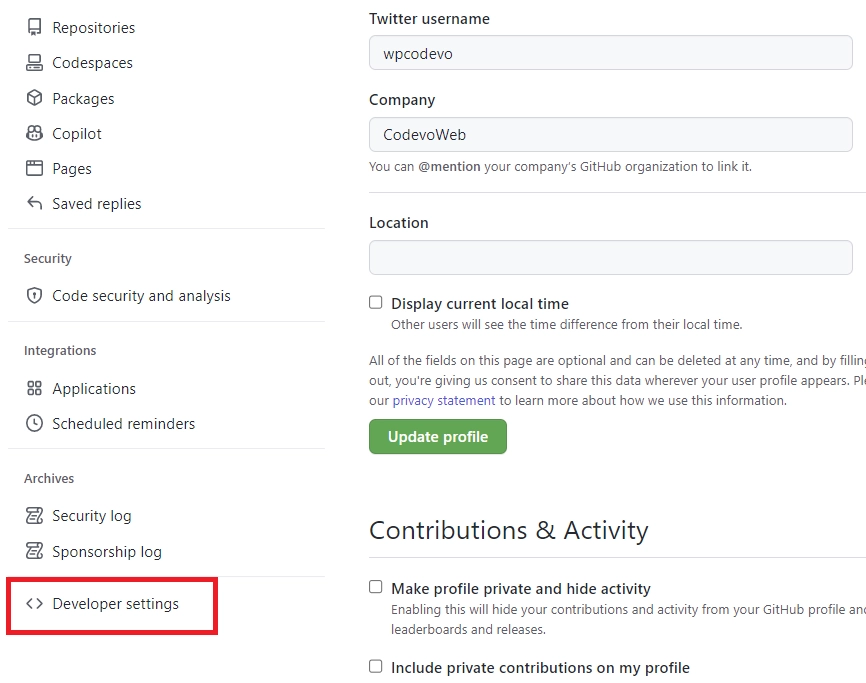
- Scroll down to find the “Developer settings” section and click on it.
- On the Developer settings page, look for “OAuth Apps” and click on it. Under the “OAuth Apps” section, click on the “New OAuth App” button.
- Fill in the “Application name” and “Homepage URL” input fields with the appropriate name and URL for your app. For the “Authorization callback URL,” copy it from the Supabase GitHub provider dropdown and paste it into the “Authorization callback URL” field. This is the URL where GitHub will redirect users after they’ve authorized the app.
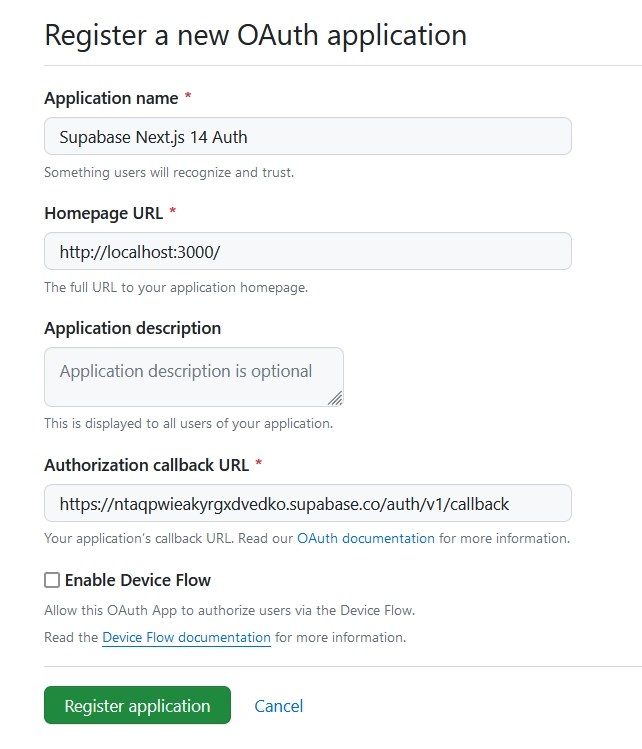
Once you’re finished, hit the “Register application” button to create the OAuth App. - Congrats, your application has been created! You’ll now be taken to the application details page where you can access the “Client ID” and generate the “Client Secret” keys.
To generate the OAuth client secret, click on the “Generate a new client secret” button. GitHub will then prompt you to confirm your identity before the client secret is generated.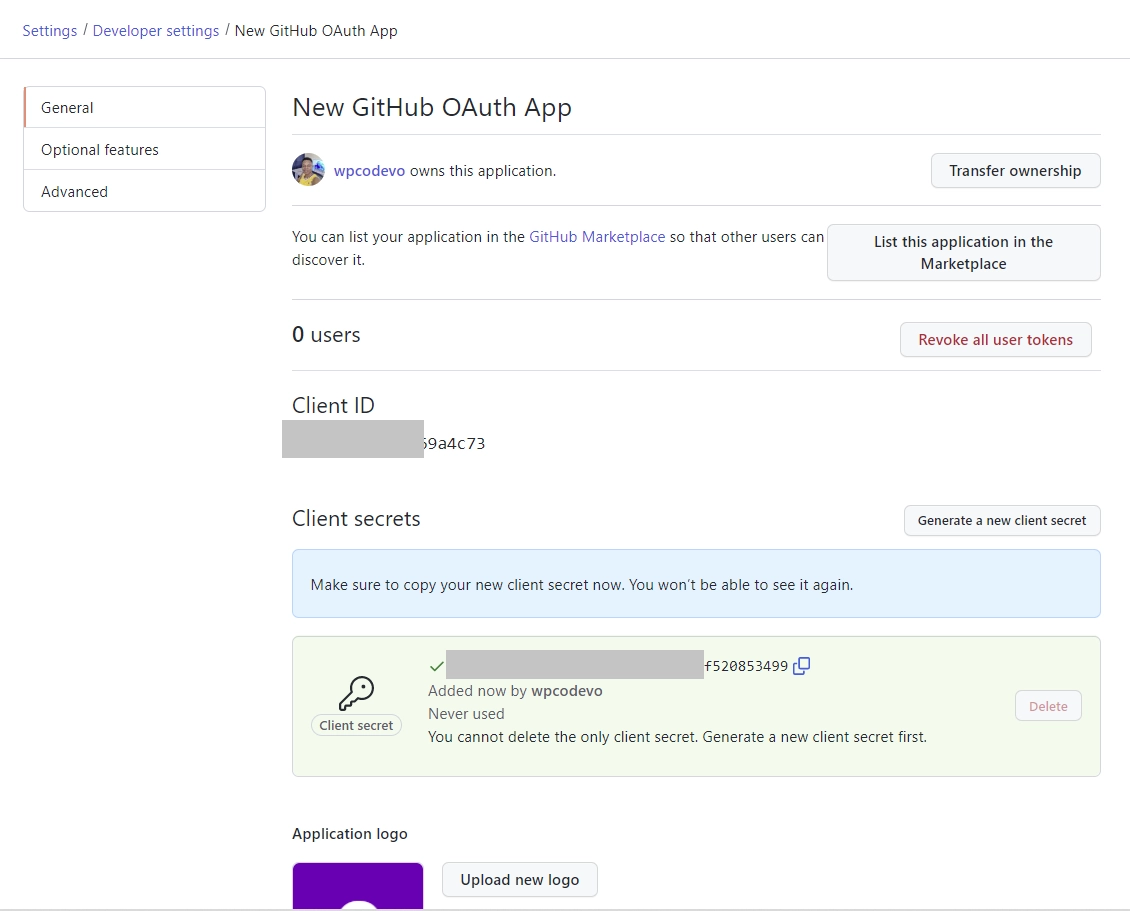
- With the GitHub OAuth client secret now generated, it’s time to add it, along with the client ID, on Supabase. Add the Client ID and secret in the GitHub dropdown on Supabase. Then, click on the ‘save’ button.
Generate the OAuth Credentials on Google
In this section, you will learn how to acquire the Google OAuth2 client ID and secret from the Google Cloud Console and use them to configure the Google OAuth provider on Supabase. Follow these steps:
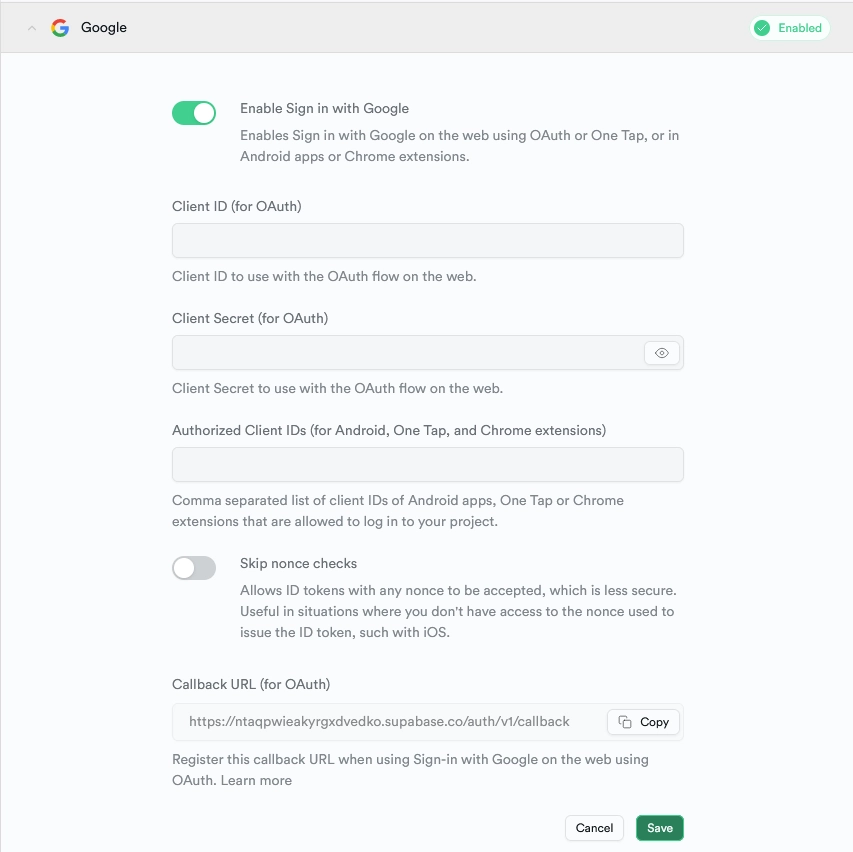
- Click on the Authentication button on the left sidebar of your Supabase project. In the Authentication menu, click on ‘Providers’. Select Google from the list of available providers to display a dropdown where you need to enter the Google OAuth credentials.
Take note of the callback URL because we will use it when setting up the OAuth on the Google Cloud Console. - Go to https://console.developers.google.com/ and make sure you’re signed in to your Google account.
- Click the dropdown menu at the top of the page to display a pop-up window. From there, you can choose an existing project or create a new one.
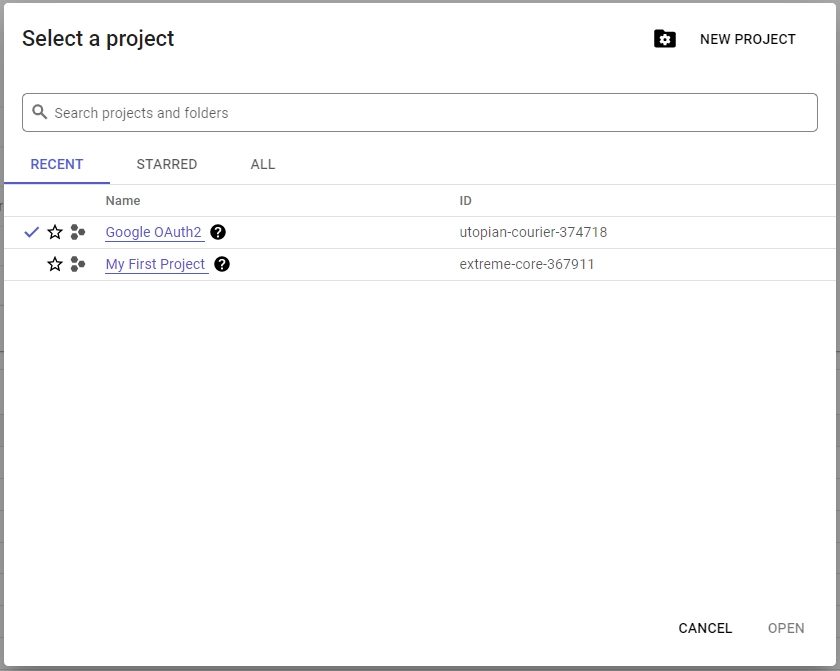
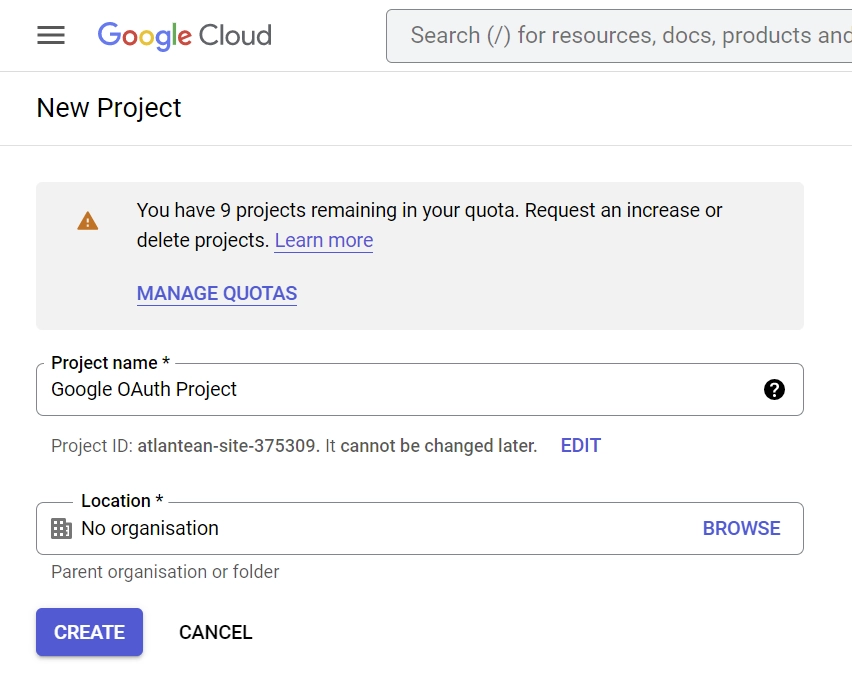
- To create a new project, click the “New Project” button in the top-right corner of the pop-up window. Enter a name for your project and click the “Create” button to complete the process.
- Once your project is created, click the “SELECT PROJECT” button from the notifications.

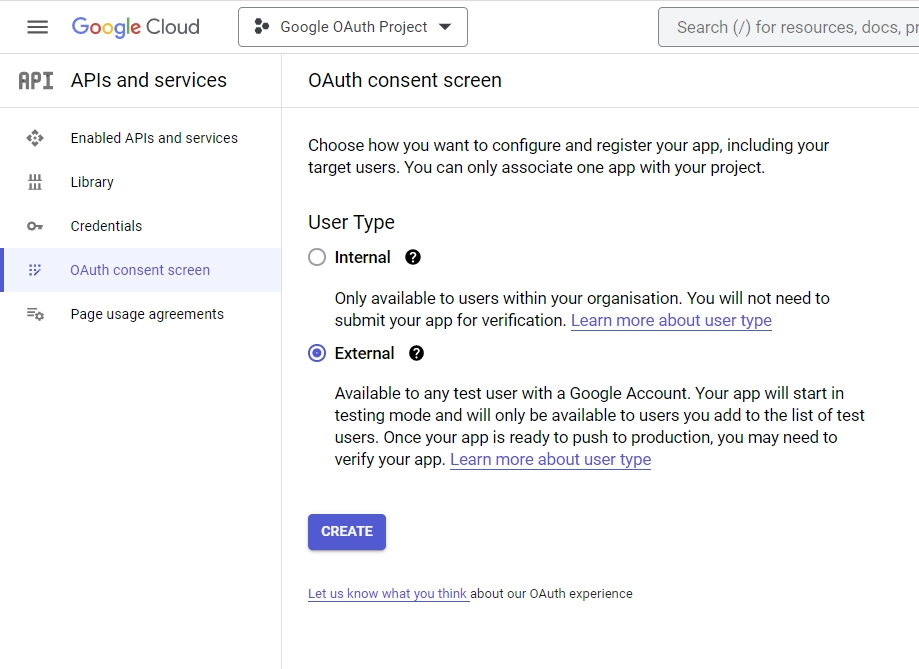
- Click the “OAuth consent screen” menu on the left sidebar. Choose “External” as the “User Type” and click on the “CREATE” button.
- On the “Edit app registration” screen, go to the “App information” section and fill in the required details, including a logo for the consent screen.
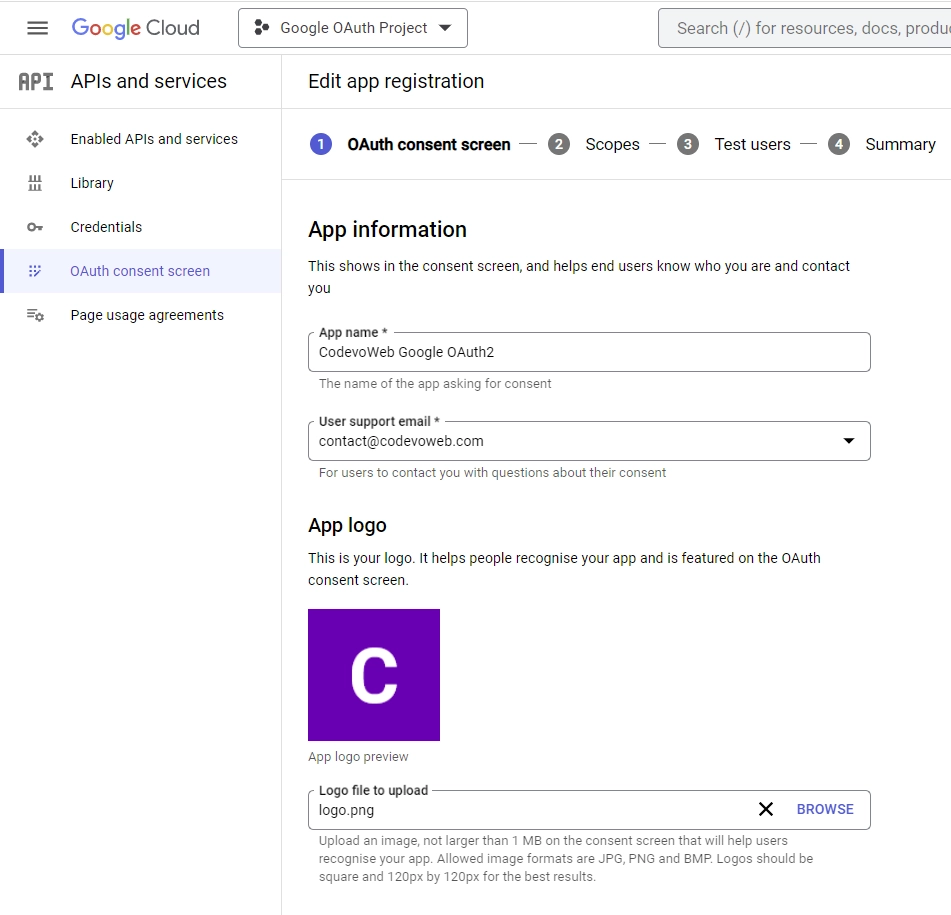
Under the “App domain” section, provide links to your homepage, privacy policy, and terms of service pages. Input your email address under the “Developer contact information” section and click on the “SAVE AND CONTINUE” button.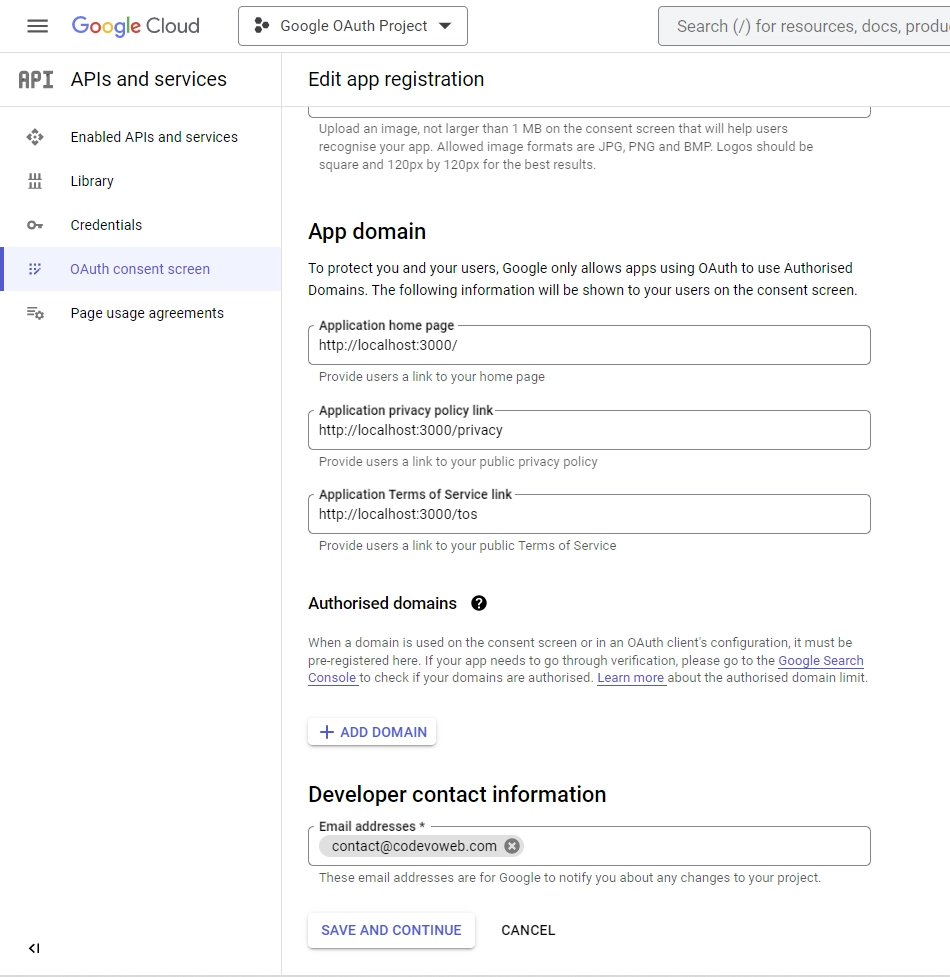
- On the “Scopes” screen, click on the “ADD OR REMOVE SCOPES” button, select
.../auth/userinfo.emailand.../auth/userinfo.profilefrom the list of options, and then click on the “UPDATE” button. Scroll down and click the “SAVE AND CONTINUE” button.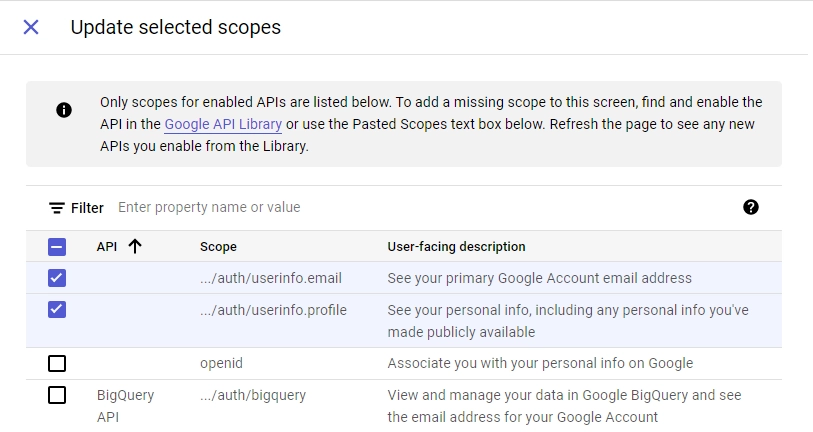
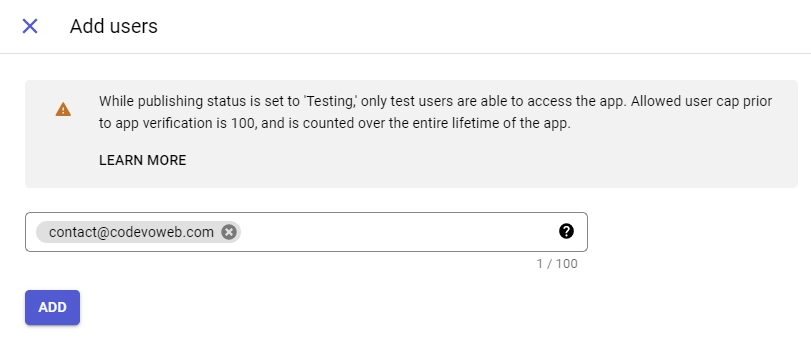
- On the “Test users” screen, add the email addresses of Google accounts that will be authorized to test your application while it is in sandbox mode. Click the “ADD USERS” button and input the email addresses. Click the “SAVE AND CONTINUE” button to proceed.
- Click on the “Credentials” option in the left sidebar. Select the “CREATE CREDENTIALS” button and choose “OAuth client ID” from the list of options provided.
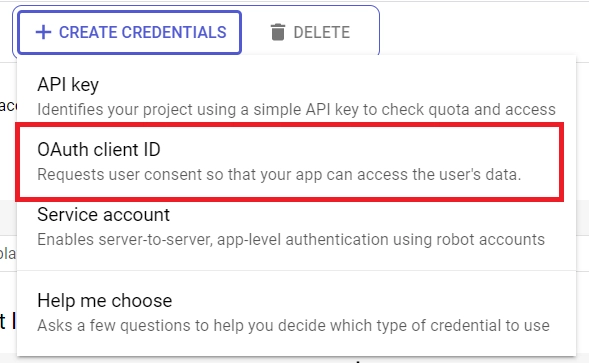
- Select “Web application” as the application type and enter a name for your app. Provide the authorized callback URI from the dropdown of the Google OAuth provider on Supabase. Once completed, click the “Create” button.
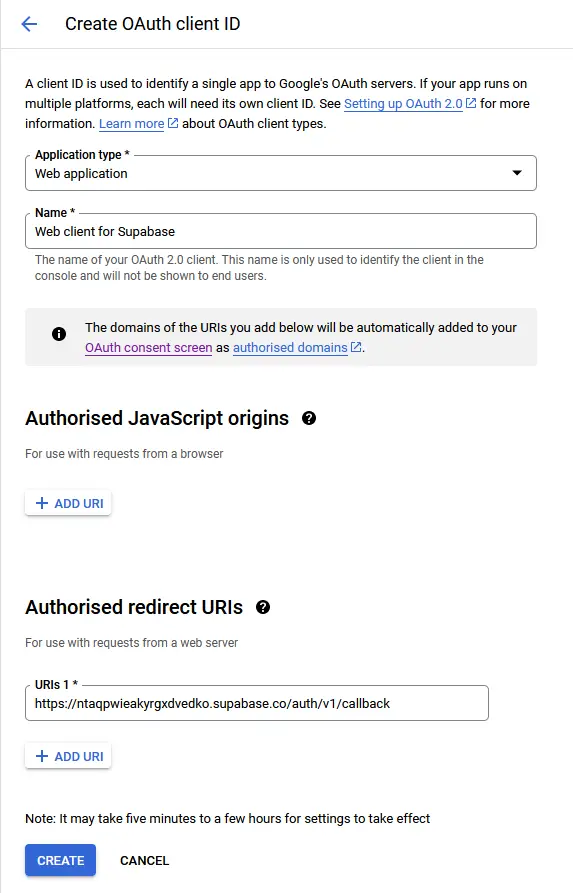
Once the client ID has been generated, copy both the client ID and secret from the “Credentials” page and paste them into the Google provider dropdown on Supabase. Finally, click the ‘Save’ button.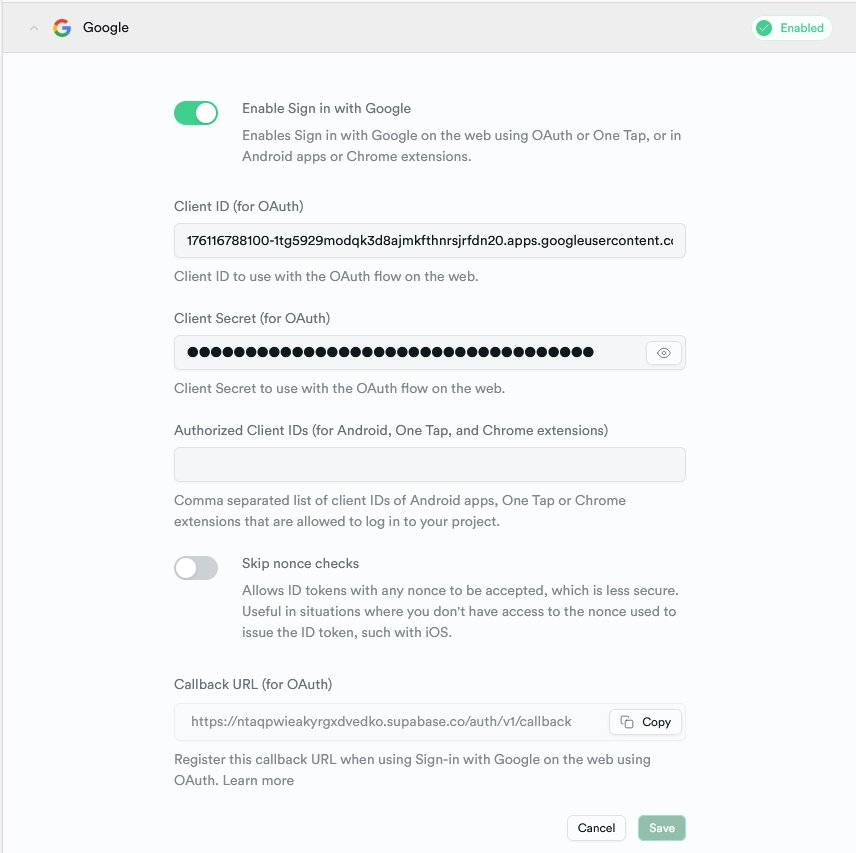
Create a Supabase Browser Client
Now that you’ve configured the Google and GitHub OAuth providers on Supabase, let’s proceed to create a Supabase browser client that will enable us to interact with them. Create a client.ts file inside the lib/supabase/ directory and add the following code:
lib/supabase/client.ts
import { useMemo } from 'react';
import { createBrowserClient } from '@supabase/ssr';

export function getSupabaseBrowserClient() {
  return createBrowserClient(
    process.env.NEXT_PUBLIC_SUPABASE_URL!,
    process.env.NEXT_PUBLIC_SUPABASE_ANON_KEY!
  );
}

function useSupabaseClient() {
  return useMemo(getSupabaseBrowserClient, []);
}

export default useSupabaseClient;
Create an API endpoint for handling
Next, we need to create a /auth/callback route where Supabase will redirect the user after a successful OAuth sign-in. This route will extract the code appended to the redirect URL and utilize it to exchange for the user’s session, automatically logging them into the application. Follow these steps:
- Create an
authfolder in theappdirectory. - Inside the
authfolder, create another folder namedcallback. - Within the
callbackdirectory, create a file namedroute.tsand add the following code:
app/auth/callback/route.ts
import { cookies } from 'next/headers';
import { NextResponse } from 'next/server';
import { type CookieOptions, createServerClient } from '@supabase/ssr';

export async function GET(request: Request) {
  const { searchParams, origin } = new URL(request.url);
  const code = searchParams.get('code');
  const next = searchParams.get('next') ?? '/';

  if (code) {
    const cookieStore = cookies();

    const supabase = createServerClient(
      process.env.NEXT_PUBLIC_SUPABASE_URL!,
      process.env.NEXT_PUBLIC_SUPABASE_ANON_KEY!,
      {
        cookies: {
          get(name: string) {
            return cookieStore.get(name)?.value;
          },
          set(name: string, value: string, options: CookieOptions) {
            cookieStore.set({ name, value, ...options });
          },
          remove(name: string, options: CookieOptions) {
            cookieStore.delete({ name, ...options });
          },
        },
      }
    );
    const { error } = await supabase.auth.exchangeCodeForSession(code);
    if (!error) {
      return NextResponse.redirect(`${origin}${next}`);
    }
  }

  // return the user to an error page with instructions
  return NextResponse.redirect(`${origin}/auth/auth-code-error`);
}
Implement OAuth in the Login Form
Now, we need to modify the app/login/login-form.tsx file to include the Google and GitHub OAuth features. Open the login-form.tsx file and replace its content with the following:
app/login/login-form.tsx
'use client';

import { LoginUserInput, loginUserSchema } from '@/lib/user-schema';
import { zodResolver } from '@hookform/resolvers/zod';
import Image from 'next/image';
import { useRouter } from 'next/navigation';
import { useState, useTransition } from 'react';
import { SubmitHandler, useForm } from 'react-hook-form';
import { signInWithEmailAndPassword } from '../_actions';
import toast from 'react-hot-toast';
import useSupabaseClient from '@/lib/supabase/client';

export const LoginForm = () => {
  const router = useRouter();
  const [error, setError] = useState('');
  const [isPending, startTransition] = useTransition();
  const supabase = useSupabaseClient();

  const methods = useForm<LoginUserInput>({
    resolver: zodResolver(loginUserSchema),
  });

  const {
    reset,
    handleSubmit,
    register,
    formState: { errors },
  } = methods;

  const onSubmitHandler: SubmitHandler<LoginUserInput> = async (values) => {
    startTransition(async () => {
      const result = await signInWithEmailAndPassword(values);

      const { error } = JSON.parse(result);
      if (error?.message) {
        setError(error.message);
        toast.error(error.message);
        console.log('Error message', error.message);
        reset({ password: '' });
        return;
      }

      setError('');
      toast.success('successfully logged in');
      router.push('/');
    });
  };

  const loginWithGitHub = () => {
    supabase.auth.signInWithOAuth({
      provider: 'github',
      options: {
        redirectTo: `${location.origin}/auth/callback`,
      },
    });
  };

  const loginWithGoogle = () => {
    supabase.auth.signInWithOAuth({
      provider: 'google',
      options: {
        redirectTo: `${location.origin}/auth/callback`,
      },
    });
  };

  const input_style =
    'form-control block w-full px-4 py-5 text-sm font-normal text-gray-700 bg-white bg-clip-padding border border-solid border-gray-300 rounded transition ease-in-out m-0 focus:text-gray-700 focus:bg-white focus:border-blue-600 focus:outline-none';

  return (
    <form onSubmit={handleSubmit(onSubmitHandler)}>
      {error && (
        <p className='text-center bg-red-300 py-4 mb-6 rounded'>{error}</p>
      )}
      <div className='mb-6'>
        <input
          type='email'
          {...register('email')}
          placeholder='Email address'
          className={`${input_style}`}
        />
        {errors['email'] && (
          <span className='text-red-500 text-xs pt-1 block'>
            {errors['email']?.message as string}
          </span>
        )}
      </div>
      <div className='mb-6'>
        <input
          type='password'
          {...register('password')}
          placeholder='Password'
          className={`${input_style}`}
        />
        {errors['password'] && (
          <span className='text-red-500 text-xs pt-1 block'>
            {errors['password']?.message as string}
          </span>
        )}
      </div>
      <button
        type='submit'
        style={{ backgroundColor: `${isPending ? '#ccc' : '#3446eb'}` }}
        className='inline-block px-7 py-4 bg-blue-600 text-white font-medium text-sm leading-snug uppercase rounded shadow-md hover:bg-blue-700 hover:shadow-lg focus:bg-blue-700 focus:shadow-lg focus:outline-none focus:ring-0 active:bg-blue-800 active:shadow-lg transition duration-150 ease-in-out w-full'
        disabled={isPending}
      >
        {isPending ? 'loading...' : 'Sign In'}
      </button>

      <div className='flex items-center my-4 before:flex-1 before:border-t before:border-gray-300 before:mt-0.5 after:flex-1 after:border-t after:border-gray-300 after:mt-0.5'>
        <p className='text-center font-semibold mx-4 mb-0'>OR</p>
      </div>

      <a
        className='px-7 py-2 text-white font-medium text-sm leading-snug uppercase rounded shadow-md hover:shadow-lg focus:shadow-lg focus:outline-none focus:ring-0 active:shadow-lg transition duration-150 ease-in-out w-full flex justify-center items-center mb-3'
        style={{ backgroundColor: '#3b5998' }}
        onClick={loginWithGoogle}
        role='button'
      >
        <Image
          className='pr-2'
          src='/images/google.svg'
          alt=''
          style={{ height: '2rem' }}
          width={35}
          height={35}
        />
        Continue with Google
      </a>
      <a
        className='px-7 py-2 text-white font-medium text-sm leading-snug uppercase rounded shadow-md hover:shadow-lg focus:shadow-lg focus:outline-none focus:ring-0 active:shadow-lg transition duration-150 ease-in-out w-full flex justify-center items-center'
        style={{ backgroundColor: '#55acee' }}
        onClick={loginWithGitHub}
        role='button'
      >
        <Image
          className='pr-2'
          src='/images/github.svg'
          alt=''
          width={40}
          height={40}
        />
        Continue with GitHub
      </a>
    </form>
  );
};
We’ve created two functions:
loginWithGitHub– This function will be called to sign the user into the application using their GitHub account. It generates the GitHub consent screen URL and redirects the user to it. On the consent screen, the user will be prompted to authorize our application.loginWithGoogle– When invoked, this function generates the Google OAuth consent screen URL and redirects the user to it.
Create a Next.js Middleware to Refresh Cookies
Finally, we need to create a Next.js middleware that will automatically refresh the cookies when the user’s session expires, even before the route gets loaded. This way, when the user leaves their browser tab open and their session expires, and they attempt to navigate to a protected page, the middleware will refresh their cookies in the background.
This ensures that when we call the supabase.auth.getSession function from any component, it will be based on the new cookies. Create a middleware.ts file in the root directory and add the following code:
middleware.ts
import { createServerClient, type CookieOptions } from '@supabase/ssr';
import { NextResponse, type NextRequest } from 'next/server';

export async function middleware(request: NextRequest) {
  let response = NextResponse.next({
    request: {
      headers: request.headers,
    },
  });

  const supabase = createServerClient(
    process.env.NEXT_PUBLIC_SUPABASE_URL!,
    process.env.NEXT_PUBLIC_SUPABASE_ANON_KEY!,
    {
      cookies: {
        get(name: string) {
          return request.cookies.get(name)?.value;
        },
        set(name: string, value: string, options: CookieOptions) {
          request.cookies.set({
            name,
            value,
            ...options,
          });
          response = NextResponse.next({
            request: {
              headers: request.headers,
            },
          });
          response.cookies.set({
            name,
            value,
            ...options,
          });
        },
        remove(name: string, options: CookieOptions) {
          request.cookies.set({
            name,
            value: '',
            ...options,
          });
          response = NextResponse.next({
            request: {
              headers: request.headers,
            },
          });
          response.cookies.set({
            name,
            value: '',
            ...options,
          });
        },
      },
    }
  );

  await supabase.auth.getUser();

  return response;
}

export const config = {
  matcher: [
    /*
     * Match all request paths except for the ones starting with:
     * - _next/static (static files)
     * - _next/image (image optimization files)
     * - favicon.ico (favicon file)
     * Feel free to modify this pattern to include more paths.
     */
    '/((?!_next/static|_next/image|favicon.ico).*)',
  ],
};
And we are done! You should also be able to sign into the Next.js application using both the Google and GitHub OAuth options available on the login form.
Conclusion
In this comprehensive guide, you learned how to implement authentication using email and password, as well as Google and GitHub OAuth providers with Supabase in Next.js 14. I hope you found this article helpful and enjoyable. If you have any questions or feedback, feel free to leave them in the comment section below. Thanks for reading!