
In this tutorial, we’ll delve into the implementation of JSON Web Token (JWT) authentication within SvelteKit. We’ll be using TypeScript along with Prisma, a popular Object-Relational Mapping (ORM) tool for Node.js. By integrating these components, we’ll empower our API to handle crucial user-related functions such as registration, sign-ins, sign-outs, and retrieval of user account details.
To ensure the security of our API, we’ll leverage SvelteKit’s powerful feature known as hooks, which acts as middleware. This will allow us to establish protection for private routes within the API. This approach is particularly advantageous as it enables us to secure multiple endpoints from a single location, simplifying the route protection process.
It’s worth noting that we previously created a similar API in a prior article titled ‘JWT Authentication in Next.js 13 API Route Handlers‘. However, that implementation was built using Next.js 13 and included a frontend to interact with the API. If you’re interested, you can refer to that article to gain insight into the flow. In an upcoming article, we’ll create the frontend for the SvelteKit API developed in this tutorial.
Without further ado, let’s dive straight into the tutorial and start building a JWT authentication system for our SvelteKit application.
More practice (Optional):
- How to Build a Simple API in SvelteKit
- Build a Frontend App in SvelteKit using a RESTful API
- Building a FullStack SvelteKit Application with Form Actions
- Learn Next.js Server Actions and Mutations with Examples
- Integrate FastAPI Framework with Next.js and Deploy
- Integrate Python Flask Framework with Next.js and Deploy
- JWT Authentication in Next.js 13 API Route Handlers
- User Registration and Login in Next.js 13 App Directory
- Build a Simple API in Next.js 13 App Directory
- Build a Simple Frontend App in Next.js 13 App Directory
- Next.js – Add Google and GitHub OAuth2 using NextAuth.js
- Next.js – Use Custom Login and SignUp Pages for NextAuth.js
- How to Setup Prisma ORM in Next.js 13 App Directory
Running the SvelteKit JWT App Locally
To run the SvelteKit application on your local machine, follow these steps:
- Download or clone the project from its GitHub repository at https://github.com/wpcodevo/sveltekit-jwt-authentication. Once you have access to the project, open it in your preferred IDE or text editor.
- Install all the necessary dependencies by running the command
pnpm iin the integrated terminal of your code editor. If you do not already have PNPM installed, you can do so by runningnpm i -g pnpm. - Duplicate the
.env.examplefile and rename the copy to.env. - If you have a cloud PostgreSQL database, add its URL as the value of the
DATABASE_URLvariable in the.envfile. However, if you don’t have one, you can set it up using Docker by running the commanddocker-compose up -d. - Run the command
pnpm dev --port 3000. This command will synchronize the Prisma migrations with the PostgreSQL database, generate the Prisma Client in thenode_modulesfolder, and start the SvelteKit development server. - Import the
SvelteKit HS256 JWT.postman_collection.jsonfile provided in the source code into Postman or the Thunder Client VS Code extension to access predefined requests for testing the API. You can use these requests to test the JWT authentication flow, including signing up, signing in, signing out, and retrieving your account information.
Setting up the SvelteKit Project
As usual, let’s begin by generating a new SvelteKit project. If you already have one, feel free to skip this step. Open a new terminal in the folder where you want to keep the source code, and then run the following command based on your preferred package manager to bootstrap the SvelteKit project:
# For PNPM
pnpm create svelte@latest sveltekit-jwt-authentication

# For Yarn
yarn create svelte@latest sveltekit-jwt-authentication

# For NPM
npm create svelte@latest sveltekit-jwt-authentication
Running this command will temporarily download the Svelte project scaffolding binary from the NPM repository. Next, you’ll be prompted to choose a template. Select the “skeleton project” option, and then choose “Yes” for TypeScript type checking. Optionally, you can include ESLint and Prettier by selecting them with the spacebar. Finally, press the Enter key to generate the project.
Once the project is created, navigate to its folder and run pnpm install to install all the necessary dependencies. After the installation is complete, you can open the project in your preferred IDE. Now you’re all set to start building your SvelteKit JWT authentication application!
Setting up a PostgreSQL Database
Moving on, let’s set up a cloud Postgres database, which will be beneficial when we decide to deploy the application online. I’ll guide you through the process of obtaining the connection URI from Supabase, but feel free to choose any other provider if you prefer. Follow these simple steps:
- Sign up at https://supabase.com/dashboard/sign-up using your GitHub account.
- Create a new project. Once the project is set up, copy the PostgreSQL database password and keep it in a place you can easily access. Next, click on the settings icon located in the left sidebar.
- In the settings page, select “Database” and scroll down to the “Connection string” section. Under this, choose the “URI” tab and copy the provided URI.
- Now, create a
.envfile at the root level of your project and paste the copied connection string as the value for theDATABASE_URLvariable. Be sure to replace the[YOUR-PASSWORD]placeholder with your actual Postgres database password, which you received when creating the new project on Supabase.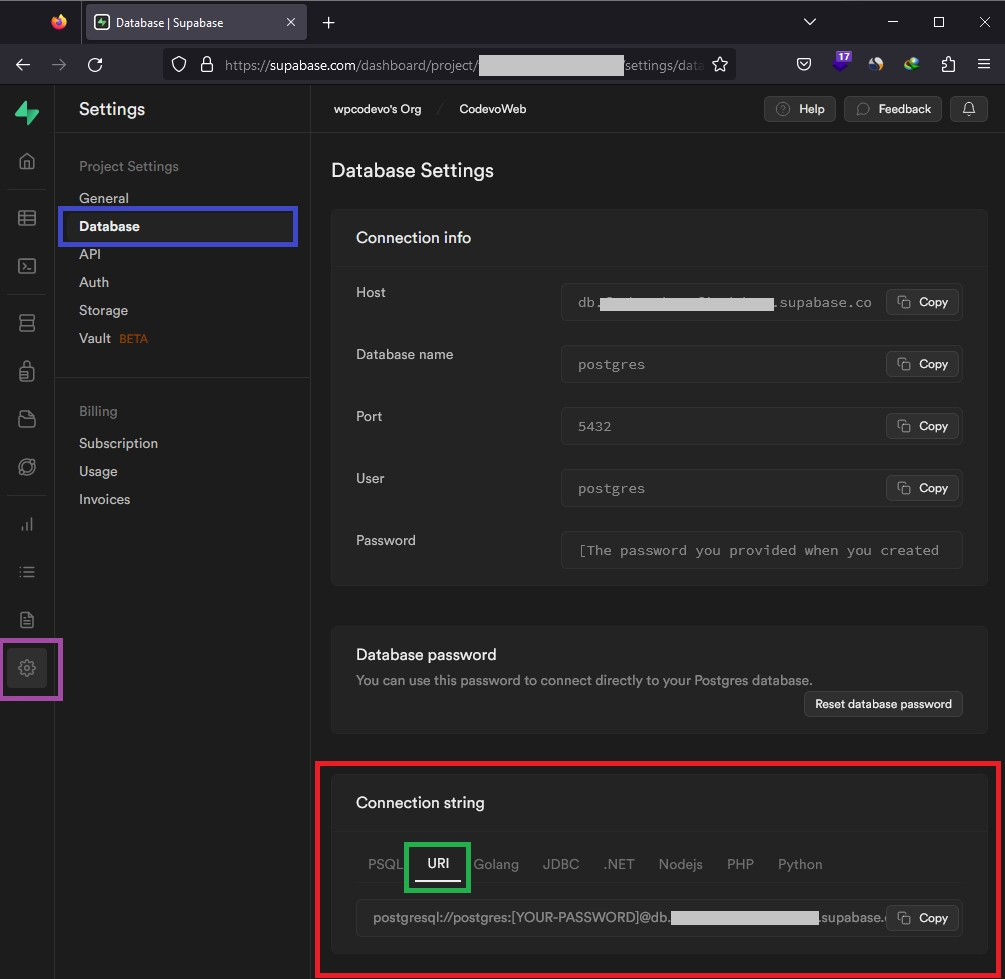
.env
# -----------------------------------------------------------------------------
# Database (PostgreSQL - Supabase)
# -----------------------------------------------------------------------------

DATABASE_URL=paste_cloud_postgres_uri_here
Optional: Using Docker
If you haven’t obtained a PostgreSQL connection URI from a cloud provider, don’t worry. We can easily set it up using Docker and add pgAdmin to help us view and manipulate the data stored in the PostgreSQL database. This is an optional step for those who didn’t use a cloud-based Postgres database.
To set up a Postgres server and pgAdmin in Docker, follow these steps:
- Create a
docker-compose.ymlfile at the root level of your project. - Add the following configurations to the
docker-compose.ymlfile:
docker-compose.yml
services:
  postgres:
    image: postgres
    container_name: postgres
    ports:
      - 6500:5432
    env_file:
      - ./.env
    volumes:
      - postgres:/var/lib/postgresql/data
  pgadmin:
    image: dpage/pgadmin4
    container_name: pgadmin
    ports:
      - "5050:80"
    env_file:
      - ./.env
    volumes:
      - pgadmin-data:/var/lib/pgadmin
    restart: always
volumes:
  postgres:
  pgadmin-data:
In the configuration, we used a .env file in the env_file fields of both the postgres and pgadmin services. This file will hold the credentials needed to build the PostgreSQL and pgAdmin images. To ensure these credentials are available, create a .env file at the project’s root directory and include the following environment variables:
.env
# -----------------------------------------------------------------------------
# PostgreSQL Credentials for Docker Compose
# -----------------------------------------------------------------------------
POSTGRES_HOST=127.0.0.1
POSTGRES_USER=admin
POSTGRES_PASSWORD=password123
POSTGRES_DB=sveltekit_jwt_app
POSTGRES_PORT=6500

# -----------------------------------------------------------------------------
# pgAdmin4 Credentials for Docker Compose
# -----------------------------------------------------------------------------
PGADMIN_DEFAULT_EMAIL=admin@admin.com
PGADMIN_DEFAULT_PASSWORD=password123
PGADMIN_LISTEN_PORT=80


# -----------------------------------------------------------------------------
# Database (PostgreSQL - Docker)
# -----------------------------------------------------------------------------
DATABASE_URL=postgresql://admin:password123@localhost:6500/sveltekit_jwt_app?schema=public
With the environment variables set, run the command docker-compose up -d to start both the PostgreSQL and pgAdmin servers in their respective containers.
Setting up Prisma ORM
Now that the PostgreSQL database is up and running, let’s proceed to set up Prisma in the project. Follow these steps:
Step 1: Install Prisma CLI and Client
Run the command below to install both the Prisma CLI and the Client:
# For PNPM
pnpm add @prisma/client && pnpm add -D prisma

# For Yarn
yarn add @prisma/client && yarn add -D prisma

# For NPM
npm i @prisma/client && npm i -D prisma
Step 2: Initialize Prisma in the Project
Next, initialize Prisma in the project by running the command below:
# For PNPM
pnpm prisma init --datasource-provider postgresql

# For Yarn
yarn prisma init --datasource-provider postgresql

# For NPM
npx prisma init --datasource-provider postgresql
This command will generate a prisma directory at the root level, containing a schema.prisma file. The schema.prisma file holds information about the database provider along with the necessary Prisma models. Open the schema.prisma file and replace its existing content with the following:
prisma/schema.prisma
// This is your Prisma schema file,
// learn more about it in the docs: https://pris.ly/d/prisma-schema
generator client {
provider = "prisma-client-js"
}
datasource db {
provider = "postgresql"
url = env("DATABASE_URL")
}
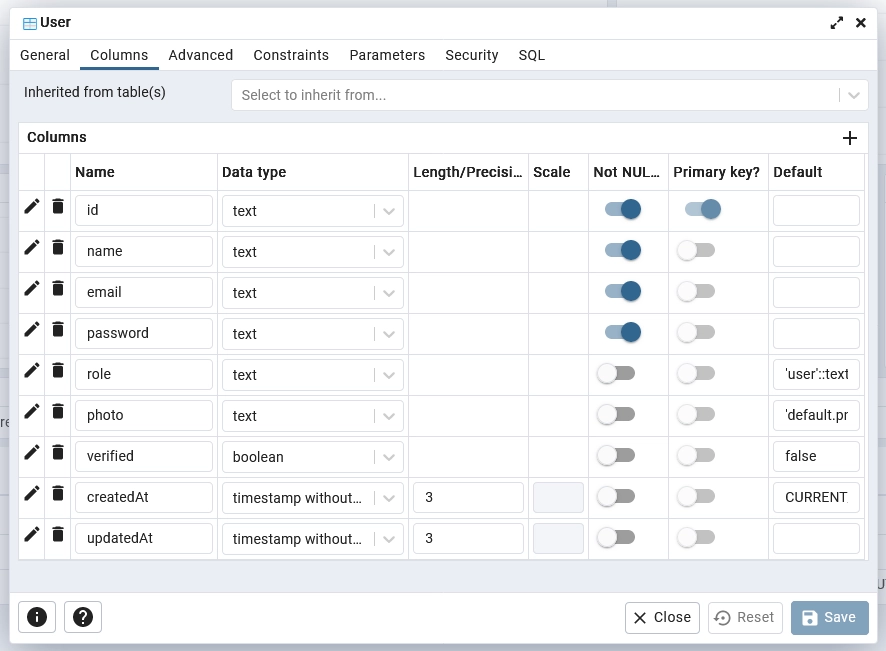
model User {
id String @id @unique @default(uuid())
name String
email String @unique
password String
role String? @default("user")
photo String? @default("default.png")
verified Boolean? @default(false)
createdAt DateTime? @default(now())
updatedAt DateTime? @updatedAt
}
In this schema, we defined a User model with fields that the Prisma engine will later convert into their corresponding columns in the database.
Step 3: Performing Database Migrations
With the User model defined in the Prisma schema, it’s time to generate and apply migrations to the PostgreSQL database. Follow these steps:
Step 3.1: Generate Migrations
Run the following command to establish a connection to the PostgreSQL database, generate migrations named init, and apply the necessary changes:
# For PNPM
pnpm prisma migrate dev --name init

# For Yarn
yarn prisma migrate dev --name init

# For NPM
npx prisma migrate dev --name init
This command will generate a migration with the name init in the migrations directory. The migration contains the SQL commands to create the necessary tables and columns based on the defined User model.
Step 3.2: View Tables in pgAdmin
To view the tables added to the PostgreSQL database, access the pgAdmin GUI by opening your web browser and navigating to http://localhost:5050/. Ensure that your Docker container is up and running.
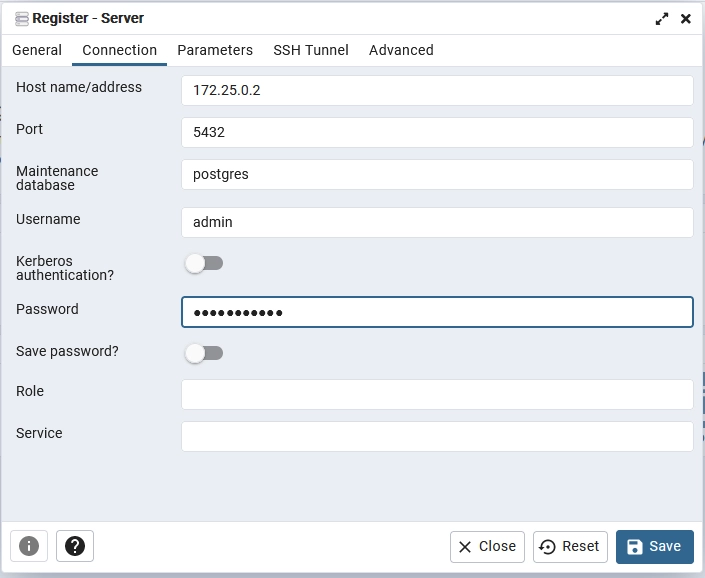
Next, log in to pgAdmin using the credentials specified in the .env file. Once logged in, on the pgAdmin dashboard, create a new server using the PostgreSQL credentials from the .env file. Use the default Postgres port (5432) instead of the one provided in the .env file.
To obtain the IP address of the running Postgres server, follow these steps:
- Run the command
docker psto list all running Docker containers. - Find the container ID of the PostgreSQL container from the output.
- Run the command
docker inspect <container_id>, replacing<container_id>with the actual container ID from the previous step. - In the output, scroll down to the “NetworkSettings” section and copy the value of the “IPAddress” field.
After successfully registering the Postgres server in pgAdmin, navigate to sveltekit_jwt_app -> Schemas -> Tables section. Next, right-click on the User table and select “Properties” to view its details. In the displayed popup, click on the “Columns” tab to explore the table’s columns and their properties.
Connecting to Database
We are now ready to establish the connection between the SvelteKit application and the PostgreSQL database using the Prisma Client. To ensure smooth development and prevent unnecessary database connections during hot reloads, we will store the Prisma Client globally.
Open the app.d.ts file located in the src directory. This file is used for type declarations in SvelteKit projects. Add the following code to declare a global variable named prisma with the type PrismaClient:
src/app.d.ts
// See https://kit.svelte.dev/docs/types#app

import type { PrismaClient } from '@prisma/client';

// for information about these interfaces
declare global {
	namespace App {
		// interface Error {}
		// interface Locals {}
		// interface PageData {}
		// interface Platform {}
	}
	var prisma: PrismaClient;
}

export {};
Next, navigate to the src/lib/ directory and create a new folder called server. Inside the server folder, add a new file named prisma.ts. This file will handle the creation of the Prisma Client and manage its global instance. Include the following code in the prisma.ts file:
src/lib/server/prisma.ts
import { PrismaClient } from '@prisma/client';

const options: any = process.env.NODE_ENV === 'development' ? { log: ['query'] } : {};
const prisma = globalThis.prisma ?? new PrismaClient(options);

if (process.env.NODE_ENV === 'development') globalThis.prisma = prisma;

export { prisma };
This code sets up the Prisma Client with additional logging in the development environment to view executed queries. It checks if a global prisma variable already exists, and if not, it creates a new instance of the Prisma Client. During development, the prisma instance is stored globally to avoid multiple connections.
Creating the Request Validation Schemas
When building an API, it’s essential to validate incoming data before storing it in the database to ensure data integrity. To achieve this, we’ll use the zod library, which provides powerful schema validation capabilities. Let’s install Zod first:
# For PNPM
pnpm add zod

# For Yarn
yarn add zod

# For NPM
npm i zod
Once Zod is installed, create a new folder named validations inside the src/lib/ directory. This folder will hold all our validation schemas. Although we’ll define just one schema in this article, placing the validations folder in the src/lib/ directory allows us to use the validation schemas on both the server and client.
Within the validations folder, create a user.schema.ts file and add the following code to it:
src/lib/validations/user.schema.ts
import { z } from 'zod';

export const RegisterUserSchema = z
	.object({
		name: z
			.string({
				required_error: 'Name is required'
			})
			.min(1, 'Full name is required'),
		email: z
			.string({
				required_error: 'Email is required'
			})
			.min(1, 'Email is required')
			.email('Email is invalid'),
		photo: z.string().optional(),
		password: z
			.string({
				required_error: 'Password is required'
			})
			.min(1, 'Password is required')
			.min(8, 'Password must be more than 8 characters')
			.max(32, 'Password must be less than 32 characters'),
		passwordConfirm: z
			.string({
				required_error: 'Confirm your password'
			})
			.min(1, 'Confirm your password')
	})
	.refine((data) => data.password === data.passwordConfirm, {
		path: ['passwordConfirm'],
		message: 'Passwords do not match'
	});

export const LoginUserSchema = z.object({
	email: z
		.string({
			required_error: 'Email is required'
		})
		.min(1, 'Email is required')
		.email('Email is invalid'),
	password: z
		.string({
			required_error: 'Password is required'
		})
		.min(1, 'Password is required')
		.min(8, 'Password must be at least 8 characters')
});

export type LoginUserInput = z.infer<typeof LoginUserSchema>;
export type RegisterUserInput = z.infer<typeof RegisterUserSchema>;
We’ve defined two validation schemas: RegisterUserSchema for validating the request body during the account registration process, and LoginUserSchema for validating the request body during the login process. At the bottom of the file, we use Zod’s z.infer generic type to obtain the TypeScript types from the schemas. This will ensure that we get type safety when using the schemas throughout our application.
Signing and Verifying JSON Web Tokens
To handle JSON Web Tokens (JWTs) in a secure and efficient way, we’ll use the jose library instead of the jsonwebtoken library. The advantage of using jose is that it doesn’t depend on the Crypto module, making it suitable for serverless environments where Crypto might not be available. Let’s install jose:
# For PNPM
pnpm add jose

# For Yarn
yarn add jose

# For NPM
npm i jose
Next, open the .env file and add the following environment variables to define the JWT secret and expiration time. Ensure that your JWT secret key is strong and hard to guess for enhanced security.
.env
# -----------------------------------------------------------------------------
# JSON Web Token Credentials
# -----------------------------------------------------------------------------
JWT_SECRET_KEY=my_ultra_secure_jwt_secret_key
JWT_EXPIRES_IN=60
JWT_SECRET_KEY– will be used to sign the tokens securely.JWT_EXPIRES_IN– specifies the token expiration time in minutes (here set to 60 minutes).
Sign JWTs
In this section, we’ll create a utility function called signJWT responsible for signing new JSON Web Tokens (JWTs). The signJWT function takes two parameters: payload, which contains the subject (sub) of the token, and options, which includes the expiration time (exp) of the token. The function will sign the JWT using the HS256 algorithm and return the signed token.
To get started, create a new file named token.ts in the src/lib/server/ directory and add the following code:
src/lib/server/token.ts
import { JWT_SECRET_KEY } from '$env/static/private';
import { SignJWT, jwtVerify } from 'jose';

export const signJWT = async (payload: { sub: string }, options: { exp: string }) => {
	try {
		const secret = new TextEncoder().encode(JWT_SECRET_KEY);
		const alg = 'HS256';
		return new SignJWT(payload)
			.setProtectedHeader({ alg })
			.setExpirationTime(options.exp)
			.setIssuedAt()
			.setSubject(payload.sub)
			.sign(secret);
	} catch (error) {
		throw error;
	}
};
In the signJWT function, we first convert the JWT_SECRET_KEY from the environment to bytes using TextEncoder. Then, we set the algorithm to HS256, which is a widely used hashing algorithm for signing JWTs. We set the expiration time of the token using the options.exp parameter and add the current timestamp as the issued at (iat) claim. Finally, we set the subject (sub) claim to the provided payload’s sub value and sign the token with the secret key.
Verify JWTs
In the same token.ts file, we’ll implement another utility function called verifyJWT to verify the integrity of a JWT and ensure it’s valid.
src/lib/server/token.ts
export const verifyJWT = async <T>(token: string): Promise<T> => {
	try {
		return (await jwtVerify(token, new TextEncoder().encode(JWT_SECRET_KEY))).payload as T;
	} catch (error) {
		console.log(error);
		throw new Error('Your token has expired.');
	}
};
The verifyJWT function takes a token parameter, which is the JWT to be verified. Inside the function, we use jwtVerify from the jose library to verify the JWT’s signature and integrity. If the token is valid, we return its payload as the generic type T, which allows us to use the verified payload with a specific interface. If the token is invalid or has expired, an error will be thrown, indicating that the token is no longer valid.
Creating the SvelteKit API Endpoints
Now, we’ve reached the heart of this tutorial – the point where we build the core API endpoints responsible for managing JWT authentication. Let’s outline the key endpoints we’ll be creating:
/api/auth/register– Here, users can register and create new accounts./api/auth/login– This endpoint handles the login process for registered users./api/auth/logout– Designed for securely logging out authenticated users./api/users/me– This endpoint allows authenticated users to retrieve their credentials.
Let’s dive right in. Open your terminal and install the Bcrypt library using this command:
# For PNPM
pnpm add bcryptjs && pnpm add -D @types/bcryptjs

# For Yarn
yarn add bcryptjs && yarn add -D @types/bcryptjs

# For NPM
npm i bcryptjs && npm i -D @types/bcryptjs
Why are we incorporating the Bcrypt library? Well, it serves a pivotal role in our authentication system by hashing user passwords before they’re stored in the database. This practice is crucial for maintaining security. By hashing passwords, even if a breach were to occur, hackers wouldn’t gain immediate access to users’ accounts through plain text passwords.
Registering a User
Let’s start with the first endpoint, which gets invoked to register a user when a POST request is submitted to the /api/auth/register route.
To create this route handler, follow these steps:
- Within the
src/routes/folder, create a new directory namedapi. - Inside the
apidirectory, create a subdirectory namedauth. - Within the
authdirectory, create a further subdirectory namedregister. - Inside the
registerdirectory, create a file named+server.tsand paste the provided code.
src/routes/api/auth/register/+server.ts
import { RegisterUserSchema, type RegisterUserInput } from '$lib/validations/user.schema.js';
import { json } from '@sveltejs/kit';
import bcrypt from 'bcryptjs';
import { ZodError } from 'zod';
import { prisma } from '$lib/server/prisma';

export async function POST({ request }) {
	try {
		const body = (await request.json()) as RegisterUserInput;
		const data = RegisterUserSchema.parse(body);

		const hashedPassword = await bcrypt.hash(data.password, 12);

		const user = await prisma.user.create({
			data: {
				name: data.name,
				email: data.email,
				password: hashedPassword,
				photo: data.photo
			}
		});

		return json({ status: 'success', data: { ...user, password: undefined } }, { status: 201 });
	} catch (error: any) {
		if (error instanceof ZodError) {
			return json({ message: 'failed validations', error: error.flatten() }, { status: 400 });
		}

		if (error.code === 'P2002') {
			return json({ message: 'user with that email already exists' }, { status: 409 });
		}

		return json({ message: error.message }, { status: 500 });
	}
}
Here’s a detailed breakdown of how it works:
- Request Handling: When a client makes a POST request to
/api/auth/register, this handler is triggered. It begins by extracting the request body usingrequest.json()to access the submitted user registration data. - Data Validation: The incoming data is then subjected to validation using the
RegisterUserSchemaschema. This schema is designed to ensure that the provided data adheres to predefined validation rules, such as required fields, email format, and password constraints. - Validation Error Handling: If any validation errors occur during the schema validation, the handler captures these errors. The
catchblock is responsible for handling such cases. - Hashing Password: Assuming validation passes successfully, the handler proceeds to securely hash the user’s provided password using the
bcryptlibrary. This is a vital security measure, ensuring that sensitive user data is not stored in plain text. - Storing User Data: The code then uses
prisma.user.create()to insert the user’s information into the database. Thename,email, hashedpassword, and optionalphotoare included in the data being stored. - Response: Upon successful user creation, a JSON response is generated using the
jsonfunction. This response includes astatusindicating success and a modified version of the user data, excluding the sensitivepasswordfield. The HTTP status code201 Createdis also set. - Error Handling: In case of any errors during the entire process, specific error scenarios are handled. If the error is due to failed schema validation, a
400 Bad Requestresponse is generated, accompanied by details of the validation errors. Additionally, if a user with the provided email already exists in the database, a409 Conflictresponse is returned. For any other errors, a500 Internal Server Errorresponse is generated.
Logging in a User
Moving forward, let’s address the login process. This route handler comes into play when a POST request is sent to the /api/auth/login endpoint.
To implement this route handler, follow these steps:
- Create a new directory named
loginwithin theauthdirectory undersrc/routes/api. - Inside the
logindirectory, create a file named+server.ts. - Add the following code to the
+server.tsfile:
src/routes/api/auth/login/+server.ts
import { LoginUserSchema, type LoginUserInput } from '$lib/validations/user.schema.js';
import { json } from '@sveltejs/kit';
import { ZodError } from 'zod';
import { prisma } from '$lib/server/prisma.js';
import bcrypt from 'bcryptjs';
import { signJWT } from '$lib/server/token.js';
import { JWT_EXPIRES_IN } from '$env/static/private';

export async function POST({ request, cookies }) {
	try {
		const body = (await request.json()) as LoginUserInput;
		const data = LoginUserSchema.parse(body);

		const user = await prisma.user.findUnique({
			where: { email: data.email }
		});

		if (!user || !(await bcrypt.compare(data.password, user.password))) {
			return json({ message: 'Invalid email or password' }, { status: 401 });
		}

		const token = await signJWT({ sub: user.id }, { exp: `${JWT_EXPIRES_IN}m` });

		const tokenMaxAge = parseInt(JWT_EXPIRES_IN) * 60;

		const cookieOptions = {
			httpOnly: true,
			path: '/api',
			secure: process.env.NODE_ENV !== 'development',
			maxAge: tokenMaxAge
		};

		cookies.set('token', token, cookieOptions);
		cookies.set('logged-in', 'true', {
			...cookieOptions,
			httpOnly: false
		});

		return json({ token });
	} catch (error: any) {
		if (error instanceof ZodError) {
			return json({ message: 'failed validations', error: error.flatten() }, { status: 400 });
		}

		return json({ message: error.message }, { status: 500 });
	}
}
This route handler is responsible for processing user login attempts via a POST request to the /api/auth/login endpoint. Upon receiving the request, it validates the provided data against the LoginUserSchema. If the validation succeeds and the user is authenticated, a JSON Web Token (JWT) is created and returned in the response, allowing the user to access authenticated routes.
Additionally, the route handler sets cookies containing the JWT and relevant authentication information, which are then utilized to maintain user sessions. In the case of any errors, appropriate error messages and status codes are returned to facilitate effective communication with the client.
Logging out a User
Now that we have the route handlers responsible for registering and logging in users, let’s shift our attention to creating the handler that will facilitate signing them out of the API.
Here, we will use a simple technique to achieve the sign-out process by sending expired cookies to their API client or browser, effectively removing the existing ones they acquired during the login process. While this approach may not be the most advanced solution for handling logouts, it serves our purpose effectively for this basic API.
To proceed with implementing this route handler, follow these steps:
- Establish a new directory named
logoutwithin theauthdirectory undersrc/routes/api. - Inside the
logoutdirectory, generate a file titled+server.ts. - Embed the ensuing code snippet into the
+server.tsfile:
src/routes/api/auth/logout/+server.ts
import { json } from '@sveltejs/kit';

export async function POST({ cookies, locals }) {
	locals.user = null;

	const cookieOptions = {
		path: '/api',
		secure: process.env.NODE_ENV !== 'development'
	};

	cookies.delete('token', cookieOptions);
	cookies.delete('logged-in', cookieOptions);

	return json({ status: 'success' });
}
Fetching Authenticated User Data
Now, let’s focus on the final route handler, which serves to retrieve the credentials of an authenticated user. This handler gets invoked when a GET request is sent to the /api/users/me endpoint. The purpose of this endpoint is to provide authenticated users with their own information.
The process for this route handler is simple: it retrieves the user’s credentials from the locals object. If there is no user information found, it responds with a JSON message indicating that the user is not logged in. Otherwise, the user’s information is returned in a JSON response, with the password omitted for security reasons.
To create this route handler, follow these steps:
- Inside the
src/routes/apidirectory, create ausersdirectory. - Within the
usersdirectory, create a file namedmewith the extension+server.ts. - Add the following code to the
mefile:
src/routes/api/users/me/+server.ts
import { json } from '@sveltejs/kit';

export async function GET({ locals }) {
	try {
		const user = locals.user;

		if (!user) {
			return json(
				{
					message: 'You are not logged in, please provide token to gain access'
				},
				{ status: 401 }
			);
		}

		return json({ data: { ...user, password: undefined } });
	} catch (error: any) {
		return json({ message: error.message }, { status: 500 });
	}
}
Protecting the API Endpoints with SvelteKit Hooks
With the route handlers in place, we are now ready to implement SvelteKit hooks (middleware) to safeguard specific endpoints accessible only to authenticated users. To begin, let’s address TypeScript integration. Open the src/app.d.ts file and uncomment // interface Locals {} within the App namespace. Subsequently, add a new field named “user” and define its type using the User type generated by Prisma. Here’s the necessary adjustment:
src/app.d.ts
// See https://kit.svelte.dev/docs/types#app

import type { PrismaClient, User } from '@prisma/client';

// for information about these interfaces
declare global {
	namespace App {
		// interface Error {}
		interface Locals {
			user: User | null;
		}
		// interface PageData {}
		// interface Platform {}
	}
	var prisma: PrismaClient;
}

export {};
Now that this adjustment is complete, let’s move forward and create the middleware. Begin by creating a hooks.server.ts file within the src directory, and include the following code:
src/hooks.server.ts
import { verifyJWT } from '$lib/server/token';
import { error, type Handle } from '@sveltejs/kit';
import { prisma } from '$lib/server/prisma';

export const handle: Handle = async ({ resolve, event }) => {
	const { url, locals, request, cookies } = event;

	let authToken: string | undefined;

	if (cookies.get('token')) {
		authToken = cookies.get('token');
	} else if (request.headers.get('Authorization')?.startsWith('Bearer ')) {
		authToken = request.headers.get('Authorization')?.substring(7);
	}

	if (
		!authToken &&
		(url.pathname.startsWith('/api/users') || url.pathname.startsWith('/api/auth/logout'))
	) {
		throw error(401, 'You are not logged in. Please provide a token to gain access.');
	}

	try {
		if (authToken) {
			const { sub } = await verifyJWT<{ sub: string }>(authToken);
			const user = await prisma.user.findUnique({ where: { id: sub } });
			if (!user) {
				throw error(401, 'User belonging to this token no longer exists');
			}

			locals.user = user;
		}
	} catch (err: any) {
		if (url.pathname.startsWith('/api')) {
			throw error(401, "Token is invalid or user doesn't exists");
		}
	}

	const response = await resolve(event);

	return response;
};
The code’s purpose is to attempt to retrieve the token from two potential sources: cookies or the Authorization header. If the token is found, it’s assigned to the authToken variable. If no token is found, a 401 error is thrown or returned to inform the user that a token is required.
When authToken is present, the function proceeds to verify the token’s authenticity using the verifyJWT function. The payload of the token, containing the subject (sub), is extracted. The prisma client is then used to query the database and fetch user data based on the sub. If the user exists, their credentials are stored in the locals object.
For scenarios where errors occur during token verification or user retrieval, suitable error responses are generated based on the request’s context. For example, if the user doesn’t exist or the token is invalid, a 401 Unauthorized error is triggered. After authentication and error handling, the resolve function is called to continue the request/response cycle.
Testing the JWT Application
At this point, we have successfully completed the development of our SvelteKit application and are now poised to put our endpoints to the test. To begin, ensure that you’ve applied the Prisma migrations to your PostgreSQL database. Once this step is completed, you can launch the SvelteKit development server by running the command pnpm dev --port 3000.
Once the server is up and running, you’re ready to proceed. Open either Postman or utilize the Thunder Client extension within Visual Studio Code. Import the SvelteKit HS256 JWT.postman_collection.json file, which is included in the source code. This collection file equips you with preconfigured requests, simplifying the process of testing the various API endpoints.
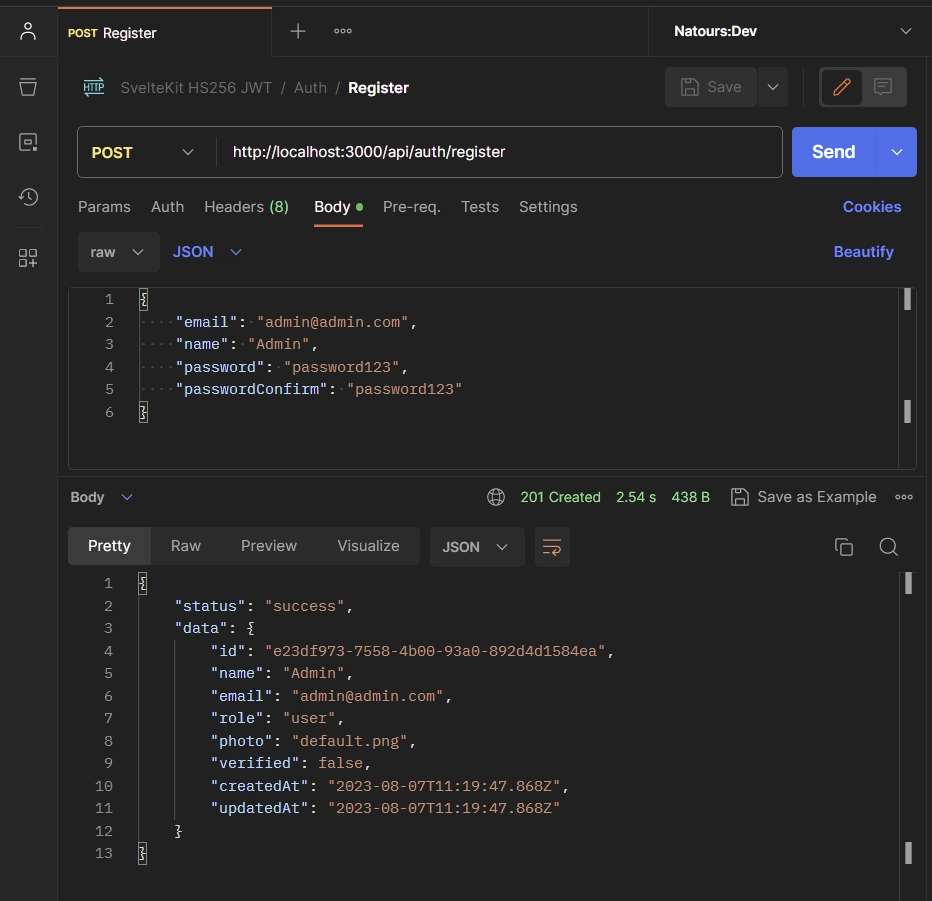
Sign Up
To register an account, include your credentials in JSON format within the request body and send a POST request to the /api/auth/register endpoint. The structure should resemble the following:
{
    "email": "admin@admin.com",
    "name": "Admin",
    "password": "password123",
    "passwordConfirm": "password123"
}
Feel free to skip some fields to test the server’s validation logic. If you exclude certain fields from the JSON object or if the password and password confirmation fields don’t match, you’ll receive validation errors from the SvelteKit API. Assuming you’ve correctly provided the necessary fields and adhered to the appropriate data types in the JSON object, you can expect to receive a 201 response from the API.
Sign In
To log into your account, provide your email and password in a JSON format within the request body. Send this as a POST request to the /api/auth/login endpoint. Here’s what it should look like:
{
    "email": "admin@admin.com",
    "password": "password123"
}
The API will then check if the email and password match what’s in the database. If they do, you’ll get a special code (JWT) in the response. This token can be utilized to access protected routes securely.

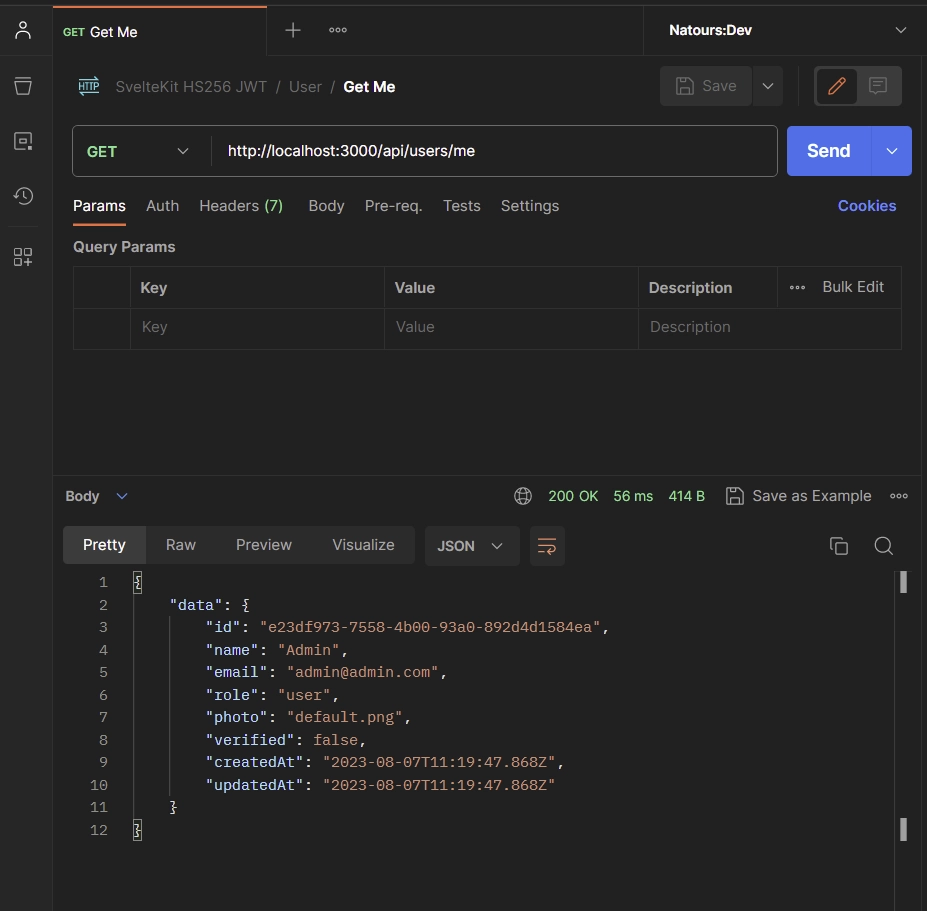
Accessing Protected Route
Now that you possess a token obtained from the API, you can use it to access your account details. You have the option to embed the token either within the Authorization header as Bearer or utilize Cookies. If your API client is compatible with cookies, send a GET request to the /api/users/me endpoint, and your account information will be delivered in the response.
In this scenario, your API client will automatically transmit the token contained within the cookie alongside the request. Alternatively, if your API client lacks cookie support, you can include the token as a Bearer in the Authorization header before sending the GET request to the /api/users/me endpoint.
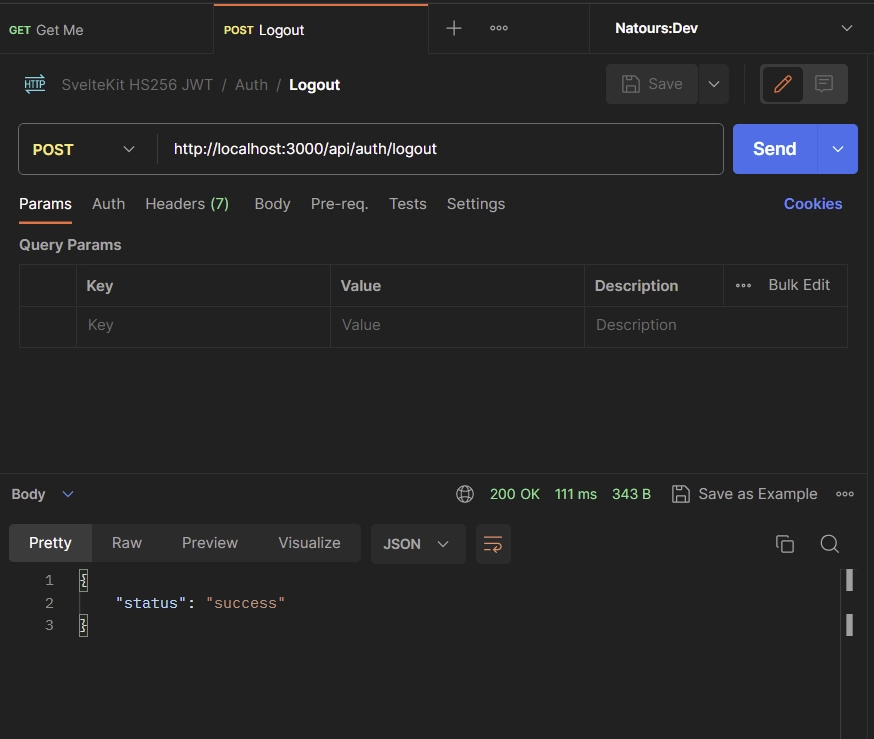
Sign Out
To log out from your account, initiate a POST request to the /api/auth/logout endpoint. Ensure that you include the token within the Authorization header as Bearer, especially if your API client lacks cookie support. This step is essential as the endpoint is secured and only accessible to authenticated users.
Conclusion
Congratulations on reaching the end! Throughout this comprehensive tutorial, you have learned how to build an API in SvelteKit using Prisma ORM, which includes support for JWT authentication. I hope you found the tutorial helpful and enjoyable. If you have any questions or feedback, please feel free to leave them in the comment section. Thank you for reading!
how can you create the token refresh, and being not an expert programmer, is it possible to have some example code?
I currently don’t have specific example code for token refresh in SvelteKit.