
In this article, you will learn how to build a Rust API with unit testing in mind. This means we will take a modular approach, which will make our lives easier when writing unit tests. The API will encompass user registration, sign-in, and sign-out. In addition, we will have endpoints for retrieving both single and multiple users. Also, we will protect specific routes using Actix-Web middleware through JWT authentication and grant access to certain roles through Authorization.
It’s worth noting that the project is already complete with all the various unit tests, Swagger/Redoc/RapidDoc integration, readiness for Docker execution, and deployability using GitHub actions on a VPS server. However, this article will focus solely on creating the API. If you are interested, you can explore the complete source code by reviewing the main branch. Should you desire the source code exclusively for the API we are building in this article, you can switch to the restful-api-in-rust branch.
Articles in This Series
- Building a Rust API with Unit Testing in Mind
- How to Add Swagger UI, Redoc and RapiDoc to a Rust API
- JWT Authentication and Authorization in a Rust API using Actix-Web
- How to Write Unit Tests for Your Rust API
- Dockerizing a Rust API Project: SQL Database and pgAdmin
- Deploy Rust App on VPS with GitHub Actions and Docker
- Build a CRUD API HTTP Server in Rust
Prerequisites
Before diving into this tutorial, make sure you have the following prerequisites in place:
- Operating System: You’ll need a Windows, Linux, or Mac machine to work with.
- Docker Desktop: Ensure you have Docker Desktop installed and running on your system.
- Rust Experience: Familiarity with Rust is recommended, as I won’t delve into detailed explanations of certain concepts to keep the article focused.
- API Understanding: A basic grasp of API architecture will be helpful for following the tutorial. Just knowing about various HTTP methods and headers is enough.
- Docker and SQL Basics: While not mandatory, a basic understanding of Docker commands and SQL will be beneficial.
Running the Rust API Project in Docker
To run the Rust API project with Docker, follow these simple steps:
- Download or clone the project from its GitHub repository at https://github.com/wpcodevo/complete-restful-api-in-rust and open the source code in your preferred text editor.
- Explore the project files in your text editor to gain an understanding of its components, including database migrations, unit tests, SQLx models, and API endpoints.
- Open your code editor’s integrated terminal and execute the command
docker-compose -f docker-compose.yml -f docker-compose.dev.yml up -d. This command will launch the Rust API, pgAdmin, and Postgres images within separate Docker containers. - Access the Swagger documentation by visiting
http://localhost:8000/. Alternatively, you can test endpoints using the Redoc UI athttp://localhost:8000/redocor the Rapidoc UI athttp://localhost:8000/rapidoc. These user interfaces provide a convenient way to interact with the API endpoints.
Running the Rust API Project on Your Machine
To run the Rust project on your local machine and execute the accompanying unit tests, follow the steps outlined below:
- Download or clone the project from its GitHub repository at https://github.com/wpcodevo/complete-restful-api-in-rust and open the source code in your preferred code editor.
- Start the Postgres and pgAdmin Docker containers by running the command
docker-compose -f docker-compose.no_api.yml up -d. - Apply the database migrations to the PostgreSQL database by running
sqlx migrate run. If you don’t already have the SQLx-CLI installed on your computer, you can do so by running the commandcargo install sqlx-cli --no-default-features --features postgres. - In the terminal of the root directory, run the command
cargo testwhich will first build the project and run the 49 unit tests that come with the Rust project. - Once the tests have been completed successfully, run the command
cargo runto start the Actix-web development server. - You can access the Swagger documentation by navigating to
http://localhost:8000/. Additionally, you have the option to use the Redoc UI available athttp://localhost:8000/redocor the Rapidoc UI accessible throughhttp://localhost:8000/rapidoc. These user interfaces offer a user-friendly approach to interact with the API endpoints and explore their functionality.
Setting Up the Rust API Project
As always, we need to generate a new Rust project first. To accomplish this, navigate to the directory where you intend to store the source code for this project and open a new terminal there. Execute the command below to generate a new Rust binary project in a folder named complete-restful-api-in-rust.
cargo new --bin complete-restful-api-in-rust
Once the project is generated, open it in your favorite text editor or integrated development environment (IDE). In your chosen editor, access the integrated terminal and execute the subsequent commands. These commands will add the necessary dependencies to the Cargo.toml file, which are essential for our project:
cargo add actix-web
cargo add actix-cors
cargo add serde_json
cargo add async-trait
cargo add serde -F derive
cargo add chrono -F serde
cargo add futures-util
cargo add env_logger
cargo add dotenv
cargo add uuid -F "serde v4"
cargo add sqlx -F "tls-native-tls runtime-async-std postgres chrono uuid"
cargo add jsonwebtoken
cargo add argon2
cargo add validator -F derive
After you’ve included the required crates in the Cargo.toml file, execute cargo build to download and install them into your project.
Setting Up PostgreSQL and pgAdmin with Docker
Now, let’s configure our database environment. For this project, I’ve chosen to use an SQL database, specifically PostgreSQL. Additionally, we’ll set up pgAdmin to facilitate data management and manipulation within the Postgres database. To effortlessly run both PostgreSQL and pgAdmin servers on your local machine using Docker, follow these steps:
Step 1: Creating Docker Compose Configuration
To get started, we’ll define the necessary Docker Compose configuration. In the root directory of your project, create a new file named docker-compose.no_api.yml and populate it with the following contents:
docker-compose.no_api.yml
version: '3'

services:
  postgres:
    image: postgres:15.3-alpine
    container_name: postgres
    environment:
      POSTGRES_USER: ${POSTGRES_USER}
      POSTGRES_PASSWORD: ${POSTGRES_PASSWORD}
      POSTGRES_DB: ${POSTGRES_DB}
    ports:
      - 6500:5432
    volumes:
      - postgres:/var/lib/postgresql/data
    healthcheck:
      test: ["CMD", "pg_isready", "-h", "postgres", "-U", "${POSTGRES_USER}"]
      interval: 5s
      timeout: 5s
      retries: 5
    networks:
      - rust_app_no_api_network

  pgadmin:
    image: dpage/pgadmin4
    container_name: pgadmin
    environment:
      PGADMIN_DEFAULT_EMAIL: ${PGADMIN_DEFAULT_EMAIL}
      PGADMIN_DEFAULT_PASSWORD: ${PGADMIN_DEFAULT_PASSWORD}
      PGADMIN_LISTEN_PORT: ${PGADMIN_LISTEN_PORT}
    ports:
      - 5050:80
    volumes:
      - pgadmin-data:/var/lib/pgadmin
    restart: always
    depends_on:
      - postgres
    networks:
      - rust_app_no_api_network

volumes:
  postgres:
  pgadmin-data:

networks:
  rust_app_no_api_network:
Step 2: Adding Environment Variables
To make the necessary environment variables accessible to both the pgAdmin and Postgres images, create a .env file within the project’s root directory. Add the following environment variables to this file:
.env
# -----------------------------------------------------------------------------
# PostgreSQL Credentials for Docker Compose
# -----------------------------------------------------------------------------
POSTGRES_USER=postgres
POSTGRES_PASSWORD=password123
POSTGRES_DB=rust_app

# -----------------------------------------------------------------------------
# pgAdmin4 Credentials for Docker Compose
# -----------------------------------------------------------------------------
PGADMIN_DEFAULT_EMAIL=admin@admin.com
PGADMIN_DEFAULT_PASSWORD=password123
PGADMIN_LISTEN_PORT=80


# -----------------------------------------------------------------------------
# Database (PostgreSQL - Docker)
# -----------------------------------------------------------------------------
DATABASE_URL=postgresql://postgres:password123@localhost:6500/rust_app?schema=public
Step 3: Launching the Postgres and pgAdmin Containers
With your environment variables in place, fire up the pgAdmin and Postgres servers within their respective containers using the command below:
docker-compose -f docker-compose.no_api.yml up -d
You can verify the status of the containers by using the docker ps command, or conveniently monitor their activity through Docker Desktop:
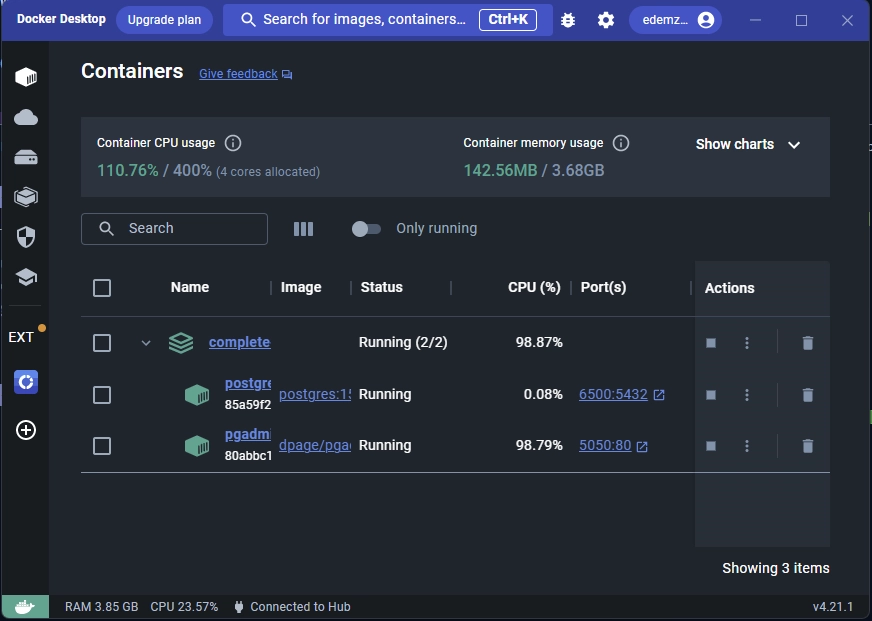
If you ever need to bring down the active containers, simply execute this command:
docker-compose -f docker-compose.no_api.yml down
Performing Database Migrations with SQLx-CLI
With our PostgreSQL database up and running, we’re ready to dive into creating our database model, migration scripts, and synchronizing the database using SQLx-CLI. Let’s get started by installing the SQLx-CLI tool:
cargo install sqlx-cli --no-default-features --features postgres
Defining the Database Model
Our next step involves creating the User model, which will have fields corresponding to the columns of the ‘users‘ table we’ll create in the PostgreSQL database. To do this, create a models.rs file within the src directory and insert the following code:
src/models.rs
use chrono::prelude::*;
use serde::{Deserialize, Serialize};

#[derive(Debug, Deserialize, Serialize, Clone, Copy, sqlx::Type, PartialEq)]
#[sqlx(type_name = "user_role", rename_all = "lowercase")]
pub enum UserRole {
    Admin,
    Moderator,
    User,
}

impl UserRole {
    pub fn to_str(&self) -> &str {
        match self {
            UserRole::Admin => "admin",
            UserRole::User => "user",
            UserRole::Moderator => "moderator",
        }
    }
}

#[derive(Debug, Deserialize, sqlx::FromRow, sqlx::Type, Serialize, Clone)]
pub struct User {
    pub id: uuid::Uuid,
    pub name: String,
    pub email: String,
    pub password: String,
    pub role: UserRole,
    pub photo: String,
    pub verified: bool,
    #[serde(rename = "createdAt")]
    pub created_at: Option<DateTime<Utc>>,
    #[serde(rename = "updatedAt")]
    pub updated_at: Option<DateTime<Utc>>,
}
In the above code, we’ve define a UserRole enum that outlines the permitted user roles for our API. Beneath that, we’ve created the User model, which incorporates the UserRole enum to define the role field, in addition to other fields of a user object.
Creating the Database Schema
Now, let’s define our database schema, which represents the SQL structure of both the UserRole enum and the User model. To achieve this, we’ll create a migration file, allowing us to apply these changes to the PostgreSQL database using either the SQLx-CLI tool or the SQLx toolkit. In case you haven’t installed the SQLx-CLI yet, you can do so by executing the following command:
cargo install sqlx-cli --no-default-features --features postgres
Once you’ve installed the SQLx-CLI, you can generate reversible migration scripts containing both “up” and “down” SQL files within a “migrations” folder by running:
sqlx migrate add -r "init"
The “up” migration file will carry the necessary SQL code for inserting the user_role enum and the users table into the database. To do this, access the “up” migration file located in the “migrations” directory, and populate it with the following SQL code:
migrations/20230808102331_init.up.sql
-- Add up migration script here

CREATE TYPE user_role AS ENUM ('admin', 'moderator', 'user');
CREATE EXTENSION IF NOT EXISTS "uuid-ossp";


CREATE TABLE
    "users" (
        id UUID NOT NULL PRIMARY KEY DEFAULT (uuid_generate_v4()),
        name VARCHAR(100) NOT NULL,
        email VARCHAR(255) NOT NULL UNIQUE,
        photo VARCHAR NOT NULL DEFAULT 'default.png',
        verified BOOLEAN NOT NULL DEFAULT FALSE,
        password VARCHAR(100) NOT NULL,
        role user_role NOT NULL DEFAULT 'user',
        created_at TIMESTAMP
        WITH
            TIME ZONE DEFAULT NOW(),
            updated_at TIMESTAMP
        WITH
            TIME ZONE DEFAULT NOW()
    );

CREATE INDEX users_email_idx ON users (email);
Because we opted for a uuid::Uuid type for the id field in the User model, we similarly utilize the UUID type in the SQL code’s id column. We then leverage the uuid_generate_v4() function from the uuid-ossp module to automatically generate a UUID for the id column whenever a record is inserted into the “users” table.
As usual, we also need to prepare corresponding “down” SQL code within the “down” script that allows us to reverse the changes applied by the “up” migration script. To accomplish this, open the “down” script and add the following code:
migrations/20230808102331_init.down.sql
-- Add down migration script here

DROP TABLE IF EXISTS "users";

DROP TYPE IF EXISTS user_role;

DROP EXTENSION IF EXISTS "uuid-ossp";
Running the Migrations
Now that we’ve defined the necessary SQL code in our migration scripts, let’s proceed to bring those changes into the database schema. To synchronize the database schema with our migration scripts, execute the following command:
sqlx migrate run
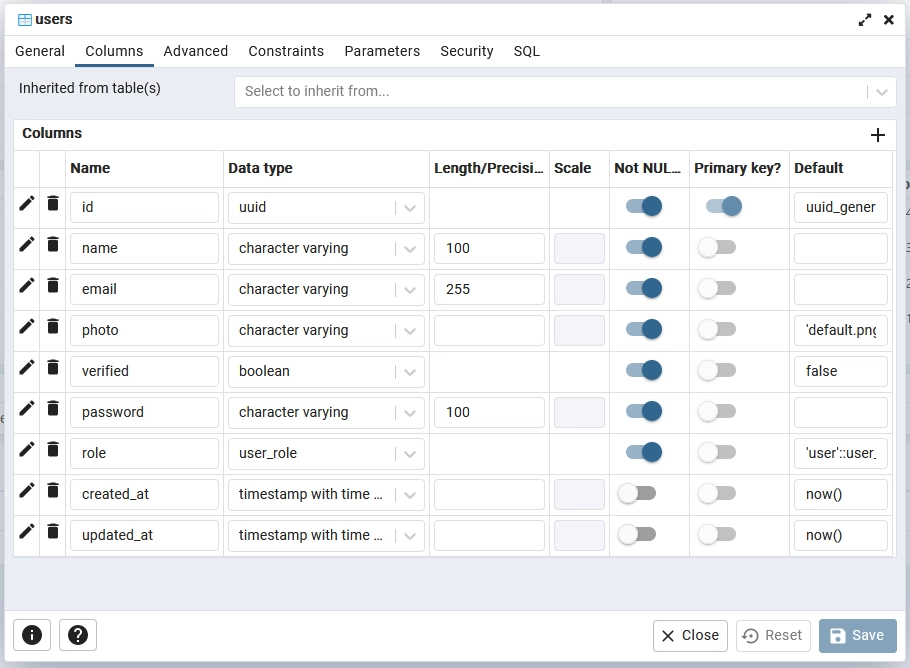
Upon seeing the “Applied” message in the console, you’ll know that the “up” migration script has been successfully integrated into the database. To verify this, we’ll inspect the changes either through the interactive shell of the running PostgreSQL container or, in our case, by utilizing pgAdmin.
Access the pgAdmin GUI by navigating to http://localhost:5050/ in your browser and log in using the credentials provided in the .env file.
To leverage pgAdmin for this purpose, first, add a new server using the Postgres credentials from the .env file. Use postgres as the hostname and “5132” as the port, considering that both the Postgres and pgAdmin containers share the same network.

Once you’ve successfully registered the Postgres server in pgAdmin, explore the Databases -> rust_app -> Schemas -> Tables section. Right-click on the ‘users‘ table, then select “Properties” to view its details. In the presented popup, click on the “Columns” tab to examine the table’s columns and their attributes. This will allow you to verify that the applied migrations have been accurately reflected in the database schema.
Loading the Environment Variables
Let’s proceed to write code that reads environment variables from the Rust runtime and encapsulates them within a struct for easy utilization within our application. Here’s how you can achieve this:
- Navigate to the
srcdirectory and create a new file namedconfig.rs. - Within the newly created
config.rsfile, add the provided code snippet:
src/config.rs
#[derive(Debug, Clone)]
pub struct Config {
    pub database_url: String,
    pub jwt_secret: String,
    pub jwt_maxage: i64,
    pub port: u16,
}

impl Config {
    pub fn init() -> Config {
        let database_url = std::env::var("DATABASE_URL").expect("DATABASE_URL must be set");
        let jwt_secret = std::env::var("JWT_SECRET_KEY").expect("JWT_SECRET_KEY must be set");
        let jwt_maxage = std::env::var("JWT_MAXAGE").expect("JWT_MAXAGE must be set");

        Config {
            database_url,
            jwt_secret,
            jwt_maxage: jwt_maxage.parse::<i64>().unwrap(),
            port: 8000,
        }
    }
}
We’ve defined a Config structure that encapsulates the key environment variables necessary for our application. The init() method within the impl block efficiently fetches these variables from the runtime and constructs a Config instance.
To make both the JWT_SECRET_KEY and JWT_MAXAGE environments accessible, simply open the .env file and include the following code:
# -----------------------------------------------------------------------------
# JSON Web Token Credentials
# -----------------------------------------------------------------------------
JWT_SECRET_KEY=my_ultra_secure_jwt_secret_key
JWT_MAXAGE=60
Connecting the Rust App to the PostgreSQL Database
With our environment variables properly configured, the next step is to establish a connection between the Rust application and the active PostgreSQL server. To achieve this, follow these steps:
- Generate a new file named
db.rsin thesrcdirectory to centralize the database-related code. - Populate the newly created
db.rsfile with the provided code snippet:
src/db.rs
use sqlx::{Pool, Postgres};

#[derive(Debug, Clone)]
pub struct DBClient {
    pool: Pool<Postgres>,
}

impl DBClient {
    pub fn new(pool: Pool<Postgres>) -> Self {
        DBClient { pool }
    }
}
For now, this file contains a struct to manage the Postgres connection pool that will be used within our application. As we progress, we will augment this file by incorporating functions designed for querying and inserting records into the database. To proceed, let’s navigate to the main.rs file and replace its existing code with the code below:
src/main.rs
mod config;
mod db;

use actix_web::{get, middleware::Logger, web, App, HttpResponse, HttpServer, Responder};
use config::Config;
use db::DBClient;
use dotenv::dotenv;
use sqlx::postgres::PgPoolOptions;

#[derive(Debug, Clone)]
pub struct AppState {
    pub env: Config,
    pub db_client: DBClient,
}

#[actix_web::main]
async fn main() -> Result<(), Box<dyn std::error::Error>> {
    if std::env::var_os("RUST_LOG").is_none() {
        std::env::set_var("RUST_LOG", "actix_web=info");
    }

    dotenv().ok();
    env_logger::init();

    let config = Config::init();

    let pool = PgPoolOptions::new()
        .max_connections(10)
        .connect(&config.database_url)
        .await?;

    let db_client = DBClient::new(pool);
    let app_state: AppState = AppState {
        env: config.clone(),
        db_client,
    };

    println!(
        "{}",
        format!("Server is running on http://localhost:{}", config.port)
    );

    HttpServer::new(move || {
        App::new()
            .app_data(web::Data::new(app_state.clone()))
            .wrap(Logger::default())
            .service(health_checker_handler)
    })
    .bind(("0.0.0.0", config.port))?
    .run()
    .await?;

    Ok(())
}

#[get("/api/healthchecker")]
async fn health_checker_handler() -> impl Responder {
    const MESSAGE: &str = "Complete Restful API in Rust";

    HttpResponse::Ok().json(serde_json::json!({"status": "success", "message": MESSAGE}))
}
Quite a lot is happening in the above code, let’s break it down:
- We begin by importing the necessary modules and crates for our application.
- We define the
AppStatestruct that holds the configuration (env) and the database client (db_client). - In the
mainfunction, we set the default logging level and load environment variables from the.envfile. - We initialize logging using
env_logger::init(). - The
configis initialized by reading environment variables from the runtime. - A Postgres connection pool (
pool) is created with a maximum of 10 connections. - An instance of
DBClientis created to manage the connection pool. - The
AppStateis instantiated with the configuration and database client. - The HTTP server is started using
HttpServer::new(), with route handlers and middleware. - The server startup message is printed.
- Finally, the server is started and run using
run()method.
Handling API Errors
Next, we’ll adopt a robust strategy for managing errors within our API by using a well-structured approach. This involves utilizing an enum to define various error scenarios that our application may encounter. To implement this, follow the steps below:
- Create a new file named
error.rswithin thesrcdirectory. - Populate the
error.rsfile with the code snippet below
src/error.rs
use std::fmt;

use actix_web::{HttpResponse, ResponseError};
use serde::{Deserialize, Serialize};

#[derive(Debug, Serialize, Deserialize)]
pub struct ErrorResponse {
    pub status: String,
    pub message: String,
}

impl fmt::Display for ErrorResponse {
    fn fmt(&self, f: &mut fmt::Formatter<'_>) -> fmt::Result {
        write!(f, "{}", serde_json::to_string(&self).unwrap())
    }
}

#[derive(Serialize, Deserialize)]
pub struct Response {
    pub status: &'static str,
    pub message: String,
}

#[derive(Debug, PartialEq)]
pub enum ErrorMessage {
    EmptyPassword,
    ExceededMaxPasswordLength(usize),
    HashingError,
    InvalidHashFormat,
    InvalidToken,
    ServerError,
    WrongCredentials,
    EmailExist,
    UserNoLongerExist,
    TokenNotProvided,
    PermissionDenied,
}

impl ToString for ErrorMessage {
    fn to_string(&self) -> String {
        self.to_str().to_owned()
    }
}

impl Into<String> for ErrorMessage {
    fn into(self) -> String {
        self.to_string()
    }
}

impl ErrorMessage {
    fn to_str(&self) -> String {
        match self {
            ErrorMessage::ServerError => "Server Error. Please try again later".to_string(),
            ErrorMessage::WrongCredentials => "Email or password is wrong".to_string(),
            ErrorMessage::EmailExist => "An User with this email already exists".to_string(),
            ErrorMessage::UserNoLongerExist => {
                "User belonging to this token no longer exists".to_string()
            }
            ErrorMessage::EmptyPassword => "Password cannot be empty".to_string(),
            ErrorMessage::HashingError => "Error while hashing password".to_string(),
            ErrorMessage::InvalidHashFormat => "Invalid password hash format".to_string(),
            ErrorMessage::ExceededMaxPasswordLength(max_length) => {
                format!("Password must not be more than {} characters", max_length)
            }
            ErrorMessage::InvalidToken => "Authentication token is invalid or expired".to_string(),
            ErrorMessage::TokenNotProvided => {
                "You are not logged in, please provide token".to_string()
            }
            ErrorMessage::PermissionDenied => {
                "You are not allowed to perform this action".to_string()
            }
        }
    }
}

#[derive(Debug, Clone)]
pub struct HttpError {
    pub message: String,
    pub status: u16,
}

impl HttpError {
    pub fn new(message: impl Into<String>, status: u16) -> Self {
        HttpError {
            message: message.into(),
            status,
        }
    }

    pub fn server_error(message: impl Into<String>) -> Self {
        HttpError {
            message: message.into(),
            status: 500,
        }
    }

    pub fn bad_request(message: impl Into<String>) -> Self {
        HttpError {
            message: message.into(),
            status: 400,
        }
    }

    pub fn unique_constraint_voilation(message: impl Into<String>) -> Self {
        HttpError {
            message: message.into(),
            status: 409,
        }
    }

    pub fn unauthorized(message: impl Into<String>) -> Self {
        HttpError {
            message: message.into(),
            status: 401,
        }
    }

    // pub fn not_found(message: impl Into<String>) -> Self {
    //     HttpError {
    //         message: message.into(),
    //         status: 404,
    //     }
    // }

    pub fn into_http_response(self) -> HttpResponse {
        match self.status {
            400 => HttpResponse::BadRequest().json(Response {
                status: "fail",
                message: self.message.into(),
            }),
            401 => HttpResponse::Unauthorized().json(Response {
                status: "fail",
                message: self.message.into(),
            }),
            409 => HttpResponse::Conflict().json(Response {
                status: "fail",
                message: self.message.into(),
            }),
            500 => HttpResponse::InternalServerError().json(Response {
                status: "error",
                message: self.message.into(),
            }),
            _ => {
                eprintln!(
                    "Warning: Missing pattern match. Converted status code {} to 500.",
                    self.status
                );

                HttpResponse::InternalServerError().json(Response {
                    status: "error",
                    message: ErrorMessage::ServerError.into(),
                })
            }
        }
    }
}

impl fmt::Display for HttpError {
    fn fmt(&self, f: &mut fmt::Formatter<'_>) -> fmt::Result {
        write!(
            f,
            "HttpError: message: {}, status: {}",
            self.message, self.status
        )
    }
}

impl std::error::Error for HttpError {}

impl ResponseError for HttpError {
    fn error_response(&self) -> HttpResponse<actix_web::body::BoxBody> {
        let cloned = self.clone();
        cloned.into_http_response()
    }
}
- We define an
ErrorResponsestruct that will be used to format error responses as JSON objects. - An
ErrorMessageenum is introduced to enumerate potential error types along with corresponding error messages. - The
HttpErrorstruct encapsulates error information, including message and status code. - We include methods in the
HttpErrorstruct to create specific types of errors with corresponding status codes. - The
into_http_responsefunction constructs the appropriateHttpResponsebased on the error’s status code. - Implementations of various traits (
Display,Error, andResponseError) enhance error handling capabilities.
Creating Data Transfer Objects (DTOs)
It is now time to define structs that represent the structure of the request and response bodies. For the request bodies, we will use the validator crate to define validation rules for the fields, ensuring that users adhere to the necessary validation criteria before their requests are processed. This approach effectively prevents users from submitting junk values within the request bodies.
To accomplish this, proceed to create a dtos.rs file within the src directory, and then include the code snippet below:
src/dtos.rs
use chrono::{DateTime, Utc};
use serde::{Deserialize, Serialize};
use validator::Validate;

use crate::models::User;

#[derive(Validate, Debug, Default, Clone, Serialize, Deserialize)]
pub struct RegisterUserDto {
    #[validate(length(min = 1, message = "Name is required"))]
    pub name: String,
    #[validate(
        length(min = 1, message = "Email is required"),
        email(message = "Email is invalid")
    )]
    pub email: String,
    #[validate(
        length(min = 1, message = "Password is required"),
        length(min = 6, message = "Password must be at least 6 characters")
    )]
    pub password: String,
    #[validate(
        length(min = 1, message = "Please confirm your password"),
        must_match(other = "password", message = "Passwords do not match")
    )]
    #[serde(rename = "passwordConfirm")]
    pub password_confirm: String,
}

#[derive(Validate, Debug, Default, Clone, Serialize, Deserialize)]
pub struct LoginUserDto {
    #[validate(
        length(min = 1, message = "Email is required"),
        email(message = "Email is invalid")
    )]
    pub email: String,
    #[validate(
        length(min = 1, message = "Password is required"),
        length(min = 6, message = "Password must be at least 6 characters")
    )]
    pub password: String,
}

#[derive(Serialize, Deserialize, Validate)]
pub struct RequestQueryDto {
    #[validate(range(min = 1))]
    pub page: Option<usize>,
    #[validate(range(min = 1, max = 50))]
    pub limit: Option<usize>,
}

#[derive(Debug, Serialize, Deserialize)]
pub struct FilterUserDto {
    pub id: String,
    pub name: String,
    pub email: String,
    pub role: String,
    pub photo: String,
    pub verified: bool,
    #[serde(rename = "createdAt")]
    pub created_at: DateTime<Utc>,
    #[serde(rename = "updatedAt")]
    pub updated_at: DateTime<Utc>,
}

impl FilterUserDto {
    pub fn filter_user(user: &User) -> Self {
        FilterUserDto {
            id: user.id.to_string(),
            email: user.email.to_owned(),
            name: user.name.to_owned(),
            photo: user.photo.to_owned(),
            role: user.role.to_str().to_string(),
            verified: user.verified,
            created_at: user.created_at.unwrap(),
            updated_at: user.updated_at.unwrap(),
        }
    }

    pub fn filter_users(users: &[User]) -> Vec<FilterUserDto> {
        users.iter().map(FilterUserDto::filter_user).collect()
    }
}

#[derive(Debug, Serialize, Deserialize)]
pub struct UserData {
    pub user: FilterUserDto,
}

#[derive(Debug, Serialize, Deserialize)]
pub struct UserResponseDto {
    pub status: String,
    pub data: UserData,
}

#[derive(Debug, Serialize, Deserialize)]
pub struct UserListResponseDto {
    pub status: String,
    pub users: Vec<FilterUserDto>,
    pub results: usize,
}

#[derive(Debug, Serialize, Deserialize)]
pub struct UserLoginResponseDto {
    pub status: String,
    pub token: String,
}
Creating Utility Functions
As we move forward, our next focus is on creating a couple of utility functions that play a pivotal role in our application’s functionality. These functions encompass tasks ranging from password hashing and comparison to the creation and validation of JSON Web Tokens (JWTs). By isolating these functions into dedicated modules, we pave the way for efficient unit testing.
To begin, create a utils directory within the src folder. Inside this directory, create a mod.rs file and input the subsequent code snippet:
src/utils/mod.rs
pub mod password;
pub mod token;
Hashing and Comparing Passwords
Here, we’re creating two key functions: hash, responsible for securely hashing plain-text passwords using the Argon2 library, and compare, which facilitates the comparison between a plain-text password and its hashed counterpart.
Begin by creating a password.rs file within the src/utils/ folder and populate it with the following code:
src/utils/password.rs
use argon2::{
    password_hash::{rand_core::OsRng, PasswordHash, PasswordHasher, PasswordVerifier, SaltString},
    Argon2,
};

use crate::error::ErrorMessage;

const MAX_PASSWORD_LENGTH: usize = 64;

pub fn hash(password: impl Into<String>) -> Result<String, ErrorMessage> {
    let password = password.into();

    if password.is_empty() {
        return Err(ErrorMessage::EmptyPassword);
    }

    if password.len() > MAX_PASSWORD_LENGTH {
        return Err(ErrorMessage::ExceededMaxPasswordLength(MAX_PASSWORD_LENGTH));
    }

    let salt = SaltString::generate(&mut OsRng);
    let hashed_password = Argon2::default()
        .hash_password(password.as_bytes(), &salt)
        .map_err(|_| ErrorMessage::HashingError)?
        .to_string();

    Ok(hashed_password)
}

pub fn compare(password: &str, hashed_password: &str) -> Result<bool, ErrorMessage> {
    if password.is_empty() {
        return Err(ErrorMessage::EmptyPassword);
    }

    if password.len() > MAX_PASSWORD_LENGTH {
        return Err(ErrorMessage::ExceededMaxPasswordLength(MAX_PASSWORD_LENGTH));
    }

    let parsed_hash =
        PasswordHash::new(hashed_password).map_err(|_| ErrorMessage::InvalidHashFormat)?;

    let password_matches = Argon2::default()
        .verify_password(password.as_bytes(), &parsed_hash)
        .map_or(false, |_| true);

    Ok(password_matches)
}
Signing and Verifying JWTs
In order to generate and validate the authenticity of a JWT, we’re creating two helper functions: create_token and decode_token. These functions respectively handle the generation of JWTs and the extraction of their payload for validation. Let’s break down these functions:
create_token: This function generates a JWT by incorporating parameters such as the user’s ID, the JWT secret key (in byte form), and the token’s expiration duration. It returns the JWT as aResultalongside potential errors.decode_token: With this function, a JWT and secret key are provided for the purpose of JWT decoding. The payload stored within the token is extracted and returned.
To implement these functionalities, create a token.rs file within the src/utils/ directory and include the provided code:
src/utils/token.rs
use chrono::{Duration, Utc};
use jsonwebtoken::{decode, encode, Algorithm, DecodingKey, EncodingKey, Header, Validation};
use serde::{Deserialize, Serialize};

use crate::error::{ErrorMessage, HttpError};

#[derive(Debug, Serialize, Deserialize)]
pub struct TokenClaims {
    pub sub: String,
    pub iat: usize,
    pub exp: usize,
}

pub fn create_token(
    user_id: &str,
    secret: &[u8],
    expires_in_seconds: i64,
) -> Result<String, jsonwebtoken::errors::Error> {
    if user_id.is_empty() {
        return Err(jsonwebtoken::errors::ErrorKind::InvalidSubject.into());
    }

    let now = Utc::now();
    let iat = now.timestamp() as usize;
    let exp = (now + Duration::minutes(expires_in_seconds)).timestamp() as usize;
    let claims: TokenClaims = TokenClaims {
        sub: user_id.to_string(),
        exp,
        iat,
    };

    encode(
        &Header::default(),
        &claims,
        &EncodingKey::from_secret(secret),
    )
}

pub fn decode_token<T: Into<String>>(token: T, secret: &[u8]) -> Result<String, HttpError> {
    let decoded = decode::<TokenClaims>(
        &token.into(),
        &DecodingKey::from_secret(secret),
        &Validation::new(Algorithm::HS256),
    );
    match decoded {
        Ok(token) => Ok(token.claims.sub),
        Err(_) => Err(HttpError::new(ErrorMessage::InvalidToken.to_string(), 401)),
    }
}
Creating the Database Access Layer
Now, our focus shifts to creating functions that will facilitate communication with the database. These functions are dedicated to querying and inserting records, using the SQLx toolkit.
You might be wondering why we’re not embedding the database access code directly within the route handlers. The rationale is twofold: it enables us to write unit tests for each function individually and ensures a cleaner and more organized codebase, as we can reuse these functions across our unit tests.
To create these functions, navigate to the src/db.rs file and replace its existing content with the provided code below:
src/db.rs
use crate::models::UserRole;
use async_trait::async_trait;
use sqlx::{Pool, Postgres};
use uuid::Uuid;

use crate::models::User;

#[derive(Debug, Clone)]
pub struct DBClient {
    pool: Pool<Postgres>,
}

impl DBClient {
    pub fn new(pool: Pool<Postgres>) -> Self {
        DBClient { pool }
    }
}

#[async_trait]
pub trait UserExt {
    async fn get_user(
        &self,
        user_id: Option<Uuid>,
        name: Option<&str>,
        email: Option<&str>,
    ) -> Result<Option<User>, sqlx::Error>;
    async fn get_users(&self, page: u32, limit: usize) -> Result<Vec<User>, sqlx::Error>;
    async fn save_user<T: Into<String> + Send>(
        &self,
        name: T,
        email: T,
        password: T,
    ) -> Result<User, sqlx::Error>;
    async fn save_admin_user<T: Into<String> + Send>(
        &self,
        name: T,
        email: T,
        password: T,
    ) -> Result<User, sqlx::Error>;
}

#[async_trait]
impl UserExt for DBClient {
    async fn get_user(
        &self,
        user_id: Option<uuid::Uuid>,
        name: Option<&str>,
        email: Option<&str>,
    ) -> Result<Option<User>, sqlx::Error> {
        let mut user: Option<User> = None;

        if let Some(user_id) = user_id {
            user = sqlx::query_as!(User, r#"SELECT id,name, email, password, photo,verified,created_at,updated_at,role as "role: UserRole" FROM users WHERE id = $1"#, user_id)
                .fetch_optional(&self.pool)
                .await?;
        } else if let Some(name) = name {
            user = sqlx::query_as!(User, r#"SELECT id,name, email, password, photo,verified,created_at,updated_at,role as "role: UserRole" FROM users WHERE name = $1"#, name)
                .fetch_optional(&self.pool)
                .await?;
        } else if let Some(email) = email {
            user = sqlx::query_as!(User, r#"SELECT id,name, email, password, photo,verified,created_at,updated_at,role as "role: UserRole" FROM users WHERE email = $1"#, email)
                .fetch_optional(&self.pool)
                .await?;
        }

        Ok(user)
    }

    async fn get_users(&self, page: u32, limit: usize) -> Result<Vec<User>, sqlx::Error> {
        let offset = (page - 1) * limit as u32;

        let users = sqlx::query_as!(
            User,
            r#"SELECT id,name, email, password, photo,verified,created_at,updated_at,role as "role: UserRole" FROM users
            LIMIT $1 OFFSET $2"#,
            limit as i64,
            offset as i64
        )
        .fetch_all(&self.pool)
        .await?;

        Ok(users)
    }

    async fn save_user<T: Into<String> + Send>(
        &self,
        name: T,
        email: T,
        password: T,
    ) -> Result<User, sqlx::Error> {
        let user = sqlx::query_as!(
            User,
            r#"INSERT INTO users (name, email, password) VALUES ($1, $2, $3) RETURNING id,name, email, password, photo,verified,created_at,updated_at,role as "role: UserRole""#,
            name.into(),
            email.into(),
            password.into()
        )
        .fetch_one(&self.pool)
        .await?;

        Ok(user)
    }

    async fn save_admin_user<T: Into<String> + Send>(
        &self,
        name: T,
        email: T,
        password: T,
    ) -> Result<User, sqlx::Error> {
        let user = sqlx::query_as!(
            User,
            r#"INSERT INTO users (name, email, password, role) VALUES ($1, $2, $3, $4) RETURNING id,name, email, password, photo,verified,created_at,updated_at,role as "role: UserRole""#,
            name.into(),
            email.into(),
            password.into(),
            UserRole::Admin as UserRole
        )
        .fetch_one(&self.pool)
        .await?;

        Ok(user)
    }
}
We define the UserExt trait with methods for querying and inserting user records into the database. At the bottom, we implement these methods using the SQLx library.
Creating the Authentication Middleware Guard
In this section, we’re creating Actix-Web middleware to protect specific routes within the API. These middleware guards ensure enhanced security by requiring a valid JWT (JSON Web Token) before granting access to the next middleware in the stack.
While we won’t delve into the intricacies of middleware implementation in Actix-Web here, an upcoming article in this tutorial series titled “JWT Authentication and Authorization in a Rust API using Actix-Web” will provide an in-depth exploration. To summarize, we’re creating three distinct middleware:
AuthMiddleware: This middleware requires a valid JWT in the request to access the endpoint. It acts as the foundation upon which other middleware will be built.RequireAuth: This middleware ensures that the endpoint is protected and accessible only to roles specified in its list of permitted roles.RequireOnlyAdmin: Similar toRequireAuth, this middleware allows access to the endpoint but exclusively to users with the “admin” role.
To create these middlewares, follow these steps:
- Create an
extractorsdirectory within thesrcfolder. - Within the
extractorsdirectory, create anauth.rsfile. - Place the code provided below into the
auth.rsfile.
src/extractors/auth.rs
use actix_web::dev::{Service, ServiceRequest, ServiceResponse, Transform};
use actix_web::error::{ErrorForbidden, ErrorInternalServerError, ErrorUnauthorized};
use actix_web::{http, web, HttpMessage};
use futures_util::future::{ready, LocalBoxFuture, Ready};
use futures_util::FutureExt;
use std::rc::Rc;
use std::task::{Context, Poll};

use crate::db::UserExt;
use crate::error::{ErrorMessage, ErrorResponse, HttpError};
use crate::models::{User, UserRole};
use crate::{utils, AppState};

pub struct RequireAuth;

impl<S> Transform<S, ServiceRequest> for RequireAuth
where
    S: Service<
            ServiceRequest,
            Response = ServiceResponse<actix_web::body::BoxBody>,
            Error = actix_web::Error,
        > + 'static,
{
    type Response = ServiceResponse<actix_web::body::BoxBody>;
    type Error = actix_web::Error;
    type Transform = AuthMiddleware<S>;
    type InitError = ();
    type Future = Ready<Result<Self::Transform, Self::InitError>>;

    fn new_transform(&self, service: S) -> Self::Future {
        ready(Ok(AuthMiddleware {
            service: Rc::new(service),
            allowed_roles: vec![UserRole::User, UserRole::Moderator, UserRole::Admin],
        }))
    }
}

pub struct RequireOnlyAdmin;

impl<S> Transform<S, ServiceRequest> for RequireOnlyAdmin
where
    S: Service<
            ServiceRequest,
            Response = ServiceResponse<actix_web::body::BoxBody>,
            Error = actix_web::Error,
        > + 'static,
{
    type Response = ServiceResponse<actix_web::body::BoxBody>;
    type Error = actix_web::Error;
    type Transform = AuthMiddleware<S>;
    type InitError = ();
    type Future = Ready<Result<Self::Transform, Self::InitError>>;

    fn new_transform(&self, service: S) -> Self::Future {
        ready(Ok(AuthMiddleware {
            service: Rc::new(service),
            allowed_roles: vec![UserRole::Admin],
        }))
    }
}

pub struct AuthMiddleware<S> {
    service: Rc<S>,
    allowed_roles: Vec<UserRole>,
}

impl<S> Service<ServiceRequest> for AuthMiddleware<S>
where
    S: Service<
            ServiceRequest,
            Response = ServiceResponse<actix_web::body::BoxBody>,
            Error = actix_web::Error,
        > + 'static,
{
    type Response = ServiceResponse<actix_web::body::BoxBody>;
    type Error = actix_web::Error;
    type Future = LocalBoxFuture<'static, Result<Self::Response, actix_web::Error>>;

    fn poll_ready(&self, ctx: &mut Context<'_>) -> Poll<Result<(), Self::Error>> {
        self.service.poll_ready(ctx)
    }

    fn call(&self, req: ServiceRequest) -> Self::Future {
        let token = req
            .cookie("token")
            .map(|c| c.value().to_string())
            .or_else(|| {
                req.headers()
                    .get(http::header::AUTHORIZATION)
                    .map(|h| h.to_str().unwrap().split_at(7).1.to_string())
            });

        if token.is_none() {
            let json_error = ErrorResponse {
                status: "fail".to_string(),
                message: ErrorMessage::TokenNotProvided.to_string(),
            };
            return Box::pin(ready(Err(ErrorUnauthorized(json_error))));
        }

        let app_state = req.app_data::<web::Data<AppState>>().unwrap();
        let user_id = match utils::token::decode_token(
            &token.unwrap(),
            app_state.env.jwt_secret.as_bytes(),
        ) {
            Ok(id) => id,
            Err(e) => {
                return Box::pin(ready(Err(ErrorUnauthorized(ErrorResponse {
                    status: "fail".to_string(),
                    message: e.message,
                }))))
            }
        };

        let cloned_app_state = app_state.clone();
        let allowed_roles = self.allowed_roles.clone();
        let srv = Rc::clone(&self.service);

        async move {
            let user_id = uuid::Uuid::parse_str(user_id.as_str()).unwrap();
            let result = cloned_app_state
                .db_client
                .get_user(Some(user_id.clone()), None, None)
                .await
                .map_err(|e| ErrorInternalServerError(HttpError::server_error(e.to_string())))?;

            let user = result.ok_or(ErrorUnauthorized(ErrorResponse {
                status: "fail".to_string(),
                message: ErrorMessage::UserNoLongerExist.to_string(),
            }))?;

            // Check if user's role matches the required role
            if allowed_roles.contains(&user.role) {
                req.extensions_mut().insert::<User>(user);
                let res = srv.call(req).await?;
                Ok(res)
            } else {
                let json_error = ErrorResponse {
                    status: "fail".to_string(),
                    message: ErrorMessage::PermissionDenied.to_string(),
                };
                Err(ErrorForbidden(json_error))
            }
        }
        .boxed_local()
    }
}
In the call function of the AuthMiddleware, we check both the cookie object and the Authorization header for a token. If no token is found, a 401 Unauthorized error is returned. When a token is detected, it’s decoded, and the user ID contained within its payload is matched with the db_client.get_user() method to verify the user’s existence in the database.
Subsequently, the user’s role is compared against the list of allowed roles to determine authorization. In case a role mismatch occurs, a 403 Forbidden error is returned. On the other hand, if the user’s role matches one of the allowed roles, the user retrieved from the database is stored in the request extension. This makes the user’s information available to subsequent middleware within the middleware stack.
To make this module accessible for use throughout the codebase, create a mod.rs file and include the following code:
src/extractors/mod.rs
pub mod auth;
Creating Authentication Endpoint Handlers
Now it’s time to delve into creating the authentication endpoints responsible for user registration, login, and logout. Let’s break down each endpoint in a more organized manner:
1. User Registration /api/auth/register
This endpoint handles user registration within the API. It invokes the register route function, which performs the following steps:
- Validates the request body according to the validation rules defined in the
RegisterUserDtostruct. - If validation passes, hashes the plain-text password and stores the user data, including the hashed password, in the database.
- Returns a JSON response containing a filtered version of the user data returned from the database.
2. User Login /api/auth/login
This endpoint facilitates user login by invoking the login route function, which carries out the following actions:
- Validates the credentials provided in the request payload using the rules specified in the
LoginUserDtostruct. - Checks the database to find a user with the given email address.
- If a matching user is found, compares the plain-text password from the request body with the hashed password stored in the user object.
- If the passwords match, generates a token and sends it in both the JSON response and as a cookie.
3. User Logout /api/auth/logout
The logout endpoint invokes the logout route function, which performs the following single action:
- Returns an expired cookie to invalidate the token issued during the login process, thus requiring the user to authenticate again.
To begin implementing these route handlers, start by creating a new scopes directory in the src folder. Inside the scopes folder, create an auth.rs file and include the provided code:
src/scopes/auth.rs
use actix_web::{
    cookie::time::Duration as ActixWebDuration, cookie::Cookie, web, HttpResponse, Responder, Scope,
};
use serde_json::json;
use validator::Validate;

use crate::{
    db::UserExt,
    dtos::{
        FilterUserDto, LoginUserDto, RegisterUserDto, UserData, UserLoginResponseDto,
        UserResponseDto,
    },
    error::{ErrorMessage, HttpError},
    extractors::auth::RequireAuth,
    utils::{password, token},
    AppState,
};

pub fn auth_scope() -> Scope {
    web::scope("/api/auth")
        .route("/register", web::post().to(register))
        .route("/login", web::post().to(login))
        .route("/logout", web::post().to(logout).wrap(RequireAuth))
}

pub async fn register(
    app_state: web::Data<AppState>,
    body: web::Json<RegisterUserDto>,
) -> Result<HttpResponse, HttpError> {
    body.validate()
        .map_err(|e| HttpError::bad_request(e.to_string()))?;

    let hashed_password =
        password::hash(&body.password).map_err(|e| HttpError::server_error(e.to_string()))?;

    let result = app_state
        .db_client
        .save_user(&body.name, &body.email, &hashed_password)
        .await;

    match result {
        Ok(user) => Ok(HttpResponse::Created().json(UserResponseDto {
            status: "success".to_string(),
            data: UserData {
                user: FilterUserDto::filter_user(&user),
            },
        })),
        Err(sqlx::Error::Database(db_err)) => {
            if db_err.is_unique_violation() {
                Err(HttpError::unique_constraint_voilation(
                    ErrorMessage::EmailExist,
                ))
            } else {
                Err(HttpError::server_error(db_err.to_string()))
            }
        }
        Err(e) => Err(HttpError::server_error(e.to_string())),
    }
}

pub async fn login(
    app_state: web::Data<AppState>,
    body: web::Json<LoginUserDto>,
) -> Result<HttpResponse, HttpError> {
    body.validate()
        .map_err(|e| HttpError::bad_request(e.to_string()))?;

    let result = app_state
        .db_client
        .get_user(None, None, Some(&body.email))
        .await
        .map_err(|e| HttpError::server_error(e.to_string()))?;

    let user = result.ok_or(HttpError::unauthorized(ErrorMessage::WrongCredentials))?;

    let password_matches = password::compare(&body.password, &user.password)
        .map_err(|_| HttpError::unauthorized(ErrorMessage::WrongCredentials))?;

    if password_matches {
        let token = token::create_token(
            &user.id.to_string(),
            &app_state.env.jwt_secret.as_bytes(),
            app_state.env.jwt_maxage,
        )
        .map_err(|e| HttpError::server_error(e.to_string()))?;
        let cookie = Cookie::build("token", token.to_owned())
            .path("/")
            .max_age(ActixWebDuration::new(60 * &app_state.env.jwt_maxage, 0))
            .http_only(true)
            .finish();

        Ok(HttpResponse::Ok()
            .cookie(cookie)
            .json(UserLoginResponseDto {
                status: "success".to_string(),
                token,
            }))
    } else {
        Err(HttpError::unauthorized(ErrorMessage::WrongCredentials))
    }
}

pub async fn logout() -> impl Responder {
    let cookie = Cookie::build("token", "")
        .path("/")
        .max_age(ActixWebDuration::new(-1, 0))
        .http_only(true)
        .finish();

    HttpResponse::Ok()
        .cookie(cookie)
        .json(json!({"status": "success"}))
}
Creating Users Endpoint Handlers
Let’s proceed with the creation of endpoints responsible for managing user-related operations. These endpoints encompass retrieving individual user account details and obtaining a paginated list of users stored in the database. The following summary outlines these endpoints:
1. Retrieve the User Account /api/users/me
This endpoint, facilitated by the get_me function, is accessible exclusively to users with a valid JWT. Upon invocation, the function extracts the user’s information from the request extension, filters out sensitive fields such as the password, and then returns the result within a JSON response.
2. Retrieve a List of Users /api/users
This endpoint, powered by the get_users function, is restricted to users having the “admin” role and possessing a valid JWT. Upon invocation, it carries out the following steps:
- Validates the query parameters based on the validation rules specified in the
RequestQueryDtostruct. - Utilizes the validated query parameters to query the database, retrieving users based on the provided page and limit parameters.
- Responds with a JSON representation comprising the discovered users, along with details indicating the operation’s success.
To implement these functionalities within your Rust application, create a users.rs file inside the scopes directory and add the following code:
src/scopes/users.rs
use actix_web::{web, HttpMessage, HttpRequest, HttpResponse, Scope};
use validator::Validate;

use crate::{
    db::UserExt,
    dtos::{FilterUserDto, RequestQueryDto, UserData, UserListResponseDto, UserResponseDto},
    error::HttpError,
    extractors::auth::{RequireAuth, RequireOnlyAdmin},
    AppState,
    models::User,
};

pub fn users_scope() -> Scope {
    web::scope("/api/users")
        .route("", web::get().to(get_users).wrap(RequireOnlyAdmin))
        .route("/me", web::get().to(get_me).wrap(RequireAuth))
}

async fn get_me(req: HttpRequest) -> Result<HttpResponse, HttpError> {
    match req.extensions().get::<User>() {
        Some(user) => {
            let filtered_user = FilterUserDto::filter_user(user);

            let response_data = UserResponseDto {
                status: "success".to_string(),
                data: UserData {
                    user: filtered_user,
                },
            };

            Ok(HttpResponse::Ok().json(response_data))
        }
        None => Err(HttpError::server_error("User not found")),
    }
}

pub async fn get_users(
    query: web::Query<RequestQueryDto>,
    app_state: web::Data<AppState>,
) -> Result<HttpResponse, HttpError> {
    let query_params: RequestQueryDto = query.into_inner();

    query_params
        .validate()
        .map_err(|e| HttpError::bad_request(e.to_string()))?;

    let page = query_params.page.unwrap_or(1);
    let limit = query_params.limit.unwrap_or(10);

    let users = app_state
        .db_client
        .get_users(page as u32, limit)
        .await
        .map_err(|e| HttpError::server_error(e.to_string()))?;

    Ok(HttpResponse::Ok().json(UserListResponseDto {
        status: "success".to_string(),
        users: FilterUserDto::filter_users(&users),
        results: users.len(),
    }))
}
To ensure these modules are accessible to other parts of your codebase, create a mod.rs file within the scopes directory:
src/scopes/mod.rs
pub mod auth;
pub mod users;
Adding CORS Middleware and Registering API Routes
We’re now at the point where we’ll integrate the modules we’ve created into the main.rs file. This involves configuring the Actix-Web server with CORS middleware and registering our Actix-Web scopes or endpoints. To proceed, open the src/main.rs file and replace its current content with the provided code:
src/main.rs
mod config;
mod db;
mod dtos;
mod error;
mod extractors;
mod models;
mod scopes;
mod utils;

use actix_cors::Cors;
use actix_web::{
    get, http::header, middleware::Logger, web, App, HttpResponse, HttpServer, Responder,
};
use config::Config;
use db::DBClient;
use dotenv::dotenv;
use sqlx::postgres::PgPoolOptions;

#[derive(Debug, Clone)]
pub struct AppState {
    pub env: Config,
    pub db_client: DBClient,
}

#[actix_web::main]
async fn main() -> Result<(), Box<dyn std::error::Error>> {
    if std::env::var_os("RUST_LOG").is_none() {
        std::env::set_var("RUST_LOG", "actix_web=info");
    }

    dotenv().ok();
    env_logger::init();

    let config = Config::init();

    let pool = PgPoolOptions::new()
        .max_connections(10)
        .connect(&config.database_url)
        .await?;

    match sqlx::migrate!("./migrations").run(&pool).await {
        Ok(_) => println!("Migrations executed successfully."),
        Err(e) => eprintln!("Error executing migrations: {}", e),
    };

    let db_client = DBClient::new(pool);
    let app_state: AppState = AppState {
        env: config.clone(),
        db_client,
    };

    println!(
        "{}",
        format!("Server is running on http://localhost:{}", config.port)
    );

    HttpServer::new(move || {
        let cors = Cors::default()
            .allowed_origin("http://localhost:3000")
            .allowed_origin("http://localhost:8000")
            .allowed_methods(vec!["GET", "POST"])
            .allowed_headers(vec![
                header::CONTENT_TYPE,
                header::AUTHORIZATION,
                header::ACCEPT,
            ])
            .supports_credentials();

        App::new()
            .app_data(web::Data::new(app_state.clone()))
            .wrap(cors)
            .wrap(Logger::default())
            .service(scopes::auth::auth_scope())
            .service(scopes::users::users_scope())
            .service(health_checker_handler)
    })
    .bind(("0.0.0.0", config.port))?
    .run()
    .await?;

    Ok(())
}

#[get("/api/healthchecker")]
async fn health_checker_handler() -> impl Responder {
    const MESSAGE: &str = "Complete Restful API in Rust";

    HttpResponse::Ok().json(serde_json::json!({"status": "success", "message": MESSAGE}))
}
Upon completing this integration, you can start the Actix-Web server using the cargo run command. With the server up and running, you can use tools like Postman or the Thunder Client VS Code extension to interact with your API endpoints.
Conclusion
And we are done! In this tutorial, we have learned how to create a REST API in Rust that supports JWT authentication and authorization. Moreover, we have embraced a modular approach, setting the stage for us to effortlessly write unit tests – a topic we will delve into in an upcoming tutorial.
I trust you have found this tutorial both insightful and enjoyable. Should you have any questions or feedback, please don’t hesitate to share them in the comments section. Thank you for your time and happy reading!
More practice (Optional):
- Rust API – User Registration and Email Verification
- Rust API – Forgot/Reset Password with Emails
- How to Send HTML Emails in Rust via SMTP
- RESTful API in Rust using Axum Framework and MongoDB
- Rust CRUD API Example with Axum Framework and MySQL
- Rust CRUD API Example with Axum and PostgreSQL
- Create a Simple API in Rust using the Axum Framework
- Build a Frontend Web App in Rust using the Yew.rs Framework
- Frontend App with Rust and Yew.rs: User SignUp and Login
- Rust – How to Generate and Verify (JWTs) JSON Web Tokens
- Rust and Actix Web – JWT Access and Refresh Tokens
- Rust and Yew.rs Frontend: JWT Access and Refresh Tokens
- Rust – JWT Authentication with Actix Web
- Build a Simple API with Rust and Rocket
- Build a CRUD API with Rust and MongoDB
- Implement Google and GitHub OAuth2 in Rust Frontend App