

Are you interested in building a powerful web app in Rust using Yew.rs and Actix Web frameworks? If so, you’re in for an exciting and rewarding experience! This powerful technology stack allows you to develop fast and modern web applications that incorporate both a frontend and backend, as well as a robust database.
In this article, I’ll walk you through the process of building a backend API using the Actix web framework, SQLX, PostgreSQL, and Docker. Once we’ve created a powerful backend, we’ll move on to building a single-page app using the Yew.rs framework. By the end of this tutorial, you’ll have a fully functional web app that seamlessly integrates the frontend app with the backend API.
To make things even better, we’ll use Rust workspace to keep our frontend and backend projects organized. You’ll see just how easy it is to create a Rust library that contains code shared between the two projects, making the development process even smoother.
Before we dive into the tutorial, I want to give a shout-out to Brad Traversy, who originally created the frontend app in Svelte on YouTube. Make sure to check him out and show him some love!
More practice:
- Build a Frontend Web App in Rust using the Yew.rs Framework
- Frontend App with Rust and Yew.rs: User SignUp and Login
- Rust – JWT Authentication with Actix Web
- Build a Simple API in Rust
- Build a Simple API with Rust and Rocket
- Build a CRUD API with Rust and MongoDB
- Build a Simple API with Rust and Actix Web

Run the Full-Stack Rust App Locally
To run the Full-Stack Rust app on your local machine, follow these steps:
- Download or clone the Full-stack Rust app from https://github.com/wpcodevo/fullstack-rust-app and open the source code in your preferred IDE or text editor.
- To start the backend project, open the integrated terminal in your IDE and navigate to the backend folder by entering
cd backend. Run the commanddocker-compose up -dto start the Postgres and pgAdmin servers in Docker. - Ensure that you have the SQLx CLI tool installed. If not, you can install it by running
cargo install sqlx-cli. Once installed, execute the commandsqlx migrate runto migrate the SQL queries to the PostgreSQL database. - Install the backend project’s dependencies and start the Actix Web HTTP server by running
cargo run. - To set up the frontend project, ensure that you have Trunk and the Webassembly target installed. If not, follow the instructions provided at https://yew.rs/docs/getting-started/introduction.
- Once you have installed Trunk, proceed by opening a new terminal and navigating to the frontend directory. From there, you can initiate the installation of the frontend project’s dependencies and start the Yew.rs development server on port 3000 by running the command
trunk serve --port 3000. - After completing the above steps, access the web app by visiting
http://localhost:3000to use the frontend app to interact with the backend API.
Setup the Full-Stack Rust App
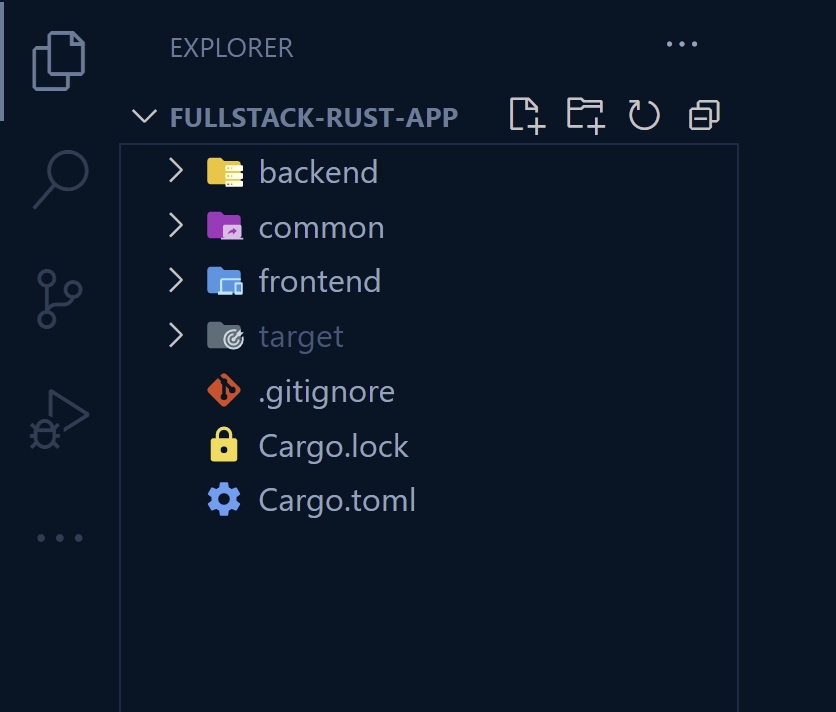
Once you’re done with this project, the files and folders on your computer will look like the ones in the picture below.
To begin, navigate to a convenient location on your machine or desktop and open a new terminal. Then, enter the following commands to create a new folder called fullstack-rust-app, move into that folder, and initialize the Rust project using Cargo.
mkdir fullstack-rust-app
cd fullstack-rust-app
cargo init
As we’ll be using Rust workspace to manage the projects, go ahead and remove the ‘src‘ directory. Then, execute the commands below to generate the three Rust projects:
cargo new --lib common
cargo new backend
cargo new frontend
After completing the previous steps, open the project in your favourite IDE or text editor. If you have the cargo-workspaces binary installed, you can use it to initialize the root project directory as a Rust workspace by running cargo workspaces init.
Alternatively, you can create a Cargo.toml file in the root directory and add the following code, which accomplishes the same thing as using the cargo-workspaces tool.
Cargo.toml
[workspace]
resolver = "2"
members = [
    "backend",
    "common",
    "frontend",
]
Work on the Library Project
With the general project setup complete, it’s time to start working on the library project. This project will define code that can be easily shared between the frontend and backend projects. To begin, navigate to the ‘common‘ directory in your terminal and execute the following commands to install the necessary dependencies.
cargo add serde --features derive
cargo add uuid --features "serde v4 js"
Once you’ve installed the crates listed above, your common/Cargo.toml file should resemble the example below. If you encounter issues with the latest versions of the crates, you can use the versions provided below instead. Don’t forget to leave a comment detailing the issue so that I can make any necessary adjustments.
common/Cargo.toml
[package]
name = "common"
version = "0.1.0"
edition = "2021"

# See more keys and their definitions at https://doc.rust-lang.org/cargo/reference/manifest.html

[dependencies]
serde = { version = "1.0.152", features = ["derive"] }
uuid = { version = "1.3.0", features = ["serde", "v4", "js"] }
Next, open the common/src/lib.rs file and replace its contents with the following structs. These structs describe the structure of the feedback record that SQLX will return from the PostgreSQL database and the JSON responses that the backend API will provide.
common/src/lib.rs
use serde::{Deserialize, Serialize};

#[derive(Debug, Deserialize, Serialize, PartialEq, Clone)]
pub struct Feedback {
    pub id: uuid::Uuid,
    pub text: String,
    pub rating: u8,
}

#[derive(Serialize, Deserialize, Debug)]
pub struct FeedbackData {
    pub feedback: Feedback,
}

#[derive(Serialize, Deserialize, Debug)]
pub struct FeedbackResponse {
    pub status: String,
    pub data: FeedbackData,
}

#[derive(Serialize, Deserialize, Debug)]
pub struct FeedbackListResponse {
    pub status: String,
    pub results: i32,
    pub feedbacks: Vec<Feedback>,
}

#[derive(Serialize, Deserialize, Debug)]
pub struct ErrorResponse {
    pub status: String,
    pub message: String,
}
In real-world applications, there are many other types of code that can be shared between frontend and backend projects, such as validation, helpers, utilities, and more. However, for the purposes of this project, we’ll only be focusing on the data structs.
Work on the Backend Project
Now, we can begin working on the backend project. Given that this project includes both frontend and backend components, I won’t delve into every detail about why certain things need to be done a certain way.
However, if you’re interested in a more comprehensive guide on how to use Actix Web with SQLX and PostgreSQL, I recommend reading the article titled “Rust – Build a CRUD API with SQLX and PostgreSQL“.
Setup the Rust API Project
To begin, change into the backend folder and install the required dependencies by running the command below.
cargo add actix-web
cargo add actix-cors
cargo add serde_json
cargo add serde --features derive
cargo add chrono --features serde
cargo add env_logger
cargo add dotenv
cargo add uuid --features "serde v4"
cargo add sqlx --features "runtime-async-std-native-tls postgres chrono uuid"
After completing the installation process, your backend/Cargo.toml file should reflect the configuration provided below. If you encounter compatibility issues with newer versions of these crates, you can easily revert to the specific versions specified here.
backend/Cargo.toml
[package]
name = "backend"
version = "0.1.0"
edition = "2021"

# See more keys and their definitions at https://doc.rust-lang.org/cargo/reference/manifest.html

[dependencies]
actix-cors = "0.7.0"
actix-web = "4.3.1"
chrono = { version = "0.4.23", features = ["serde"] }
dotenv = "0.15.0"
env_logger = "0.11.2"
serde = { version = "1.0.152", features = ["derive"] }
serde_json = "1.0.93"
sqlx = { version = "0.7.3", features = ["runtime-async-std-native-tls", "postgres", "chrono", "uuid"] }
uuid = { version = "1.3.0", features = ["serde", "v4"] }
common = { version = "0.1.0", path = "../common" }
In the configuration above, we have added the common library as an internal dependency. This allows the backend project to utilize the code defined in the common library.
Setup PostgreSQL and pgAdmin with Docker
If you already have a running PostgreSQL server on your machine, you may skip this optional section on setting up PostgreSQL and pgAdmin with Docker. However, if you plan to use the Postgres server on your machine, don’t forget to add the credentials to the .env file.
In case you don’t have a running Postgres server, setting one up is easy with Docker. Simply create a new docker-compose.yml file in the “backend” directory and add the following Docker Compose configurations:
backend/docker-compose.yml
version: '3'
services:
  postgres:
    image: postgres:latest
    container_name: postgres
    ports:
      - '6500:5432'
    volumes:
      - progresDB:/data/postgres
    env_file:
      - ./.env
  pgAdmin:
    image: dpage/pgadmin4
    container_name: pgAdmin
    env_file:
      - ./.env
    ports:
      - "5050:80"
volumes:
  progresDB:
Then, create a .env file in the ‘backend‘ folder and add the following environment variables. These credentials will be used by Docker Compose to build the Postgres and pgAdmin servers in their respective containers.
backend/.env
POSTGRES_HOST=127.0.0.1
POSTGRES_PORT=6500
POSTGRES_USER=admin
POSTGRES_PASSWORD=password123
POSTGRES_DB=rust_sqlx

DATABASE_URL=postgresql://admin:password123@localhost:6500/rust_sqlx?schema=public

PGADMIN_DEFAULT_EMAIL=admin@admin.com
PGADMIN_DEFAULT_PASSWORD=password123
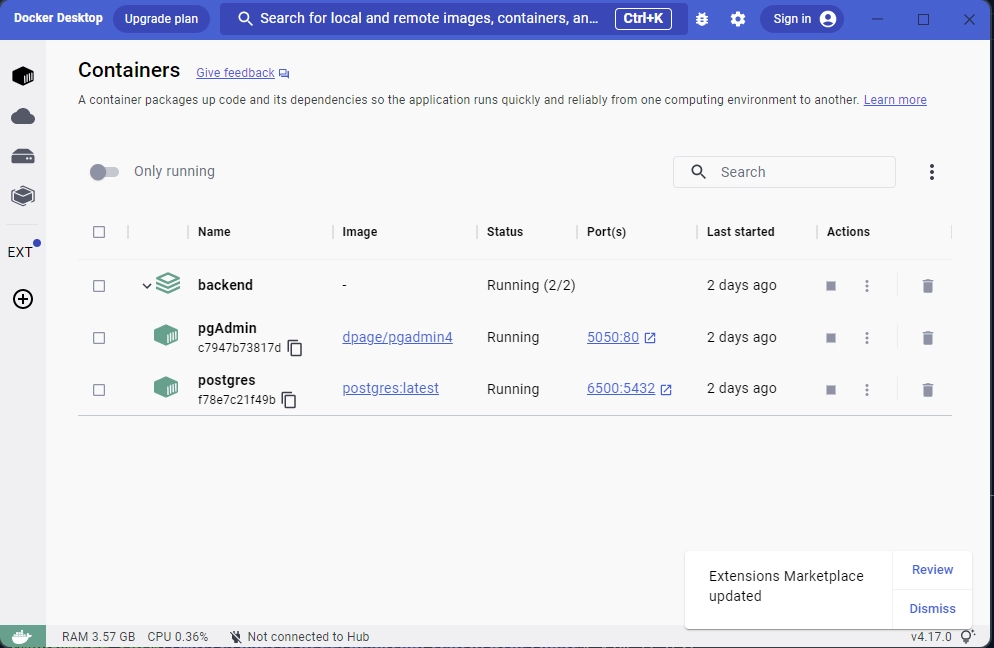
With the above configurations in place, it’s time to launch the Postgres and pgAdmin servers. Begin by opening a terminal in the ‘backend‘ folder and executing the command docker-compose up -d to start the containers.
To verify if the containers are up and running, you can either run the command docker ps in your terminal or you can check the Docker desktop application for active containers.
Database Migration with SQLX
Now that our Postgres server is up and running, we can use the SQLx command-line tool to generate migration files. Once we’ve generated these files, we’ll add our SQL queries to them.
Finally, we’ll use the SQLX-CLI tool to synchronize the Postgres database schema with the SQL queries we’ve defined. If you haven’t installed the SQLX-CLI tool yet, don’t worry! Simply run the command below to get started.
cargo install sqlx-cli
To begin generating the migration files, ensure that the SQLX command-line tool is installed on your machine. Once you’ve confirmed that it is, navigate to the ‘backend‘ directory in your terminal and run the command sqlx migrate add -r init to create a reversible migrations folder. If you prefer a different name for the migration scripts, simply replace init after the -r flag.
After creating the migrations folder, open the ‘up‘ script located within it. In this script, you can add the necessary SQL queries to activate the uuid-ossp contrib module in your Postgres server and insert a feedbacks table into the database.
backend/migrations/20230303140608_init.up.sql
CREATE EXTENSION IF NOT EXISTS "uuid-ossp";

CREATE TABLE
    IF NOT EXISTS feedbacks (
        id UUID PRIMARY KEY NOT NULL DEFAULT (uuid_generate_v4()),
        rating INTEGER NOT NULL,
        text TEXT NOT NULL UNIQUE,
        created_at TIMESTAMP
        WITH
            TIME ZONE DEFAULT NOW(),
            updated_at TIMESTAMP
        WITH
            TIME ZONE DEFAULT NOW()
    );
To ensure that you can safely undo the changes made by the ‘up‘ script in the migrations folder, open the corresponding ‘down‘ script and add the following SQL code. This will remove the feedbacks table that was added by the ‘up‘ script.
backend/migrations/20230303140608_init.down.sql
DROP TABLE IF EXISTS feedbacks;
With the necessary SQL queries defined, you can apply the changes to the database by running the sqlx migrate run command in the terminal from within the backend directory. This will execute the ‘up‘ migration script and update the database accordingly.
If you need to undo the changes made by the ‘up‘ migration script, you can use the sqlx migrate revert command to apply the corresponding ‘down‘ script.
Create the SQLX Database Model
Now that the Postgres database is in sync with the codebase, we can create a SQLX model to represent the structure of the feedbacks table. This struct will be used by SQLX to map each column of the record returned from the Postgres database to the corresponding fields of the struct.
To define the model, navigate to the backend/src directory and create a model.rs file, then add the following code.
backend/src/model.rs
use serde::{Deserialize, Serialize};
use sqlx::FromRow;
use uuid::Uuid;

#[derive(Debug, FromRow, Deserialize, Serialize)]
#[allow(non_snake_case)]
pub struct FeedbackModel {
    pub id: Uuid,
    pub text: String,
    pub rating: i32,
    #[serde(rename = "createdAt")]
    pub created_at: Option<chrono::DateTime<chrono::Utc>>,
    #[serde(rename = "updatedAt")]
    pub updated_at: Option<chrono::DateTime<chrono::Utc>>,
}
Create the Request Validation Structs
In any API design, it’s essential to validate user inputs to prevent storing invalid data in the database. While we could use the validator crate to define advanced validation rules, we’ll keep it simple in this project by defining structs that ensure users provide the right data types.
To do this, create a schema.rs file in the backend/src directory and add the following code:
backend/src/schema.rs
use serde::{Deserialize, Serialize};

#[derive(Deserialize, Debug)]
pub struct FilterOptions {
    pub page: Option<usize>,
    pub limit: Option<usize>,
}

#[derive(Deserialize, Debug)]
pub struct ParamOptions {
    pub id: String,
}

#[derive(Serialize, Deserialize, Debug)]
pub struct CreateFeedbackSchema {
    pub rating: i32,
    pub text: String,
}

#[derive(Serialize, Deserialize, Debug)]
pub struct UpdateFeedbackSchema {
    pub rating: Option<i32>,
    pub text: Option<String>,
}
Create the CRUD API Route Handlers
Now that we have completed defining the SQLX model, syncing the database with the codebase, and creating the validation structs, it’s time to implement the CRUD operations against the database using Actix Web route functions. The API will support the following endpoints for CRUD operations:
#[get("/feedbacks")]– This endpoint will return a paginated list of feedback items.#[post("/feedbacks/")]– This endpoint will add a new feedback item to the database and return the newly-inserted record.#[get("/feedbacks/{id}")]– This endpoint will retrieve a feedback item by ID.#[patch("/feedbacks/{id}")]– This endpoint will find a feedback item by ID and edit its columns based on the data provided in the request body.#[delete("/feedbacks/{id}")]– This endpoint will find a feedback item by ID and delete it from the database.
To define the route handlers, create a handler.rs in the backend/src and add the following code:
backend/src/handler.rs
use crate::{
    model::FeedbackModel,
    schema::{CreateFeedbackSchema, FilterOptions, UpdateFeedbackSchema},
    AppState,
};
use actix_web::{delete, get, patch, post, web, HttpResponse, Responder};
use chrono::prelude::*;
use serde_json::json;

#[get("/healthchecker")]
async fn health_checker_handler() -> impl Responder {
    const MESSAGE: &str = "Build API with Rust, SQLX, Postgres,and Actix Web";

    HttpResponse::Ok().json(json!({"status": "success","message": MESSAGE}))
}

#[get("/feedbacks")]
pub async fn feedback_list_handler(
    opts: web::Query<FilterOptions>,
    data: web::Data<AppState>,
) -> impl Responder {
    let limit = opts.limit.unwrap_or(10);
    let offset = (opts.page.unwrap_or(1) - 1) * limit;

    let query_result = sqlx::query_as!(
        FeedbackModel,
        "SELECT * FROM feedbacks ORDER by id LIMIT $1 OFFSET $2",
        limit as i32,
        offset as i32
    )
    .fetch_all(&data.db)
    .await;

    if query_result.is_err() {
        let message = "Something bad happened while fetching all feedback items";
        return HttpResponse::InternalServerError()
            .json(json!({"status": "error","message": message}));
    }

    let feedbacks = query_result.unwrap();

    let json_response = serde_json::json!({
        "status": "success",
        "results": feedbacks.len(),
        "feedbacks": feedbacks
    });
    HttpResponse::Ok().json(json_response)
}

#[post("/feedbacks/")]
async fn create_feedback_handler(
    body: web::Json<CreateFeedbackSchema>,
    data: web::Data<AppState>,
) -> impl Responder {
    let query_result = sqlx::query_as!(
        FeedbackModel,
        "INSERT INTO feedbacks (text,rating) VALUES ($1, $2) RETURNING *",
        body.text.to_string(),
        body.rating,
    )
    .fetch_one(&data.db)
    .await;

    match query_result {
        Ok(feedback) => {
            let feedback_response = serde_json::json!({"status": "success","data": serde_json::json!({
                "feedback": feedback
            })});

            return HttpResponse::Ok().json(feedback_response);
        }
        Err(e) => {
            if e.to_string()
                .contains("duplicate key value violates unique constraint")
            {
                return HttpResponse::BadRequest()
                .json(serde_json::json!({"status": "fail","message": "Feedback with that title already exists"}));
            }

            return HttpResponse::InternalServerError()
                .json(serde_json::json!({"status": "error","message": format!("{:?}", e)}));
        }
    }
}

#[get("/feedbacks/{id}")]
async fn get_feedback_handler(
    path: web::Path<uuid::Uuid>,
    data: web::Data<AppState>,
) -> impl Responder {
    let feedback_id = path.into_inner();
    let query_result = sqlx::query_as!(
        FeedbackModel,
        "SELECT * FROM feedbacks WHERE id = $1",
        feedback_id
    )
    .fetch_one(&data.db)
    .await;

    match query_result {
        Ok(feedback) => {
            let feedback_response = serde_json::json!({"status": "success","data": serde_json::json!({
                "feedback": feedback
            })});

            return HttpResponse::Ok().json(feedback_response);
        }
        Err(_) => {
            let message = format!("feedback with ID: {} not found", feedback_id);
            return HttpResponse::NotFound()
                .json(serde_json::json!({"status": "fail","message": message}));
        }
    }
}

#[patch("/feedbacks/{id}")]
async fn edit_feedback_handler(
    path: web::Path<uuid::Uuid>,
    body: web::Json<UpdateFeedbackSchema>,
    data: web::Data<AppState>,
) -> impl Responder {
    let feedback_id = path.into_inner();
    let query_result = sqlx::query_as!(
        FeedbackModel,
        "SELECT * FROM feedbacks WHERE id = $1",
        feedback_id
    )
    .fetch_one(&data.db)
    .await;

    if query_result.is_err() {
        let message = format!("Feedback with ID: {} not found", feedback_id);
        return HttpResponse::NotFound()
            .json(serde_json::json!({"status": "fail","message": message}));
    }

    let now = Utc::now();
    let feedback = query_result.unwrap();

    let query_result = sqlx::query_as!(
        FeedbackModel,
        "UPDATE feedbacks SET text = $1, rating = $2, updated_at = $3 WHERE id = $4 RETURNING *",
        body.text.to_owned().unwrap_or(feedback.text),
        body.rating.to_owned().unwrap_or(feedback.rating),
        now,
        feedback_id
    )
    .fetch_one(&data.db)
    .await;

    match query_result {
        Ok(feedback) => {
            let feedback_response = serde_json::json!({"status": "success","data": serde_json::json!({
                "feedback": feedback
            })});

            return HttpResponse::Ok().json(feedback_response);
        }
        Err(err) => {
            let message = format!("Error: {:?}", err);
            return HttpResponse::InternalServerError()
                .json(serde_json::json!({"status": "error","message": message}));
        }
    }
}

#[delete("/feedbacks/{id}")]
async fn delete_feedback_handler(
    path: web::Path<uuid::Uuid>,
    data: web::Data<AppState>,
) -> impl Responder {
    let feedback_id = path.into_inner();
    let rows_affected = sqlx::query!("DELETE FROM feedbacks  WHERE id = $1", feedback_id)
        .execute(&data.db)
        .await
        .unwrap()
        .rows_affected();

    if rows_affected == 0 {
        let message = format!("Feedback with ID: {} not found", feedback_id);
        return HttpResponse::NotFound().json(json!({"status": "fail","message": message}));
    }

    HttpResponse::NoContent().finish()
}

pub fn config(conf: &mut web::ServiceConfig) {
    let scope = web::scope("/api")
        .service(health_checker_handler)
        .service(feedback_list_handler)
        .service(create_feedback_handler)
        .service(get_feedback_handler)
        .service(edit_feedback_handler)
        .service(delete_feedback_handler);

    conf.service(scope);
}
Register the API Routes and Setup CORS
With all the necessary configurations in place, the next step is to connect the Actix Web server to the Postgres database, configure CORS to allow requests from the frontend app, and register the API routes.
To achieve this, navigate to the backend/src/main.rs file and replace its content with the following code:
backend/src/main.rs
mod handler;
mod model;
mod schema;

use actix_cors::Cors;
use actix_web::middleware::Logger;
use actix_web::{http::header, web, App, HttpServer};
use dotenv::dotenv;
use sqlx::{postgres::PgPoolOptions, Pool, Postgres};

pub struct AppState {
    db: Pool<Postgres>,
}

#[actix_web::main]
async fn main() -> std::io::Result<()> {
    if std::env::var_os("RUST_LOG").is_none() {
        std::env::set_var("RUST_LOG", "actix_web=info");
    }
    dotenv().ok();
    env_logger::init();

    let database_url = std::env::var("DATABASE_URL").expect("DATABASE_URL must be set");
    let pool = match PgPoolOptions::new()
        .max_connections(10)
        .connect(&database_url)
        .await
    {
        Ok(pool) => {
            println!("✅Connection to the database is successful!");
            pool
        }
        Err(err) => {
            println!("🔥 Failed to connect to the database: {:?}", err);
            std::process::exit(1);
        }
    };

    println!("🚀 Server started successfully");

    HttpServer::new(move || {
        let cors = Cors::default()
            .allowed_origin("http://localhost:3000")
            .allowed_methods(vec!["GET", "POST", "PATCH", "DELETE"])
            .allowed_headers(vec![
                header::CONTENT_TYPE,
                header::AUTHORIZATION,
                header::ACCEPT,
            ])
            .supports_credentials();
        App::new()
            .app_data(web::Data::new(AppState { db: pool.clone() }))
            .configure(handler::config)
            .wrap(cors)
            .wrap(Logger::default())
    })
    .bind(("127.0.0.1", 8000))?
    .run()
    .await
}
If you’re coming from a Node.js background, you might be familiar with Nodemon, a package that automatically reloads the server when any required files change. Similarly, in Rust, we have a package called Cargo Watch that rebuilds the project and starts the server whenever there are changes to any required files.
To install Cargo Watch, simply execute the command cargo install cargo-watch if you haven’t done so already. Once it’s installed, run the following command within the backend folder’s terminal: cargo watch -q -c -w src/ -x run. This will build the project and start the Actix Web server automatically upon detecting changes in the required files.
Alternatively, if you prefer to build and start the server manually without automatic updates, you can use the standard cargo run command.
Work on the Frontend Project
With the backend project now complete, it’s time to move on to the frontend project. To avoid making this article overly lengthy, I will briefly summarize some of the key concepts. However, if you’d like a more comprehensive guide, I recommend reading the article “Build a Frontend Web App in Rust using the Yew.rs Framework“.
Setup the Yew.rs Project
To get started, navigate to the ‘frontend‘ directory in your terminal and execute the following commands to install the necessary crates.
cargo add yew --features csr
cargo add serde_json
cargo add serde --features derive
cargo add uuid --features "serde v4 js"
cargo add reqwasm
cargo add gloo
cargo add yewdux
cargo add wasm-bindgen
cargo add web-sys --features "HtmlInputElement Window"
cargo add wasm-bindgen-futures
As you read this article, keep in mind that some of the crates may have introduced breaking changes that could cause errors in your application. If this happens, you can revert to the versions listed below. Additionally, please leave a comment about the crate so that I can make any necessary updates to the article.
frontend/Cargo.toml
[package]
name = "frontend"
version = "0.1.0"
edition = "2021"

# See more keys and their definitions at https://doc.rust-lang.org/cargo/reference/manifest.html

[dependencies]
gloo = "0.11.0"
serde = { version = "1.0.152", features = ["derive"] }
uuid = { version = "1.3.0", features = ["serde", "v4", "js"] }
wasm-bindgen = "0.2.84"
web-sys = { version = "0.3.61", features = ["HtmlInputElement", "Window"] }
yew = { version = "0.21.0", features = ["csr"] }
yewdux = "0.10.0"
reqwasm = "0.5.0"
wasm-bindgen-futures = "0.4.34"
serde_json = "1.0.93"
common = { version = "0.1.0", path = "../common" }
Setup Tailwind CSS for Styling
Now it’s time to set up Tailwind CSS and style our Yew components. The first step is to generate the Tailwind CSS configuration files. To do this, make sure you’re in the ‘frontend‘ directory’s terminal and execute the following command.
npx tailwindcss init -p
Next, navigate to the frontend/tailwind.config.js file and replace its current content with the following code. This will instruct Tailwind CSS to generate the final CSS based on the utility classes used in both the index.html file and all the files within the ‘src‘ directory.
frontend/tailwind.config.js
/** @type {import('tailwindcss').Config} */
module.exports = {
  content: [
    "./index.html",
    "./src/**/*.{rs,html}"
  ],
  theme: {
    extend: {
      fontFamily: {
        Poppins: ['Poppins, sans-serif'],
      },
      container: {
        center: true,
        padding: '1rem',
        screens: {
          lg: '1125px',
          xl: '1125px',
          '2xl': '1125px',
        },
      },
    },
  },
  plugins: [],
};
Create a new directory called ‘styles‘ within the ‘frontend‘ directory. Inside the ‘styles‘ directory, create a file named tailwind.css and add the following CSS code along with the necessary Tailwind CSS directives.
frontend/styles/tailwind.css
@import url('https://fonts.googleapis.com/css2?family=Poppins:wght@300;400;500;600;700&display=swap');

@tailwind base;
@tailwind components;
@tailwind utilities;

html {
    font-family: 'Poppins', sans-serif;
}

body {
    background-color: #202142;
}
Now, in order to define a post-build hook to automate the Tailwind CSS command execution, we need to create a Trunk.toml file in the ‘frontend‘ directory and include the following configuration options:
frontend/Trunk.toml
[[hooks]]
stage = "post_build"
command = "sh"
command_arguments = ["-c", "npx tailwindcss -i ./styles/tailwind.css -o ./dist/.stage/index.css"]
Trunk requires a source HTML file to guide its asset building and bundling process. As such, we need to create an index.html file in the ‘frontend‘ directory and include the following code:
frontend/index.html
<!DOCTYPE html>
<html lang="en">
  <head>
    <meta charset="UTF-8" />
    <meta http-equiv="X-UA-Compatible" content="IE=edge" />
    <meta name="viewport" content="width=device-width, initial-scale=1.0" />
    <link data-trunk rel="icon" href="logo.svg" type="image/svg" />
    <link rel="stylesheet" href="./index.css" />
    <title>My First Yew App</title>
  </head>
  <body></body>
</html>
In the HTML code above, we have included a link to the CSS file generated by Tailwind CSS, as well as a link to a Yew logo that will be used as the favicon for our application. If you don’t have the Yew logo, you can download it from their official website.
Create the API Request Functions
Next, we will create functions that will be used in our Yew components to make requests to the backend API. While it’s possible to write the request logic directly within the components, it can lead to cluttered code. Instead, we’ll create a separate file for the API functions, which will make the components look cleaner.
To get started, create an api.rs file in the frontend/src directory and add the following code:
frontend/src/api.rs
use common::{ErrorResponse, Feedback, FeedbackListResponse, FeedbackResponse};
use reqwasm::http;

pub async fn api_create_feedback(feedback_data: &str) -> Result<Feedback, String> {
    let response = match http::Request::post("http://localhost:8000/api/feedbacks/")
        .header("Content-Type", "application/json")
        .body(feedback_data)
        .send()
        .await
    {
        Ok(res) => res,
        Err(_) => return Err("Failed to make request".to_string()),
    };

    if response.status() != 200 {
        let error_response = response.json::<ErrorResponse>().await;
        if let Ok(error_response) = error_response {
            return Err(error_response.message);
        } else {
            return Err(format!("API error: {}", response.status()));
        }
    }

    let res_json = response.json::<FeedbackResponse>().await;
    match res_json {
        Ok(data) => Ok(data.data.feedback),
        Err(_) => Err("Failed to parse response".to_string()),
    }
}

pub async fn _api_fetch_single_feedback(feedback_id: &str) -> Result<Feedback, String> {
    let response = match http::Request::get(
        format!("http://localhost:8000/api/feedbacks/{}", feedback_id).as_str(),
    )
    .send()
    .await
    {
        Ok(res) => res,
        Err(_) => return Err("Failed to make request".to_string()),
    };

    if response.status() != 200 {
        let error_response = response.json::<ErrorResponse>().await;
        if let Ok(error_response) = error_response {
            return Err(error_response.message);
        } else {
            return Err(format!("API error: {}", response.status()));
        }
    }

    let res_json = response.json::<FeedbackResponse>().await;
    match res_json {
        Ok(data) => Ok(data.data.feedback),
        Err(_) => Err("Failed to parse response".to_string()),
    }
}

pub async fn api_fetch_feedbacks((page, limit): (i32, i32)) -> Result<Vec<Feedback>, String> {
    let response = match http::Request::get(
        format!(
            "http://localhost:8000/api/feedbacks?page={}&limit={}",
            page, limit
        )
        .as_str(),
    )
    .send()
    .await
    {
        Ok(res) => res,
        Err(_) => return Err("Failed to make request".to_string()),
    };

    if response.status() != 200 {
        let error_response = response.json::<ErrorResponse>().await;
        if let Ok(error_response) = error_response {
            return Err(error_response.message);
        } else {
            return Err(format!("API error: {}", response.status()));
        }
    }

    let res_json = response.json::<FeedbackListResponse>().await;
    match res_json {
        Ok(data) => Ok(data.feedbacks),
        Err(_) => Err("Failed to parse response".to_string()),
    }
}

pub async fn api_delete_feedback(feedback_id: &str) -> Result<(), String> {
    let response = match http::Request::delete(
        format!("http://localhost:8000/api/feedbacks/{}", feedback_id).as_str(),
    )
    .send()
    .await
    {
        Ok(res) => res,
        Err(_) => return Err("Failed to make request".to_string()),
    };

    if response.status() != 204 {
        let error_response = response.json::<ErrorResponse>().await;
        if let Ok(error_response) = error_response {
            return Err(error_response.message);
        } else {
            return Err(format!("API error: {}", response.status()));
        }
    }

    Ok(())
}
State Management with Yewdux
Now, we can use the Yewdux crate to define a global store that holds the application states. Along with the store, we will create setter functions that we can call in the Yew components to modify the corresponding state in the store. We can write the mutation logic in the component, but keeping them close to the store allows us to maintain separation of concerns.
To implement this, navigate to the frontend/src directory and create a store.rs file with the following code:
frontend/src/store.rs
use common::Feedback;
use serde::{Deserialize, Serialize};
use yewdux::prelude::*;

#[derive(Debug, PartialEq, Serialize, Deserialize, Default, Clone)]
pub struct AlertInput {
    pub show_alert: bool,
    pub alert_message: String,
}

#[derive(Default, PartialEq, Serialize, Deserialize, Store, Clone)]
#[store(storage = "local", storage_tab_sync)]
pub struct Store {
    pub feedbacks: Vec<Feedback>,
    pub loading: bool,
    pub alert_input: AlertInput,
}

pub fn set_feedback(feedback: Feedback, dispatch: Dispatch<Store>) {
    dispatch.reduce_mut(move |store| {
        store.feedbacks.insert(0, feedback);
    })
}

pub fn set_feedback_list(feedbacks: Vec<Feedback>, dispatch: Dispatch<Store>) {
    dispatch.reduce_mut(move |store| {
        store.feedbacks = feedbacks;
    })
}

pub fn delete_feedback(id: uuid::Uuid, dispatch: Dispatch<Store>) {
    dispatch.reduce_mut(move |store| {
        store.feedbacks.retain(|f| f.id != id);
    })
}

pub fn set_loading(loading: bool, dispatch: Dispatch<Store>) {
    dispatch.reduce_mut(move |store| {
        store.loading = loading;
    })
}

pub fn set_show_alert(message: String, dispatch: Dispatch<Store>) {
    dispatch.reduce_mut(move |store| {
        store.alert_input = AlertInput {
            alert_message: message,
            show_alert: true,
        };
    })
}

pub fn set_hide_alert(dispatch: Dispatch<Store>) {
    dispatch.reduce_mut(move |store| {
        store.alert_input.show_alert = false;
    })
}
Create Reusable Components
With that out of the way, we can now focus on creating some reusable Yew components that can be used multiple times in other components.
Alert Notification Component
To create the Alert notification component, you can start by creating a ‘components‘ folder in the frontend/src directory. Inside the components folder, create a alert.rs file and add the following code. This component can be used to display messages such as success or error messages.
frontend/src/components/alert.rs
use gloo::timers::callback::Timeout;
use yew::prelude::*;
use yewdux::prelude::use_store;

use crate::store::{set_hide_alert, Store};

#[derive(Debug, PartialEq, Properties)]
pub struct Props {
    pub message: String,
    pub delay_ms: u32,
}

#[function_component]
pub fn AlertComponent(props: &Props) -> Html {
    let (store, dispatch) = use_store::<Store>();
    let show_alert = store.alert_input.show_alert;

    use_effect_with(
        (show_alert, dispatch.clone(), props.delay_ms),

        move |(show_alert, dispatch, delay_ms)| {
            let cloned_dispatch = dispatch.clone();
            if *show_alert {
                let handle =
                    Timeout::new(*delay_ms, move || set_hide_alert(cloned_dispatch)).forget();
                let clear_handle = move || {
                    web_sys::Window::clear_timeout_with_handle(
                        &web_sys::window().unwrap(),
                        handle.as_f64().unwrap() as i32,
                    );
                };

                Box::new(clear_handle) as Box<dyn FnOnce()>
            } else {
                Box::new(|| {}) as Box<dyn FnOnce()>
            }
        },
    );

    html! {
    <div id="myToast" class={format!("fixed top-14 right-10 px-5 py-4 border-r-8 border-orange-500 bg-white drop-shadow-lg {}", if show_alert { "" } else { "hidden" })}>
        <p class="text-sm">
            <span class="mr-2 inline-block px-3 py-1 rounded-full bg-blue-500 text-white font-extrabold">{"i"}</span>
            {props.message.clone()}
        </p>
    </div>
    }
}
Rating Component
To create the Rating component, you can start by creating a new file named rating.rs inside the components directory. Then, add the following code to the file:
frontend/src/components/rating.rs
use wasm_bindgen::JsCast;
use web_sys::HtmlInputElement;
use yew::prelude::*;

#[derive(Properties, Clone, PartialEq)]
pub struct Props {
    #[prop_or_default]
    pub selected: u8,
    #[prop_or_default]
    pub onchange: Callback<u8>,
}

#[function_component]
pub fn Rating(props: &Props) -> Html {
    let selected = props.selected;

    let onchange = props.onchange.clone();
    let on_input_change = Callback::from(move |event: Event| {
        let target = event.target().unwrap();
        let value = target.unchecked_into::<HtmlInputElement>().value();
        let selected = value.parse::<u8>().unwrap();
        onchange.emit(selected)
    });

    html! {
        <ul class="list-none flex items-center justify-around my-7">
            { for (1..=10).map(|i| {
                let label = i.to_string();
                let id = format!("num{}", i);

                html! {
                    <li class={format!("relative bg-gray-200 w-14 h-14 p-3 text-center rounded-full border-gray-300 border-2 transition duration-300 {}",
                        if selected == i { "bg-pink-500 text-white" } else { "" },
                    )}>
                        <input type="radio" class="opacity-0" id={id.clone()} name="rating" value={Some(i.to_string())} checked={selected == i} onchange={on_input_change.clone()} />
                        <label for={id} class="absolute w-full h-full flex items-center justify-center rounded-full top-1/2 left-1/2 transform -translate-x-1/2 -translate-y-1/2 cursor-pointer hover:bg-pink-500 hover:text-white transition duration-300">{ label }</label>
                    </li>
                }
            })}
        </ul>
    }
}
Yew Component to Add New Feedback Item
To create a Yew component with a form for adding new feedback items, we will first need to create a feedback_form.rs file in the frontend/src/components directory.
Once you have created the file, add the code below. This component will extract the form data, and make a POST request to the Rust API to add the new feedback item.
If the request is successful, it will add the new item to the Yewdux store. If the request fails, it will use the Alert notification to display the error returned by the backend API.
frontend/src/components/feedback_form.rs
use super::rating::Rating;
use crate::{
    api::api_create_feedback,
    store::{set_feedback, set_loading, set_show_alert, Store},
};

use wasm_bindgen::JsCast;
use wasm_bindgen_futures::spawn_local;
use web_sys::HtmlInputElement;
use yew::prelude::*;
use yewdux::prelude::*;

#[function_component]
pub fn FeedbackForm() -> Html {
    let (store, dispatch) = use_store::<Store>();
    let loading = &store.loading;
    let text = use_state(String::new);
    let rating = use_state(|| 10_u8);
    let min = use_state(|| 10);
    let message = use_state(|| Option::<String>::None);

    let text_input_ref = use_node_ref();

    let handle_select = {
        let rating = rating.clone();
        Callback::from(move |value| {
            rating.set(value);
        })
    };

    let handle_input = {
        let text = text.clone();
        let message = message.clone();
        Callback::from(move |event: InputEvent| {
            let target = event.target().unwrap();
            let value = target.unchecked_into::<HtmlInputElement>().value();
            message.set(None);
            text.set(value);
        })
    };

    let on_submit = {
        let cloned_dispatch = dispatch.clone();
        let cloned_text_input_ref = text_input_ref.clone();
        let cloned_rating = rating.clone();
        let cloned_text = text.clone();
        let message = message.clone();

        Callback::from(move |event: SubmitEvent| {
            let text_input_ref = cloned_text_input_ref.clone();
            let text = cloned_text.clone();
            let rating = cloned_rating.clone();
            let dispatch = cloned_dispatch.clone();

            event.prevent_default();
            set_loading(true, dispatch.clone());

            if text.trim().len() < *min {
                message.set(Some("Text must be at least 10 characters".to_string()));
                set_loading(false, dispatch.clone());
                return;
            }

            let feedback_data = serde_json::json!({
                "text": text.to_string(),
                "rating": *rating
            });

            spawn_local(async move {
                set_loading(true, dispatch.clone());
                let text_input = text_input_ref.cast::<HtmlInputElement>().unwrap();
                text_input.set_value("");
                text.set(String::new());
                rating.set(10);

                let response = api_create_feedback(feedback_data.to_string().as_str()).await;

                match response {
                    Ok(feedback) => {
                        set_loading(false, dispatch.clone());
                        set_show_alert("Feeback added successfully".to_string(), dispatch.clone());
                        set_feedback(feedback, dispatch);
                    }
                    Err(e) => {
                        set_loading(false, dispatch.clone());
                        set_show_alert(e.to_string(), dispatch);
                    }
                }
            });
        })
    };

    html! {
        <div class="bg-white text-gray-700 rounded-lg p-8 my-5 relative">
            <header class="max-w-md mx-auto">
                <h2 class="text-center text-2xl font-bold">{"How would you rate your service with us?"}</h2>
            </header>
            <form onsubmit={on_submit}>
                <Rating selected={*rating} onchange={handle_select} />
                <div class="flex border rounded-lg my-4 px-2 py-3">
                    <input
                        type="text"
                        ref={text_input_ref}
                        oninput={handle_input}
                        class="flex-grow border-none text-lg focus:outline-none"
                        placeholder="Tell us something that keeps you coming back"
                    />
                <button
                    type="submit"
                    class={format!(
                        "border-0 rounded-md w-28 h-10 cursor-pointer hover:bg-indigo-500 {}",
                        if *loading { "bg-[#ccc] text-gray-800"} else {"bg-indigo-600 text-white"}
                    )}
                >
                    {"Send"}
                </button>
                </div>
                {if let Some(msg) = message.as_ref() {
                    html! { <div class="pt-3 text-center text-purple-600">{msg.clone()}</div> }
                } else {
                    html! {}
                }}
            </form>
        </div>
    }
}
Yew Component to Display Feedback Statistics
Next, we’ll create a Yew component to display statistics such as the average rating or number of feedback items. To do this, create a feedback_stats.rs file in the components directory and add the following code snippets.
frontend/src/components/feedback_stats.rs
use yew::prelude::*;
use yewdux::prelude::*;

use crate::store::Store;

#[function_component]
pub fn FeedbackStats() -> Html {
    let (store, _) = use_store::<Store>();
    let count = store.feedbacks.len();
    let sum: u32 = store.feedbacks.iter().map(|f| u32::from(f.rating)).sum();

    let average = if count > 0 {
        format!("{:.2}", sum as f32 / count as f32)
    } else {
        "0.0".to_string()
    };

    html! {
        <div class="flex justify-between items-center mb-11">
            <h4 class="text-white">{count} {" "} {"Reviews"}</h4>
            <h4 class="text-white">{"Ratings Average: "} {average}</h4>
        </div>
    }
}
Yew Component to Display Feedback Information
Next, let’s create a Yew component to display the information of a feedback item. To do this, create a feedback_item.rs file in the components directory and add the following code. This component will also have the logic for deleting a feedback item.
When the delete icon is clicked, a DELETE request will be fired to the backend API. If the request is successful, the deleted feedback item will be removed from the Yewdux store.
frontend/src/components/feedback_item.rs
use wasm_bindgen_futures::spawn_local;
use yew::prelude::*;
use yewdux::prelude::*;

use crate::{
    api::api_delete_feedback,
    store::{delete_feedback, set_loading, set_show_alert, Store},
};
use common::Feedback;

#[derive(Debug, PartialEq, Properties)]
pub struct Props {
    pub feedback: Feedback,
}

fn confirm_delete(message: &str) -> bool {
    web_sys::Window::confirm_with_message(&web_sys::window().unwrap(), message).unwrap()
}

#[function_component]
pub fn FeedbackItem(props: &Props) -> Html {
    let (_, dispatch) = use_store::<Store>();

    let on_delete = {
        let cloned_dispatch = dispatch.clone();
        let feedback_id = props.feedback.id.clone();
        Callback::from(move |_: MouseEvent| {
            let dispatch = cloned_dispatch.clone();
            let confirmed = confirm_delete("Do you really want to delete this item?");

            if confirmed {
                spawn_local(async move {
                    set_loading(true, dispatch.clone());
                    let response = api_delete_feedback(feedback_id.to_string().as_str()).await;
                    match response {
                        Ok(_) => {
                            set_loading(false, dispatch.clone());
                            set_show_alert(
                                "Feedback deleted successfully".to_string(),
                                dispatch.clone(),
                            );
                            delete_feedback(feedback_id, dispatch);
                        }
                        Err(e) => {
                            set_loading(false, dispatch.clone());
                            set_show_alert(e.to_string(), dispatch);
                        }
                    }
                });
            }
        })
    };

    html! {
        <div class="bg-white text-gray-700 rounded-lg p-8 my-5 relative">
            <div class="bg-pink-500 text-white rounded-full border-2 border-gray-200 w-12 h-12 flex items-center justify-center text-2xl font-bold absolute top-0 left-0 -mt-4 -ml-4">
                {props.feedback.rating}
            </div>
            <button class="absolute font-bold top-2 right-4 cursor-pointer bg-transparent border-none" onclick={on_delete}>{"X"}</button>
            <p>
                {&props.feedback.text}
            </p>
        </div>
    }
}
Yew Component to Display the Feedback Items
Let’s create a Yew component to display a list of feedback items using the FeedbackItem component. Upon rendering, this component will make a GET request to the backend API to retrieve a paginated list of feedback items, which will then be displayed in the UI.
To create this component, create a feedback_list.rs file in the components folder and add the code below.
frontend/src/components/feedback_list.rs
use yew::prelude::*;
use yewdux::prelude::*;

use super::feedback_item::FeedbackItem;
use crate::{
    api::api_fetch_feedbacks,
    store::{set_feedback_list, set_loading, set_show_alert, Store},
};

#[function_component]
pub fn FeedbackList() -> Html {
    let (store, dispatch) = use_store::<Store>();
    let feedback_list = store.feedbacks.clone();

    use_effect_with(
    (),
        move |_| {
            let dispatch = dispatch.clone();
            wasm_bindgen_futures::spawn_local(async move {
                set_loading(true, dispatch.clone());
                let response = api_fetch_feedbacks((1, 10)).await;
                match response {
                    Ok(feedbacks) => {
                        set_loading(false, dispatch.clone());
                        set_feedback_list(feedbacks, dispatch);
                    }
                    Err(e) => {
                        set_loading(false, dispatch.clone());
                        set_show_alert(e.to_string(), dispatch);
                    }
                }
            });
        },
    );

    html! {
        <div>
            {
                feedback_list.into_iter().map(|feedback|{
                    let key = feedback.id.to_string();
                    html!{<FeedbackItem {key} feedback={feedback.clone()} />}
                }).collect::<Html>()
            }
        </div>
    }
}
Export the Component Files as Modules
With all the components now defined, we need to create a mod.rs file in the ‘components‘ directory to export them for use in other modules. This file will allow us to use the components as modules in other parts of our application. To do this, simply create a mod.rs file in the components folder and add the following code to it:
frontend/src/components/mod.rs
pub mod alert;
pub mod feedback_form;
pub mod feedback_item;
pub mod feedback_list;
pub mod feedback_stats;
pub mod rating;
Add the Components to the Main File
To wrap up, we need to add our components to the entry point of the application and conditionally render some HTML to display a loading spinner while the backend API is processing requests.
To do this, open the frontend/src/main.rs file and replace its content with the following code:
frontend/src/main.rs
mod api;
mod components;
mod store;

use components::{
    alert::{AlertComponent, Props as AlertProps},
    feedback_form::FeedbackForm,
    feedback_list::FeedbackList,
    feedback_stats::FeedbackStats,
};
use store::Store;
use yew::prelude::*;
use yewdux::prelude::*;

#[function_component]
fn App() -> Html {
    let (store, _) = use_store::<Store>();
    let message = store.alert_input.alert_message.clone();
    let show_alert = store.alert_input.show_alert;
    let loading = &store.loading;

    let alert_props = AlertProps {
        message,
        delay_ms: 5000,
    };
    html! {
        <>
            if show_alert {
                    <AlertComponent
                        message={alert_props.message}
                        delay_ms={alert_props.delay_ms}
                     />
                }
            <main class="md:container mt-24 px-5">
                <FeedbackForm />
                <FeedbackStats />
                <FeedbackList />
            </main>
            if *loading {
                <div
                    class="fixed top-5 left-5 inline-block h-8 w-8 animate-spin rounded-full border-4 border-solid border-yellow-400 border-r-transparent align-[-0.125em] text-warning motion-reduce:animate-[spin_1.5s_linear_infinite]"
                    role="status">
                    <span
                    class="!absolute !-m-px !h-px !w-px !overflow-hidden !whitespace-nowrap !border-0 !p-0 ![clip:rect(0,0,0,0)]"
                    >{"Loading..."}</span
                >
                </div>
            }
        </>
    }
}

fn main() {
    yew::Renderer::<App>::new().render();
}
And we are done! To run the Yew application, navigate to the frontend directory in your terminal and enter the command trunk serve --port 3000 to start the Trunk dev server.
The default port for Trunk is 8080, so we passed 3000 to the --port flag to run the server on that port. If you prefer a different port number, feel free to use it instead. Once the server is running, you can view the application in your web browser at http://localhost:3000.
Test the Rust Full-Stack App
With the Yew application successfully running, it’s time to leverage its functionality to communicate with the backend API. If you haven’t already, open a new terminal, navigate to the ‘backend‘ directory, and execute the command cargo watch -q -c -w src/ -x run to start the backend server.
Additionally, ensure that the Postgres and pgAdmin Docker containers are running before you execute the Cargo Watch command.
Once you have both the frontend and backend applications up and running, open a new tab in your browser and visit http://localhost:3000/ to view the Yew application.
To create a new feedback entry, enter the feedback text into the input field, choose a rating, and click the “Send” button to submit the form data to the Rust API.
If the request is successful, the Yew application will update the DOM to display the newly added feedback item.
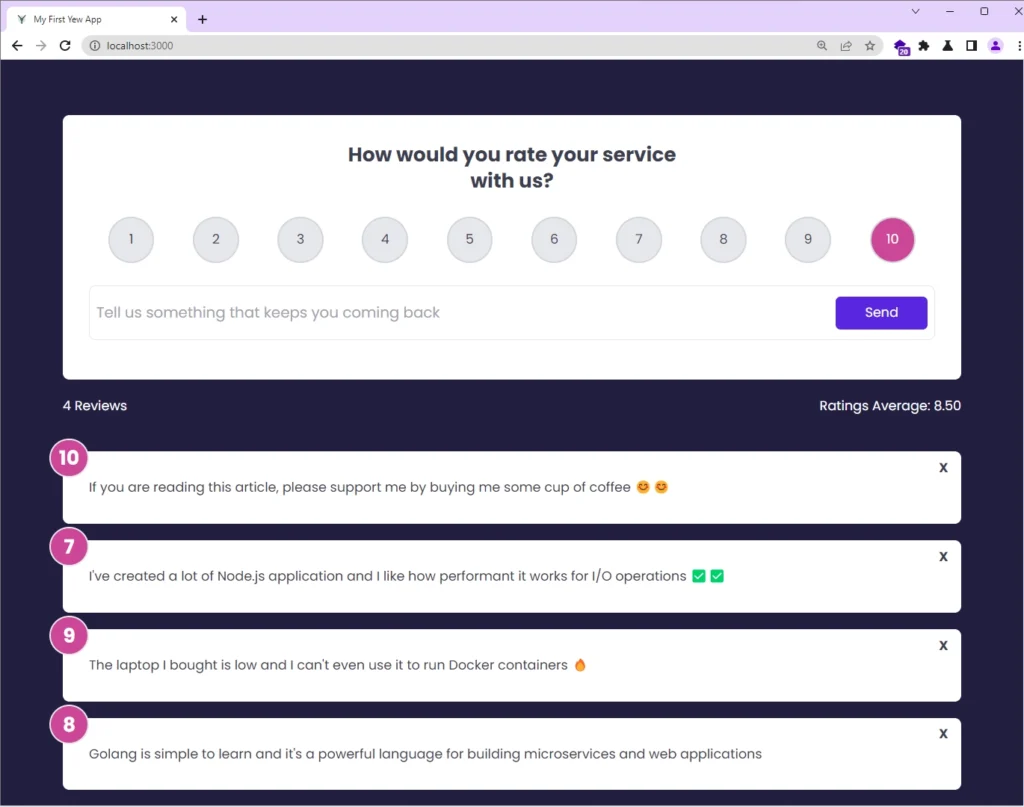
To delete a feedback item, simply click the cross icon located at the top-right corner of the item. This will send a DELETE request to the Rust API to remove the feedback item from the database. If the request is successful, the Yew application will update the DOM to remove the deleted item.
Conclusion
Throughout this article, you’ve acquired the skills needed to build a full-stack Rust application using Yew.rs, Actix Web, PostgreSQL, Yewdux, SQLX, and Docker. However, the possibilities don’t end there. This project is an excellent opportunity to challenge yourself by adding more functionality.
I hope you found this tutorial valuable! If you have any feedback or questions, please leave a comment below. Thank you for taking the time to read it.
The entire source code for the full-stack Rust application can be found on GitHub.
hi bro i hope you are doing well , if you can explain to more abuote common folder and how it work and Database Migration with SQLX how to set it ,when i see it i want to know how to create one and your doing amazing job in the backend , i use axum when i see you are using actix understand it like am using actix , great job