

In this tutorial, you’ll learn how to build a React.js CRUD application with JavaScript Fetch API, tailwind CSS, and React-Hook-Form. This app will leverage Fetch API to perform CRUD (CREATE, READ, UPDATE, DELETE) operations against a RESTful API via HTTP protocol.
To make the React Fetch API app communicate with a RESTful API, follow the steps provided in the “Run the Deno CRUD API Locally” section to quickly spin up a CRUD API built with Deno and TypeScript.
More practice:
- Build a React.js CRUD App using a RESTful API
- Build a Full Stack tRPC CRUD App with Next.js
- Build a FullStack tRPC CRUD App with TypeScript
- Node.js, Express, TypeORM, PostgreSQL: CRUD Rest API
- Next.js Full-Stack App with React Query, and GraphQL-CodeGen
- Build Full-Stack tRPC CRUD Application with Node.js, and React.js
- GraphQL CRUD API with Next.js, MongoDB, and TypeGraphQL

Prerequisites
Before proceeding with this tutorial, these prerequisites are needed to make the tutorial easier to follow.
- You should have basic knowledge of JavaScript, TypeScript, and React.js
- Optional: Have Deno installed if you’ll be running the backend API
- You should have basic knowledge of RESTful architecture and how to interact with a CRUD API.
Run the Deno CRUD API Locally
- Make sure you have the latest version of Deno installed on your machine. Visit https://deno.land/manual/getting_started/installation to install the right Deno binary for your operating system. If you already have it installed, run
deno upgradeto get the newest version of Deno. - Download or clone the Deno CRUD project from https://github.com/wpcodevo/deno-crud-app and open it with an IDE.
- Run
deno run -A src/server.tsto install the required dependencies and start the Deno HTTP server on port 8000. - Open any API testing software and test the Deno API or set up the frontend app to interact with the Deno API.
Run the React Fetch API App Locally
- Visit https://github.com/wpcodevo/react-crud-fetchapi-app to download or clone the React.js Fetch API CRUD project and open it with an IDE or text editor.
- Run
yarnoryarn installin the terminal of the root directory to install all the project’s dependencies. - Start the app on port 3000 with
yarn dev. - Open http://localhost:3000/ in a new tab to test the React Fetch API CRUD app against the Deno CRUD API. Note: opening the app on
http://127.0.0.1:3000will result in a site can’t be reached or CORS errors.
Setup the React.js Project
Typically, you might create a new React.js project with Create React App, but the project scaffolding process can take a lot of time since over 140 MB of dependencies has to be installed first. Although Create React App works well, as the project size increases, its performance decreases.
Vite on the other hand is a lightweight tool that installs 31 MB of dependencies to scaffold a project. This is a game changer and will save you a lot of time in starting a new project.
So, we’ll use Vite to bootstrap the React project and configure it to use TypeScript for type-checking and tailwind CSS for styling.
Bootstrap React Project with Vite
To begin, go to the location where you would like to create the project and run this command to start the project scaffolding process.
yarn create vite react-crud-fetchapi-app
# or
npm create vite react-crud-fetchapi-app
This will create a folder with the name react-crud-fetchapi-app and download the vite-create binary from the NPM repository before prompting you to select your framework of choice. Select React as the framework and choose TypeScript as the variant.
Once the project has been generated, open it with an IDE or text editor and run yarn install or npm install depending on the package manager you used to install all the necessary dependencies.
After that, open the package.json file and change the dev script to:
package.json
{
"dev": "vite --host localhost --port 3000"
}
This will tell Vite to start the development server on port 3000 instead of the default port 5173.
Set up Tailwind CSS
Now that the project is ready, install these dependencies to help us integrate Tailwind CSS into the project.
yarn add -D tailwindcss postcss autoprefixer
# or
npm install -D tailwindcss postcss autoprefixer
Create the postcss.config.cjs and tailwind.config.cjs files with this command:
yarn tailwindcss init -p
# or
npx tailwindcss init -p
After the files have been generated, open the tailwind.config.cjs file and replace its content with the following tailwind CSS configurations:
tailwind.config.cjs
/** @type {import('tailwindcss').Config} */
module.exports = {
  content: [
    "./index.html",
    "./src/**/*.{vue,js,ts,jsx,tsx}",
  ],
  theme: {
    extend: {
      colors: {
        'ct-dark-600': '#222',
        'ct-dark-200': '#575757',
        'ct-dark-100': '#6d6d6d',
        'ct-blue-600': '#01b274',
        'ct-blue-700': '#019862',
        'ct-yellow-600': '#f9d13e',
      },
      fontFamily: {
        Poppins: ['Poppins, sans-serif'],
      },
      container: {
        center: true,
        padding: '1rem',
        screens: {
          lg: '1125px',
          xl: '1125px',
          '2xl': '1125px',
          '3xl': '1500px'
        },
      },
    },
  },
  plugins: [],
};
In the above configurations, we provided the paths to the template files, added some custom colors, and specified Poppins as a custom font. Now open the src/index.css file and add the import directive for the Poppins font, tailwind CSS directives, and these CSS styles.
src/index.css
@import url('https://fonts.googleapis.com/css2?family=Poppins:wght@300;400;500;600;700&display=swap');

#nprogress .bar {
    background: #ffbb00 !important;
    height: 3px !important;
}

#nprogress .spinner .spinner-icon {
    width: 22px;
    height: 22px;
    border-top-color: #ffbb00 !important;
    border-left-color: #ffbb00 !important;
}

#nprogress .spinner {
    top: 15px;
    left: 15px !important;
}

@tailwind base;
@tailwind components;
@tailwind utilities;

html{
    font-family: 'Poppins', sans-serif;
}

body{
    background-color: #06de92;
}
Add Zustand State Manager
React’s client-side or server-side state management has evolved a lot during the past few years. In earlier times, states were managed by sharing data between components using props, but this approach became inefficient, especially when sharing states between multiple nested components.
To address this issue, state management libraries like Redux, Flux, XState, MobX, Zustand, Joi, etc were developed; their primary aim is to store and manage the state in a central store.
There are lots of popular state management libraries in React, but in this article, we’ll use Zustand because it is the lightest state management library available right now.
So, install the Zustand library with this command:
yarn add zustand
# or
npm i zustand
Before defining the Zustand store, create a src/types.ts file and add the following TypeScript types. The INote type describes the fields that will be included in the Note item the API will return to the React app and we’ll use it to provide typings in the Zustand store.
To make TypeScript happy, we’ll use the remaining types to type the responses returned by Fetch API.
src/types.ts
export type INote = {
  id: string;
  title: string;
  content: string;
  createdAt: Date;
  updatedAt: Date;
};

export type IGenericResponse = {
  status: string;
  message: string;
};

export type INoteResponse = {
  status: string;
  data: {
    note: INote;
  };
};

export type INotesResponse = {
  status: string;
  results: number;
  notes: INote[];
};
We are now ready to create the store with some default states and actions to modify the values of the states. To create the store, we’ll leverage the Create API exposed by Zustand, and the actions will be created with named functions that return the set() method. The set() method has access to the current state in the store and it can be used to change the value of the state it references.
src/store/index.ts
import create from "zustand";
import { INote } from "../types";

type Store = {
  notes: INote[] | [];
  setNotes: (notes: INote[]) => void;
  createNote: (note: INote) => void;
  updateNote: (note: INote) => void;
  deleteNote: (noteId: string) => void;
};

const useStore = create<Store>((set) => ({
  notes: [],
  setNotes: (notes) => set((state) => ({ notes })),
  createNote: (note) => set((state) => ({ notes: [...state.notes, note] })),
  deleteNote: (noteId) =>
    set((state) => ({
      notes: state.notes.filter((item) => item.id != noteId),
    })),
  updateNote: (note) =>
    set((state) => ({
      notes: state.notes.map((item) => {
        if (item.id === note.id) {
          return Object.assign(item, note);
        }
        return item;
      }),
    })),
}));

export default useStore;
Above, we created a store named useStore to track the state of the note items returned by the API and set its initial value to an empty array. To modify the notes state in the store, we’ll create four actions:
setNotes– This action will replace the empty notes array with the list of note items returned by Fetch API.createNote– This action will add the newly-created note item to the store.updateNote– This action will update the fields of a note item in the store.deleteNote– This action will delete a note item from the store.
Create Reusable Components
Now that we’ve defined the Zustand store, let’s create some reusable React components and style them with tailwind CSS. In this section, you’ll create Spinner, LoadingButton, and Modal popup components with React and Tailwind CSS.
First, install the tailwind-merge package that we’ll use to merge tailwind CSS classes without worrying about conflicts between the classes.
yarn add tailwind-merge
# or
npm i tailwind-merge
Instead of using an image as the spinner, we’ll leverage the power of tailwind CSS and React to create the Spinner component with an SVG. To make the Spinner component customizable, we’ll pass a couple of props to it.
This component will be made visible by the LoadingButton component and other components to indicate that a request is being processed by the backend API.
To create the Spinner component, navigate to the src folder and create a components folder. Within the components folder, create a Spinner.tsx file and add the following code.
src/components/Spinner.tsx
import React from 'react';
import { twMerge } from 'tailwind-merge';
type SpinnerProps = {
  width?: number;
  height?: number;
  color?: string;
  bgColor?: string;
};
const Spinner: React.FC<SpinnerProps> = ({
  width = 5,
  height = 5,
  color,
  bgColor,
}) => {
  return (
    <svg
      role='status'
      className={twMerge(
        'w-5 h-5 mr-2 text-gray-200 animate-spin dark:text-gray-600 fill-blue-600',
        `w-${width} h-${height} ${color} ${bgColor}`
      )}
      viewBox='0 0 100 101'
      fill='none'
      xmlns='http://www.w3.org/2000/svg'
    >
      <path
        d='M100 50.5908C100 78.2051 77.6142 100.591 50 100.591C22.3858 100.591 0 78.2051 0 50.5908C0 22.9766 22.3858 0.59082 50 0.59082C77.6142 0.59082 100 22.9766 100 50.5908ZM9.08144 50.5908C9.08144 73.1895 27.4013 91.5094 50 91.5094C72.5987 91.5094 90.9186 73.1895 90.9186 50.5908C90.9186 27.9921 72.5987 9.67226 50 9.67226C27.4013 9.67226 9.08144 27.9921 9.08144 50.5908Z'
        fill='currentColor'
      />
      <path
        d='M93.9676 39.0409C96.393 38.4038 97.8624 35.9116 97.0079 33.5539C95.2932 28.8227 92.871 24.3692 89.8167 20.348C85.8452 15.1192 80.8826 10.7238 75.2124 7.41289C69.5422 4.10194 63.2754 1.94025 56.7698 1.05124C51.7666 0.367541 46.6976 0.446843 41.7345 1.27873C39.2613 1.69328 37.813 4.19778 38.4501 6.62326C39.0873 9.04874 41.5694 10.4717 44.0505 10.1071C47.8511 9.54855 51.7191 9.52689 55.5402 10.0491C60.8642 10.7766 65.9928 12.5457 70.6331 15.2552C75.2735 17.9648 79.3347 21.5619 82.5849 25.841C84.9175 28.9121 86.7997 32.2913 88.1811 35.8758C89.083 38.2158 91.5421 39.6781 93.9676 39.0409Z'
        fill='currentFill'
      />
    </svg>
  );
};

export default Spinner;
Now that we’ve created the Spinner component, let’s create a LoadingButton component to use it. The LoadingButton component also accepts props to make the button customizable.
The Spinner component will be hidden by default but when a request is in flight and the loading state is true, it will be made visible to indicate that the request is being handled by the backend API.
To create the LoadingButton component, navigate to the components folder within the src directory and create a LoadingButton.tsx file. After that, open the LoadingButton.tsx file and add these code snippets.
src/components/LoadingButton.tsx
import React from "react";
import { twMerge } from "tailwind-merge";
import Spinner from "./Spinner";

type LoadingButtonProps = {
  loading: boolean;
  btnColor?: string;
  textColor?: string;
  children: React.ReactNode;
};

export const LoadingButton: React.FC<LoadingButtonProps> = ({
  textColor = "text-white",
  btnColor = "bg-ct-blue-700",
  children,
  loading = false,
}) => {
  return (
    <button
      type="submit"
      className={twMerge(
        `w-full py-3 font-semibold ${btnColor} rounded-lg outline-none border-none flex justify-center`,
        `${loading && "bg-[#ccc]"}`
      )}
    >
      {loading ? (
        <div className="flex items-center gap-3">
          <Spinner />
          <span className="text-white inline-block">Loading...</span>
        </div>
      ) : (
        <span className={`text-lg font-normal ${textColor}`}>{children}</span>
      )}
    </button>
  );
};
Now it’s time to create a modal popup with React portal. We could have used Z-index and some complex CSS code to render the modal in the root DOM tree but this method is inefficient since we have to temper with the DOM hierarchy.
So, the best approach is to use React portals to render the modal component outside the root DOM tree.
To create the modal popup component, go into the src/components folder and create a note.modal.tsx file. Then, open the newly-created file and add the following TSX code.
src/components/note.modal.tsx
import ReactDom from "react-dom";
import React, { FC } from "react";

type INoteModal = {
  openNoteModal: boolean;
  setOpenNoteModal: (open: boolean) => void;
  children: React.ReactNode;
};

const NoteModal: FC<INoteModal> = ({
  openNoteModal,
  setOpenNoteModal,
  children,
}) => {
  if (!openNoteModal) return null;
  return ReactDom.createPortal(
    <>
      <div
        className="fixed inset-0 bg-[rgba(0,0,0,.5)] z-[1000]"
        onClick={() => setOpenNoteModal(false)}
      ></div>
      <div className="max-w-lg w-full rounded-md fixed top-0 lg:top-[10%] left-1/2 -translate-x-1/2 bg-white z-[1001] p-6">
        {children}
      </div>
    </>,
    document.getElementById("note-modal") as HTMLElement
  );
};

export default NoteModal;
Since we want the modal popup component to render out of the root HTML element, open the index.html file and add the React portal element below the root div.
    <!-- Add the portal below the root div -->
    <div id="note-modal"></div>
Also, since the project depends on two external CSS stylesheets, open the index.html file and replace its content with the following HTML code. This will import the Nprogress and Boxicons stylesheets into the project via the link tags.
index.html
<!DOCTYPE html>
<html lang="en">
  <head>
    <meta charset="UTF-8" />
    <link rel="icon" type="image/svg+xml" href="/vite.svg" />
    <meta name="viewport" content="width=device-width, initial-scale=1.0" />
    <title>Vite + React + TS</title>
    <link
      href="https://unpkg.com/boxicons@2.1.4/css/boxicons.min.css"
      rel="stylesheet"
    />
    <link
      href="https://unpkg.com/nprogress@0.2.0/nprogress.css"
      rel="stylesheet"
    />
  </head>
  <body>
    <div id="root"></div>
    <div id="note-modal"></div>
    <script type="module" src="/src/main.tsx"></script>
  </body>
</html>
Add the CRUD Components
In this section, you’ll build four React.js components that leverage Fetch API to perform CRUD operations against the backend API. Before we can start implementing the CRUD operations, install these dependencies with Yarn or NPM.
yarn add zod react-toastify react-hook-form nprogress date-fns @hookform/resolvers && yarn add -D @types/nprogress
# or
npm install zod react-toastify react-hook-form nprogress date-fns @hookform/resolvers && npm install -D @types/nprogress
zod– A schema validation library with static type inferencereact-toastify– An alert notification libraryreact-hook-form– A form validation library that supports schema validation libraries like Zod, Yub, Joi, and others.nprogress– A thin progress bardate-fns– A library for manipulating dates in JavaScript@hookform/resolvers– A React-hook-form validation resolver.
Implement the CREATE Operation
At this point, we’re now ready to implement the first CRUD operation. To do that, go into the components directory and create a notes folder. Within the notes folder, create a create.note.tsx file and add the following code.
The CreateNote component will be used to add a new note item to the database. It contains a form built with React Hook Form library. The form validation rules are defined with the Zod schema validation library and passed to React-Hook-Form useForm<T>() hook via the @hookform/resolvers/zod package.
When the form is submitted and is valid, the createNote() function will be evoked to submit the form data to the backend API with Fetch API.
src/components/notes/create.note.tsx
import { FC, useState } from "react";
import { SubmitHandler, useForm } from "react-hook-form";
import { twMerge } from "tailwind-merge";
import { object, string, TypeOf } from "zod";
import { zodResolver } from "@hookform/resolvers/zod";
import { LoadingButton } from "../LoadingButton";
import { toast } from "react-toastify";
import NProgress from "nprogress";
import useStore from "../../store";
import { INoteResponse } from "../../types";

const BASE_URL = "http://localhost:8000/api";

type ICreateNoteProps = {
  setOpenNoteModal: (open: boolean) => void;
};

const createNoteSchema = object({
  title: string().min(1, "Title is required"),
  content: string().min(1, "Content is required"),
});

export type CreateNoteInput = TypeOf<typeof createNoteSchema>;

const CreateNote: FC<ICreateNoteProps> = ({ setOpenNoteModal }) => {
  const [loading, setLoading] = useState(false);
  const noteStore = useStore();
  const methods = useForm<CreateNoteInput>({
    resolver: zodResolver(createNoteSchema),
  });

  const {
    register,
    handleSubmit,
    formState: { errors },
  } = methods;

  const createNote = async (note: CreateNoteInput) => {
    try {
      NProgress.start();
      setLoading(true);
      const response = await fetch(`${BASE_URL}/notes/`, {
        method: "POST",
        mode: "cors",
        cache: "no-cache",
        headers: {
          "Content-Type": "application/json",
        },
        body: JSON.stringify(note),
      });
      if (!response.ok) {
        const error = await response.json();
        throw error ? error : "Something bad happended";
      }

      const data = (await response.json()) as INoteResponse;
      noteStore.createNote(data.data.note);

      setLoading(false);
      setOpenNoteModal(false);
      NProgress.done();
      toast("Note created successfully", {
        type: "success",
        position: "top-right",
      });
    } catch (error: any) {
      setLoading(false);
      setOpenNoteModal(false);
      NProgress.done();
      const resMessage = error.message || error.detail || error.toString();
      toast.error(resMessage, {
        position: "top-right",
      });
    }
  };

  const onSubmitHandler: SubmitHandler<CreateNoteInput> = async (data) => {
    createNote(data);
  };
  return (
    <section>
      <div className="flex justify-between items-center mb-3 pb-3 border-b border-gray-200">
        <h2 className="text-2xl text-ct-dark-600 font-semibold">Create Note</h2>
        <div
          onClick={() => setOpenNoteModal(false)}
          className="text-2xl text-gray-400 hover:bg-gray-200 hover:text-gray-900 rounded-lg p-1.5 ml-auto inline-flex items-center cursor-pointer"
        >
          <i className="bx bx-x"></i>
        </div>
      </div>
      <form className="w-full" onSubmit={handleSubmit(onSubmitHandler)}>
        <div className="mb-2">
          <label className="block text-gray-700 text-lg mb-2" htmlFor="title">
            Title
          </label>
          <input
            className={twMerge(
              `appearance-none border border-gray-400 rounded w-full py-3 px-3 text-gray-700 mb-2  leading-tight focus:outline-none`,
              `${errors["title"] && "border-red-500"}`
            )}
            {...methods.register("title")}
          />
          <p
            className={twMerge(
              `text-red-500 text-xs italic mb-2 invisible`,
              `${errors["title"] && "visible"}`
            )}
          >
            {errors["title"]?.message as string}
          </p>
        </div>
        <div className="mb-2">
          <label className="block text-gray-700 text-lg mb-2" htmlFor="title">
            Content
          </label>
          <textarea
            className={twMerge(
              `appearance-none border border-gray-400 rounded w-full py-3 px-3 text-gray-700 mb-2 leading-tight focus:outline-none`,
              `${errors.content && "border-red-500"}`
            )}
            rows={6}
            {...register("content")}
          />
          <p
            className={twMerge(
              `text-red-500 text-xs italic mb-2`,
              `${errors.content ? "visible" : "invisible"}`
            )}
          >
            {errors.content && (errors.content.message as string)}
          </p>
        </div>
        <LoadingButton loading={loading}>Create Note</LoadingButton>
      </form>
    </section>
  );
};

export default CreateNote;
The returned TSX template contains the form with title and content input fields and validation messages. The control of the form input fields is handled by React Hook Form via the methods returned by evoking themethods.register(name_of_field) function.
Implement the UPDATE Operation
Let’s create a React component to implement the UPDATE CRUD operation. To do this, go into the components/notes folder located in the src directory and create a update.note.tsx file. After that, open the update.note.tsx file and add the code below.
The UpdateNote component has a form and a LoadingButton for submitting the form data. The form validation is handled by React-Hook-Form and the validation rules are defined by the Zod schema validation library.
When the UpdateNote component is mounted into the DOM, the .reset() method of React-Hook-Form will be evoked by the useEffect() hook to populate the fields of the form with the note item passed as a prop.
src/components/notes/update.note.tsx
import { FC, useEffect, useState } from "react";
import { SubmitHandler, useForm } from "react-hook-form";
import { twMerge } from "tailwind-merge";
import { object, string, TypeOf } from "zod";
import { zodResolver } from "@hookform/resolvers/zod";
import { LoadingButton } from "../LoadingButton";
import { toast } from "react-toastify";
import NProgress from "nprogress";
import { INote, INoteResponse } from "../../types";
import useStore from "../../store";

const BASE_URL = "http://localhost:8000/api";

type IUpdateNoteProps = {
  note: INote;
  setOpenNoteModal: (open: boolean) => void;
};

const updateNoteSchema = object({
  title: string().min(1, "Title is required"),
  content: string().min(1, "Content is required"),
});

export type UpdateNoteInput = TypeOf<typeof updateNoteSchema>;

const UpdateNote: FC<IUpdateNoteProps> = ({ note, setOpenNoteModal }) => {
  const [loading, setLoading] = useState(false);
  const noteStore = useStore();
  const methods = useForm<UpdateNoteInput>({
    resolver: zodResolver(updateNoteSchema),
  });

  const {
    register,
    handleSubmit,
    formState: { errors },
  } = methods;

  useEffect(() => {
    if (note) {
      methods.reset(note);
    }
    // eslint-disable-next-line react-hooks/exhaustive-deps
  }, []);

  const updateNote = async ({
    noteId,
    note,
  }: {
    noteId: string;
    note: UpdateNoteInput;
  }) => {
    try {
      NProgress.start();
      setLoading(true);
      const response = await fetch(`${BASE_URL}/notes/${noteId}`, {
        method: "PATCH",
        mode: "cors",
        cache: "no-cache",
        headers: {
          "Content-Type": "application/json",
        },
        body: JSON.stringify(note),
      });
      if (!response.ok) {
        const error = await response.json();
        throw error ? error : "Something bad happended";
      }
      const data = (await response.json()) as INoteResponse;
      noteStore.updateNote(data.data.note);
      setLoading(false);
      setOpenNoteModal(false);
      NProgress.done();
      toast("Note updated successfully", {
        type: "success",
        position: "top-right",
      });
    } catch (error: any) {
      setLoading(false);
      setOpenNoteModal(false);
      NProgress.done();
      const resMessage = error.message || error.detail || error.toString();
      toast.error(resMessage, {
        position: "top-right",
      });
    }
  };

  const onSubmitHandler: SubmitHandler<UpdateNoteInput> = async (data) => {
    updateNote({ noteId: note.id, note: data });
  };
  return (
    <section>
      <div className="flex justify-between items-center mb-4">
        <h2 className="text-2xl text-ct-dark-600 font-semibold">Update Note</h2>
        <div
          onClick={() => setOpenNoteModal(false)}
          className="text-2xl text-gray-400 hover:bg-gray-200 hover:text-gray-900 rounded-lg p-1.5 ml-auto inline-flex items-center cursor-pointer"
        >
          <i className="bx bx-x"></i>
        </div>
      </div>{" "}
      <form className="w-full" onSubmit={handleSubmit(onSubmitHandler)}>
        <div className="mb-2">
          <label className="block text-gray-700 text-lg mb-2" htmlFor="title">
            Title
          </label>
          <input
            className={twMerge(
              `appearance-none border border-gray-400 rounded w-full py-3 px-3 text-gray-700 mb-2 leading-tight focus:outline-none`,
              `${errors["title"] && "border-red-500"}`
            )}
            {...methods.register("title")}
          />
          <p
            className={twMerge(
              `text-red-500 text-xs italic mb-2 invisible`,
              `${errors["title"] && "visible"}`
            )}
          >
            {errors["title"]?.message as string}
          </p>
        </div>
        <div className="mb-2">
          <label className="block text-gray-700 text-lg mb-2" htmlFor="title">
            Content
          </label>
          <textarea
            className={twMerge(
              `appearance-none border rounded w-full py-3 px-3 text-gray-700 mb-2 leading-tight focus:outline-none`,
              `${errors.content ? "border-red-500" : "border-gray-400"}`
            )}
            rows={6}
            {...register("content")}
          />
          <p
            className={twMerge(
              `text-red-500 text-xs italic mb-2`,
              `${errors.content ? "visible" : "invisible"}`
            )}
          >
            {errors.content && (errors.content.message as string)}
          </p>
        </div>
        <LoadingButton loading={loading}>Update Note</LoadingButton>
      </form>
    </section>
  );
};

export default UpdateNote;
After the form has been submitted and there are no validation errors, the updateNote() function will be evoked which will also call fetch API to submit the form data to the backend API.
Once the backend API returns the modified data, the updateNote() action will be evoked to update that note item with the modified fields in the Zustand store.
Implement the DELETE Operation
Now that we’re able to perform the CREATE and UPDATE CRUD operations, let’s create a React component to implement the DELETE operation. To do that, navigate to the components/notes folder in the src directory and create a note.component.tsx file. After that, open the note.component.tsx file and add the code snippets below.
The NoteItem component has a button for displaying the Edit and Delete menus. When the Delete button is clicked, the user will be prompted to confirm the action before the deleteNote() function will be evoked to make a DELETE request to the backend API.
The Edit button on the other hand will display the Update Note modal where the user can modify the title or content of the note item.
src/components/notes/note.component.tsx
import { FC, useEffect, useState } from "react";
import { format, parseISO } from "date-fns";
import { twMerge } from "tailwind-merge";
import NoteModal from "../note.modal";
import UpdateNote from "./update.note";
import { toast } from "react-toastify";
import NProgress from "nprogress";
import { INote } from "../../types";
import useStore from "../../store";

const BASE_URL = "http://localhost:8000/api";

type NoteItemProps = {
  note: INote;
};

const NoteItem: FC<NoteItemProps> = ({ note }) => {
  const noteStore = useStore();
  const [openSettings, setOpenSettings] = useState(false);
  const [openNoteModal, setOpenNoteModal] = useState(false);

  useEffect(() => {
    const handleOutsideClick = (event: MouseEvent) => {
      const target = event.target as HTMLElement;
      const dropdown = document.getElementById(`settings-dropdown-${note.id}`);

      if (dropdown && !dropdown.contains(target)) {
        setOpenSettings(false);
      }
    };
    document.addEventListener("mousedown", handleOutsideClick);

    return () => {
      document.removeEventListener("mousedown", handleOutsideClick);
    };
  }, [note.id]);

  const deleteNote = async (noteId: string) => {
    try {
      NProgress.start();
      const response = await fetch(`${BASE_URL}/notes/${noteId}`, {
        method: "DELETE",
        mode: "cors",
      });
      if (!response.ok) {
        const error = await response.json();
        throw error ? error : "Something bad happended";
      }

      noteStore.deleteNote(noteId);
      setOpenNoteModal(false);
      NProgress.done();
      toast("Note deleted successfully", {
        type: "warning",
        position: "top-right",
      });
    } catch (error: any) {
      setOpenNoteModal(false);
      const resMessage = error.message || error.detail || error.toString();
      toast.error(resMessage, {
        position: "top-right",
      });
      NProgress.done();
    }
  };

  const onDeleteHandler = (noteId: string) => {
    if (window.confirm("Are you sure")) {
      deleteNote(noteId);
    }
  };

  return (
    <>
      <div className="p-4 bg-white rounded-lg border border-gray-200 shadow-md flex flex-col justify-between overflow-hidden">
        <div className="details">
          <h4 className="mb-2 pb-2 text-2xl font-semibold tracking-tight text-gray-900">
            {note.title.length > 40
              ? note.title.substring(0, 40) + "..."
              : note.title}
          </h4>
          <p className="mb-3 font-normal text-ct-dark-200">
            {note.content.length > 210
              ? note.content.substring(0, 210) + "..."
              : note.content}
          </p>
        </div>
        <div className="relative border-t border-slate-300 flex justify-between items-center">
          <span className="text-ct-dark-100 text-sm">
            {format(parseISO(String(note.createdAt)), "PPP")}
          </span>
          <div
            onClick={() => setOpenSettings(!openSettings)}
            className="text-ct-dark-100 text-lg cursor-pointer"
          >
            <i className="bx bx-dots-horizontal-rounded"></i>
          </div>
          <div
            id={`settings-dropdown-${note.id}`}
            className={twMerge(
              `absolute right-0 bottom-3 z-10 w-28 text-base list-none bg-white rounded divide-y divide-gray-100 shadow`,
              `${openSettings ? "block" : "hidden"}`
            )}
          >
            <ul className="py-1" aria-labelledby="dropdownButton">
              <li
                onClick={() => {
                  setOpenSettings(false);
                  setOpenNoteModal(true);
                }}
                className="py-2 px-4 text-sm text-gray-700 hover:bg-gray-100 cursor-pointer"
              >
                <i className="bx bx-pencil"></i> Edit
              </li>
              <li
                onClick={() => {
                  setOpenSettings(false);
                  onDeleteHandler(note.id);
                }}
                className="py-2 px-4 text-sm text-red-600 hover:bg-gray-100 cursor-pointer"
              >
                <i className="bx bx-trash"></i> Delete
              </li>
            </ul>
          </div>
        </div>
      </div>
      <NoteModal
        openNoteModal={openNoteModal}
        setOpenNoteModal={setOpenNoteModal}
      >
        <UpdateNote note={note} setOpenNoteModal={setOpenNoteModal} />
      </NoteModal>
    </>
  );
};

export default NoteItem;
Implement the READ Operation
The App component displays a list of note items and a button for creating notes. The useEffect() hook is used to get a paginated list of notes from the backend API when the component is mounted in the DOM.
When the useEffect() hook evokes the getNotes() function, Fetch API will fire a GET request to the http://localhost:8000/api/notes endpoint to retrieve the first 10 records from the database.
After the API returns the results, the setNotes() action will be called to add the list of notes to the Zustand store.
src/App.tsx
import "react-toastify/dist/ReactToastify.css";
import { useEffect, useState } from "react";
import { toast, ToastContainer } from "react-toastify";
import NoteModal from "./components/note.modal";
import CreateNote from "./components/notes/create.note";
import NoteItem from "./components/notes/note.component";
import NProgress from "nprogress";
import { INotesResponse } from "./types";
import useStore from "./store";

const BASE_URL = "http://localhost:8000/api";

function AppContent() {
  const [openNoteModal, setOpenNoteModal] = useState(false);
  const { notes, setNotes } = useStore();

  const getNotes = async ({ page, limit }: { page: number; limit: number }) => {
    try {
      NProgress.start();
      const response = await fetch(
        `${BASE_URL}/notes?page=${page}&limit=${limit}`,
        {
          method: "GET",
          mode: "cors",
        }
      );
      if (!response.ok) {
        const error = await response.json();
        throw error ? error : "Something bad happended";
      }
      const data = (await response.json()) as INotesResponse;
      setNotes(data.notes);

      NProgress.done();
    } catch (error: any) {
      const resMessage = error.message || error.detail || error.toString();
      toast.error(resMessage, {
        position: "top-right",
      });
      NProgress.done();
    }
  };

  useEffect(() => {
    getNotes({ page: 1, limit: 10 });
  }, []);

  return (
    <div className="2xl:max-w-[90rem] max-w-[68rem] mx-auto">
      <div className="m-8 grid grid-cols-[repeat(auto-fill,_320px)] gap-7 grid-rows-[1fr]">
        <div className="p-4 min-h-[18rem] bg-white rounded-lg border border-gray-200 shadow-md flex flex-col items-center justify-center">
          <div
            onClick={() => setOpenNoteModal(true)}
            className="flex items-center justify-center h-20 w-20 border-2 border-dashed border-ct-blue-600 rounded-full text-ct-blue-600 text-5xl cursor-pointer"
          >
            <i className="bx bx-plus"></i>
          </div>
          <h4
            onClick={() => setOpenNoteModal(true)}
            className="text-lg font-medium text-ct-blue-600 mt-5 cursor-pointer"
          >
            Add new note
          </h4>
        </div>
        {/* Note Items */}

        {notes?.map((note) => (
          <NoteItem key={note.id} note={note} />
        ))}

        {/* Create Note Modal */}
        <NoteModal
          openNoteModal={openNoteModal}
          setOpenNoteModal={setOpenNoteModal}
        >
          <CreateNote setOpenNoteModal={setOpenNoteModal} />
        </NoteModal>
      </div>
    </div>
  );
}

function App() {
  return (
    <>
      <AppContent />
      <ToastContainer />
    </>
  );
}

export default App;
Test the CRUD App
Oops, quite a lot of code. At this point, we are now ready to test the React Fetch API CRUD app with the Deno backend API. Before starting the Vite development server, make sure the Deno API is running.
CREATE CRUD Functionality
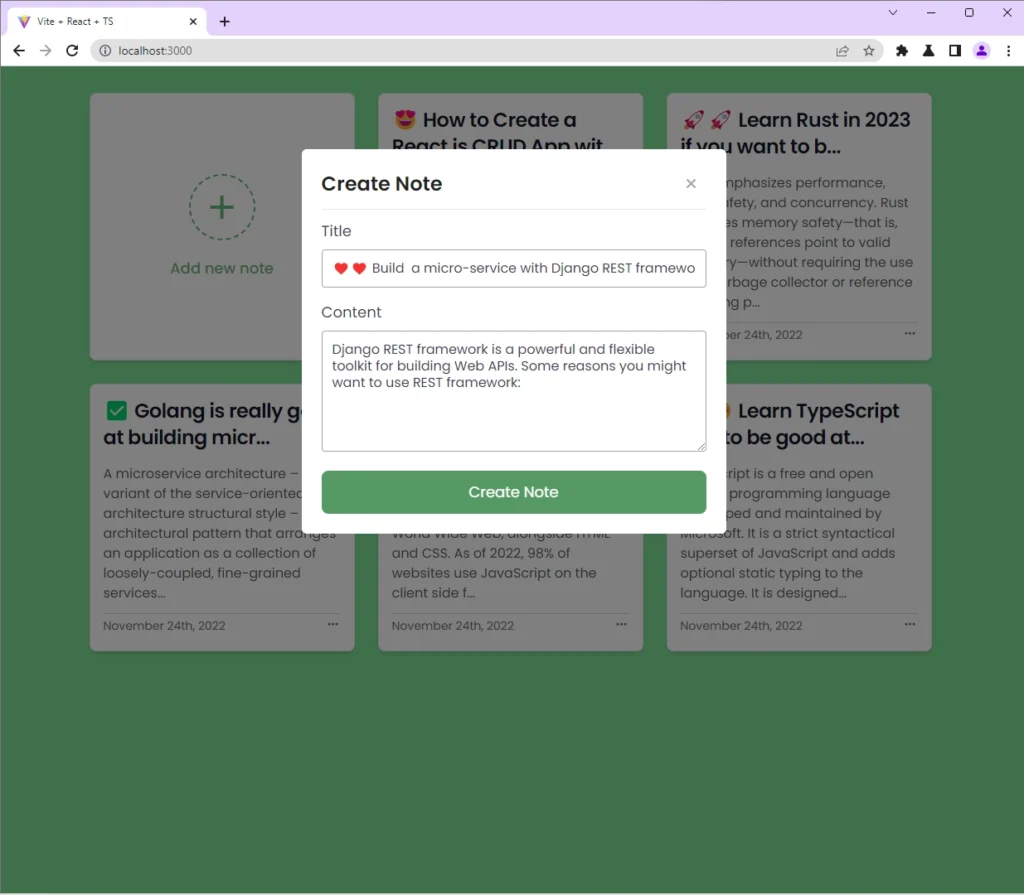
To add a new record to the database, click on the plus (+) icon to display the Create Note modal popup. Provide the title and content of your note and click on the Create Note button.
Upon clicking the Create Note button, Fetch API will fire an HTTP POST request with the form data included in the request body to the /api/notes endpoint.
The Deno API will validate the request body against a validation schema, add the record to the database, and return the newly-created note item to React.
Once the request resolves successfully, the createNote() action will be evoked to add the new note item to the Zustand store. This will cause React to re-render the DOM to display the newly-created note item in the UI.
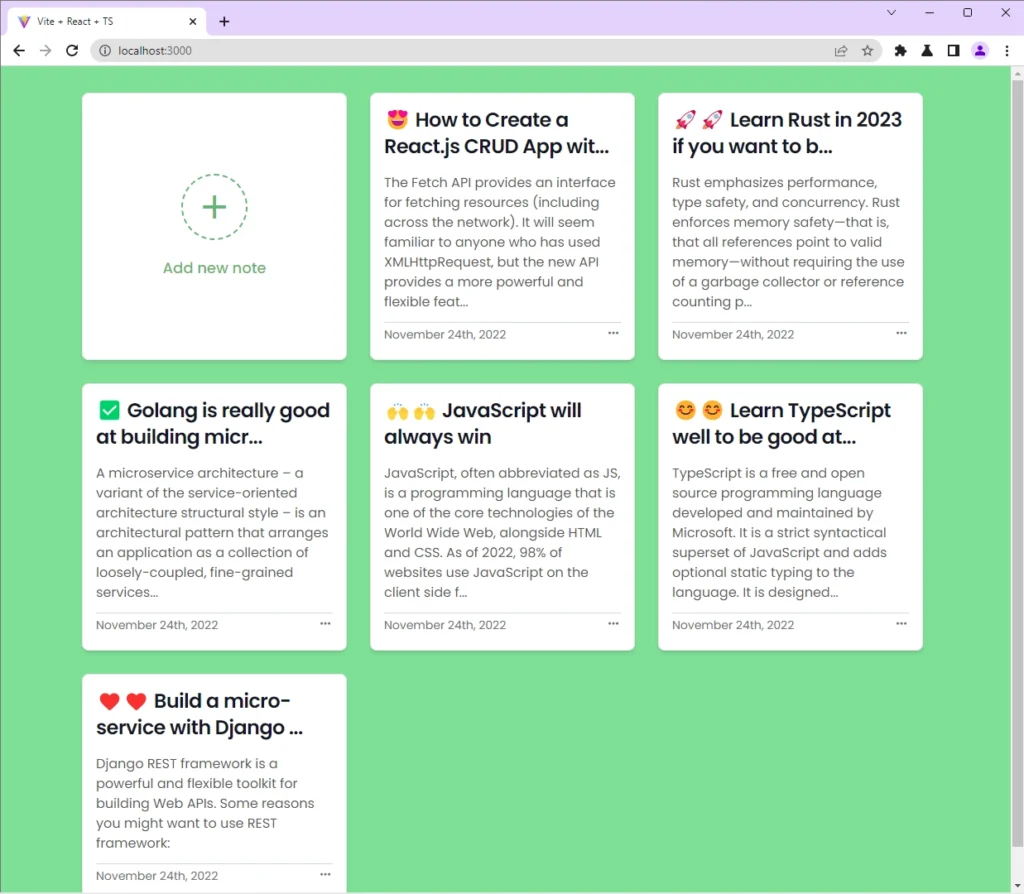
READ CRUD Functionality
When you visit the root route, Fetch API will make a GET request to retrieve the first 10 note items from the API. The setNotes() action will be called to update the Zustand store with the list of note items returned by the API.
After the store has been updated, React will re-render the DOM to display the list of note items in the UI.
UPDATE CRUD Functionality
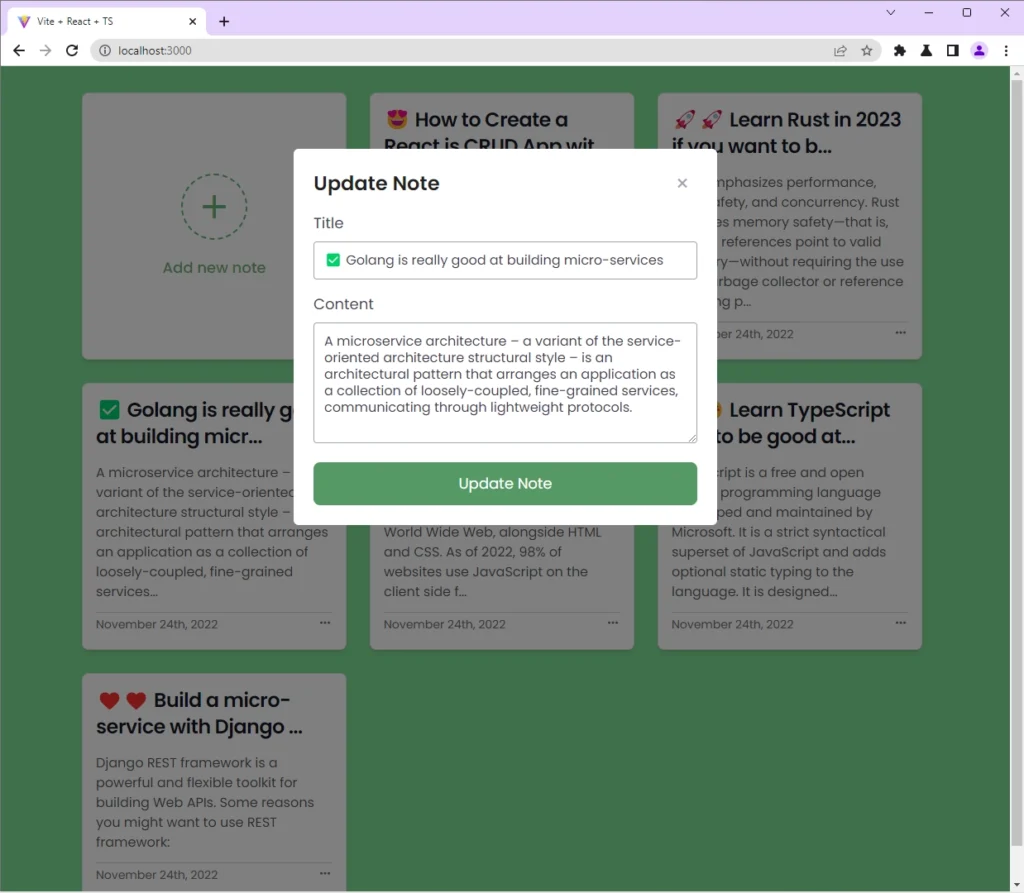
To modify the title or content of a note item, click on the three dots (…) opposite the date element and click on the Edit button. Edit the title or content and click on the Update Note button.
When you click on the Update Note button, Fetch API will make a PATCH request with the modified data included in the request body to the /api/notes/:noteId endpoint.
The backend API will then update the record that matches the provided ID in the database and return the modified record to React.
Once the request resolves successfully, the updateNote() action will be evoked to update the store with the modified note item. After that, React will re-render the DOM to reflect the changes in the UI.
DELETE CRUD Functionality
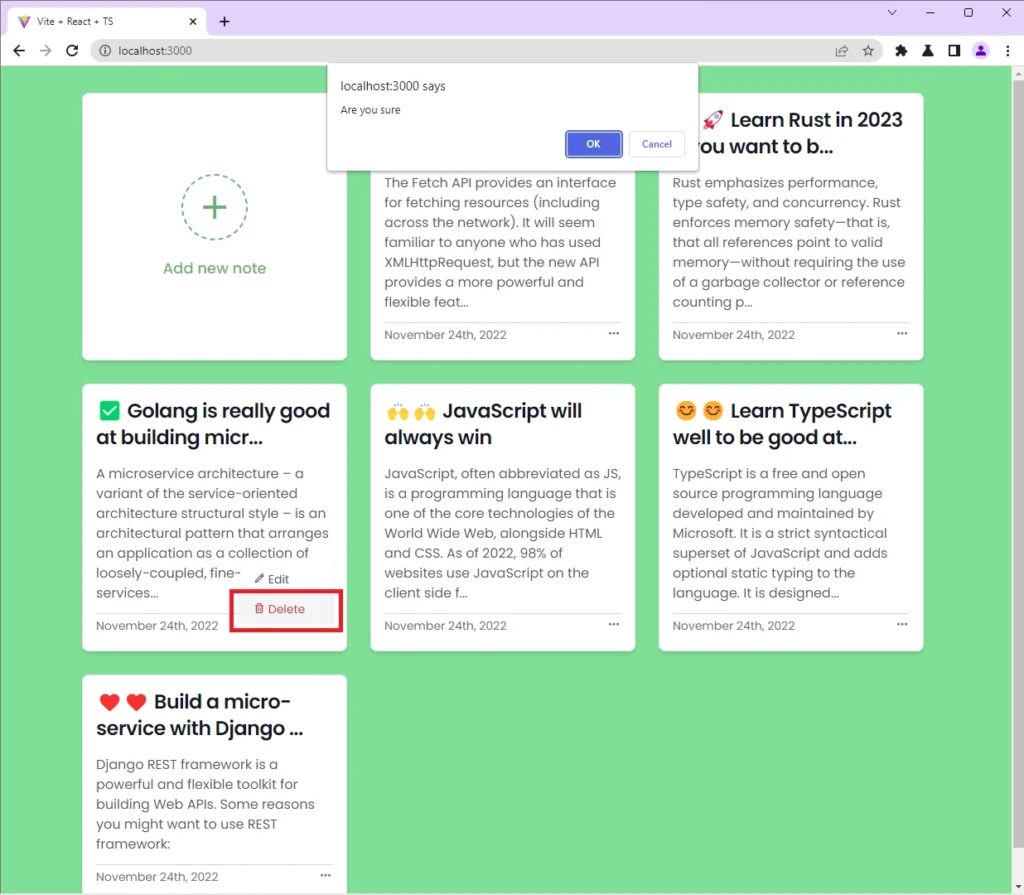
To delete a note item, click on the three dots again and click on the Delete button. You’ll be prompted to confirm your action or cancel it. When you click on the ok button, Fetch API will fire a DELETE request with the ID of that item to the /api/notes/:noteId endpoint.
The backend API will then delete the record that matches that ID from the database and return a success message to the React app.
When the request resolves successfully, the deleteNote() action will be evoked to remove that note item from the Zustand store. After that, React will re-render the DOM to remove that note item from the UI.
Conclusion
Congrats on reaching the end. In this article, you learned how to create a React.js CRUD app with Fetch API. Also, you learned how to manage React state with the Zustand library.
You can find the complete source code of the React Fetch API project on GitHub