
In this article, you’ll learn how to build a CRUD application with FastAPI, PyMongo, and a MongoDB database. At the end of this tutorial, you’ll have a fully-fledged REST API that can accept CRUD (Create, Read, Update, and Delete) requests from any API testing tool or a frontend application.
More practice:
- CRUD RESTful API Server with Python, FastAPI, and MongoDB
- Node.js, Express, TypeORM, PostgreSQL: CRUD Rest API
- Build CRUD RESTful API Server with Golang, Gin, and MongoDB
- Next.js Full-Stack App with React Query, and GraphQL-CodeGen
- Build Full-Stack tRPC CRUD Application with Node.js, and React.js
- GraphQL CRUD API with Next.js, MongoDB, and TypeGraphQL

Prerequisites
Despite structuring this tutorial to accommodate beginners, these prerequisites are needed to get the most out of this article.
- Have Python 3.7+ installed
- You should be comfortable with the basics of Python and FastAPI
- Have basic knowledge of API designs
- Have Docker or MongoDB server installed
Run the FastAPI CRUD App Locally
- Download or clone the PyMongo CRUD source code from https://github.com/wpcodevo/crud-app-pymongo and open the project with an IDE or text editor.
- Open the integrated terminal in your IDE or text editor and create a virtual environment with:
- Windows OS –
python -m venv venv - Mac or Linux OS –
python3 -m venv venv
- Windows OS –
- Click “Yes” to activate the virtual environment if prompted by your IDE or text editor.
Alternatively, you can manually activate the virtual environment with the following commands:- Windows OS (Command Prompt ) –
venv\Scripts\activate.bat. - Windows OS (Git Bash) –
venv/Scripts/activate.bat. - Mac or Linux OS –
source venv/bin/activate
- Windows OS (Command Prompt ) –
- Install all the necessary packages by running
pip install -r requirements.txt - Start the MongoDB server in the Docker container by running
docker-compose up -d - Start the FastAPI HTTP server with
uvicorn app.main:app --reload - Test the PyMongo CRUD API with a frontend app or an API testing software
Run the Frontend App Locally
- Download or clone the React.js CRUD app source code from https://github.com/wpcodevo/reactjs-crud-note-app and open the project with an IDE.
- Install all the necessary dependencies by running
yarnoryarn installin the terminal of the root directory. - Run
yarn devto start the Vite development server on port 3000 - Open http://localhost:3000/ in a new tab to perform the CRUD operations against the backend API.
Setup FastAPI with PyMongo
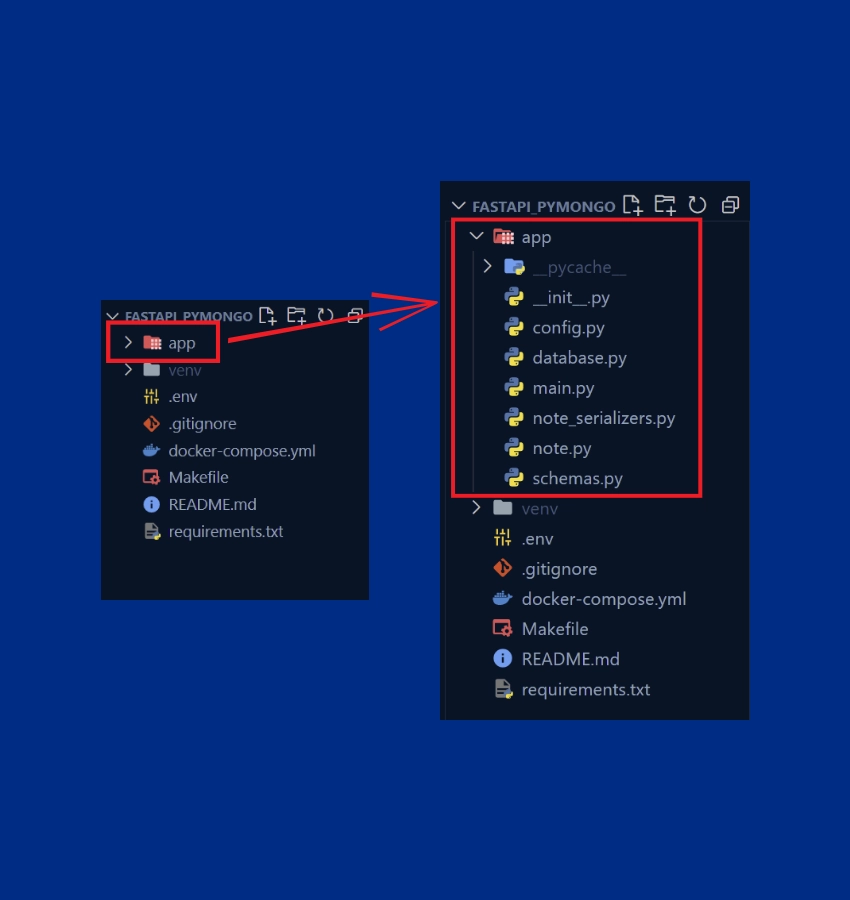
In this section, you’ll set up a MongoDB server with Docker, install FastAPI and start the HTTP server. At the end of this tutorial, you should end up with a folder structure that looks somewhat like this.
Setup MongoDB With Docker
Despite having the option to download the MongoDB community server binary executable from https://www.mongodb.com/try/download/community, we’ll use Docker to quickly spawn up a running MongoDB server on our machine instead.
Throughout this tutorial, I’ll be using VS Code as my text editor but feel free to use any IDE or text editor you are more comfortable with.
First things first, navigate to the location where you want the source code to live and create a new directory. You can name the project fastapi_pymongo .
$ mkdir fastapi_pymongo
$ cd fastapi_pymongo
$ code . # opens the project with VS Code
Now let’s create and activate a virtual environment to manage our dependencies. To do that, open the integrated terminal in your IDE and run the following command based on your operating system.
Windows Machine:
$ py -3 -m venv venvmacOS Machine:
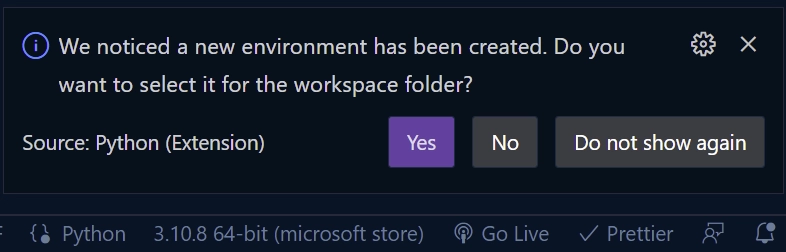
$ python3 -m venv venvIf your IDE or text editor prompts you to activate the virtual environment in the workspace, click Yes to accept the action.
After that, create a docker-compose.yml file in the root directory and add these Docker Compose configurations.
docker-compose.yml
version: '3'
services:
  mongo:
    image: mongo:latest
    container_name: mongo
    env_file:
      - ./.env
    environment:
      MONGO_INITDB_ROOT_USERNAME: ${MONGO_INITDB_ROOT_USERNAME}
      MONGO_INITDB_ROOT_PASSWORD: ${MONGO_INITDB_ROOT_PASSWORD}
      MONGO_INITDB_DATABASE: ${MONGO_INITDB_DATABASE}
    volumes:
      - mongo:/data/db
    ports:
      - '6000:27017'

volumes:
  mongo:
In the above, we added a reference to an environment variables file and used placeholders for the MongoDB server credentials. To make the credentials available to Docker Compose, create a .env file and add the following environment variables.
Note: the environment variables must have the same names as the placeholders in the docker-compose.yml file.
.env
MONGO_INITDB_ROOT_USERNAME=admin
MONGO_INITDB_ROOT_PASSWORD=password123
MONGO_INITDB_DATABASE=fastapi

DATABASE_URL=mongodb://admin:password123@localhost:6000/fastapi?authSource=admin
To avoid committing the venv folder and the .env file to your Git repository, create a .gitignore file in the root directory and add the following:
.gitignore
__pycache__
venv/
.env
With that out of the way, we are now ready to build the Mongo Docker image and start the MongoDB server. To do this, open the terminal and run this command:
$ docker-compose up -dOptional: stop the running MongoDB server with this command:
$ docker-compose downInstall FastAPI and Start the HTTP Server
We are now ready to install the FastAPI library and its peer dependencies. Before we can install the packages, we need to make sure the virtual environment has been activated for the workspace.
Create a app/main.py file to help VS Code prepare the Python development environment.
If by any changes your IDE didn’t prompt you to activate the virtual environment, run the following command to activate it.
- Windows OS (Command Prompt ) –
venv\Scripts\activate.bat. - Windows OS (Git Bash) –
venv/Scripts/activate.bat. - Mac or Linux OS –
source venv/bin/activate
In VS Code, the easiest way to activate the virtual environment is to close and reopen the integrated terminal.
Now create an empty app/__init__.py file to convert the app directory into a Python package.
Install the FastAPI library and its peer dependencies:
pip install fastapi[all]
After that, open the app/main.py file and add the following code:
from fastapi import FastAPI
app = FastAPI()
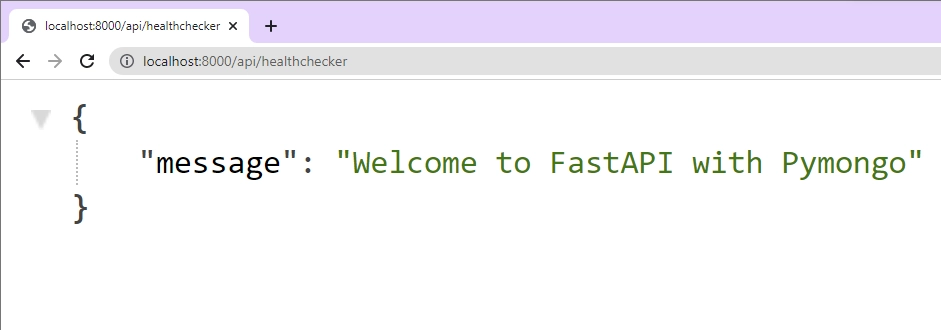
@app.get("/api/healthchecker")
def root():
return {"message": "Welcome to FastAPI with Pymongo"}
We imported the FastAPI class, initialized the app, and added a /api/healthchecker route to the middleware stack. To start the FastAPI HTTP server with Uvicorn, open your terminal and run this command:
uvicorn app.main:app --host localhost --port 8000 --reload
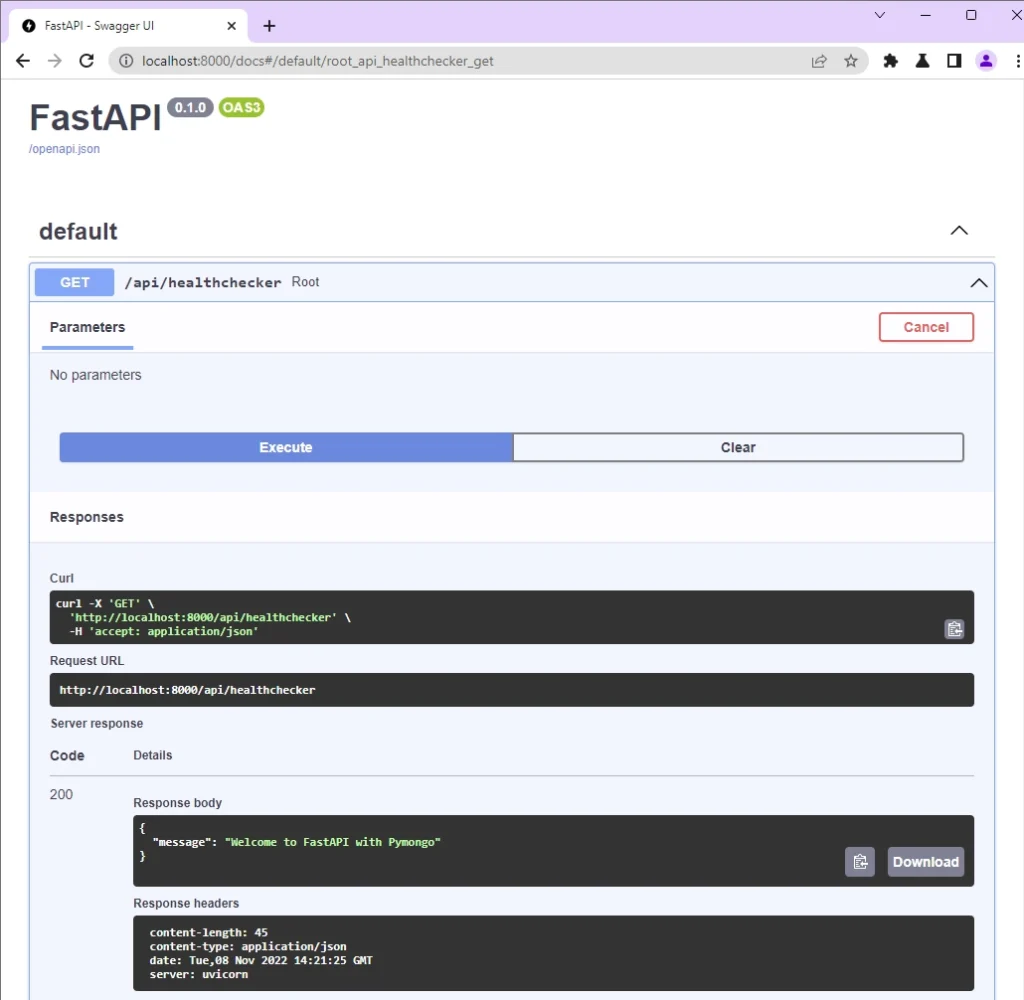
This will start the HTTP server on port 8000. Open a new tab in your browser and visit http://localhost:8000/api/healthchecker to see the JSON response sent by the FastAPI server.
Alternatively, you can fire the same request through the auto-generated Swagger docs on http://localhost:8000/docs.
Designing the App
Let’s get to the main focus of this tutorial. The goal is to design a RESTful API that supports CRUD operations against a MongoDB database. That means the user will be able to create, read, update, and delete a list of documents in the MongoDB collection. So, we’ll probably have five endpoints with their corresponding HTTP methods.
| RESOURCE | HTTP METHOD | ROUTE | DESCRIPTION |
|---|---|---|---|
| notes | GET | /api/notes | Retrieve all notes |
| notes | POST | /api/notes | Add a new note |
| notes | GET | /api/notes/{noteId} | Get a single note |
| notes | PATCH | /api/notes/{noteId} | Edit a note |
| notes | DELETE | /api/notes/{noteId} | Remove a note |
As you can see, the type of operation against the database dictates the HTTP verb used on the route. For example, the endpoint responsible for retrieving a list of note items or a paginated result of them has an HTTP GET method. Also, the GET method for retrieving a single record, the PATCH, and the DELETE methods have a {noteId} placeholder as their URL parameter.
To get our feet wet, let’s implement the path operation functions for our desired endpoints.
app/main.py
from fastapi import FastAPI, APIRouter, status

app = FastAPI()
router = APIRouter()


@router.get('/')
def get_notes():
    return "return a list of note items"


@router.post('/', status_code=status.HTTP_201_CREATED)
def create_note():
    return "create note item"


@router.patch('/{noteId}')
def update_note(noteId: str):
    return f"update note item with id {noteId}"


@router.get('/{noteId}')
def get_note(noteId: str):
    return f"get note item with id {noteId}"


@router.delete('/{noteId}')
def delete_note(noteId: str):
    return f"delete note item with id {noteId}"


app.include_router(router, tags=['Notes'], prefix='/api/notes')


@app.get("/api/healthchecker")
def root():
    return {"message": "Welcome to FastAPI with Pymongo"}
Let’s evaluate the above code:
- First, we imported the FastAPI modules at the top level of the file.
- Then, we created instances of the FastAPI and APIRouter classes.
- After that, we created the CRUD path operation functions and added them to the router middleware pipeline.
- Lastly, we evoked the
include_router()method available on theappinstance to register the router in the app.
With the above explanation, open your terminal and run this command to start the FastAPI HTTP server.
uvicorn app.main:app --host localhost --port 8000 --reload
Once the server is listening on port 8000, open a new tab in your browser and visit http://localhost:8000/docs to see the Swagger docs generated based on the endpoints defined on the API.
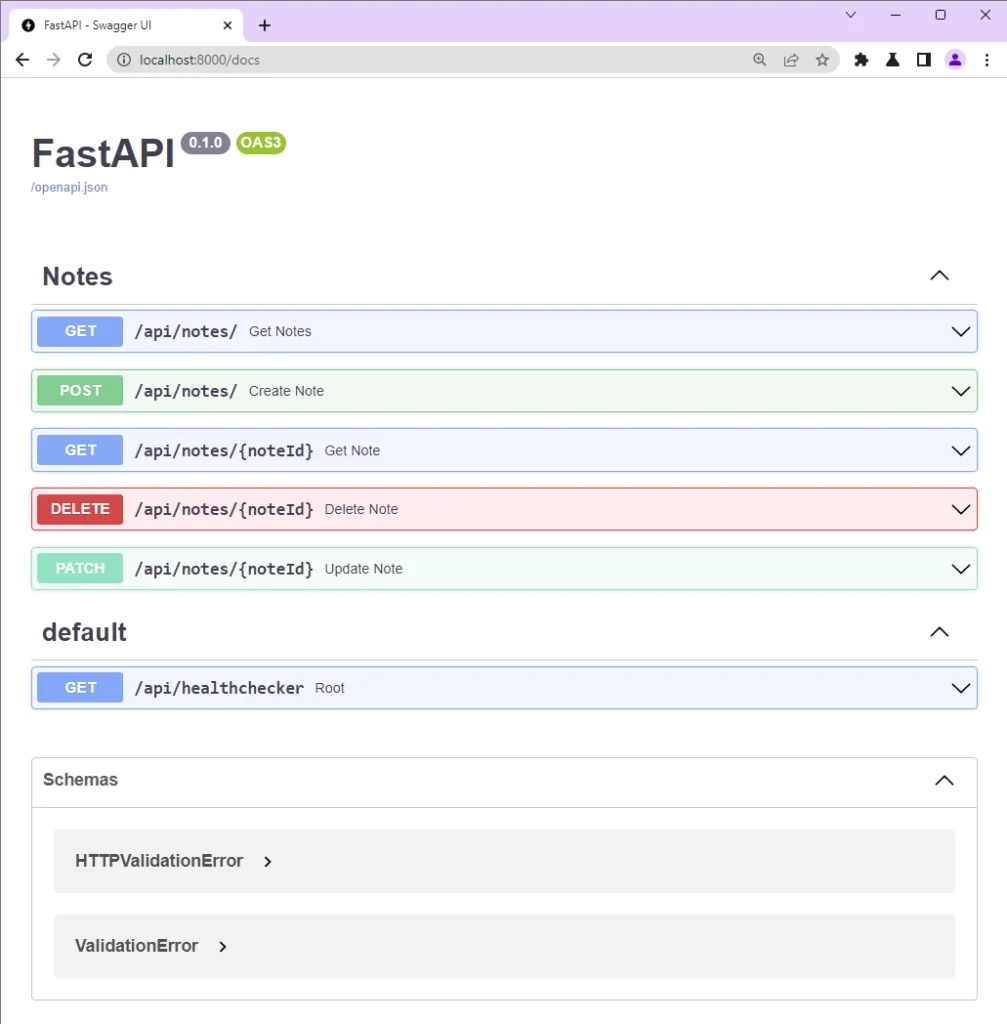
To test the CRUD endpoints on the API, open any of the routes on the API documentation and fire requests to the API by clicking the “Try it out” button.
Connect the FastAPI App to MongoDB
In this section, you’ll connect the app to the running MongoDB instance in the Docker container. To do that, we’ll use the PyMongo driver. PyMongo is an official MongoDB driver for synchronous Python applications. This driver will take care of creating the connection pool and giving us a simple interface to interact with the database instance.
If you want to access and manage MongoDB asynchronously or from co-routines, I recommend you use the Motor driver instead.
Install PyMongo with this command:
pip install pymongo
Add all the project dependencies to a requirements.txt file:
pip freeze > requirements.txt
With the database driver installed, let’s write the code needed to connect the app to the MongoDB database. Before we can do that, we first need to load the MongoDB connection URL and the database name from the .env file.
So, create a app/config.py file and add the following Pydantic code to load the environment variables and make them available in the app.
app/config.py
from pydantic import BaseSettings


class Settings(BaseSettings):
    DATABASE_URL: str
    MONGO_INITDB_DATABASE: str

    class Config:
        env_file = './.env'


settings = Settings()
Despite having the option to create the environment variables outside of Python and read them with the os.getenv() method, we’ll use Pydantic’s BaseSettings utility class to load the environment variables and provide type validation for the variables.
To load the environment variables into the app, we created a sub-class from the BaseSettings class and declared class attributes with type annotations on the sub-class.
The setting env_file on the Config class will tell Pydantic to load the environment variables from the provided path.
Now let’s write the code required to connect the app to the MongoDB instance. So, create a app/database.py file and add the code below.
app/database.py
from pymongo import mongo_client, ASCENDING
from app.config import settings

client = mongo_client.MongoClient(settings.DATABASE_URL)
print('🚀 Connected to MongoDB...')

db = client[settings.MONGO_INITDB_DATABASE]
Note = db.notes
Note.create_index([("title", ASCENDING)], unique=True)
mongo_client– A tool for connecting to MongoDBASCENDING– Ascending sort ordersettings– For accessing the environment variables
We evoked the .MongoClient() method with the database connection URL in the above code to create a connection pool to the MongoDB database. Calling the .MongoClient() method returns a client object with a bunch of methods that we can use to access and manage the MongoDB instance.
Next, we created the database with client["enter_database_name"] , added a collection with the name notes and created a unique index on the title field. The unique index will ensure that no two documents in the collection end up with the same title.
Create the Request Validation Schemas
In this section, you’ll create a Pydantic model to represent how data is stored in the MongoDB database and schemas that will be used by FastAPI to validate incoming and outgoing data.
Create a app/schemas.py file and add the following Pydantic schemas. The NoteBaseSchema represents the structure of the documents that will be stored in the MongoDB collection.
app/schemas.py
from datetime import datetime
from typing import List
from pydantic import BaseModel
from bson.objectid import ObjectId


class NoteBaseSchema(BaseModel):
    id: str | None = None
    title: str
    content: str
    category: str = ""
    published: bool = False
    createdAt: datetime | None = None
    updatedAt: datetime | None = None

    class Config:
        orm_mode = True
        allow_population_by_field_name = True
        arbitrary_types_allowed = True
        json_encoders = {ObjectId: str}


class UpdateNoteSchema(BaseModel):
    title: str | None = None
    content: str | None = None
    category: str | None = None
    published: bool | None = None

    class Config:
        orm_mode = True
        allow_population_by_field_name = True
        arbitrary_types_allowed = True
        json_encoders = {ObjectId: str}

class NoteResponse(BaseModel):
    status: str
    note: NoteBaseSchema

class ListNoteResponse(BaseModel):
    status: str
    results: int
    notes: List[NoteBaseSchema]
Create Database Serializers
Before getting into the API implementation, let’s create serializer functions that we’ll use to parse the data returned from MongoDB into Python dictionaries.
app/note_serializers.py
def noteEntity(note) -> dict:
    return {
        "id": str(note["_id"]),
        "title": note["title"],
        "category": note["category"],
        "content": note["content"],
        "published": note["published"],
        "createdAt": note["createdAt"],
        "updatedAt": note["updatedAt"]
    }


def noteListEntity(notes) -> list:
    return [noteEntity(note) for note in notes]
Create the Path Operation Functions
To reduce the complexity of the project, we’ll implement all the business logic related to the CRUD operations directly in the path operation functions. However, you can extract the business logic from the route handlers into a separate file as a challenge. This will make your code more modular and easier to test.
So, create a app/note.py file and add these imports. Also, since we want to create the path operation functions in a separate file, instantiate the APIRouter class and assign it to a router variable.
app/note.py
from datetime import datetime
from fastapi import HTTPException, status, APIRouter, Response
from pymongo.collection import ReturnDocument
from app import schemas
from app.database import Note
from app.note_serializers import noteEntity, noteListEntity
from bson.objectid import ObjectId

router = APIRouter()
Retrieve all Documents
The first path operation function will be responsible for retrieving all the documents in the collection or a paginated list of the documents. When a GET request hits the /api/notes endpoint, FastAPI will delegate the request to this route handler to retrieve a selection of documents in the database.
app/note.py
# [...] Get First 10 Records
@router.get('/', response_model=schemas.ListNoteResponse)
def get_notes(limit: int = 10, page: int = 1, search: str = ''):
    skip = (page - 1) * limit
    pipeline = [
        {'$match': {'title': {'$regex': search, '$options': 'i'}}},
        {
            '$skip': skip
        }, {
            '$limit': limit
        }
    ]
    notes = noteListEntity(Note.aggregate(pipeline))
    return {'status': 'success', 'results': len(notes), 'notes': notes}
In the above, we created a MongoDB aggregation pipeline to perform operations like:
- Sorting
- Filtering
- Limiting
Next, we passed the aggregation pipeline to the Note.aggregate() method in order to retrieve a paginated list of the documents in the database. The noteListEntity() method will then parse the list of documents returned by MongoDB into Python dictionaries.
Create a Document
The second path operation function will be responsible for adding new documents to the database. FastAPI will forward any POST request that matches /api/notes to this route handler.
When this route controller is evoked, Pydantic will read the request body as JSON, validate the JSON against the provided schema and assign the payload data to the payload variable.
app/note.py
# [...] Get First 10 Records

# [...] Create a Record
@router.post('/', status_code=status.HTTP_201_CREATED, response_model=schemas.NoteResponse)
def create_note(payload: schemas.NoteBaseSchema):
    payload.createdAt = datetime.utcnow()
    payload.updatedAt = payload.createdAt
    try:
        result = Note.insert_one(payload.dict(exclude_none=True))
        new_note = Note.find_one({'_id': result.inserted_id})
        return {"status": "success", "note": noteEntity(new_note)}
    except:
        raise HTTPException(status_code=status.HTTP_409_CONFLICT,
                            detail=f"Note with title: {payload.title} already exists")
Next, we converted the JSON payload into a Python dictionary by evoking the .dict() method and passed the result as an argument to the Note.insert_one() method. The .insert_one() method will query the MongoDB database to add the new document to the collection and return the ObjectId of the newly-added document.
So, to retrieve the newly-created document, we had to call the Note.find_one() method with the ObjectId.
Update a Document
This path operation function will be called to edit a document in the collection whenever a /api/notes/{noteId} PATCH request hits the server. When the request is delegated to this handler, Pydantic will validate the request body against the schemas.UpdateNoteSchema and assign the resulting JSON to the payload variable.
Also, the Id of the document to be updated will be extracted from the URL parameters and assigned to the noteId variable.
app/note.py
# [...] Get First 10 Records

# [...] Create a Record

# [...] Update a Record
@router.patch('/{noteId}', response_model=schemas.NoteResponse)
def update_note(noteId: str, payload: schemas.UpdateNoteSchema):
    if not ObjectId.is_valid(noteId):
        raise HTTPException(status_code=status.HTTP_400_BAD_REQUEST,
                            detail=f"Invalid id: {noteId}")
    updated_note = Note.find_one_and_update(
        {'_id': ObjectId(noteId)}, {'$set': payload.dict(exclude_none=True)}, return_document=ReturnDocument.AFTER)
    if not updated_note:
        raise HTTPException(status_code=status.HTTP_404_NOT_FOUND,
                            detail=f'No note with this id: {noteId} found')
    return {"status": "success", "note": noteEntity(updated_note)}
Then, the ObjectId.is_valid() method will be called to check if the provided Id is a valid ObjectId before the Note.find_one_and_update() method will be evoked to update the document with the data provided in the request body.
Since PyMongo will return the document before it was updated, theReturnDocument.AFTER option will instruct PyMongo to return the document after it has been updated.
Get a Document
This path operation function will be called to retrieve a single document from the database when a GET request hits the /api/notes/{noteId} endpoint.
The Id of the document to be lookup for will be obtained from the URL parameter and the ObjectId.is_valid() method will be called to check if the Id is a valid MongoDB ObjectId.
After that, the Note.find_one() method will be evoked to query the database to find the document that matches the provided ObjectId.
app/note.py
# [...] Get First 10 Records

# [...] Create a Record

# [...] Update a Record

# [...] Get a Single Record
@router.get('/{noteId}', response_model=schemas.NoteResponse)
def get_note(noteId: str):
    if not ObjectId.is_valid(noteId):
        raise HTTPException(status_code=status.HTTP_400_BAD_REQUEST,
                            detail=f"Invalid id: {noteId}")

    note = Note.find_one({'_id': ObjectId(noteId)})
    if not note:
        raise HTTPException(status_code=status.HTTP_404_NOT_FOUND,
                            detail=f"No note with this id: {noteId} found")
    return {"status": "success", "note": noteEntity(note)}
Once the document has been retrieved from the database, the noteEntity() method will be called to parse it into a Python dictionary.
Delete a Document
Now that we’ve implemented the Create, Update, and Read operations, let’s create a route handler to delete a document in the database. This path operation function will be evoked to remove a document in the collection when a /api/notes/{noteId} DELETE request is made to the API.
The Id of the document to be deleted will be extracted from the URL parameter and the ObjectId.is_valid() method will be called to check if it’s a valid ObjectId before the Note.find_one_and_delete() method will be called to remove that document from the database.
app/note.py
# [...] Get First 10 Records

# [...] Create a Record

# [...] Update a Record

# [...] Get a Single Record

# [...] Delete a Record
@router.delete('/{noteId}')
def delete_note(noteId: str):
    if not ObjectId.is_valid(noteId):
        raise HTTPException(status_code=status.HTTP_400_BAD_REQUEST,
                            detail=f"Invalid id: {noteId}")
    note = Note.find_one_and_delete({'_id': ObjectId(noteId)})
    if not note:
        raise HTTPException(status_code=status.HTTP_404_NOT_FOUND,
                            detail=f'No note with this id: {noteId} found')
    return Response(status_code=status.HTTP_204_NO_CONTENT)
Complete Path Operation Functions
app/note.py
from datetime import datetime
from fastapi import HTTPException, status, APIRouter, Response
from pymongo.collection import ReturnDocument
from app import schemas
from app.database import Note
from app.note_serializers import noteEntity, noteListEntity
from bson.objectid import ObjectId

router = APIRouter()


@router.get('/', response_model=schemas.ListNoteResponse)
def get_notes(limit: int = 10, page: int = 1, search: str = ''):
    skip = (page - 1) * limit
    pipeline = [
        {'$match': {'title': {'$regex': search, '$options': 'i'}}},
        {
            '$skip': skip
        }, {
            '$limit': limit
        }
    ]
    notes = noteListEntity(Note.aggregate(pipeline))
    return {'status': 'success', 'results': len(notes), 'notes': notes}


@router.post('/', status_code=status.HTTP_201_CREATED, response_model=schemas.NoteResponse)
def create_note(payload: schemas.NoteBaseSchema):
    payload.createdAt = datetime.utcnow()
    payload.updatedAt = payload.createdAt
    try:
        result = Note.insert_one(payload.dict(exclude_none=True))
        new_note = Note.find_one({'_id': result.inserted_id})
        return {"status": "success", "note": noteEntity(new_note)}
    except:
        raise HTTPException(status_code=status.HTTP_409_CONFLICT,
                            detail=f"Note with title: {payload.title} already exists")


@router.patch('/{noteId}', response_model=schemas.NoteResponse)
def update_note(noteId: str, payload: schemas.UpdateNoteSchema):
    if not ObjectId.is_valid(noteId):
        raise HTTPException(status_code=status.HTTP_400_BAD_REQUEST,
                            detail=f"Invalid id: {noteId}")
    updated_note = Note.find_one_and_update(
        {'_id': ObjectId(noteId)}, {'$set': payload.dict(exclude_none=True)}, return_document=ReturnDocument.AFTER)
    if not updated_note:
        raise HTTPException(status_code=status.HTTP_404_NOT_FOUND,
                            detail=f'No note with this id: {noteId} found')
    return {"status": "success", "note": noteEntity(updated_note)}


@router.get('/{noteId}', response_model=schemas.NoteResponse)
def get_note(noteId: str):
    if not ObjectId.is_valid(noteId):
        raise HTTPException(status_code=status.HTTP_400_BAD_REQUEST,
                            detail=f"Invalid id: {noteId}")

    note = Note.find_one({'_id': ObjectId(noteId)})
    if not note:
        raise HTTPException(status_code=status.HTTP_404_NOT_FOUND,
                            detail=f"No note with this id: {noteId} found")
    return {"status": "success", "note": noteEntity(note)}


@router.delete('/{noteId}')
def delete_note(noteId: str):
    if not ObjectId.is_valid(noteId):
        raise HTTPException(status_code=status.HTTP_400_BAD_REQUEST,
                            detail=f"Invalid id: {noteId}")
    note = Note.find_one_and_delete({'_id': ObjectId(noteId)})
    if not note:
        raise HTTPException(status_code=status.HTTP_404_NOT_FOUND,
                            detail=f'No note with this id: {noteId} found')
    return Response(status_code=status.HTTP_204_NO_CONTENT)
Register the Router in the FastAPI App
Now that we’ve implemented the CRUD API, let’s add the router to the FastAPI app and configure the app to accept requests from cross-origin domains. To do that, open the app/main.py file and replace its content with the following.
app/main.py
from app import note
from fastapi import FastAPI
from fastapi.middleware.cors import CORSMiddleware

app = FastAPI()

origins = [
    "http://localhost:3000",
]

app.add_middleware(
    CORSMiddleware,
    allow_origins=origins,
    allow_credentials=True,
    allow_methods=["*"],
    allow_headers=["*"],
)


app.include_router(note.router, tags=['Notes'], prefix='/api/notes')


@app.get("/api/healthchecker")
def root():
    return {"message": "Welcome to FastAPI with Pymongo"}
Let’s evaluate the above code snippets:
- We imported the CORSMiddleware class to help us configure the FastAPI application with CORS.
- Then, we created a list of the allowed origins and added the CORS configurations to the FastAPI middleware stack.
- Setting
allow_credentials=Truewill tell the FastAPI app to accept credentials like Authorization headers, Cookies, etc from the cross-origin domain.
Conclusion
In this tutorial, you learned how to create a CRUD app with FastAPI, PyMongo, and MongoDB. Also, you learned how to load environment variables in FastAPI, create validation schemas with Pydantic, and parse MongoDB documents into Python dictionaries.
You can find the complete source code of the FastAPI CRUD app on GitHub.

Excellent article! Thanks a lot, buddy!