
This article will teach you how to create a CRUD RESTful API with Python, FastAPI, PyMongo, MongoDB, and Docker-compose to perform the basic Create/Read/Update/Delete operations against a database.
API with Python, FastAPI, PyMongo, and MongoDB series:
- API with Python, FastAPI, and MongoDB: JWT Authentication
- RESTful API with Python & FastAPI: Send HTML Emails
- CRUD RESTful API Server with Python, FastAPI, and MongoDB
Related articles:
- Node.js, Express, TypeORM, PostgreSQL: CRUD Rest API
- Build CRUD RESTful API Server with Golang, Gin, and MongoDB
- Next.js Full-Stack App with React Query, and GraphQL-CodeGen
- Build Full-Stack tRPC CRUD Application with Node.js, and React.js
- GraphQL CRUD API with Next.js, MongoDB, and TypeGraphQL

Run the FastAPI CRUD Project Locally
- Download or clone the FastAPI CRUD App from https://github.com/wpcodevo/fastapi_mongodb and open the source code in an IDE.
- Change the Git branch to
fastapi_mongodb_crud_api. - In the terminal of the root project, run this command to create a new virtual environment.
- Windows OS –
python -m venv venv - Mac or Linux OS –
python3 -m venv venv
- Windows OS –
- If you are using VS Code, close the current terminal and open a new one to activate the virtual environment. Alternatively, run this command to manually activate it:
- Windows OS (Command Prompt ) –
venv\Scripts\activate.bat. - Windows OS (Git Bash) –
venv/Scripts/activate.bat. - Mac or Linux OS –
source venv/bin/activate
- Windows OS (Command Prompt ) –
- Run
pip install -r requirements.txtto install all the required dependencies. - Start the MongoDB Docker container with
docker-compose up -d - Run
uvicorn app.main:app --reloadto start the FastAPI HTTP server.
Python, FastAPI, MongoDB CRUD API Overview
We’ll build a CRUD RESTful API with FastAPI to perform create, read, update and delete operations against a MongoDB database.
| RESOURCE | HTTP METHOD | ROUTE | DESCRIPTION |
|---|---|---|---|
| posts | GET | /api/posts | Retrieve all posts |
| posts | POST | /api/posts | Add a new post |
| posts | GET | /api/posts/:postId | Get a single post |
| posts | PUT | /api/posts/:postId | Edit a post |
| posts | DELETE | /api/posts/:postId | Delete a post |
-You can add a new post to the database by making a POST request with the required data to the FastAPI server.
-To edit a post in the database, you need to make a PUT request with the updated data to the FastAPI server.
-You can retrieve a single post from the database by making a GET request to /api/posts/:postId .
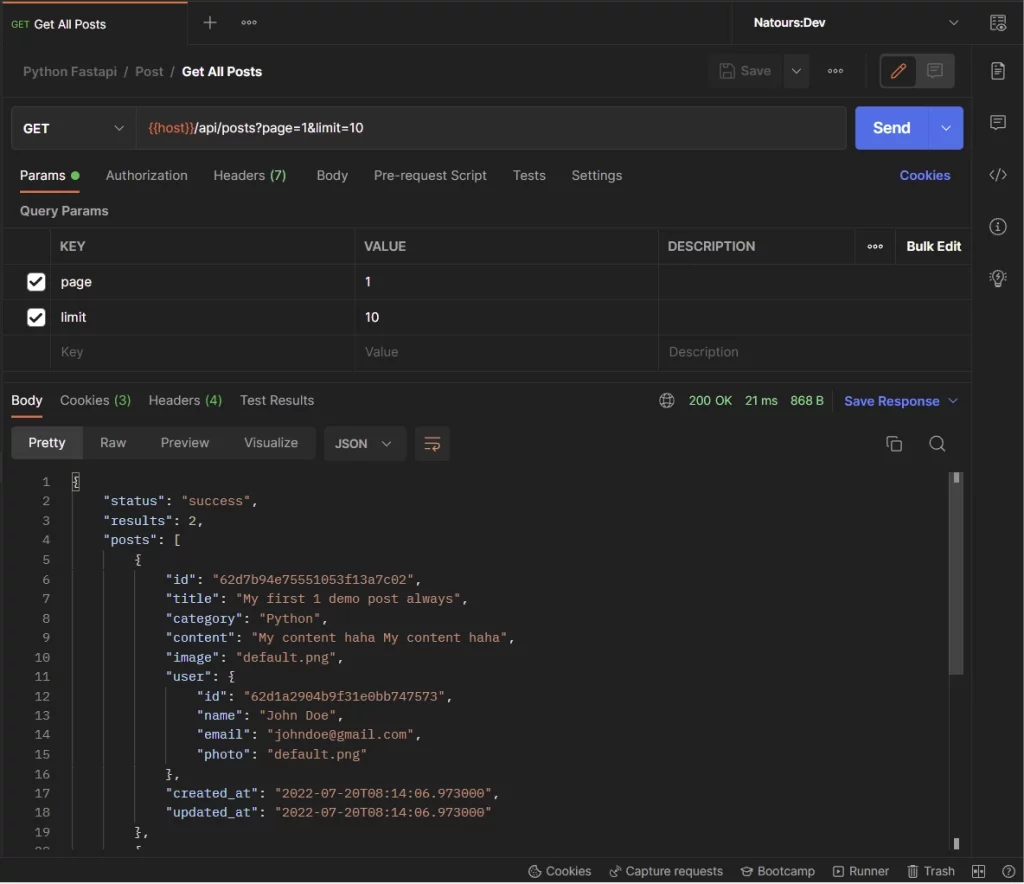
-You can also retrieve all the posts from the database or a paginated list of the posts by appending the page and limit parameters to the request URL.
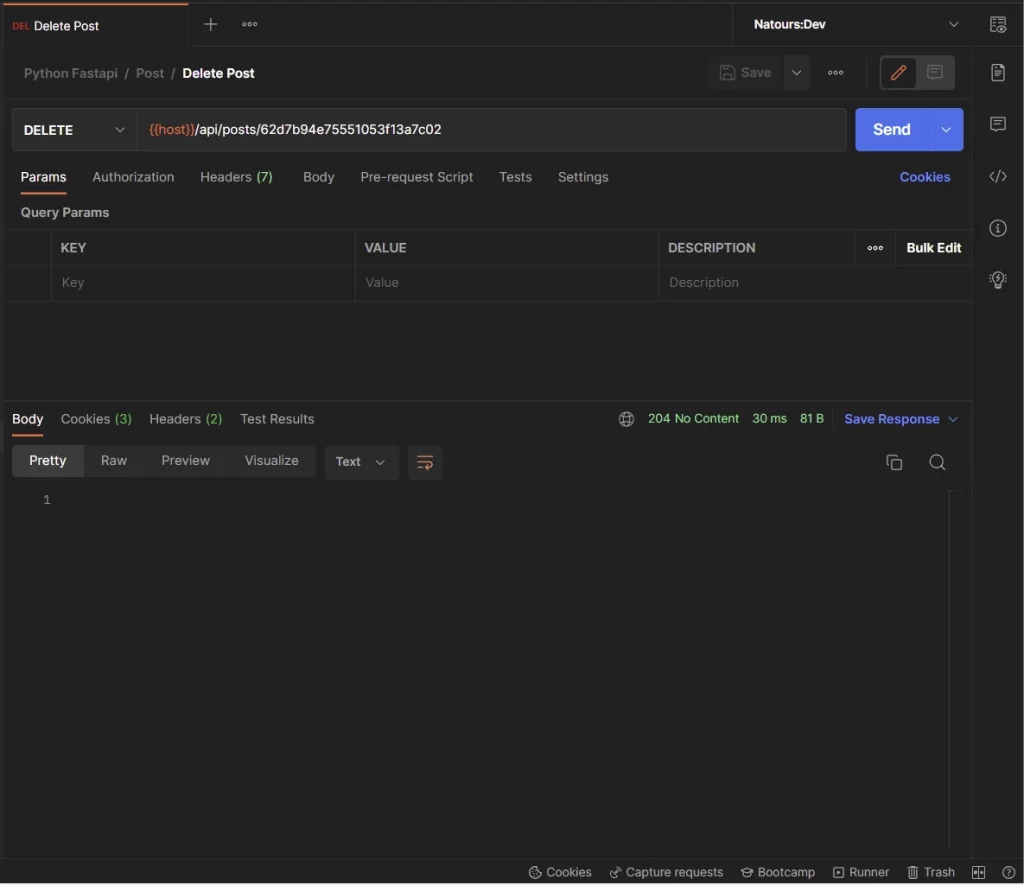
-You can remove a post from the database by making a DELETE request to /api/posts/:postId .
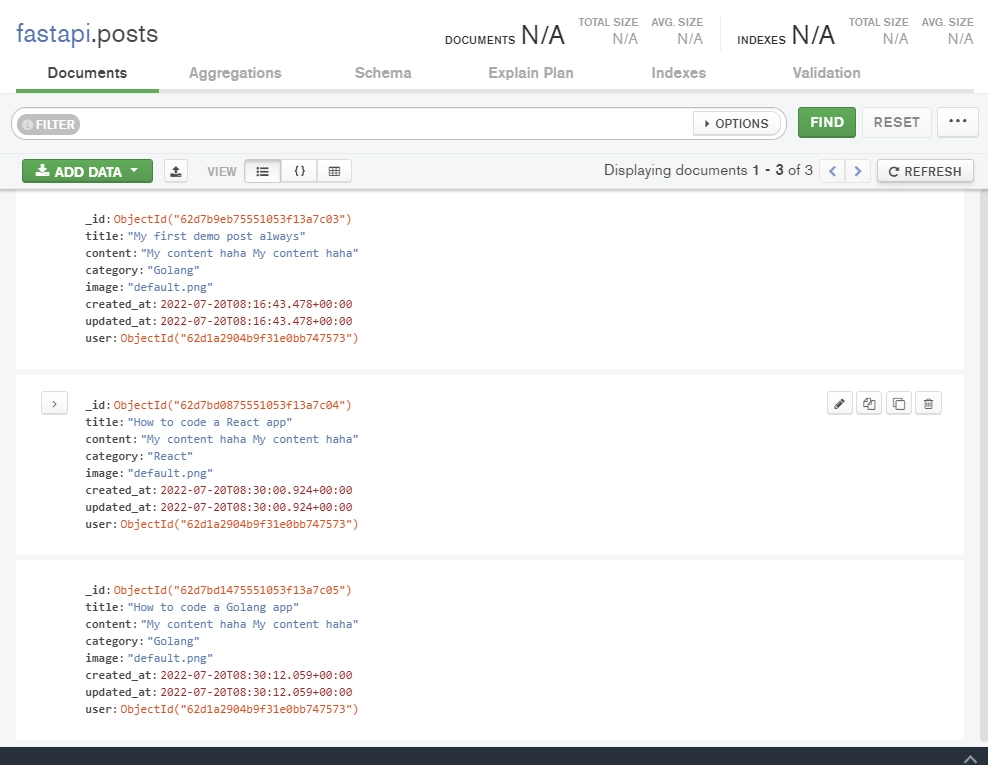
-You can open the MongoDB Compass application to see all the posts you created.
Prerequisites
Before you start this tutorial, you should:
- Have Python 3.6+ installed on your computer
- Be comfortable with the basics of Python
- Have Docker and Docker-compose installed on your system
Setting up FastAPI with MongoDB
Out-of-the-box, FastAPI supports NoSQL and SQL databases, making it a good choice for building microservices.
It allows you to easily adapt your code to work with popular databases like:
- CouchDB
- MySQL
- PostgreSQL
- MongoDB,
- Couchbase
- Cassandra
- SQLite, and many more.
The quickest and easiest way to run the MongoDB server on your machine is to use Docker and Docker-compose. Before we begin with any configurations, I will assume you already have Docker installed on your computer.
Whether you are new to this web development game or you are a veteran player, you may probably be using VS Code (Visual Studio Code) as your default text editor. That’s exactly the text editor am going to use throughout this tutorial.
Nevertheless, the type of IDE or text editor you use to showcase your coding skills and talent doesn’t matter so feel free to use whatever IDE you are comfortable with.
To begin, let’s create a new directory named fastapi_mongodb to hold the FastAPI project:
$ mkdir fastapi_mongodb
$ cd fastapi_mongodb
$ code . # opens the project with VS Code
Open the integrated terminal in your text editor or IDE (Integrated development environment) and run the command below to create a virtual environment.
Windows Machine:
$ py -3 -m venv venvmacOS Machine:
$ python3 -m venv venvNext, create a docker-compose.yml file in the root project and add these configurations to set up the MongoDB database server.
docker-compose.yml
version: '3'
services:
  mongo:
    image: mongo:latest
    container_name: mongo
    env_file:
      - ./.env
    environment:
      MONGO_INITDB_ROOT_USERNAME: ${MONGO_INITDB_ROOT_USERNAME}
      MONGO_INITDB_ROOT_PASSWORD: ${MONGO_INITDB_ROOT_PASSWORD}
      MONGO_INITDB_DATABASE: ${MONGO_INITDB_DATABASE}
    volumes:
      - mongo:/data/db
    ports:
      - '6000:27017'

volumes:
  mongo:
Since the Mongo Docker image requires some credentials to set up the MongoDB server, create a .env file and add the following environment variables.
.env
MONGO_INITDB_ROOT_USERNAME=admin
MONGO_INITDB_ROOT_PASSWORD=password123
MONGO_INITDB_DATABASE=fastapi
Security is always key in every application so create a .gitignore file and add the environment variables file to avoid pushing it to GitHub.
.gitignore
__pycache__
venv/
.env
With that out of the way, we are now ready to start the MongoDB Docker container:
$ docker-compose up -dExecute this command to stop the running MongoDB Docker container
$ docker-compose downInstalling FastAPI
Now let’s create a app/main.py file to enable VS Code to prepare the Python development environment.
Before we can start installing packages, we need to activate the virtual environment we created above.
The easiest way to activate the virtual environment is to close and reopen the integrated terminal. The script needed to activate the virtual environment will be automatically executed by VS Code.
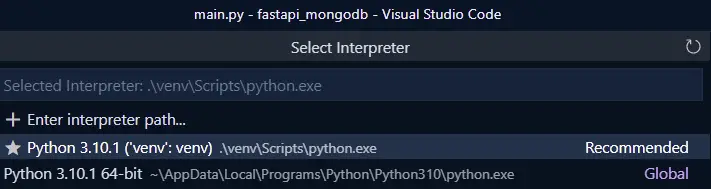
Alternatively, you can open the command palette (Ctrl+Shift+P) then type Python:S and click on the Python: Select Interpreter command.
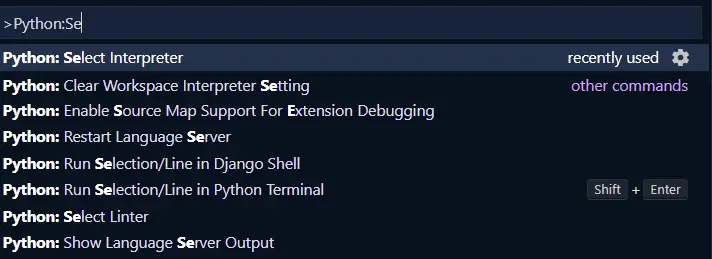
VS Code will automatically detect and add the virtual environment to the list of interpreters.
Click on the interpreter with the “Recommended” tag to activate it.
Next, create an empty app/__init__.py file to convert the app folder into a Python package.
Install FastAPI and its peer dependencies:
pip install fastapi[all]
Running the FastAPI Server
Now add the following code to the app/main.py file to start the FastAPI server with Uvicorn.
from fastapi import FastAPI
app = FastAPI()
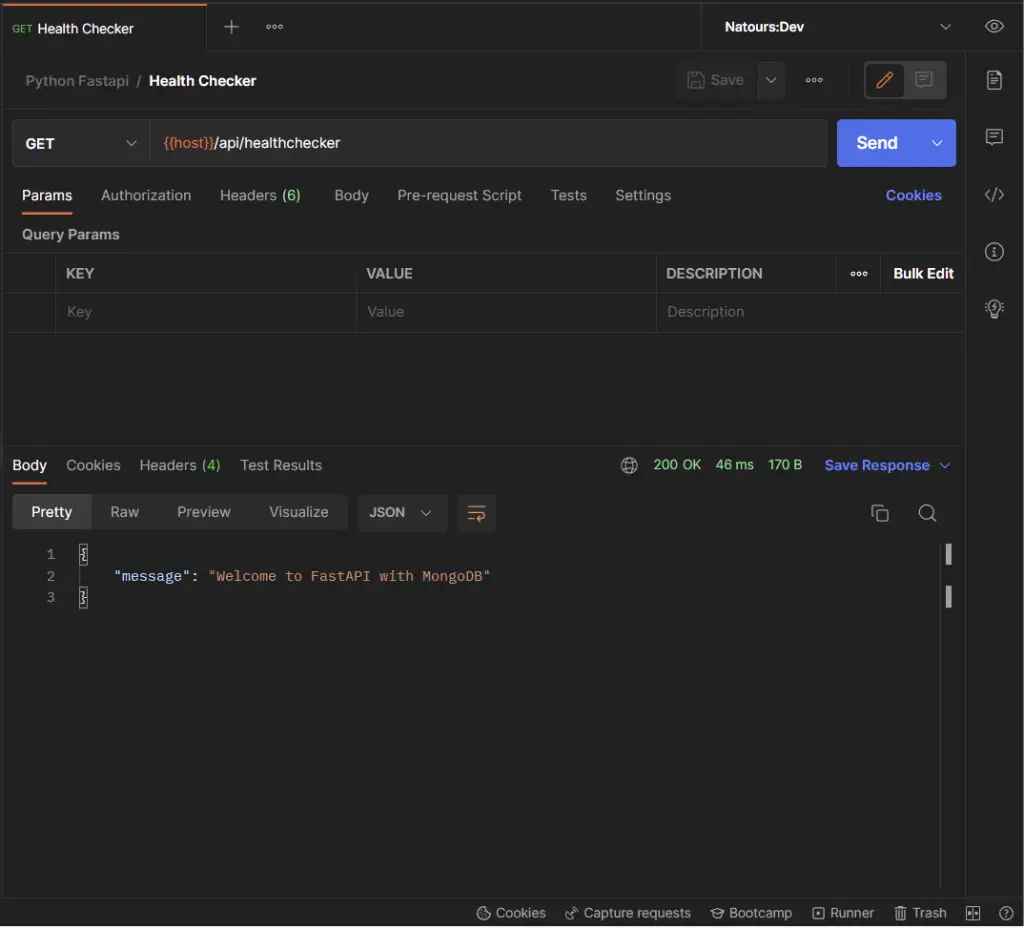
@app.get("/api/healthchecker")
def root():
return {"message": "Welcome to FastAPI with MongoDB"}
Run this command to start the FastAPI server with Uvicorn:
uvicorn app.main:app --host localhost --port 8000 --reload
uvicorn– a high-performance ASGI web serverapp.main: theapp/main.pyfileapp: the object returned after evokingFASTAPI()--host: allows us to bind the socket to a host. Defaults to127.0.0.1--port: allows us to bind the socket to a specific port. 8000 is the default.--reload: Enables hot-reloading
Make a GET request to http://localhost:8000/api/healthchecker with any API testing tool and you should see the message we added to the JSON response.
Loading Environment Variables with Pydantic
By default, Pydantic allows us to load environment variables from a configuration file into the Python environment.
To read, load, and validate the environment variables in the .env file, we will need a model class that inherits the BaseSettings class. This approach ensures that the model initializer loads the content of the environment variables file if we do not provide keyword arguments to the defined fields.
Replace the content of the .env file with the environment variables:
.env
MONGO_INITDB_ROOT_USERNAME=admin
MONGO_INITDB_ROOT_PASSWORD=password123
MONGO_INITDB_DATABASE=fastapi

DATABASE_URL=mongodb://admin:password123@localhost:6000/fastapi?authSource=admin

ACCESS_TOKEN_EXPIRES_IN=15
REFRESH_TOKEN_EXPIRES_IN=60
JWT_ALGORITHM=RS256

CLIENT_ORIGIN=http://localhost:3000


JWT_PRIVATE_KEY=LS0tLS1CRUdJTiBSU0EgUFJJVkFURSBLRVktLS0tLQpNSUlCT2dJQkFBSkJBSSs3QnZUS0FWdHVQYzEzbEFkVk94TlVmcWxzMm1SVmlQWlJyVFpjd3l4RVhVRGpNaFZuCi9KVHRsd3h2a281T0pBQ1k3dVE0T09wODdiM3NOU3ZNd2xNQ0F3RUFBUUpBYm5LaENOQ0dOSFZGaHJPQ0RCU0IKdmZ2ckRWUzVpZXAwd2h2SGlBUEdjeWV6bjd0U2RweUZ0NEU0QTNXT3VQOXhqenNjTFZyb1pzRmVMUWlqT1JhUwp3UUloQU84MWl2b21iVGhjRkltTFZPbU16Vk52TGxWTW02WE5iS3B4bGh4TlpUTmhBaUVBbWRISlpGM3haWFE0Cm15QnNCeEhLQ3JqOTF6bVFxU0E4bHUvT1ZNTDNSak1DSVFEbDJxOUdtN0lMbS85b0EyaCtXdnZabGxZUlJPR3oKT21lV2lEclR5MUxaUVFJZ2ZGYUlaUWxMU0tkWjJvdXF4MHdwOWVEejBEWklLVzVWaSt6czdMZHRDdUVDSUVGYwo3d21VZ3pPblpzbnU1clBsTDJjZldLTGhFbWwrUVFzOCtkMFBGdXlnCi0tLS0tRU5EIFJTQSBQUklWQVRFIEtFWS0tLS0t
JWT_PUBLIC_KEY=LS0tLS1CRUdJTiBQVUJMSUMgS0VZLS0tLS0KTUZ3d0RRWUpLb1pJaHZjTkFRRUJCUUFEU3dBd1NBSkJBSSs3QnZUS0FWdHVQYzEzbEFkVk94TlVmcWxzMm1SVgppUFpSclRaY3d5eEVYVURqTWhWbi9KVHRsd3h2a281T0pBQ1k3dVE0T09wODdiM3NOU3ZNd2xNQ0F3RUFBUT09Ci0tLS0tRU5EIFBVQkxJQyBLRVktLS0tLQ==
Now let’s create a app/config.py file and define the class that inherits the BaseSettings class to make Pydantic load the environment variables.
app/config.py
from pydantic import BaseSettings


class Settings(BaseSettings):
    DATABASE_URL: str
    MONGO_INITDB_DATABASE: str

    JWT_PUBLIC_KEY: str
    JWT_PRIVATE_KEY: str
    REFRESH_TOKEN_EXPIRES_IN: int
    ACCESS_TOKEN_EXPIRES_IN: int
    JWT_ALGORITHM: str

    CLIENT_ORIGIN: str

    class Config:
        env_file = './.env'


settings = Settings()
Connecting to the MongoDB Database Server
When it comes to choosing the best database driver for MongoDB in Python, we have two popular options:
- PyMongo – a MongoDB driver created by the MongoDB team for synchronous Python applications.
- Motor – a MongoDB driver created for asynchronous Python applications
Despite these two options, we will be using PyMongo to query and mutate the MongoDB database.
Run this command to install the PyMongo package:
pip install pymongo
To connect to the MongoDB server, create a app/database.py file and add the following configurations.
app/database.py
from pymongo import mongo_client
import pymongo
from app.config import settings

client = mongo_client.MongoClient(settings.DATABASE_URL)
print('Connected to MongoDB...')

db = client[settings.MONGO_INITDB_DATABASE]
User = db.users
Post = db.posts
User.create_index([("email", pymongo.ASCENDING)], unique=True)
Post.create_index([("title", pymongo.ASCENDING)], unique=True)
In the above, we used client[settings.MONGO_INITDB_DATABASE] to create a database named fastapi .
We also created the users and posts collections in the fastapi database and added unique constraints to the email and title fields.
Adding the unique constraints will make MongoDB raise a duplicate key violation error with an 11000 code.
Creating the Schemas with Pydantic
We are now ready to create the Pydantic schemas needed to parse and validate the requests and responses.
Replace the content of the app/schemas.py file with the following code snippets:
app/schemas.py
from datetime import datetime
from typing import List
from pydantic import BaseModel, EmailStr, constr
from bson.objectid import ObjectId


class UserBaseSchema(BaseModel):
    name: str
    email: str
    photo: str
    role: str | None = None
    created_at: datetime | None = None
    updated_at: datetime | None = None

    class Config:
        orm_mode = True


class CreateUserSchema(UserBaseSchema):
    password: constr(min_length=8)
    passwordConfirm: str
    verified: bool = False


class LoginUserSchema(BaseModel):
    email: EmailStr
    password: constr(min_length=8)


class UserResponseSchema(UserBaseSchema):
    id: str
    pass


class UserResponse(BaseModel):
    status: str
    user: UserResponseSchema


class FilteredUserResponse(UserBaseSchema):
    id: str


class PostBaseSchema(BaseModel):
    title: str
    content: str
    category: str
    image: str
    created_at: datetime | None = None
    updated_at: datetime | None = None

    class Config:
        orm_mode = True
        allow_population_by_field_name = True
        arbitrary_types_allowed = True
        json_encoders = {ObjectId: str}


class CreatePostSchema(PostBaseSchema):
    user: ObjectId | None = None
    pass


class PostResponse(PostBaseSchema):
    id: str
    user: FilteredUserResponse
    created_at: datetime
    updated_at: datetime


class UpdatePostSchema(BaseModel):
    title: str | None = None
    content: str | None = None
    category: str | None = None
    image: str | None = None
    user: str | None = None

    class Config:
        orm_mode = True
        allow_population_by_field_name = True
        arbitrary_types_allowed = True
        json_encoders = {ObjectId: str}


class ListPostResponse(BaseModel):
    status: str
    results: int
    posts: List[PostResponse]
Serializers for the MongoDB Documents
Since MongoDB uses BSON for data storage and network transfer, we need to unmarshal the BSON documents returned by the MongoDB database into Python dictionaries.
Create a app/serializers/userSerializers.py file and add the following serializers to parse the BSON documents returned from the users collection.
app/serializers/userSerializers.py
def userEntity(user) -> dict:
    return {
        "id": str(user["_id"]),
        "name": user["name"],
        "email": user["email"],
        "role": user["role"],
        "photo": user["photo"],
        "verified": user["verified"],
        "password": user["password"],
        "created_at": user["created_at"],
        "updated_at": user["updated_at"]
    }


def userResponseEntity(user) -> dict:
    return {
        "id": str(user["_id"]),
        "name": user["name"],
        "email": user["email"],
        "role": user["role"],
        "photo": user["photo"],
        "created_at": user["created_at"],
        "updated_at": user["updated_at"]
    }


def embeddedUserResponse(user) -> dict:
    return {
        "id": str(user["_id"]),
        "name": user["name"],
        "email": user["email"],
        "photo": user["photo"]
    }


def userListEntity(users) -> list:
    return [userEntity(user) for user in users]
Next, create a app/serializers/postSerializers.py file and these serializers to parse the BSON documents returned from the posts collection.
app/serializers/postSerializers.py
from app.serializers.userSerializers import embeddedUserResponse


def postEntity(post) -> dict:
    return {
        "id": str(post["_id"]),
        "title": post["title"],
        "category": post["category"],
        "content": post["content"],
        "image": post["image"],
        "user": str(post["user"]),
        "created_at": post["created_at"],
        "updated_at": post["updated_at"]
    }


def populatedPostEntity(post) -> dict:
    return {
        "id": str(post["_id"]),
        "title": post["title"],
        "category": post["category"],
        "content": post["content"],
        "image": post["image"],
        "user": embeddedUserResponse(post["user"]),
        "created_at": post["created_at"],
        "updated_at": post["updated_at"]
    }


def postListEntity(posts) -> list:
    return [populatedPostEntity(post) for post in posts]
Creating the Controllers
Now that we have everything configured correctly, let’s create five path operation functions to perform the CRUD (Create, Read, Update, and Delete) functionalities.
@router.get('/api/posts/')– This path operation function will query the database to retrieve a paginated list of documents and return them to the client.@router.post('/api/posts/')– This path operation function will insert the data provided in the request payload to the MongoDB database.@router.get('/api/posts/{id}')– This path operation function will query the database to retrieve a document that matches the ID provided in the request URL parameter and return it to the client.@router.put('/api/posts/{id}')– This path operation function will scan the MongoDB collection to find a document that matches the ID provided in the request URL parameter and edit the fields based on the request payload.@router.delete('/api/posts/{id}')– This path operation function will find a single document in the collection and delete the found document from the database.
First thing first, create a routers/post.py file in the app directory and add the following module imports:
app/routers/post.py
from datetime import datetime
from fastapi import Depends, HTTPException, status, APIRouter, Response
from pymongo.collection import ReturnDocument
from app import schemas
from app.database import Post
from app.oauth2 import require_user
from app.serializers.postSerializers import postEntity, postListEntity
from bson.objectid import ObjectId
from pymongo.errors import DuplicateKeyError
Get All Posts Controller
The first CRUD operation we’ll implement is READ. To do this, we’ll create a path operation function to get a list of documents from the MongoDB collection and return them to the client or frontend application.
This route handler is protected and it can only be accessed by users with valid access tokens. Also, since it’s a bad practice to send all the documents in a collection to the client, we’ll add a pagination feature where the user can provide a page and limit parameters in the URL to retrieve a selected list of the documents.
Pymongo has a .find() method that can be used to retrieve all the documents in the collection but since we want to embed the user document in the post document, we’ll use MongoDB Aggregation Pipeline to achieve that.
app/routers/post.py
# [...] imports

router = APIRouter()

# [...] Get All Posts
@router.get('/')
def get_posts(limit: int = 10, page: int = 1, search: str = '', user_id: str = Depends(require_user)):
    skip = (page - 1) * limit
    pipeline = [
        {'$match': {}},
        {'$lookup': {'from': 'users', 'localField': 'user',
                     'foreignField': '_id', 'as': 'user'}},
        {'$unwind': '$user'},
        {
            '$skip': skip
        }, {
            '$limit': limit
        }
    ]
    posts = postListEntity(Post.aggregate(pipeline))
    return {'status': 'success', 'results': len(posts), 'posts': posts}
First, we created a statement to calculate the number of documents to skip based on the limit and page parameters. Then, we defined an Aggregation Pipeline to find the documents in the collection, embed the user document, skip a number of documents, and limit the results based on the limit value.
Next, we called the postListEntity() function to serialize the list of documents returned by MongoDB into a list of Python objects and returned them in the JSON response.
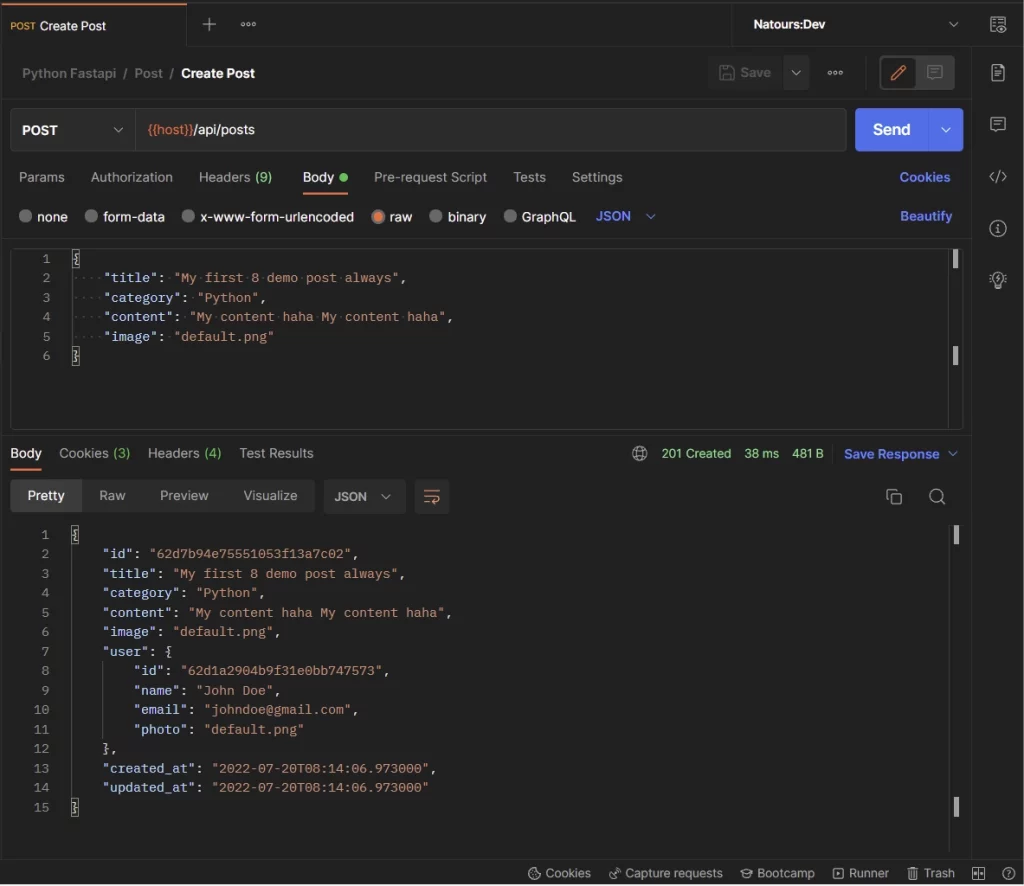
Create New Post Controller
The second CRUD operation we’ll implement is CREATE. This path operation function will be evoked to add a new post to the MongoDB collection. To avoid storing junk values in the database, we’ll add the CreatePostSchema class as a dependency to validate the data provided in the request body.
app/routers/post.py
# [...] imports

router = APIRouter()

# [...] Get All Posts

# [...] Create Post
@router.post('/', status_code=status.HTTP_201_CREATED)
def create_post(post: schemas.CreatePostSchema, user_id: str = Depends(require_user)):
    post.user = ObjectId(user_id)
    post.created_at = datetime.utcnow()
    post.updated_at = post.created_at
    try:
        result = Post.insert_one(post.dict())
        pipeline = [
            {'$match': {'_id': result.inserted_id}},
            {'$lookup': {'from': 'users', 'localField': 'user',
                         'foreignField': '_id', 'as': 'user'}},
            {'$unwind': '$user'},
        ]
        new_post = postListEntity(Post.aggregate(pipeline))[0]
        return new_post
    except DuplicateKeyError:
        raise HTTPException(status_code=status.HTTP_409_CONFLICT,
                            detail=f"Post with title: '{post.title}' already exists")
Quite a lot is going on in the above, let’s break it down:
- We added the
require_user()function as a dependency to thecreate_post()path operation function. This will ensure that the user includes a valid access token in the request before the post will be added to the database. - Then, we called the
insert_one()method available on thePostmodel to insert the document into the database. - The Pymongo model has a
find_one()method that returns the first document that matches a query. However, I couldn’t find a way to replace the user reference ID with the user document so I choose the aggregation pipeline approach. - We then defined a simple aggregation pipeline to find the document by the ObjectId returned by the
insert_one()method and populated theuserfield with the user document.
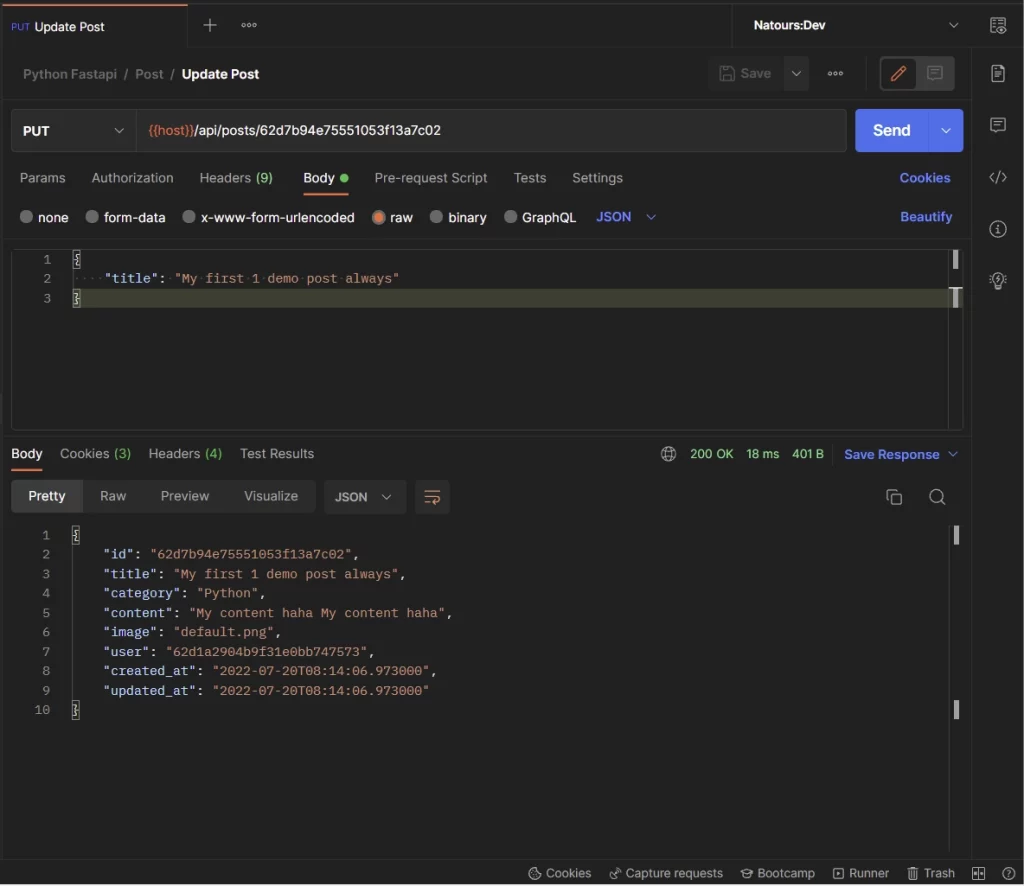
Update Post Controller
At this point, we are now ready to implement the UPDATE CRUD operation. To do this, we’ll create a path operation function to edit the fields of a document in the database. This route handler will be called when a PUT request is made to the /api/posts/{id} endpoint.
To filter junk values and unnecessary fields in the request body, we’ll add the UpdatePostSchema class to the list of dependencies so that Pydantic can validate the payload against the rules defined in the schema.
First, we’ll call the ObjectId.is_valid() method to check if the provided ID is a valid MongoDB ObjectId.
Next, the Post.find_one_and_update() method will be evoked to find the document that matches the query and update the fields based on the data included in the request body.
app/routers/post.py
# [...] imports

router = APIRouter()

# [...] Get All Posts
# [...] Create Post

# [...] Update Post
@router.put('/{id}')
def update_post(id: str, payload: schemas.UpdatePostSchema, user_id: str = Depends(require_user)):
    if not ObjectId.is_valid(id):
        raise HTTPException(status_code=status.HTTP_400_BAD_REQUEST,
                            detail=f"Invalid id: {id}")
    updated_post = Post.find_one_and_update(
        {'_id': ObjectId(id)}, {'$set': payload.dict(exclude_none=True)}, return_document=ReturnDocument.AFTER)
    if not updated_post:
        raise HTTPException(status_code=status.HTTP_404_NOT_FOUND,
                            detail=f'No post with this id: {id} found')
    return postEntity(updated_post)
By default, the .find_one_and_update() function will return the document in the state it was before being modified. So, the ReturnDocument.AFTER option will tell MongoDB to return the updated document instead of the original one.
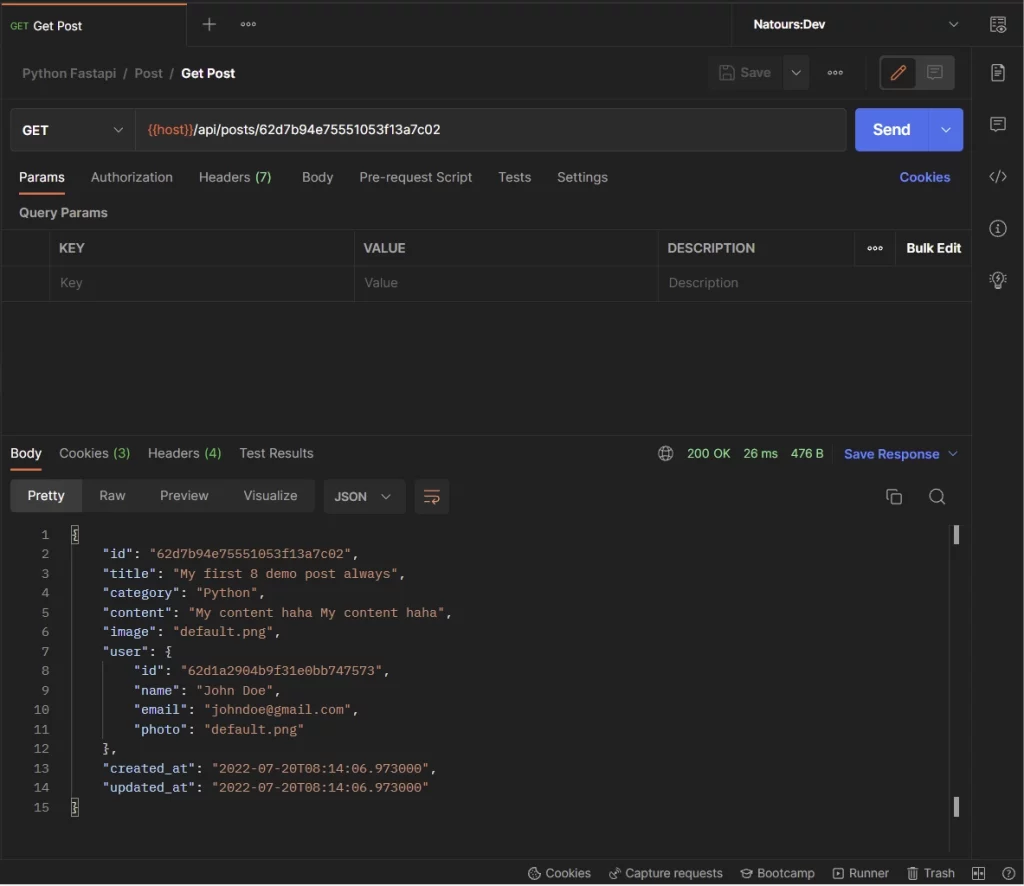
Get Post Controller
Now let’s perform another READ operation to retrieve a single document. To do this, we’ll create a path operation function that will scan the MongoDB database to find a document that matches an ID parameter and return the found document to the client or frontend app.
To prevent the API from crashing when an invalid UUID is provided, we’ll leverage the ObjectId.is_valid() method to check if the provided UUID is a valid MongoDB ObjectId.
Then, we’ll create a MongoDB aggregation pipeline to find the document and embed the user document in it.
app/routers/post.py
# [...] imports

router = APIRouter()

# [...] Get All Posts

# [...] Create Post

# [...] Update Post

# [...] Get Single Post
@router.get('/{id}')
def get_post(id: str, user_id: str = Depends(require_user)):
    if not ObjectId.is_valid(id):
        raise HTTPException(status_code=status.HTTP_400_BAD_REQUEST,
                            detail=f"Invalid id: {id}")
    pipeline = [
        {'$match': {'_id': ObjectId(id)}},
        {'$lookup': {'from': 'users', 'localField': 'user',
                     'foreignField': '_id', 'as': 'user'}},
        {'$unwind': '$user'},
    ]
    db_cursor = Post.aggregate(pipeline)
    results = list(db_cursor)

    if len(results) == 0:
        raise HTTPException(status_code=status.HTTP_404_NOT_FOUND,
                            detail=f"No post with this id: {id} found")

    post = postListEntity(results)[0]
    return post
Lastly, we’ll serialize the document returned in the MongoDB cursor into a Python object before returning it to the client.
Delete Post Controller
The last CRUD operation is DELETE. Here, we’ll find the document by the ID provided in the URL parameter and delete it from the database. To do this, we’ll check if the ID is a valid MongoDB ObjectId and call .find_one_and_delete() to remove the document from the database.
app/routers/post.py
# [...] imports

router = APIRouter()

# [...] Get All Posts
# [...] Create Post
# [...] Update Post
# [...] Get Single Post

# [...] Delete Post
@router.delete('/{id}')
def delete_post(id: str, user_id: str = Depends(require_user)):
    if not ObjectId.is_valid(id):
        raise HTTPException(status_code=status.HTTP_400_BAD_REQUEST,
                            detail=f"Invalid id: {id}")
    post = Post.find_one_and_delete({'_id': ObjectId(id)})
    if not post:
        raise HTTPException(status_code=status.HTTP_404_NOT_FOUND,
                            detail=f'No post with this id: {id} found')
    return Response(status_code=status.HTTP_204_NO_CONTENT)
Complete Code for the Post Controllers
app/routers/post.py
from datetime import datetime
from fastapi import Depends, HTTPException, status, APIRouter, Response
from pymongo.collection import ReturnDocument
from app import schemas
from app.database import Post
from app.oauth2 import require_user
from app.serializers.postSerializers import postEntity, postListEntity
from bson.objectid import ObjectId
from pymongo.errors import DuplicateKeyError

router = APIRouter()


@router.get('/')
def get_posts(limit: int = 10, page: int = 1, search: str = '', user_id: str = Depends(require_user)):
    skip = (page - 1) * limit
    pipeline = [
        {'$match': {}},
        {'$lookup': {'from': 'users', 'localField': 'user',
                     'foreignField': '_id', 'as': 'user'}},
        {'$unwind': '$user'},
        {
            '$skip': skip
        }, {
            '$limit': limit
        }
    ]
    posts = postListEntity(Post.aggregate(pipeline))
    return {'status': 'success', 'results': len(posts), 'posts': posts}


@router.post('/', status_code=status.HTTP_201_CREATED)
def create_post(post: schemas.CreatePostSchema, user_id: str = Depends(require_user)):
    post.user = ObjectId(user_id)
    post.created_at = datetime.utcnow()
    post.updated_at = post.created_at
    try:
        result = Post.insert_one(post.dict())
        pipeline = [
            {'$match': {'_id': result.inserted_id}},
            {'$lookup': {'from': 'users', 'localField': 'user',
                         'foreignField': '_id', 'as': 'user'}},
            {'$unwind': '$user'},
        ]
        new_post = postListEntity(Post.aggregate(pipeline))[0]
        return new_post
    except DuplicateKeyError:
        raise HTTPException(status_code=status.HTTP_409_CONFLICT,
                            detail=f"Post with title: '{post.title}' already exists")


@router.put('/{id}')
def update_post(id: str, payload: schemas.UpdatePostSchema, user_id: str = Depends(require_user)):
    if not ObjectId.is_valid(id):
        raise HTTPException(status_code=status.HTTP_400_BAD_REQUEST,
                            detail=f"Invalid id: {id}")
    updated_post = Post.find_one_and_update(
        {'_id': ObjectId(id)}, {'$set': payload.dict(exclude_none=True)}, return_document=ReturnDocument.AFTER)
    if not updated_post:
        raise HTTPException(status_code=status.HTTP_404_NOT_FOUND,
                            detail=f'No post with this id: {id} found')
    return postEntity(updated_post)


@router.get('/{id}')
def get_post(id: str, user_id: str = Depends(require_user)):
    if not ObjectId.is_valid(id):
        raise HTTPException(status_code=status.HTTP_400_BAD_REQUEST,
                            detail=f"Invalid id: {id}")
    pipeline = [
        {'$match': {'_id': ObjectId(id)}},
        {'$lookup': {'from': 'users', 'localField': 'user',
                     'foreignField': '_id', 'as': 'user'}},
        {'$unwind': '$user'},
    ]
    db_cursor = Post.aggregate(pipeline)
    results = list(db_cursor)

    if len(results) == 0:
        raise HTTPException(status_code=status.HTTP_404_NOT_FOUND,
                            detail=f"No post with this id: {id} found")

    post = postListEntity(results)[0]
    return post


@router.delete('/{id}')
def delete_post(id: str, user_id: str = Depends(require_user)):
    if not ObjectId.is_valid(id):
        raise HTTPException(status_code=status.HTTP_400_BAD_REQUEST,
                            detail=f"Invalid id: {id}")
    post = Post.find_one_and_delete({'_id': ObjectId(id)})
    if not post:
        raise HTTPException(status_code=status.HTTP_404_NOT_FOUND,
                            detail=f'No post with this id: {id} found')
    return Response(status_code=status.HTTP_204_NO_CONTENT)
Update the Main File
Oops, quite a lot of code. Open the app/main.py file and register the post.router . Once you are done, start the FastAPI server and test the API endpoints from an API testing software.
app/main.py
from fastapi import FastAPI
from fastapi.middleware.cors import CORSMiddleware

from app.config import settings
from app.routers import auth, user, post

app = FastAPI()

origins = [
    settings.CLIENT_ORIGIN,
]

app.add_middleware(
    CORSMiddleware,
    allow_origins=origins,
    allow_credentials=True,
    allow_methods=["*"],
    allow_headers=["*"],
)


app.include_router(auth.router, tags=['Auth'], prefix='/api/auth')
app.include_router(user.router, tags=['Users'], prefix='/api/users')
app.include_router(post.router, tags=['Posts'], prefix='/api/posts')


@app.get("/api/healthchecker")
def root():
    return {"message": "Welcome to FastAPI with MongoDB"}
Conclusion
With this FastAPI, MongoDB, Pydantic, PyMongo, and Docker example in Python, you’ve learned how to build a CRUD API server to perform the basic CRUD operations.
FastAPI, and MongoDB CRUD App Source Code
You can find the complete source code in this GitHub repository.
uvicorn : The term ‘uvicorn’ is not recognized as the name of a cmdlet, function, script file, or operable program. Check
the spelling of the name, or if a path was included, verify that the path is correct and try again.
At line:1 char:1
+ uvicorn app.main:app –host localhost –port 8000 –reload
+ ~~~~~~~
+ CategoryInfo : ObjectNotFound: (uvicorn:String) [], CommandNotFoundException
+ FullyQualifiedErrorId : CommandNotFoundException
Hi, I got above error , I had tried in stakeoverflow but didn’t get the any proper solution . How to fix this issue?
These might be the reasons why you got that error:
1. You didn’t activate the virtual environment
2. You didn’t install the project’s dependencies
I just added a Run the FastAPI CRUD Project Locally section to help you run the Project with ease.