

Are you interested in building a secure authentication system for your Rust web application? Look no further than the Axum framework and JSON Web Tokens (JWTs)! Axum is a fast and scalable Rust web framework that provides a reliable and efficient platform for developing microservices and APIs.
To keep things simple, we’ll implement the JWT using the HS256 algorithm and store data in a PostgreSQL database using SQLX.
The HS256 algorithm is widely used and considered secure when implemented correctly. However, since it uses the same secret key to both sign and verify the JWT, anyone who gains access to the secret key can generate and validate JWTs. This can make it more vulnerable to attacks if the secret key is compromised.
In an upcoming article, we’ll take things to the next level and implement the RS256 algorithm. This involves using a public-private key pair to sign and verify JWTs, which adds an extra layer of security. We’ll also incorporate Redis as a server session to easily revoke JWTs when needed. So stay tuned for that!
More practice:
- Implement Google and GitHub OAuth2 in Rust Frontend App
- Create a Simple API in Rust using the Axum Framework
- Rust CRUD API Example with Axum and PostgreSQL
- Build a Frontend Web App in Rust using the Yew.rs Framework
- Frontend App with Rust and Yew.rs: User SignUp and Login
- Rust – How to Generate and Verify (JWTs) JSON Web Tokens
- Rust and Actix Web – JWT Access and Refresh Tokens
- Rust and Yew.rs Frontend: JWT Access and Refresh Tokens
- Rust – JWT Authentication with Actix Web
- Build a Simple API with Rust and Rocket
- Build a CRUD API with Rust and MongoDB
Set Up and Test the Rust Axum JWT Authentication Project
- You can get the Rust Axum JWT authentication project from its GitHub repository at https://github.com/wpcodevo/rust-axum-jwt-auth. Simply download or clone the project and open the source code in your preferred IDE or text editor.
- Start a PostgreSQL server in a Docker container by executing the command
docker-compose up -din the root directory’s terminal. - Install the SQLX CLI tool by running
cargo install sqlx-cli. Use the commandsqlx migrate runto apply the PostgreSQL database’s “up” migration script. - Start the Axum HTTP server by running the command
cargo runin the terminal. This will install the necessary crates and launch the server. - To test the Axum JWT authentication flow, import the
Rust HS256 JWT.postman_collection.jsonfile into Postman or the Thunder Client extension in Visual Studio Code. This file contains pre-defined HTTP requests for each of the API endpoints, allowing you to quickly test the application without manually creating the request bodies and URLs.
Setup the Rust Axum Project
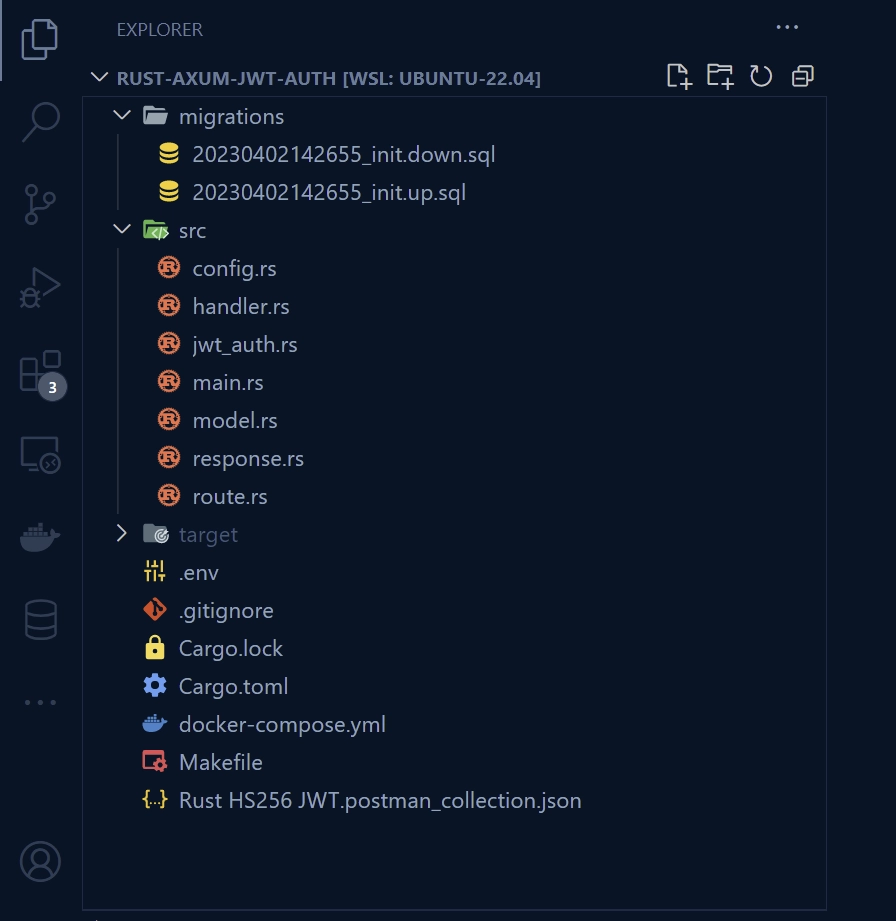
To give you a better idea of how your project will look like as you follow along with this tutorial, take a look at the screenshot below. It illustrates the folder and file organization that you will end up with once you’ve completed all the steps outlined in this article. This overview will help you keep track of your progress and ensure that your project is properly structured.
Let’s get started by creating a new directory to store our project’s source code. Navigate to a directory of your choice using your terminal and enter the following commands:
mkdir rust-axum-jwt-auth
cd rust-axum-jwt-auth
cargo init
This will create a new folder named rust-axum-jwt-auth and initialize a Rust project in that directory.
Once you’ve initialized the project, you can open it in your preferred code editor. From there, you can launch the integrated terminal and install all the dependencies needed for the project by running the following commands:
cargo add axum
cargo add axum-extra -F cookie
cargo add time
cargo add tokio -F full
cargo add tower-http -F "cors"
cargo add serde_json
cargo add serde -F derive
cargo add chrono -F serde
cargo add dotenv
cargo add uuid -F "serde v4"
cargo add sqlx -F "runtime-async-std-native-tls postgres chrono uuid"
cargo add jsonwebtoken
cargo add argon2
cargo add rand_core --features "std"
axum– A fast and scalable Rust web framework for building microservices and APIs.axum-extra– A collection of additional components and utilities for the Axum web framework, including middleware and filters.time– A library for working with dates, times, and durations.tokio– A runtime for writing asynchronous, event-driven applications.tower-http– A set of composable middleware components for building HTTP servers and clients.serde_json– A crate for fast and efficient JSON serialization and deserialization.serde– A framework for serializing and deserializing Rust data structures into various formats.chrono– A date and time library for working with dates, times, and time zones.dotenv– A library for loading environment variables from a.envfile.uuid– A crate for generating, parsing, and formatting UUIDs.sqlx– A crate for database access that supports asynchronous I/O and provides a type-safe API for working with databases.jsonwebtoken– A crate for creating and verifying JWTs.argon2– A crate for password hashing using the Argon2 algorithm.rand_core– A crate for generating random numbers.
Please note that Rust is an evolving language, and some of the crates used in this project may introduce breaking changes by the time you read this article. If you encounter any issues, please revert to the versions provided in the Cargo.toml file below.
Additionally, feel free to leave a comment detailing any problems you encounter, and I will update the article and source code accordingly to help others who may face the same issue.
Cargo.toml
[package]
name = "rust-axum-jwt-auth"
version = "0.1.0"
edition = "2021"

# See more keys and their definitions at https://doc.rust-lang.org/cargo/reference/manifest.html

[dependencies]
argon2 = "0.5.0"
axum = "0.7.2"
axum-extra = { version = "0.9.0", features = ["cookie"] }
chrono = { version = "0.4.24", features = ["serde"] }
dotenv = "0.15.0"
jsonwebtoken = "9.2.0"
rand_core = { version = "0.6.4", features = ["std"] }
serde = { version = "1.0.159", features = ["derive"] }
serde_json = "1.0.95"
sqlx = { version = "0.7.3", features = ["runtime-async-std-native-tls", "postgres", "chrono", "uuid"] }
time = "0.3.20"
tokio = { version = "1.27.0", features = ["full"] }
tower-http = { version = "0.5.0", features = ["cors"] }
uuid = { version = "1.3.0", features = ["serde", "v4"] }
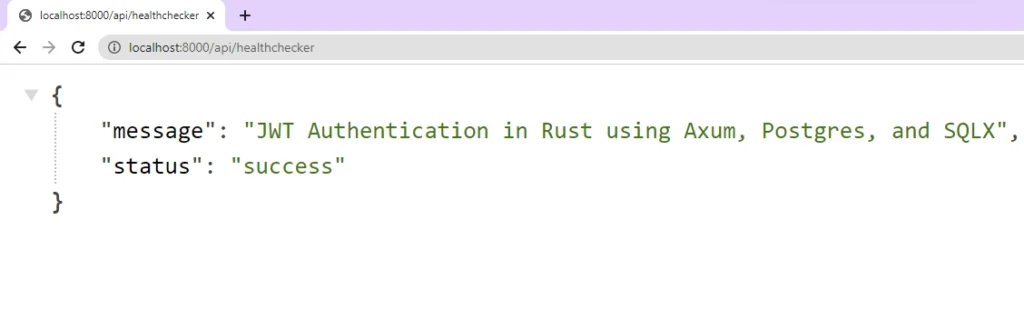
Before we dive into the authentication process, let’s set up a basic Axum server that has one endpoint. This endpoint will return a simple JSON object when a GET request is made to /api/healthchecker. This is just a warm-up exercise to get you familiar with Axum.
Open the main.rs file in the ‘src‘ directory and replace the existing code with the following snippet.
src/main.rs
use axum::{response::IntoResponse, routing::get, Json, Router};

pub async fn health_checker_handler() -> impl IntoResponse {
    const MESSAGE: &str = "JWT Authentication in Rust using Axum, Postgres, and SQLX";

    let json_response = serde_json::json!({
        "status": "success",
        "message": MESSAGE
    });

    Json(json_response)
}

#[tokio::main]
async fn main() {
    let app = Router::new().route("/api/healthchecker", get(health_checker_handler));

    println!("🚀 Server started successfully");
    let listener = tokio::net::TcpListener::bind("0.0.0.0:8000").await.unwrap();
    axum::serve(listener, app).await.unwrap();
}
With the Axum server set up, we’re ready to test it out. Running cargo run every time you make changes to the source code can be time-consuming and tedious. Fortunately, there’s a solution: cargo-watch. This tool automatically builds your project whenever it detects changes in the source code, similar to Nodemon in Node.js.
To install cargo-watch, run the following command:
cargo install cargo-watch
Now that cargo-watch is installed, you can use it to start the Axum server by running the command cargo watch -q -c -w src/ -x run. This command sets up cargo-watch to automatically build and run your project whenever changes are detected in the src directory. This way, you don’t have to manually run the cargo run command every time you make changes to your code.
With the Axum server running, you can now test it out by making a GET request to http://localhost:8000/api/healthchecker to see the JSON object response.
Setup the PostgreSQL and pgAdmin Servers
Let’s set up PostgreSQL and pgAdmin servers with Docker so that we can easily run the Postgres database and use pgAdmin’s GUI to access and manage the database. To get started, we need to create a docker-compose.yml file and add the following Docker Compose configurations.
docker-compose.yml
version: "3"
services:
  postgres:
    image: postgres:latest
    container_name: postgres
    ports:
      - "6500:5432"
    volumes:
      - progresDB:/var/lib/postgresql/data
    env_file:
      - ./.env
  pgAdmin:
    image: dpage/pgadmin4
    container_name: pgAdmin
    env_file:
      - ./.env
    ports:
      - "5050:80"
volumes:
  progresDB:
When you examine the Docker Compose configurations above, you may notice that we haven’t specified the credentials required to build the Postgres and pgAdmin images.
Instead, we’ve directed Docker Compose to a .env file that will contain these credentials. To ensure that Docker Compose can access the credentials, create a new file called .env in the root directory and add the necessary environment variables to it.
.env
POSTGRES_HOST=127.0.0.1
POSTGRES_PORT=6500
POSTGRES_USER=admin
POSTGRES_PASSWORD=password123
POSTGRES_DB=rust_hs256

DATABASE_URL=postgresql://admin:password123@localhost:6500/rust_hs256?schema=public

PGADMIN_DEFAULT_EMAIL=admin@admin.com
PGADMIN_DEFAULT_PASSWORD=password123

JWT_SECRET=my_ultra_secure_secret
JWT_EXPIRED_IN=60m
JWT_MAXAGE=60
We included the JWT secret, the expiration time, and the token max-age in the .env file, which we’ll cover in a later section. However, since there are only three variables, we decided to include them here.
Once you have set up the .env file with the required credentials, you can start the PostgreSQL and pgAdmin servers by running the command docker-compose up -d. This will launch the two servers in their own Docker containers.
If at any point you wish to stop the running containers, simply run the command docker-compose down.
Load the Environment Variables
As we build our project, we need a way to access the environment variables from the .env file without having to retrieve them in every file that needs them. To achieve this, we’ll create a utility function that can be called during project initialization.
To get started, create a file named config.rs in the ‘src‘ directory and include the following code.
src/config.rs
#[derive(Debug, Clone)]
pub struct Config {
    pub database_url: String,
    pub jwt_secret: String,
    pub jwt_expires_in: String,
    pub jwt_maxage: i32,
}

impl Config {
    pub fn init() -> Config {
        let database_url = std::env::var("DATABASE_URL").expect("DATABASE_URL must be set");
        let jwt_secret = std::env::var("JWT_SECRET").expect("JWT_SECRET must be set");
        let jwt_expires_in = std::env::var("JWT_EXPIRED_IN").expect("JWT_EXPIRED_IN must be set");
        let jwt_maxage = std::env::var("JWT_MAXAGE").expect("JWT_MAXAGE must be set");
        Config {
            database_url,
            jwt_secret,
            jwt_expires_in,
            jwt_maxage: jwt_maxage.parse::<i32>().unwrap(),
        }
    }
}
By centralizing the retrieval of environment variables in a utility function, our codebase becomes more organized and maintainable. This approach saves us from having to clutter every file that needs access to the environment variables with the same repetitive code.
Create and Push the Database Migrations
Let’s move on to the database migration process. This involves generating migration scripts and defining the necessary SQL queries in the migration file, followed by applying the ‘up‘ migration script to the database. To begin, you need to install the sqlx-cli tool by running the following command:
cargo install sqlx-cli
Once you’ve installed sqlx-cli, you can generate the migration files by running the command sqlx migrate add -r init in your terminal. This will create a ‘migrations‘ folder in the root directory of your project, and within that folder, you’ll find the ‘up‘ and ‘down‘ migration files. You can use a different name instead of ‘init‘ after the -r flag, but it’s common practice to use ‘init‘ since it’s the first migration.
Now navigate to the ‘migrations‘ folder and open the ‘up‘ migration file. Here, you can add the necessary SQL queries for this migration.
migrations/20230402142655_init.up.sql
-- Add up migration script here
CREATE EXTENSION IF NOT EXISTS "uuid-ossp";
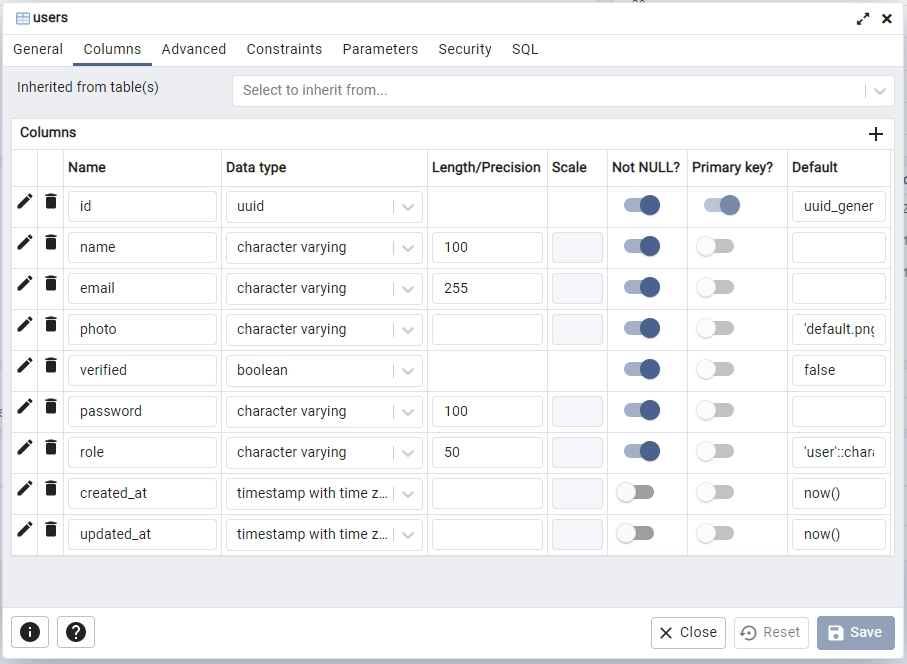
CREATE TABLE
"users" (
id UUID NOT NULL PRIMARY KEY DEFAULT (uuid_generate_v4()),
name VARCHAR(100) NOT NULL,
email VARCHAR(255) NOT NULL UNIQUE,
photo VARCHAR NOT NULL DEFAULT 'default.png',
verified BOOLEAN NOT NULL DEFAULT FALSE,
password VARCHAR(100) NOT NULL,
role VARCHAR(50) NOT NULL DEFAULT 'user',
created_at TIMESTAMP
WITH
TIME ZONE DEFAULT NOW(),
updated_at TIMESTAMP
WITH
TIME ZONE DEFAULT NOW()
);
CREATE INDEX users_email_idx ON users (email);
To make sure we can undo the changes made by the ‘up‘ migration file, we need to add the appropriate SQL code to the corresponding ‘down‘ migration file. To do this, go to the ‘migrations‘ folder and find the ‘down‘ migration file that corresponds to the ‘up‘ migration file. Then, add the following SQL code to it:
migrations/20230402142655_init.down.sql
-- Add down migration script here

DROP TABLE IF EXISTS "users";
Now that we have defined the SQL queries for both the ‘up’ and ‘down’ migration files, we can apply the ‘up’ migration script to the database by running the command sqlx migrate run in the terminal. This will establish a connection to the Postgres database using the database connection URL provided in the .env file and apply the migration script.
It’s worth noting that this approach helps to keep our database schema changes organized and trackable over time. If at any point you want to undo the changes made by the migration script, you can run the sqlx migrate revert command, which will execute the corresponding ‘down‘ migration file.
After completing the setup steps, you can access pgAdmin by visiting http://localhost:5050/ and authenticate using the credentials provided in the .env file. Next, connect to the Postgres server using the login details from the .env file. To find the IP address of the PostgreSQL container, simply run the command docker inspect postgres.
Once you have successfully connected to the PostgreSQL server, navigate to the tables section of the rust_hs256 database in pgAdmin to view the users table that was created by SQLX-CLI during the migration process.
Connect the App to the PostgreSQL Database
Now that the Postgres database schema is in-sync with the codebase, the next step is to connect the Axum server to the running Postgres server. This will involve using the Config::init() function to load the environment variables from the .env file and create 10 connection pools to the PostgreSQL server using SQLX and the database connection URL.
To achieve this, you can open the src/main.rs file and replace its content with the following code.
src/main.rs
mod config;
use std::sync::Arc;

use axum::{response::IntoResponse, routing::get, Json, Router};
use config::Config;
use dotenv::dotenv;

use sqlx::{postgres::PgPoolOptions, Pool, Postgres};

pub struct AppState {
    db: Pool<Postgres>,
    env: Config,
}

#[tokio::main]
async fn main() {
    dotenv().ok();

    let config = Config::init();

    let pool = match PgPoolOptions::new()
        .max_connections(10)
        .connect(&config.database_url)
        .await
    {
        Ok(pool) => {
            println!("✅Connection to the database is successful!");
            pool
        }
        Err(err) => {
            println!("🔥 Failed to connect to the database: {:?}", err);
            std::process::exit(1);
        }
    };

    let app = Router::new()
        .route("/api/healthchecker", get(health_checker_handler))
        .with_state(Arc::new(AppState {
            db: pool.clone(),
            env: config.clone(),
        }));

    println!("🚀 Server started successfully");
    axum::Server::bind(&"0.0.0.0:8000".parse().unwrap())
        .serve(app.into_make_service())
        .await
        .unwrap();
}

pub async fn health_checker_handler() -> impl IntoResponse {
    const MESSAGE: &str = "JWT Authentication in Rust using Axum, Postgres, and SQLX";

    let json_response = serde_json::json!({
        "status": "success",
        "message": MESSAGE
    });

    Json(json_response)
}
In the code above, we initialized the Config struct using the Config::init() method, which loads environment variables from the .env file. Then, we used the PgPoolOptions method from the SQLX crate to create a pool of 10 connections to the Postgres server.
Finally, we used the Arc smart pointer to share the state of the AppState struct across multiple threads. The AppState struct contains the database connection pool and the Config struct.
Define the SQLX Database Model
Let’s now create the SQLX database model. We’ll start by defining a struct that represents the users table in the PostgreSQL database. The struct will have fields that match the columns of the table. To map query results to the struct, we’ll implement the sqlx::FromRow trait.
To get started, create a new file called model.rs in the src directory and add the following structs:
src/model.rs
use chrono::prelude::*;
use serde::{Deserialize, Serialize};

#[allow(non_snake_case)]
#[derive(Debug, Deserialize, sqlx::FromRow, Serialize, Clone)]
pub struct User {
    pub id: uuid::Uuid,
    pub name: String,
    pub email: String,
    pub password: String,
    pub role: String,
    pub photo: String,
    pub verified: bool,
    #[serde(rename = "createdAt")]
    pub created_at: Option<DateTime<Utc>>,
    #[serde(rename = "updatedAt")]
    pub updated_at: Option<DateTime<Utc>>,
}

#[derive(Debug, Serialize, Deserialize)]
pub struct TokenClaims {
    pub sub: String,
    pub iat: usize,
    pub exp: usize,
}

#[derive(Debug, Deserialize)]
pub struct RegisterUserSchema {
    pub name: String,
    pub email: String,
    pub password: String,
}

#[derive(Debug, Deserialize)]
pub struct LoginUserSchema {
    pub email: String,
    pub password: String,
}
The above code introduces three additional structs – TokenClaims, RegisterUserSchema, and LoginUserSchema – alongside the SQLX database model struct. Although these structs should ideally be defined in a separate file, we’ve kept them in the model.rs file for the sake of simplicity.
The TokenClaims struct allows us to construct the JWT claim when signing tokens, while the RegisterUserSchema struct allows us to deserialize the request body during the account registration process to ensure the user provides the correct data types. Similarly, the LoginUserSchema struct lets us deserialize the request body during the account login process.
Define the Response Structures
When designing APIs, it’s generally best to filter the data in the JSON response in order to exclude any sensitive fields like hashed passwords, credit card numbers, and so on.
To accomplish this, we’ll create a separate struct that includes only the fields we want to send to the user, rather than sending the SQLX database model directly. Later on, we’ll create a helper function that uses this struct to filter the results returned by SQLX and remove any sensitive fields.
To get started, create a new file called response.rs in the src directory and define the following structs:
src/response.rs
use chrono::prelude::*;
use serde::Serialize;

#[allow(non_snake_case)]
#[derive(Debug, Serialize)]
pub struct FilteredUser {
    pub id: String,
    pub name: String,
    pub email: String,
    pub role: String,
    pub photo: String,
    pub verified: bool,
    pub createdAt: DateTime<Utc>,
    pub updatedAt: DateTime<Utc>,
}

#[derive(Serialize, Debug)]
pub struct UserData {
    pub user: FilteredUser,
}

#[derive(Serialize, Debug)]
pub struct UserResponse {
    pub status: String,
    pub data: UserData,
}
Create the Axum JWT Authentication Middleware
At this point, we are ready to start implementing the authentication aspect of our project. To achieve this, we’ll create a middleware for JWT authentication using Axum. This middleware will ensure that only users with valid JWTs can access subsequent route handlers.
The middleware’s main responsibility is to authenticate incoming requests by checking for a valid JSON Web Token (JWT) in either a cookie or the Authorization header of the request. It takes four arguments:
cookie_jar: The cookie jar extracted from the request.State(data): The application state, which is anArcof anAppStatestruct.req: The HTTP request being authenticated.next: The next middleware or handler in the chain, which is executed if authentication is successful.
The middleware first tries to get the JWT from the cookie jar. If it’s not present, it checks the Authorization header for the token. If the middleware can’t find a JWT in either location, it returns an error response with a 401 Unauthorized status code.
src/jwt_auth.rs
use std::sync::Arc;

use axum::{
    extract::State,
    http::{header, Request, StatusCode},
    middleware::Next,
    response::IntoResponse,
    Json, body::Body,
};

use axum_extra::extract::cookie::CookieJar;
use jsonwebtoken::{decode, DecodingKey, Validation};
use serde::Serialize;

use crate::{
    model::{TokenClaims, User},
    AppState,
};

#[derive(Debug, Serialize)]
pub struct ErrorResponse {
    pub status: &'static str,
    pub message: String,
}

pub async fn auth(
    cookie_jar: CookieJar,
    State(data): State<Arc<AppState>>,
    mut req: Request<Body>,
    next: Next,
) -> Result<impl IntoResponse, (StatusCode, Json<ErrorResponse>)> {
    let token = cookie_jar
        .get("token")
        .map(|cookie| cookie.value().to_string())
        .or_else(|| {
            req.headers()
                .get(header::AUTHORIZATION)
                .and_then(|auth_header| auth_header.to_str().ok())
                .and_then(|auth_value| {
                    if auth_value.starts_with("Bearer ") {
                        Some(auth_value[7..].to_owned())
                    } else {
                        None
                    }
                })
        });

    let token = token.ok_or_else(|| {
        let json_error = ErrorResponse {
            status: "fail",
            message: "You are not logged in, please provide token".to_string(),
        };
        (StatusCode::UNAUTHORIZED, Json(json_error))
    })?;

    let claims = decode::<TokenClaims>(
        &token,
        &DecodingKey::from_secret(data.env.jwt_secret.as_ref()),
        &Validation::default(),
    )
    .map_err(|_| {
        let json_error = ErrorResponse {
            status: "fail",
            message: "Invalid token".to_string(),
        };
        (StatusCode::UNAUTHORIZED, Json(json_error))
    })?
    .claims;

    let user_id = uuid::Uuid::parse_str(&claims.sub).map_err(|_| {
        let json_error = ErrorResponse {
            status: "fail",
            message: "Invalid token".to_string(),
        };
        (StatusCode::UNAUTHORIZED, Json(json_error))
    })?;

    let user = sqlx::query_as!(User, "SELECT * FROM users WHERE id = $1", user_id)
        .fetch_optional(&data.db)
        .await
        .map_err(|e| {
            let json_error = ErrorResponse {
                status: "fail",
                message: format!("Error fetching user from database: {}", e),
            };
            (StatusCode::INTERNAL_SERVER_ERROR, Json(json_error))
        })?;

    let user = user.ok_or_else(|| {
        let json_error = ErrorResponse {
            status: "fail",
            message: "The user belonging to this token no longer exists".to_string(),
        };
        (StatusCode::UNAUTHORIZED, Json(json_error))
    })?;

    req.extensions_mut().insert(user);
    Ok(next.run(req).await)
}
If a valid JWT is found, the middleware function uses the jsonwebtoken library and the application’s JWT secret to decode it. If decoding is successful, the function extracts the user ID from the JWT’s subject field and looks up the corresponding user in the database using the sqlx library. This step ensures that the user belonging to the token still exists in the database.
If the user is found in the database, the middleware stores the user record in the request’s extensions so that subsequent middleware or handlers can access it. If the user is not found, the middleware returns an error response with a 401 Unauthorized status code.
If any errors occur during the authentication process, the middleware returns an error response with a 500 Internal Server Error status code and an appropriate error message.
Implement the JWT Authentication in Axum
Now that we have implemented the JWT middleware, it is time to move on to creating route handlers for user registration, login, and logout. Additionally, we will demonstrate how the authorization process works by creating an Axum route handler that will return the user’s profile information. This route handler will be secured by the previously implemented JWT middleware to ensure that only authorized users can access it.
To get started, we will create a new handler.rs file in the src directory and add the necessary crates and dependencies to it.
src/handler.rs
use std::sync::Arc;

use argon2::{password_hash::SaltString, Argon2, PasswordHash, PasswordHasher, PasswordVerifier};
use axum::{
    extract::State,
    http::{header, Response, StatusCode},
    response::IntoResponse,
    Extension, Json,
};
use axum_extra::extract::cookie::{Cookie, SameSite};
use jsonwebtoken::{encode, EncodingKey, Header};
use rand_core::OsRng;
use serde_json::json;

use crate::{
    model::{LoginUserSchema, RegisterUserSchema, TokenClaims, User},
    response::FilteredUser,
    AppState,
};
To further enhance security, we’ll create a utility function that uses the FilteredUser struct to filter sensitive fields from the user data retrieved from the database. This function will be defined in handler.rs and can be placed at the bottom of the file, as the route handlers will be defined above it in the next steps.
src/handler.rs
fn filter_user_record(user: &User) -> FilteredUser {
    FilteredUser {
        id: user.id.to_string(),
        email: user.email.to_owned(),
        name: user.name.to_owned(),
        photo: user.photo.to_owned(),
        role: user.role.to_owned(),
        verified: user.verified,
        createdAt: user.created_at.unwrap(),
        updatedAt: user.updated_at.unwrap(),
    }
}
Axum User Registration Handler
To register new users, we’ll create an Axum route handler called register_user_handler that takes two arguments: State(data), which is a state object that contains the AppState, and Json(body), which is the request body in a RegisterUserSchema object format.
When registering a new user, we want to ensure that there are no duplicate email addresses in the database. To do this, the register_user_handler function first checks if a user with the email provided in the request body already exists in the database. If a user with that email address is found, the function will return an HTTP status code of 409 along with an error message.
If the email is not found in the database, the function will generate a random salt string and hash the user’s plain-text password using the Argon2 algorithm. The function will then use SQLX to perform an INSERT query to add the new user to the database. Once the user has been successfully created, the function will return the new user’s data in a JSON response.
src/handler.rs
pub async fn register_user_handler(
    State(data): State<Arc<AppState>>,
    Json(body): Json<RegisterUserSchema>,
) -> Result<impl IntoResponse, (StatusCode, Json<serde_json::Value>)> {
    let user_exists: Option<bool> =
        sqlx::query_scalar("SELECT EXISTS(SELECT 1 FROM users WHERE email = $1)")
            .bind(body.email.to_owned().to_ascii_lowercase())
            .fetch_one(&data.db)
            .await
            .map_err(|e| {
                let error_response = serde_json::json!({
                    "status": "fail",
                    "message": format!("Database error: {}", e),
                });
                (StatusCode::INTERNAL_SERVER_ERROR, Json(error_response))
            })?;

    if let Some(exists) = user_exists {
        if exists {
            let error_response = serde_json::json!({
                "status": "fail",
                "message": "User with that email already exists",
            });
            return Err((StatusCode::CONFLICT, Json(error_response)));
        }
    }

    let salt = SaltString::generate(&mut OsRng);
    let hashed_password = Argon2::default()
        .hash_password(body.password.as_bytes(), &salt)
        .map_err(|e| {
            let error_response = serde_json::json!({
                "status": "fail",
                "message": format!("Error while hashing password: {}", e),
            });
            (StatusCode::INTERNAL_SERVER_ERROR, Json(error_response))
        })
        .map(|hash| hash.to_string())?;

    let user = sqlx::query_as!(
        User,
        "INSERT INTO users (name,email,password) VALUES ($1, $2, $3) RETURNING *",
        body.name.to_string(),
        body.email.to_string().to_ascii_lowercase(),
        hashed_password
    )
    .fetch_one(&data.db)
    .await
    .map_err(|e| {
        let error_response = serde_json::json!({
            "status": "fail",
            "message": format!("Database error: {}", e),
        });
        (StatusCode::INTERNAL_SERVER_ERROR, Json(error_response))
    })?;

    let user_response = serde_json::json!({"status": "success","data": serde_json::json!({
        "user": filter_user_record(&user)
    })});

    Ok(Json(user_response))
}
However, if there is an error with the database or the password hashing, the register_user_handler function will return an HTTP status code of 500 along with an error message in the response.
Axum User Login Handler
In order to allow registered users to sign into the API, we need to create a route function called login_user_handler that will be invoked when a POST request is made to the /api/auth/login endpoint.
First, the function queries the database using the sqlx crate to retrieve the user associated with the email provided in the request body. If no user is found, the function will return an error response with the message “Invalid email or password“.
If a user is found, the function then validates the password using the Argon2 algorithm. If the password is invalid, the function will return an error response with the message “Invalid email or password“.
However, if the password is valid, the function generates a JSON Web Token (JWT) that contains the user’s ID, an expiration time, and an issue time. The token is then signed using the encode() function from the jsonwebtoken crate and sent to the client in a response body, along with a cookie containing the token.
src/handler.rs
pub async fn login_user_handler(
    State(data): State<Arc<AppState>>,
    Json(body): Json<LoginUserSchema>,
) -> Result<impl IntoResponse, (StatusCode, Json<serde_json::Value>)> {
    let user = sqlx::query_as!(
        User,
        "SELECT * FROM users WHERE email = $1",
        body.email.to_ascii_lowercase()
    )
    .fetch_optional(&data.db)
    .await
    .map_err(|e| {
        let error_response = serde_json::json!({
            "status": "error",
            "message": format!("Database error: {}", e),
        });
        (StatusCode::INTERNAL_SERVER_ERROR, Json(error_response))
    })?
    .ok_or_else(|| {
        let error_response = serde_json::json!({
            "status": "fail",
            "message": "Invalid email or password",
        });
        (StatusCode::BAD_REQUEST, Json(error_response))
    })?;

    let is_valid = match PasswordHash::new(&user.password) {
        Ok(parsed_hash) => Argon2::default()
            .verify_password(body.password.as_bytes(), &parsed_hash)
            .map_or(false, |_| true),
        Err(_) => false,
    };

    if !is_valid {
        let error_response = serde_json::json!({
            "status": "fail",
            "message": "Invalid email or password"
        });
        return Err((StatusCode::BAD_REQUEST, Json(error_response)));
    }

    let now = chrono::Utc::now();
    let iat = now.timestamp() as usize;
    let exp = (now + chrono::Duration::minutes(60)).timestamp() as usize;
    let claims: TokenClaims = TokenClaims {
        sub: user.id.to_string(),
        exp,
        iat,
    };

    let token = encode(
        &Header::default(),
        &claims,
        &EncodingKey::from_secret(data.env.jwt_secret.as_ref()),
    )
    .unwrap();

    let cookie = Cookie::build(("token", token.to_owned()))
        .path("/")
        .max_age(time::Duration::hours(1))
        .same_site(SameSite::Lax)
        .http_only(true);

    let mut response = Response::new(json!({"status": "success", "token": token}).to_string());
    response
        .headers_mut()
        .insert(header::SET_COOKIE, cookie.to_string().parse().unwrap());
    Ok(response)
}
Finally, the function returns an Axum Result type. If the request is successful, the function will return a successful response containing the token and cookie. If the request is unsuccessful, the function will return an error response with a status code and a message explaining the cause of the error.
Axum User Logout Handler
Now that we have a function to sign users into the API, we’ll create a corresponding function to sign them out. This new function, called logout_handler, will be invoked when a GET request is sent to /api/auth/logout.
When logout_handler is called, it creates a cookie named “token” with no value and sets its expiration time to a negative value, effectively removing the existing cookie from the user’s browser.
Finally, the function constructs a success response containing a JSON object and the empty cookie.
src/handler.rs
pub async fn logout_handler() -> Result<impl IntoResponse, (StatusCode, Json<serde_json::Value>)> {
    let cookie = Cookie::build(("token", ""))
        .path("/")
        .max_age(time::Duration::hours(-1))
        .same_site(SameSite::Lax)
        .http_only(true);

    let mut response = Response::new(json!({"status": "success"}).to_string());
    response
        .headers_mut()
        .insert(header::SET_COOKIE, cookie.to_string().parse().unwrap());
    Ok(response)
}
Axum Handler to Fetch Logged-in User
We’ll now create an Axum route handler that will return the authenticated user’s profile information when a GET request is made to the /api/users/me endpoint. To protect this route function, we’ll apply the JWT middleware guard, which means that only users with a valid JWT will be able to access it.
When a user with a valid JWT accesses this endpoint, the JWT authentication middleware will add the user’s record to the request’s extensions. Then, the get_me_handler function will retrieve the user’s record from the extension, filter out any sensitive data using the filter_user_record function, and return the remaining non-sensitive data in a JSON response to the client.
src/handler.rs
pub async fn get_me_handler(
    Extension(user): Extension<User>,
) -> Result<impl IntoResponse, (StatusCode, Json<serde_json::Value>)> {
    let json_response = serde_json::json!({
        "status":  "success",
        "data": serde_json::json!({
            "user": filter_user_record(&user)
        })
    });

    Ok(Json(json_response))
}
The Complete Code for the Axum Handlers
src/handler.rs
use std::sync::Arc;

use argon2::{password_hash::SaltString, Argon2, PasswordHash, PasswordHasher, PasswordVerifier};
use axum::{
    extract::State,
    http::{header, Response, StatusCode},
    response::IntoResponse,
    Extension, Json,
};
use axum_extra::extract::cookie::{Cookie, SameSite};
use jsonwebtoken::{encode, EncodingKey, Header};
use rand_core::OsRng;
use serde_json::json;

use crate::{
    model::{LoginUserSchema, RegisterUserSchema, TokenClaims, User},
    response::FilteredUser,
    AppState,
};

pub async fn health_checker_handler() -> impl IntoResponse {
    const MESSAGE: &str = "JWT Authentication in Rust using Axum, Postgres, and SQLX";

    let json_response = serde_json::json!({
        "status": "success",
        "message": MESSAGE
    });

    Json(json_response)
}

pub async fn register_user_handler(
    State(data): State<Arc<AppState>>,
    Json(body): Json<RegisterUserSchema>,
) -> Result<impl IntoResponse, (StatusCode, Json<serde_json::Value>)> {
    let user_exists: Option<bool> =
        sqlx::query_scalar("SELECT EXISTS(SELECT 1 FROM users WHERE email = $1)")
            .bind(body.email.to_owned().to_ascii_lowercase())
            .fetch_one(&data.db)
            .await
            .map_err(|e| {
                let error_response = serde_json::json!({
                    "status": "fail",
                    "message": format!("Database error: {}", e),
                });
                (StatusCode::INTERNAL_SERVER_ERROR, Json(error_response))
            })?;

    if let Some(exists) = user_exists {
        if exists {
            let error_response = serde_json::json!({
                "status": "fail",
                "message": "User with that email already exists",
            });
            return Err((StatusCode::CONFLICT, Json(error_response)));
        }
    }

    let salt = SaltString::generate(&mut OsRng);
    let hashed_password = Argon2::default()
        .hash_password(body.password.as_bytes(), &salt)
        .map_err(|e| {
            let error_response = serde_json::json!({
                "status": "fail",
                "message": format!("Error while hashing password: {}", e),
            });
            (StatusCode::INTERNAL_SERVER_ERROR, Json(error_response))
        })
        .map(|hash| hash.to_string())?;

    let user = sqlx::query_as!(
        User,
        "INSERT INTO users (name,email,password) VALUES ($1, $2, $3) RETURNING *",
        body.name.to_string(),
        body.email.to_string().to_ascii_lowercase(),
        hashed_password
    )
    .fetch_one(&data.db)
    .await
    .map_err(|e| {
        let error_response = serde_json::json!({
            "status": "fail",
            "message": format!("Database error: {}", e),
        });
        (StatusCode::INTERNAL_SERVER_ERROR, Json(error_response))
    })?;

    let user_response = serde_json::json!({"status": "success","data": serde_json::json!({
        "user": filter_user_record(&user)
    })});

    Ok(Json(user_response))
}

pub async fn login_user_handler(
    State(data): State<Arc<AppState>>,
    Json(body): Json<LoginUserSchema>,
) -> Result<impl IntoResponse, (StatusCode, Json<serde_json::Value>)> {
    let user = sqlx::query_as!(
        User,
        "SELECT * FROM users WHERE email = $1",
        body.email.to_ascii_lowercase()
    )
    .fetch_optional(&data.db)
    .await
    .map_err(|e| {
        let error_response = serde_json::json!({
            "status": "error",
            "message": format!("Database error: {}", e),
        });
        (StatusCode::INTERNAL_SERVER_ERROR, Json(error_response))
    })?
    .ok_or_else(|| {
        let error_response = serde_json::json!({
            "status": "fail",
            "message": "Invalid email or password",
        });
        (StatusCode::BAD_REQUEST, Json(error_response))
    })?;

    let is_valid = match PasswordHash::new(&user.password) {
        Ok(parsed_hash) => Argon2::default()
            .verify_password(body.password.as_bytes(), &parsed_hash)
            .map_or(false, |_| true),
        Err(_) => false,
    };

    if !is_valid {
        let error_response = serde_json::json!({
            "status": "fail",
            "message": "Invalid email or password"
        });
        return Err((StatusCode::BAD_REQUEST, Json(error_response)));
    }

    let now = chrono::Utc::now();
    let iat = now.timestamp() as usize;
    let exp = (now + chrono::Duration::minutes(60)).timestamp() as usize;
    let claims: TokenClaims = TokenClaims {
        sub: user.id.to_string(),
        exp,
        iat,
    };

    let token = encode(
        &Header::default(),
        &claims,
        &EncodingKey::from_secret(data.env.jwt_secret.as_ref()),
    )
    .unwrap();

    let cookie = Cookie::build(("token", token.to_owned()))
        .path("/")
        .max_age(time::Duration::hours(1))
        .same_site(SameSite::Lax)
        .http_only(true);

    let mut response = Response::new(json!({"status": "success", "token": token}).to_string());
    response
        .headers_mut()
        .insert(header::SET_COOKIE, cookie.to_string().parse().unwrap());
    Ok(response)
}

pub async fn logout_handler() -> Result<impl IntoResponse, (StatusCode, Json<serde_json::Value>)> {
    let cookie = Cookie::build(("token", ""))
        .path("/")
        .max_age(time::Duration::hours(-1))
        .same_site(SameSite::Lax)
        .http_only(true);

    let mut response = Response::new(json!({"status": "success"}).to_string());
    response
        .headers_mut()
        .insert(header::SET_COOKIE, cookie.to_string().parse().unwrap());
    Ok(response)
}

pub async fn get_me_handler(
    Extension(user): Extension<User>,
) -> Result<impl IntoResponse, (StatusCode, Json<serde_json::Value>)> {
    let json_response = serde_json::json!({
        "status":  "success",
        "data": serde_json::json!({
            "user": filter_user_record(&user)
        })
    });

    Ok(Json(json_response))
}

fn filter_user_record(user: &User) -> FilteredUser {
    FilteredUser {
        id: user.id.to_string(),
        email: user.email.to_owned(),
        name: user.name.to_owned(),
        photo: user.photo.to_owned(),
        role: user.role.to_owned(),
        verified: user.verified,
        createdAt: user.created_at.unwrap(),
        updatedAt: user.updated_at.unwrap(),
    }
}
Create the API Routes
With all the Axum route functions now defined, it’s time to create the routes that will call them. Although we could add this logic to the main.rs file, it’s better to keep our project organized and easy to understand by creating a separate file for routes. We’ll call this file route.rs which we’ll create in the src directory.
Here’s the code that defines our routes. Although it’s worth mentioning that it could be refactored by creating a common route prefix for all the routes since they all start with /api, but for simplicity’s sake, we’ll leave it as is.
src/route.rs
use std::sync::Arc;

use axum::{
    middleware,
    routing::{get, post},
    Router,
};

use crate::{
    handler::{
        get_me_handler, health_checker_handler, login_user_handler, logout_handler,
        register_user_handler,
    },
    jwt_auth::auth,
    AppState,
};

pub fn create_router(app_state: Arc<AppState>) -> Router {
    Router::new()
        .route("/api/healthchecker", get(health_checker_handler))
        .route("/api/auth/register", post(register_user_handler))
        .route("/api/auth/login", post(login_user_handler))
        .route(
            "/api/auth/logout",
            get(logout_handler)
                .route_layer(middleware::from_fn_with_state(app_state.clone(), auth)),
        )
        .route(
            "/api/users/me",
            get(get_me_handler)
                .route_layer(middleware::from_fn_with_state(app_state.clone(), auth)),
        )
        .with_state(app_state)
}
Register the API Router and Setup CORS
After defining all the routes in the route.rs file, we need to register them with the Axum server and enable it to handle requests from the frontend application. To do this, we’ll use a component called CorsLayer from the tower-http crate.
We’ll start by creating a CorsLayer instance that specifies the origins, HTTP methods, credentials, and headers to allow. Then, we’ll create a Router instance using the create_router function we defined earlier, and pass an AppState object that holds our database connection pool and environment configuration.
Lastly, we’ll apply the CorsLayer to our Router instance using the layer method, and assign the result to the app variable. With this setup, our Axum server is now ready to receive and process incoming requests.
src/main.rs
mod config;
mod handler;
mod jwt_auth;
mod model;
mod response;
mod route;

use config::Config;
use std::sync::Arc;

use axum::http::{
    header::{ACCEPT, AUTHORIZATION, CONTENT_TYPE},
    HeaderValue, Method,
};
use dotenv::dotenv;
use route::create_router;
use tower_http::cors::CorsLayer;

use sqlx::{postgres::PgPoolOptions, Pool, Postgres};

pub struct AppState {
    db: Pool<Postgres>,
    env: Config,
}

#[tokio::main]
async fn main() {
    dotenv().ok();

    let config = Config::init();

    let pool = match PgPoolOptions::new()
        .max_connections(10)
        .connect(&config.database_url)
        .await
    {
        Ok(pool) => {
            println!("✅Connection to the database is successful!");
            pool
        }
        Err(err) => {
            println!("🔥 Failed to connect to the database: {:?}", err);
            std::process::exit(1);
        }
    };

    let cors = CorsLayer::new()
        .allow_origin("http://localhost:3000".parse::<HeaderValue>().unwrap())
        .allow_methods([Method::GET, Method::POST, Method::PATCH, Method::DELETE])
        .allow_credentials(true)
        .allow_headers([AUTHORIZATION, ACCEPT, CONTENT_TYPE]);

    let app = create_router(Arc::new(AppState {
        db: pool.clone(),
        env: config.clone(),
    }))
    .layer(cors);

    println!("🚀 Server started successfully");
    let listener = tokio::net::TcpListener::bind("0.0.0.0:8000").await.unwrap();
    axum::serve(listener, app).await.unwrap();
}
Oops, that was a lot of code! But don’t worry, we’re almost there. To help you test out the API without having to manually type in the request URLs and bodies, I’ve prepared a file for you.
You can easily import the Rust HS256 JWT.postman_collection.json file from the project’s GitHub repository at https://github.com/wpcodevo/rust-axum-jwt-auth into either Postman or the Thunder Client VS Code extension. This file contains a set of pre-defined requests that you can use to interact with the Axum server.
Once you have the collection imported, you can quickly test the authentication flow of the API by making requests to it. Happy testing!
Conclusion
That’s it! Congratulations on reaching the end of this tutorial. By now, you’ve acquired a new skill: implementing JSON Web Token authentication in Rust using Axum and SQLX. You’ve learned how to securely authenticate users, store data in a PostgreSQL database, and build a robust API server. It’s a big accomplishment, and you should be proud of yourself.
Keep exploring Rust and Axum, and who knows what exciting projects you’ll create next!
Thanks for sharing
You are welcome!
Hi. Thanks. What license do you apply to this works ?
I typically use the MIT license for my open-source projects, but I may have forgotten to include it in the Rust projects. Nevertheless, please note that the project is freely available for anyone to use.
I was in doubt if I can use and modify your code for commercial use. Great work, it is the best I found in the topic!
I’m glad you found my code helpful. You are absolutely welcome to use and modify it for commercial use.
This tutorial is very useful! I’m curious if there is also a tutorial to make frontend with this API so I can use it in the browser. Thanks!
Absolutely! You’re in luck! There is indeed a tutorial available to create the frontend for this API, and it’s written in Rust using the Yew.rs framework. You can access it at https://codevoweb.com/frontend-app-with-rust-and-yew-user-signup-and-login/. In this tutorial, simply follow the instructions on how to run both the API and the frontend.
If you’re looking for a more advanced tutorial that includes features like email verification and password reset, you can check out https://codevoweb.com/rust-api-forgot-reset-password-with-emails/ but the frontend is built with React.js, and the backend is in Rust.
Thanks for this valuable information, I learned a lot from it. I am quite new to docker, but since you already used it in this project I think it would be useful to just be able to start the whole API with docker. However, I have no idea what the dockerfile should look like then, do you have a better idea about this as the creator of this API code?
As a matter of fact, I feel sorry for the power of docker, but don’t quite understand why we don’t do this da immediately to start the whole api.
Thanks in advance!
(Please excuse me for the previous messages, I have some problems with internet connection and the messages just didn’t load in properly)
Currently, I haven’t published an article on running the Rust API in a Docker container, but rest assured, it’s on my to-do list, and I plan to write a comprehensive guide on the process soon. However, I discovered a highly helpful video (https://youtu.be/_gMzg77Qjm0) that dives into the detailed steps of running the API in Docker and deploying it using GitHub Actions.
Since you’re new to Docker, I recommend following the tutorial without feeling pressured to memorize every step. The crucial aspect is getting the API up and running in Docker successfully. If you encounter any challenges or get stuck at any point during the process, don’t hesitate to reach out to me.
hi, thank a lot for sharing, I had a problem, when I run ‘ sqlx migrate run’, it display ‘Applied 20230908064745/migrate init ‘, but I can`t find the database rust_hs256 and users table in “http://localhost:5050/”, do you know why?
You need to add the Postgres server running in the Docker container as a server on pgAdmin using the credentials in the
.envfile before you can view the available databases.hey, thanks for sharing this, but I’m having problem in running the docker-compose command, is there anything that is to be downloaded or installed before running this command?