

Are you interested in building a Rust API with CRUD functionalities using the Axum framework and PostgreSQL database? If so, you’re in the right place! In this article, I will guide you through building a functional note-taking application API using Rust, Axum, SQLX, and PostgreSQL.
Throughout this tutorial, you will learn how to set up your environment, perform database migrations using the SQLx-CLI tool, execute database queries with SQLx, create necessary modules, handle requests and responses, and set up a PostgreSQL database to store your note items.
Before we begin, let’s give a shoutout to the Axum framework for simplifying web application development in Rust. Although Actix-Web is commonly used for web applications in Rust, Axum’s interface is simplified, making it easy to handle middleware, routes, route handlers, and more.
Axum’s architecture is similar to that of Express.js, a popular Node.js web framework, which means you can transfer your knowledge from Express to build the API in Axum.
So, let’s dive in and get started with the main focus of this tutorial – building a RESTful API in Rust using Axum and PostgreSQL. This guide is perfect for those new to Rust or anyone wanting to expand their knowledge of building APIs.
More practice:
- Implement Google and GitHub OAuth2 in Rust Frontend App
- Create a Simple API in Rust using the Axum Framework
- Build a Frontend Web App in Rust using the Yew.rs Framework
- Frontend App with Rust and Yew.rs: User SignUp and Login
- Rust – How to Generate and Verify (JWTs) JSON Web Tokens
- Rust and Actix Web – JWT Access and Refresh Tokens
- Rust and Yew.rs Frontend: JWT Access and Refresh Tokens
- Rust – JWT Authentication with Actix Web
- Build a Simple API with Rust and Rocket
- Build a CRUD API with Rust and MongoDB
Run the Axum PostgreSQL API Locally
Follow these steps to run the Axum CRUD API project on your local machine:
- Download or clone the project source code from https://github.com/wpcodevo/rust-axum-postgres-api and open it in a code editor.
- Launch the PostgreSQL server in a Docker container by running
docker-compose up -din the terminal from the root directory. - If you don’t already have it installed, run
cargo install sqlx-clito install the SQLX-CLI. Then, push the “up” migration script to the PostgreSQL database by runningsqlx migrate run. - Install the necessary crates and start the Axum HTTP server by running
cargo run. - To test the CRUD API endpoints, you can import the
Note App.postman_collection.jsonfile into Postman or Thunder Client VS Code extension. This file includes predefined requests that you can use for testing. Alternatively, you can follow the instructions below to set up a React application to interact with the API.
Run the Axum API with a Frontend Application
To quickly spin up a frontend application to interact with your Axum API, follow these steps:
- Make sure you have Node.js and Yarn installed on your computer.
- Clone or download the React CRUD project from https://github.com/wpcodevo/reactjs-crud-note-app and open the source code in an IDE or text editor.
- Install the project’s dependencies by running
yarnoryarn installin the console at the root directory. - Run
yarn devto start the Vite development server. - Open the app on
http://localhost:3000/to test the CRUD functionalities against the Rust API.
Note: Avoid visiting the React app on http://127.0.0.1:3000 to prevent “site can’t be reached” or CORS errors. For a more detailed guide on how to build the React.js CRUD app, see the post “Build a React.js CRUD App using a RESTful API“.
Setup the Axum and Rust Project
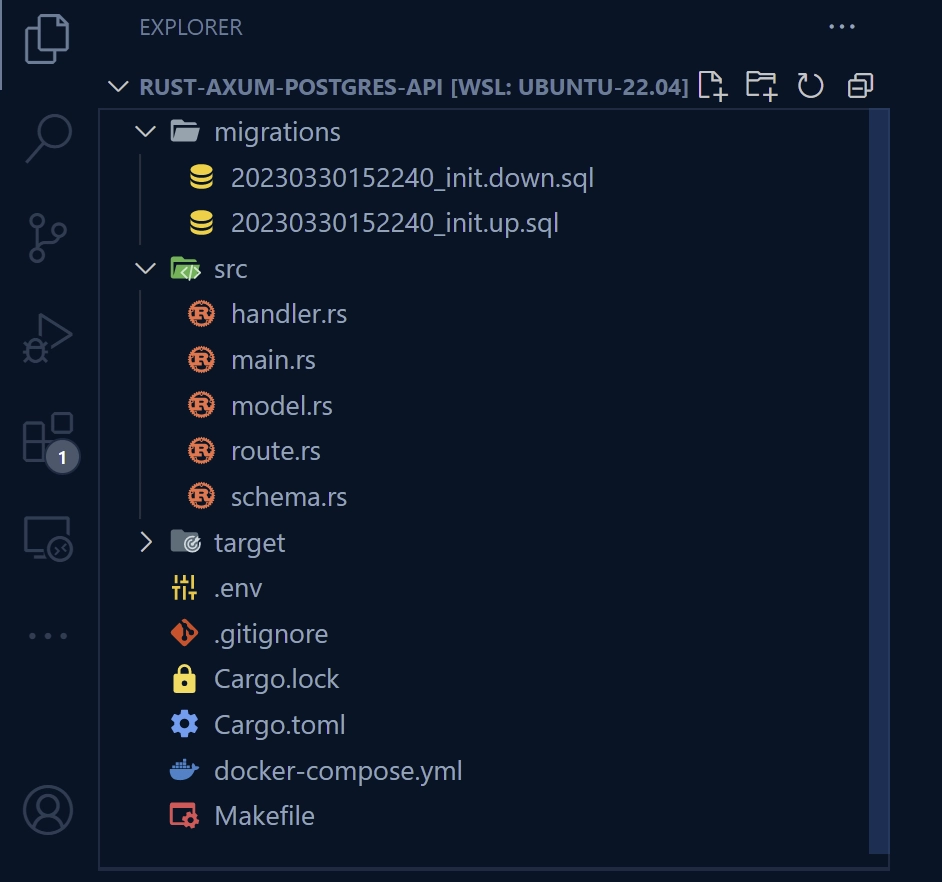
Upon finishing this article, your project directory structure will resemble the screenshot below, except for the Makefile and Note App.postman_collection.json files.
Let’s begin by creating a directory on your machine where you’d like to store the project source code. Once you’ve chosen a suitable location, open a new terminal in that directory and enter the following commands. These commands will create a folder named rust-axum-postgres-api and initialize a new Rust project in it.
mkdir rust-axum-postgres-api
cd rust-axum-postgres-api
cargo init
Once the Rust project is initialized, the next step is to open it in a code editor. After opening the code editor, navigate to the integrated terminal and install the required project dependencies using the following commands.
cargo add axum
cargo add tokio -F full
cargo add tower-http -F "cors"
cargo add serde_json
cargo add serde -F derive
cargo add chrono -F serde
cargo add dotenv
cargo add uuid -F "serde v4"
cargo add sqlx -F "runtime-async-std-native-tls postgres chrono uuid"
# HotReload
cargo install cargo-watch
# SQLX-CLI
cargo install sqlx-cli
axum– a web application framework built on top of Tokio, providing routing, middleware, and support for JSON and form-encoded request bodies.tokio– a runtime for building reliable and asynchronous I/O services, such as network connections, filesystem access, and timers.chrono– a library for working with date and time.serde– a library for serializing and deserializing data structures to and from JSON, YAML, and other formats.serde_json– a library that provides JSON serialization and deserialization based on Serde.uuid– a library for generating, parsing, and manipulating UUIDs.tower-http– a library that provides HTTP middleware and utilities for use with the Tower framework.dotenv– a crate that helps to load environment variables from a.envfile into Rust’sstd::envmodule.sqlx– a library that provides compile-time SQL query checking and runtime query interpolation, making it easier and safer to work with databases.cargo-watch– a cargo subcommand that automatically compiles and reloads Rust projects when changes are made to the source code.sqlx-cli– a command-line tool used in Rust projects that utilize the SQLx library, simplifying the process of managing SQL databases by providing a simple interface for performing database migrations and running SQL queries.
Please note that Rust and its ecosystem are constantly evolving, and as such, some of the crates used in this article may introduce breaking changes in newer versions. If you encounter any issues, try reverting to the versions specified in the Cargo.toml file provided below.
If you’re still having trouble, feel free to leave a comment naming the problematic crates so I can update the article and project accordingly.
Cargo.toml
[package]
name = "rust-axum-postgres-api"
version = "0.1.0"
edition = "2021"

# See more keys and their definitions at https://doc.rust-lang.org/cargo/reference/manifest.html

[dependencies]
axum = "0.7.2"
chrono = { version = "0.4.24", features = ["serde"] }
dotenv = "0.15.0"
serde = { version = "1.0.159", features = ["derive"] }
serde_json = "1.0.95"
sqlx = { version = "0.7.3", features = ["runtime-async-std-native-tls", "postgres", "chrono", "uuid"] }
tokio = { version = "1.27.0", features = ["full"] }
tower-http = { version = "0.5.0", features = ["cors"] }
uuid = { version = "1.3.0", features = ["serde", "v4"] }
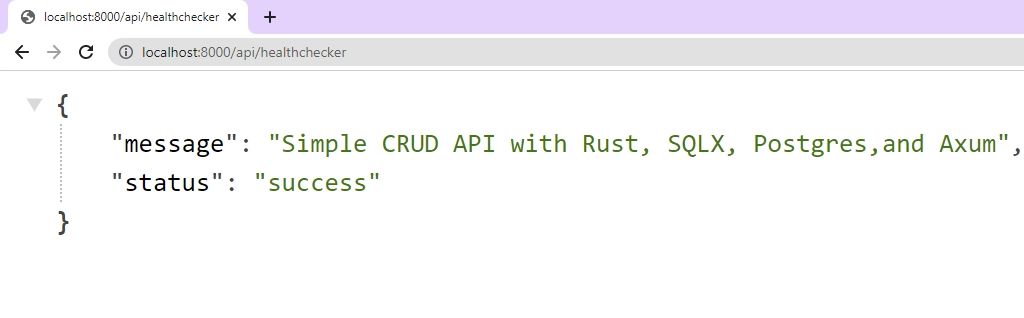
To get our feet wet, let’s create a simple Axum server with just one endpoint, a health checker route that responds with a basic JSON object when a GET request is made to /api/healthchecker. To create the server, you’ll need to open the src/main.rs file and replace its contents with the code snippet provided below.
src/main.rs
use axum::{response::IntoResponse, routing::get, Json, Router};

async fn health_checker_handler() -> impl IntoResponse {
    const MESSAGE: &str = "Simple CRUD API with Rust, SQLX, Postgres,and Axum";

    let json_response = serde_json::json!({
        "status": "success",
        "message": MESSAGE
    });

    Json(json_response)
}

#[tokio::main]
async fn main() {
    let app = Router::new().route("/api/healthchecker", get(health_checker_handler));

    println!("🚀 Server started successfully");
    let listener = tokio::net::TcpListener::bind("0.0.0.0:8000").await.unwrap();
    axum::serve(listener, app).await.unwrap();
}
Since you have Cargo Watch installed, you can set up automatic recompilation and reloading of your Rust project whenever changes are made to any files in the ‘src‘ directory. To do this, run the following command: cargo watch -q -c -w src/ -x run.
Once your Axum server is up and running, you can make a GET request to http://localhost:8000/api/healthchecker to see the JSON object.
Setup Postgres and pgAdmin Servers with Docker
To proceed further, we need to set up a PostgreSQL server using Docker. This can be done by creating a docker-compose.yml file in the project’s root directory and adding the following Docker Compose configuration:
docker-compose.yml
version: "3"
services:
  postgres:
    image: postgres:latest
    container_name: postgres
    ports:
      - "6500:5432"
    volumes:
      - progresDB:/var/lib/postgresql/data
    env_file:
      - ./.env
  pgAdmin:
    image: dpage/pgadmin4
    container_name: pgAdmin
    env_file:
      - ./.env
    ports:
      - "5050:80"
volumes:
  progresDB:
If you take a closer look at the above configuration, you’ll notice that we did not provide the required credentials for the Postgres and pgAdmin images. Instead, we directed Docker Compose to a file named .env where the credentials will be stored. To make the credentials available, create a .env file in the root directory and add the following environment variables.
.env
POSTGRES_HOST=127.0.0.1
POSTGRES_PORT=6500
POSTGRES_USER=admin
POSTGRES_PASSWORD=password123
POSTGRES_DB=rust_sqlx

DATABASE_URL=postgresql://admin:password123@localhost:6500/rust_sqlx?schema=public

PGADMIN_DEFAULT_EMAIL=admin@admin.com
PGADMIN_DEFAULT_PASSWORD=password123
Now that the credentials are defined, you can launch both the Postgres and pgAdmin servers by running the command docker-compose up -d.
Run Database Migrations with SQLx-CLI
With the PostgreSQL server up and running, the next step is to generate migration files for the database using the SQLx-CLI tool, write the necessary SQL queries, and apply the migrations to the database.
Assuming you have already installed the SQLx-CLI binary, you can use the following command in the project’s root directory to generate reversible migrations with corresponding ‘up‘ and ‘down‘ scripts: sqlx migrate add -r init. You can change the name ‘init‘ to whatever you prefer, but ‘init‘ is a common choice for the first migration file.
Next, navigate to the ‘migrations‘ folder and open the ‘up‘ script. In this script, add the following SQL code. The code first activates the uuid-ossp contrib module, as we’ll be using the uuid_generate_v4 function to generate UUIDs. Additionally, the code creates a table that represents the fields of our note item.
migrations/20230330152240_init.up.sql
-- Add up migration script here

CREATE EXTENSION IF NOT EXISTS "uuid-ossp";

CREATE TABLE
    IF NOT EXISTS notes (
        id UUID PRIMARY KEY NOT NULL DEFAULT (uuid_generate_v4()),
        title VARCHAR(255) NOT NULL UNIQUE,
        content TEXT NOT NULL,
        category VARCHAR(100),
        published BOOLEAN DEFAULT FALSE,
        created_at TIMESTAMP
        WITH
            TIME ZONE DEFAULT NOW(),
            updated_at TIMESTAMP
        WITH
            TIME ZONE DEFAULT NOW()
    );
It is recommended to always include a script that can undo the changes made by the ‘up‘ script. To do this, navigate to the corresponding ‘down‘ script and add the following SQL code:
migrations/20230330152240_init.down.sql
-- Add down migration script here

DROP TABLE IF EXISTS notes;
After adding the necessary SQL code in the ‘up‘ and ‘down‘ scripts, you can apply the migrations to the PostgreSQL database by running sqlx migrate run in the terminal of the project’s root directory. In case you need to undo the changes made by the ‘up‘ script, you can run sqlx migrate revert.
Connect to the Postgres Server with SQLx
With the database schema now in sync with our codebase, we can move on to establishing a connection between our Rust application and the PostgreSQL database. To accomplish this, we’ll use the SQLX toolkit together with the PostgreSQL driver. Start by opening the src/main.rs file and replacing its contents with the following code:
src/main.rs
use std::sync::Arc;

use axum::{response::IntoResponse, routing::get, Json, Router};
use dotenv::dotenv;

use sqlx::{postgres::PgPoolOptions, Pool, Postgres};

async fn health_checker_handler() -> impl IntoResponse {
    const MESSAGE: &str = "Simple CRUD API with Rust, SQLX, Postgres,and Axum";

    let json_response = serde_json::json!({
        "status": "success",
        "message": MESSAGE
    });

    Json(json_response)
}

pub struct AppState {
    db: Pool<Postgres>,
}

#[tokio::main]
async fn main() {
    dotenv().ok();

    let database_url = std::env::var("DATABASE_URL").expect("DATABASE_URL must be set");
    let pool = match PgPoolOptions::new()
        .max_connections(10)
        .connect(&database_url)
        .await
    {
        Ok(pool) => {
            println!("✅Connection to the database is successful!");
            pool
        }
        Err(err) => {
            println!("🔥 Failed to connect to the database: {:?}", err);
            std::process::exit(1);
        }
    };

    let app_state = Arc::new(AppState { db: pool.clone() });
    let app = Router::new()
        .route("/api/healthchecker", get(health_checker_handler))
        .with_state(app_state);

    println!("🚀 Server started successfully");
    let listener = tokio::net::TcpListener::bind("0.0.0.0:8000").await.unwrap();
    axum::serve(listener, app).await.unwrap();
}
The code above sets a limit of 10 connection pools to the PostgreSQL database. Once you restart the Axum server, you should see a success message printed in the console, indicating that the application has successfully connected to the database.
Create the SQLX Database Model
It’s now time to define a struct using the SQLX toolkit with fields that correspond to the columns of the ‘notes‘ table in our database. To achieve this, we’ll implement the sqlx::FromRow trait, which facilitates mapping between the struct fields and the underlying SQL table columns in our PostgreSQL database.
To create the database model, simply create a new file in your project directory called src/model.rs and add the following code to it.
src/model.rs
use serde::{Deserialize, Serialize};
use sqlx::FromRow;
use uuid::Uuid;

#[derive(Debug, FromRow, Deserialize, Serialize)]
#[allow(non_snake_case)]
pub struct NoteModel {
    pub id: Uuid,
    pub title: String,
    pub content: String,
    pub category: Option<String>,
    pub published: Option<bool>,
    #[serde(rename = "createdAt")]
    pub created_at: Option<chrono::DateTime<chrono::Utc>>,
    #[serde(rename = "updatedAt")]
    pub updated_at: Option<chrono::DateTime<chrono::Utc>>,
}
Create the Request Validation Structs
Now it’s time to define structures that allow us to deserialize and validate the request bodies. Validation ensures that the necessary fields are present in the request body and that they have the correct data types.
To define the request validation schemas, create a new file called schema.rs in the ‘src‘ directory, and then add the following structs to the file.
src/schema.rs
use serde::{Deserialize, Serialize};

#[derive(Deserialize, Debug, Default)]
pub struct FilterOptions {
    pub page: Option<usize>,
    pub limit: Option<usize>,
}

#[derive(Deserialize, Debug)]
pub struct ParamOptions {
    pub id: String,
}

#[derive(Serialize, Deserialize, Debug)]
pub struct CreateNoteSchema {
    pub title: String,
    pub content: String,
    #[serde(skip_serializing_if = "Option::is_none")]
    pub category: Option<String>,
    #[serde(skip_serializing_if = "Option::is_none")]
    pub published: Option<bool>,
}

#[derive(Serialize, Deserialize, Debug)]
pub struct UpdateNoteSchema {
    pub title: Option<String>,
    pub content: Option<String>,
    pub category: Option<String>,
    pub published: Option<bool>,
}
Implement the CRUD Functionalities
Now that we’ve defined the SQLX model that maps the fields of the SQL table in our database, it’s time to create the CRUD (Create, Read, Update, Delete) functions that will use SQLX to query and manipulate the database. To achieve this, we’ll leverage the sqlx::query_as! macro, which allows us to benefit from both compile-time SQL query checking and runtime query interpolation.
To get started, create a new file named handler.rs in the src directory and add the following dependencies and crates:
src/handler.rs
use std::sync::Arc;

use axum::{
    extract::{Path, Query, State},
    http::StatusCode,
    response::IntoResponse,
    Json,
};
use serde_json::json;

use crate::{
    model::NoteModel,
    schema::{CreateNoteSchema, FilterOptions, UpdateNoteSchema},
    AppState,
};
Axum Route Handler to Fetch All Records
Our first CRUD operation is READ, which involves fetching a list of notes from the database and returning them. To implement this, we’ll define a route function called note_list_handler that takes two parameters: opts and State(data).
The opts parameter, which is of type Query<FilterOptions>, is optional and allows us to specify filtering and pagination options for the results. By doing so, we can prevent sending large payloads in the JSON response when dealing with databases that contain a large number of note items.
The State(data) parameter, on the other hand, leverages the State extractor from the Axum framework to retrieve a reference to the AppState instance.
When a GET request is made to the /api/notes endpoint, Axum invokes note_list_handler. The function first extracts any filtering and pagination options from the opts parameter, using default values if opts is None. It then constructs a SQL query using the SQLX library to retrieve the notes from the database, based on the specified filter and pagination options.
src/handler.rs
pub async fn note_list_handler(
    opts: Option<Query<FilterOptions>>,
    State(data): State<Arc<AppState>>,
) -> Result<impl IntoResponse, (StatusCode, Json<serde_json::Value>)> {
    let Query(opts) = opts.unwrap_or_default();

    let limit = opts.limit.unwrap_or(10);
    let offset = (opts.page.unwrap_or(1) - 1) * limit;

    let query_result = sqlx::query_as!(
        NoteModel,
        "SELECT * FROM notes ORDER by id LIMIT $1 OFFSET $2",
        limit as i32,
        offset as i32
    )
    .fetch_all(&data.db)
    .await;

    if query_result.is_err() {
        let error_response = serde_json::json!({
            "status": "fail",
            "message": "Something bad happened while fetching all note items",
        });
        return Err((StatusCode::INTERNAL_SERVER_ERROR, Json(error_response)));
    }

    let notes = query_result.unwrap();

    let json_response = serde_json::json!({
        "status": "success",
        "results": notes.len(),
        "notes": notes
    });
    Ok(Json(json_response))
}
If the query execution succeeds, the function retrieves the notes from the query result and constructs a JSON response that includes the status, the number of notes returned, and the list of notes. If the query execution fails, the function constructs an error response with a message indicating that something went wrong while fetching the notes.
Finally, the function returns a Result object containing either the JSON response or the error response, depending on the result of the query execution.
Axum Route Handler to Add a Record
To implement the CREATE operation of CRUD, we define a route function called create_note_handler. This function is called when a client sends a POST request to the /api/notes endpoint. It takes two parameters: State(data) and Json(body).
The State(data) parameter uses the State extractor from the Axum framework to obtain a reference to the AppState instance. This allows us to access the database connection pool and perform SQL operations.
The Json(body) parameter uses the Json extractor from the Axum framework to deserialize the request body into a CreateNoteSchema struct. This struct contains the fields title, content, and category, which are used to create a new note in the database.
When the function is called, it constructs an SQL query using the sqlx library to insert a new note into the notes table of the database. If the query execution is successful, the function constructs a JSON response with a status of 201 (Created) and the newly created note.
src/handler.rs
pub async fn create_note_handler(
    State(data): State<Arc<AppState>>,
    Json(body): Json<CreateNoteSchema>,
) -> Result<impl IntoResponse, (StatusCode, Json<serde_json::Value>)> {
    let query_result = sqlx::query_as!(
        NoteModel,
        "INSERT INTO notes (title,content,category) VALUES ($1, $2, $3) RETURNING *",
        body.title.to_string(),
        body.content.to_string(),
        body.category.to_owned().unwrap_or("".to_string())
    )
    .fetch_one(&data.db)
    .await;

    match query_result {
        Ok(note) => {
            let note_response = json!({"status": "success","data": json!({
                "note": note
            })});

            return Ok((StatusCode::CREATED, Json(note_response)));
        }
        Err(e) => {
            if e.to_string()
                .contains("duplicate key value violates unique constraint")
            {
                let error_response = serde_json::json!({
                    "status": "fail",
                    "message": "Note with that title already exists",
                });
                return Err((StatusCode::CONFLICT, Json(error_response)));
            }
            return Err((
                StatusCode::INTERNAL_SERVER_ERROR,
                Json(json!({"status": "error","message": format!("{:?}", e)})),
            ));
        }
    }
}
If the query execution fails, the function checks if the error message contains the text “duplicate key value violates unique constraint“. If it does, the function constructs a JSON response with a status of 409 (Conflict), indicating that a note with the same title already exists.
If the error message does not contain that text, the function constructs an error response with a status of 500 (Internal Server Error) and the error message returned by the database.
Finally, the function returns either the JSON response or the error response wrapped in a Result object, depending on whether the query execution was successful or not.
Axum Route Handler to Fetch a Record
In addition to the existing READ operation that retrieves a list of note items from the database, we need to implement a new READ operation that retrieves a single note item from the database. This route handler function is called when a GET request is made to the /api/notes/:id endpoint and takes two parameters: Path(id) and State(data).
The Path(id) parameter uses the Path extractor from the Axum framework to extract the ‘id‘ parameter from the request URL, which is expected to be a UUID.
The State(data) parameter uses the State extractor from the Axum framework to obtain a reference to the AppState instance.
src/handler.rs
pub async fn get_note_handler(
    Path(id): Path<uuid::Uuid>,
    State(data): State<Arc<AppState>>,
) -> Result<impl IntoResponse, (StatusCode, Json<serde_json::Value>)> {
    let query_result = sqlx::query_as!(NoteModel, "SELECT * FROM notes WHERE id = $1", id)
        .fetch_one(&data.db)
        .await;

    match query_result {
        Ok(note) => {
            let note_response = serde_json::json!({"status": "success","data": serde_json::json!({
                "note": note
            })});

            return Ok(Json(note_response));
        }
        Err(_) => {
            let error_response = serde_json::json!({
                "status": "fail",
                "message": format!("Note with ID: {} not found", id)
            });
            return Err((StatusCode::NOT_FOUND, Json(error_response)));
        }
    }
}
Inside the function, we construct an SQL query using the SQLX library to select a note with the specified ID from the notes table in the database. If the query execution is successful, the function creates a JSON response with a status of 200 and the note data and returns it wrapped in a Result object.
If the query execution fails, the function creates an error response with a status of 404 and a message indicating that the note with the specified ID was not found, and returns it wrapped in a Result object.
Axum Route Handler to Edit a Record
Our next step is to implement an edit_note_handler function, which will handle the updating of existing note items in the database. This function is called by a PATCH request sent to the /api/notes/:id endpoint, with the :id parameter representing the ID of the note to be modified.
The function takes three arguments: id, for the ID of the target note extracted from the request path; data, for a shared state containing the database connection pool; and body, for a JSON payload containing the updated values of the note fields.
When the edit_note_handler function is invoked by Axum, it first attempts to retrieve the note from the database using the specified ID. If the note cannot be found, the function returns an error response with a status of 404 and a message stating that the requested note could not be found.
src/handler.rs
pub async fn edit_note_handler(
    Path(id): Path<uuid::Uuid>,
    State(data): State<Arc<AppState>>,
    Json(body): Json<UpdateNoteSchema>,
) -> Result<impl IntoResponse, (StatusCode, Json<serde_json::Value>)> {
    let query_result = sqlx::query_as!(NoteModel, "SELECT * FROM notes WHERE id = $1", id)
        .fetch_one(&data.db)
        .await;

    if query_result.is_err() {
        let error_response = serde_json::json!({
            "status": "fail",
            "message": format!("Note with ID: {} not found", id)
        });
        return Err((StatusCode::NOT_FOUND, Json(error_response)));
    }

    let now = chrono::Utc::now();
    let note = query_result.unwrap();

    let query_result = sqlx::query_as!(
        NoteModel,
        "UPDATE notes SET title = $1, content = $2, category = $3, published = $4, updated_at = $5 WHERE id = $6 RETURNING *",
        body.title.to_owned().unwrap_or(note.title),
        body.content.to_owned().unwrap_or(note.content),
        body.category.to_owned().unwrap_or(note.category.unwrap()),
        body.published.unwrap_or(note.published.unwrap()),
        now,
        id
    )
    .fetch_one(&data.db)
    .await
    ;

    match query_result {
        Ok(note) => {
            let note_response = serde_json::json!({"status": "success","data": serde_json::json!({
                "note": note
            })});

            return Ok(Json(note_response));
        }
        Err(err) => {
            return Err((
                StatusCode::INTERNAL_SERVER_ERROR,
                Json(json!({"status": "error","message": format!("{:?}", err)})),
            ));
        }
    }
}
If the query to retrieve the note is successful, the function retrieves the current values of the note’s fields and generates a new query to update those fields using the data provided in the JSON payload.
In the event of a failure during the update operation, the function constructs an error response with a status code of 500 and a message that includes details about the error. The error response is then returned wrapped in a Result object.
Axum Route Handler to Delete a Record
To complete the CRUD operations for our note-taking API, we’ll now implement the DELETE functionality. We’ll create a route handler function named delete_note_handler that will handle DELETE requests made to the /api/notes/:id endpoint.
When invoked by Axum, the delete_note_handler function first constructs an SQL query using the SQLX library to delete the note with the specified ID from the notes table in our database. The function then executes the query and retrieves the number of rows affected by the deletion, which is stored in the rows_affected variable.
src/handler.rs
pub async fn delete_note_handler(
    Path(id): Path<uuid::Uuid>,
    State(data): State<Arc<AppState>>,
) -> Result<impl IntoResponse, (StatusCode, Json<serde_json::Value>)> {
    let rows_affected = sqlx::query!("DELETE FROM notes  WHERE id = $1", id)
        .execute(&data.db)
        .await
        .unwrap()
        .rows_affected();

    if rows_affected == 0 {
        let error_response = serde_json::json!({
            "status": "fail",
            "message": format!("Note with ID: {} not found", id)
        });
        return Err((StatusCode::NOT_FOUND, Json(error_response)));
    }

    Ok(StatusCode::NO_CONTENT)
}
If the value of rows_affected is 0, it means that the note with the specified ID was not found in the database. In this case, the function constructs an error response with a status code of 404 and a message indicating that the note could not be found. The error response is then returned wrapped in a Result object.
If rows_affected is greater than 0, it means that at least one note was deleted. In this case, the function returns a success response with a status code of 204, indicating that no content is returned. The success response is also wrapped in a Result object.
The Complete Axum Route Handlers
src/handler.rs
use std::sync::Arc;

use axum::{
    extract::{Path, Query, State},
    http::StatusCode,
    response::IntoResponse,
    Json,
};
use serde_json::json;

use crate::{
    model::NoteModel,
    schema::{CreateNoteSchema, FilterOptions, UpdateNoteSchema},
    AppState,
};

pub async fn health_checker_handler() -> impl IntoResponse {
    const MESSAGE: &str = "Simple CRUD API with Rust, SQLX, Postgres,and Axum";

    let json_response = serde_json::json!({
        "status": "success",
        "message": MESSAGE
    });

    Json(json_response)
}

pub async fn note_list_handler(
    opts: Option<Query<FilterOptions>>,
    State(data): State<Arc<AppState>>,
) -> Result<impl IntoResponse, (StatusCode, Json<serde_json::Value>)> {
    let Query(opts) = opts.unwrap_or_default();

    let limit = opts.limit.unwrap_or(10);
    let offset = (opts.page.unwrap_or(1) - 1) * limit;

    let query_result = sqlx::query_as!(
        NoteModel,
        "SELECT * FROM notes ORDER by id LIMIT $1 OFFSET $2",
        limit as i32,
        offset as i32
    )
    .fetch_all(&data.db)
    .await;

    if query_result.is_err() {
        let error_response = serde_json::json!({
            "status": "fail",
            "message": "Something bad happened while fetching all note items",
        });
        return Err((StatusCode::INTERNAL_SERVER_ERROR, Json(error_response)));
    }

    let notes = query_result.unwrap();

    let json_response = serde_json::json!({
        "status": "success",
        "results": notes.len(),
        "notes": notes
    });
    Ok(Json(json_response))
}

pub async fn create_note_handler(
    State(data): State<Arc<AppState>>,
    Json(body): Json<CreateNoteSchema>,
) -> Result<impl IntoResponse, (StatusCode, Json<serde_json::Value>)> {
    let query_result = sqlx::query_as!(
        NoteModel,
        "INSERT INTO notes (title,content,category) VALUES ($1, $2, $3) RETURNING *",
        body.title.to_string(),
        body.content.to_string(),
        body.category.to_owned().unwrap_or("".to_string())
    )
    .fetch_one(&data.db)
    .await;

    match query_result {
        Ok(note) => {
            let note_response = json!({"status": "success","data": json!({
                "note": note
            })});

            return Ok((StatusCode::CREATED, Json(note_response)));
        }
        Err(e) => {
            if e.to_string()
                .contains("duplicate key value violates unique constraint")
            {
                let error_response = serde_json::json!({
                    "status": "fail",
                    "message": "Note with that title already exists",
                });
                return Err((StatusCode::CONFLICT, Json(error_response)));
            }
            return Err((
                StatusCode::INTERNAL_SERVER_ERROR,
                Json(json!({"status": "error","message": format!("{:?}", e)})),
            ));
        }
    }
}

pub async fn get_note_handler(
    Path(id): Path<uuid::Uuid>,
    State(data): State<Arc<AppState>>,
) -> Result<impl IntoResponse, (StatusCode, Json<serde_json::Value>)> {
    let query_result = sqlx::query_as!(NoteModel, "SELECT * FROM notes WHERE id = $1", id)
        .fetch_one(&data.db)
        .await;

    match query_result {
        Ok(note) => {
            let note_response = serde_json::json!({"status": "success","data": serde_json::json!({
                "note": note
            })});

            return Ok(Json(note_response));
        }
        Err(_) => {
            let error_response = serde_json::json!({
                "status": "fail",
                "message": format!("Note with ID: {} not found", id)
            });
            return Err((StatusCode::NOT_FOUND, Json(error_response)));
        }
    }
}

pub async fn edit_note_handler(
    Path(id): Path<uuid::Uuid>,
    State(data): State<Arc<AppState>>,
    Json(body): Json<UpdateNoteSchema>,
) -> Result<impl IntoResponse, (StatusCode, Json<serde_json::Value>)> {
    let query_result = sqlx::query_as!(NoteModel, "SELECT * FROM notes WHERE id = $1", id)
        .fetch_one(&data.db)
        .await;

    if query_result.is_err() {
        let error_response = serde_json::json!({
            "status": "fail",
            "message": format!("Note with ID: {} not found", id)
        });
        return Err((StatusCode::NOT_FOUND, Json(error_response)));
    }

    let now = chrono::Utc::now();
    let note = query_result.unwrap();

    let query_result = sqlx::query_as!(
        NoteModel,
        "UPDATE notes SET title = $1, content = $2, category = $3, published = $4, updated_at = $5 WHERE id = $6 RETURNING *",
        body.title.to_owned().unwrap_or(note.title),
        body.content.to_owned().unwrap_or(note.content),
        body.category.to_owned().unwrap_or(note.category.unwrap()),
        body.published.unwrap_or(note.published.unwrap()),
        now,
        id
    )
    .fetch_one(&data.db)
    .await
    ;

    match query_result {
        Ok(note) => {
            let note_response = serde_json::json!({"status": "success","data": serde_json::json!({
                "note": note
            })});

            return Ok(Json(note_response));
        }
        Err(err) => {
            return Err((
                StatusCode::INTERNAL_SERVER_ERROR,
                Json(json!({"status": "error","message": format!("{:?}", err)})),
            ));
        }
    }
}

pub async fn delete_note_handler(
    Path(id): Path<uuid::Uuid>,
    State(data): State<Arc<AppState>>,
) -> Result<impl IntoResponse, (StatusCode, Json<serde_json::Value>)> {
    let rows_affected = sqlx::query!("DELETE FROM notes  WHERE id = $1", id)
        .execute(&data.db)
        .await
        .unwrap()
        .rows_affected();

    if rows_affected == 0 {
        let error_response = serde_json::json!({
            "status": "fail",
            "message": format!("Note with ID: {} not found", id)
        });
        return Err((StatusCode::NOT_FOUND, Json(error_response)));
    }

    Ok(StatusCode::NO_CONTENT)
}
Create the CRUD API Endpoints
Now that we have created all the route handlers, the next step is to define the routes that will trigger them. We’ll use the with_state method provided by the Axum router to ensure that the PostgreSQL connection is available to all the route handlers. To create the routes, simply add the following code to a new file called route.rs in your ‘src‘ directory.
src/route.rs
use std::sync::Arc;

use axum::{
    routing::{get, post},
    Router,
};

use crate::{
    handler::{
        create_note_handler, delete_note_handler, edit_note_handler, get_note_handler,
        health_checker_handler, note_list_handler,
    },
    AppState,
};

pub fn create_router(app_state: Arc<AppState>) -> Router {
    Router::new()
        .route("/api/healthchecker", get(health_checker_handler))
        .route("/api/notes/", post(create_note_handler))
        .route("/api/notes", get(note_list_handler))
        .route(
            "/api/notes/:id",
            get(get_note_handler)
                .patch(edit_note_handler)
                .delete(delete_note_handler),
        )
        .with_state(app_state)
}
Register the Axum Router and Setup CORS
To register all the routes in our application, we call the create_router() function and configure Cross-Origin Resource Sharing (CORS) to allow the server to accept cross-origin requests from specified origins.
Since our frontend application will run on a different origin, it needs to communicate with the backend, which we enable by creating a CorsLayer and specifying the allowed origins, methods, credentials, and headers.
Inside the main() function, we create a connection pool using the database URL provided in the environment variables. The pool is then passed to the create_router() function using an Arc reference to enable sharing the AppState instance across multiple threads.
Here’s the code for the main.rs file:
src/main.rs
mod handler;
mod model;
mod route;
mod schema;

use std::sync::Arc;

use axum::http::{
    header::{ACCEPT, AUTHORIZATION, CONTENT_TYPE},
    HeaderValue, Method,
};
use dotenv::dotenv;
use route::create_router;
use tower_http::cors::CorsLayer;

use sqlx::{postgres::PgPoolOptions, Pool, Postgres};

pub struct AppState {
    db: Pool<Postgres>,
}

#[tokio::main]
async fn main() {
    dotenv().ok();

    let database_url = std::env::var("DATABASE_URL").expect("DATABASE_URL must be set");
    let pool = match PgPoolOptions::new()
        .max_connections(10)
        .connect(&database_url)
        .await
    {
        Ok(pool) => {
            println!("✅Connection to the database is successful!");
            pool
        }
        Err(err) => {
            println!("🔥 Failed to connect to the database: {:?}", err);
            std::process::exit(1);
        }
    };

    let cors = CorsLayer::new()
        .allow_origin("http://localhost:3000".parse::<HeaderValue>().unwrap())
        .allow_methods([Method::GET, Method::POST, Method::PATCH, Method::DELETE])
        .allow_credentials(true)
        .allow_headers([AUTHORIZATION, ACCEPT, CONTENT_TYPE]);

    let app = create_router(Arc::new(AppState { db: pool.clone() })).layer(cors);

    println!("🚀 Server started successfully");
    let listener = tokio::net::TcpListener::bind("0.0.0.0:8000").await.unwrap();
    axum::serve(listener, app).await.unwrap();
}
We’ve now completed the project, and you can test its CRUD functionalities by sending HTTP requests to the server using an API testing tool such as Postman. To avoid having to manually set the request URL and HTTP verbs, you can download the source code for this project and import the Note App.postman_collection.json file into Postman or the Thunder Client VS Code extension. This file contains predefined requests that you can use to communicate with the Axum server.
If you’d like to test the API with a frontend application, follow the instructions provided in the “Run the Axum API with a Frontend Application” section.
Conclusion
And we are done! Throughout this article, we have successfully built a RESTful API with CRUD functionalities using Rust, the Axum framework, and SQLX to store data in a PostgreSQL database.
While this is a great start, there are other features we can add to make the API more robust, such as JWT authentication and role-based authorization, Input validation, Error handling, and more. You can use this as a challenge to enhance the functionality of your API.
I hope you found this article enjoyable and informative. Please leave a comment below if you have any feedback or questions. Thank you for reading!
Exelente inducción, fácil y práctica. ¡Muchas Gracias!
de nada
Hello. this is good and beginner friendly article. I want to know more like if I have multiple tables, relations and business module/feature, then what would be the folder structure rather than a flat folder structure. Specially i want to learn how to inject service(service for database communication and data preparation) in handler like Nest.js did like injectable service those are used in controller. How to manage DI in axum. Please make a post or give me some code snippet to do that. Thanks
Excellent article – even works with updated crates! Nice work!
hi please update to latest 0.7 axum version. thank you!
Thanks for the suggestion! I’ve gone ahead and updated all the Axum-related projects to the latest version
Path(id): Path,
State(data): State<Arc>,
) -> Result<impl IntoResponse, (StatusCode, Json)> {
let query_result = sqlx::query_as!(NoteModel2, “SELECT id,idclave_nombre,usuario,fecha_actualiza,motivo,observacion,fechaproxima_llamada
FROM tbl_observaciones
WHERE id = $1”, id
)
.fetch_one(&data.db)
.await;
i tried this to find by ID but is not working, i dont use uuid
I don’t see anything wrong with the code but try using a ‘match’ statement to check if the
query_resultcontains a result or not.How i do that? Where i have to put the code? Thank yoy
Try this code and correct any error if necessary
async fn find_note_by_id(
id: Path
data: State
) -> Result
let query_result = sqlx::query_as!(
NoteModel2,
"SELECT id, idclave_nombre, usuario, fecha_actualiza, motivo, observacion, fechaproxima_llamada
FROM tbl_observaciones
WHERE id = $1",
id
)
.fetch_one(&data.db)
.await;
    match query_result {

        Ok(note) => {

            // Record found, do something with the `note`

            Ok((StatusCode::OK, Json(note)))

        }

        Err(sqlx::Error::RowNotFound) => {

            // No record found

            Err((StatusCode::NOT_FOUND, Json("Record not found")))

        }

        Err(err) => {

            // Other error occurred

            eprintln!("Error fetching record: {:?}", err);

            Err((StatusCode::INTERNAL_SERVER_ERROR, Json("Internal server error")))

        }

    }

}
Thank you, one question, what about i got a id but is not uuid its int4 for example, i tried but it wont find anything and doesnt give any error either
full error https://pastebin.com/id8QyjCc
full code src: https://pastebin.com/8M2GjQ0t its the func at the end comments_list_handler
The
Jsonstruct expects a value of typeValue.To resolve the errors, apply
.into()on the string literal to convert it to aValue. For instance:Err((StatusCode::NOT_FOUND, Json("Record not found".into()))). Give it a try and check if the issues are resolved.works good except the offset 🙁
unresolved imports `crate::model`, `crate::schema`
This error suggests that the Rust compiler is unable to locate the definitions for the specified modules in your code.
To address this issue, make sure that the modules ‘model’ and ‘schema’ are accurately defined within your project’s directory structure.
Fantastic article, Thank a lot
You are welcome!
Hi. I love your website! So many cool Stuff! Thank you very much!
Edem I have a question. Is this hard to integrate Image upload this CRUD ?
I would like to CRUD with image . I have been searching sample code or video tutorial but it’s not working well. If you do it . I’m so happy about it!
Thank you for your kind words! Integrating image upload in the CRUD app is not difficult.
I appreciate your suggestion, and I’ll consider adding it to my to-do list. I’ll work on implementing it when I have some free time.
Hi. Edem.
Thank you very much for answering me!
Wow! I can’t belive you said that adding image is not difficult!? How Cool !
I’m beginer of rust. I have been study basic but still so hard understand rust CRUD.
I’m looking forward to image upload integration.
And… Do me a favor. I have another question. I’m Japanese and I have been trying to set Japan time zone this app. but I couldn’t to do it. and I messed up you code so I need to rollback. Is this hard to set own countries timezone when post data ? Could you give me a solotuion please ?
I appreciate your kind responce! Thank you very much.
Hey there,
I ran into 2 issues. Initially, I was on the latest nightly build and had to revert to 1.76.0 due to the removal of ‘stdsimd’.
After reverting, I am now getting the following error message:
error: to use a constant of type `TypeId` in a pattern, `TypeId` must be annotated with `#[derive(PartialEq)]`
–> /home/tking/.cargo/registry/src/index.crates.io-6f17d22bba15001f/value-bag-1.0.0-alpha.9/src/internal/cast/primitive.rs:43:33
|
43 | $const_ident => |v| Some(Internal::from(unsafe { &*(*v as *const Self as *const $ty) })),
| ^^^^^^^^^^^^
…
71 | / to_internal![
72 | | usize: (USIZE, OPTION_USIZE),
73 | | u8: (U8, OPTION_U8),
74 | | u16: (U16, OPTION_U16),
… |
96 | | String: (STRING, OPTION_STRING),
97 | | ];
| |_________- in this macro invocation
|
= note: the traits must be derived, manual `impl`s are not sufficient
= note: see https://doc.rust-lang.org/stable/std/marker/trait.StructuralPartialEq.html for details
= note: this error originates in the macro `to_internal` (in Nightly builds, run with -Z macro-backtrace for more info)
error: to use a constant of type `TypeId` in a pattern, `TypeId` must be annotated with `#[derive(PartialEq)]`
–> /home/tking/.cargo/registry/src/index.crates.io-6f17d22bba15001f/value-bag-1.0.0-alpha.9/src/internal/cast/primitive.rs:46:33
|
46 | $option_ident => |v| Some({
| ^^^^^^^^^^^^^
…
71 | / to_internal![
72 | | usize: (USIZE, OPTION_USIZE),
73 | | u8: (U8, OPTION_U8),
74 | | u16: (U16, OPTION_U16),
… |
96 | | String: (STRING, OPTION_STRING),
97 | | ];
| |_________- in this macro invocation
|
= note: the traits must be derived, manual `impl`s are not sufficient
= note: see https://doc.rust-lang.org/stable/std/marker/trait.StructuralPartialEq.html for details
= note: this error originates in the macro `to_internal` (in Nightly builds, run with -Z macro-backtrace for more info)
error: to use a constant of type `TypeId` in a pattern, `TypeId` must be annotated with `#[derive(PartialEq)]`
–> /home/tking/.cargo/registry/src/index.crates.io-6f17d22bba15001f/value-bag-1.0.0-alpha.9/src/internal/cast/primitive.rs:55:29
|
55 | STR => |v| Some(Internal::from(unsafe { &**(v as *const &’a Self as *const &’a str) })),
| ^^^
…
71 | / to_internal![
72 | | usize: (USIZE, OPTION_USIZE),
73 | | u8: (U8, OPTION_U8),
74 | | u16: (U16, OPTION_U16),
… |
96 | | String: (STRING, OPTION_STRING),
97 | | ];
| |_________- in this macro invocation
|
= note: the traits must be derived, manual `impl`s are not sufficient
= note: see https://doc.rust-lang.org/stable/std/marker/trait.StructuralPartialEq.html for details
= note: this error originates in the macro `to_internal` (in Nightly builds, run with -Z macro-backtrace for more info)
error: could not compile `value-bag` (lib) due to 3 previous errors
Any ideas?
No, it appears that this issue is originating from the
value-bagcrate. It would be advisable to consider submitting a bug report to the maintainers of thevalue-bagcrate.They may be able to provide further assistance or address the issue in a future release.
Thanks Edem!
I resolved this by moving back to the stable build, so you are correct!