
Setting up TypeScript with Node.js and debugging in VS Code can be a daunting task. Although there is a vast amount of information available online, the challenge is that TypeScript is rapidly evolving, causing the information to quickly become outdated.
When searching for solutions on platforms like Stack Overflow, it’s easy to find conflicting answers, making it challenging to determine which approach is correct. As a result, you may end up spending hours, if not days, scouring through numerous online resources to find the right solution.
Once TypeScript is set up in VS Code, you can reuse the same configurations across multiple projects, so you don’t need to go through the setup process frequently. To streamline the process and make it easier to follow, I’ll provide straightforward instructions.
Other articles:
- Best VS Code Extensions to Unlock the Power of VS Code
- Top 10 VS Code Extensions for JavaScript Developers
- Top 10 VS Code Extensions for HTML, CSS, & SASS Developers
- Top 10 Best VS Code Extensions for PHP Developers
- Top 10 Best VS Code Extensions for React Developers
- Top 10 Best VS Code Extensions for Vue.js Developers
- Top 10 VS Code Extensions for C# and .NET Development
Setup the TypeScript Project
To kick things off, navigate to a convenient location on your computer and create a new folder for your project. For this tutorial, we’ll use the name typescript-example, but feel free to choose a different name that suits your needs.
Next, right-click on the newly-created folder and select ‘Open with Code‘ to open it in Visual Studio Code. Alternatively, you can use the following commands, which will achieve the same result as the previous instructions.
mkdir typescript-example
cd typescript-example
code .
With your project now open in VS Code, let’s create our first file and write some TypeScript code to get started. Create a new file called hello-world.ts and add the following code to it:
hello-world.ts
const message = "Hello World";
console.log(message);
To transpile our TypeScript code into JavaScript, we need to install the TypeScript compiler on our machine. This can be done by running the command npm install typescript -g in your terminal, which installs the TypeScript compiler globally using NPM.
After installing the TypeScript compiler, you can use the tsc command to transpile your TypeScript code into JavaScript. To compile the hello-world.ts file, run the command tsc hello-world.ts in your terminal. A new file named hello-world.js will appear in the root directory of your project.
To run the generated JavaScript code, you can use the Node.js runtime environment. Simply run the command node hello-world.js in the terminal. This will execute the JavaScript code and display the console log output.
Now, in order to debug TypeScript code and automate the compilation process, we need to initialize the project as a Node.js project. You can choose any package manager you prefer. Here are the commands to initialize the project with Yarn, NPM, or PNPM:
yarn init -y
# or
npm init -y
# or
pnpm init -y
Choose the command that corresponds to your preferred package manager and run it in your terminal to initialize the Node.js project.
Next up, we will initialize TypeScript in the project with specific configurations that will enable us to debug the code effectively. To begin, we should delete the existing hello-world.ts and hello-world.js files. Once that’s done, you can run the command below to initialize TypeScript in the project:
tsc --init --sourceMap --rootDir src --outDir dist
--init– This flag initializes the TypeScript configuration file.--sourceMap– This flag generates a corresponding source map file (.map) for every TypeScript file in the project. This source map file allows the debugger to map the generated JavaScript code back to the original TypeScript code for debugging purposes.--rootDir– This flag specifies the root directory for all input TypeScript files in the project.--outDir– This flag specifies the output directory for all compiled JavaScript files.
Challenges You Might Face
To help you prepare for potential challenges, I will now show you some common issues that may arise and how to overcome them. First, create an ‘src‘ directory and add an index.ts file inside it. Then, paste the following code into the file:
src/index.ts
function max(a: number, b: number) {
  return a > b ? a : b;
}

let maximum = max(54, 23);

console.log(maximum);
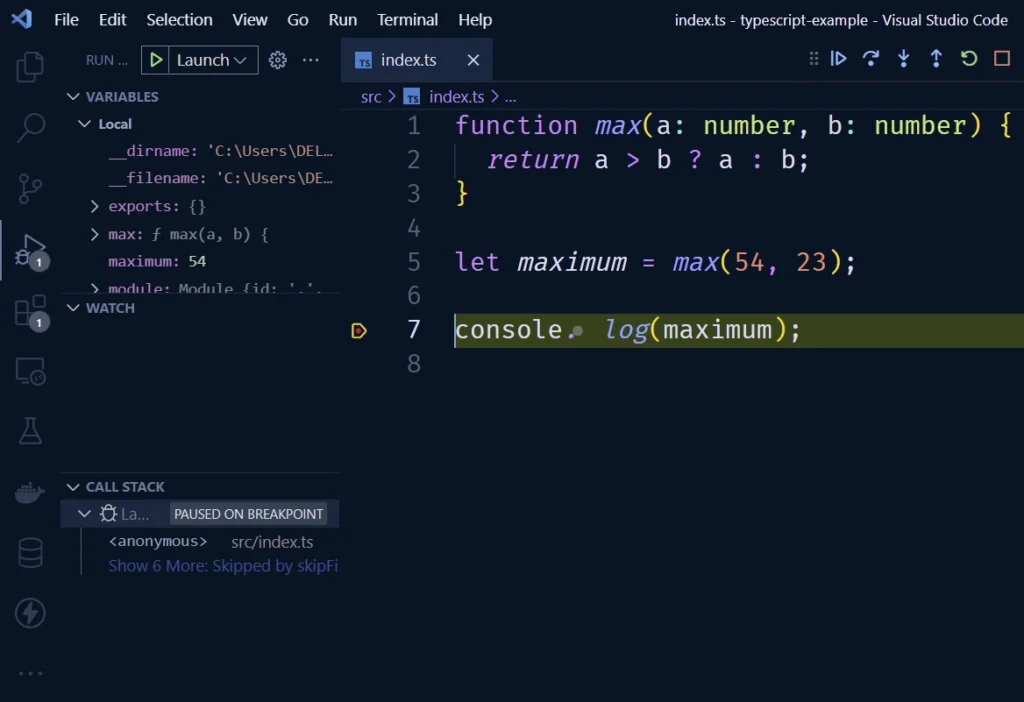
Add a breakpoint on the line of the console.log by positioning your cursor on that line and either pressing the F9 key or clicking on the gutter located to the left of the line in the editor. This will enable you to pause the program execution at that line and inspect the values of the variables in the code.

Now open the Debug view by selecting the Debugging icon on the left side menu.
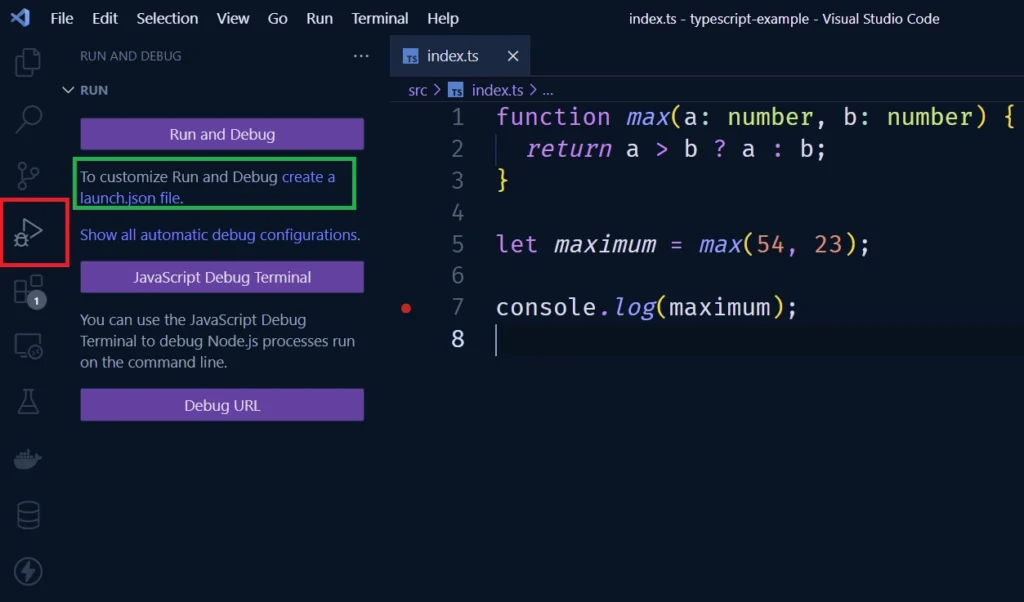
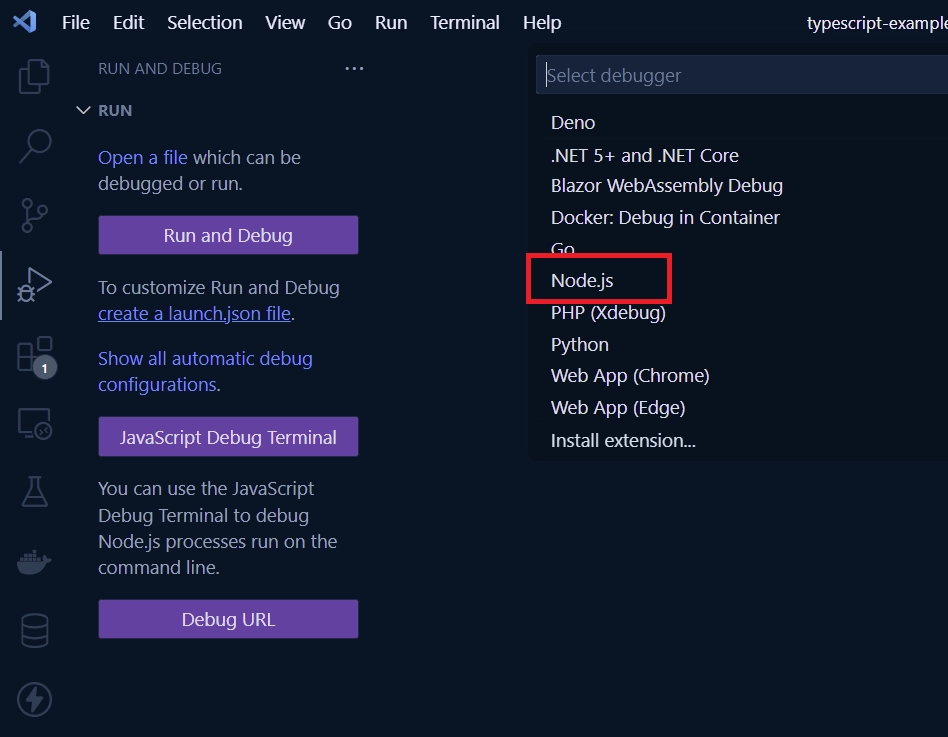
Before clicking on the ‘Run and Debug‘ button in the Debugger panel, it’s important to generate a launch.json file first to avoid module-related issues. Click on the ‘create a launch.json file‘ link to generate the file and choose ‘Node.js‘ as the type of framework or language for your project.
The launch.json file will contain the necessary configurations to ensure a smooth running and debugging process.
The default configuration may not work if you run the code or add more files. You may encounter an error message asking you to set "type": "module" in your ‘package.json‘ file or use the .mjs extension. However, this can be confusing and you may find yourself going back and forth between different answers on Stack Overflow.
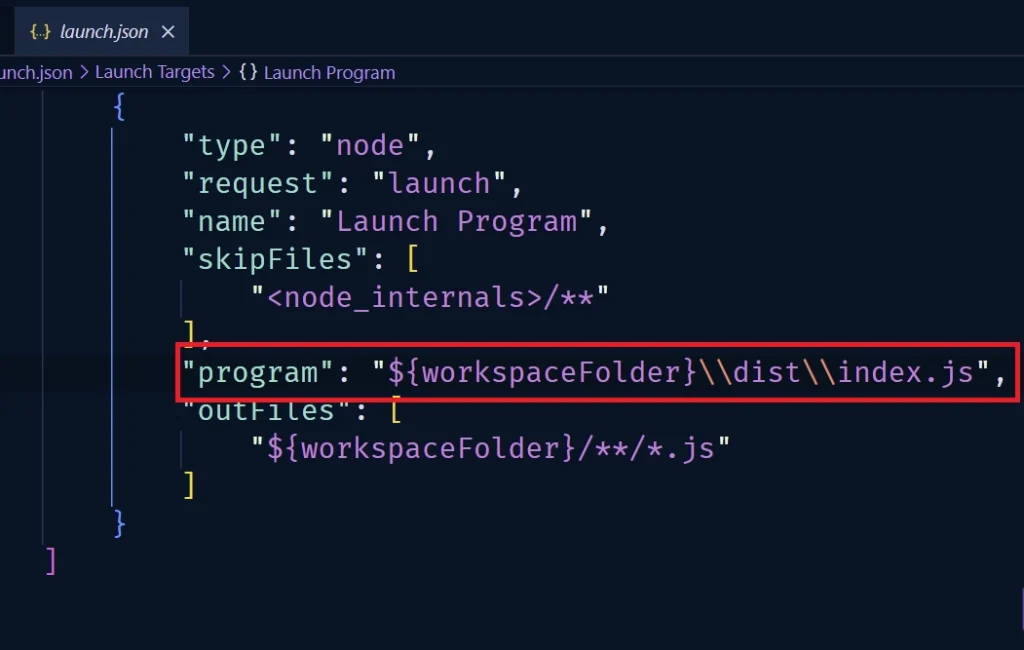
To solve this issue, you need to change the path to the program file in the Launch.json file to point to the ‘dist‘ directory instead of ‘src‘. To do this, open the ‘Launch.json‘ file, and replace src with dist, and index.ts with index.js.
Next, we need to compile our TypeScript code into JavaScript before we can run the debugger. This is necessary to avoid any errors that may occur due to unsupported TypeScript features.
To compile the TypeScript code, run the tsc command in your terminal. This will transpile the code and output the result into the dist directory. Once the compilation is complete, you can open the Debug view and run the debugger. You’ll see that everything works correctly without any errors.
Next, we’ll create a separate file to test if our configuration will work with multiple files. Start by creating a user.ts file in the src directory and add the following code:
src/user.ts
export class User {
  name: string;
  age: number;
  constructor(name: string, age: number) {
    this.name = name;
    this.age = age;
  }

  getAge() {
    return this.age;
  }
}
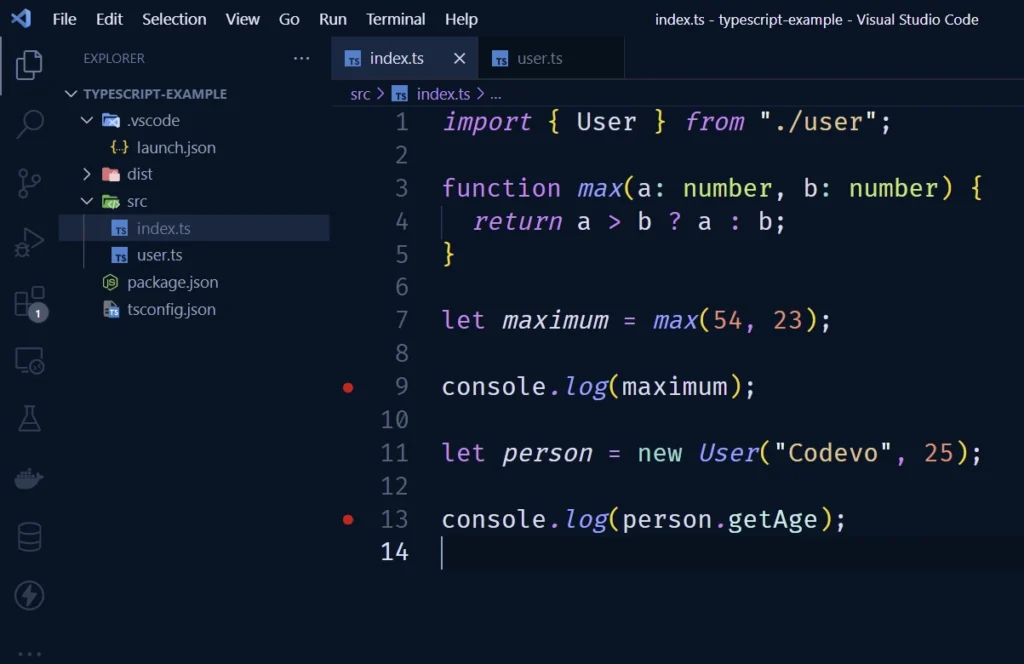
Next, let’s open the src/index.ts file and replace its contents with the following code:
src/index.ts
import { User } from "./user";

function max(a: number, b: number) {
  return a > b ? a : b;
}

let maximum = max(54, 23);

console.log(maximum);

let person = new User("Codevo", 25);

console.log(person.getAge);
Add a breakpoint on the console.log(person.getAge) line by clicking on the gutter to the left side of the line in the editor. This will add a red circle, indicating that a breakpoint has been set.
Next, to transpile the TypeScript files into JavaScript files, open the terminal and run the tsc command. This will compile the TypeScript code and output the resulting JavaScript files into the designated dist directory.
Next, open the Debug panel and run the debugger. If everything works correctly, you have successfully configured the debugger to work for both single and multiple files.

Automate the TypeScript Transpilation Process
Although running the tsc command manually to transpile TypeScript code works, it can be time-consuming and inefficient when making frequent changes. Fortunately, VS Code offers a useful feature that allows us to automate certain tasks within the editor, including TypeScript transpilation.
To streamline the process, we will use the TypeScript watch feature to automatically detect any changes in the TypeScript code and re-compile the JavaScript code accordingly.
First of all, we need to install TypeScript as a dependency in our project. To do that, open your terminal and run the following commands based on your package manager of choice.
yarn add -D typescript
# or
npm install -D typescript
# or
pnpm install -D typescript
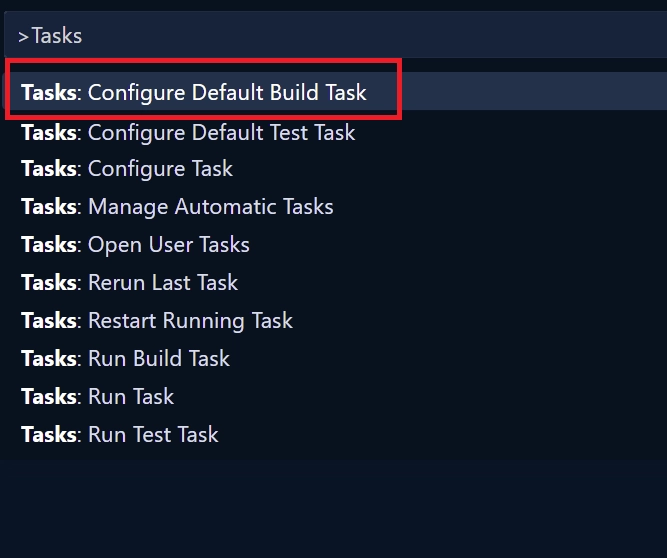
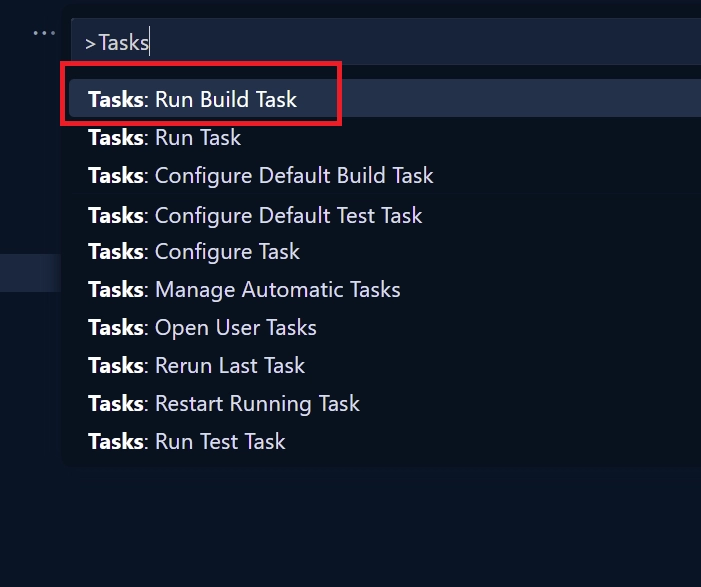
Next, you can press F1 or use Ctrl + Shift + P to open the command palette. From there, search for “Tasks” and select “Task: Configure Default Build Task” option.
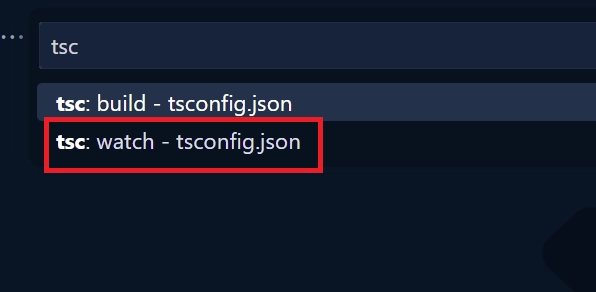
In the next prompt, you should search for tsc and select the “tsc: watch – tsconfig.json” option.
This will create a tasks.json file in the .vscode folder with the default configuration already set up for you, so you don’t need to do anything else. To start the TypeScript watch process, press F1 or use Ctrl + Shift + P to open the command palette and search for “Tasks“. Then, select “Tasks: Run Build Task“.
This will open a new terminal instance and begin watching for changes to your TypeScript code.
You can now return to your TypeScript code, make any necessary changes, save the file, and start the debugger. You no longer need to manually run the tsc command, as the TypeScript watch process is now automatically compiling your code in the background. Your changes should be reflected immediately.
When I tried to run the “Tasks: Run Build Task” command using Git Bash, I encountered some errors. However, I was able to resolve the issue by changing the default terminal profile in VS Code to “Powershell” or “Command Prompt“.
If you encounter a similar problem, try changing your default terminal profile to one of these options.
Conclusion
And there you have it! I hope you found this article helpful. If you have any feedback or questions, feel free to leave a comment below.