In this article, you’ll learn how to set up NextAuth v5 within a Next.js 15 project. On October 21, 2024, the Next.js team announced that Next.js 15 is officially stable and ready for production.
Although this update may not be groundbreaking, it brings significant enhancements to key APIs.
I’ve received numerous requests to cover the integration of NextAuth v5 with this latest version, so I’m excited to guide you through the process. The setup is quite simple; all you need to do is install the beta version of NextAuth that’s compatible with Next.js 15. Let’s get started!
More practice
- Setup and Use NextAuth.js in Next.js 14 App Directory
- Implement Authentication with NextAuth in Next.js 14
- Set up Google and GitHub OAuth with NextAuth in Next.js 14
- Implement Authentication with Supabase in Next.js 14
- Setup Google and GitHub OAuth with Supabase in Next.js 14
- Implement Authentication with tRPC in Next.js 14
- Implement Authentication with tRPC API in Next.js 14
- Using tRPC with Next.js 14, React Query and Prisma
- How to Set Up and Use React Query in Next.js 14
- Using React Query with Supabase in Next.js App Router
- How to Setup React Query in Next.js 13 App Directory
- React Query and Axios: User Registration and Email Verification

Run and Test the NextAuth v5 Integration Locally
To run the NextAuth v5 integration on your local machine, follow the steps below:
- Download or clone the project from its GitHub repository at https://github.com/wpcodevo/nextauth-nextjs15-prisma, and then open the source code in your preferred IDE or code editor.
- Open the integrated terminal in your IDE, and from the root directory, execute the command
pnpm installto install all the necessary dependencies. - Duplicate the
example.envfile and rename the copy to.env. - Launch the PostgreSQL server with Docker by running the command
docker-compose up -d.
Alternatively, create a serverless PostgreSQL database on https://neon.tech/ and add the connection string to theDATABASE_URLvariable in the.envfile. - Synchronize the Prisma migrations with the PostgreSQL database schema by running the command
pnpm prisma migrate dev. - Open the
.envfile and add your Google and GitHub OAuth credentials in the designated fields. If you need help obtaining these credentials, follow the instructions at codevoweb.com. - Start the Next.js development server by running the command
pnpm dev. Once the server is ready, open the application’s homepage in your browser. You should be automatically redirected to the default NextAuth sign-in page. - On the default NextAuth sign-in page, log in using the Google or GitHub OAuth option. Once authenticated, you’ll be redirected to the homepage, where your public profile information will be displayed.
Install NextAuth Dependencies
Now that you’ve experienced the final project, let’s move on to initializing NextAuth in your Next.js 15 project. To do this, start by installing the NextAuth beta package along with the Prisma adapter using the commands below. Note that to make NextAuth compatible with Next.js 15, you’ll need to install the beta version.
pnpm add next-auth@beta @auth/prisma-adapter

# or
yarn add next-auth@beta @auth/prisma-adapter

# or
npm i next-auth@beta @auth/prisma-adapter
Configure Prisma for Persistent Data Storage
Before initializing Prisma, we need to set up a database. In this tutorial, we’ll use PostgreSQL and rely on Docker to easily spin up a PostgreSQL server. If you already have a PostgreSQL database running in the cloud, you can skip this step—just be sure to add its connection URL to the .env file.
Now, create a docker-compose.yml file in the root directory and add the following Docker Compose configuration:
services:
  postgres:
    image: postgres:latest
    container_name: postgres
    ports:
      - '6500:5432'
    volumes:
      - progresDB:/var/lib/postgresql/data
    env_file:
      - ./.env
volumes:
  progresDB:
The Docker configuration references a .env file to supply Docker Compose with the credentials required to launch the PostgreSQL server. To set this up, create a .env file in the root directory and add the following environment variables:
AUTH_GITHUB_ID=
AUTH_GITHUB_SECRET=

AUTH_GOOGLE_ID=
AUTH_GOOGLE_SECRET=

AUTH_SECRET=my_ultra_secure_nextauth_secret
# NEXTAUTH_URL=http://localhost:3000 this is causing a webpack error in the beta v8 of NextAuth

POSTGRES_HOST=127.0.0.1
POSTGRES_PORT=6500
POSTGRES_USER=admin
POSTGRES_PASSWORD=password123
POSTGRES_DB=nextauth_prisma

DATABASE_URL="postgresql://admin:password123@localhost:6500/nextauth_prisma?schema=public"
Once you have the credentials in place, run the command docker-compose up -d to launch the PostgreSQL server.
Now that we have a running PostgreSQL server, install the Prisma-related dependencies using the commands below:
pnpm add @prisma/client bcryptjs
pnpm add -D prisma ts-node @types/bcryptjs

# or
yarn add @prisma/client bcryptjs
yarn add -D prisma ts-node @types/bcryptjs

# or
npm i @prisma/client bcryptjs
npm i -D prisma ts-node @types/bcryptjs
After the dependencies have been installed, use the command below to initialize Prisma in the project:
pnpm prisma init --datasource-provider postgresql

# or
yarn prisma init --datasource-provider postgresql

# or
npm run prisma init --datasource-provider postgresql
Next, we need to define the Prisma models required by NextAuth to handle authentication for our application. Open the prisma/schema.prisma file and add the following Prisma code:
prisma/schema.prisma
// This is your Prisma schema file,
// learn more about it in the docs: https://pris.ly/d/prisma-schema

generator client {
  provider = "prisma-client-js"
}

datasource db {
  provider = "postgresql"
  url      = env("DATABASE_URL")
}

model User {
  id            String    @id @default(uuid())
  name          String
  email         String?   @unique
  password      String?
  emailVerified DateTime? @map("email_verified")
  image         String?
  createdAt     DateTime  @default(now())
  updatedAt     DateTime  @updatedAt
  accounts      Account[]
  sessions      Session[]

  @@map("users")
}

model Account {
  id                String   @id @default(cuid())
  userId            String   @map("user_id")
  type              String?
  provider          String
  providerAccountId String   @map("provider_account_id")
  token_type        String?
  refresh_token     String?  @db.Text
  access_token      String?  @db.Text
  expires_at        Int?
  scope             String?
  id_token          String?  @db.Text
  createdAt         DateTime @default(now())
  updatedAt         DateTime @updatedAt
  user              User     @relation(fields: [userId], references: [id], onDelete: Cascade)

  @@unique([provider, providerAccountId])
  @@map("accounts")
}

model Session {
  id           String   @id @default(cuid())
  userId       String?  @map("user_id")
  sessionToken String   @unique @map("session_token") @db.Text
  accessToken  String?  @map("access_token") @db.Text
  expires      DateTime
  user         User?    @relation(fields: [userId], references: [id], onDelete: Cascade)
  createdAt    DateTime @default(now())
  updatedAt    DateTime @updatedAt

  @@map("sessions")
}

model VerificationRequest {
  id         String   @id @default(cuid())
  identifier String
  token      String   @unique
  expires    DateTime
  createdAt  DateTime @default(now())
  updatedAt  DateTime @updatedAt

  @@unique([identifier, token])
}
With the Prisma models defined, run the command pnpm prisma migrate dev --name init to generate the migration files and synchronize the PostgreSQL database with the migrations.
One final step we need to address is to create a singleton function that will enable our application to connect to the Postgres database via Prisma. To do this, create a prisma.ts file in the ‘prisma‘ directory.
prisma/prisma.ts
import { PrismaClient } from '@prisma/client';

const prismaClientSingleton = () => {
  return new PrismaClient();
};

declare global {
  var prisma: undefined | ReturnType<typeof prismaClientSingleton>;
}

const prisma = globalThis.prisma ?? prismaClientSingleton();

export default prisma;

if (process.env.NODE_ENV !== 'production') globalThis.prisma = prisma;
Define NextAuth Configuration Settings
Next, at the root of your project, create an auth.ts file and insert the following code. This code configures NextAuth v5 and exports a handler function, which will be used to set up the dynamic HTTP route required by NextAuth in Next.js.
auth.ts
import NextAuth from "next-auth";
import { PrismaAdapter } from "@auth/prisma-adapter";
import prisma from "./prisma/prisma";
import github from "next-auth/providers/github";
import google from "next-auth/providers/google";
import CredentialsProvider from "next-auth/providers/credentials";
import bcrypt from "bcryptjs";

export const { handlers, auth, signIn, signOut } = NextAuth({
  session: { strategy: "jwt" },
  adapter: PrismaAdapter(prisma),
  providers: [
    github,
    google,
    CredentialsProvider({
      name: "Sign in",
      id: "credentials",
      credentials: {
        email: {
          label: "Email",
          type: "email",
          placeholder: "example@example.com",
        },
        password: { label: "Password", type: "password" },
      },
      async authorize(credentials) {
        if (!credentials?.email || !credentials.password) {
          return null;
        }

        const user = await prisma.user.findUnique({
          where: {
            email: String(credentials.email),
          },
        });

        if (
          !user ||
          !(await bcrypt.compare(String(credentials.password), user.password!))
        ) {
          return null;
        }

        return {
          id: user.id,
          email: user.email,
          name: user.name,
          randomKey: "Hey cool",
        };
      },
    }),
  ],
  callbacks: {
    authorized({ auth, request: { nextUrl } }) {
      const isLoggedIn = !!auth?.user;
      // const paths = ["/profile", "/client-side"];
      const paths = ["/"];
      const isProtected = paths.some((path) =>
        nextUrl.pathname.startsWith(path)
      );

      if (isProtected && !isLoggedIn) {
        const redirectUrl = new URL("/api/auth/signin", nextUrl.origin);
        redirectUrl.searchParams.append("callbackUrl", nextUrl.href);
        return Response.redirect(redirectUrl);
      }
      return true;
    },
    jwt: ({ token, user }) => {
      if (user) {
        const u = user as unknown as any;
        return {
          ...token,
          id: u.id,
          randomKey: u.randomKey,
        };
      }
      return token;
    },
    session(params) {
      return {
        ...params.session,
        user: {
          ...params.session.user,
          id: params.token.id as string,
          randomKey: params.token.randomKey,
        },
      };
    },
  },
});
Create the NextAuth API Route
To set up the Next.js HTTP routes for NextAuth, follow the steps below:
- Go into the
appdirectory and create anapifolder. - Inside the
apifolder, create another directory namedauth. Then, within theauthfolder, create a dynamic route folder named[...nextauth]. - Finally, create a
route.tsfile in the[...nextauth]folder and add the code below:
Ensure you manually type the dynamic folder
[...nextauth]to avoid encountering errors, as the three dots will be changed to ellipses if you copy them from this article.
app/api/auth/[…nextauth]/route.ts
import { handlers } from '@/auth';

export const { GET, POST } = handlers;
Next, add the AUTH_SECRET variable to your .env file and use the command openssl rand -hex 32 to generate a unique string value for it. This secret will be used by NextAuth to sign and decode the JSON Web Token.
.env
AUTH_SECRET=my_ultra_secure_nextauth_secret
Retrieve NextAuth Sessions in API Routes
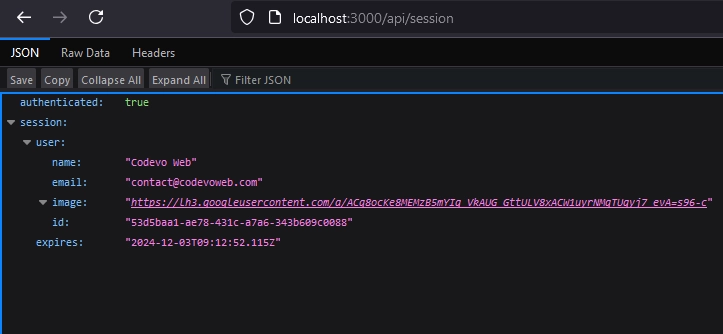
We have now successfully integrated NextAuth v5 into our Next.js 15 project. Next, let’s test the authentication flow by creating a route that returns the session object of the authenticated user. In the api directory, create a new folder called session. Inside the session directory, create a route.ts file and add the following code:
src/app/api/session/route.ts
import { NextResponse } from "next/server";
import { auth } from "../../../../auth";

export async function GET(_request: Request) {
  const session = await auth();

  if (!session?.user) {
    return new NextResponse(
      JSON.stringify({ status: "fail", message: "You are not logged in" }),
      { status: 401 }
    );
  }

  return NextResponse.json({
    authenticated: !!session,
    session,
  });
}
When you access the /api/session route in your browser after logging into the application, you should see a JSON object containing your public OAuth credentials. If you attempt to access the route while not logged in, you will be redirected to the default NextAuth login page.

Access NextAuth Sessions in Page Components
Next, let’s explore how to access the session object within a page component. To do this, open the src/app/page.tsx file and replace its existing content with the code provided below:
src/app/page.tsx
import Image from "next/image";
import { redirect } from "next/navigation";
import { auth } from "../../auth";

export default async function ProfilePage() {
  const session = await auth();

  if (!session?.user) {
    return redirect("/api/auth/signin");
  }

  const user = session?.user;

  return (
    <section className="to-blue-600  min-h-screen pt-20">
      <div className="max-w-4xl mx-auto bg-ct-dark-100 rounded-md h-[20rem] flex justify-center items-center">
        <div>
          <p className="mb-3 text-5xl text-center font-semibold">
            Profile Page
          </p>
          <div className="flex items-center gap-8">
            <div>
              <Image
                src={user?.image ? user.image : "/default.png"}
                alt={`profile photo of ${user?.name}`}
                width={90}
                height={90}
              />
            </div>
            <div className="mt-8">
              <p className="mb-3">ID: {user?.id}</p>
              <p className="mb-3">Name: {user?.name}</p>
              <p className="mb-3">Email: {user?.email}</p>
            </div>
          </div>
        </div>
      </div>
    </section>
  );
}
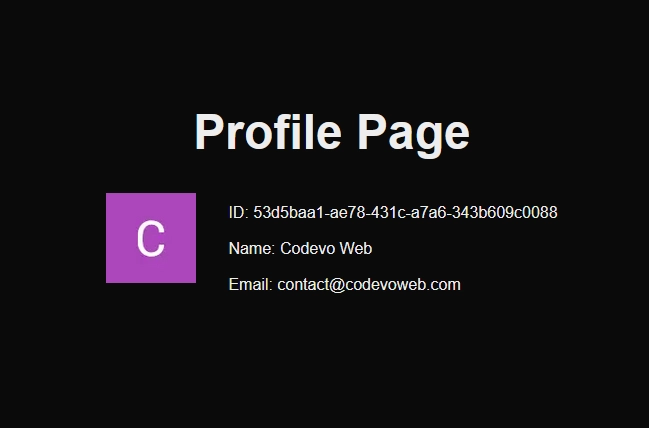
When you access the home page, you should see your user information displayed as shown in the screenshot below. As always, please remember that you need to be signed in to access this page.

Conclusion
We’ve now concluded this article. In this comprehensive guide, you have learned how to set up NextAuth v5 in your Next.js 5 project. I hope you found this article both informative and enjoyable. If you have any questions or feedback, please feel free to share your thoughts in the comment section below.

