
In this comprehensive guide, you will learn how to build a single-page frontend web application in Rust using the Yew.rs framework. The application will include essential authentication features such as user sign-up, login, logout, and restricting access to protected pages.
If you have prior experience with React.js, you’ll find working with Yew.rs to be a breeze since the knowledge is easily transferable. To style the application, we’ll be utilizing the power of Tailwind CSS, enabling you to craft visually stunning interfaces with ease.
What is Yew.rs? Yew.rs is a modern Rust framework for building web applications with a frontend in WebAssembly. Yew.rs is inspired by React.js and Elm, and it uses Rust’s ownership and concurrency model to provide a high degree of safety and reliability to web application development.
Yew.rs supports components, virtual DOM, state management, and routing out of the box, and it also has a growing ecosystem of plugins and tools to enhance development. With Yew.rs, developers can create high-performance and reliable web applications that can run on both desktop and mobile platforms.
More practice:
- Rust – JWT Authentication with Actix Web
- Build a Simple API in Rust
- Build a Simple API with Rust and Rocket
- Build a CRUD API with Rust and MongoDB
- Build a Simple API with Rust and Actix Web
- Golang, GORM, & Fiber: JWT Authentication
Prerequisites
- Having prior experience in React.js or Elm can be beneficial, however, I will make sure to provide a comprehensive explanation of each concept to ensure a thorough understanding.
- Basic knowledge of Rust and its ecosystem.
- Basic understanding of API architecture and the various HTTP verbs.
Run the Yew.rs JWT Frontend App Locally
- To get started, ensure that Rust is installed on your machine. You’ll also need to install the WebAssembly target, which you can do by visiting https://yew.rs/docs/getting-started/introduction. Additionally, make sure you have the Trunk tool installed if you haven’t already done so.
- Download or clone the Rust Yew.rs user signup and sign-in project from https://github.com/wpcodevo/rust-yew-signup-signin and open the source code in your preferred code editor.
- In your IDE or text editor, open the integrated terminal and execute
trunk buildcommand. This will install the necessary crates and create asset-build pipelines for the assets specified in theindex.htmltarget. - After completing the installation of the necessary crates and asset build pipelines, you can initiate the Yew web server by running the command
trunk serve --port 3000. This will create a local web server on your machine that can be accessed through your web browser atlocalhost:3000. - To enable the Yew application to make API requests, you’ll need to first run a Rust API on your machine. Follow the instructions provided in the section below to learn how to set up and run the API, so that it can be accessed by the Yew application.
Run the Yew.rs Web App with a Rust API
If you need guidance on how to implement JWT authentication in Rust, check out the post “Rust – JWT Authentication with Actix Web“. Otherwise, you can follow the instructions below to quickly set up the API and use the Rust Yew.rs application to interact with it.
- To get started, download or clone the Rust Actix-Web JWT authentication project available at https://github.com/wpcodevo/rust-jwt-hs256, and open the source code in your preferred IDE or text editor.
- In the terminal of the root directory, run the command
docker-compose up -dto launch the PostgreSQL server in the Docker container. - Install the SQLX CLI tool by running
cargo install sqlx-cli. Once installed, use thesqlx migrate runcommand to apply the “up” migration script to the PostgreSQL database. - Run
cargo buildto download and install the project’s dependencies and packages. - After the build process is complete, launch the Actix Web HTTP server by running
cargo r -r. This will start the server on port 8000. - To send HTTP requests to the API endpoints, import the file
Rust HS256 JWT.postman_collection.jsoninto Postman or the Thunder Client extension in Visual Studio Code. Alternatively, if you have the Yew application running, you can interact with the API by visitinghttp://localhost:3000/.
Scaffold the Yew Project
By the end of this tutorial, your file and folder structure should resemble the screenshot provided below.
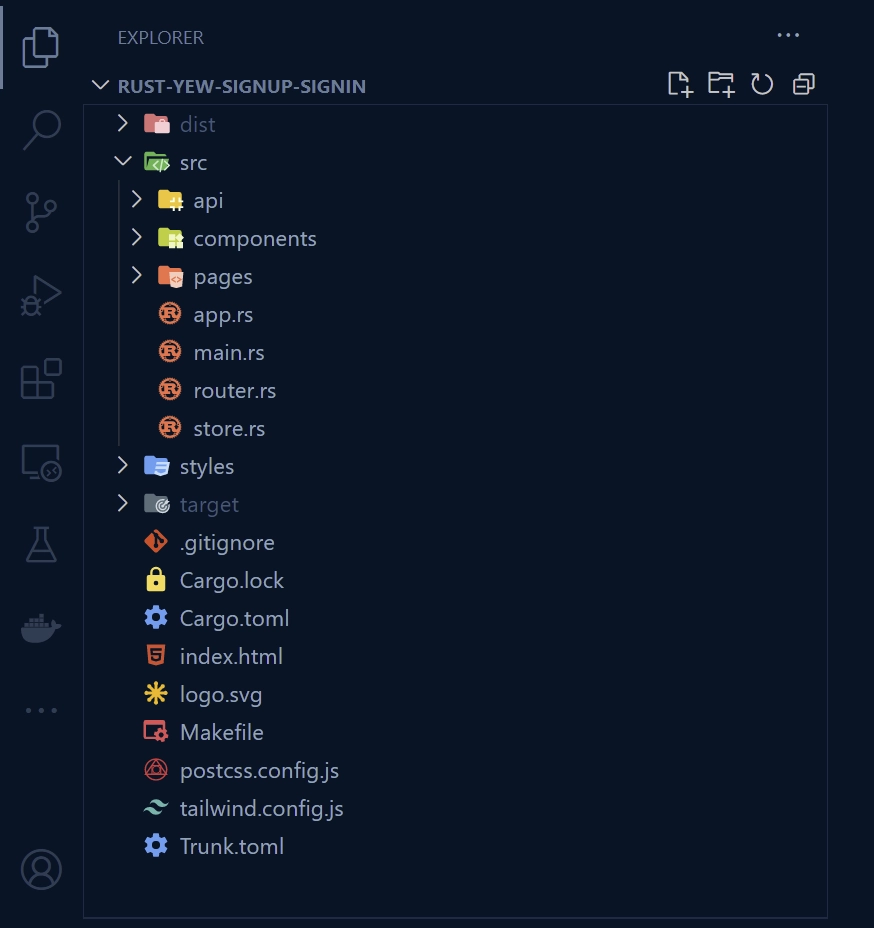
First things first, navigate to any convenient location on your machine, such as your Desktop, and create a new project folder named rust-yew-signup-signin. Feel free to choose a different name for your project. After that, change into the newly-created directory and initialize the Rust project by running cargo init.
mkdir rust-yew-signup-signin
cd rust-yew-signup-signin
cargo init
Once the project is initialized, run the following commands to install the necessary dependencies and packages.
cargo add yew --features csr
cargo add serde_json
cargo add serde --features derive
cargo add chrono --features serde
cargo add reqwasm
cargo add yew-router
cargo add gloo
cargo add validator --features derive
cargo add yewdux
cargo add wasm-bindgen
cargo add web-sys --features "HtmlInputElement Window"
cargo add wasm-bindgen-futures
yew– A web framework for Rust that focuses on creating web applications using WebAssembly and virtual DOM.serde_json– For serializing and deserializing JSON data in Rust.serde– For serializing and deserializing Rust data structures.chrono– Date and time library for Rustreqwasm– A Rust crate that provides a set of APIs for making HTTP requests from WebAssembly applications running in the browser. It is built on top of theweb-sysandwasm-bindgencrates, which provide low-level access to the Web APIs and the JavaScript runtime environment.yew-router– This crate will enable you to implement dynamic routing in the Yew application.gloo– This crate provides a more Rust-like interface for interacting with the Web APIs in a browser environment, such as working with the DOM, handling events, making HTTP requests, and managing web workers.validator– This crate will enable us to validate the fields of the HTML forms and show validation errors if necessary.yewdux– Yewdux is a crate that implements the Redux architecture for the Yew framework. It allows us to manage the application state globally and create dispatch functions, which can modify the states in the store. This helps to ensure a more organized and predictable way of handling state changes, making it easier to manage complex applications.wasm-bindgen– This crate provides bindings between Rust and JavaScript, enabling Rust code to be called from JavaScript and vice versa.web-sys– This crate provides Rust bindings to the APIs exposed by web browsers such as DOM manipulation, WebGL, WebSockets, and many others.wasm-bindgen-futures– This crate provides a bridge between JavaScript Promises and Rust Futures, allowing asynchronous operations to be composed and executed in a Rust-y way.
With all the necessary dependencies installed, the next step is to set up a basic Yew application that outputs a simple message in a heading tag. To do this, create an “src” folder in the root directory, and within the “src” directory, create a main.rs file and add the code below.
src/main.rs
use yew::prelude::*;

#[function_component(App)]
fn app() -> Html {
    html! {
        <h1>{"Frontend App with Rust and Yew.rs: User SignUp and Login"}</h1>
    }
}

fn main() {
    yew::Renderer::<App>::new().render();
}
The code above defines a Yew functional component called “App” using the #[function_component(App)] attribute macro. The function app() -> Html represents the component’s body, which uses the html! macro to generate an HTML node.
To initialize the Yew framework, we created the Renderer object with the App component and called its render method inside the main function. This method renders the component into the DOM.
Before launching the web server with Trunk, we need to create an index.html file in the root directory with some basic HTML boilerplate code. This step is necessary since Trunk will use the index.html file to drive all asset building and bundling.
index.html
<!DOCTYPE html>
<html lang="en">
  <head>
    <meta charset="UTF-8" />
    <meta http-equiv="X-UA-Compatible" content="IE=edge" />
    <meta name="viewport" content="width=device-width, initial-scale=1.0" />
    <title>My First Yew App</title>
  </head>
  <body></body>
</html>
Before starting the Trunk web server, ensure that you have installed the WebAssembly target and Trunk by following the instructions provided in the official Yew documentation at https://yew.rs/docs/getting-started/introduction.
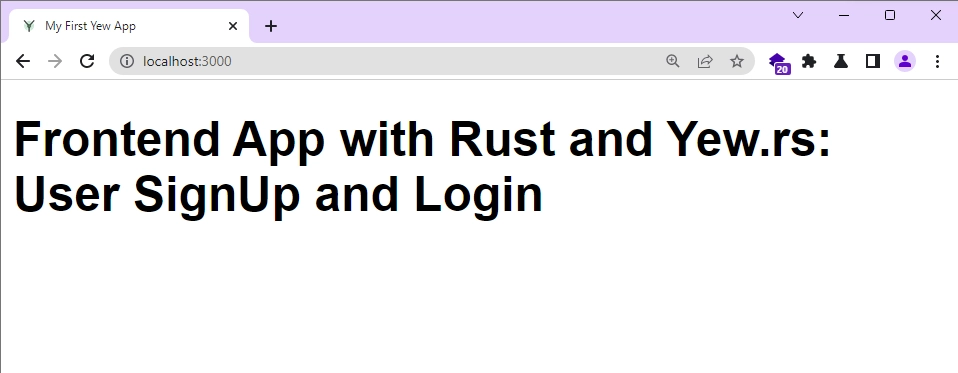
To build and run the Yew application locally, navigate to the root directory in your terminal and execute the command trunk serve --port 3000. This will build and serve the application on your local machine. Once the web server is up and running, open your preferred browser and navigate to http://localhost:3000/ to view the content rendered in the App component.
Setup Tailwind CSS for Styling
Let’s set up Tailwind CSS to help us style the components. We’ll need to install the tailwindcss library and its peer dependencies, which would typically require creating a package.json file in the root directory. As a result, a node_modulesfolder would be created to house the installed packages.
However, since we’re using Rust, we can use npx to run the Tailwind CSS commands without creating the package.json file or node_modules folder in the root directory. This approach will allow us to install and use Tailwind CSS in our Yew.rs project without adding unnecessary files and folders to the codebase.
With that explanation, let’s generate the Tailwind CSS configuration files tailwind.config.js and postcss.config.js by running the command below.
npx tailwindcss init -p
Next, let’s configure Tailwind CSS to recognize all of the Rust template files in our project, as well as add some custom colours and fonts. To do this, open the tailwind.config.js file and replace its current contents with the following configuration options:
tailwind.config.js
/** @type {import('tailwindcss').Config} */
module.exports = {
  content: [
    "./index.html",
    "./src/**/*.{rs,html}"
  ],
  theme: {
    extend: {
      colors: {
        'ct-dark-600': '#222',
        'ct-dark-200': '#e5e7eb',
        'ct-dark-100': '#f5f6f7',
        'ct-blue-600': '#2363eb',
        'ct-yellow-600': '#f9d13e',
        'ct-red-500': '#ef4444',
      },
      fontFamily: {
        Poppins: ['Poppins, sans-serif'],
      },
      container: {
        center: true,
        padding: '1rem',
        screens: {
          lg: '1125px',
          xl: '1125px',
          '2xl': '1125px',
        },
      },
    },
  },
  plugins: [],
};
Let’s create a CSS file to house the Tailwind CSS directives and font import. First, create a “styles” folder in the root directory if it doesn’t already exist. Within the “styles” folder, create a tailwind.css file and add the following code.
styles/tailwind.css
@import url('https://fonts.googleapis.com/css2?family=Poppins:wght@300;400;500;600;700&display=swap');

@tailwind base;
@tailwind components;
@tailwind utilities;

html {
    font-family: 'Poppins', sans-serif;
}
Now let’s see how we can automate the generation of the CSS file. Instead of manually compiling the styles/tailwind.css file and generating only the necessary styles used in the Yew.rs project, we can utilize Trunk’s post-build hook.
This will automatically generate the CSS after the rest of the build is complete, just before the staging directory is copied over to the dist directory. This way, we can ensure that the CSS is always up to date without the need for manual intervention.
Trunk.toml
[[hooks]]
stage = "post_build"
command = "sh"
command_arguments = ["-c", "npx tailwindcss -i ./styles/tailwind.css -o ./dist/.stage/index.css"]
To complete the setup, open the index.html file and replace its content with the following HTML code.
index.html
<!DOCTYPE html>
<html lang="en">
  <head>
    <meta charset="UTF-8" />
    <meta http-equiv="X-UA-Compatible" content="IE=edge" />
    <meta name="viewport" content="width=device-width, initial-scale=1.0" />
    <link data-trunk rel="icon" href="logo.svg" type="image/svg" />
    <link rel="stylesheet" href="./index.css" />
    <title>My First Yew App</title>
  </head>
  <body></body>
</html>
In the above code, we referenced the index.css file in the HTML link tag to make the CSS code available to the application via Trunk. We also specified the logo.svg file as the application’s favicon in the HTML code. To use the Yew.rs logo as the favicon, download the logo from the official website and place it in the root directory of your project.
Define the API Requests with the Reqwasm Crate
In this section, we’ll utilize the Reqwasm crate to create API request functions that the application will use to make HTTP requests to the backend server.
Rather than scattering individual API requests in their corresponding components, we’ll consolidate the logic into functions and handle any errors appropriately. This approach will help us maintain clean and simple components while keeping the API request logic separate and organized.
API Response Types
To get started, navigate to the “src” directory and create a new folder named api. Within the api folder, create a file named types.rs and define the following structs:
src/api/types.rs
use chrono::prelude::*;
use serde::{Deserialize, Serialize};

#[allow(non_snake_case)]
#[derive(Debug, Serialize, Deserialize, Default, PartialEq, Clone)]
pub struct User {
    pub id: String,
    pub name: String,
    pub email: String,
    pub role: String,
    pub photo: String,
    pub verified: bool,
    pub createdAt: DateTime<Utc>,
    pub updatedAt: DateTime<Utc>,
}

#[derive(Serialize, Deserialize, Debug)]
pub struct UserData {
    pub user: User,
}

#[derive(Serialize, Deserialize, Debug)]
pub struct UserResponse {
    pub status: String,
    pub data: UserData,
}

#[derive(Serialize, Deserialize, Debug)]
pub struct UserLoginResponse {
    pub status: String,
    pub token: String,
}

#[derive(Serialize, Deserialize, Debug)]
pub struct ErrorResponse {
    pub status: String,
    pub message: String,
}
These structs will represent the response structure returned by the backend server. By defining them in a separate file, we can easily share them across different components and modules within the application. Furthermore, by typing the API responses, we can ensure that our code is more robust and that the Rust analyzer will catch any type-related errors.
Create the API Requests
Next up, we will create the API request functions that will be used to interact with the backend server. To do this, navigate to the api directory and create a new file called user_api.rs. Copy and paste the following code into the file.
src/api/user_api.rs
use super::types::{ErrorResponse, User, UserLoginResponse, UserResponse};
use reqwasm::http;

pub async fn api_register_user(user_data: &str) -> Result<User, String> {
    let response = match http::Request::post("http://localhost:8000/api/auth/register")
        .header("Content-Type", "application/json")
        .body(user_data)
        .send()
        .await
    {
        Ok(res) => res,
        Err(_) => return Err("Failed to make request".to_string()),
    };

    if response.status() != 200 {
        let error_response = response.json::<ErrorResponse>().await;
        if let Ok(error_response) = error_response {
            return Err(error_response.message);
        } else {
            return Err(format!("API error: {}", response.status()));
        }
    }

    let res_json = response.json::<UserResponse>().await;
    match res_json {
        Ok(data) => Ok(data.data.user),
        Err(_) => Err("Failed to parse response".to_string()),
    }
}

pub async fn api_login_user(credentials: &str) -> Result<UserLoginResponse, String> {
    let response = match http::Request::post("http://localhost:8000/api/auth/login")
        .header("Content-Type", "application/json")
        .credentials(http::RequestCredentials::Include)
        .body(credentials)
        .send()
        .await
    {
        Ok(res) => res,
        Err(_) => return Err("Failed to make request".to_string()),
    };

    if response.status() != 200 {
        let error_response = response.json::<ErrorResponse>().await;
        if let Ok(error_response) = error_response {
            return Err(error_response.message);
        } else {
            return Err(format!("API error: {}", response.status()));
        }
    }

    let res_json = response.json::<UserLoginResponse>().await;
    match res_json {
        Ok(data) => Ok(data),
        Err(_) => Err("Failed to parse response".to_string()),
    }
}

pub async fn api_user_info() -> Result<User, String> {
    let response = match http::Request::get("http://localhost:8000/api/users/me")
        .credentials(http::RequestCredentials::Include)
        .send()
        .await
    {
        Ok(res) => res,
        Err(_) => return Err("Failed to make request".to_string()),
    };

    if response.status() != 200 {
        let error_response = response.json::<ErrorResponse>().await;
        if let Ok(error_response) = error_response {
            return Err(error_response.message);
        } else {
            return Err(format!("API error: {}", response.status()));
        }
    }

    let res_json = response.json::<UserResponse>().await;
    match res_json {
        Ok(data) => Ok(data.data.user),
        Err(_) => Err("Failed to parse response".to_string()),
    }
}

pub async fn api_logout_user() -> Result<(), String> {
    let response = match http::Request::get("http://localhost:8000/api/auth/logout")
        .credentials(http::RequestCredentials::Include)
        .send()
        .await
    {
        Ok(res) => res,
        Err(_) => return Err("Failed to make request".to_string()),
    };

    if response.status() != 200 {
        let error_response = response.json::<ErrorResponse>().await;
        if let Ok(error_response) = error_response {
            return Err(error_response.message);
        } else {
            return Err(format!("API error: {}", response.status()));
        }
    }

    Ok(())
}
api_register_user– This function will add the form data to the request body and make a POST request to the/api/auth/registerendpoint to register the new user.api_login_user– This function will take the credentials entered in the form and add them to the request body. It will then make a POST request to the/api/auth/loginendpoint to retrieve an access token from the backend server. To ensure that the backend sends back the cookies, you will need to setcredentials(http::RequestCredentials::Include).api_user_info– This function will retrieve the authenticated user’s information by making a GET request to the/api/users/meendpoint. Since this route is protected, it’s necessary to setcredentials(http::RequestCredentials::Include)so that the browser can send along the cookie.api_logout_user– This function will be used to log out the currently logged-in user by making a GET request to the/api/auth/logoutendpoint. As with the previous endpoints, this route is also protected, so you need to setcredentials(http::RequestCredentials::Include)in order to include the cookie with the request.
To allow other modules or files to access the API request functions and types that we’ve created, we’ll create a mod.rs file inside the api folder. In this file, we’ll export the types and user_api modules so that they can be used in other parts of the application.
src/api/mod.rs
pub mod types;
pub mod user_api;
Setup a Global Store with the Yewdux Library
In this section, we’ll utilize the yewdux crate to create a global store that will allow us to manage the application’s state from a central location. To get started, create a store.rs file and add the following code.
src/store.rs
use serde::{Deserialize, Serialize};
use yewdux::prelude::*;

use crate::api::types::User;

#[derive(Debug, PartialEq, Serialize, Deserialize, Default, Clone)]
pub struct AlertInput {
    pub show_alert: bool,
    pub alert_message: String,
}

#[derive(Debug, Serialize, Deserialize, Default, Clone, PartialEq, Store)]
pub struct Store {
    pub auth_user: Option<User>,
    pub page_loading: bool,
    pub alert_input: AlertInput,
}

pub fn set_page_loading(loading: bool, dispatch: Dispatch<Store>) {
    dispatch.reduce_mut(move |store| {
        store.page_loading = loading;
    })
}

pub fn set_auth_user(user: Option<User>, dispatch: Dispatch<Store>) {
    dispatch.reduce_mut(move |store| {
        store.auth_user = user;
    })
}

pub fn set_show_alert(message: String, dispatch: Dispatch<Store>) {
    dispatch.reduce_mut(move |store| {
        store.alert_input = AlertInput {
            alert_message: message,
            show_alert: true,
        };
    })
}

pub fn set_hide_alert(dispatch: Dispatch<Store>) {
    dispatch.reduce_mut(move |store| {
        store.alert_input.show_alert = false;
    })
}
In the code above, you can observe that we’ve defined functions that take the dispatch function as an argument and utilize the dispatch.reduce_mut() method to mutate the state of the store. Moving the store mutation logic from the components to a centralized location, which is the src/store.rs file, can help keep the components simple and clean.
Create Reusable Yew Components
Here, you’ll be creating a couple of reusable Yew components and styling them with Tailwind CSS. By leveraging reusable components, you can write a block of code once and use it across multiple parts of the application. This not only saves development time but also makes the code more readable, maintainable, and easier to debug in the long run.
Create a Spinner Component
The first Yew component you’ll create is a Spinner, which will be used to indicate when a request is in progress or being processed by the backend server. This component is designed to accept props such as width, height, color, and background color, making it highly customizable.
To create the Spinner component, navigate to the “src” directory and create a new folder called “components“. Within the “components” folder, create a file named spinner.rs and add the following code.
src/components/spinner.rs
use yew::prelude::*;

#[derive(Debug, Properties, PartialEq)]
pub struct Props {
    pub width: Option<String>,
    pub height: Option<String>,
    pub color: Option<String>,
    pub bg_color: Option<String>,
}

#[function_component(Spinner)]
pub fn spinner_component(props: &Props) -> Html {
    let width = props.width.clone().unwrap_or_else(|| "1.25rem".to_string());
    let height = props
        .height
        .clone()
        .unwrap_or_else(|| "1.25rem".to_string());
    let color = props
        .color
        .clone()
        .unwrap_or_else(|| "text-gray-200".to_string());
    let bg_color = props
        .bg_color
        .clone()
        .unwrap_or_else(|| "fill-blue-600".to_string());

    html! {
    <svg
      role="status"
      class={format!(
        "mr-2 {} animate-spin dark:text-gray-600 {} h-5",
        color, bg_color
      )}
      style={format!("height:{};width:{}", width, height)}
      viewBox="0 0 100 101"
      fill="none"
      xmlns="http://www.w3.org/2000/svg"
    >
      <path
        d="M100 50.5908C100 78.2051 77.6142 100.591 50 100.591C22.3858 100.591 0 78.2051 0 50.5908C0 22.9766 22.3858 0.59082 50 0.59082C77.6142 0.59082 100 22.9766 100 50.5908ZM9.08144 50.5908C9.08144 73.1895 27.4013 91.5094 50 91.5094C72.5987 91.5094 90.9186 73.1895 90.9186 50.5908C90.9186 27.9921 72.5987 9.67226 50 9.67226C27.4013 9.67226 9.08144 27.9921 9.08144 50.5908Z"
        fill="currentColor"
      />
      <path
        d="M93.9676 39.0409C96.393 38.4038 97.8624 35.9116 97.0079 33.5539C95.2932 28.8227 92.871 24.3692 89.8167 20.348C85.8452 15.1192 80.8826 10.7238 75.2124 7.41289C69.5422 4.10194 63.2754 1.94025 56.7698 1.05124C51.7666 0.367541 46.6976 0.446843 41.7345 1.27873C39.2613 1.69328 37.813 4.19778 38.4501 6.62326C39.0873 9.04874 41.5694 10.4717 44.0505 10.1071C47.8511 9.54855 51.7191 9.52689 55.5402 10.0491C60.8642 10.7766 65.9928 12.5457 70.6331 15.2552C75.2735 17.9648 79.3347 21.5619 82.5849 25.841C84.9175 28.9121 86.7997 32.2913 88.1811 35.8758C89.083 38.2158 91.5421 39.6781 93.9676 39.0409Z"
        fill="currentFill"
      />
    </svg>
    }
}
Create a Loading Button Component
Here, we will create a highly customizable button component that utilizes the Spinner component. This button will be used in different forms of the application, and it can be easily customized through the props passed to it.
The Spinner component used in the button will be hidden by default, but when a request is being processed by the API, it will become visible to provide feedback to the user that the request is being handled by the backend server.
src/components/loading_button.rs
use super::spinner::Spinner;
use yew::prelude::*;

#[derive(Debug, Properties, PartialEq)]
pub struct Props {
    pub loading: bool,
    pub btn_color: Option<String>,
    pub text_color: Option<String>,
    pub children: Children,
}

#[function_component(LoadingButton)]
pub fn loading_button_component(props: &Props) -> Html {
    let text_color = props
        .text_color
        .clone()
        .unwrap_or_else(|| "text-white".to_string());
    let btn_color = props
        .btn_color
        .clone()
        .unwrap_or_else(|| "bg-ct-yellow-600".to_string());

    html! {
    <button
      type="submit"
      class={format!(
        "w-full py-3 font-semibold rounded-lg outline-none border-none flex justify-center {}",
         if props.loading {"bg-[#ccc]"} else {btn_color.as_str()}
      )}
    >
      if props.loading {
        <div class="flex items-center gap-3">
          <Spinner />
          <span class="text-slate-500 inline-block">{"Loading..."}</span>
        </div>
      }else{
        <span class={text_color.to_owned()}>{props.children.clone()}</span>
      }
    </button>
    }
}
Create a Notification Toast Component
The next component is a notification toast that will allow us to display messages within the UI. This component will come in handy when we need to display errors or other feedback to the user based on interactions with the backend API.
This component will utilize the setTimeout function of the browser window to automatically remove the toast component from the UI after a set amount of time. To enable this feature, you’ll need to install the Window feature of web-sys.
To create the notification toast component, create a new file named alert.rs inside the components folder. Then, add the code presented below to the file.
src/components/alert.rs
use gloo::timers::callback::Timeout;
use yew::prelude::*;
use yewdux::prelude::use_store;

use crate::store::{set_hide_alert, Store};

#[derive(Debug, PartialEq, Properties)]
pub struct Props {
    pub message: String,
    pub delay_ms: u32,
}

#[function_component(AlertComponent)]
pub fn alert_component(props: &Props) -> Html {
    let (store, dispatch) = use_store::<Store>();
    let show_alert = store.alert_input.show_alert;

    use_effect_with_deps(
        move |(show_alert, dispatch, delay_ms)| {
            let cloned_dispatch = dispatch.clone();
            if *show_alert {
                let handle =
                    Timeout::new(*delay_ms, move || set_hide_alert(cloned_dispatch)).forget();
                let clear_handle = move || {
                    web_sys::Window::clear_timeout_with_handle(
                        &web_sys::window().unwrap(),
                        handle.as_f64().unwrap() as i32,
                    );
                };

                Box::new(clear_handle) as Box<dyn FnOnce()>
            } else {
                Box::new(|| {}) as Box<dyn FnOnce()>
            }
        },
        (show_alert, dispatch.clone(), props.delay_ms),
    );

    html! {
    <div id="myToast" class={format!("fixed top-14 right-10 px-5 py-4 border-r-8 border-orange-500 bg-white drop-shadow-lg {}", if show_alert { "" } else { "hidden" })}>
        <p class="text-sm">
            <span class="mr-2 inline-block px-3 py-1 rounded-full bg-blue-500 text-white font-extrabold">{"i"}</span>
            {props.message.clone()}
        </p>
    </div>
    }
}
Create a Form Input Component
This Yew component is crucial as it represents an input field with a label and error message. It has the ability to accept numerous properties such as input type, label text, input name, and callbacks for managing changes and validation errors.
We’ll create two callback functions, handle_onchange and handle_on_input_blur, to manage changes to the input field value and validation errors, respectively. These callbacks will be passed as properties from the parent component and will be activated when the input field value changes or when the input field loses focus.
To interact with input elements in the browser’s DOM, the HtmlInputElement feature of the web-sys crate needs to be installed, which we have already done.
src/components/form_input.rs
use std::{cell::RefCell, rc::Rc};

use validator::ValidationErrors;
use wasm_bindgen::JsCast;
use web_sys::HtmlInputElement;
use yew::prelude::*;

#[derive(Properties, PartialEq)]
pub struct Props {
    pub input_type: Option<String>,
    pub label: String,
    pub name: String,
    pub input_ref: NodeRef,
    pub handle_onchange: Callback<String>,
    pub handle_on_input_blur: Callback<(String, String)>,
    pub errors: Rc<RefCell<ValidationErrors>>,
}

#[function_component(FormInput)]
pub fn form_input_component(props: &Props) -> Html {
    let input_type = props
        .input_type
        .clone()
        .unwrap_or_else(|| "text".to_string());
    let val_errors = props.errors.borrow();
    let errors = val_errors.field_errors().clone();
    let empty_errors = vec![];
    let error = match errors.get(&props.name.as_str()) {
        Some(error) => error,
        None => &empty_errors,
    };
    let error_message = match error.get(0) {
        Some(message) => message.to_string(),
        None => "".to_string(),
    };

    let handle_onchange = props.handle_onchange.clone();
    let onchange = Callback::from(move |event: Event| {
        let target = event.target().unwrap();
        let value = target.unchecked_into::<HtmlInputElement>().value();
        handle_onchange.emit(value);
    });

    let handle_on_input_blur = props.handle_on_input_blur.clone();
    let on_blur = {
        let cloned_input_name = props.name.clone();
        Callback::from(move |event: FocusEvent| {
            let input_name = cloned_input_name.clone();
            let target = event.target().unwrap();
            let value = target.unchecked_into::<HtmlInputElement>().value();
            handle_on_input_blur.emit((input_name, value));
        })
    };

    html! {
    <div>
      <label html={props.name.clone()} class="block text-ct-blue-600 mb-3">
        {props.label.clone()}
      </label>
      <input
        type={input_type}
        placeholder=""
        class="block w-full rounded-2xl appearance-none focus:outline-none py-2 px-4"
        ref={props.input_ref.clone()}
        onchange={onchange}
        onblur={on_blur}
      />
    <span class="text-red-500 text-xs pt-1 block">
        {error_message}
    </span>
    </div>
    }
}
Inside the component, we defined a default value of “text” for the input_type prop if no value is provided. Then, we extracted the validation errors from the errors property using a RefCell and Rc to allow for shared ownership across the component and its parent.
Next, we created the onchange callback function to handle changes to the input field value and emit the new value via the handle_onchange callback. Similarly, we defined the on_blur callback to handle changes to the input field value and emit the input name and value via the handle_on_input_blur callback.
Create a Header Component
The final component is a Header that will contain a list of navigation links, allowing us to move between different parts of the Yew application. While it’s intended to include logout functionality, for now, we’ll leave that out to keep things simple.
src/components/header.rs
use crate::{router::Route, store::Store};
use yew::prelude::*;
use yew_router::prelude::*;
use yewdux::prelude::*;

#[function_component(Header)]
pub fn header_component() -> Html {
    let (store, _) = use_store::<Store>();
    let user = store.auth_user.clone();

    html! {
        <header class="bg-white h-20">
        <nav class="h-full flex justify-between container items-center">
          <div>
            <Link<Route> to={Route::HomePage} classes="text-ct-dark-600">{"CodevoWeb"}</Link<Route>>
          </div>
          <ul class="flex items-center gap-4">
            <li>
              <Link<Route> to={Route::HomePage} classes="text-ct-dark-600">{"Home"}</Link<Route>>
            </li>
            if user.is_some() {
               <>
                <li>
                  <Link<Route> to={Route::ProfilePage} classes="text-ct-dark-600">{"Profile"}</Link<Route>>
                </li>
                <li
                  class="cursor-pointer"
                >
                  {"Create Post"}
                </li>
                <li class="cursor-pointer">
                  {"Logout"}
                </li>
              </>

            } else {
              <>
                <li>
                  <Link<Route> to={Route::RegisterPage} classes="text-ct-dark-600">{"SignUp"}</Link<Route>>
                </li>
                <li>
                  <Link<Route> to={Route::LoginPage} classes="text-ct-dark-600">{"Login"}</Link<Route>>
                </li>
              </>
            }
          </ul>
        </nav>
      </header>
    }
}
Implement the Authentication Flow
In this section, we’ll manage user authentication for the Yew application, including registration, login, and logout.
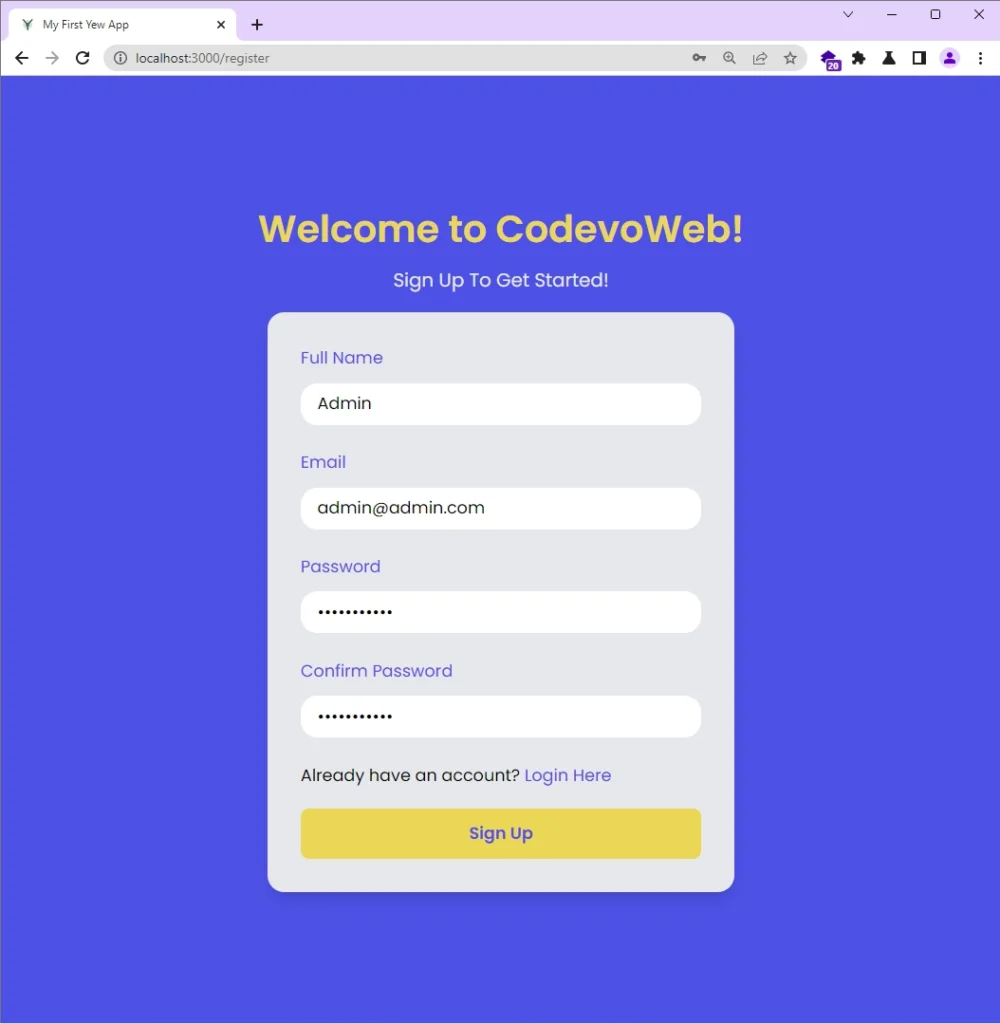
Create the Account Registration Page
This Yew component will display a registration form where users can enter their credentials to create new accounts. The form includes four fields: name, email, password, and password_confirm, and all fields are mandatory.
In order to validate the form, we will use traits provided by the validator crate to define a RegisterUserSchema struct. This struct will contain the fields of the form along with their corresponding validation rules and error messages.
To create the account registration component, start by creating a new folder named “pages” inside the “src” directory. Then, navigate to the newly created “pages” folder and create a file named register_page.rs. Finally, add the following code to the newly created file.
src/pages/register_page.rs
use std::cell::RefCell;
use std::ops::Deref;
use std::rc::Rc;

use crate::api::user_api::api_register_user;
use crate::components::{form_input::FormInput, loading_button::LoadingButton};
use crate::router::{self, Route};
use crate::store::{set_page_loading, set_show_alert, Store};

use serde::{Deserialize, Serialize};
use validator::{Validate, ValidationErrors};
use wasm_bindgen_futures::spawn_local;
use web_sys::HtmlInputElement;
use yew::prelude::*;
use yew_router::prelude::*;
use yewdux::prelude::*;

#[derive(Validate, Debug, Default, Clone, Serialize, Deserialize)]

struct RegisterUserSchema {
    #[validate(length(min = 1, message = "Name is required"))]
    name: String,
    #[validate(
        length(min = 1, message = "Email is required"),
        email(message = "Email is invalid")
    )]
    email: String,
    #[validate(
        length(min = 1, message = "Password is required"),
        length(min = 6, message = "Password must be at least 6 characters")
    )]
    password: String,
    #[validate(
        length(min = 1, message = "Please confirm your password"),
        must_match(other = "password", message = "Passwords do not match")
    )]
    password_confirm: String,
}

fn get_input_callback(
    name: &'static str,
    cloned_form: UseStateHandle<RegisterUserSchema>,
) -> Callback<String> {
    Callback::from(move |value| {
        let mut data = cloned_form.deref().clone();
        match name {
            "name" => data.name = value,
            "email" => data.email = value,
            "password" => data.password = value,
            "password_confirm" => data.password_confirm = value,
            _ => (),
        }
        cloned_form.set(data);
    })
}

#[function_component(RegisterPage)]
pub fn register_page() -> Html {
    let (store, dispatch) = use_store::<Store>();
    let form = use_state(|| RegisterUserSchema::default());
    let validation_errors = use_state(|| Rc::new(RefCell::new(ValidationErrors::new())));
    let navigator = use_navigator().unwrap();

    let name_input_ref = NodeRef::default();
    let email_input_ref = NodeRef::default();
    let password_input_ref = NodeRef::default();
    let password_confirm_input_ref = NodeRef::default();

    let validate_input_on_blur = {
        let cloned_form = form.clone();
        let cloned_validation_errors = validation_errors.clone();
        Callback::from(move |(name, value): (String, String)| {
            let mut data = cloned_form.deref().clone();
            match name.as_str() {
                "email" => data.email = value,
                "password" => data.password = value,
                _ => (),
            }
            cloned_form.set(data);

            match cloned_form.validate() {
                Ok(_) => {
                    cloned_validation_errors
                        .borrow_mut()
                        .errors_mut()
                        .remove(name.as_str());
                }
                Err(errors) => {
                    cloned_validation_errors
                        .borrow_mut()
                        .errors_mut()
                        .retain(|key, _| key != &name);
                    for (field_name, error) in errors.errors() {
                        if field_name == &name {
                            cloned_validation_errors
                                .borrow_mut()
                                .errors_mut()
                                .insert(field_name.clone(), error.clone());
                        }
                    }
                }
            }
        })
    };

    let handle_name_input = get_input_callback("name", form.clone());
    let handle_email_input = get_input_callback("email", form.clone());
    let handle_password_input = get_input_callback("password", form.clone());
    let handle_password_confirm_input = get_input_callback("password_confirm", form.clone());

    let on_submit = {
        let cloned_form = form.clone();
        let cloned_validation_errors = validation_errors.clone();
        let cloned_navigator = navigator.clone();
        let cloned_dispatch = dispatch.clone();

        let cloned_name_input_ref = name_input_ref.clone();
        let cloned_email_input_ref = email_input_ref.clone();
        let cloned_password_input_ref = password_input_ref.clone();
        let cloned_password_confirm_input_ref = password_confirm_input_ref.clone();

        Callback::from(move |event: SubmitEvent| {
            let form = cloned_form.clone();
            let validation_errors = cloned_validation_errors.clone();
            let navigator = cloned_navigator.clone();
            let dispatch = cloned_dispatch.clone();

            let name_input_ref = cloned_name_input_ref.clone();
            let email_input_ref = cloned_email_input_ref.clone();
            let password_input_ref = cloned_password_input_ref.clone();
            let password_confirm_input_ref = cloned_password_confirm_input_ref.clone();

            event.prevent_default();
            spawn_local(async move {
                match form.validate() {
                    Ok(_) => {
                        let form_data = form.deref().clone();
                        let form_json = serde_json::to_string(&form_data).unwrap();
                        set_page_loading(true, dispatch.clone());

                        let name_input = name_input_ref.cast::<HtmlInputElement>().unwrap();
                        let email_input = email_input_ref.cast::<HtmlInputElement>().unwrap();
                        let password_input = password_input_ref.cast::<HtmlInputElement>().unwrap();
                        let password_confirm_input = password_confirm_input_ref
                            .cast::<HtmlInputElement>()
                            .unwrap();

                        name_input.set_value("");
                        email_input.set_value("");
                        password_input.set_value("");
                        password_confirm_input.set_value("");

                        let res = api_register_user(&form_json).await;
                        match res {
                            Ok(_) => {
                                set_page_loading(false, dispatch.clone());
                                set_show_alert(
                                    "Account registered successfully".to_string(),
                                    dispatch,
                                );
                                navigator.push(&router::Route::LoginPage);
                            }
                            Err(e) => {
                                set_page_loading(false, dispatch.clone());
                                set_show_alert(e.to_string(), dispatch);
                            }
                        };
                    }
                    Err(e) => {
                        validation_errors.set(Rc::new(RefCell::new(e)));
                    }
                }
            });
        })
    };

    html! {
    <section class="py-8 bg-ct-blue-600 min-h-screen grid place-items-center">
      <div class="w-full">
        <h1 class="text-4xl xl:text-6xl text-center font-[600] text-ct-yellow-600 mb-4">
         {" Welcome to CodevoWeb!"}
        </h1>
        <h2 class="text-lg text-center mb-4 text-ct-dark-200">
          {"Sign Up To Get Started!"}
        </h2>
          <form
            onsubmit={on_submit}
            class="max-w-md w-full mx-auto overflow-hidden shadow-lg bg-ct-dark-200 rounded-2xl p-8 space-y-5"
          >
            <FormInput label="Full Name" name="name" input_ref={name_input_ref} handle_onchange={handle_name_input}  errors={&*validation_errors} handle_on_input_blur={validate_input_on_blur.clone()} />
            <FormInput label="Email" name="email" input_type="email" input_ref={email_input_ref} handle_onchange={handle_email_input}  errors={&*validation_errors} handle_on_input_blur={validate_input_on_blur.clone()} />
            <FormInput label="Password" name="password" input_type="password" input_ref={password_input_ref} handle_onchange={handle_password_input}  errors={&*validation_errors} handle_on_input_blur={validate_input_on_blur.clone()} />
            <FormInput
              label="Confirm Password"
              name="password_confirm"
              input_type="password"
              input_ref={password_confirm_input_ref}
              handle_onchange={handle_password_confirm_input}
              errors={&*validation_errors}
              handle_on_input_blur={validate_input_on_blur.clone()}
            />
            <span class="block">
              {"Already have an account?"} {" "}
            <Link<Route> to={Route::LoginPage} classes="text-ct-blue-600">{"Login Here"}</Link<Route>>
            </span>
            <LoadingButton
              loading={store.page_loading}
              text_color={Some("text-ct-blue-600".to_string())}
            >
             {" Sign Up"}
            </LoadingButton>
          </form>
      </div>
    </section>
    }
}
Let’s evaluate the above code. First, we created a get_input_callback helper function that will create a callback to update the corresponding field in the RegisterUserSchema struct whenever a user enters data into an input field in the registration form.
After that, we created a callback function named validate_input_on_blur which validates the input fields when the user leaves the field. Upon submitting the form, the values of the input fields will be extracted and their references will be used to reset the fields
The next step involves submitting the form data to the backend server with the help of the api_register_user function, which is defined in the src/api/user_api.rs file. If the API returns any errors, we display them in the UI using the toast notification component. However, if the request is successful, the user is redirected to the login page.
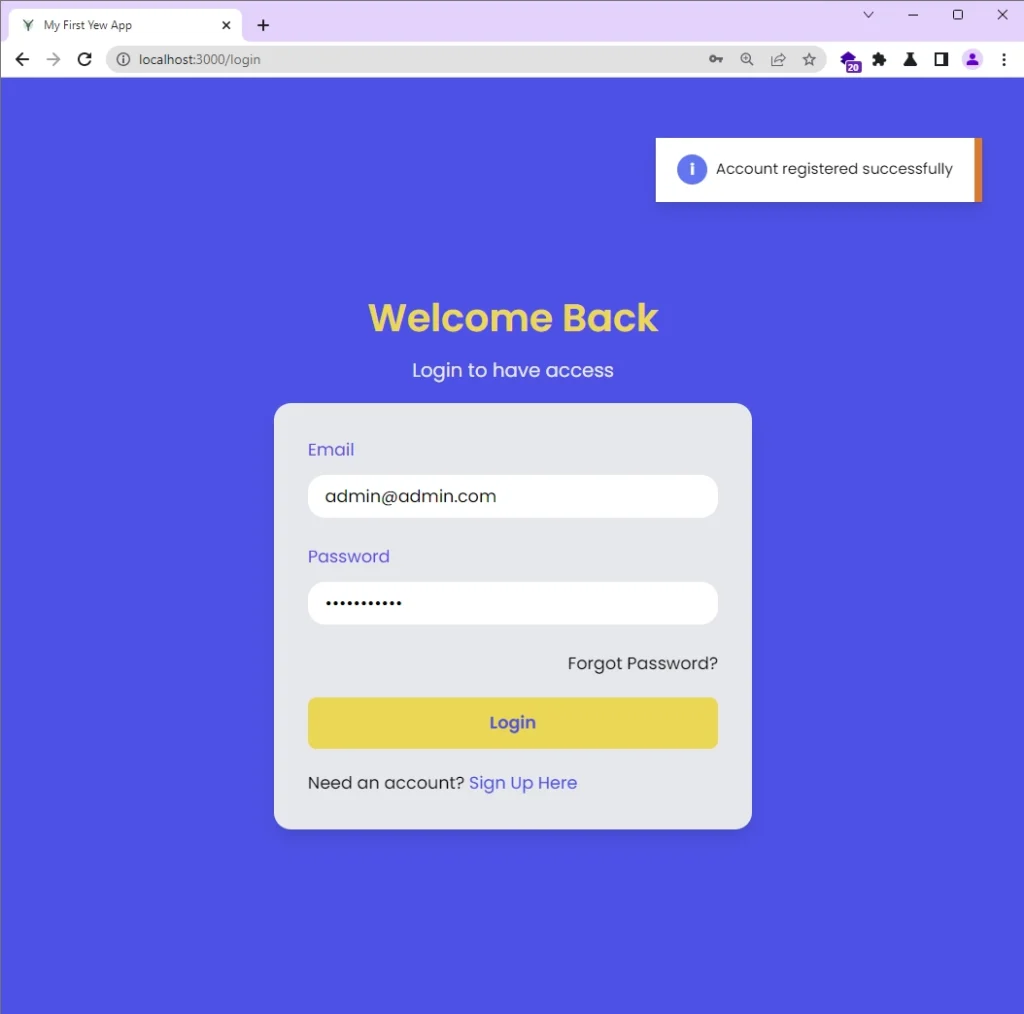
Create the Account Login Page
This Yew component will display a login form where users can enter their credentials to sign into the application. The form consists of two mandatory fields: email and password.
In order to validate the form, we will use traits provided by the validator crate to define a LoginUserSchema struct. This struct will contain the fields of the form along with their corresponding validation rules and error messages.
To create the login component, create a file named login_page.rs in the “pages” directory and add the following code to the file.
src/pages/login_page.rs
use std::cell::RefCell;
use std::ops::Deref;
use std::rc::Rc;

use crate::api::user_api::api_login_user;
use crate::components::{form_input::FormInput, loading_button::LoadingButton};
use crate::router::{self, Route};
use crate::store::{set_page_loading, set_show_alert, Store};

use serde::{Deserialize, Serialize};
use validator::{Validate, ValidationErrors};
use wasm_bindgen_futures::spawn_local;
use web_sys::HtmlInputElement;
use yew::prelude::*;
use yew_router::prelude::*;
use yewdux::prelude::*;

#[derive(Validate, Debug, Default, Clone, Serialize, Deserialize)]

struct LoginUserSchema {
    #[validate(
        length(min = 1, message = "Email is required"),
        email(message = "Email is invalid")
    )]
    email: String,
    #[validate(
        length(min = 1, message = "Password is required"),
        length(min = 6, message = "Password must be at least 6 characters")
    )]
    password: String,
}

fn get_input_callback(
    name: &'static str,
    cloned_form: UseStateHandle<LoginUserSchema>,
) -> Callback<String> {
    Callback::from(move |value| {
        let mut data = cloned_form.deref().clone();
        match name {
            "email" => data.email = value,
            "password" => data.password = value,
            _ => (),
        }
        cloned_form.set(data);
    })
}

#[function_component(LoginPage)]
pub fn login_page() -> Html {
    let (store, dispatch) = use_store::<Store>();
    let form = use_state(|| LoginUserSchema::default());
    let validation_errors = use_state(|| Rc::new(RefCell::new(ValidationErrors::new())));
    let navigator = use_navigator().unwrap();

    let email_input_ref = NodeRef::default();
    let password_input_ref = NodeRef::default();

    let validate_input_on_blur = {
        let cloned_form = form.clone();
        let cloned_validation_errors = validation_errors.clone();
        Callback::from(move |(name, value): (String, String)| {
            let mut data = cloned_form.deref().clone();
            match name.as_str() {
                "email" => data.email = value,
                "password" => data.password = value,
                _ => (),
            }
            cloned_form.set(data);

            match cloned_form.validate() {
                Ok(_) => {
                    cloned_validation_errors
                        .borrow_mut()
                        .errors_mut()
                        .remove(name.as_str());
                }
                Err(errors) => {
                    cloned_validation_errors
                        .borrow_mut()
                        .errors_mut()
                        .retain(|key, _| key != &name);
                    for (field_name, error) in errors.errors() {
                        if field_name == &name {
                            cloned_validation_errors
                                .borrow_mut()
                                .errors_mut()
                                .insert(field_name.clone(), error.clone());
                        }
                    }
                }
            }
        })
    };

    let handle_email_input = get_input_callback("email", form.clone());
    let handle_password_input = get_input_callback("password", form.clone());

    let on_submit = {
        let cloned_form = form.clone();
        let cloned_validation_errors = validation_errors.clone();
        let store_dispatch = dispatch.clone();
        let cloned_navigator = navigator.clone();

        let cloned_email_input_ref = email_input_ref.clone();
        let cloned_password_input_ref = password_input_ref.clone();

        Callback::from(move |event: SubmitEvent| {
            event.prevent_default();

            let dispatch = store_dispatch.clone();
            let form = cloned_form.clone();
            let validation_errors = cloned_validation_errors.clone();
            let navigator = cloned_navigator.clone();

            let email_input_ref = cloned_email_input_ref.clone();
            let password_input_ref = cloned_password_input_ref.clone();

            spawn_local(async move {
                match form.validate() {
                    Ok(_) => {
                        let form_data = form.deref().clone();
                        set_page_loading(true, dispatch.clone());

                        let email_input = email_input_ref.cast::<HtmlInputElement>().unwrap();
                        let password_input = password_input_ref.cast::<HtmlInputElement>().unwrap();

                        email_input.set_value("");
                        password_input.set_value("");

                        let form_json = serde_json::to_string(&form_data).unwrap();
                        let res = api_login_user(&form_json).await;
                        match res {
                            Ok(_) => {
                                set_page_loading(false, dispatch);
                                navigator.push(&router::Route::ProfilePage);
                            }
                            Err(e) => {
                                set_page_loading(false, dispatch.clone());
                                set_show_alert(e.to_string(), dispatch);
                            }
                        };
                    }
                    Err(e) => {
                        validation_errors.set(Rc::new(RefCell::new(e)));
                    }
                }
            });
        })
    };

    html! {
    <section class="bg-ct-blue-600 min-h-screen grid place-items-center">
      <div class="w-full">
        <h1 class="text-4xl xl:text-6xl text-center font-[600] text-ct-yellow-600 mb-4">
          {"Welcome Back"}
        </h1>
        <h2 class="text-lg text-center mb-4 text-ct-dark-200">
          {"Login to have access"}
        </h2>
          <form
            onsubmit={on_submit}
            class="max-w-md w-full mx-auto overflow-hidden shadow-lg bg-ct-dark-200 rounded-2xl p-8 space-y-5"
          >
            <FormInput label="Email" name="email" input_type="email" input_ref={email_input_ref} handle_onchange={handle_email_input} errors={&*validation_errors} handle_on_input_blur={validate_input_on_blur.clone()} />
            <FormInput label="Password" name="password" input_type="password" input_ref={password_input_ref} handle_onchange={handle_password_input} errors={&*validation_errors} handle_on_input_blur={validate_input_on_blur.clone()}/>

            <div class="text-right">
              <a href="#">
                {"Forgot Password?"}
              </a>
            </div>
            <LoadingButton
              loading={store.page_loading}
              text_color={Some("text-ct-blue-600".to_string())}
            >
              {"Login"}
            </LoadingButton>
            <span class="block">
              {"Need an account?"} {" "}
              <Link<Route> to={Route::RegisterPage} classes="text-ct-blue-600">{ "Sign Up Here" }</Link<Route>>
            </span>
          </form>
      </div>
    </section>
    }
}
In the above code, we defined several NodeRefs, which are references to specific nodes in the DOM. These NodeRef‘s will be used to access and reset the values of the email and password input fields when the form is submitted.
To handle changes to the input fields, we’ve defined the get_input_callback function which takes in the name of the input field and a cloned form, and returns a Callback that updates the corresponding field in the form whenever the input value changes.
In order to validate the input fields, we’ve created the validate_input_on_blur callback which is called whenever an input field loses focus. The handle_email_input and handle_password_input callbacks update the relevant fields in the login form whenever their corresponding input values change.
Finally, when the form is submitted, the on_submit callback will validate the form and call the api_login_user function to log in the user if it is valid. If the login attempt is successful, the user is redirected to the profile page. However, if it fails, the toast notification component will be used to display any errors.
Add the Logout Functionality to the Header
Now that user registration and login functionalities have been implemented, the next step is to add the logout feature. The Header component is a convenient place to include the logout logic, and we can achieve this by replacing its existing code with the following snippets.
src/components/header.rs
use crate::{
    api::user_api::api_logout_user,
    router::{self, Route},
    store::{set_auth_user, set_page_loading, set_show_alert, Store},
};
use wasm_bindgen_futures::spawn_local;
use yew::prelude::*;
use yew_router::prelude::*;
use yewdux::prelude::*;

#[function_component(Header)]
pub fn header_component() -> Html {
    let (store, dispatch) = use_store::<Store>();
    let user = store.auth_user.clone();
    let navigator = use_navigator().unwrap();

    let handle_logout = {
        let store_dispatch = dispatch.clone();
        let cloned_navigator = navigator.clone();

        Callback::from(move |_: MouseEvent| {
            let dispatch = store_dispatch.clone();
            let navigator = cloned_navigator.clone();
            spawn_local(async move {
                set_page_loading(true, dispatch.clone());
                let res = api_logout_user().await;
                match res {
                    Ok(_) => {
                        set_page_loading(false, dispatch.clone());
                        set_auth_user(None, dispatch.clone());
                        set_show_alert("Logged out successfully".to_string(), dispatch);
                        navigator.push(&router::Route::LoginPage);
                    }
                    Err(e) => {
                        set_show_alert(e.to_string(), dispatch.clone());
                        set_page_loading(false, dispatch);
                    }
                };
            });
        })
    };

    html! {
        <header class="bg-white h-20">
        <nav class="h-full flex justify-between container items-center">
          <div>
            <Link<Route> to={Route::HomePage} classes="text-ct-dark-600">{"CodevoWeb"}</Link<Route>>
          </div>
          <ul class="flex items-center gap-4">
            <li>
              <Link<Route> to={Route::HomePage} classes="text-ct-dark-600">{"Home"}</Link<Route>>
            </li>
            if user.is_some() {
               <>
                <li>
                  <Link<Route> to={Route::ProfilePage} classes="text-ct-dark-600">{"Profile"}</Link<Route>>
                </li>
                <li
                  class="cursor-pointer"
                >
                  {"Create Post"}
                </li>
                <li class="cursor-pointer" onclick={handle_logout}>
                  {"Logout"}
                </li>
              </>

            } else {
              <>
                <li>
                  <Link<Route> to={Route::RegisterPage} classes="text-ct-dark-600">{"SignUp"}</Link<Route>>
                </li>
                <li>
                  <Link<Route> to={Route::LoginPage} classes="text-ct-dark-600">{"Login"}</Link<Route>>
                </li>
              </>
            }
          </ul>
        </nav>
      </header>
    }
}
When the user clicks on the logout button in the navigation menu, the handle_logout callback will be triggered, which will call the api_logout_user() function to send the logout request to the backend API.
If the request is successful, the user will be redirected to the login page. However, If the request is unsuccessful, a toast notification will be displayed to show the error sent by the backend server.
Create the Remaining Yew Pages
Let’s create the remaining Yew components to have more pages to navigate through.
Create the Home Page Component
This is the Home page that will display a simple message in the UI when the user lands on the root route.
src/pages/home_page.rs
use crate::components::header::Header;
use yew::prelude::*;

#[function_component(HomePage)]
pub fn home_page() -> Html {
    html! {
      <>
        <Header />
        <section class="bg-ct-blue-600 min-h-screen pt-20">
            <div class="max-w-4xl mx-auto bg-ct-dark-100 rounded-md h-[20rem] flex justify-center items-center">
                <p class="text-3xl font-semibold">{"Welcome to Rust, Yew.rs and WebAssembly"}</p>
            </div>
        </section>
      </>
    }
}
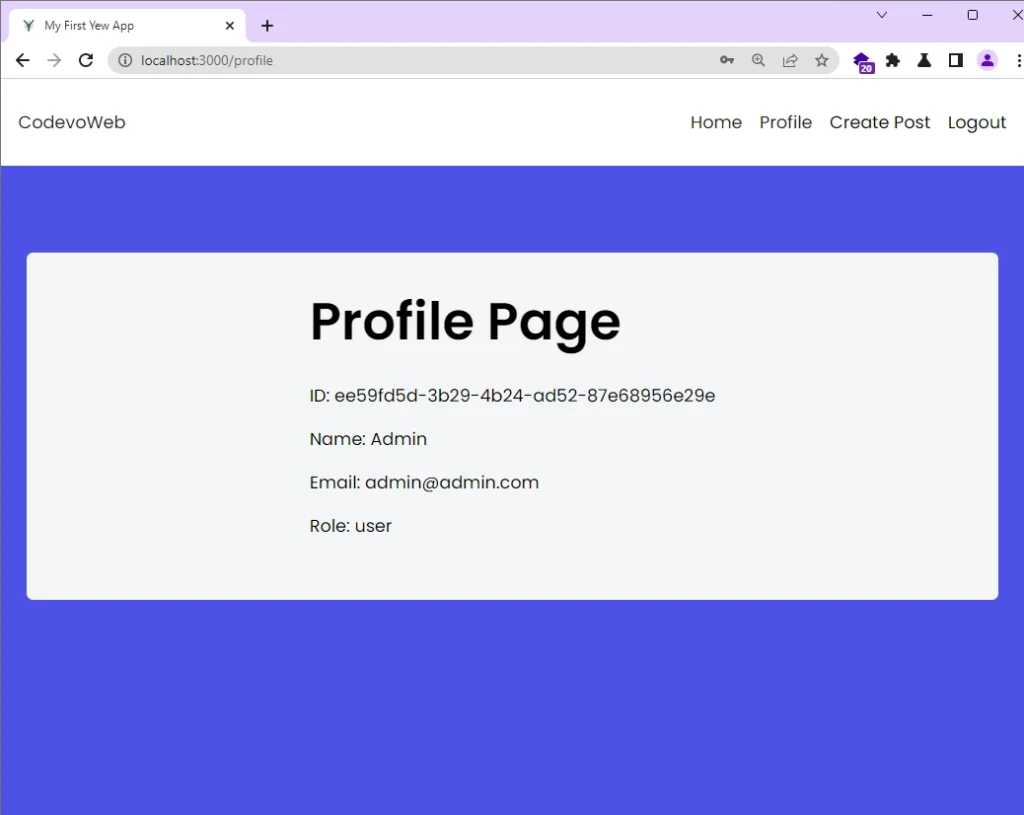
Create the Profile Page Component
To demonstrate how protected pages work in Yew.rs, let’s create a profile page that will display the authenticated user’s profile information in the UI. After successful authentication, the login component will redirect the user to the profile page by default.
Once the user lands on this page, the use_effect_with_deps hook will execute, which will trigger the asynchronous code within the wasm_bindgen_futures::spawn_local() method to fetch the authenticated user’s credentials using the api_user_info() method.
If the request resolves successfully, the DOM will be updated to display the user’s profile information in the UI. However, if the backend returns an error with the message “You are not logged in“, the user will be redirected to the login page.
src/pages/profile_page.rs
use crate::{
    api::user_api::api_user_info,
    components::header::Header,
    router,
    store::{set_auth_user, set_page_loading, set_show_alert, Store},
};
use yew::prelude::*;
use yew_router::prelude::use_navigator;
use yewdux::prelude::*;

#[function_component(ProfilePage)]
pub fn profile_page() -> Html {
    let (store, dispatch) = use_store::<Store>();
    let user = store.auth_user.clone();
    let navigator = use_navigator().unwrap();

    use_effect_with_deps(
        move |_| {
            let dispatch = dispatch.clone();
            wasm_bindgen_futures::spawn_local(async move {
                set_page_loading(true, dispatch.clone());
                let response = api_user_info().await;
                match response {
                    Ok(user) => {
                        set_page_loading(false, dispatch.clone());
                        set_auth_user(Some(user), dispatch);
                    }
                    Err(e) => {
                        set_page_loading(false, dispatch.clone());
                        if e.contains("You are not logged in") {
                            navigator.push(&router::Route::LoginPage);
                        }
                        set_show_alert(e.to_string(), dispatch);
                    }
                }
            });
        },
        (),
    );

    html! {
    <>
      <Header />
      <section class="bg-ct-blue-600 min-h-screen pt-20">
        <div class="max-w-4xl mx-auto bg-ct-dark-100 rounded-md h-[20rem] flex justify-center items-center">
          <div>
            <p class="text-5xl font-semibold">{"Profile Page"}</p>
            if let Some(user) = user {
              <div class="mt-8">
                <p class="mb-4">{format!("ID: {}", user.id)}</p>
                <p class="mb-4">{format!("Name: {}", user.name)}</p>
                <p class="mb-4">{format!("Email: {}", user.email)}</p>
                <p class="mb-4">{format!("Role: {}", user.role)}</p>
              </div>
            }else {
              <p class="mb-4">{"Loading..."}</p>
            }
          </div>
        </div>
      </section>
    </>
    }
}
Setup Routes using the Yew Router Crate
Now that we’ve created all the pages for our application. The next step is to define routes for them using the yew_router crate. To do this, create a new file called router.rs within the “src” directory and add the following code to it.
src/router.rs
use yew::prelude::*;
use yew_router::prelude::*;

use crate::pages::{
    home_page::HomePage, login_page::LoginPage, profile_page::ProfilePage,
    register_page::RegisterPage,
};

#[derive(Clone, Routable, PartialEq)]
pub enum Route {
    #[at("/")]
    HomePage,
    #[at("/register")]
    RegisterPage,
    #[at("/login")]
    LoginPage,
    #[at("/profile")]
    ProfilePage,
}

pub fn switch(routes: Route) -> Html {
    match routes {
        Route::HomePage => html! {<HomePage/> },
        Route::RegisterPage => html! {<RegisterPage/> },
        Route::LoginPage => html! {<LoginPage/> },
        Route::ProfilePage => html! {<ProfilePage/> },
    }
}
Moving on, let’s create an App component that will serve as the main entry point of our application. To enable the yew_router library to handle the navigation, we’ll wrap the entire app with the BrowserRouter component and utilize the Switch component to render the appropriate page based on the current route.
src/app.rs
use crate::components::{
    alert::{AlertComponent, Props as AlertProps},
    spinner::Spinner,
};
use yew::prelude::*;
use yew_router::prelude::*;
use yewdux::prelude::use_store;

use crate::router::{switch, Route};
use crate::store::Store;

#[function_component(App)]
pub fn app() -> Html {
    let (store, _) = use_store::<Store>();
    let message = store.alert_input.alert_message.clone();
    let show_alert = store.alert_input.show_alert;
    let is_page_loading = store.page_loading.clone();

    let alert_props = AlertProps {
        message,
        delay_ms: 5000,
    };
    html! {
        <BrowserRouter>
                <Switch<Route> render={switch} />
                if show_alert {
                    <AlertComponent
                        message={alert_props.message}
                        delay_ms={alert_props.delay_ms}
                     />
                }
                if is_page_loading {
                    <div class="pt-4 pl-2 top-[5.5rem] fixed">
                        <Spinner width={Some("1.5rem")} height={Some("1.5rem")} color="text-ct-yellow-600" />
                    </div>
                }
        </BrowserRouter>
    }
}
Render the Yew Application in the Main File
To complete the application, we need to include all the necessary modules at the top of the main file. After that, we can use Yew’s Renderer struct and render() method within the main function to display the Yew application in the browser window.
src/main.rs
mod api;
mod app;
mod components;
mod pages;
mod router;
mod store;

fn main() {
    yew::Renderer::<app::App>::new().render();
}
Now you can launch the Trunk dev server by running trunk serve --port 3000 . Then, visit http://localhost:3000/ to view the Yew application.
Test the Yew Application in the Browser
At this point, we are ready to test the Yew application. To do so, you’ll first need to follow the instructions provided in the “Run the Yew.rs Web App with a Rust API” section to quickly launch the backend API.
Visit the Home Page
When you visit the root route http://localhost:3000/, you’ll see the message displayed by the Home page component.

Register a New User
On the account registration page, you can provide the necessary credentials and click the “SIGN UP” button to create a new account. If the request is successful, you’ll be redirected to the login page.
Login the User
To log in to the Yew application, enter the credentials used during the account registration on the login page and click the “Login” button. If the login request is successful, you will be redirected to the Profile page where your public credentials will be displayed.
Access the Protected Page
On the profile page, your account credentials will be displayed in the UI. Only users with valid JWTs can access this protected page. To log out from the application, simply click on the “Logout” link located in the navigation menu.
Conclusion
And we are done! You can find the complete source code of the Rust Yew.rs web application on GitHub.
This tutorial walked you through the process of building a Rust frontend application with Yew.rs and WebAssembly. You gained knowledge on handling form validation, accessing input values, and resetting input fields. Additionally, you learned how to utilize Web APIs from the web-sys crate.
I hope you found this article helpful and enjoyable. If you have any questions, please feel free to leave a comment below.