
In this tutorial, you’ll learn how to create a feedback frontend application using Rust, Yew.rs, WebAssembly, and Tailwind CSS. You’ll discover how to manage the application state globally with the Yewdux crate and store feedback items locally using the localStorage API. This will allow you to access your feedback items even after refreshing your browser.
To give your app a visually appealing design, we’ll use Tailwind CSS to style the Yew.rs components. Tailwind CSS is a popular and user-friendly CSS framework that makes it easy to create beautiful and responsive designs. Although there are CSS-in-Rust styling solutions and Yew.rs styling component libraries available, I opted for Tailwind CSS due to its simplicity.
It’s worth mentioning that the original version of this application was created in Svelte by Brad Traversy on YouTube, so be sure to check him out and show him some love. However, I decided to rewrite the code in Rust using the Yew.rs framework.
By the end of this tutorial, you’ll have a solid understanding of how to build a feedback app with all the essential features, including creating and deleting feedback items and saving them in localStorage for future reference. So, let’s get started and explore the world of Rust and Yew.rs together!
More practice:
- Frontend App with Rust and Yew.rs: User SignUp and Login
- Rust – JWT Authentication with Actix Web
- Build a Simple API in Rust
- Build a Simple API with Rust and Rocket
- Build a CRUD API with Rust and MongoDB
- Build a Simple API with Rust and Actix Web
Run the Rust Yew.rs Web App Locally
To run the Rust Yew.rs web app on your machine, follow these steps:
- First, make sure you have Rust installed on your machine. You’ll also need to install the WebAssembly target, which you can do by visiting https://yew.rs/docs/getting-started/introduction. Additionally, ensure that you have the Trunk tool installed if you haven’t done so already.
- Next, download or clone the Rust Yew.rs feedback project from https://github.com/wpcodevo/rust-yew-app and open the source code in your preferred code editor.
- Open the integrated terminal and run the command
trunk buildin your IDE or text editor. This will install the necessary crates and create asset-build pipelines for the assets specified in theindex.htmltarget. - Once the installation of the necessary crates and asset build pipelines is complete, you can start the Yew web server by running the command
trunk serve --port 3000. This will create a local web server on your machine that can be accessed through your web browser atlocalhost:3000. - Finally, interact with the app to create, delete, and load feedback items.
Bootstrap the Yew.rs Project
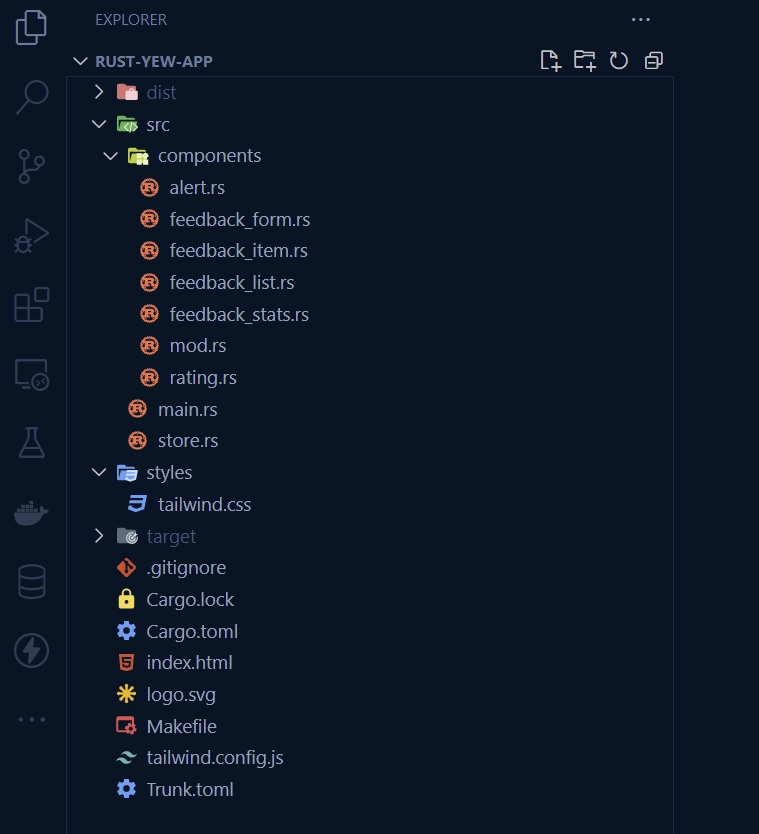
After completing this tutorial, your file and folder structures will resemble the screenshot below.
To get started, open the terminal in a convenient location on your machine. Then, use the following commands to create a folder named ‘rust-yew-app‘, navigate into the folder, and initialize the Rust project.
mkdir rust-yew-app
cd rust-yew-app
cargo init
Now that we have initialized the Rust project, let’s proceed to install all the necessary crates and packages that we will need for the project by running the following commands:
cargo add yew --features csr
cargo add serde --features derive
cargo add uuid --features "serde v4"
cargo add gloo
cargo add yewdux
cargo add wasm-bindgen
cargo add web-sys --features "HtmlInputElement Window"
yew– A Rust framework for building web applications with WebAssembly, based on React and Elm architectures.serde– For serializing and deserializing Rust data structures.gloo– This crate provides an easy-to-use API for interacting with the web platform, including DOM manipulation and event handling, and can be used in conjunction with other Rust web frameworks such aswasm-bindgenand Yew.yewdux– The Yewdux crate is a simple and lightweight state management library for the Yew.rs framework. It allows you to manage your application’s state in a predictable, testable, and reusable way, similar to the popular Redux library in the JavaScript ecosystem.wasm-bindgen– Is a Rust library that facilitates high-level interactions between WebAssembly modules and JavaScript. It provides a bridge between Rust and JavaScript, allowing Rust code to be called from JavaScript and vice versa.
Additionally, it automates the conversion of JavaScript types to their equivalent Rust types, making it easier to work with data between the two languages.web-sys– This crate provides Rust bindings to the Web APIs exposed by browsers, allowing Rust code to interact with browser features such as the DOM, Web Workers, WebSockets, and others. It provides a safe and Rust-native way to access the browser’s features and APIs from a Rust application compiled into WebAssembly.
Please note that Rust and its associated crates are constantly evolving, and the latest versions may introduce breaking changes that can impact your application. In the event that you encounter any issues, you can revert to the versions specified in the Cargo.toml file provided below.
Additionally, if you encounter any breaking changes that are not accounted for, please leave a comment so that I can make the necessary updates.
Cargo.toml
[package]
name = "rust-yew-app"
version = "0.1.0"
edition = "2021"

# See more keys and their definitions at https://doc.rust-lang.org/cargo/reference/manifest.html

[dependencies]
gloo = "0.8.0"
serde = { version = "1.0.152", features = ["derive"] }
uuid = { version = "1.3.0", features = ["serde", "v4", "js"] }
wasm-bindgen = "0.2.84"
web-sys = { version = "0.3.61", features = ["HtmlInputElement", "Window"] }
yew = { version = "0.20.0", features = ["csr"] }
yewdux = "0.9.2"
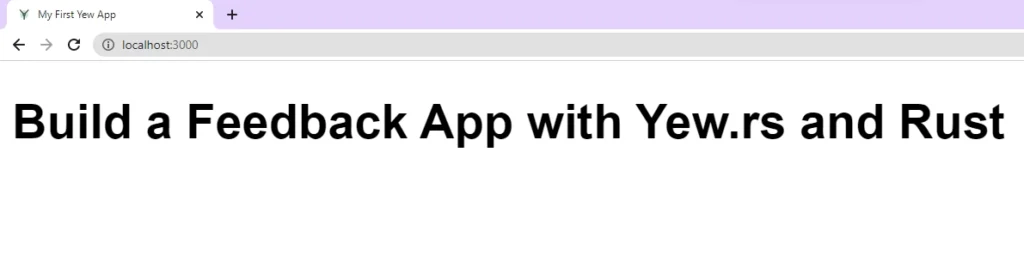
Let’s now create a simple Yew.rs component to ensure that our installation and setup are correct. To do this, open the src/main.rs file and replace its contents with the following code. This code will print a “Build a Feedback App with Yew.rs and Rust” message in a h1 tag:
src/main.rs
use yew::prelude::*;

#[function_component]
fn App() -> Html {
    html! {
        <h1>
            {"Build a Feedback App with Yew.rs and Rust"}
        </h1>
    }
}

fn main() {
    yew::Renderer::<App>::new().render();
}
Similar to Vite or Webpack in JavaScript, Rust also has a web application bundler called Trunk, which performs tasks such as automatic asset optimization, live reloading during development, and seamless integration with popular web deployment platforms.
Trunk uses the contents of an index.html file located in the root directory to generate an index.js file that initializes the Yew application and loads all the required assets and dependencies. Therefore, we need to create an index.html file in the root directory and generate a boilerplate HTML code in it.
index.html
<!DOCTYPE html>
<html lang="en">
  <head>
    <meta charset="UTF-8" />
    <meta http-equiv="X-UA-Compatible" content="IE=edge" />
    <meta name="viewport" content="width=device-width, initial-scale=1.0" />
    <title>My First Yew App</title>
  </head>
  <body></body>
</html>
To start the local web server on your machine, run the command trunk serve --port 3000. By default, Trunk starts the development server on port 8080, but you can specify a different port by passing the --port flag with the desired value.
Once the server is up and running, navigate to http://localhost:3000 to preview the web app.
Setup Tailwind CSS
Let’s configure Tailwind CSS to style our Yew components. Typically, this would require creating a package.json file in the root directory to install the tailwindcss library and its peer dependencies. However, since we’re using Rust, we can utilize npx to run the Tailwind CSS commands without adding unnecessary files and folders to the codebase.
To generate the tailwind.config.js and postcss.config.js configuration files, execute the following command:
npx tailwindcss init -p
Next, let’s configure Tailwind CSS to recognize all of the Rust template files in our project and add some custom colors and fonts. To achieve this, we need to open the tailwind.config.js file and replace its current content with the following configuration options:
tailwind.config.js
/** @type {import('tailwindcss').Config} */
module.exports = {
  content: [
    "./index.html",
    "./src/**/*.{rs,html}"
  ],
  theme: {
    extend: {
      fontFamily: {
        Poppins: ['Poppins, sans-serif'],
      },
      container: {
        center: true,
        padding: '1rem',
        screens: {
          lg: '1125px',
          xl: '1125px',
          '2xl': '1125px',
        },
      },
    },
  },
  plugins: [],
};
Create a “styles” folder in the root directory if it doesn’t already exist. Within the “styles” folder, create a tailwind.css file and add the following code to house the Tailwind CSS directives and font import.
styles/tailwind.css
@import url('https://fonts.googleapis.com/css2?family=Poppins:wght@300;400;500;600;700&display=swap');

@tailwind base;
@tailwind components;
@tailwind utilities;

html {
    font-family: 'Poppins', sans-serif;
}

body {
    background-color: #202142;
}
Let’s automate the generation of the CSS file to ensure that it is always up to date without the need for manual intervention. Instead of manually compiling the styles/tailwind.css file and generating only the necessary styles used in the Yew.rs project, we can utilize Trunk’s post-build hook.
This hook will automatically generate the CSS after the rest of the build is complete, just before the content of the staging folder is copied over to the dist directory. To set this up, create a Trunk.toml file in the root directory and add the following code:
Trunk.toml
[[hooks]]
stage = "post_build"
command = "sh"
command_arguments = ["-c", "npx tailwindcss -i ./styles/tailwind.css -o ./dist/.stage/index.css"]
Finally, let’s include a link to the index.css file in the index.html file so that the generated CSS styles are applied to the Yew.rs templates. This can be done by adding the following code inside the head element of the index.html file:
index.html
<!DOCTYPE html>
<html lang="en">
  <head>
    <meta charset="UTF-8" />
    <meta http-equiv="X-UA-Compatible" content="IE=edge" />
    <meta name="viewport" content="width=device-width, initial-scale=1.0" />
    <link data-trunk rel="icon" href="logo.svg" type="image/svg" />
    <link rel="stylesheet" href="./index.css" />
    <title>My First Yew App</title>
  </head>
  <body></body>
</html>
With this addition, the Yew.rs project will now be styled using the Tailwind CSS framework and the generated CSS will be automatically updated whenever changes are made to the Yew.rs templates.
The code we added to index.html also sets the application’s favicon using a logo.svg file. To obtain the Yew.rs SVG logo, simply visit their official website, right-click on the logo, save it as a file with the name logo.svg, and place it in the root directory of your project.
To confirm that we have configured everything correctly, start the local dev server using the command trunk serve --port 3000. This will launch the application on port 3000, allowing you to view it in your web browser and verify that the configuration changes have been applied successfully.
Create a Global Store with Yewdux
Now that we’ve configured everything as mentioned above, let’s set up a global state using the Yewdux crate. Although Yew provides a Context API for managing application states globally, it has some limitations, so we’ll be using the Yewdux library instead.
Rather than embedding state mutation logic within Yew.rs components, we’ll define separate functions that will act as setters to mutate the states in the store. We’ll place these functions in the same file where the store is defined to improve code separation. Furthermore, we’ll utilize the #[store()] macro to persist the store in local storage.
To define the store and functions for state mutation, navigate to the src directory and create a new file called store.rs. Inside this file, add the following code:
src/store.rs
use serde::{Deserialize, Serialize};
use yewdux::prelude::*;

#[derive(Debug, Deserialize, Serialize, PartialEq, Clone)]
pub struct Feedback {
    pub id: uuid::Uuid,
    pub text: String,
    pub rating: u8,
}

#[derive(Debug, PartialEq, Serialize, Deserialize, Default, Clone)]
pub struct AlertInput {
    pub show_alert: bool,
    pub alert_message: String,
}

#[derive(Default, PartialEq, Serialize, Deserialize, Store, Clone)]
#[store(storage = "local", storage_tab_sync)]
pub struct Store {
    pub feedbacks: Vec<Feedback>,
    pub loading: bool,
    pub alert_input: AlertInput,
}

pub fn set_feedback(feedback: Feedback, dispatch: Dispatch<Store>) {
    dispatch.reduce_mut(move |store| {
        store.feedbacks.insert(0, feedback);
    })
}

pub fn delete_feedback(id: uuid::Uuid, dispatch: Dispatch<Store>) {
    dispatch.reduce_mut(move |store| {
        store.feedbacks.retain(|f| f.id != id);
    })
}

pub fn set_loading(loading: bool, dispatch: Dispatch<Store>) {
    dispatch.reduce_mut(move |store| {
        store.loading = loading;
    })
}

pub fn set_show_alert(message: String, dispatch: Dispatch<Store>) {
    dispatch.reduce_mut(move |store| {
        store.alert_input = AlertInput {
            alert_message: message,
            show_alert: true,
        };
    })
}

pub fn set_hide_alert(dispatch: Dispatch<Store>) {
    dispatch.reduce_mut(move |store| {
        store.alert_input.show_alert = false;
    })
}
By default, the store in Yew is local to each tab. This means that if the application is open in multiple tabs, the store will not be updated in any tab other than the current one. However, by passing storage_tab_sync to the #[store()] macro, the store will be synced in all tabs. This allows us to maintain a consistent global state across all tabs in the application.
Create Reusable Yew.rs Components
When developing software, it’s always a good idea to follow the DRY (Don’t Repeat Yourself) principle to avoid repeating code. So let’s create some reusable Yew.rs components that we can use in multiple files. To make them look good and responsive, we’ll style them with Tailwind CSS.
Alert Notification Component
The first component we’ll build is an alert notification component, which will allow us to display messages in the UI that disappear after a given number of seconds, making it useful for showing error messages and giving feedback to the user.
To get started, navigate to the src directory and create a new folder called components. Inside the components folder, create a file called alert.rs and add the following code to define the Alert component.
src/components/alert.rs
use gloo::timers::callback::Timeout;
use yew::prelude::*;
use yewdux::prelude::use_store;

use crate::store::{set_hide_alert, Store};

#[derive(Debug, PartialEq, Properties)]
pub struct Props {
    pub message: String,
    pub delay_ms: u32,
}

#[function_component]
pub fn AlertComponent(props: &Props) -> Html {
    let (store, dispatch) = use_store::<Store>();
    let show_alert = store.alert_input.show_alert;

    use_effect_with_deps(
        move |(show_alert, dispatch, delay_ms)| {
            let cloned_dispatch = dispatch.clone();
            if *show_alert {
                let handle =
                    Timeout::new(*delay_ms, move || set_hide_alert(cloned_dispatch)).forget();
                let clear_handle = move || {
                    web_sys::Window::clear_timeout_with_handle(
                        &web_sys::window().unwrap(),
                        handle.as_f64().unwrap() as i32,
                    );
                };

                Box::new(clear_handle) as Box<dyn FnOnce()>
            } else {
                Box::new(|| {}) as Box<dyn FnOnce()>
            }
        },
        (show_alert, dispatch.clone(), props.delay_ms),
    );

    html! {
    <div id="myToast" class={format!("fixed top-14 right-10 px-5 py-4 border-r-8 border-orange-500 bg-white drop-shadow-lg {}", if show_alert { "" } else { "hidden" })}>
        <p class="text-sm">
            <span class="mr-2 inline-block px-3 py-1 rounded-full bg-blue-500 text-white font-extrabold">{"i"}</span>
            {props.message.clone()}
        </p>
    </div>
    }
}
To ensure that the alert notification component disappears after a specific duration, we’ll utilize the use_effect_with_deps hook in combination with the setTimeout API. Furthermore, we’ll invoke the clearTimeout() method before the component unmounts to prevent any lingering timeouts.
Rating Component
Our next component is the Rating component, which will allow users to select a rating between 1 and 10 using a list of radio buttons. This component will have an onchange callback function that emits the selected rating value back to the form component.
To create this component, navigate to the components directory and create a new file called rating.rs. Then, add the following code, along with the necessary props.
src/components/rating.rs
use wasm_bindgen::JsCast;
use web_sys::HtmlInputElement;
use yew::prelude::*;

#[derive(Properties, Clone, PartialEq)]
pub struct Props {
    #[prop_or_default]
    pub selected: u8,
    #[prop_or_default]
    pub onchange: Callback<u8>,
}

#[function_component]
pub fn Rating(props: &Props) -> Html {
    let selected = props.selected;

    let onchange = props.onchange.clone();
    let on_input_change = Callback::from(move |event: Event| {
        let target = event.target().unwrap();
        let value = target.unchecked_into::<HtmlInputElement>().value();
        let selected = value.parse::<u8>().unwrap();
        onchange.emit(selected)
    });

    html! {
        <ul class="list-none flex items-center justify-around my-7">
            { for (1..=10).map(|i| {
                let label = i.to_string();
                let id = format!("num{}", i);

                html! {
                    <li class={format!("relative bg-gray-200 w-14 h-14 p-3 text-center rounded-full border-gray-300 border-2 transition duration-300 {}",
                        if selected == i { "bg-pink-500 text-white" } else { "" },
                    )}>
                        <input type="radio" class="opacity-0" id={id.clone()} name="rating" value={Some(i.to_string())} checked={selected == i} onchange={on_input_change.clone()} />
                        <label for={id} class="absolute w-full h-full flex items-center justify-center rounded-full top-1/2 left-1/2 transform -translate-x-1/2 -translate-y-1/2 cursor-pointer hover:bg-pink-500 hover:text-white transition duration-300">{ label }</label>
                    </li>
                }
            })}
        </ul>
    }
}
Create a Form to Add New Feedback Items
Let’s create a Yew component that will allow users to add new feedback items. This component will include a rating selector, text input, and a submit button.
To get started, create a new file called feedback_form.rs in the components folder and add the following code snippets.
src/components/feedback_form.rs
use super::rating::Rating;
use crate::store::{set_feedback, set_loading, set_show_alert, Feedback, Store};
use uuid::Uuid;
use wasm_bindgen::JsCast;
use web_sys::HtmlInputElement;
use yew::prelude::*;
use yewdux::prelude::*;

#[function_component]
pub fn FeedbackForm() -> Html {
    let (store, dispatch) = use_store::<Store>();
    let loading = &store.loading;
    let text = use_state(String::new);
    let rating = use_state(|| 10_u8);
    let min = use_state(|| 10);
    let message = use_state(|| Option::<String>::None);

    let text_input_ref = use_node_ref();

    let handle_select = {
        let rating = rating.clone();
        Callback::from(move |value| {
            rating.set(value);
        })
    };

    let handle_input = {
        let text = text.clone();
        let message = message.clone();
        Callback::from(move |event: InputEvent| {
            let target = event.target().unwrap();
            let value = target.unchecked_into::<HtmlInputElement>().value();
            message.set(None);
            text.set(value);
        })
    };

    let on_submit = {
        let cloned_dispatch = dispatch.clone();
        let rating = rating.clone();
        let text = text.clone();
        let message = message.clone();
        let text_input_ref = text_input_ref.clone();

        Callback::from(move |event: SubmitEvent| {
            let dispatch = cloned_dispatch.clone();
            event.prevent_default();
            set_loading(true, dispatch.clone());

            if text.trim().len() < *min {
                message.set(Some("Text must be at least 10 characters".to_string()));
                set_loading(false, dispatch.clone());
                return;
            }

            let new_feedback = Feedback {
                id: Uuid::new_v4(),
                text: text.to_string(),
                rating: *rating,
            };

            set_feedback(new_feedback, dispatch.clone());
            set_show_alert("Feeback added successfully".to_string(), dispatch.clone());

            let text_input = text_input_ref.cast::<HtmlInputElement>().unwrap();
            text_input.set_value("");
            text.set(String::new());
            rating.set(10);
            set_loading(false, dispatch);
        })
    };

    html! {
        <div class="bg-white text-gray-700 rounded-lg p-8 my-5 relative">
            <header class="max-w-md mx-auto">
                <h2 class="text-center text-2xl font-bold">{"How would you rate your service with us?"}</h2>
            </header>
            <form onsubmit={on_submit}>
                <Rating selected={*rating} onchange={handle_select} />
                <div class="flex border rounded-lg my-4 px-2 py-3">
                    <input
                        type="text"
                        ref={text_input_ref}
                        oninput={handle_input}
                        class="flex-grow border-none text-lg focus:outline-none"
                        placeholder="Tell us something that keeps you coming back"
                    />
                <button
                    type="submit"
                    class={format!(
                        "border-0 rounded-md w-28 h-10 cursor-pointer hover:bg-indigo-500 {}",
                        if *loading { "bg-[#ccc] text-gray-800"} else {"bg-indigo-600 text-white"}
                    )}
                >
                    {"Send"}
                </button>
                </div>
                {if let Some(msg) = message.as_ref() {
                    html! { <div class="pt-3 text-center text-purple-600">{msg.clone()}</div> }
                } else {
                    html! {}
                }}
            </form>
        </div>
    }
}
Let’s review the code above. First, we used Yew’s use_state hook to create local states and Yewdux’s use_store hook to access the global store.
We also created a reference using use_node_ref that we’ll pass to the input element, allowing us to reset its value after the form is submitted. The handle_select callback function is responsible for retrieving the rating value emitted by the Rating component and storing it in the local state.
Similarly, the handle_input callback function retrieves the input field value whenever the user types something into the input field and stores it in the local state.
Upon form submission, the on_submit callback function is called. If the input field is empty or the text is less than 10 characters, an error message is displayed.
If the input field is not empty and the text is longer than 10 characters, the new feedback item will be added to the Yewdux store. Once the feedback item has been successfully added, the values of both the input field and the rating component will be reset to their default values.
Display the Feedback Statistics
Next up, we’ll build a Yew component that displays feedback statistics. This component will access the Yewdux store to retrieve the list of feedback items, calculate the total number of items, and determine the average rating. Once these calculations are complete, the component will display the feedback count and the rating average to the user.
To create this component, create a new file called feedback_stats.rs in the components directory, and add the code snippets provided below.
src/components/feedback_stats.rs
use yew::prelude::*;
use yewdux::prelude::*;

use crate::store::Store;

#[function_component]
pub fn FeedbackStats() -> Html {
    let (store, _) = use_store::<Store>();
    let count = store.feedbacks.len();
    let sum: u32 = store.feedbacks.iter().map(|f| u32::from(f.rating)).sum();

    let average = if count > 0 {
        format!("{:.2}", sum as f32 / count as f32)
    } else {
        "0.0".to_string()
    };

    html! {
        <div class="flex justify-between items-center mb-11">
            <h4 class="text-white">{count} {" "} {"Reviews"}</h4>
            <h4 class="text-white">{"Ratings Average: "} {average}</h4>
        </div>
    }
}
Create a Feedback Item Component
To display the feedback information, we need to create a feedback item component. This component will show the feedback text, rating, and an icon to delete the item. Additionally, we need to implement the functionality to delete a feedback item from the Yewdux store.
We can achieve this by creating an on_delete callback function. When called, the function will prompt the user to confirm their action before removing the feedback item from the store and local storage.
To create the feedback item component, we can create a new file named feedback_item.rs and include the following code snippets.
src/components/feedback_item.rs
use yew::prelude::*;
use yewdux::prelude::*;

use crate::store::{delete_feedback, set_show_alert, Feedback, Store};

#[derive(Debug, PartialEq, Properties)]
pub struct Props {
    pub feedback: Feedback,
}

fn confirm_delete(message: &str) -> bool {
    web_sys::Window::confirm_with_message(&web_sys::window().unwrap(), message).unwrap()
}

#[function_component]
pub fn FeedbackItem(props: &Props) -> Html {
    let (_, dispatch) = use_store::<Store>();

    let on_delete = {
        let cloned_dispatch = dispatch.clone();
        let feedback_id = props.feedback.id.clone();
        Callback::from(move |_: MouseEvent| {
            let dispatch = cloned_dispatch.clone();
            let confirmed = confirm_delete("Do you really want to delete this item?");

            if confirmed {
                delete_feedback(feedback_id, dispatch.clone());
                set_show_alert("Feedback deleted successfully".to_string(), dispatch);
            }
        })
    };

    html! {
        <div class="bg-white text-gray-700 rounded-lg p-8 my-5 relative">
            <div class="bg-pink-500 text-white rounded-full border-2 border-gray-200 w-12 h-12 flex items-center justify-center text-2xl font-bold absolute top-0 left-0 -mt-4 -ml-4">
                {props.feedback.rating}
            </div>
            <button class="absolute font-bold top-2 right-4 cursor-pointer bg-transparent border-none" onclick={on_delete}>{"X"}</button>
            <p>
                {&props.feedback.text}
            </p>
        </div>
    }
}
Display the Feedback Items
Now, let’s build a Yew component that accesses the list of feedback items stored in Yewdux, iterates through them, and uses the FeedbackItem component to display each feedback item.
To achieve this, create a file named feedback_list.rs in the components folder and add the following code:
src/components/feedback_list.rs
use yew::prelude::*;
use yewdux::prelude::*;

use super::feedback_item::FeedbackItem;
use crate::store::Store;

#[function_component]
pub fn FeedbackList() -> Html {
    let (store, _) = use_store::<Store>();
    let feedback_list = store.feedbacks.clone();

    html! {
        <div>
            {
                feedback_list.into_iter().map(|feedback|{
                    let key = feedback.id.to_string();
                    html!{<FeedbackItem {key} feedback={feedback.clone()} />}
                }).collect::<Html>()
            }
        </div>
    }
}
Export the Component Files as Modules
Let’s create a mod.rs file in the “components” folder. This file will be used to export all the defined Yew.rs components as modules, so they can be easily used in other components.
src/components/mod.rs
pub mod alert;
pub mod feedback_form;
pub mod feedback_item;
pub mod feedback_list;
pub mod feedback_stats;
pub mod rating;
Register All the Components in the Main File
So far, we’ve achieved a lot – we’ve created all the necessary Yew.rs components, established a Yewdux store to handle the app’s state, implemented logic to save the store into localStorage, and set up Tailwind CSS to give our components a sleek look.
Now, we’ll tie everything together by incorporating our components into the main entry point of the app. Additionally, we’ll implement logic to display a loading spinner whenever the store’s loading state is true, indicating that there’s an ongoing asynchronous operation.
To get started, navigate to the src/main.rs file and replace its contents with the following code:
src/main.rs
mod components;
mod store;

use components::{
    alert::{AlertComponent, Props as AlertProps},
    feedback_form::FeedbackForm,
    feedback_list::FeedbackList,
    feedback_stats::FeedbackStats,
};
use store::Store;
use yew::prelude::*;
use yewdux::prelude::*;

#[function_component]
fn App() -> Html {
    let (store, _) = use_store::<Store>();
    let message = store.alert_input.alert_message.clone();
    let show_alert = store.alert_input.show_alert;
    let loading = &store.loading;

    let alert_props = AlertProps {
        message,
        delay_ms: 5000,
    };

    html! {
        <>
            if show_alert {
                    <AlertComponent
                        message={alert_props.message}
                        delay_ms={alert_props.delay_ms}
                     />
                }
            <main class="md:container mt-24 px-5">
                <FeedbackForm />
                <FeedbackStats />
                <FeedbackList />
            </main>
            if *loading {
                <div
                    class="fixed top-5 left-5 inline-block h-8 w-8 animate-spin rounded-full border-4 border-solid border-yellow-400 border-r-transparent align-[-0.125em] text-warning motion-reduce:animate-[spin_1.5s_linear_infinite]"
                    role="status">
                    <span
                    class="!absolute !-m-px !h-px !w-px !overflow-hidden !whitespace-nowrap !border-0 !p-0 ![clip:rect(0,0,0,0)]"
                    >{"Loading..."}</span
                >
                </div>
            }
        </>
    }
}

fn main() {
    yew::Renderer::<App>::new().render();
}
Finally, you can start the Trunk dev server by running the command trunk serve --port 3000.
Testing the Yew.rs Feedback Application
Now that the Trunk dev server is up and running, it’s time to test the functionality of the app. To add a new feedback item, simply select a rating radio button, input the feedback text, and hit the “Send” button. This will add the new feedback to the Yewdux store and save it to localStorage.
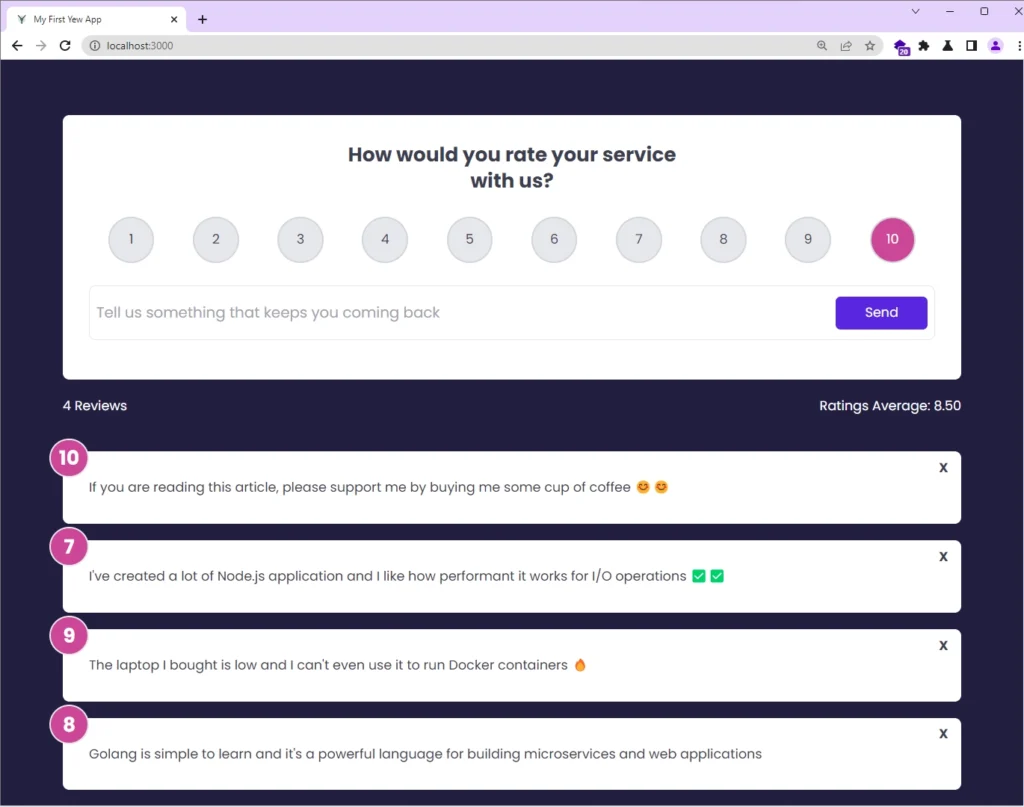
If you need to delete a feedback item, simply click the cross icon located at the top-right corner of the item. Keep in mind that this operation is irreversible, so you will be prompted to confirm your action before the item is deleted from both the store and localStorage.
Conclusion
That’s it! The complete code for this feedback app is available on GitHub.
In this article, we built a Rust-based feedback app from the ground up using Yew.rs, along with some additional useful crates that support WebAssembly.
Our app is packed with all the necessary functionalities, such as adding new feedback, storing the feedback in the Yewdux store, persisting the store in localStorage, displaying the feedback in the UI, and deleting feedback.
We even went one step further by creating a component to display statistics on the number of ratings and their average.
I hope you found this tutorial informative and enjoyable, and please don’t hesitate to leave a comment if you have any questions or feedback. Thank you for reading!