

In this article, you’ll learn how to build a CRUD API in Rust using SQLX, Actix-web, and PostgreSQL. Learning how to build a CRUD API as a developer will equip you with valuable skills for building robust, maintainable, and scalable applications.
Building a CRUD (Create, Read, Update, and Delete) API in Rust can be a daunting task, especially if you’re new to the language. Nonetheless, it can be a relatively straightforward process with the right tools and guidance. We will start from scratch and I will provide clear and easy-to-understand explanations to ensure that even those new to Rust can grasp the information presented in the article.
To summarise, we’ll set up a PostgreSQL server with Docker, migrate the SQL queries to the database using SQLX-CLI, build an API that runs on the Actix-web HTTP server, and persist data in the Postgres database using SQLX.
More practice:
- Build a Simple API in Rust
- Build a Simple API with Rust and Rocket
- Build a CRUD API with Rust and MongoDB
- Build a Simple API with Rust and Actix Web
- Build a CRUD API with Node.js and Sequelize
- Build a CRUD App with FastAPI and SQLAlchemy
- Build a CRUD App with FastAPI and PyMongo
- Build CRUD API with Django REST framework

Prerequisites
To fully grasp the knowledge presented in this article, the following prerequisites are needed.
- You should have Docker installed on your machine. This is required to run the PostgreSQL server and pgAdmin.
- You should have basic knowledge of HTTP and Web development concepts.
- You should have a basic understanding of Rust and its ecosystem.
- Some experience with Actix Web or any Rust web framework will be beneficial.
Run the Rust SQLX Project Locally
- Download or clone the SQLX Rust project from https://github.com/wpcodevo/rust-postgres-crud-sqlx and open the source code in a code editor.
- Start the PostgreSQL server in the Docker container by running
docker-compose up -din the terminal of the root directory. - Run
cargo install sqlx-clito install the SQLX-CLI if you do not already have it. Push the “up” migration script to the PostgreSQL database by runningsqlx migrate run. - Run
cargo r -rto install the necessary crates and start the Actix Web HTTP server. - Import the
Note App.postman_collection.jsonfile into Postman or Thunder Client VS Code extension to test the CRUD API endpoints. Alternatively, you can set up the React app to interact with the API.
Run the Rust SQLX API with a React.js App
For a complete guide on how to build the React.js CRUD app see the post Build a React.js CRUD App using a RESTful API. However, you can follow the steps below to spin up the React application without writing a single line of code.
- Ensure you have Node.js and Yarn installed.
- Download or clone the React CRUD project from https://github.com/wpcodevo/reactjs-crud-note-app and open the source code in an IDE or text editor.
- Install the project’s dependencies by running
yarnoryarn installin the console of the root directory. - Run
yarn devto start the Vite development server. - Open the app on
http://localhost:3000/to test the CRUD functionalities against the Rust API. Note: Do not visit the React app onhttp://127.0.0.1:3000to avoid site can’t be reached or CORS errors.
Setup the Rust Project
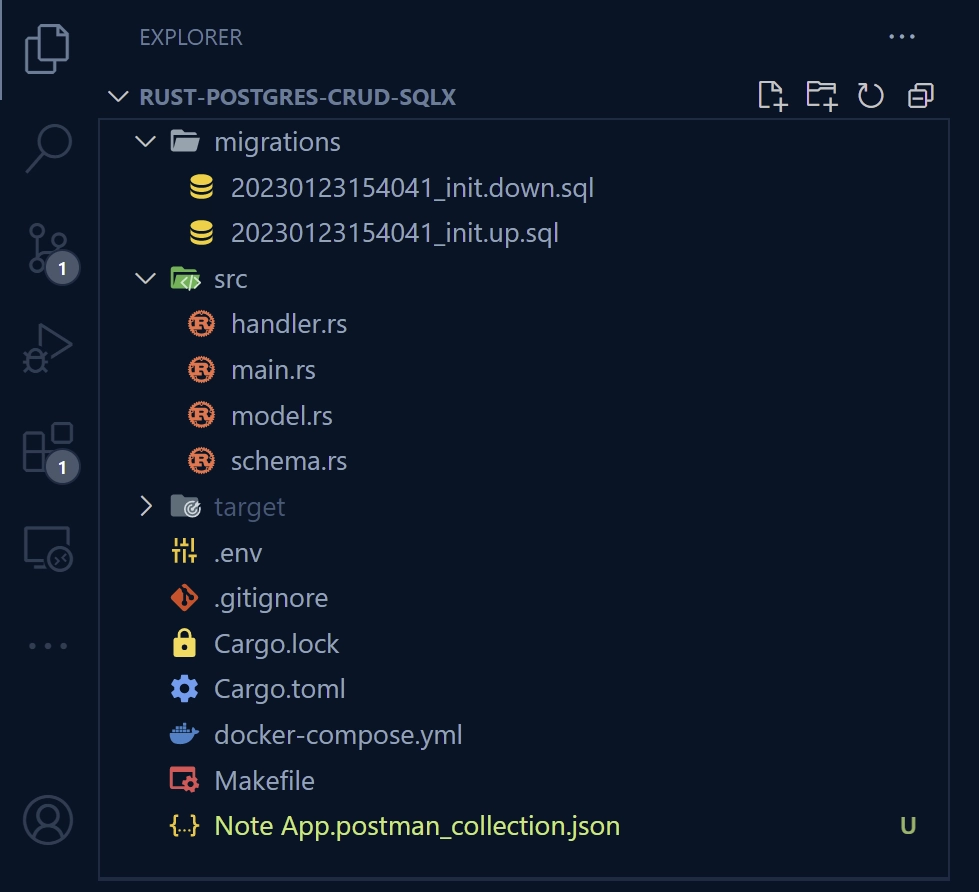
By the end of this tutorial, you’ll have a folder structure that looks somewhat like the screenshot below. Minus the Makefile and Note App.postman_collection.json files.
To begin, let’s create a new folder and initialize the Rust project with Cargo. Go to a convenient location on your machine and create a folder named rust-postgres-crud-sqlx. After that, change into the folder and run the Cargo init command to initialize the Rust project.
mkdir rust-postgres-crud-sqlx
cd rust-postgres-crud-sqlx
cargo init && code .
Once that is done, open the project in an IDE or text editor. In my case, I’ll be using VS Code throughout the tutorial. At this point, we are ready to install the project’s dependencies.
To do this, open the integrated terminal of your IDE and run the following commands to install these crates.
cargo add actix-web
cargo add actix-cors
cargo add serde_json
cargo add serde --features derive
cargo add chrono --features serde
cargo add env_logger
cargo add dotenv
cargo add uuid --features "serde v4"
cargo add sqlx --features "runtime-async-std-native-tls postgres chrono uuid"
actix-web– Is a web framework for Rust. It is built on top of the Actix actor framework and provides a high-performance, async, and scalable web server with support for routing, middleware, and web sockets.actix-cors– A CORS middleware for Actix Web.serde_json– A library for serializing and deserializing JSON data.serde– A library for serializing and deserializing data structures in Rust.chrono– Date and time library for Rust.env_logger– Provides an easy way to configure and initialize a logger using environment variables.dotenv– Load environment variables from a.envfile.uuid– A library to generate and parse UUIDs.sqlx– A Rust SQL toolkit that provides a high-level and ergonomic way to interact with SQL databases.
Since the Rust ecosystem is growing rapidly and libraries are being updated frequently, your code might break when you install the latest versions of the crates.
If you fall into that category, use the versions provided in the Cargo.toml file below.
Cargo.toml
[package]
name = "rust-postgres-crud-sqlx"
version = "0.1.0"
edition = "2021"

# See more keys and their definitions at https://doc.rust-lang.org/cargo/reference/manifest.html

[dependencies]
actix-cors = "0.6.4"
actix-web = "4.2.1"
chrono = { version = "0.4.23", features = ["serde"] }
dotenv = "0.15.0"
env_logger = "0.10.0"
serde = { version = "1.0.152", features = ["derive"] }
serde_json = "1.0.91"
sqlx = { version = "0.6.2", features = ["runtime-async-std-native-tls", "postgres", "uuid", "chrono"] }
uuid = { version = "1.2.2", features = ["serde", "v4"] }
Let’s get a feel of the project by building a basic Actix Web server that responds with a simple JSON object. To do that, replace the content of the src/main.rs file.
src/main.rs
use actix_web::middleware::Logger;
use actix_web::{get, App, HttpResponse, HttpServer, Responder};
use serde_json::json;

#[get("/api/healthchecker")]
async fn health_checker_handler() -> impl Responder {
    const MESSAGE: &str = "Build Simple CRUD API with Rust, SQLX, Postgres,and Actix Web";

    HttpResponse::Ok().json(json!({"status": "success","message": MESSAGE}))
}

#[actix_web::main]
async fn main() -> std::io::Result<()> {
    if std::env::var_os("RUST_LOG").is_none() {
        std::env::set_var("RUST_LOG", "actix_web=info");
    }
    env_logger::init();

    println!("🚀 Server started successfully");

    HttpServer::new(move || {
        App::new()
            .service(health_checker_handler)
            .wrap(Logger::default())
    })
    .bind(("127.0.0.1", 8000))?
    .run()
    .await
}
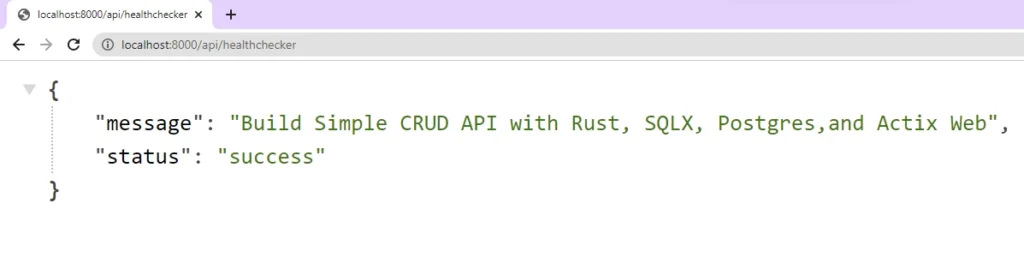
In the above, we imported the necessary modules and created a health_checker_handler route function that returns an HttpResponse object with a status code of 200 and a JSON object containing the message “Build Simple CRUD API with Rust, SQLX, Postgres, and Actix Web“.
In the main function, we added the HTTP request logger, created a new instance of HttpServer , and registered the health_checker_handler function as a service. This means when a GET request is made to the /api/healthchecker endpoint, the health_checker_handler function will be called and the JSON object will be returned as the response.
Finally, we bind the server to the IP address 127.0.0.1 and port 8000 . With the above explanation, you can start the Actix Web HTTP server by running cargo r -r .
However, if you want to automatically restart the server when a file is saved, you need to install the cargo-watch CLI tool.
cargo install cargo-watch
Once the installation is complete, run this command to start the server. Also, the cargo-watch tool will watch the src directory for changes and restart the server.
cargo watch -q -c -w src/ -x run
If you send a GET request to http://localhost:8000/api/healthchecker , it will respond with the JSON object.
Setup PostgreSQL and pgAdmin with Docker
In this section, you’ll set up a PostgreSQL server and pgAdmin with Docker and Docker Compose. Create a docker-compose.yml file in the src directory and add the following configurations.
docker-compose.yml
version: '3'
services:
  postgres:
    image: postgres:latest
    container_name: postgres
    ports:
      - '6500:5432'
    volumes:
      - progresDB:/data/postgres
    env_file:
      - ./.env
  pgAdmin:
    image: dpage/pgadmin4
    container_name: pgAdmin
    env_file:
      - ./.env
    ports:
      - "5050:80"
volumes:
  progresDB:
The postgres service will pull the latest Postgres image from Docker Hub, build the PostgreSQL server with the credentials provided in the .env file, and map port 6500 to the default Postgres port 5432.
Similarly, the pgAdmin service will pull the dpage/pgadmin4 image from Docker Hub, build the container with the credentials provided in the .env file, and map the container’s port 80 to the host’s port 5050.
Since we are reading the pgAdmin and Postgres credentials from the .env file, create a .env file in the root directory and add the following environment variables to make them available to Docker compose.
.env
POSTGRES_HOST=127.0.0.1
POSTGRES_PORT=6500
POSTGRES_USER=admin
POSTGRES_PASSWORD=password123
POSTGRES_DB=rust_sqlx

DATABASE_URL=postgresql://admin:password123@localhost:6500/rust_sqlx?schema=public

PGADMIN_DEFAULT_EMAIL=admin@admin.com
PGADMIN_DEFAULT_PASSWORD=password123
Now run the command below to build and start the Docker containers:
docker-compose up -d
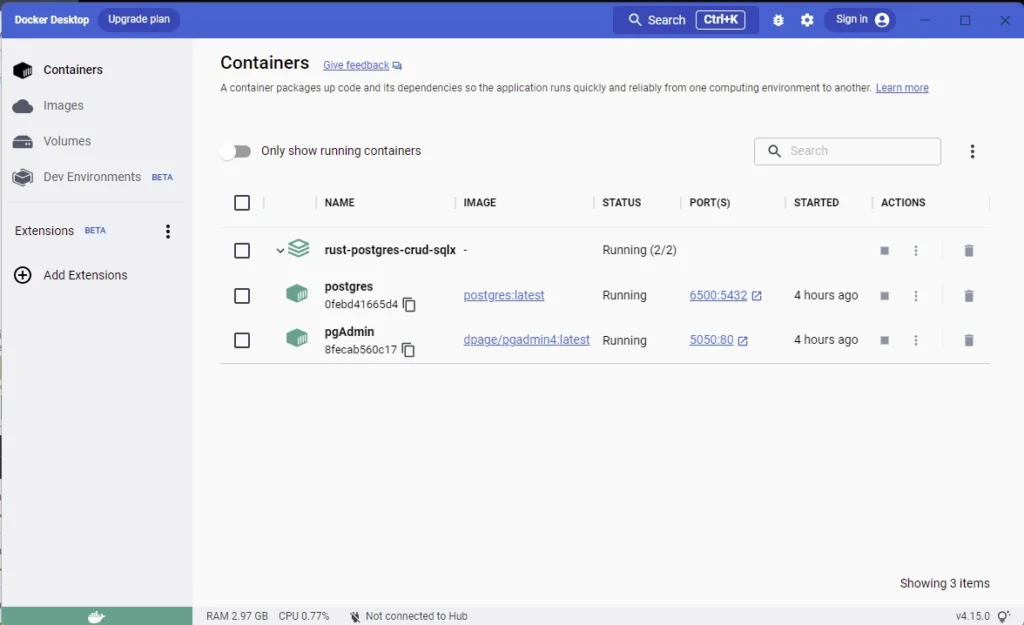
Run docker ps to see the running containers. Alternatively, you can open Docker Desktop to see them.
Create and Migrate the Database Queries
Now that the Postgres server is up and running, let’s define SQL queries in a migration file and push the schema to the Postgres database.
To achieve this, we’ll use the sqlx-cli tool which is built on top of the sqlx library. This tool will allow us to run SQL queries, execute migrations, and inspect the schema of the database directly from the command line.
Run the command below to install the sqlx-cli binary:
cargo install sqlx-cli
Once the installation is done, run this command to create the reversible migration files. This will create a migrations folder that contains the up/down migration files in the root directory. init is the name of the “up” and “down” scripts.
sqlx migrate add -r init
Open the “up” script and add the following SQL queries:
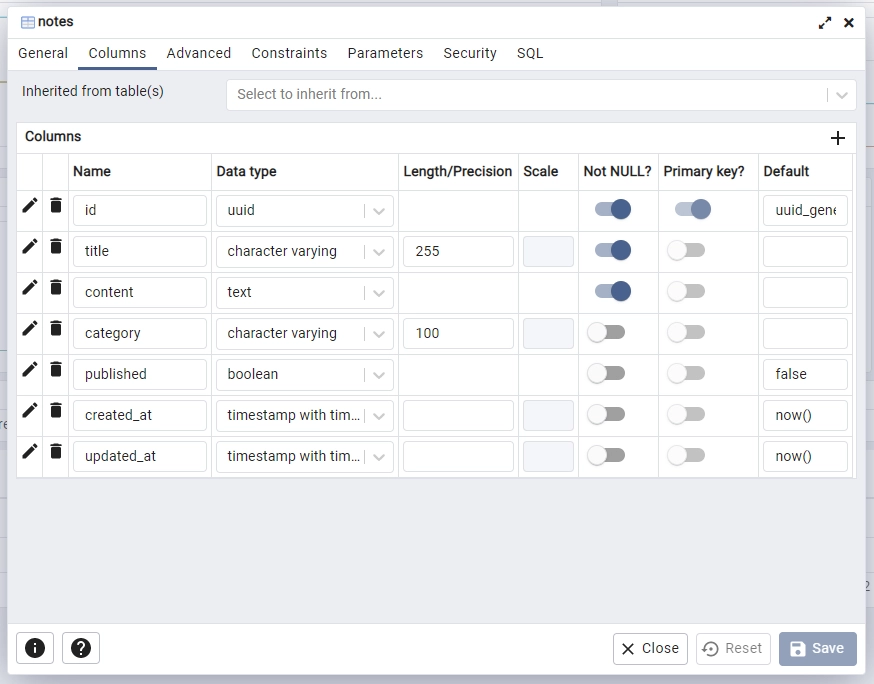
migrations/20230123154041_init.up.sql
CREATE EXTENSION IF NOT EXISTS "uuid-ossp";

CREATE TABLE
    IF NOT EXISTS notes (
        id UUID PRIMARY KEY NOT NULL DEFAULT (uuid_generate_v4()),
        title VARCHAR(255) NOT NULL UNIQUE,
        content TEXT NOT NULL,
        category VARCHAR(100),
        published BOOLEAN DEFAULT FALSE,
        created_at TIMESTAMP
        WITH
            TIME ZONE DEFAULT NOW(),
            updated_at TIMESTAMP
        WITH
            TIME ZONE DEFAULT NOW()
    );
Let’s evaluate the above SQL code:
- First, the
uuid-osspextension will be installed on the Postgres server. This extension provides functions for generating UUIDs. By default, the extension is available but not installed. - Secondly, we created a
notestable that has columns representing the fields of the database Model. Don’t worry, we’ll create the model in a bit.
We used the UUID data type for theidcolumn and evoked theuuid_generate_v4()function to generate a UUID value as the primary key.
Now let’s create the “down” script to revert the changes. Open the “down” script and add this SQL code.
migrations/20230123154041_init.down.sql
DROP TABLE IF EXISTS notes;
Run this command to push the “up” migration script to the database:
sqlx migrate run
Once the migration history has been synced with the running database, let’s use a Postgres client to connect to the Postgres server to see the SQL table created by the SQLX-CLI tool.
Before that, let’s get the IP address of the running Postgres container. To do this, run this command to print the information of the postgres container.
docker inspect postgres
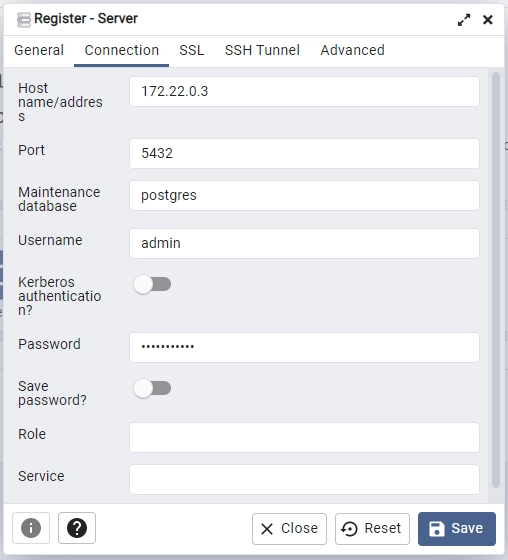
In the terminal, scroll down to the “NetworkSettings” section, and copy the value of the “IPAddress” property. Open http://localhost:5050/ in a new tab to access the pgAdmin dashboard and sign in with the credentials provided in the .env file.
After signing in, click on the “Add New Server” button, provide the required credentials including the IP address you copied earlier as the “Host name/address“, and click on the “Save” button.
Once you’ve signed into the server, go to the Table section of the rust-sqlx database to see the notes table.
Optional: You can run this command to undo the changes that were done by the “up” script. This command will execute the “down” migration script.
sqlx migrate revert
Create the SQLX Database Model
Now let’s create a database model to represent the underlying SQL table. Create a model.rs file in the src directory and add the model below.
src/model.rs
use serde::{Deserialize, Serialize};
use sqlx::FromRow;
use uuid::Uuid;

#[derive(Debug, FromRow, Deserialize, Serialize)]
#[allow(non_snake_case)]
pub struct NoteModel {
    pub id: Uuid,
    pub title: String,
    pub content: String,
    pub category: Option<String>,
    pub published: Option<bool>,
    #[serde(rename = "createdAt")]
    pub created_at: Option<chrono::DateTime<chrono::Utc>>,
    #[serde(rename = "updatedAt")]
    pub updated_at: Option<chrono::DateTime<chrono::Utc>>,
}
The NoteModel struct should implement the sqlx::FromRow trait so that the struct can be mapped to the row of the data returned by the SQL query.
Create the Validation Schemas
To avoid storing junk values or harmful code in the database, let’s create validation schemas to ensure that users provide the right data types in the request bodies.
Create a schema.rs file in the src directory and add the following schema definitions.
src/schema.rs
use serde::{Deserialize, Serialize};

#[derive(Deserialize, Debug)]
pub struct FilterOptions {
    pub page: Option<usize>,
    pub limit: Option<usize>,
}

#[derive(Deserialize, Debug)]
pub struct ParamOptions {
    pub id: String,
}

#[derive(Serialize, Deserialize, Debug)]
pub struct CreateNoteSchema {
    pub title: String,
    pub content: String,
    #[serde(skip_serializing_if = "Option::is_none")]
    pub category: Option<String>,
    #[serde(skip_serializing_if = "Option::is_none")]
    pub published: Option<bool>,
}

#[derive(Serialize, Deserialize, Debug)]
pub struct UpdateNoteSchema {
    pub title: Option<String>,
    pub content: Option<String>,
    pub category: Option<String>,
    pub published: Option<bool>,
}
Create CRUD Route Functions
Oops, quite a lot of configurations, if you made it this far, am proud of you. At this point, we’re ready to create route functions to implement the CRUD functionalities.
These route functions can be considered higher-level CRUD functions since they’ll utilize the lower-level CRUD functions provided by SQLX to access and mutate the Postgres database.
The API will have the following routes:
#[get("/api/notes")]– The function that implements this macro will be called to retrieve a selected list of records.#[post("/api/notes/")]– The function that implements this macro will be called to add a new record to the database.#[get("/api/notes/{id}")]– The function that implements this macro will be evoked to retrieve a single record from the database.#[patch("/api/notes/{id}")]– The function that implements this macro will be called to edit the fields of a record.#[delete("/api/notes/{id}")]– The function that implements this macro will be called to delete a record in the database.
To begin, create a handler.rs file in the src directory and add the following modules.
src/handler.rs
use crate::{
    model::NoteModel,
    schema::{CreateNoteSchema, FilterOptions, UpdateNoteSchema},
    AppState,
};
use actix_web::{delete, get, patch, post, web, HttpResponse, Responder};
use chrono::prelude::*;
use serde_json::json;
Fetch All Records
Here, you’ll perform the first READ operation of CRUD to retrieve a selected list of records from the database. This route function will have a pagination feature where users can select a range of records in the database.
If the user fails to provide the limit and page query parameters in the URL, the function will only return the first 10 records.
To retrieve a specific number of records from the table, we’ll use the OFFSET and LIMIT clauses along with the SELECT statement. The OFFSET clause will specify the number of rows to skip, whereas the LIMIT clause will specify the maximum number of rows to return.
src/handler.rs
#[get("/notes")]
pub async fn note_list_handler(
    opts: web::Query<FilterOptions>,
    data: web::Data<AppState>,
) -> impl Responder {
    let limit = opts.limit.unwrap_or(10);
    let offset = (opts.page.unwrap_or(1) - 1) * limit;

    let query_result = sqlx::query_as!(
        NoteModel,
        "SELECT * FROM notes ORDER by id LIMIT $1 OFFSET $2",
        limit as i32,
        offset as i32
    )
    .fetch_all(&data.db)
    .await;

    if query_result.is_err() {
        let message = "Something bad happened while fetching all note items";
        return HttpResponse::InternalServerError()
            .json(json!({"status": "error","message": message}));
    }

    let notes = query_result.unwrap();

    let json_response = serde_json::json!({
        "status": "success",
        "results": notes.len(),
        "notes": notes
    });
    HttpResponse::Ok().json(json_response)
}
The .fetch_all() method will then be evoked on the query to retrieve the rows of the query and map the returned data to the NoteModel struct. If the operation fails, a 500 InternalServerError response will be sent to the client. Otherwise, the list of records will be returned in the JSON response.
Add New Record
Now let’s perform the CREATE operation of CRUD to add new records to the database. When Actix-web calls this function, it will deserialize the request body and assign the result to the data variable.
Next, it will execute the INSERT statement using the sqlx::query_as!() macro and bind the data to the query parameters.
After that, the .fetch_one() method will be called to execute the query and return the newly-inserted record. If a record with that title already exists in the database, a 409 Conflict error response will be sent to the client.
Otherwise, the newly-inserted record will be serialized and returned to the client in the JSON response.
src/handler.rs
#[post("/notes/")]
async fn create_note_handler(
    body: web::Json<CreateNoteSchema>,
    data: web::Data<AppState>,
) -> impl Responder {
    let query_result = sqlx::query_as!(
        NoteModel,
        "INSERT INTO notes (title,content,category) VALUES ($1, $2, $3) RETURNING *",
        body.title.to_string(),
        body.content.to_string(),
        body.category.to_owned().unwrap_or("".to_string())
    )
    .fetch_one(&data.db)
    .await;

    match query_result {
        Ok(note) => {
            let note_response = serde_json::json!({"status": "success","data": serde_json::json!({
                "note": note
            })});

            return HttpResponse::Ok().json(note_response);
        }
        Err(e) => {
            if e.to_string()
                .contains("duplicate key value violates unique constraint")
            {
                return HttpResponse::BadRequest()
                .json(serde_json::json!({"status": "fail","message": "Note with that title already exists"}));
            }

            return HttpResponse::InternalServerError()
                .json(serde_json::json!({"status": "error","message": format!("{:?}", e)}));
        }
    }
}
Retrieve a Single Record
Now let’s perform the second READ operation of CRUD. To do this, we’ll execute the SELECT statement using the sqlx::query_as!() macro and evoke the .fetch_one() method on the query to return the first row of the query.
If the operation is successful, SQLX will map the row to the NoteModel struct and the result will be returned to the client in the JSON response. However, if no record matches the query, a 404 Not Found response will be sent to the client.
src/handler.rs
#[get("/notes/{id}")]
async fn get_note_handler(
    path: web::Path<uuid::Uuid>,
    data: web::Data<AppState>,
) -> impl Responder {
    let note_id = path.into_inner();
    let query_result = sqlx::query_as!(NoteModel, "SELECT * FROM notes WHERE id = $1", note_id)
        .fetch_one(&data.db)
        .await;

    match query_result {
        Ok(note) => {
            let note_response = serde_json::json!({"status": "success","data": serde_json::json!({
                "note": note
            })});

            return HttpResponse::Ok().json(note_response);
        }
        Err(_) => {
            let message = format!("Note with ID: {} not found", note_id);
            return HttpResponse::NotFound()
                .json(serde_json::json!({"status": "fail","message": message}));
        }
    }
}
Edit an Existing Record
When this route function is called, it will extract the record’s ID from the URL parameter and use the sqlx::query_as!() macro to execute the SELECT statement which will query the database to check if a record with that ID exists.
If no record was found, a 404 Not Found response will be sent to the client. However, if a record with that ID exists, the UPDATE statement will be executed by the sqlx::query_as!() macro to edit the fields of the record based on the data provided in the request body.
src/handler.rs
#[patch("/notes/{id}")]
async fn edit_note_handler(
    path: web::Path<uuid::Uuid>,
    body: web::Json<UpdateNoteSchema>,
    data: web::Data<AppState>,
) -> impl Responder {
    let note_id = path.into_inner();
    let query_result = sqlx::query_as!(NoteModel, "SELECT * FROM notes WHERE id = $1", note_id)
        .fetch_one(&data.db)
        .await;

    if query_result.is_err() {
        let message = format!("Note with ID: {} not found", note_id);
        return HttpResponse::NotFound()
            .json(serde_json::json!({"status": "fail","message": message}));
    }

    let now = Utc::now();
    let note = query_result.unwrap();

    let query_result = sqlx::query_as!(
        NoteModel,
        "UPDATE notes SET title = $1, content = $2, category = $3, published = $4, updated_at = $5 WHERE id = $6 RETURNING *",
        body.title.to_owned().unwrap_or(note.title),
        body.content.to_owned().unwrap_or(note.content),
        body.category.to_owned().unwrap_or(note.category.unwrap()),
        body.published.unwrap_or(note.published.unwrap()),
        now,
        note_id
    )
    .fetch_one(&data.db)
    .await
    ;

    match query_result {
        Ok(note) => {
            let note_response = serde_json::json!({"status": "success","data": serde_json::json!({
                "note": note
            })});

            return HttpResponse::Ok().json(note_response);
        }
        Err(err) => {
            let message = format!("Error: {:?}", err);
            return HttpResponse::InternalServerError()
                .json(serde_json::json!({"status": "error","message": message}));
        }
    }
}
If the operation is successful, the newly-updated record will be returned to the client in the JSON response. Otherwise, a 500 InternalServerError will be sent.
Delete a Record
This route function will implement the [delete("/notes/{id}")] macro to perform the DELETE operation of CRUD. When Actix-web calls this function, it will extract the ID of the record from the URL parameter using the path.into_inner() function and assign it to the note_id variable.
Next, it will use sqlx::query!() macro to execute the DELETE statement which will query the database to find and delete the record that matches the provided ID.
src/handler.rs
#[delete("/notes/{id}")]
async fn delete_note_handler(
    path: web::Path<uuid::Uuid>,
    data: web::Data<AppState>,
) -> impl Responder {
    let note_id = path.into_inner();
    let rows_affected = sqlx::query!("DELETE FROM notes  WHERE id = $1", note_id)
        .execute(&data.db)
        .await
        .unwrap()
        .rows_affected();

    if rows_affected == 0 {
        let message = format!("Note with ID: {} not found", note_id);
        return HttpResponse::NotFound().json(json!({"status": "fail","message": message}));
    }

    HttpResponse::NoContent().finish()
}
If no record was deleted, a 404 Not Found error response will be sent to the client. Otherwise a 204 No Content response will be returned.
Merge the Route Functions
Now let’s utilize Actix-web’s web::ServiceConfig struct along with the web::scope() method to group the routes under a common path prefix /api.
src/handler.rs
pub fn config(conf: &mut web::ServiceConfig) {
    let scope = web::scope("/api")
        .service(health_checker_handler)
        .service(note_list_handler)
        .service(create_note_handler)
        .service(get_note_handler)
        .service(edit_note_handler)
        .service(delete_note_handler);

    conf.service(scope);
}
Complete Route Functions
src/handler.rs
use crate::{
    model::NoteModel,
    schema::{CreateNoteSchema, FilterOptions, UpdateNoteSchema},
    AppState,
};
use actix_web::{delete, get, patch, post, web, HttpResponse, Responder};
use chrono::prelude::*;
use serde_json::json;

#[get("/healthchecker")]
async fn health_checker_handler() -> impl Responder {
    const MESSAGE: &str = "Build Simple CRUD API with Rust, SQLX, Postgres,and Actix Web";

    HttpResponse::Ok().json(json!({"status": "success","message": MESSAGE}))
}

#[get("/notes")]
pub async fn note_list_handler(
    opts: web::Query<FilterOptions>,
    data: web::Data<AppState>,
) -> impl Responder {
    let limit = opts.limit.unwrap_or(10);
    let offset = (opts.page.unwrap_or(1) - 1) * limit;

    let query_result = sqlx::query_as!(
        NoteModel,
        "SELECT * FROM notes ORDER by id LIMIT $1 OFFSET $2",
        limit as i32,
        offset as i32
    )
    .fetch_all(&data.db)
    .await;

    if query_result.is_err() {
        let message = "Something bad happened while fetching all note items";
        return HttpResponse::InternalServerError()
            .json(json!({"status": "error","message": message}));
    }

    let notes = query_result.unwrap();

    let json_response = serde_json::json!({
        "status": "success",
        "results": notes.len(),
        "notes": notes
    });
    HttpResponse::Ok().json(json_response)
}

#[post("/notes/")]
async fn create_note_handler(
    body: web::Json<CreateNoteSchema>,
    data: web::Data<AppState>,
) -> impl Responder {
    let query_result = sqlx::query_as!(
        NoteModel,
        "INSERT INTO notes (title,content,category) VALUES ($1, $2, $3) RETURNING *",
        body.title.to_string(),
        body.content.to_string(),
        body.category.to_owned().unwrap_or("".to_string())
    )
    .fetch_one(&data.db)
    .await;

    match query_result {
        Ok(note) => {
            let note_response = serde_json::json!({"status": "success","data": serde_json::json!({
                "note": note
            })});

            return HttpResponse::Ok().json(note_response);
        }
        Err(e) => {
            if e.to_string()
                .contains("duplicate key value violates unique constraint")
            {
                return HttpResponse::BadRequest()
                .json(serde_json::json!({"status": "fail","message": "Note with that title already exists"}));
            }

            return HttpResponse::InternalServerError()
                .json(serde_json::json!({"status": "error","message": format!("{:?}", e)}));
        }
    }
}

#[get("/notes/{id}")]
async fn get_note_handler(
    path: web::Path<uuid::Uuid>,
    data: web::Data<AppState>,
) -> impl Responder {
    let note_id = path.into_inner();
    let query_result = sqlx::query_as!(NoteModel, "SELECT * FROM notes WHERE id = $1", note_id)
        .fetch_one(&data.db)
        .await;

    match query_result {
        Ok(note) => {
            let note_response = serde_json::json!({"status": "success","data": serde_json::json!({
                "note": note
            })});

            return HttpResponse::Ok().json(note_response);
        }
        Err(_) => {
            let message = format!("Note with ID: {} not found", note_id);
            return HttpResponse::NotFound()
                .json(serde_json::json!({"status": "fail","message": message}));
        }
    }
}

#[patch("/notes/{id}")]
async fn edit_note_handler(
    path: web::Path<uuid::Uuid>,
    body: web::Json<UpdateNoteSchema>,
    data: web::Data<AppState>,
) -> impl Responder {
    let note_id = path.into_inner();
    let query_result = sqlx::query_as!(NoteModel, "SELECT * FROM notes WHERE id = $1", note_id)
        .fetch_one(&data.db)
        .await;

    if query_result.is_err() {
        let message = format!("Note with ID: {} not found", note_id);
        return HttpResponse::NotFound()
            .json(serde_json::json!({"status": "fail","message": message}));
    }

    let now = Utc::now();
    let note = query_result.unwrap();

    let query_result = sqlx::query_as!(
        NoteModel,
        "UPDATE notes SET title = $1, content = $2, category = $3, published = $4, updated_at = $5 WHERE id = $6 RETURNING *",
        body.title.to_owned().unwrap_or(note.title),
        body.content.to_owned().unwrap_or(note.content),
        body.category.to_owned().unwrap_or(note.category.unwrap()),
        body.published.unwrap_or(note.published.unwrap()),
        now,
        note_id
    )
    .fetch_one(&data.db)
    .await
    ;

    match query_result {
        Ok(note) => {
            let note_response = serde_json::json!({"status": "success","data": serde_json::json!({
                "note": note
            })});

            return HttpResponse::Ok().json(note_response);
        }
        Err(err) => {
            let message = format!("Error: {:?}", err);
            return HttpResponse::InternalServerError()
                .json(serde_json::json!({"status": "error","message": message}));
        }
    }
}

#[delete("/notes/{id}")]
async fn delete_note_handler(
    path: web::Path<uuid::Uuid>,
    data: web::Data<AppState>,
) -> impl Responder {
    let note_id = path.into_inner();
    let rows_affected = sqlx::query!("DELETE FROM notes  WHERE id = $1", note_id)
        .execute(&data.db)
        .await
        .unwrap()
        .rows_affected();

    if rows_affected == 0 {
        let message = format!("Note with ID: {} not found", note_id);
        return HttpResponse::NotFound().json(json!({"status": "fail","message": message}));
    }

    HttpResponse::NoContent().finish()
}

pub fn config(conf: &mut web::ServiceConfig) {
    let scope = web::scope("/api")
        .service(health_checker_handler)
        .service(note_list_handler)
        .service(create_note_handler)
        .service(get_note_handler)
        .service(edit_note_handler)
        .service(delete_note_handler);

    conf.service(scope);
}
Register the Routes and Add CORS
In this section, you’ll add the API routes to the Actix Web server, connect the server to the Postgres database, and configure the server to accept requests from specific cross-origin domains.
To connect to the Postgres database, we’ll use the sqlx::postgres::Pool struct along with the PgPoolOptions to create a connection pool to the Postgres server. The connection pool will allow us to manage a pool of database connections and reuse them across multiple queries.
The PgPoolOptions::new() method will allow us to configure various settings for the pool, such as the maximum number of connections. Open the src/main.rs file and replace its content with the following code:
src/main.rs
mod handler;
mod model;
mod schema;

use actix_cors::Cors;
use actix_web::middleware::Logger;
use actix_web::{http::header, web, App, HttpServer};
use dotenv::dotenv;
use sqlx::{postgres::PgPoolOptions, Pool, Postgres};

pub struct AppState {
    db: Pool<Postgres>,
}

#[actix_web::main]
async fn main() -> std::io::Result<()> {
    if std::env::var_os("RUST_LOG").is_none() {
        std::env::set_var("RUST_LOG", "actix_web=info");
    }
    dotenv().ok();
    env_logger::init();

    let database_url = std::env::var("DATABASE_URL").expect("DATABASE_URL must be set");
    let pool = match PgPoolOptions::new()
        .max_connections(10)
        .connect(&database_url)
        .await
    {
        Ok(pool) => {
            println!("✅Connection to the database is successful!");
            pool
        }
        Err(err) => {
            println!("🔥 Failed to connect to the database: {:?}", err);
            std::process::exit(1);
        }
    };

    println!("🚀 Server started successfully");

    HttpServer::new(move || {
        let cors = Cors::default()
            .allowed_origin("http://localhost:3000")
            .allowed_methods(vec!["GET", "POST", "PATCH", "DELETE"])
            .allowed_headers(vec![
                header::CONTENT_TYPE,
                header::AUTHORIZATION,
                header::ACCEPT,
            ])
            .supports_credentials();
        App::new()
            .app_data(web::Data::new(AppState { db: pool.clone() }))
            .configure(handler::config)
            .wrap(cors)
            .wrap(Logger::default())
    })
    .bind(("127.0.0.1", 8000))?
    .run()
    .await
}
In the above code, we passed the handler::config function to Actix-web’s App::new().configure() method to register all the routes in the application.
Then, we created the CORS options using the Cors::default() method and provided the CORS middleware to Actix-web’s App::new().wrap() method.
The dotenv().ok() method will load the environment variables from the .env file and make them available throughout the application.
Run the command below to start the server again:
cargo watch -q -c -w src/ -x run
Test the Rust CRUD API
To test the Rust API, make HTTP requests from an API testing software like Postman to the endpoints or interact with the API from a frontend application.
Spin up a React app to interact with the API by following the steps provided in the “Run the Rust SQLX API with a React.js App” section.
Perform the CREATE Operation
To add a new note item, click on the plus (+) icon or the “Add new note” button below it to open the “Create Note” modal. On the modal, enter the title and content into the input fields and click on the “Create Note” button to submit the form data to the Rust API.
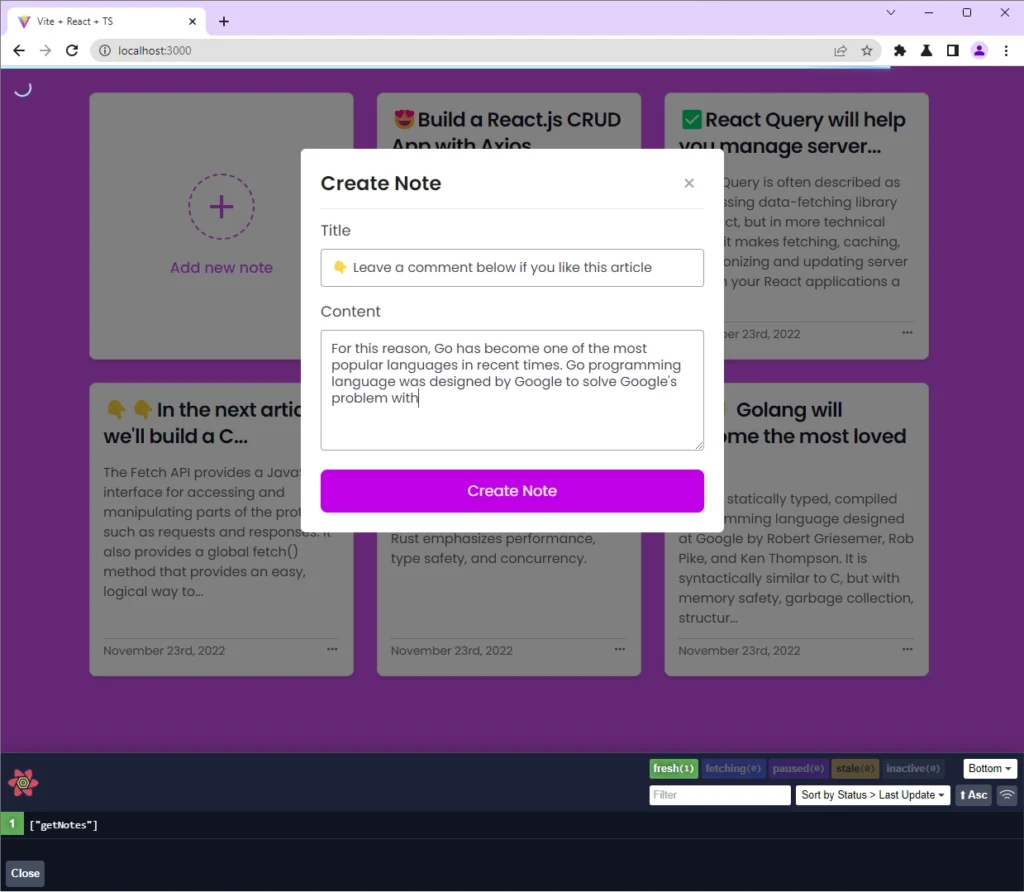
When the Actix Web server receives the request, it will delegate the request to the create_note_handler function. The route function will deserialize the request payload and use sqlx::query_as! macro to execute an INSERT statement to insert the data into the table and map the result to the NoteModel struct.
If the operation is successful, the newly-created record will be returned in the JSON response. Once React receives the response, it will re-render the DOM to display the new note item in the UI.
Perform the UPDATE Operation
To update the fields of a note item in the database, click on the three dots opposite the date element and select the Edit option to display the “Update Note” modal.
On the modal, make the appropriate changes and click on the “Update Note” button to submit the form data to the Rust API.
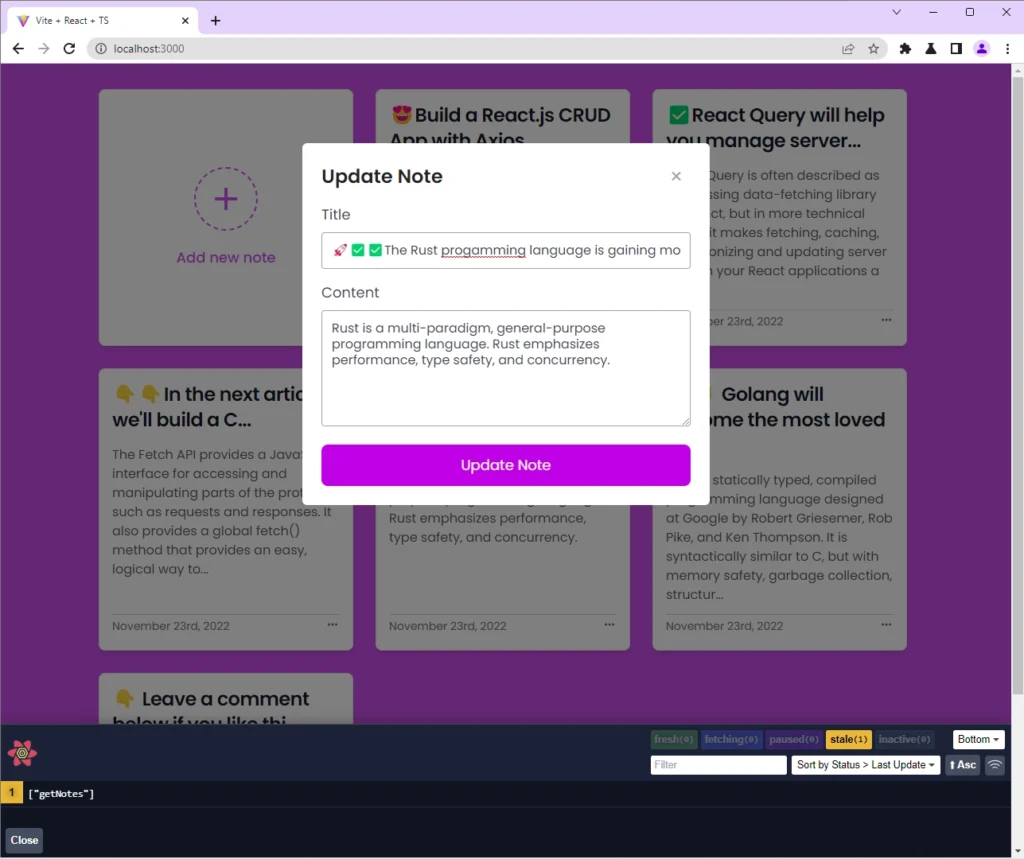
The Rust API will edit the fields of the record that matches the query and return the newly-updated record in the JSON response. If the operation is successful, React will re-render the DOM to reflect the changes in the UI.
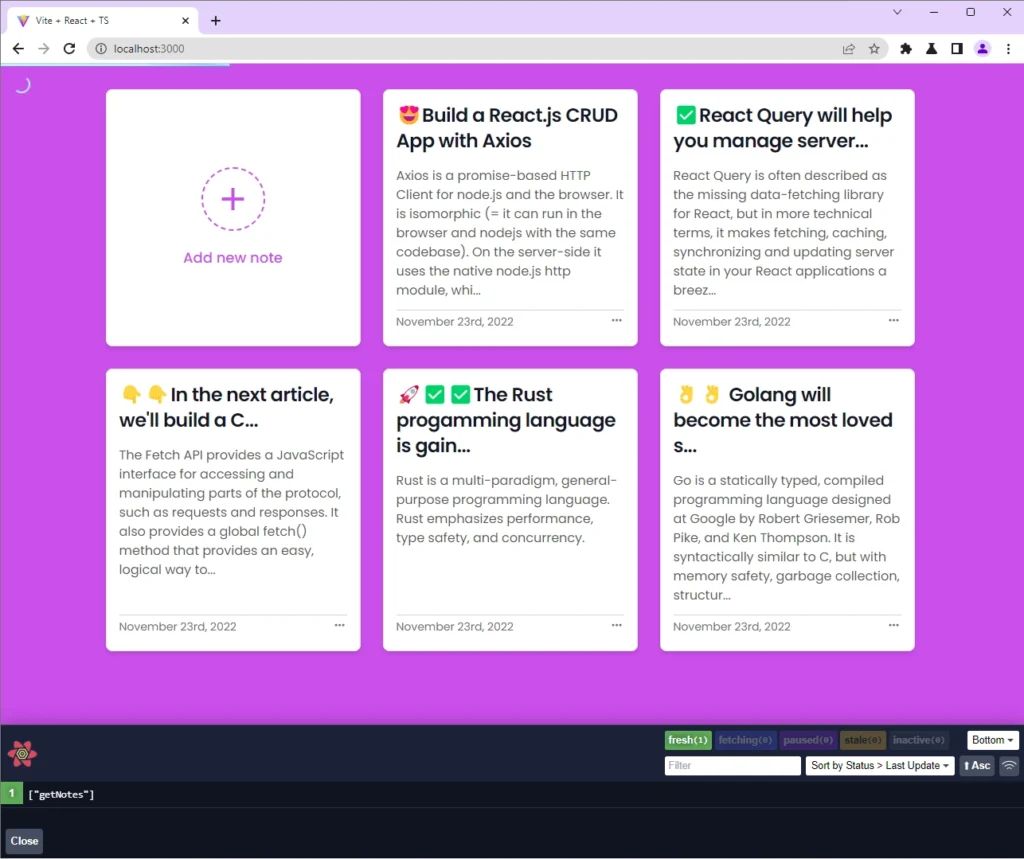
Perform the READ Operation
On the root route of the application, React will make a GET request with React Query to retrieve a paginated list of records from the Rust API. If the request resolves successfully, the list of note items will be displayed in the UI.
Otherwise, an alert notification will be displayed to show the errors returned by the Rust API.
Perform the DELETE Operation
To delete a note item, click on the three dots adjacent to the date element and select the Delete option. Since this operation is expensive, you’ll be prompted to confirm your action before the DELETE request will be made to the Rust API.
The Rust API will then query the database and delete the record that matches the ID provided in the URL parameter. If the operation is successful, the Rust API will return a 204 No Content response to the React app.
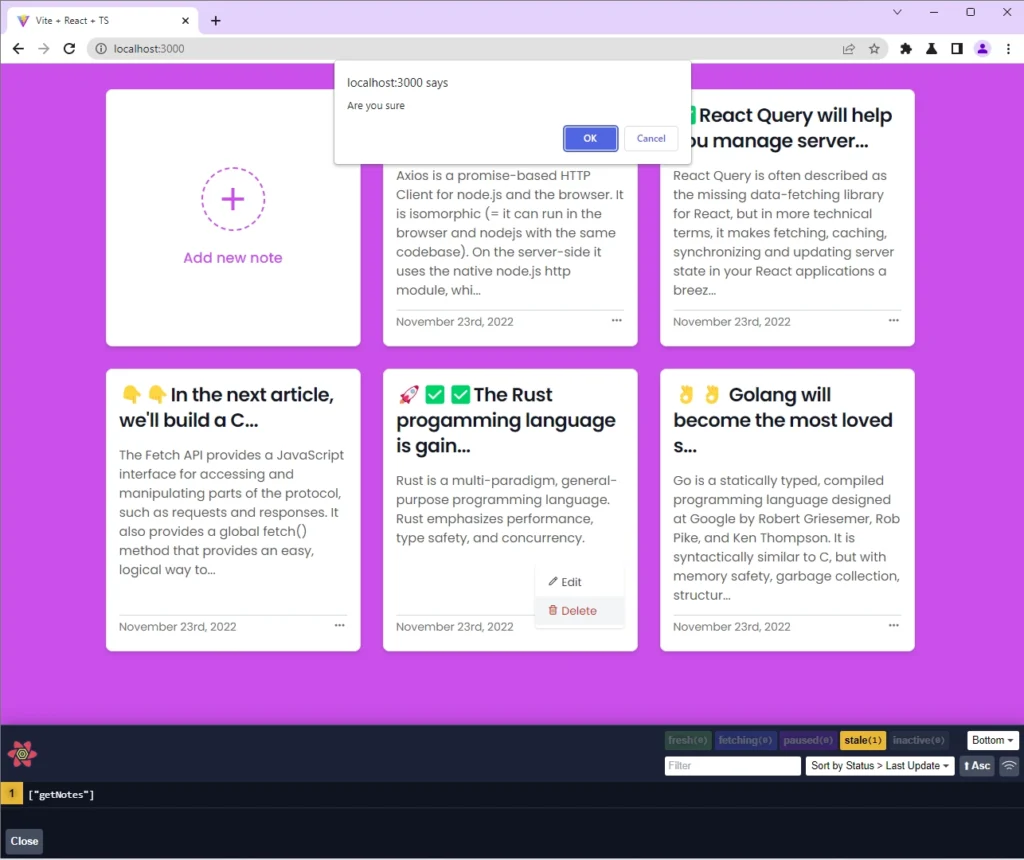
Once React receives the response, it will re-render the DOM to remove the deleted note item from the UI.
Conclusion
And we are done! You can find the source code of the SQLX Rust project on GitHub.
In this article, we built a Rust API with SQLX, Postgres, and Actix Web to support CRUD functionalities. We even went a step further to generate migration scripts with the SQLX-CLI tool and push the migrations to the database.
This was very informative. Thanks for this great effort.
Thanks for your comment! I’m happy to hear that you found my article informative and I appreciate your feedback!
Hi Edem,
Thank you for the tutorial. How would you separate the folders that way you have the routes-handlers in one file and the services that deal with queries to postgres in another?
Thanks in advance
Hi Arturo, I’m glad to hear that you found my tutorial useful! It’s always a good idea to organize your codebase for better maintenance and readability, and I completely understand your interest in doing so.
While I didn’t separate the codebase into services, routes, and handlers in the tutorial, I think it’s a fantastic idea for more complex projects. I kept things simple to make the tutorial more accessible to a wider audience.
Here are some steps you can follow to separate the different parts of the codebase:
Firstly, create a new folder called
servicesin thesrcdirectory. Inside this folder, you can add a new file for each service you want to create, such asuser.service.rs,note.service.rs, etc.The services will contain the logic for communicating with the database, so it’s a good idea to keep them separate from the handlers. Don’t forget to create a
mod.rsfile in theservicesdirectory to export the services as modules.Next, create a new folder called
handlersand add a file for each route handler you want to create. For example, you can haveuser.handler.rs,note.handler.rs, etc.These handlers should not communicate directly with the database. Instead, they will call the services to query and mutate the database. Remember to create a
mod.rsfile in thehandlersdirectory to export the handlers.Lastly, create a new folder called
routesand add a file for each group of routes you want to create, such asuser.route.rs,note.route.rs, etc.Each route file should have routes for their respective route handler. Don’t forget to create a
mod.rsfile in theroutesdirectory to export the routes.By separating the code in this way, you can make it easier to maintain and extend the codebase in the future. I hope this helps, and let me know if you have any other questions!
I already did that but then when I try to separate the sql from the route I get a weird error.
Do you want me to show you my github repo?
Great to hear that you’ve made an attempt to separate the SQL from the route! I would be delighted to take a look at your Github repo and assist you in troubleshooting the error you’ve encountered.
To make sure I can easily locate your repo and provide you with the best possible support, please share the link through the contact form on my website.
Additionally, kindly include a note so that I can recognize that it’s your repo. Thank you!
This is a very good tutorial. Thank you so much
Amazing!
Very much appreciated tutorial. Works like a charm and is very helpful for me who just started learning Rust
Thanks!
I’m glad the article was helpful you.