

This article will teach you how to secure a React.js app by implementing two-factor authentication (2FA) feature using TOTP tokens generated by Google Authenticator, Authy, or Chrome’s Authenticator extension.
You will learn how to:
- Validate HTML forms with React-Hook-Form and Zod
- Make API calls with Axios
- Register users with React.js
- Sign users into their accounts
- Generate and verify QR codes
- Implement 2FA in React.js
Related articles:
- How to Implement (2FA) Two-factor Authentication in Golang
- How to Implement Two-factor Authentication (2FA) in Node.js
- Two-factor Authentication (2FA) in FastAPI and Python
- Django – Implement (2FA) Two-Factor Authentication
- Rust – Implement (2FA) Two-Factor Authentication
More practice:
- How to Setup and Use MongoDB with Deno
- How to Set up Deno RESTful CRUD Project with MongoDB
- Authentication with Bcrypt, JWT, and Cookies in Deno
- Complete Deno CRUD RESTful API with MongoDB

Prerequisite
Before proceeding with this tutorial, you should have the following prerequisites to get the most out of this article:
- Have basic knowledge of JavaScript and TypeScript
- Have a basic understanding of API designs and how to interact with APIs.
- Familiarity with React.js will be beneficial.
- Have basic knowledge of CSS and TailwindCSS
Run the 2FA Backend APIs Locally
Based on the programming language you are comfortable with, you can run either the Golang or Node.js 2FA API by following the instructions below.
2FA Backend API Built with Golang
Read the post How to Implement (2FA) Two-factor Authentication in Golang to get a full guide on how to build the 2FA backend API with Golang.
- Download and install the latest version of Golang from https://go.dev/doc/install
- Download or clone the two-factor authentication (2FA) Golang source code from https://github.com/wpcodevo/two_factor_golang
- Install all the required packages by running
go mod tidyfrom the terminal in the root directory. - Start the Golang Gin HTTP server by running
go run main.go - Open any API testing tool and interact with the 2FA verification system
2FA Backend API with Node.js
Read the post How to Implement Two-factor Authentication (2FA) in Node.js to get a full guide on how to build the two-factor authentication (2FA) API with TypeScript and Node.js.
- Download and install Node.js from https://nodejs.org/.
- Download or clone the two-factor authentication (2FA) Node.js source code from https://github.com/wpcodevo/2fa-nodejs
- Install all the necessary dependencies by running
yarnoryarn installfrom the terminal in the root folder. - This project uses Prisma ORM to add data to an SQLite database. Run
yarn db:migrateandyarn db:pushto push the Prisma schema to the SQLite database. - Start the Node.js HTTP server by running
yarn start - Test the API endpoints with your API testing software like Postman.
Run the 2FA React App Locally
- Visit https://github.com/wpcodevo/two_factor_reactjs to download or clone the React.js two-factor authentication (2FA) source code.
- Run
yarnoryarn installto install all the required dependencies. - Start the Vite dev server by running
yarn dev. - Navigate to http://localhost:3000 in a new tab to start testing the two-factor authentication system against the Node.js or Golang API.
React.js Two-Factor Authentication Overview
The React two-factor authentication app will have the following routes:
/login– a public route for signing users into the React app/register– a public route for registering new users/validateOtp– a public route for verifying the OTP tokens generated by the authenticator app/profile– a private route where the 2FA feature can be enabled/– a public route for displaying a simple message
Setup the 2FA Feature
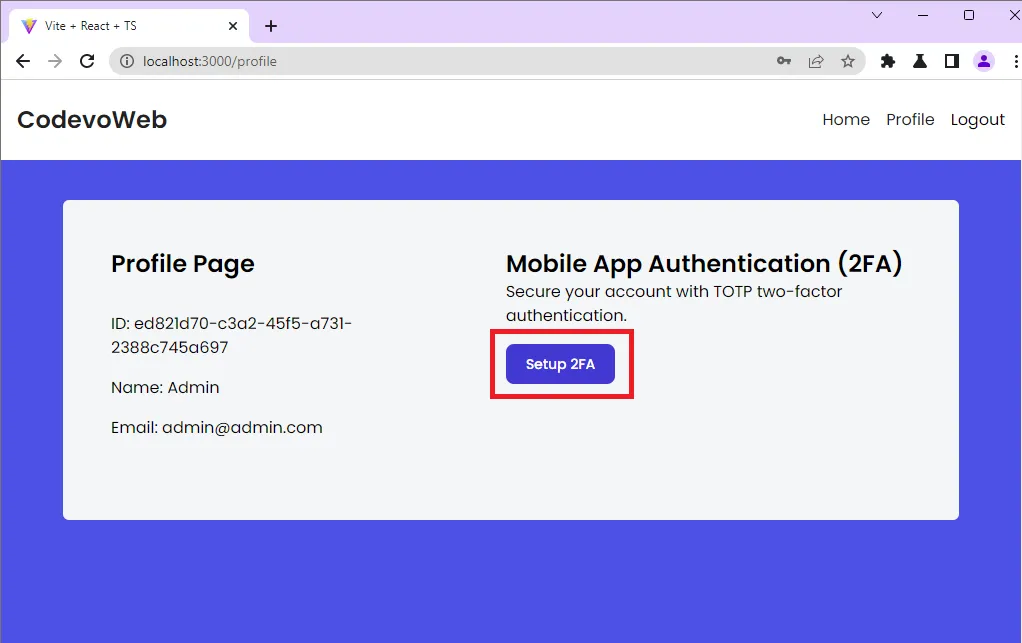
After creating an account and logging into the app, React will redirect you to the profile page where you can enable the 2FA feature.
To enable the two-factor authentication feature in React, click on the Setup 2FA button on the profile page. When the Setup 2FA button is clicked, React will make a POST request to the /api/auth/otp/generate endpoint. The API will generate the OTP secret key, store the secret key in the database, and return the OTP URL to React.
Scan the Generated QR Code
After React receives the OTP URL, it will render a popup, generate a QR Code from the OTP URL and display the QR Code in addition to the base32 string sent by the API.
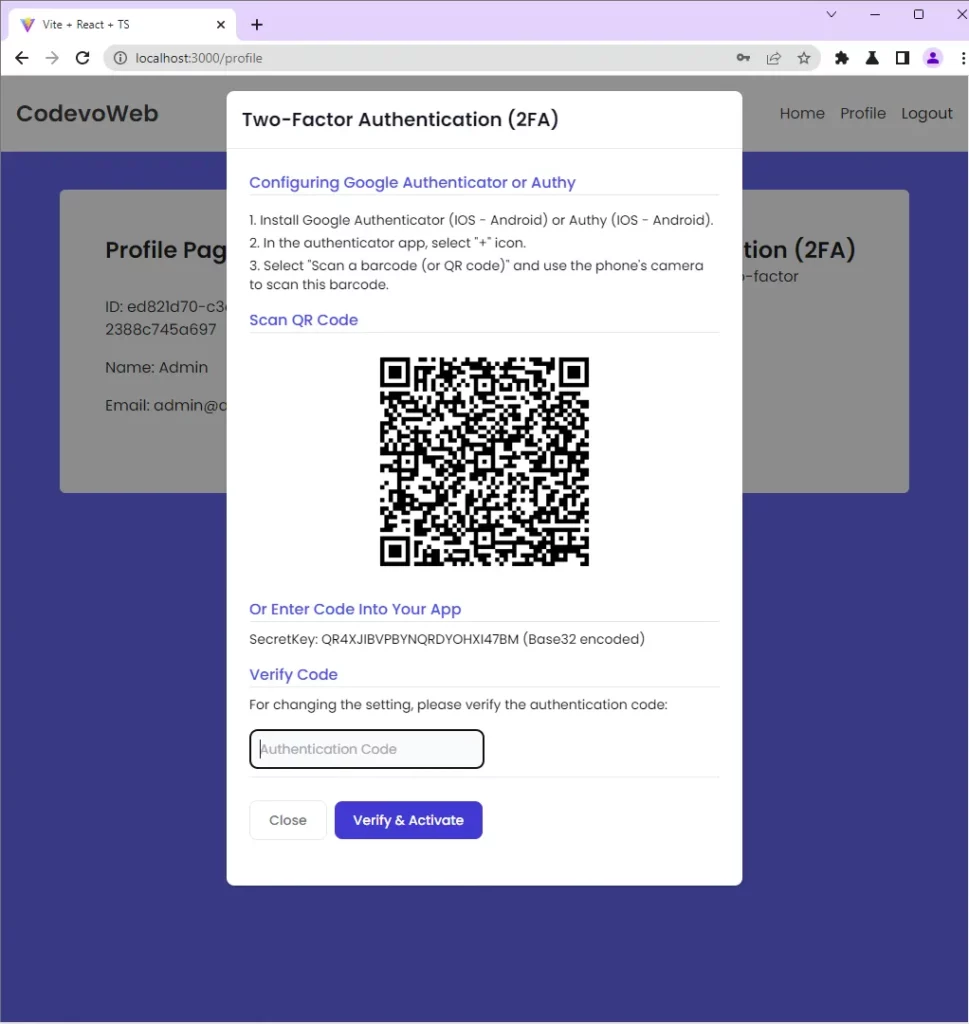
To display the One Time Password, open any authenticator app ( Authenticator, Authy, or Chrome’s Authenticator extension ) and scan the QR Code.
Alternatively, you can use the manual option to display the OTP tokens by entering the base32 string.

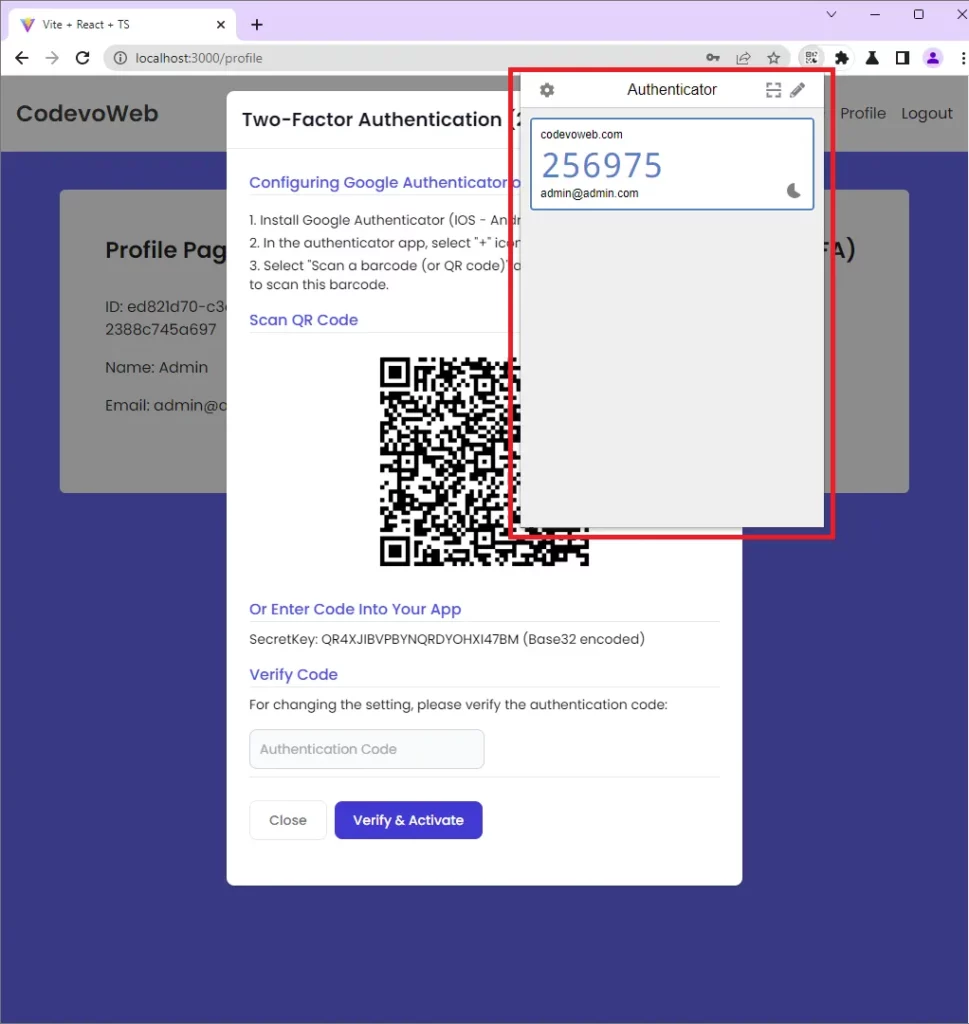
Verify the OTP Code
Once the OTP tokens are been displayed by the authenticator app, copy the current OTP, paste it into the text field on the popup and click the Verify & Activate button.
When the Verify & Activate button is clicked, an Axios POST request will be fired to the /api/auth/otp/verify API endpoint. The API will verify the OTP against the secret key stored in the database and return a response to React.
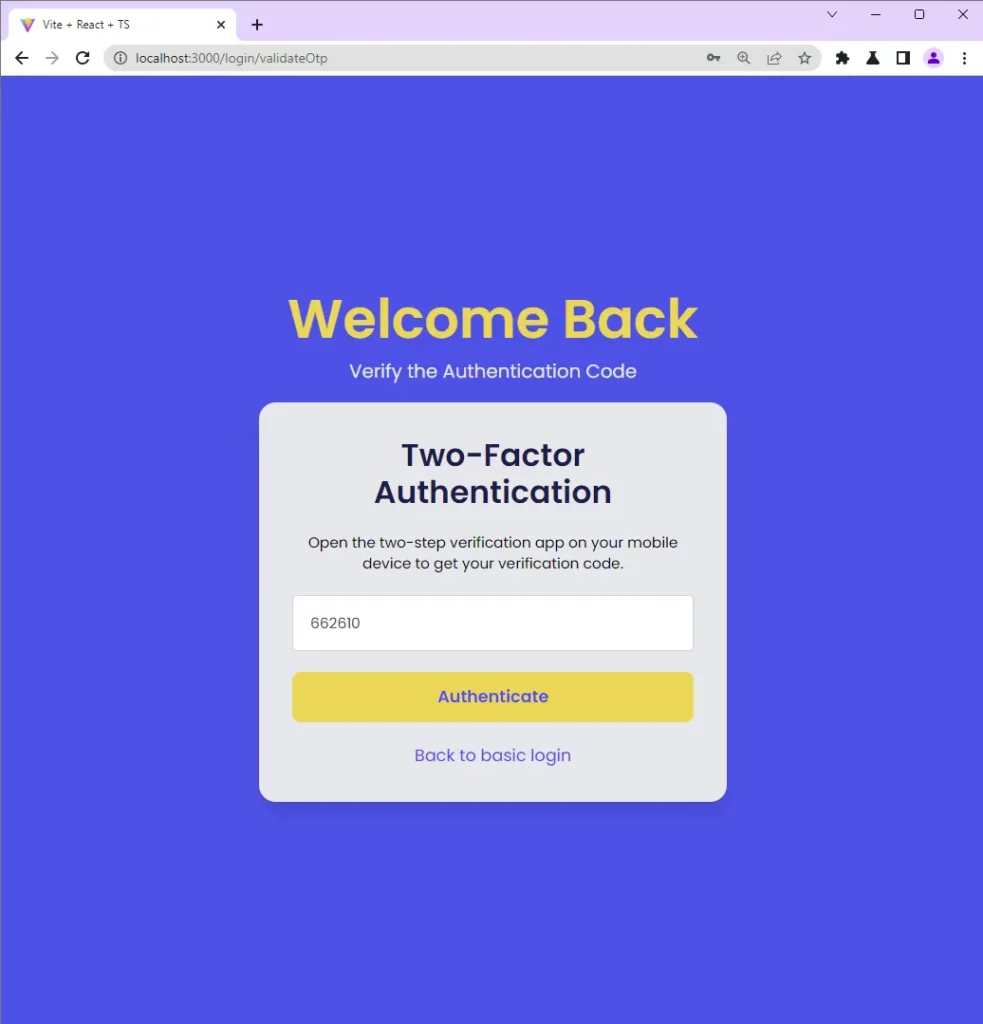
Validate the OTP Code
After the 2FA feature has been enabled, reload the page to log out from the app. When you submit your credentials to the API through the login page, React will redirect you to the OTP verification page.
Open the authenticator app, copy the OTP code, enter the token into the input field, and click the Authenticate button. React will make a POST request to /api/auth/otp/validate endpoint for the OTP to be verified by the API.
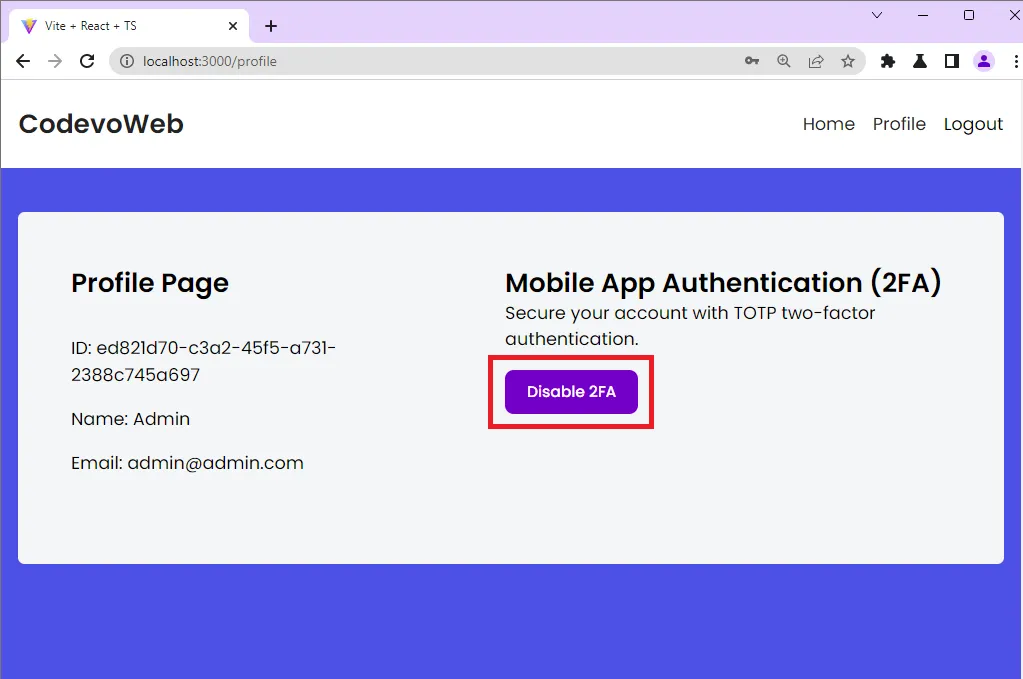
Disable the 2FA Feature
Once the OTP code has been verified by the API and you’ve been redirected to the profile page, you can disable the 2FA feature by clicking the Disable 2FA button.
When you try logging into the app after the 2FA feature is disabled, you will be taken straight to the profile page instead of going through the OTP verification step.
Step 1 – Setup React.js with Tailwind CSS
To begin, let’s use the Vite scaffolding tool to bootstrap the React.js project. Vite comes with a lot of benefits over Create React App which makes Vite significantly faster than CRA.
Run the following command to set up the React project with Vite. You can name the project 2fa_reactjs .
yarn create vite 2fa_reactjs --template react-ts
# or
npm create vite@latest 2fa_reactjs -- --template react-ts
This will generate the React.js project and configure it to use TypeScript. Open the project with your preferred IDE or text editor and run yarn install or npm install to install all the necessary dependencies.
After that, open the package.json file and replace the dev script with "dev": "vite --host localhost --port 3000" . This will instruct Vite to use port 3000 for the development server.
With that out of the way, let’s set up tailwind CSS. To do that, install the following dependencies:
yarn add -D tailwindcss postcss autoprefixer
# or
npm install -D tailwindcss postcss autoprefixer
Next, run the tailwind CSS init command to generate the tailwind.config.cjs and postcss.config.cjs files.
yarn tailwindcss init -p
# or
npx tailwindcss init -p
Open the tailwind.config.cjs file and replace its content with the following tailwind CSS configurations.
tailwind.config.cjs
/** @type {import('tailwindcss').Config} */
module.exports = {
  content: [
    "./index.html",
    "./src/**/*.{vue,js,ts,jsx,tsx}",
  ],
  theme: {
    extend: {
      colors: {
        'ct-dark-600': '#222',
        'ct-dark-200': '#e5e7eb',
        'ct-dark-100': '#f5f6f7',
        'ct-blue-600': '#2363eb',
        'ct-yellow-600': '#f9d13e',
      },
      fontFamily: {
        Poppins: ['Poppins, sans-serif'],
      },
      container: {
        center: true,
        padding: '1rem',
        screens: {
          lg: '1125px',
          xl: '1125px',
          '2xl': '1125px',
        },
      },
    },
  },
  plugins: [],
};
Next, replace the content of the src/index.css file with the following CSS code and tailwind directives.
src/index.css
@import url('https://fonts.googleapis.com/css2?family=Poppins:wght@300;400;500;600;700&display=swap');

@tailwind base;
@tailwind components;
@tailwind utilities;

html{
    font-family: 'Poppins', sans-serif;
}
After following all the above configurations, start the Vite development server by running yarn dev or npm run dev .
Step 2 – Setup Axios and Zustand
In this step, you will create an Axios instance, add a default configuration to the instance and configure the React app to use the Zustand state manager.
To do this, install the following packages:
yarn add axios zustand
# or
npm install axios zustand
axios– An HTTP client for the browser and node.jszustand– A lightweight React.js state management library
Setup Axios
Axios is an HTTP client that can be used to make HTTP or GraphQL requests in the browser or Node.js. Because TypeScript requires us to type the API responses, create a src/api/types.ts file and add the following TypeScript interfaces.
src/api/types.ts
export interface IUser {
  id: string;
  name: string;
  email: string;
  otp_enabled: string;
}

export interface GenericResponse {
  status: string;
  message: string;
}

export interface ILoginResponse {
  status: string;
  user: IUser;
}
By default, Axios comes with an instance that can be used for API requests but to use a custom Axios instance, we need to use Axios’ .create() method and provide it with our own configuration options.
Using a custom Axios instance will allow us to:
- Use the same configurations for all API invocations done through the instance.
- Append default configurations to the instance.
Now create a src/api/authApi.ts file and add the following code:
src/api/authApi.ts
import axios from "axios";

const BASE_URL = "http://localhost:8000/api/";

export const authApi = axios.create({
  baseURL: BASE_URL,
  withCredentials: true,
});

authApi.defaults.headers.common["Content-Type"] = "application/json";
baseURL– Relative URL for the Axios instancewithCredentials– Tells the browser to include the cookies in the requests.
We created an Axios instance with the name authApi and appended a default HTTP header to the instance.
Setup Zustand State Manager
Zustand is a lightweight, fast, and scalable React.js state management library. It uses simplified flux principles and a comfy API based on hooks to make state management in React a breeze.
Lately, Zustand has been gaining a lot of traction because it integrates well with JavaScript frameworks like Svelte, Vue, Angular, and even Vanilla JS.
With the above explanation, create a src/store/index.ts file and add the following code snippets.
src/store/index.ts
import create from 'zustand';
import { IUser } from '../api/types';

type Store = {
  authUser: IUser | null;
  requestLoading: boolean;
  setAuthUser: (user: IUser | null) => void;
  setRequestLoading: (isLoading: boolean) => void;
};

const useStore = create<Store>((set) => ({
  authUser: null,
  requestLoading: false,
  setAuthUser: (user) => set((state) => ({ ...state, authUser: user })),
  setRequestLoading: (isLoading) =>
    set((state) => ({ ...state, requestLoading: isLoading })),
}));

export default useStore;
Store– TypeScript types for the Zustand storeuseStore– A hook that has a lot of properties and methods for managing the Zustand store.
Step 3 – Create Reusable React Components
In this step, you will create reusable React components like a spinner, loading button, input field, and 2fa modal. To do this, install the following dependencies:
yarn add tailwind-merge react-router-dom react-hook-form zod @hookform/resolvers react-toastify qrcode && yarn add -D @types/qrcode
# or
npm install tailwind-merge react-router-dom react-hook-form zod @hookform/resolvers react-toastify qrcode && npm install -D @types/qrcode
tailwind-merge– Merges tailwind CSS classesreact-router-dom– Routing in React.jsreact-hook-form– Validates the formzod– Defines the form validation schemareact-toastify– Display alert notificationsqrcode– Generates the QR Code
Spinner Component
The first component will be a spinner which will be displayed to indicate that a request is been processed by the API. Create a src/components/Spinner.tsx file and add the following code:
src/components/Spinner.tsx
import React from 'react';
import { twMerge } from 'tailwind-merge';
type SpinnerProps = {
  width?: number;
  height?: number;
  color?: string;
  bgColor?: string;
};
const Spinner: React.FC<SpinnerProps> = ({
  width = 5,
  height = 5,
  color,
  bgColor,
}) => {
  return (
    <svg
      role='status'
      className={twMerge(
        'w-5 h-5 mr-2 text-gray-200 animate-spin dark:text-gray-600 fill-blue-600',
        `w-${width} h-${height} ${color} ${bgColor}`
      )}
      viewBox='0 0 100 101'
      fill='none'
      xmlns='http://www.w3.org/2000/svg'
    >
      <path
        d='M100 50.5908C100 78.2051 77.6142 100.591 50 100.591C22.3858 100.591 0 78.2051 0 50.5908C0 22.9766 22.3858 0.59082 50 0.59082C77.6142 0.59082 100 22.9766 100 50.5908ZM9.08144 50.5908C9.08144 73.1895 27.4013 91.5094 50 91.5094C72.5987 91.5094 90.9186 73.1895 90.9186 50.5908C90.9186 27.9921 72.5987 9.67226 50 9.67226C27.4013 9.67226 9.08144 27.9921 9.08144 50.5908Z'
        fill='currentColor'
      />
      <path
        d='M93.9676 39.0409C96.393 38.4038 97.8624 35.9116 97.0079 33.5539C95.2932 28.8227 92.871 24.3692 89.8167 20.348C85.8452 15.1192 80.8826 10.7238 75.2124 7.41289C69.5422 4.10194 63.2754 1.94025 56.7698 1.05124C51.7666 0.367541 46.6976 0.446843 41.7345 1.27873C39.2613 1.69328 37.813 4.19778 38.4501 6.62326C39.0873 9.04874 41.5694 10.4717 44.0505 10.1071C47.8511 9.54855 51.7191 9.52689 55.5402 10.0491C60.8642 10.7766 65.9928 12.5457 70.6331 15.2552C75.2735 17.9648 79.3347 21.5619 82.5849 25.841C84.9175 28.9121 86.7997 32.2913 88.1811 35.8758C89.083 38.2158 91.5421 39.6781 93.9676 39.0409Z'
        fill='currentFill'
      />
    </svg>
  );
};

export default Spinner;
Loading Button Component
The loading button will have a spinner and text. The spinner will be invisible by default but when a request is in flight, React will make the spinner visible while waiting for a response from the API.
src/components/LoadingButton.tsx
import React from "react";
import { twMerge } from "tailwind-merge";
import Spinner from "./Spinner";

type LoadingButtonProps = {
  loading: boolean;
  btnColor?: string;
  textColor?: string;
  children: React.ReactNode;
};

export const LoadingButton: React.FC<LoadingButtonProps> = ({
  textColor = "text-white",
  btnColor = "bg-ct-yellow-600",
  children,
  loading = false,
}) => {
  return (
    <button
      type="submit"
      className={twMerge(
        `w-full py-3 font-semibold rounded-lg outline-none border-none flex justify-center`,
        `${btnColor} ${loading && "bg-[#ccc]"}`
      )}
    >
      {loading ? (
        <div className="flex items-center gap-3">
          <Spinner />
          <span className="text-slate-500 inline-block">Loading...</span>
        </div>
      ) : (
        <span className={`${textColor}`}>{children}</span>
      )}
    </button>
  );
};
Header Component
The Header component will display some menu links to make navigation through the app a breeze. Even though the handleLogout() function is defined, I omitted its functionality to reduce the complexity of the project.
src/components/Header.tsx
import { Link } from "react-router-dom";
import useStore from "../store";
import Spinner from "./Spinner";

const Header = () => {
  const store = useStore();
  const user = store.authUser;

  const handleLogout = () => {
  window.location.reload();
};

  return (
    <>
      <header className="bg-white h-20">
        <nav className="h-full flex justify-between container items-center">
          <div>
            <Link to="/" className="text-ct-dark-600 text-2xl font-semibold">
              CodevoWeb
            </Link>
          </div>
          <ul className="flex items-center gap-4">
            <li>
              <Link to="/" className="text-ct-dark-600">
                Home
              </Link>
            </li>
            {!user && (
              <>
                <li>
                  <Link to="/register" className="text-ct-dark-600">
                    SignUp
                  </Link>
                </li>
                <li>
                  <Link to="/login" className="text-ct-dark-600">
                    Login
                  </Link>
                </li>
              </>
            )}
            {user && (
              <>
                <li>
                  <Link to="/profile" className="text-ct-dark-600">
                    Profile
                  </Link>
                </li>
                <li className="cursor-pointer" onClick={handleLogout}>
                  Logout
                </li>
              </>
            )}
          </ul>
        </nav>
      </header>
      <div className="pt-4 pl-2 bg-ct-blue-600 fixed">
        {store.requestLoading && <Spinner color="text-ct-yellow-600" />}
      </div>
    </>
  );
};

export default Header;
Form Input Component
Here, we will use the power of React-Hook-Form to create a reusable form input component that we can use on all the pages that need a form component. To do that, create a src/components/FormInput.tsx file and add the following code:
src/components/FormInput.tsx
import React from 'react';
import { useFormContext } from 'react-hook-form';

type FormInputProps = {
  label: string;
  name: string;
  type?: string;
};

const FormInput: React.FC<FormInputProps> = ({
  label,
  name,
  type = 'text',
}) => {
  const {
    register,
    formState: { errors },
  } = useFormContext();
  return (
    <div className=''>
      <label htmlFor={name} className='block text-ct-blue-600 mb-3'>
        {label}
      </label>
      <input
        type={type}
        placeholder=' '
        className='block w-full rounded-2xl appearance-none focus:outline-none py-2 px-4'
        {...register(name)}
      />
      {errors[name] && (
        <span className='text-red-500 text-xs pt-1 block'>
          {errors[name]?.message as string}
        </span>
      )}
    </div>
  );
};

export default FormInput;
We used the useFormContext() hook to ensure that the FormInput component has access to the form context when used in the parent component.
Two-Factor Auth Component
It’s now time to create the popup component that will display the QR Code from the OTP URL sent by the API. This component will serve two purposes:
- Generate and display the QR Code
- Submit the OTP token to the API
src/components/TwoFactorAuth.tsx
import { FC, useEffect, useState } from "react";
import QRCode from "qrcode";
import { useForm, SubmitHandler } from "react-hook-form";
import { object, string, TypeOf } from "zod";
import { zodResolver } from "@hookform/resolvers/zod";
import { authApi } from "../api/authApi";
import { toast } from "react-toastify";
import useStore from "../store";
import { IUser } from "../api/types";

const styles = {
  heading3: `text-xl font-semibold text-gray-900 p-4 border-b`,
  heading4: `text-base text-ct-blue-600 font-medium border-b mb-2`,
  modalOverlay: `overflow-y-auto overflow-x-hidden fixed top-0 right-0 left-0 z-50 w-full md:inset-0 h-modal md:h-full`,
  orderedList: `space-y-1 text-sm list-decimal`,
  buttonGroup: `flex items-center py-6 space-x-2 rounded-b border-t border-gray-200 dark:border-gray-600`,
  buttonBlue: `text-white bg-blue-700 hover:bg-blue-800 focus:ring-4 focus:outline-none focus:ring-blue-300 font-medium rounded-lg text-sm px-5 py-2.5 text-center dark:bg-blue-600 dark:hover:bg-blue-700 dark:focus:ring-blue-800`,
  buttonGrey: `text-gray-500 bg-white hover:bg-gray-100 focus:ring-4 focus:outline-none focus:ring-blue-300 rounded-lg border border-gray-200 text-sm font-medium px-5 py-2.5 hover:text-gray-900 focus:z-10 dark:bg-gray-700 dark:text-gray-300 dark:border-gray-500 dark:hover:text-white dark:hover:bg-gray-600 dark:focus:ring-gray-600`,
  inputField: `bg-gray-50 border border-gray-300 text-gray-900 text-sm rounded-lg focus:ring-blue-500 focus:border-blue-500 block w-2/5 p-2.5`,
};

type TwoFactorAuthProps = {
  otpauth_url: string;
  base32: string;
  user_id: string;
  closeModal: () => void;
};

const twoFactorAuthSchema = object({
  token: string().min(1, "Authentication code is required"),
});

type TwoFactorAuthInput = TypeOf<typeof twoFactorAuthSchema>;

const TwoFactorAuth: FC<TwoFactorAuthProps> = ({
  otpauth_url,
  base32,
  user_id,
  closeModal,
}) => {
  const [qrcodeUrl, setqrCodeUrl] = useState("");
  const store = useStore();

  const {
    handleSubmit,
    register,
    formState: { errors },
    setFocus,
  } = useForm<TwoFactorAuthInput>({
    resolver: zodResolver(twoFactorAuthSchema),
  });

  const verifyOtp = async (token: string) => {
    try {
      store.setRequestLoading(true);
      const {
        data: { user },
      } = await authApi.post<{ otp_verified: string; user: IUser }>(
        "/auth/otp/verify",
        {
          token,
          user_id,
        }
      );
      store.setRequestLoading(false);
      store.setAuthUser(user);
      closeModal();
      toast.success("Two-Factor Auth Enabled Successfully", {
        position: "top-right",
      });
    } catch (error: any) {
      store.setRequestLoading(false);
      const resMessage =
        (error.response &&
          error.response.data &&
          error.response.data.message) ||
        error.response.data.detail ||
        error.message ||
        error.toString();
      toast.error(resMessage, {
        position: "top-right",
      });
    }
  };

  const onSubmitHandler: SubmitHandler<TwoFactorAuthInput> = (values) => {
    verifyOtp(values.token);
  };

  useEffect(() => {
    QRCode.toDataURL(otpauth_url).then(setqrCodeUrl);
  }, []);

  useEffect(() => {
    setFocus("token");
  }, [setFocus]);
  return (
    <div
      aria-hidden={true}
      className="overflow-y-auto overflow-x-hidden fixed top-0 right-0 left-0 z-50 w-full md:inset-0 h-modal md:h-full bg-[#222] bg-opacity-50"
      // onClick={closeModal}
    >
      <div className="relative p-4 w-full max-w-xl h-full md:h-auto left-1/2 -translate-x-1/2">
        <div className="relative bg-white rounded-lg shadow">
          <h3 className={styles.heading3}>Two-Factor Authentication (2FA)</h3>
          {/* Modal body */}
          <div className="p-6 space-y-4">
            <h4 className={styles.heading4}>
              Configuring Google Authenticator or Authy
            </h4>
            <div className={styles.orderedList}>
              <li>
                Install Google Authenticator (IOS - Android) or Authy (IOS -
                Android).
              </li>
              <li>In the authenticator app, select "+" icon.</li>
              <li>
                Select "Scan a barcode (or QR code)" and use the phone's camera
                to scan this barcode.
              </li>
            </div>
            <div>
              <h4 className={styles.heading4}>Scan QR Code</h4>
              <div className="flex justify-center">
                <img
                  className="block w-64 h-64 object-contain"
                  src={qrcodeUrl}
                  alt="qrcode url"
                />
              </div>
            </div>
            <div>
              <h4 className={styles.heading4}>Or Enter Code Into Your App</h4>
              <p className="text-sm">SecretKey: {base32} (Base32 encoded)</p>
            </div>
            <div>
              <h4 className={styles.heading4}>Verify Code</h4>
              <p className="text-sm">
                For changing the setting, please verify the authentication code:
              </p>
            </div>
            <form onSubmit={handleSubmit(onSubmitHandler)}>
              <input
                {...register("token")}
                className="bg-gray-50 border border-gray-300 text-gray-900 text-sm rounded-lg focus:ring-blue-500 focus:border-blue-500 block w-2/4 p-2.5"
                placeholder="Authentication Code"
              />
              <p className="mt-2 text-xs text-red-600">
                {errors.token ? errors.token.message : null}
              </p>

              <div className={styles.buttonGroup}>
                <button
                  type="button"
                  onClick={closeModal}
                  className={styles.buttonGrey}
                >
                  Close
                </button>
                <button type="submit" className={styles.buttonBlue}>
                  Verify & Activate
                </button>
              </div>
            </form>
          </div>
        </div>
      </div>
    </div>
  );
};

export default TwoFactorAuth;
Step 4 – Create the Authentication Components
Now that we’ve created the reusable React components, set up the Zustand state management library, and configured Axios, it’s now time to define the React.js route components.
RegisterPage– This component is responsible for registering new users.LoginPage– This component is responsible for logging users into the React appValidate2faPage– This component is responsible for validating the OTP token when the 2FA feature is enabledHomePage– This component simply displays a welcome messageProfilePage– This component is responsible for showing the user’s credentials. It’s also the place where the 2FA feature can be enabled/disabled.
User Registration Component
This React component will submit the account registration credentials to the API by firing an Axios POST request to the /api/auth/register endpoint. The component will have a form that has name, email, password, and password confirmation fields. The form validation will be handled by the React-Hook-Form library and the validation schema will be defined with Zod.
src/pages/register.page.tsx
import { object, string, TypeOf } from "zod";
import { zodResolver } from "@hookform/resolvers/zod";
import { useForm, FormProvider, SubmitHandler } from "react-hook-form";
import { useEffect } from "react";
import FormInput from "../components/FormInput";
import { LoadingButton } from "../components/LoadingButton";
import { toast } from "react-toastify";
import { Link, useNavigate } from "react-router-dom";
import { authApi } from "../api/authApi";
import useStore from "../store";
import { GenericResponse } from "../api/types";

const registerSchema = object({
  name: string().min(1, "Full name is required").max(100),
  email: string()
    .min(1, "Email address is required")
    .email("Email Address is invalid"),
  password: string()
    .min(1, "Password is required")
    .min(8, "Password must be more than 8 characters")
    .max(32, "Password must be less than 32 characters"),
  passwordConfirm: string().min(1, "Please confirm your password"),
}).refine((data) => data.password === data.passwordConfirm, {
  path: ["passwordConfirm"],
  message: "Passwords do not match",
});

export type RegisterInput = TypeOf<typeof registerSchema>;

const RegisterPage = () => {
  const navigate = useNavigate();
  const store = useStore();

  const methods = useForm<RegisterInput>({
    resolver: zodResolver(registerSchema),
  });

  const {
    reset,
    handleSubmit,
    formState: { isSubmitSuccessful },
  } = methods;

  useEffect(() => {
    if (isSubmitSuccessful) {
      reset();
    }
    // eslint-disable-next-line react-hooks/exhaustive-deps
  }, [isSubmitSuccessful]);

  const registerUser = async (data: RegisterInput) => {
    try {
      store.setRequestLoading(true);
      const response = await authApi.post<GenericResponse>(
        "auth/register",
        data
      );
      toast.success(response.data.message, {
        position: "top-right",
      });
      store.setRequestLoading(false);
      navigate("/login");
    } catch (error: any) {
      store.setRequestLoading(false);
      const resMessage =
        (error.response &&
          error.response.data &&
          error.response.data.message) ||
        error.response.data.detail ||
        error.message ||
        error.toString();
      toast.error(resMessage, {
        position: "top-right",
      });
    }
  };

  const onSubmitHandler: SubmitHandler<RegisterInput> = (values) => {
    registerUser(values);
  };

  return (
    <section className="py-8 bg-ct-blue-600 min-h-screen grid place-items-center">
      <div className="w-full">
        <h1 className="text-4xl xl:text-6xl text-center font-[600] text-ct-yellow-600 mb-4">
          Welcome to CodevoWeb!
        </h1>
        <h2 className="text-lg text-center mb-4 text-ct-dark-200">
          Sign Up To Get Started!
        </h2>
        <FormProvider {...methods}>
          <form
            onSubmit={handleSubmit(onSubmitHandler)}
            className="max-w-md w-full mx-auto overflow-hidden shadow-lg bg-ct-dark-200 rounded-2xl p-8 space-y-5"
          >
            <FormInput label="Full Name" name="name" />
            <FormInput label="Email" name="email" type="email" />
            <FormInput label="Password" name="password" type="password" />
            <FormInput
              label="Confirm Password"
              name="passwordConfirm"
              type="password"
            />
            <span className="block">
              Already have an account?{" "}
              <Link to="/login" className="text-ct-blue-600">
                Login Here
              </Link>
            </span>
            <LoadingButton
              loading={store.requestLoading}
              textColor="text-ct-blue-600"
            >
              Sign Up
            </LoadingButton>
          </form>
        </FormProvider>
      </div>
    </section>
  );
};

export default RegisterPage;
Quite a lot is happening in the above code, let’s break it down. First, we imported all the necessary dependencies and created the registerSchema with Zod. Since we are dealing with TypeScript, we used the TypeOf<> type provided by Zod to infer the TypeScript types from the registerSchema.
Then, we evoked the useForm() hook and provided it with the interred TypeScript type which is the RegisterInput and the Zod schema. After that, we created a function that will be called by React-Hook-Form to submit the form data to the API when there is no validation error.
Since the FormInput is defined in a separate file, we used the FormProvider component provided by React-Hook-Form to make the form context available to the FormInput component.
User Login Component
This component will submit the login credentials to the API by making an Axios POST request to the /api/auth/login endpoint with the credentials added as a JSON object to the request body.
Similar to the RegisterPage, this component will also have a form that has email and password fields. The form validation will also be handled by React-Hook-Form and the validation rules will be defined with Zod.
src/pages/login.page.tsx
import { object, string, TypeOf } from "zod";
import { useEffect } from "react";
import { useForm, FormProvider, SubmitHandler } from "react-hook-form";
import { zodResolver } from "@hookform/resolvers/zod";
import FormInput from "../components/FormInput";
import { LoadingButton } from "../components/LoadingButton";
import { toast } from "react-toastify";
import { Link, useLocation, useNavigate } from "react-router-dom";
import useStore from "../store";
import { authApi } from "../api/authApi";
import { ILoginResponse } from "../api/types";

const loginSchema = object({
  email: string()
    .min(1, "Email address is required")
    .email("Email Address is invalid"),
  password: string()
    .min(1, "Password is required")
    .min(8, "Password must be more than 8 characters")
    .max(32, "Password must be less than 32 characters"),
});

export type LoginInput = TypeOf<typeof loginSchema>;

const LoginPage = () => {
  const navigate = useNavigate();
  const location = useLocation();

  const methods = useForm<LoginInput>({
    resolver: zodResolver(loginSchema),
  });

  const store = useStore();

  const {
    reset,
    handleSubmit,
    formState: { isSubmitSuccessful },
  } = methods;

  useEffect(() => {
    if (isSubmitSuccessful) {
      reset();
    }
    // eslint-disable-next-line react-hooks/exhaustive-deps
  }, [isSubmitSuccessful]);

  const loginUser = async (data: LoginInput) => {
    try {
      store.setRequestLoading(true);
      const {
        data: { user },
      } = await authApi.post<ILoginResponse>("/auth/login", data);
      store.setRequestLoading(false);
      store.setAuthUser(user);
      if (user.otp_enabled) {
        navigate("/login/validateOtp");
      } else {
        navigate("/profile");
      }
    } catch (error: any) {
      store.setRequestLoading(false);
      const resMessage =
        (error.response &&
          error.response.data &&
          error.response.data.message) ||
        error.response.data.detail ||
        error.message ||
        error.toString();
      toast.error(resMessage, {
        position: "top-right",
      });
    }
  };

  const onSubmitHandler: SubmitHandler<LoginInput> = (values) => {
    loginUser(values);
  };

  return (
    <section className="bg-ct-blue-600 min-h-screen grid place-items-center">
      <div className="w-full">
        <h1 className="text-4xl lg:text-6xl text-center font-[600] text-ct-yellow-600 mb-4">
          Welcome Back
        </h1>
        <h2 className="text-lg text-center mb-4 text-ct-dark-200">
          Login to have access
        </h2>
        <FormProvider {...methods}>
          <form
            onSubmit={handleSubmit(onSubmitHandler)}
            className="max-w-md w-full mx-auto overflow-hidden shadow-lg bg-ct-dark-200 rounded-2xl p-8 space-y-5"
          >
            <FormInput label="Email" name="email" type="email" />
            <FormInput label="Password" name="password" type="password" />

            <div className="text-right">
              <Link to="/forgotpassword" className="">
                Forgot Password?
              </Link>
            </div>
            <LoadingButton
              loading={store.requestLoading}
              textColor="text-ct-blue-600"
            >
              Login
            </LoadingButton>
            <span className="block">
              Need an account?{" "}
              <Link to="/register" className="text-ct-blue-600">
                Sign Up Here
              </Link>
            </span>
          </form>
        </FormProvider>
      </div>
    </section>
  );
};

export default LoginPage;
OTP Validation Component
Now that we are able to register and log in users, let’s create a component to submit the OTP token to the API. This component will make an Axios POST request to the /api/auth/otp/validate endpoint with the OTP token included in the request body.
src/pages/validate2fa.page.tsx
import { object, string, TypeOf } from "zod";
import { useEffect } from "react";
import { useForm, SubmitHandler } from "react-hook-form";
import { zodResolver } from "@hookform/resolvers/zod";
import { LoadingButton } from "../components/LoadingButton";
import { toast } from "react-toastify";
import { Link, useNavigate } from "react-router-dom";
import useStore from "../store";
import { authApi } from "../api/authApi";

const styles = {
  inputField: `form-control block w-full px-4 py-4 text-sm text-gray-700 bg-white bg-clip-padding border border-solid border-gray-300 rounded transition ease-in-out m-0 focus:text-gray-700 focus:bg-white focus:border-blue-600 focus:outline-none`,
};

const validate2faSchema = object({
  token: string().min(1, "Authentication code is required"),
});

export type Validate2faInput = TypeOf<typeof validate2faSchema>;

const Validate2faPage = () => {
  const navigate = useNavigate();
  const store = useStore();

  const {
    handleSubmit,
    setFocus,
    register,
    formState: { errors },
  } = useForm<Validate2faInput>({
    resolver: zodResolver(validate2faSchema),
  });

  const validate2fa = async (token: string) => {
    try {
      store.setRequestLoading(true);
      const {
        data: { otp_valid },
      } = await authApi.post<{ otp_valid: boolean }>("/auth/otp/validate", {
        token,
        user_id: store.authUser?.id,
      });
      store.setRequestLoading(false);
      if (otp_valid) {
        navigate("/profile");
      } else {
        navigate("/login");
      }
    } catch (error: any) {
      store.setRequestLoading(false);
      const resMessage =
        (error.response &&
          error.response.data &&
          error.response.data.message) ||
        error.response.data.detail ||
        error.message ||
        error.toString();
      toast.error(resMessage, {
        position: "top-right",
      });
    }
  };

  const onSubmitHandler: SubmitHandler<Validate2faInput> = (values) => {
    validate2fa(values.token);
  };

  useEffect(() => {
    setFocus("token");
  }, [setFocus]);

  useEffect(() => {
    if (!store.authUser) {
      navigate("/login");
    }
  }, []);

  return (
    <section className="bg-ct-blue-600 min-h-screen grid place-items-center">
      <div className="w-full">
        <h1 className="text-4xl lg:text-6xl text-center font-[600] text-ct-yellow-600 mb-4">
          Welcome Back
        </h1>
        <h2 className="text-lg text-center mb-4 text-ct-dark-200">
          Verify the Authentication Code
        </h2>
        <form
          onSubmit={handleSubmit(onSubmitHandler)}
          className="max-w-md w-full mx-auto overflow-hidden shadow-lg bg-ct-dark-200 rounded-2xl p-8 space-y-5"
        >
          <h2 className="text-center text-3xl font-semibold text-[#142149]">
            Two-Factor Authentication
          </h2>
          <p className="text-center text-sm">
            Open the two-step verification app on your mobile device to get your
            verification code.
          </p>
          <input
            {...register("token")}
            className={styles.inputField}
            placeholder="Authentication Code"
          />
          <p className="mt-2 text-xs text-red-600">
            {errors.token ? errors.token.message : null}
          </p>

          <LoadingButton
            loading={store.requestLoading}
            textColor="text-ct-blue-600"
          >
            Authenticate
          </LoadingButton>
          <span className="block text-center">
            <Link to="/login" className="text-ct-blue-600">
              Back to basic login
            </Link>
          </span>
        </form>
      </div>
    </section>
  );
};

export default Validate2faPage;
Step 5 – Create Other Components
Apart from the authentication components, let’s create these two React components to display a welcome message and the user’s profile information.
Home Page
The home page component will be rendered to show a welcome message on the root route.
src/pages/home.page.tsx
const HomePage = () => {
  return (
    <>
      <section className="bg-ct-blue-600 min-h-screen pt-20">
        <div className="max-w-4xl mx-auto bg-ct-dark-100 rounded-md h-[20rem] flex justify-center items-center">
          <p className="text-3xl font-semibold">
            Welcome to Two-Factor Auth with React.js
          </p>
        </div>
      </section>
    </>
  );
};

export default HomePage;
Profile Page
This component will display the user’s credentials after the user completes the authentication process. It will also have a button to enable and disable the 2FA feature in the application.
src/pages/profile.page.tsx
import { useEffect, useState } from "react";
import { useNavigate } from "react-router-dom";
import { toast } from "react-toastify";
import { authApi } from "../api/authApi";
import { IUser } from "../api/types";
import TwoFactorAuth from "../components/TwoFactorAuth";
import useStore from "../store";

const ProfilePage = () => {
  const [secret, setSecret] = useState({
    otpauth_url: "",
    base32: "",
  });
  const [openModal, setOpenModal] = useState(false);
  const navigate = useNavigate();
  const store = useStore();
  const user = store.authUser;

  const generateQrCode = async ({
    user_id,
    email,
  }: {
    user_id: string;
    email: string;
  }) => {
    try {
      store.setRequestLoading(true);
      const response = await authApi.post<{
        otpauth_url: string;
        base32: string;
      }>("/auth/otp/generate", { user_id, email });
      store.setRequestLoading(false);

      if (response.status === 200) {
        setOpenModal(true);
        console.log({
          base32: response.data.base32,
          otpauth_url: response.data.otpauth_url,
        });
        setSecret({
          base32: response.data.base32,
          otpauth_url: response.data.otpauth_url,
        });
      }
    } catch (error: any) {
      store.setRequestLoading(false);
      const resMessage =
        (error.response &&
          error.response.data &&
          error.response.data.message) ||
        error.response.data.detail ||
        error.message ||
        error.toString();
      toast.error(resMessage, {
        position: "top-right",
      });
    }
  };

  const disableTwoFactorAuth = async (user_id: string) => {
    try {
      store.setRequestLoading(true);
      const {
        data: { user },
      } = await authApi.post<{
        otp_disabled: boolean;
        user: IUser;
      }>("/auth/otp/disable", { user_id });
      store.setRequestLoading(false);
      store.setAuthUser(user);
      toast.warning("Two Factor Authentication Disabled", {
        position: "top-right",
      });
    } catch (error: any) {
      store.setRequestLoading(false);
      const resMessage =
        (error.response &&
          error.response.data &&
          error.response.data.message) ||
        error.message ||
        error.toString();
      toast.error(resMessage, {
        position: "top-right",
      });
    }
  };

  useEffect(() => {
    console.log(store.authUser);
    if (!store.authUser) {
      navigate("/login");
    }
  }, []);

  return (
    <>
      <section className="bg-ct-blue-600  min-h-screen pt-10">
        <div className="max-w-4xl p-12 mx-auto bg-ct-dark-100 rounded-md h-[20rem] flex gap-20 justify-center items-start">
          <div className="flex-grow-2">
            <h1 className="text-2xl font-semibold">Profile Page</h1>
            <div className="mt-8">
              <p className="mb-4">ID: {user?.id}</p>
              <p className="mb-4">Name: {user?.name}</p>
              <p className="mb-4">Email: {user?.email}</p>
            </div>
          </div>
          <div>
            <h3 className="text-2xl font-semibold">
              Mobile App Authentication (2FA)
            </h3>
            <p className="mb-4">
              Secure your account with TOTP two-factor authentication.
            </p>
            {store.authUser?.otp_enabled ? (
              <button
                type="button"
                className="focus:outline-none text-white bg-purple-700 hover:bg-purple-800 focus:ring-4 focus:ring-purple-300 font-medium rounded-lg text-sm px-5 py-2.5 mb-2"
                onClick={() => disableTwoFactorAuth(user?.id!)}
              >
                Disable 2FA
              </button>
            ) : (
              <button
                type="button"
                className="text-white bg-blue-700 hover:bg-blue-800 focus:ring-4 focus:ring-blue-300 font-medium rounded-lg text-sm px-5 py-2.5 mr-2 mb-2 dark:bg-blue-600 dark:hover:bg-blue-700 focus:outline-none"
                onClick={() =>
                  generateQrCode({ user_id: user?.id!, email: user?.email! })
                }
              >
                Setup 2FA
              </button>
            )}
          </div>
        </div>
      </section>
      {openModal && (
        <TwoFactorAuth
          base32={secret.base32}
          otpauth_url={secret.otpauth_url}
          user_id={store.authUser?.id!}
          closeModal={() => setOpenModal(false)}
        />
      )}
    </>
  );
};

export default ProfilePage;
Step 6 – Setup Routing in React.js
Now that we have all the pages defined, it’s time to set up routing in the app. To begin, create a src/components/Layout.tsx file and add this code.
src/components/Layout.tsx
import { Outlet } from "react-router-dom";
import Header from "./Header";

const Layout = () => {
  return (
    <>
      <Header />
      <Outlet />
    </>
  );
};

export default Layout;
Next, create a src/router/index.tsx file and add the following code snippets to set up the page routing using the object syntax introduced by React-Router-Dom v6.
src/router/index.tsx
import type { RouteObject } from "react-router-dom";
import Layout from "../components/Layout";
import HomePage from "../pages/home.page";
import LoginPage from "../pages/login.page";
import ProfilePage from "../pages/profile.page";
import RegisterPage from "../pages/register.page";
import Validate2faPage from "../pages/validate2fa.page";

const authRoutes: RouteObject = {
  path: "*",
  children: [
    {
      path: "login",
      children: [
        {
          path: "",
          element: <LoginPage />,
        },
        {
          path: "validateOtp",
          element: <Validate2faPage />,
        },
      ],
    },
    {
      path: "register",
      element: <RegisterPage />,
    },
  ],
};

const normalRoutes: RouteObject = {
  path: "*",
  element: <Layout />,
  children: [
    {
      index: true,
      element: <HomePage />,
    },
    {
      path: "profile",
      element: <ProfilePage />,
    },
  ],
};

const routes: RouteObject[] = [authRoutes, normalRoutes];

export default routes;
Step 7 – Configure the App
Since we have the route object defined, let’s use the useRoute() hook provided by React-Router-Dom to render the element that matches the current location.
src/App.tsx
import { useRoutes } from "react-router-dom";
import routes from "./router";

function App() {
  const content = useRoutes(routes);
  return content;
}

export default App;
Next, open the src/main.tsx file and replace its content with the following code:
src/main.tsx
import "./index.css";
import "react-toastify/dist/ReactToastify.css";
import { ToastContainer } from "react-toastify";
import React from "react";
import ReactDOM from "react-dom/client";
import App from "./App";
import { BrowserRouter } from "react-router-dom";

ReactDOM.createRoot(document.getElementById("root") as HTMLElement).render(
  <React.StrictMode>
    <BrowserRouter>
      <App />
      <ToastContainer />
    </BrowserRouter>
  </React.StrictMode>
);
Now start the Vite development server and test the 2FA verification system against the API.
Conclusion
In this article, you learned how to implement two-factor authentication (2FA) in React.js. Also, you learned how to:
- Validate forms with React-Hook-Form and Zod
- Register users with React
- Sign-in registered users
- Generate QR Codes in React.js
- Implement 2FA in React
You can find the React 2FA project source code from this GitHub repository.
Hi, I used this React guide alongside the Django guide as well to set up 2FA on the front and back end of a project i’m working on – Ediconnector.eu, and it works a dream so thank you so much for the extensive and thorough information that you put together. Just need to figure out how to do the forgot password page now.