

Deno is a runtime for JavaScript, TypeScript, and WebAssembly developed by Ryan Dahl using the Rust programming language. The main selling point for Deno is that it is secure by default and permissions must be granted before the program can access the network or the filesystem.
Authentication is a crucial part of almost every application. A simple way to easily add authentication to your API (Application Programming Interface) is to use a social login provider like Google, GitHub, or Facebook. This way, you’ll drastically eliminate the complexities involved in authentication by using plugins that can easily integrate with your application.
However, many API designs have a custom authentication system that is harder to implement and requires some experience to make a well-architectured secure solution even when using libraries like Passport.js or Auth0.
To demonstrate how JWT authentication works in Deno, we’ll build an API that runs on an Oak middleware server and uses a MongoDB database. Then, we’ll add an authentication guard where only users with a valid JSON Web Token will be able to access the protected routes. Also, we’ll make the passwords secure by hashing them with the Bcrypt library.
Related articles:
- How to Setup and Use MongoDB with Deno
- How to Set up Deno RESTful CRUD Project with MongoDB
- Authentication with Bcrypt, JWT, and Cookies in Deno
- Complete Deno CRUD RESTful API with MongoDB
JSON Web Token Authentication with Deno Overview
The API will have the following endpoints:
| METHOD | ENDPOINT | DESCRIPTION |
|---|---|---|
| POST | /api/auth/register | Register new user |
| POST | /api/auth/login | Login user |
| GET | /api/auth/logout | Logout user |
| GET | /api/users/me | Get user’s information |
If you are also using Postman then import the JSON document to have access to the Postman collection used in testing the API endpoints.
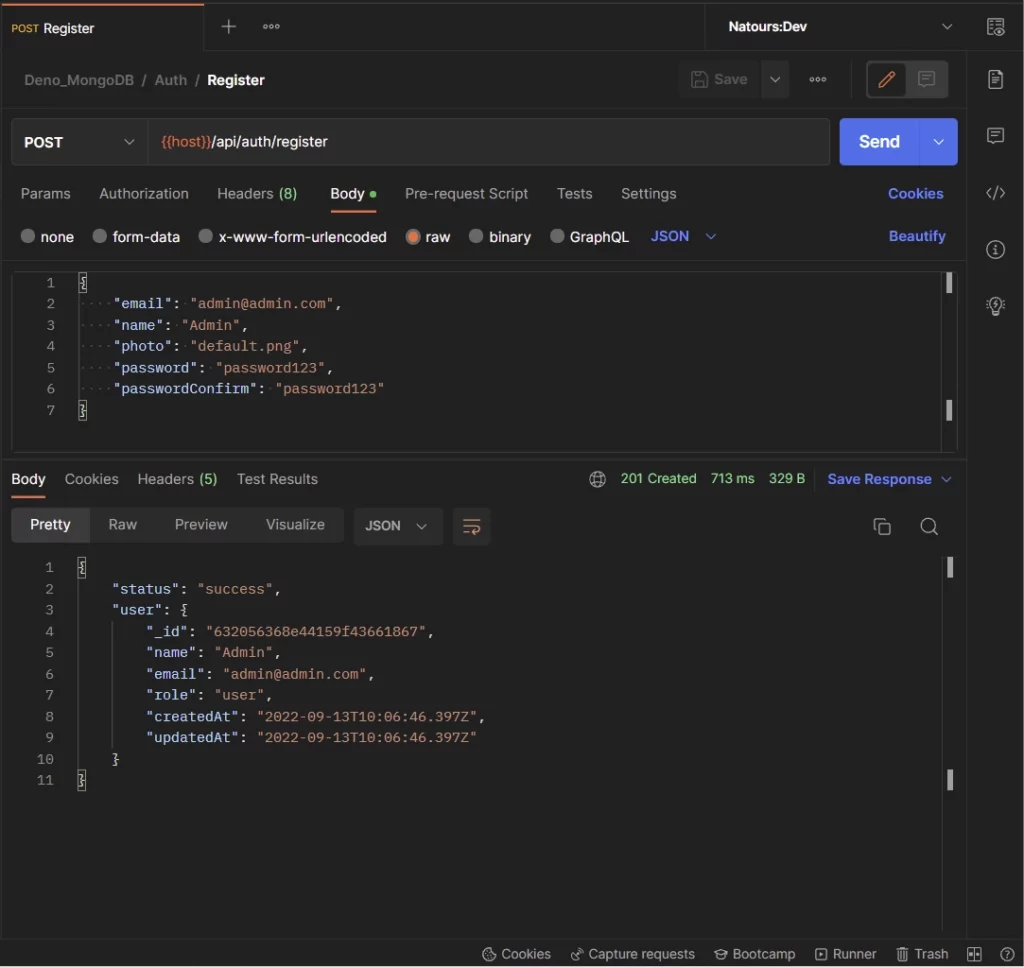
Register new users
To register for an account, you will make a POST request to the /api/auth/register endpoint with the payload included in the request body.
The Deno server will validate the request payload, add the document to the database and return the newly-created user in JSON format.
Login the user
After creating the account, you can sign into it by making a POST request to the /api/auth/login endpoint with the email and password included in the payload.
The Deno server will validate the payload, check the database to see if a user with that email address exists, validate the password against the hashed one in the database, generate the JWT token, and return the token to the client as an HTTP Only cookie.

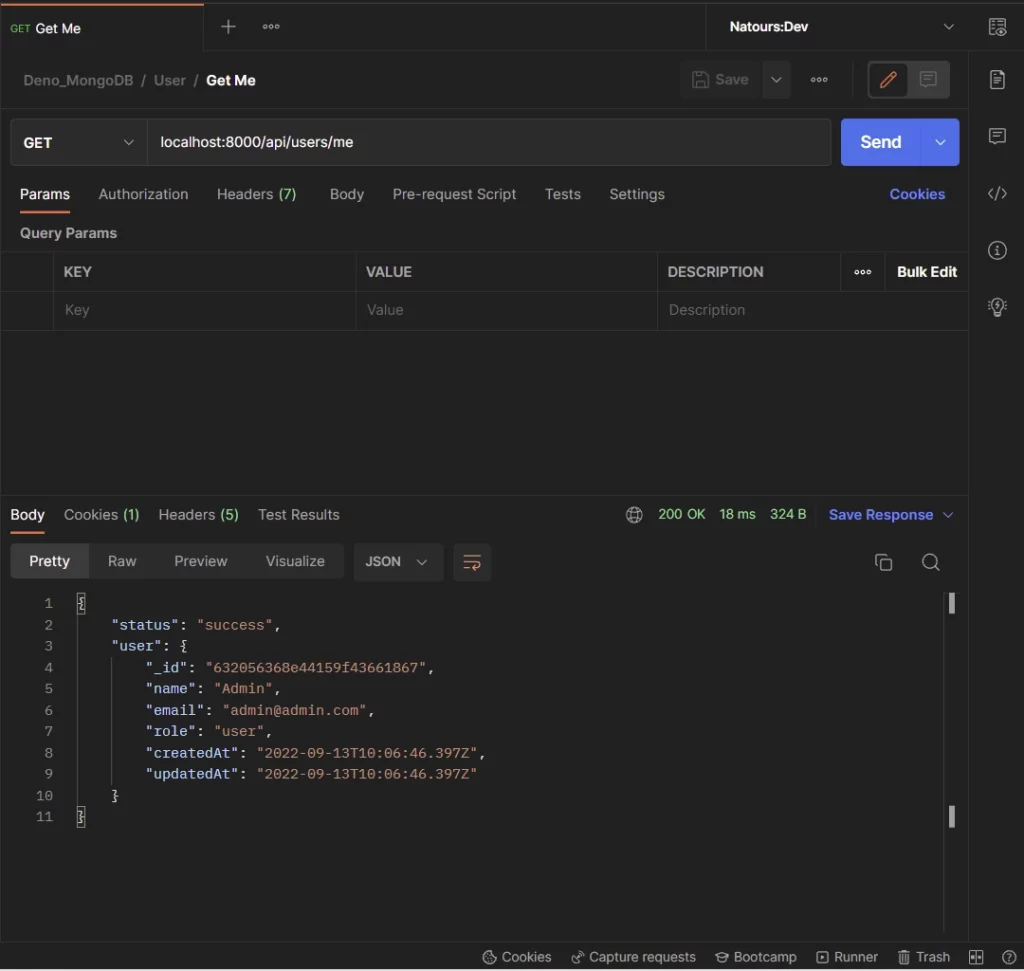
Get user’s information
Now that you have the token, you can make a GET request to the /api/users/me endpoint to retrieve your credentials. This route is protected and you need the token to be able to access it.
Note: It’s not mandatory to add the token to the authorization header since Postman will automatically include the cookie along with the request.
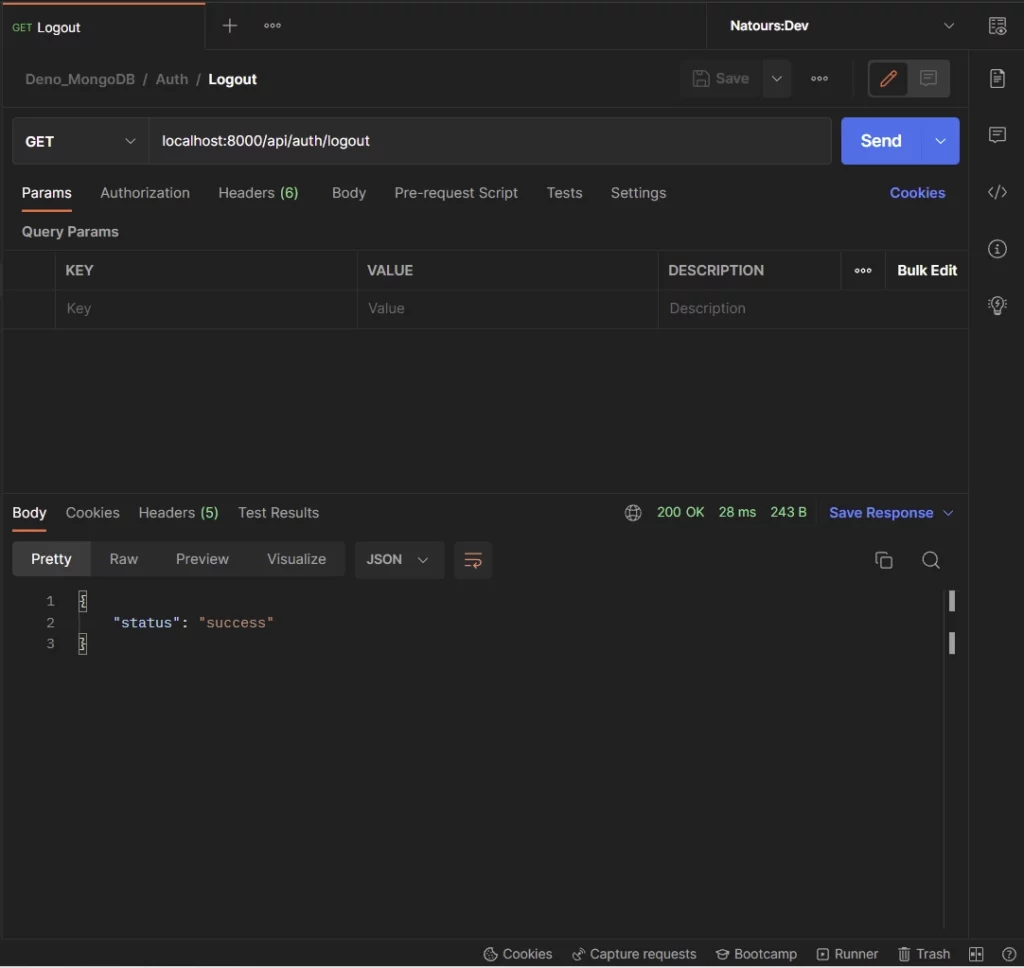
Logout the user
Lastly, you can log out from your account by making a GET request to the /api/auth/logout endpoint.
Step 1 – Setup the API Project
If you landed on this article from a Google or Bing search, catch up by following the How to Set up Deno RESTful CRUD Project with MongoDB article to get the project set up.
In a nutshell, Deno uses module references by file paths or URLs instead of a node_modules folder. One of the good practices of Deno is to manage all the third-party libraries in a single file. This will make your code easier to manage and prevent you from scattering URLs everywhere.
To do that, create a src/deps.ts file and add the following dependencies:
src/deps.ts
export { Application, helpers, Router } from "https://deno.land/x/oak@v11.1.0/mod.ts";
export type { Context, RouterContext } from "https://deno.land/x/oak@v11.1.0/mod.ts";
export { config as dotenvConfig } from "https://deno.land/x/dotenv@v3.2.0/mod.ts";
export { z } from "https://deno.land/x/zod@v3.19.1/mod.ts";
export {
  compare,
  genSalt,
  hash,
} from "https://deno.land/x/bcrypt@v0.4.0/mod.ts";
export {
  create,
  getNumericDate,
  verify,
} from "https://deno.land/x/djwt@v2.7/mod.ts";
export type { Header, Payload } from "https://deno.land/x/djwt@v2.7/mod.ts";
export {
  Bson,
  Database,
  MongoClient,
  ObjectId,
} from "https://deno.land/x/mongo@v0.31.1/mod.ts";
export { oakCors } from "https://deno.land/x/cors@v1.2.2/mod.ts";
oak– A middleware framework for handling HTTP in Denodotenv– For loading environment variables in a.envfile.zod– TypeScript-first schema validation librarybcrypt– For hashing passwords.djwt– For creating and verifying JSON Web Tokens in Deno or the browser.mongo– MongoDB driver for Denocors– This package will be used to configure the Deno server to accept requests from cross-origin domains.
Step 2 – Create the Database Model
The first thing to do when implementing authentication is to create a route to register users. To do that, we need to define a model for our users.
So create a src/models/user.model.ts file and add the following MongoDB model.
src/models/user.model.ts
import { db } from "../utils/connectDB.ts";
import { ObjectId } from "../deps.ts";

interface UserSchema {
  _id?: ObjectId;
  name: string;
  email: string;
  role: string;
  verified: boolean;
  password: string;
  createdAt: Date;
  updatedAt: Date;
}

export const User = db.collection<UserSchema>("users");
User.createIndexes({indexes:[{name: "unique_email", key: {"email": 1}, unique: true}]})
The Deno MongoDB driver allows us to create the structure of the documents with a TypeScript interface. In the above, we defined the MongoDB model with the TypeScript interface and called the .collection() method to create the collection in the database.
The .collection() method will return an object that has a lot of methods including the CRUD functions to help us interact with the MongoDB database.
To keep the consistency of the data in the collection, we added a unique constraint on the email field to ensure that no two users end up with the same email addresses.
Step 3 – Create the Validation Schemas
Now that we have the database model defined, let’s define some Zod schemas that will be used by the Oak framework to validate the request payload.
Create a src/schema/user.schema.ts file and add the following schemas.
src/schema/user.schema.ts
import { z } from "../deps.ts";

export const createUserSchema = z.object({
  body: z
    .object({
      name: z.string({ required_error: "Name is required" }),
      email: z
        .string({ required_error: "Email is required" })
        .email("Invalid email"),
      password: z
        .string({ required_error: "Password is required" })
        .min(8, "Password must be more than 8 characters")
        .max(32, "Password must be less than 32 characters"),
      passwordConfirm: z.string({
        required_error: "Please confirm your password",
      }),
    })
    .refine((data) => data.password === data.passwordConfirm, {
      path: ["passwordConfirm"],
      message: "Passwords do not match",
    }),
});

export const loginUserSchema = z.object({
  body: z.object({
    email: z
      .string({ required_error: "Email is required" })
      .email("Invalid email or password"),
    password: z
      .string({ required_error: "Password is required" })
      .min(8, "Invalid email or password"),
  }),
});

export type CreateUserInput = z.TypeOf<typeof createUserSchema>["body"];
export type LoginUserInput = z.TypeOf<typeof loginUserSchema>["body"];
We created two schemas:
createUserSchema– This schema will be used to validate the request payload when registering new users.loginUserSchema– This schema will be used to validate the request body when signing users into their accounts.
Also, we used the Zod TypeOf<> type to infer the TypeScript types from the schemas.
Now let’s create a middleware function that will be added to the Oak middleware pipeline to validate the request body.
src/middleware/validate.ts
import { helpers, RouterContext, z } from "../deps.ts";

const validate =
  (schema: z.AnyZodObject) =>
  async (ctx: RouterContext<string>, next: () => any): Promise<void> => {
    try {
      schema.parse({
        params: ctx.params,
        query: helpers.getQuery(ctx),
        body: await ctx.request.body().value,
      });

      await next();
    } catch (err) {
      if (err instanceof z.ZodError) {
        ctx.response.status = 400;
        ctx.response.body = {
          status: "fail",
          error: err.errors,
        };
        return;
      }
      await next();
    }
  };
export default validate;
This function will accept the defined schema as an argument and return a validation error to the user if any of the rules listed in the schema was violated.
Step 4 – Update the Environment Variables
Before we start creating some utility functions for our application, let’s update the .env file to have the JWT_SECRET variable. This JWT secret will be used in conjunction with the HMAC algorithm to sign the JSON Web Token.
.env
MONGO_INITDB_ROOT_USERNAME=admin
MONGO_INITDB_ROOT_PASSWORD=password123
MONGO_INITDB_DATABASE=deno_mongodb

NODE_ENV=development
SERVER_PORT=8000
MONGODB_URI=mongodb://admin:password123@localhost:6000
JWT_SECRET=my-ultra-secure-jwt-secret
Also, update the src/config/default.ts file to include the newly added variable. This file is responsible for loading the environment variables from the .env file and providing their corresponding TypeScript types.
src/config/default.ts
import { dotenvConfig } from "../deps.ts";
dotenvConfig({ export: true, path: ".env" });

const config: {
  port: number;
  dbUri: string;
  dbName: string;
  jwtSecret: string;
  jwtExpiresIn: number;
} = {
  port: parseInt(Deno.env.get("SERVER_PORT") as unknown as string),
  dbUri: Deno.env.get("MONGODB_URI") as unknown as string,
  dbName: Deno.env.get("MONGO_INITDB_DATABASE") as unknown as string,
  jwtSecret: Deno.env.get("JWT_SECRET") as unknown as string,
  jwtExpiresIn: 30,
};

export default config;
Step 5 – Create Utility Functions
In this section, you will create some utility functions to:
- Sign and verify the JWT token
- Hash and verify the password
- Filter the document returned by MongoDB
Function to Sign and Verify the JSON Web Token
To increase the security of our API, we will store the JWT in cookies. This approach has more advantages compared to storing the tokens in web storage. Also, we will use the HTTPOnly directive to store the cookies. This will make it difficult for hackers to use JavaScript to access and manipulate it.
Before we can sign the JWT, we will use symmetric encryption HS256 (HMAC with SHA-256) algorithm together with the JWT secret to generate the CryptoKey.
Next, we will create the JSON Web Token header and payload before calling the create() method provided by the djwt package to sign the token.
src/utils/jwt.ts
import { create, getNumericDate, Header, Payload, verify } from "../deps.ts";

const encoder = new TextEncoder();

async function generateKey(secretKey: string) {
  const keyBuf = encoder.encode(secretKey);
  return await crypto.subtle.importKey(
    "raw",
    keyBuf,
    { name: "HMAC", hash: "SHA-256" },
    true,
    ["sign", "verify"],
  );
}

export async function signJwt({
  userId,
  expiresIn,
  secretKey,
}: {
  userId: string;
  expiresIn: number;
  secretKey: string;
}) {
  const payload: Payload = {
    iss: "admin.com",
    sub: userId,
    exp: getNumericDate(expiresIn * 60),
    iat: getNumericDate(new Date()),
    nbf: getNumericDate(new Date()),
  };

  const header: Header = {
    alg: "HS256",
  };

  const key = await generateKey(secretKey);

  return create(header, payload, key);
}

export async function verifyJwt(token: string, secretKey: string) {
  try {
    const key = await generateKey(secretKey);
    return await verify(token, key);
  } catch (error) {
    return error.message;
  }
}
signJwt– The function will sign the JWT token with the HS256 algorithm.verifyJwt– For checking the validity of the JWT token.
Function to Hash and Verify the Passwords
Here, we will use the Bcrypt package to hash the strings, compare the plain strings to the hashed ones, and append the salt.
Hashing is an intensive task for the CPU to handle, however, the Bcrypt implementation uses a thread pool to execute the task in a separate thread. Due to that, our application can perform other tasks while hashing the passwords.
To hash the password, we will define salt rounds. The salt round also known as the cost factor is the number of iterations required to calculate a single hash. The bigger the cost factor, the most time is needed to calculate the hash, and the more difficult it is to brute force.
src/utils/password.ts
import { compare, genSalt, hash } from "../deps.ts";

export async function hashPassword(password: string): Promise<string> {
  const salt = await genSalt(12);
  return hash(password, salt);
}

export function comparePasswords(
  candidatePassword: string,
  hashedPassword: string,
): Promise<boolean> {
  return compare(candidatePassword, hashedPassword);
}
We created two functions:
hashPassword– For hashing the passwordcomparePasswords– For validating the plain-text password against the hashed one.
Function to Omit Fields from an Object
To avoid sending sensitive data to the user, let’s create a helper function to filter the data returned from the database.
src/utils/omitfields.ts
const omitFields = (obj: any, ...props: string[]) => {
  const result = { ...obj };
  props.forEach(function (prop) {
    delete result[prop];
  });
  return result;
};

export default omitFields;
Step 6 – Create the API Route Controllers
In this section, you will create the controllers responsible for the authentication aspect of the Deno API.
Register User Controller
The signup user controller contains all the business logic for registering users in the Deno API. The top of the file contains all the modules required for the authentication controllers.
src/controllers/auth.controller.ts
import type { RouterContext } from "../deps.ts";
import { Bson } from "../deps.ts";
import type { CreateUserInput, LoginUserInput } from "../schema/user.schema.ts";
import { User } from "../models/user.model.ts";
import { comparePasswords, hashPassword } from "../utils/password.ts";
import { signJwt } from "../utils/jwt.ts";
import omitFields from "../utils/omitfields.ts";
import config from "../config/default.ts";

// [...] Signup User Controller
const signUpUserController = async ({
  request,
  response,
}: RouterContext<string>) => {
  try {
    const { name, email, password }: CreateUserInput = await request.body()
      .value;

    const hashedPassword = await hashPassword(password);
    const createdAt = new Date();
    const updatedAt = createdAt;

    const userId: string | Bson.ObjectId = await User.insertOne({
      name,
      email,
      password: hashedPassword,
      role: "user",
      verified: true,
      createdAt,
      updatedAt,
    });

    if (!userId) {
      response.status = 500;
      response.body = { status: "error", message: "Error creating user" };
      return;
    }

    const user = await User.findOne({ _id: userId });

    response.status = 201;
    response.body = {
      status: "success",
      user: omitFields(user, "password", "verified"),
    };
  } catch (error) {
    if((error.message as string).includes("E11000")){
      response.status = 409;
      response.body = { status: "fail", message: "A user with that email already exists" };
      return;
    }
    response.status = 500;
    response.body = { status: "error", message: error.message };
    return;
  }
};
We extracted the payload from the request body and used the CreateUserInput type we exported from the src/schema/user.schema.ts file to help TypeScript understand the key/value pairs we will be receiving in the request payload.
Then, we called the hashPassword utility function to hash the user’s password before calling the .insertOne() method to add the new document to the database.
Since the .insertOne() method returns the ID of the newly-created document instead of the document itself, we had to make another query to the database to retrieve the newly-created user.
Also, because we added a unique constraint on the email field, a duplicate error will be returned by MongoDB if the rule is violated. So in the catch block, we checked to see if the error message contains the E11000 code and returned a well-formatted error message to the client indicating that a document with that email already exists.
Lastly, we used the omitFields utility function to remove the password and the verified fields from the document returned by MongoDB before sending it to the client.
Login User Controller
The login user controller will contain all the business logic for authenticating users. This controller is responsible for signing the JSON Web Token and returning it to the client as an HTTPOnly cookie.
src/controllers/auth.controller.ts
// [...] Imports

// [...] Signup User Controller

// [...] Signin User Controller
const loginUserController = async ({
  request,
  response,
  cookies,
}: RouterContext<string>) => {
  try {
    const { email, password }: LoginUserInput = await request.body().value;

    const message = "Invalid email or password";
    const userExists = await User.findOne({ email });
    if (
      !userExists ||
      !(await comparePasswords(password, userExists?.password))
    ) {
      response.status = 401;
      response.body = {
        status: "fail",
        message,
      };
      return;
    }

    const token = await signJwt({
      userId: String(userExists._id),
      expiresIn: config.jwtExpiresIn,
      secretKey: config.jwtSecret,
    });
    cookies.set("token", token, {
      expires: new Date(Date.now() + config.jwtExpiresIn * 60 * 1000),
      maxAge: config.jwtExpiresIn * 60,
      httpOnly: true,
      secure: false,
    });

    response.status = 200;
    response.body = { status: "success", token };
  } catch (error) {
    response.status = 500;
    response.body = { status: "error", message: error.message };
    return;
  }
};
We extracted the email and password from the request body and queried the database to check if a user with the provided email address exists.
Next, we called the comparePasswords() utility function to check if the plain-text password is the same as the hashed one in the database.
Once there weren’t any errors, we called the signJwt() utility function to generate the JSON Web Token and sent it to the client as an HTTPOnly cookie.
Logout User Controller
Add the logout controller that will send an expired cookie to remove the already existing cookie from the user’s browser or client. This approach isn’t the best way to log out users because the only way a token can be invalidated is when it has expired.
In a later article, we will include Redis to serve as an extra layer of security in the authentication flow of the Deno API.
src/controllers/auth.controller.ts
// [...] Imports

// [...] Signup User Controller

// [...] Signin User Controller

// [...] Logout User Controller
const logoutController = ({ response, cookies }: RouterContext<string>) => {
  cookies.set("token", "", {
    httpOnly: true,
    secure: false,
    maxAge: -1,
  });

  response.status = 200;
  response.body = { status: "success" };
};
export default { signUpUserController, loginUserController, logoutController };
Complete Code for the Authentication Controllers
src/controllers/auth.controller.ts
import type { RouterContext } from "../deps.ts";
import { Bson } from "../deps.ts";
import type { CreateUserInput, LoginUserInput } from "../schema/user.schema.ts";
import { User } from "../models/user.model.ts";
import { comparePasswords, hashPassword } from "../utils/password.ts";
import { signJwt } from "../utils/jwt.ts";
import omitFields from "../utils/omitfields.ts";
import config from "../config/default.ts";

// [...] Signup User Controller
const signUpUserController = async ({
  request,
  response,
}: RouterContext<string>) => {
  try {
    const { name, email, password }: CreateUserInput = await request.body()
      .value;

    const hashedPassword = await hashPassword(password);
    const createdAt = new Date();
    const updatedAt = createdAt;

    const userId: string | Bson.ObjectId = await User.insertOne({
      name,
      email,
      password: hashedPassword,
      role: "user",
      verified: true,
      createdAt,
      updatedAt,
    });

    if (!userId) {
      response.status = 500;
      response.body = { status: "error", message: "Error creating user" };
      return;
    }

    const user = await User.findOne({ _id: userId });

    response.status = 201;
    response.body = {
      status: "success",
      user: omitFields(user, "password", "verified"),
    };
  } catch (error) {
    if((error.message as string).includes("E11000")){
      response.status = 409;
      response.body = { status: "fail", message: "A user with that email already exists" };
      return;
    }
    response.status = 500;
    response.body = { status: "error", message: error.message };
    return;
  }
};

// [...] Signin User Controller
const loginUserController = async ({
  request,
  response,
  cookies,
}: RouterContext<string>) => {
  try {
    const { email, password }: LoginUserInput = await request.body().value;

    const message = "Invalid email or password";
    const userExists = await User.findOne({ email });
    if (
      !userExists ||
      !(await comparePasswords(password, userExists?.password))
    ) {
      response.status = 401;
      response.body = {
        status: "fail",
        message,
      };
      return;
    }

    const token = await signJwt({
      userId: String(userExists._id),
      expiresIn: config.jwtExpiresIn,
      secretKey: config.jwtSecret,
    });
    cookies.set("token", token, {
      expires: new Date(Date.now() + config.jwtExpiresIn * 60 * 1000),
      maxAge: config.jwtExpiresIn * 60,
      httpOnly: true,
      secure: false,
    });

    response.status = 200;
    response.body = { status: "success", token };
  } catch (error) {
    response.status = 500;
    response.body = { status: "error", message: error.message };
    return;
  }
};

// [...] Logout User Controller
const logoutController = ({ response, cookies }: RouterContext<string>) => {
  cookies.set("token", "", {
    httpOnly: true,
    secure: false,
    maxAge: -1,
  });

  response.status = 200;
  response.body = { status: "success" };
};
export default { signUpUserController, loginUserController, logoutController };
Request Authenticated User’s Profile Controller
Now let’s create a controller to return the authenticated user’s credentials. After the user has been authenticated by the Deno API, the user’s ID will be stored in the state object. Adding it to the state object will make it available to the other middleware in the pipeline.
src/controllers/user.controller.ts
import type { RouterContext } from '../deps.ts';
import { User } from '../models/user.model.ts';
import omitFields from '../utils/omitfields.ts';

const getMeController = async ({ state, response }: RouterContext<string>) => {
  try {
    const user = await User.findOne({ _id: state.userId });

    if (!user) {
      response.status = 401;
      response.body = {
        status: 'fail',
        message: 'The user belonging to this token no longer exists',
      };
      return;
    }

    response.status = 200;
    response.body = {
      status: 'success',
      user: omitFields(user, 'password', 'verified'),

    };
  } catch (error) {
    response.status = 500;
    response.body = {
      status: 'success',
      message: error.message,
    };
    return;
  }
};

export default { getMeController };
We queried the database to check if the user belonging to the token still exists before returning the document to the user. Also, you noticed we removed the password and verified fields from the document to avoid leaking them to the client.
Step 7 – Create the Middleware Guard
Since we want to protect certain resources on the server, let’s create a middleware guard that will ensure that a valid JWT is provided before the request gets delegated to the next middleware.
src/middleware/requireUser.ts
import { User } from "../models/user.model.ts";
import { ObjectId } from "../deps.ts";
import type { Context } from "../deps.ts";
import { verifyJwt } from "../utils/jwt.ts";
import config from "../config/default.ts";

const requireUser = async (ctx: Context, next: () => Promise<unknown>) => {
  try {
    const headers: Headers = ctx.request.headers;
    const authorization = headers.get("Authorization");
    const cookieToken = await ctx.cookies.get("token");
    let token;

    if (authorization) {
      token = authorization.split(" ")[1];
    } else if (cookieToken) {
      token = cookieToken;
    }

    if (!token) {
      ctx.response.status = 401;
      ctx.response.body = {
        status: "fail",
        message: "You are not logged in",
      };
      return;
    }

    const decoded = await verifyJwt(token, config.jwtSecret);

    const userExists = await User.findOne({ _id: new ObjectId(decoded.sub) });

    if (!userExists) {
      ctx.response.status = 401;
      ctx.response.body = {
        status: "fail",
        message: "The user belonging to this token no longer exists",
      };
      return;
    }

    ctx.state["userId"] = userExists._id;
    await next();
    delete ctx.state.userId;
  } catch (error) {
    ctx.response.status = 500;
    ctx.response.body = {
      status: "fail",
      message: error.message,
    };
  }
};

export default requireUser;
The middleware guard is configured in such a way that it can retrieve the token from either the request cookies or the authorization header.
The most important thing in the middleware guard is the state object we used to pass the authenticated user’s ID to the subsequent controllers in the middleware stack.
Step 8 – Create the API Routes
In this section, you will create routes for the controllers we defined above. We will use the Router class to produce middleware which we will later register in the middleware pipeline to enable routing based on the pathname of the request.
Create a src/routes/auth.routes.ts file and add the following routes.
src/routes/auth.routes.ts
import { Router } from "../deps.ts";
import authController from "../controllers/auth.controller.ts";
import { createUserSchema, loginUserSchema } from "../schema/user.schema.ts";
import validate from "../middleware/validate.ts";
import requireUser from "../middleware/requireUser.ts";

const router = new Router();

router.post<string>(
  "/register",
  validate(createUserSchema),
  authController.signUpUserController,
);
router.post<string>(
  "/login",
  validate(loginUserSchema),
  authController.loginUserController,
);

router.get<string>("/logout", requireUser, authController.logoutController);

export default router;
In the above, we added to the route to register a new user, sign in the user, and log the user out of the API.
Next, create a src/routes/user.routes.ts file to add the route that will be called to retrieve the authenticated user’s credentials.
src/routes/user.routes.ts
import { Router } from "../deps.ts";
import userController from "../controllers/user.controller.ts";
import requireUser from "../middleware/requireUser.ts";

const router = new Router();

router.get<string>("/me", requireUser, userController.getMeController);

export default router;
src/routes/index.ts
import { Application } from "../deps.ts";
import authRouter from "./auth.routes.ts";
import userRouter from "./user.routes.ts";

function init(app: Application) {
  app.use(authRouter.prefix("/api/auth/").routes());
  app.use(userRouter.prefix("/api/users/").routes());
}

export default {
  init,
};
Step 9 – Add the Routes to the Deno Application
Now that we have the routes defined, let’s add them to the Oak middleware pipeline. Also, add the Cors middleware to the middleware stack to configure the Deno server to accept cross-origin requests.
src/server.ts
import { Application, Router, oakCors } from "./deps.ts";
import type { RouterContext } from "./deps.ts";
import config from "./config/default.ts";
import appRouter from "./routes/index.ts";

const app = new Application();
const router = new Router();

// Health checker
router.get<string>('/api/healthchecker', (ctx: RouterContext<string>) => {
  ctx.response.status = 200
  ctx.response.body = {
    status: "success",
    message: "Welcome to Deno with MongoDB"
  }
});

app.use(oakCors({
    origin: /^.+localhost:(3000|3001)$/,
    optionsSuccessStatus: 200,
  }))
appRouter.init(app);
app.use(router.routes());
app.use(router.allowedMethods());

app.addEventListener("listen", ({ port, secure }) => {
  console.info(
    `? Server started on ${secure ? "https://" : "http://"}localhost:${port}`,
  );
});

const port = config.port;
app.listen({ port });
Finally, start the Deno server with the following command:
Make sure the MongoDB Docker container is running
denon run --allow-net --allow-read --allow-write --allow-env src/server.ts
Conclusion
In this article, you learned how to implement JSON Web Token authentication in Deno using TypeScript, MongoDB, and Oak middleware framework.
You can find the complete source code of the Deno JWT Authentication project from this GitHub repository.