
This article will teach you how to secure a FastAPI app by implementing two-factor (2FA) authentication using TOTP tokens generated by an authenticator application like Chrome’s Authenticator extension, Google Authenticator or Authy. The one-time passcode (OTP) codes can be delivered to the user by Email, SMS, Voice call, Push notifications, etc but we will use an authenticator app or extension to simplify the process.
Cyber attacks like credential exploitation, phishing, brute-force attacks, etc that target user accounts and passwords have become rampant over the years. This has forced many businesses to adopt multi-factor or two-factor authentication methods.
Let’s get to the main focus of this article. We will use the https://pyauth.github.io/pyotp/ library to implement the two-factor (2FA) authentication method in the FastAPI app and store the credentials in a MongoDB database.
Related articles:
- How to Implement Two-factor Authentication (2FA) in React.js
- How to Implement Two-factor Authentication (2FA) in Node.js
- How to Implement (2FA) Two-factor Authentication in Golang
- Django – Implement (2FA) Two-Factor Authentication
- Rust – Implement (2FA) Two-Factor Authentication
More learning:
- How to Setup and Use MongoDB with Deno
- How to Set up Deno RESTful CRUD Project with MongoDB
- Authentication with Bcrypt, JWT, and Cookies in Deno
- Complete Deno CRUD RESTful API with MongoDB
Prerequisites
To get the most out of this tutorial, you should have these prerequisites:
- Python 3.7+ should be installed on your system
- The latest version of Docker installed
- You should have some basic knowledge of API designs
- You should have a basic understanding of FastAPI and Python
Run the 2FA FastAPI Project Locally
- Download or clone the 2FA FastAPI source code from https://github.com/wpcodevo/2fa_fastapi and open the project with an IDE or text editor.
- Create a virtual environment with:
- Windows OS –
python -m venv venv - Mac or Linux OS –
python3 -m venv venv
- Windows OS –
- Activate the virtual environment. Note: This step is only required if your IDE doesn’t activate the virtual environment automatically.
- Windows OS –
venv\Scripts\activate.bat. Use Command Prompt app. - Mac or Linux OS –
source venv/bin/activate
- Windows OS –
- Install all the required modules by running
pip install -r requirements.txt - Start the MongoDB Docker container with
docker-compose up -d - Start the FastAPI HTTP server by running
uvicorn app.main:app --reload - Test the 2FA system by making requests to the API
Run the 2FA React.js App Locally
- Download or clone the React.js two-factor authentication (2FA) source code from https://github.com/wpcodevo/two_factor_reactjs and open the project with an IDE or text editor.
- Install all the necessary dependencies by running
yarnoryarn install. - Run
yarn devto start the Vite development server. - Open http://localhost:3000 in a new tab to start testing the two-factor verification system against the API.
Overview of Two-Factor Auth in FastAPI
The FastAPI app will have the following API endpoints:
| METHOD | ENDPOINT | DESCRIPTION |
|---|---|---|
| POST | /api/auth/register | Add new user |
| POST | /api/auth/login | Sign-in the user |
| POST | /api/auth/otp/generate | Generate the OTP Secret Key |
| POST | /api/auth/otp/verify | Verify the OTP Code |
| POST | /api/auth/otp/validate | Validate the OTP Code |
| POST | /api/auth/otp/disable | Disable the 2FA Feature |
Apart from interacting with the API using the React.js app, you can also use an API testing tool like Insomnia or Postman.
Setup the 2FA method
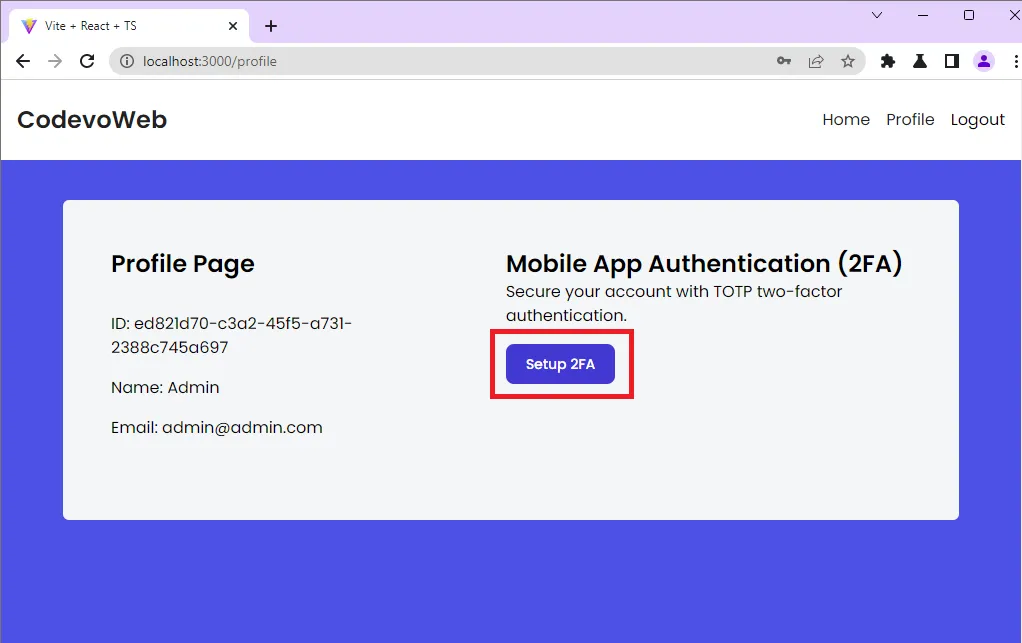
After creating an account and signing into the app, you’ll be redirected to the profile page where you can enable the two-factor (2FA) authentication method.
When you click the Setup 2FA button, an Axios POST request will be fired to the FastAPI /api/auth/register endpoint. FastAPI will then generate the OTP secret key, store the key in the database, and return a JSON object to the frontend app.
Generate the QR Code
The JSON object will have a base32 string and the OTP URL. The OTP URL will be used by React to generate the QR Code that you can scan to display the One Time Password (OTP).
The base32 string can also be used to display the OTP if you do not have an authenticator application.
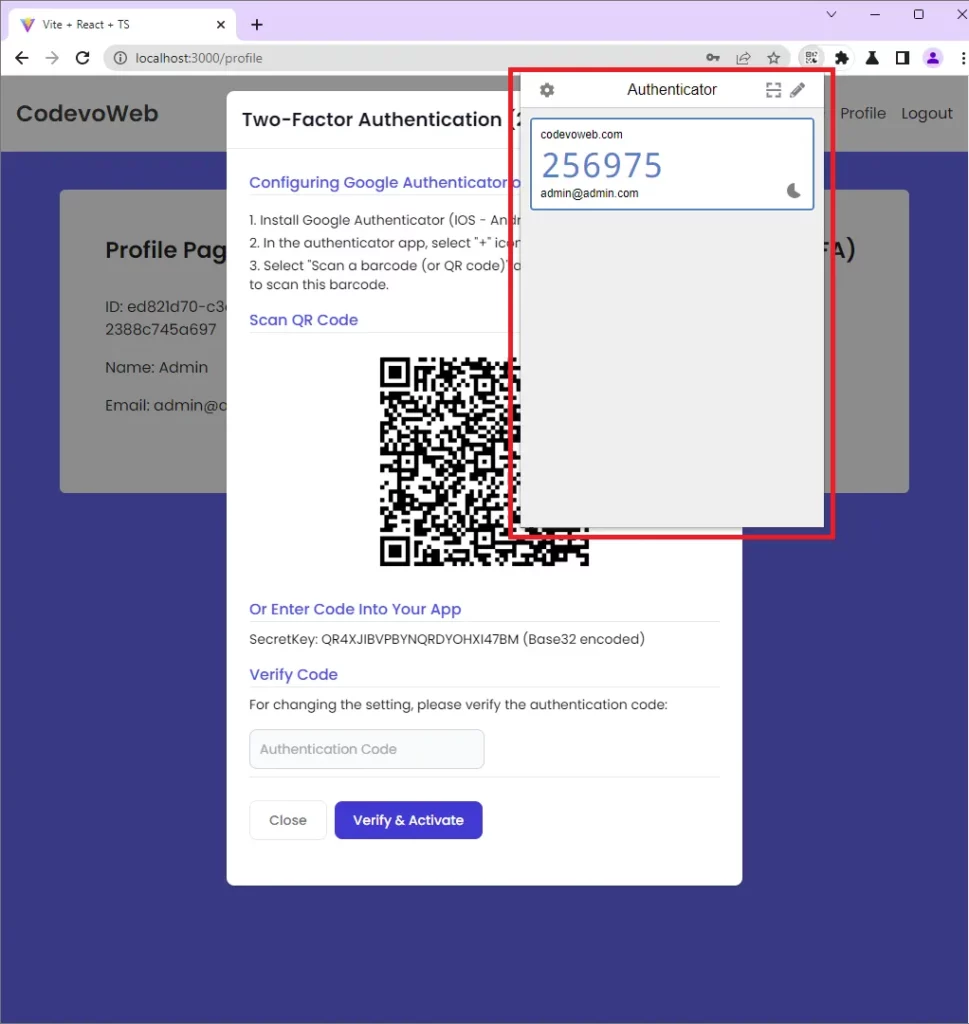
After React has generated the QR Code with the qrcode library, it will render a modal to display the QR Code and the base32 string.
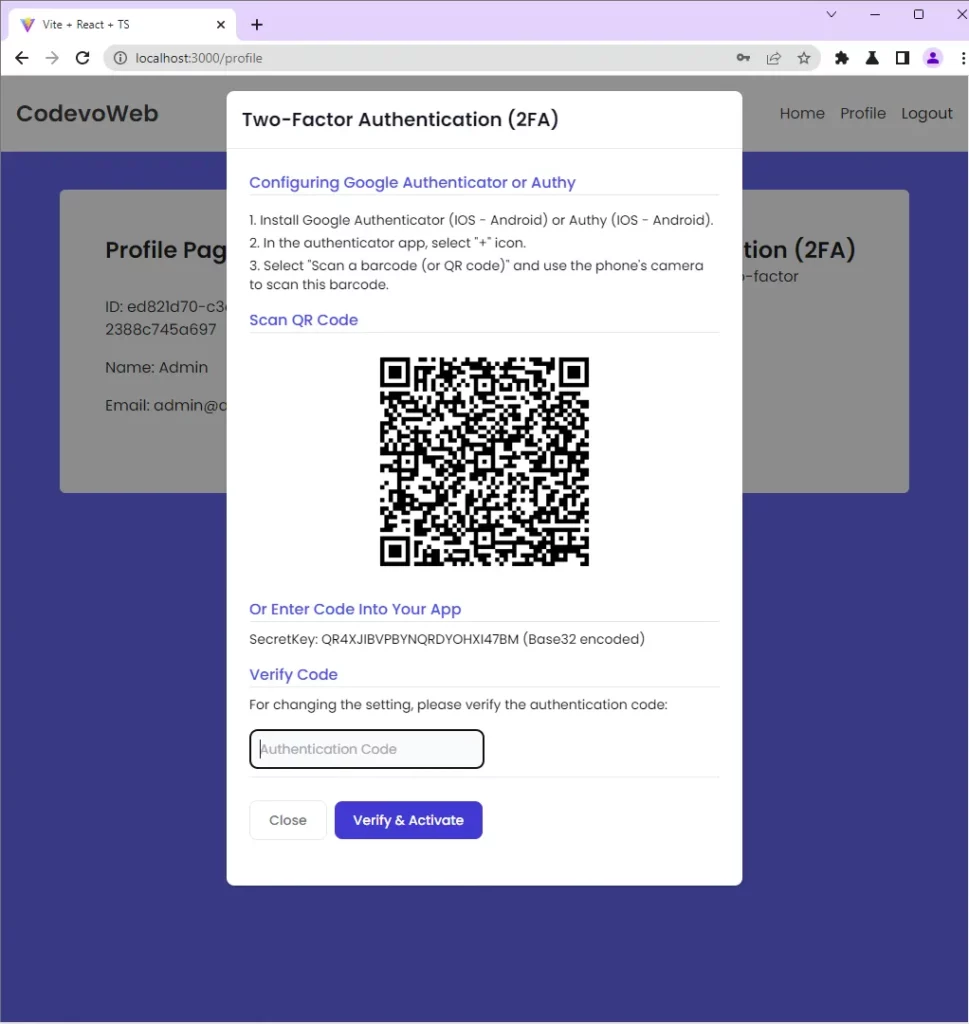
To scan the QR Code, open Chrome’s Authenticator extension, click on the scan icon, drag the selector over the QR Code, and click ok on the prompt that will appear. After that, open the Authenticator extension again and you should see the OTP token.

Verify the OTP Code and Enable the 2FA Feature
Now that you’ve been able to display the OTP, it’s time to verify it and enable the 2FA feature. Copy and paste the OTP token into the input field and click on the Verify & Activate button to submit it to the FastAPI app.
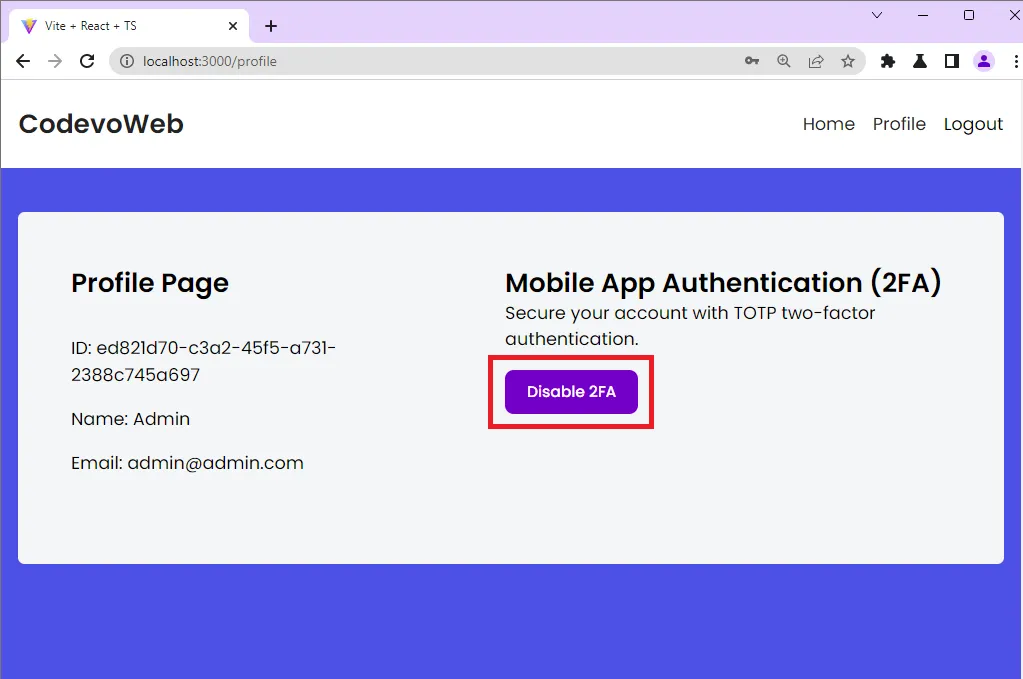
On successful OTP verification, the Setup 2FA button will change to Disable 2FA. This means the two-factor authentication feature has been enabled on your account.
Validate the OTP Code
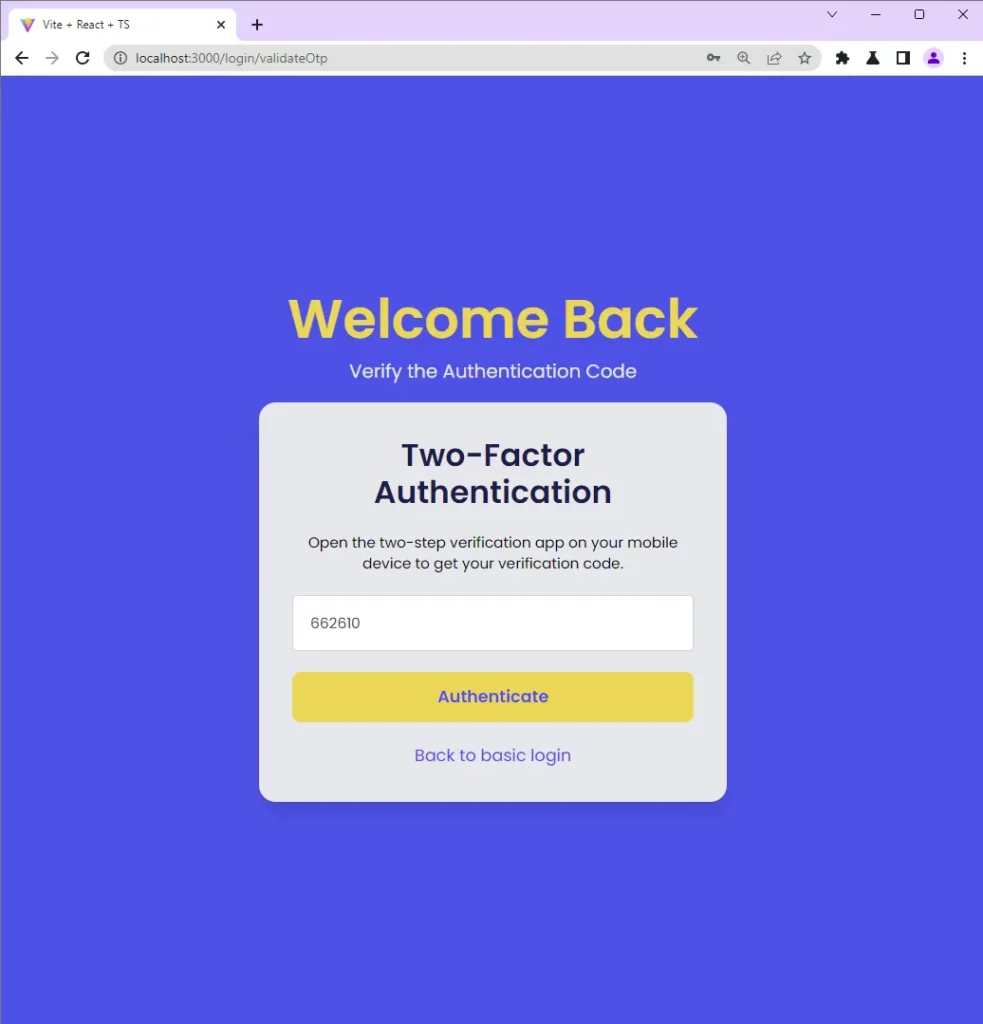
After the two-factor authentication method is enabled and you sign into the app with your credentials, you will be redirected to the OTP verification page.
Open the Authenticator extension again, copy and paste the OTP token into the text input component and click on the Authenticate button to submit it to the FastAPI app.
Disable the 2FA Feature
If you do not like the two-factor authentication method, you can click on the Disable 2FA button to disable the feature on your account.
Step 1 – Setup the FastAPI Project
At this point, I will assume you already have Python 3.7+ installed on your machine. To begin, navigate to a location on your machine where you want the project source code to reside and create a folder named 2fa_fastapi .
Open the newly-created folder with an IDE or text editor and run these commands to create a virtual environment and activate it.
Create the virtual environment:
- Windows OS –
python -m venv venv - Mac or Linux OS –
python3 -m venv venv
Activate the virtual environment:
- Windows OS –
venv\Scripts\activate.bat. Use Command Prompt - Mac or Linux OS –
source venv/bin/activate
With that out of the way, let’s install the FastAPI library. FastAPI stands on the shoulders of two giants – Starlette and Pydantic so we will use the [all] directive to install FastAPI and its peer dependencies:
pip install fastapi[all]
The above command will install FastAPI and a long list of other modules but these are the prominent ones you should be aware of:
pydantic– This package will allow us to load the environment variables from the .env file, and validate the request payloads.starlette– An HTTP web frameworkuvicorn– Hot-reload the HTTP server upon every file change
Now let’s create a FastAPI app, add a route to the middleware pipeline, and start the HTTP server with Uvicorn. To do that, create a app/main.py file and add the following code:
app/main.py
from fastapi import FastAPI

app = FastAPI()


@app.get("/api/healthchecker")
def root():
    return {"message": "Welcome to 2FA Authentication with FastAPI"}
We imported the FastAPI module, created an instance of the FastAPI class, and added a health checker route to the middleware stack.
Now start the HTTP server with Uvicorn:
uvicorn app.main:app --reload
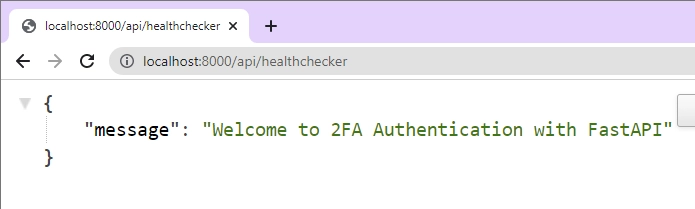
The above command will start the HTTP server on port 8000. Open a new tab in your browser and navigate to http://localhost:8000/api/healthchecker to see the JSON response sent by the FastAPI server.
Step 2 – Setup the MongoDB with Docker
In this project, we will use MongoDB to store the user credentials and OTP secret keys. To manage the MongoDB database, we will use the Pymongo library because it provides a simple interface to connect and interact with the MongoDB server.
You can easily adjust the code in this project to use an SQL database like PostgreSQL, MySQL, or SQLite but you will need an ORM like SQLalchemy to manage the data.
To quickly get a MongoDB server on your system, we will use Docker and Docker-compose. To do this, create a docker-compose.yml file and add the following configurations.
docker-compose.yml
version: '3'
services:
  mongo:
    image: mongo:latest
    container_name: mongo
    env_file:
      - ./.env
    environment:
      MONGO_INITDB_ROOT_USERNAME: ${MONGO_INITDB_ROOT_USERNAME}
      MONGO_INITDB_ROOT_PASSWORD: ${MONGO_INITDB_ROOT_PASSWORD}
      MONGO_INITDB_DATABASE: ${MONGO_INITDB_DATABASE}
    volumes:
      - mongo:/data/db
    ports:
      - '6000:27017'

volumes:
  mongo:
Since we used placeholders for the MongoDB credentials in the docker-compose.yml file, create a .env file and add the following environment variables.
.env
MONGO_INITDB_ROOT_USERNAME=admin
MONGO_INITDB_ROOT_PASSWORD=password123
MONGO_INITDB_DATABASE=fastapi

DATABASE_URL=mongodb://admin:password123@localhost:6000/fastapi?authSource=admin

CLIENT_ORIGIN=http://localhost:3000
Now we need a way to make the environment variables accessible in other files. Luckily for us, Pydantic has a BaseSettings class that we can inherit to read and load the environment variables from the .env file. To do this, create a app/config.py file and add the following code:
app/config.py
from pydantic import BaseSettings

class Settings(BaseSettings):
    DATABASE_URL: str
    MONGO_INITDB_DATABASE: str

    CLIENT_ORIGIN: str

    class Config:
        env_file = './.env'

settings = Settings()
Start the MongoDB Docker container by running this command:
docker-compose up -d
This will fetch the latest MongoDB Docker image from the Docker Hub, build the container with the provided credentials, start the MongoDB server, and map port 6000 to the default MongoDB port.
Now let’s install the Pymongo package to help us connect the FastAPI app to the running MongoDB server and manage the data stored in the database.
pip install pymongo
Next, create a app/database.py file and add the following code:
app/database.py
from pymongo import mongo_client
import pymongo
from app.config import settings

client = mongo_client.MongoClient(settings.DATABASE_URL)
print('Connected to MongoDB...')

db = client[settings.MONGO_INITDB_DATABASE]
User = db.users
User.create_index([("email", pymongo.ASCENDING)], unique=True)
Let’s evaluate the above code:
- We evoked the
.MongoClient()method and provided it with the connection URL defined in the .env file to create the MongoDB client. - Then, we created the database with the
client["DATABASE_NAME"]syntax and assigned it to adbvariable. - Next, we created a “users” collection with
db.usersand added a unique index to the email field. The unique index will ensure that no two users end up with the same email in the database.
Step 3 – Create the Validation Schemas with Pydantic
In this step, you will create validation schemas that FastAPI will use under the hood to validate the request body. To do that, we will create a class that inherits Pydantic’s BaseModel class and define the validation rules.
app/schemas.py
from datetime import datetime
from pydantic import BaseModel, EmailStr, constr

class UserBaseSchema(BaseModel):
    name: str
    email: str
    password: str

    otp_enabled: bool = False
    otp_verified: bool = False

    otp_base32: str | None = None
    otp_auth_url: str | None = None

    created_at: datetime | None = None
    updated_at: datetime | None = None

    class Config:
        orm_mode = True


class LoginUserSchema(BaseModel):
    email: EmailStr
    password: constr(min_length=8)


class UserRequestSchema(BaseModel):
    user_id: str
    token: str | None = None
Step 4 – Create the Path Operation Functions
In this section, you’ll create six path operation functions to perform the two-factor authentication:
Create_User– Adds the new user to the databaseLogin– Authenticate the registered userGenerate_OTP– Generate the OTP secret key and store them in the databaseVerify_OTP– Verify the OTP token to enable the 2FA featureValidate_OTP– Validate the OTP token after the 2FA feature is enabledDisable_OTP– Disable the 2FA feature
Before we start creating the route handlers, install the PyOTP library that will help us implement the two-factor (2FA) authentication method in the FastAPI project.
pip install pyotp
After the installation, create a app/auth.py file and add the following code:
app/auth.py
from datetime import datetime
import pyotp
from bson.objectid import ObjectId
from pymongo.collection import ReturnDocument
from fastapi import APIRouter, status, HTTPException

from app.database import User
from . import schemas


def userEntity(user) -> dict:
    return {
        "id": str(user["_id"]),
        "name": user["name"],
        "email": user["email"],
        "otp_enabled": user["otp_enabled"],
        "otp_verified": user["otp_verified"],
        "otp_base32": user["otp_base32"],
        "otp_auth_url": user["otp_auth_url"],
        "created_at": user["created_at"],
        "updated_at": user["updated_at"]
    }


router = APIRouter()
In the above code, we imported all the dependencies, created a serializer to parse the data returned from MongoDB, and instantiated FastAPI’s APIRouter class.
Register User Handler
The first stage in the two-factor authentication process is user registration. This means we need to register the user and store the credentials in the database before proceeding with the 2FA implementation.
To do that, we will create a path operation function that will be called to add the new user to the database when a POST request is made to the /api/auth/register endpoint.
app/auth.py
# [...] Register user
@router.post('/register', status_code=status.HTTP_201_CREATED)
async def Create_User(payload: schemas.UserBaseSchema):
    user = User.find_one({'email': payload.email.lower()})
    if user:
        raise HTTPException(status_code=status.HTTP_409_CONFLICT,
                            detail='Account already exist')

    payload.email = payload.email.lower()
    payload.created_at = datetime.utcnow()
    payload.updated_at = payload.created_at

    result = User.insert_one(payload.dict())

    return {'status': 'success', 'message': "Registered successfully, please login"}
Let’s evaluate the above code. First, we passed the schemas.UserBaseSchema class we defined with Pydantic to the path operation function. FastAPI will use the provided schema to parse and validate the request body before assigning the JSON object to the payload variable.
Next, we queried the MongoDB database to check if a user with that email already exists before calling the .insert_one() method to add the new user to the database.
Login User Handler
Now that we are able to register users, let’s create a path operation function to sign them into the API. To simpler the project, we will ignore other authentication methods and return the user’s credentials to the client.
app/auth.py
# [...] Register user

# [...] Login user
@router.post('/login')
def Login(payload: schemas.LoginUserSchema):
    user = User.find_one({'email': payload.email.lower()})
    if not user:
        raise HTTPException(status_code=status.HTTP_400_BAD_REQUEST,
                            detail='Incorrect Email or Password')

    return {'status': 'success', 'user': userEntity(user)}
We called the .find_one() method to retrieve the user that matches the query and serialized the found document with the userEntity serializer before returning the document to the client.
Generate TOTP Secret Key Handler
We are now ready to generate the OTP secret key with the https://pyauth.github.io/pyotp/ library. The OTP secret will be stored on both the user’s mobile device and the API server. With the PyOTP library, we first need to generate the base32-encoded string using the .random_base32() helper function.
The 32-character secret key will be compatible with Google Authenticator and other OTP applications. Next, we will generate the provisional URI for use with a QR Code generator.
Now that we are able to generate the base32 encoded key and the OTP URL, let’s store them in the database before sending them to the client.
app/auth.py
# [...] Register user

# [...] Login user

# [...] Generate OTP secret key
@router.post('/otp/generate')
def Generate_OTP(payload: schemas.UserRequestSchema):
    otp_base32 = pyotp.random_base32()
    otp_auth_url = pyotp.totp.TOTP(otp_base32).provisioning_uri(
        name="admin@admin.com", issuer_name="codevoweb.com")

    if not ObjectId.is_valid(payload.user_id):
        raise HTTPException(status_code=status.HTTP_400_BAD_REQUEST,
                            detail=f"Invalid id: {payload.user_id}")
    updated_user = User.find_one_and_update(
        {'_id': ObjectId(payload.user_id)}, {'$set': {"otp_auth_url": otp_auth_url, "otp_base32": otp_base32}}, return_document=ReturnDocument.AFTER)
    if not updated_user:
        raise HTTPException(status_code=status.HTTP_404_NOT_FOUND,
                            detail=f'No user with this id: {payload.user_id} found')

    return {'base32': otp_base32, "otpauth_url": otp_auth_url}
We used the ObjectId.is_valid() method to ensure that a valid Object ID is provided before calling the .find_one_and_update() method to store the OTP secret key in the database.
Verify OTP Token Handler
At this point, we’ve been able to generate the base32 string and the provisional URI that can be used to display the OTP secret. It’s time to create a path operation function that FastAPI with use to verify the OTP generated by the Authenticator app.
This route handler will require the client to include the user_id and OTP token in the request body when a request is made to the /api/auth/otp/verify endpoint.
The FastAPI app will parse the request body to obtain the request payload and query the database with the provided user_id to retrieve the document that has that Object Id.
app/auth.py
# [...] Register user

# [...] Login user

# [...] Generate OTP secret key

# [...] Verify OTP token
@router.post('/otp/verify')
def Verify_OTP(payload: schemas.UserRequestSchema):
    message = "Token is invalid or user doesn't exist"
    user = userEntity(User.find_one(
        {'_id': ObjectId(payload.user_id)}))
    if not user:
        raise HTTPException(status_code=status.HTTP_400_BAD_REQUEST,
                            detail=message)

    totp = pyotp.TOTP(user.get("otp_base32"))
    if not totp.verify(payload.token):
        raise HTTPException(status_code=status.HTTP_400_BAD_REQUEST,
                            detail=message)
    updated_user = User.find_one_and_update(
        {'_id': ObjectId(payload.user_id)}, {'$set': {"otp_enabled": True, "otp_verified": True}}, return_document=ReturnDocument.AFTER)
    if not updated_user:
        raise HTTPException(status_code=status.HTTP_404_NOT_FOUND,
                            detail=f'No user with this id: {payload.user_id} found')

    return {'otp_verified': True, "user": userEntity(updated_user)}
Next, we verified the OTP token provided in the request body against the base32-encoded secret key stored in the database. We called MongoDB’s .find_one_and_update() method to enable the 2FA feature on the user’s account and set the otp_verified field to true.
Validate OTP Code Handler
Now create a path operation function to validate the OTPs after the 2FA feature is enabled on the user’s account. This route handler is similar to the above one but we won’t update the user’s credentials in the database and the totp.verify() method will take a valid_window parameter as the second argument.
The valid_window will extend the validity of the OTP token to the counter value as well as window tokens ahead and window tokens behind.
app/auth.py
# [...] Register user

# [...] Login user

# [...] Generate OTP secret key

# [...] Verify OTP token

# [...] Validate OTP token
@router.post('/otp/validate')
def Validate_OTP(payload: schemas.UserRequestSchema):
    message = "Token is invalid or user doesn't exist"
    user = userEntity(User.find_one(
        {'_id': ObjectId(payload.user_id)}))
    if not user:
        raise HTTPException(status_code=status.HTTP_400_BAD_REQUEST,
                            detail=message)

    if not user.get("otp_verified"):
        raise HTTPException(status_code=status.HTTP_401_UNAUTHORIZED,
                            detail="OTP must be verified first")

    totp = pyotp.TOTP(user.get("otp_base32"))
    if not totp.verify(otp=payload.token, valid_window=1):
        raise HTTPException(status_code=status.HTTP_400_BAD_REQUEST,
                            detail=message)

    return {'otp_valid': True}
Disable 2FA Feature
Finally, let’s create the path operation function that will be used by FastAPI to disable the 2FA feature on the user’s account.
app/auth.py
# [...] Register user

# [...] Login user

# [...] Generate OTP secret key

# [...] Verify OTP token

# [...] Validate OTP token

# [...] Disable 2FA
@router.post('/otp/disable')
def Disable_OTP(payload: schemas.UserRequestSchema):
    if not ObjectId.is_valid(payload.user_id):
        raise HTTPException(status_code=status.HTTP_400_BAD_REQUEST,
                            detail=f"Invalid id: {payload.user_id}")

    updated_user = User.find_one_and_update(
        {'_id': ObjectId(payload.user_id)}, {'$set': {"otp_enabled": False}}, return_document=ReturnDocument.AFTER)
    if not updated_user:
        raise HTTPException(status_code=status.HTTP_404_NOT_FOUND,
                            detail=f'No user with this id: {payload.user_id} found')

    return {'otp_disabled': True, 'user': userEntity(updated_user)}
Complete Authentication Handlers
app/auth.py
from datetime import datetime
import pyotp
from bson.objectid import ObjectId
from pymongo.collection import ReturnDocument
from fastapi import APIRouter, status, HTTPException

from app.database import User
from . import schemas


def userEntity(user) -> dict:
    return {
        "id": str(user["_id"]),
        "name": user["name"],
        "email": user["email"],
        "otp_enabled": user["otp_enabled"],
        "otp_verified": user["otp_verified"],
        "otp_base32": user["otp_base32"],
        "otp_auth_url": user["otp_auth_url"],
        "created_at": user["created_at"],
        "updated_at": user["updated_at"]
    }


router = APIRouter()


@router.post('/register', status_code=status.HTTP_201_CREATED)
async def Create_User(payload: schemas.UserBaseSchema):
    user = User.find_one({'email': payload.email.lower()})
    if user:
        raise HTTPException(status_code=status.HTTP_409_CONFLICT,
                            detail='Account already exist')

    payload.email = payload.email.lower()
    payload.created_at = datetime.utcnow()
    payload.updated_at = payload.created_at

    result = User.insert_one(payload.dict())

    return {'status': 'success', 'message': "Registered successfully, please login"}

@router.post('/login')
def Login(payload: schemas.LoginUserSchema):
    user = User.find_one({'email': payload.email.lower()})
    if not user:
        raise HTTPException(status_code=status.HTTP_400_BAD_REQUEST,
                            detail='Incorrect Email or Password')

    return {'status': 'success', 'user': userEntity(user)}

@router.post('/otp/generate')
def Generate_OTP(payload: schemas.UserRequestSchema):
    otp_base32 = pyotp.random_base32()
    otp_auth_url = pyotp.totp.TOTP(otp_base32).provisioning_uri(
        name="admin@admin.com", issuer_name="codevoweb.com")

    if not ObjectId.is_valid(payload.user_id):
        raise HTTPException(status_code=status.HTTP_400_BAD_REQUEST,
                            detail=f"Invalid id: {payload.user_id}")
    updated_user = User.find_one_and_update(
        {'_id': ObjectId(payload.user_id)}, {'$set': {"otp_auth_url": otp_auth_url, "otp_base32": otp_base32}}, return_document=ReturnDocument.AFTER)
    if not updated_user:
        raise HTTPException(status_code=status.HTTP_404_NOT_FOUND,
                            detail=f'No user with this id: {payload.user_id} found')

    return {'base32': otp_base32, "otpauth_url": otp_auth_url}


@router.post('/otp/verify')
def Verify_OTP(payload: schemas.UserRequestSchema):
    message = "Token is invalid or user doesn't exist"
    user = userEntity(User.find_one(
        {'_id': ObjectId(payload.user_id)}))
    if not user:
        raise HTTPException(status_code=status.HTTP_400_BAD_REQUEST,
                            detail=message)

    totp = pyotp.TOTP(user.get("otp_base32"))
    if not totp.verify(payload.token):
        raise HTTPException(status_code=status.HTTP_400_BAD_REQUEST,
                            detail=message)
    updated_user = User.find_one_and_update(
        {'_id': ObjectId(payload.user_id)}, {'$set': {"otp_enabled": True, "otp_verified": True}}, return_document=ReturnDocument.AFTER)
    if not updated_user:
        raise HTTPException(status_code=status.HTTP_404_NOT_FOUND,
                            detail=f'No user with this id: {payload.user_id} found')

    return {'otp_verified': True, "user": userEntity(updated_user)}


@router.post('/otp/validate')
def Validate_OTP(payload: schemas.UserRequestSchema):
    message = "Token is invalid or user doesn't exist"
    user = userEntity(User.find_one(
        {'_id': ObjectId(payload.user_id)}))
    if not user:
        raise HTTPException(status_code=status.HTTP_400_BAD_REQUEST,
                            detail=message)

    if not user.get("otp_verified"):
        raise HTTPException(status_code=status.HTTP_401_UNAUTHORIZED,
                            detail="OTP must be verified first")

    totp = pyotp.TOTP(user.get("otp_base32"))
    if not totp.verify(otp=payload.token, valid_window=1):
        raise HTTPException(status_code=status.HTTP_400_BAD_REQUEST,
                            detail=message)

    return {'otp_valid': True}


@router.post('/otp/disable')
def Disable_OTP(payload: schemas.UserRequestSchema):
    if not ObjectId.is_valid(payload.user_id):
        raise HTTPException(status_code=status.HTTP_400_BAD_REQUEST,
                            detail=f"Invalid id: {payload.user_id}")

    updated_user = User.find_one_and_update(
        {'_id': ObjectId(payload.user_id)}, {'$set': {"otp_enabled": False}}, return_document=ReturnDocument.AFTER)
    if not updated_user:
        raise HTTPException(status_code=status.HTTP_404_NOT_FOUND,
                            detail=f'No user with this id: {payload.user_id} found')

    return {'otp_disabled': True, 'user': userEntity(updated_user)}
Step 5 – Configure CORS and Register the Routes
Now that we have all the path operation functions defined, let’s include them in the middleware pipeline. Also, add the CORS configuration to the middleware stack so that the FastAPI app can accept requests from cross-origin domains.
app/main.py
from fastapi import FastAPI
from fastapi.middleware.cors import CORSMiddleware

from app.config import settings
from app import auth

app = FastAPI()

origins = [
    settings.CLIENT_ORIGIN,
]

app.add_middleware(
    CORSMiddleware,
    allow_origins=origins,
    allow_credentials=True,
    allow_methods=["*"],
    allow_headers=["*"],
)


app.include_router(auth.router, tags=['Auth'], prefix='/api/auth')


@app.get("/api/healthchecker")
def root():
    return {"message": "Welcome to 2FA Authentication with FastAPI"}
After that, run uvicorn app.main:app --reload to start the FastAPI HTTP server.
Conclusion
In this article, you learned how to implement two-factor authentication in FastAPI and Python using the https://pyauth.github.io/pyotp/ library.
You can find the React.js and FastAPI source code on this GitHub repository: