
This article will teach you how to secure a Node.js API by implementing two-factor authentication (2FA) system using tokens generated by Google Authenticator or Authy. The one-time passcode (OTP) can be delivered via different methods like SMS but we will use Google Authenticator or Authy to reduce the complexity of the project.
API security should be a top priority for developers. Why? Because there are more than 90,000 attacks on APIs every minute. Instead of using only the traditional method of authentication – email and password, it’s recommended to add an extra layer of security by implementing social login with Google, GitHub, or Facebook, Two-Factor Authentication (2FA), Multi-factor, Facial recognition, Biometrics, Single sign-on, and many more.
Let’s talk about the main focus of this article. We will be using the otpauth library to implement the time-based one-time password (TOTP) authentication in Node.js. The API will run on an Express server and use Prisma ORM to store data in an SQLite database.
When I initially wrote this article, we utilized the Speakeasy library to implement TOTP generation and validation. However, due to the lack of recent updates and maintenance for Speakeasy (last updated 7 years ago), many users have expressed a need for an alternative library.
Consequently, I updated the article and the accompanying source code to utilize the otpauth library instead. This library has gained popularity as a reliable alternative, with a substantial number of weekly downloads, approximately 63,207. By making this switch, we can ensure a more dependable and actively supported solution for TOTP implementation.
Related article:
- How to Implement Two-factor Authentication (2FA) in React.js
- How to Implement (2FA) Two-factor Authentication in Golang
- Two-factor Authentication (2FA) in FastAPI and Python
- Django – Implement (2FA) Two-Factor Authentication
- Rust – Implement (2FA) Two-Factor Authentication
More practice:
- How to Setup and Use MongoDB with Deno
- How to Set up Deno RESTful CRUD Project with MongoDB
- Authentication with Bcrypt, JWT, and Cookies in Deno
- Complete Deno CRUD RESTful API with MongoDB
What is Two-Factor Authentication?
Two-Factor Authentication, also commonly referred to as 2FA, is a specific type of multi-factor authentication (MFA) that requires two forms of identification (also referred to as authentication factors) to grant access to a resource or data. These factors include the traditional method of authentication like username/email and password – plus something you have – like a smartphone – to approve the requests.
Businesses use two-factor authentication (2FA) to protect against many security threats that target user accounts and passwords like credential exploitation, social engineering, password brute-force attacks, phishing, and many more.
There are many authentication methods when using two-factor authentication (2FA). Some of the most popular options include:
- SMS verification
- Voice-based authentication
- Hardware tokens
- Push notifications
Advantages of Two-Factor Authentication (2FA)
The advantages of using two-factor authentication are endless and am only going to list four of them.
- It adds an extra layer of security by protecting against cybercriminals who target user passwords and accounts.
- It does not add extra costs on the part of the user since most websites and apps use your mobile device to text, call, or use personalized 2FA methods to verify your identity.
- Setting up 2FA is relatively easy and user-friendly. In most cases, all that the user will do is enable the 2FA feature and scan a QR code or enter the phone number to view or receive OTP codes.
Prerequisites
To get the most out of this tutorial, you should have:
- Basic knowledge of JavaScript and TypeScript
- Basic knowledge of API design and CRUD patterns
- Familiarity with Node.js and Express.js will be beneficial
- The latest version of Node.js installed on your system
Run the Node.js 2FA App Locally
- If you don’t have Node.js installed, visit https://nodejs.org/ to download the respective binary for your operating system.
- Download or clone the Node.js two-factor authentication source code from https://github.com/wpcodevo/2fa-nodejs
- Run
yarnoryarn installto install all the necessary dependencies - Migrate the Prisma schema to the SQLite database by running
yarn db:migrateandyarn db:push. - Start the Node.js Express server by running
yarn start - Open any API testing software like Postman to test the API endpoints
Run the Frontend Built with React.js
- Download or clone the React.js two-factor authentication source code from https://github.com/wpcodevo/two_factor_reactjs.
- Install all the necessary dependencies by running
yarnoryarn installfrom the terminal of the root project folder. - Start the Vite development server by running
yarn dev. - Open a new tab in your browser and visit http://localhost:3000 to start testing the two-factor authentication system.
Two-factor Authentication in Node.js Flow
The Node.js API will have the following endpoints:
| METHOD | ENDPOINT | DESCRIPTION |
|---|---|---|
| POST | /api/auth/register | Register New User |
| POST | /api/auth/login | Login User |
| POST | /api/auth/otp/generate | Generate the OTP Secret |
| POST | /api/auth/otp/verify | Verify the OTP Secret |
| POST | /api/auth/otp/validate | Validate the OTP Token |
| POST | /api/auth/otp/disable | Disable the OTP Feature |
The API endpoints can be tested with any API testing tool like Postman, Insomnia, VS Code Thunder Client extension, and more – but since we humans understand concepts better with visual demonstrations, we will use a frontend app built with React.js to interact with the Node.js API.
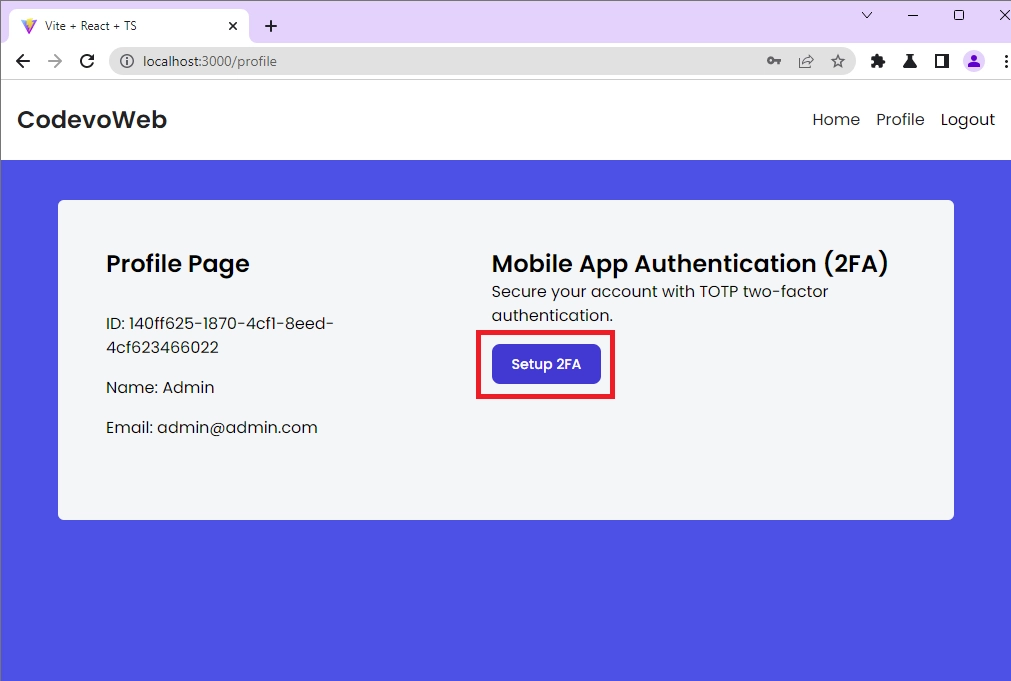
Setup the 2FA feature
To reduce the steps involved in the 2FA process, I will skip the account registration and login steps. However, you need to create an account and log in with your credentials before you can access the profile page.
When you click on the Setup 2FA button on the profile page, an HTTP POST request will be fired to the /api/auth/otp/generate endpoint where the Node.js API will generate the one-time passcode and return the OTP URL to the frontend app.
Scan the QRCode
The React app will then generate the QRCode from the OTP URL sent by the Node.js API and render a component to display the QRCode.
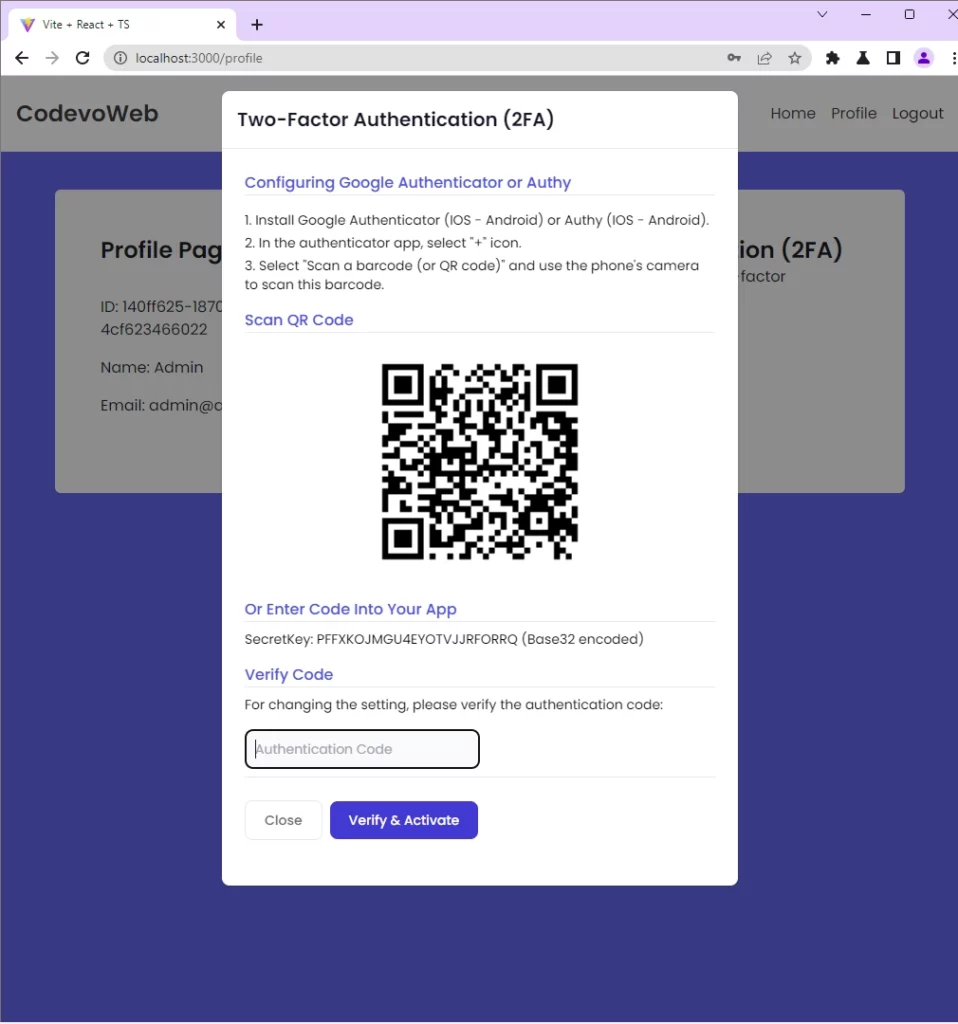
Verify the OTP token
To see the OTP token, you can do the following:
- Use the Google Authenticator app to scan the QR Code
- Use the Authy app to scan the QR Code
- Use the Authenticator extension in chrome to scan the QR Code
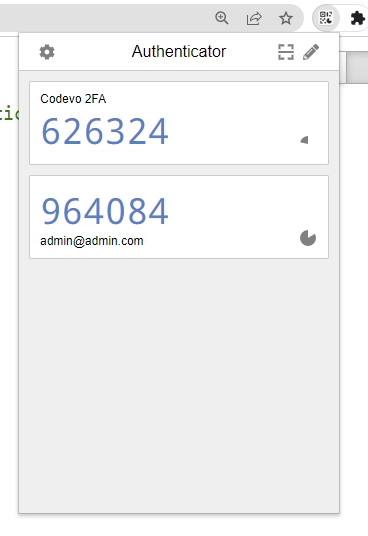
In my case, I will use the Chrome Authenticator extension to scan the QR Code since am in a development environment.
To view the OTP token with the Chrome Authenticator extension, click on the Scan QR Code icon adjacent to the pencil icon, and drag the scanner over the QR Code.
After that, go back to the Chrome Authenticator extension and you should see the OTP token.
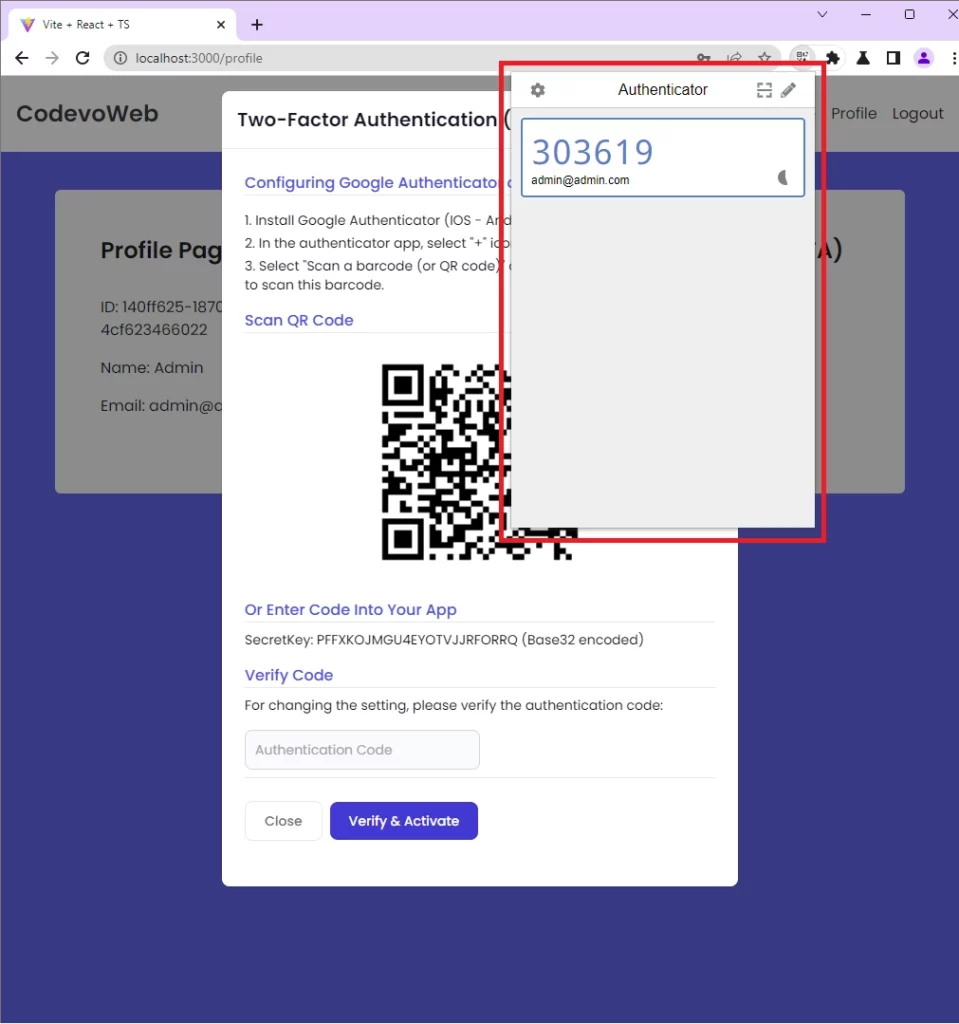
Click on the OTP token to copy and paste it into the input field on the modal. When the Verify & Activate button is clicked, React will make an HTTP POST request to the /api/auth/otp/verify endpoint where the Node.js API will enable the 2FA feature and return a success message to the frontend app.
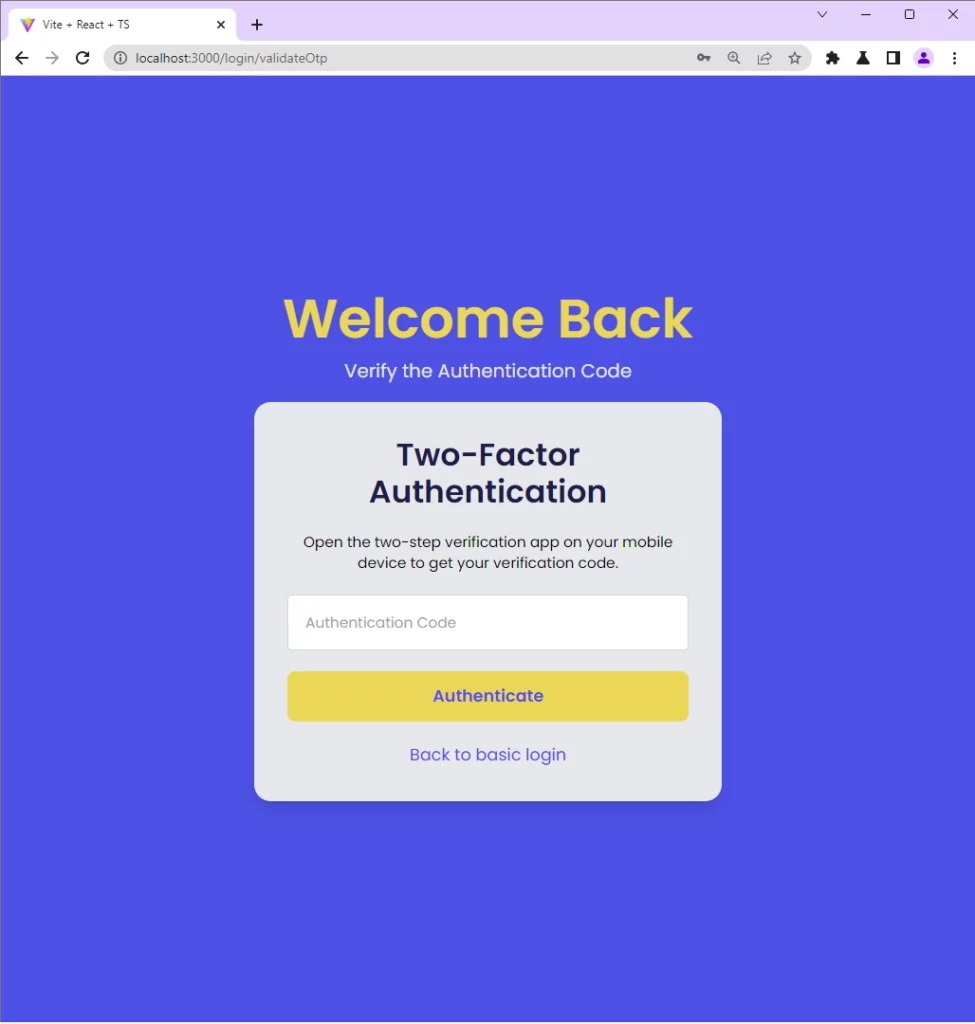
Validate the OTP token
After enabling the 2FA feature, refresh the page to log out. When you successfully log in with your credentials, React will automatically redirect you to the OTP verification page where you will be required to provide the OTP token to verify your identity.
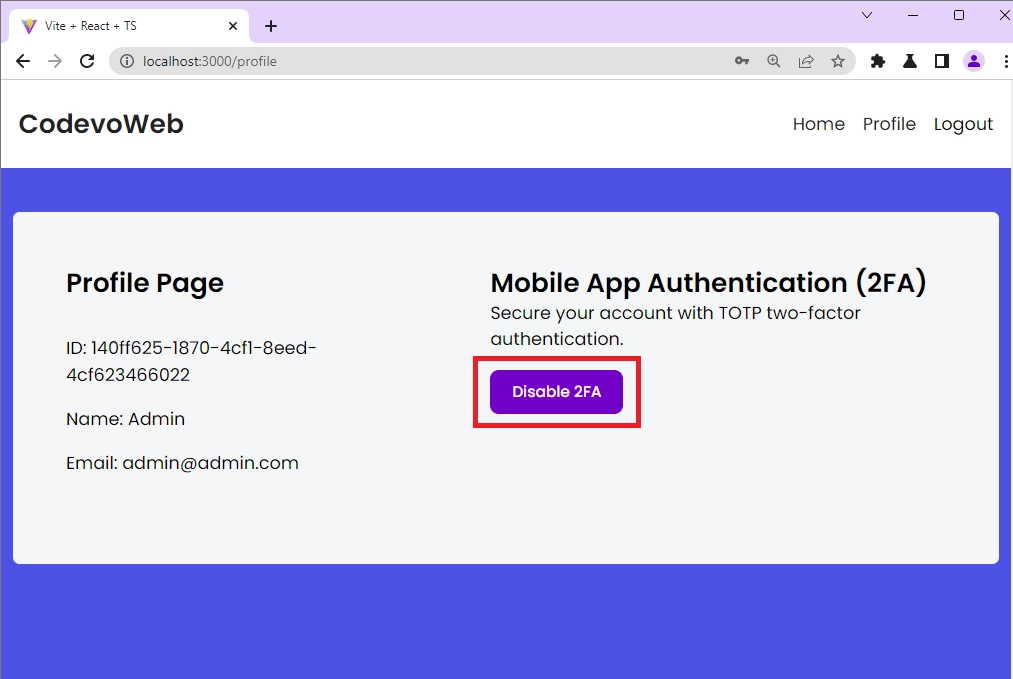
Disable the 2FA Feature
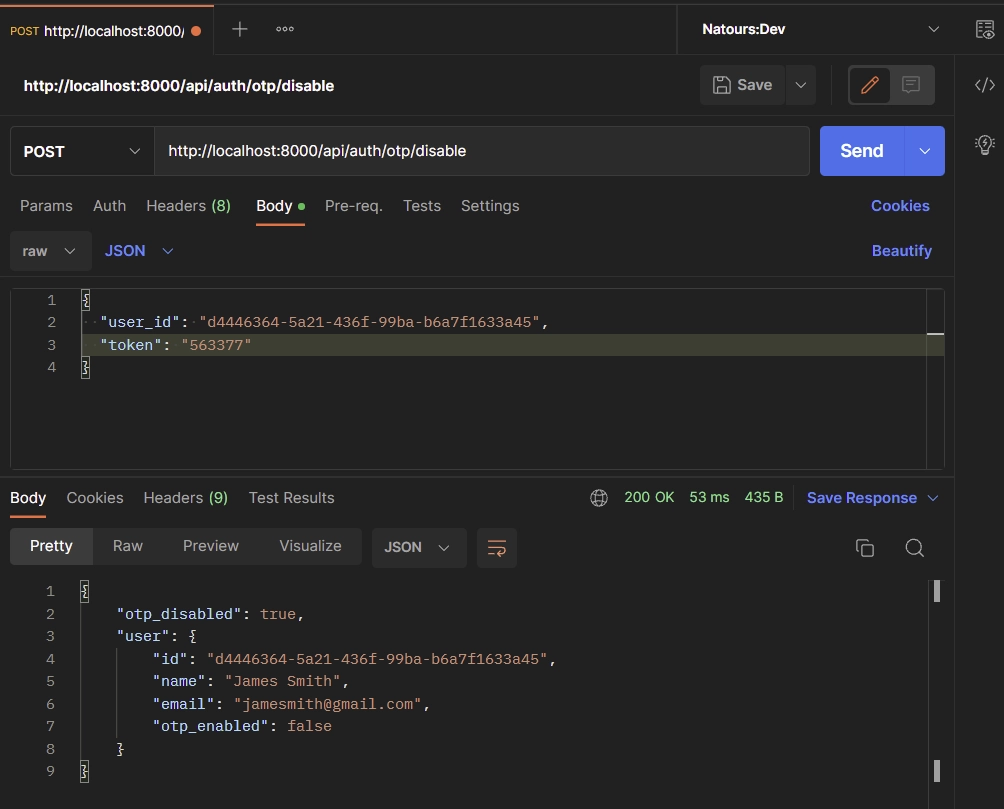
To disable the two-factor authentication (2FA) feature on your account, you can click the Disable 2FA button available on the profile page. Once the Disable 2FA button is clicked, React will make an HTTP POST request to the /api/auth/otp/disable endpoint.
One success, the 2FA feature will be disabled and the user will not be presented with the 2FA verification page during the authentication process.
Step 1 – Setup the Node.js Project
To begin, navigate to where you would like to set up the project and create a new directory to contain the source code. You can name the project 2fa_NodeJs . Once you are done, open the project with an IDE or text editor. In my case, I will be using VS Code.
mkdir 2fa_nodejs && cd 2fa_nodejs && code .
Next, you need to initialize the Node.js project with Yarn or NPM to manage the dependencies. Also, we will use TypeScript in this project to help us get better IntelliSense in VS Code.
yarn init -y && yarn add -D typescript @types/node
# or
npm init -y && npm install -D typescript @types/node
typescript– A superset of JavaScript@types/node– Contains the TypeScript definitions for Node.js
This will create a package.json file with an initial setup for the Node.js TypeScript app. Once the project initialization is complete, you will have a package.json file that might look something like this:
{
  "name": "2fa_nodejs",
  "version": "1.0.0",
  "main": "index.js",
  "license": "MIT"
}
Step 2 – Setup Prisma
The project will use Prisma ORM to store data in an SQLite database. What is Prisma? Prisma is a next-generation ORM for Node.js and TypeScript. It supports a lot of database servers like:
- MongoDB
- PostgreSQL
- SQLite
- SQL Server, and many more.
Since the main focus of this tutorial is how two-factor authentication (2FA) can be implemented in Node.js, we will use Prisma with SQLite because it only requires a few steps to get it up and running.
To get started, install these Prisma dependencies:
yarn add -D prisma && yarn add @prisma/client
# or
npm install -D prisma && npm install @prisma/client
prisma– A Prisma CLI that helps you interact with your Prisma project from the command line.@prisma/client– An auto-generated query builder that enables type-safe database access.
After that, run the Prisma init command to initialize the Prisma assets in the project:
yarn prisma init --datasource-provider sqlite
# or
npx prisma init --datasource-provider sqlite
--datasource-provider– this flag specifies the default database providersqlite– is the database
The above command will create a new prisma directory with your Prisma schema file and configure SQLite as your database. You’re now ready to define the data model and migrate the schema to the database.
Step 3 – Create the Prisma Database Model
The Prisma schema provides a simpler interface to model data. The model in the Prisma schema represents the SQL table in the underlying database.
Now open the prisma/schema.prisma file and replace its content with the following:
prisma/schema.prisma
generator client {
  provider = "prisma-client-js"
}

datasource db {
  provider = "sqlite"
  url      = env("DATABASE_URL")
}

model User {
  id       String @id @default(uuid())
  email    String @unique
  name     String
  password String

  otp_enabled  Boolean @default(false)
  otp_verified Boolean @default(false)

  otp_ascii    String?
  otp_hex      String?
  otp_base32   String?
  otp_auth_url String?

  @@map(name: "users")
}
In the above, we defined a User model with some fields. Each field has a field name followed by a datatype and optional field attributes. We used the @default(uuid()) attribute to generate a UUID for the id column instead of using incremental integers.
Now add the following commands to the package.json file:
package.json
{
  "name": "2fa_nodejs",
  "version": "1.0.0",
  "main": "index.js",
  "license": "MIT",
  "scripts": {
    "start": "ts-node-dev --respawn --transpile-only --exit-child server.ts",
    "db:migrate": "npx prisma migrate dev --name user-entity --create-only && npx prisma generate",
    "db:push": "npx prisma db push"
  },
  "devDependencies": {
    "@types/node": "^18.7.23",
    "prisma": "^4.4.0",
    "typescript": "^4.8.4"
  },
  "dependencies": {
    "@prisma/client": "^4.4.0"
  }
}
start– Starts the Node.js serverdb:migrate– Generates the migration file and Prisma Clientdb:push– Pushes the Prisma schema to the database
Step 4 – Database Migration with Prisma
At this point, you have a Prisma model but no database yet. Open your terminal and run the following command to create the SQLite database and the “users” table represented by the model.
Run this command to generate the database migration file and the Prisma Client:
npx prisma migrate dev --name user-entity --create-only && npx prisma generate
Push the Prisma schema to the database:
npx prisma db push
Alternatively, you can run yarn db:migrate and yarn db:push to execute the above commands.
After synching the SQLite database with the Prisma schema, run npx prisma studio to open the Prisma GUI tool in the browser. Prisma studio allows you to view and mutate the data stored in the database.
Step 5 – Setup the Node.js Express App
With all the above configurations, we are ready to set up the Node.js HTTP server. We will use the Express framework to set up the HTTP server and use SQLite for data storage.
Before the implementation, install the following dependencies:
yarn add express cors otpauth hi-base32 && yarn add -D morgan ts-node-dev @types/cors @types/express @types/morgan
# or
npm install express cors otpauth hi-base32 && npm install -D morgan ts-node-dev @types/cors @types/express @types/morgan
express– A Node.js web frameworkcors– Enable CORS in Expressotpauth– A library for generating and validating TOTPhi-base32– This library provides encoding and decoding functions for converting data to and from the Base32 format. We’ll use the base32-encoded string to generate the TOTP in an Authenticator app.morgan– An HTTP request logger middleware for node.jsts-node-dev– Run the Express.js server
After the installations, your package.json file should look like this:
{
  "name": "2fa_nodejs",
  "version": "1.0.0",
  "main": "index.js",
  "license": "MIT",
  "scripts": {
    "start": "ts-node-dev --respawn --transpile-only --exit-child server.ts",
    "db:migrate": "npx prisma migrate dev --name user-entity --create-only && npx prisma generate",
    "db:push": "npx prisma db push"
  },
  "devDependencies": {
    "@types/cors": "^2.8.12",
    "@types/express": "^4.17.14",
    "@types/morgan": "^1.9.3",
    "@types/node": "^18.7.23",
    "morgan": "^1.10.0",
    "prisma": "^4.4.0",
    "ts-node-dev": "^2.0.0",
    "typescript": "^4.8.4"
  },
  "dependencies": {
    "@prisma/client": "^4.4.0",
    "cors": "^2.8.5",
    "express": "^4.18.1",
    "hi-base32": "^0.5.1",
    "otpauth": "^9.1.2"
  }
}
With that out of the way, create a server.ts file and add the following code:
server.ts
import { PrismaClient } from "@prisma/client";
import express, { Request, Response } from "express";
import cors from "cors";
import morgan from "morgan";

export const prisma = new PrismaClient();
const app = express();

async function main() {
  // Middleware
  app.use(morgan("dev"));
  app.use(
    cors({
      origin: ["http://localhost:3000"],
      credentials: true,
    })
  );
  app.use(express.json());

  //   Health Checker
  app.get("/api/healthchecker", (req: Request, res: Response) => {
    res.status(200).json({
      status: "success",
      message: "Welcome to Two-Factor Authentication with Node.js",
    });
  });

  // Register the API Routes

  // Catch All
  app.all("*", (req: Request, res: Response) => {
    return res.status(404).json({
      status: "fail",
      message: `Route: ${req.originalUrl} not found`,
    });
  });

  const PORT = 8000;
  app.listen(PORT, () => {
    console.info(`Server started on port: ${PORT}`);
  });
}

main()
  .then(async () => {
    await prisma.$disconnect();
  })
  .catch(async (e) => {
    console.error(e);
    await prisma.$disconnect();
    process.exit(1);
  });
Quite a lot is happening in the above, let’s break it down:
- First, we created instances of the Prisma Client and Express. Next, we created a
mainfunction to contain all the server code. - The
morgan("dev")middleware will configure Express to log the HTTP request information in the terminal. - The
cors()middleware will configure the Express server to accept requests from cross-origin domains. - The
express.json()middleware will parse the JSON payload of the incoming HTTP POST request and expose it asreq.body.
Now start the Express.js server by running yarn start or
yarn ts-node-dev --respawn --transpile-only --exit-child server.ts
# or
npx ts-node-dev --respawn --transpile-only --exit-child server.ts
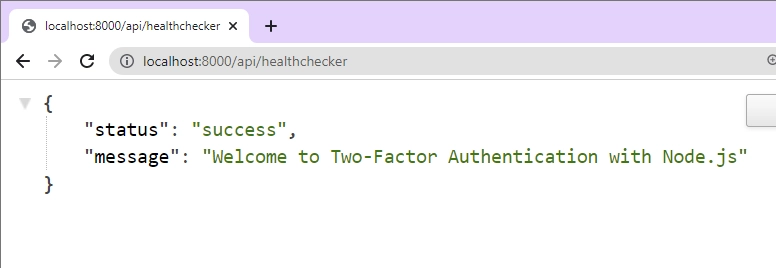
This will start the Express server on port 8000. Open a new tab in the browser and navigate to http://localhost:8000/api/healthchecker. You should get the JSON response sent from the Express server.
Step 6 – Create the Node.js Route Controllers
In this step, we will create six route controllers responsible for various tasks including user registration, login, generating the TOTP authentication URL and base32 string, verifying the TOTP, validating the TOTP, and disabling the TOTP. Prior to that, let’s begin by creating a new directory named controllers at the root level. Inside the newly created controllers directory, generate a file called auth.controller.ts and proceed to include the following import statements.
controllers/auth.controller.ts
import crypto from "crypto";
import { Prisma } from "@prisma/client";
import { Request, Response, NextFunction } from "express";
import { prisma } from "../server";
import * as OTPAuth from "otpauth";
import { encode } from "hi-base32";
Register User
The first step in every authentication flow is user registration. We will create a route handler that will add the new user to the database.
controllers/auth.controller.ts
// [...] Register user
const RegisterUser = async (
  req: Request,
  res: Response,
  next: NextFunction
) => {
  try {
    const { name, email, password } = req.body;

    await prisma.user.create({
      data: {
        name,
        email,
        password: crypto.createHash("sha256").update(password).digest("hex"),
      },
    });

    res.status(201).json({
      status: "success",
      message: "Registered successfully, please login",
    });
  } catch (error) {
    if (error instanceof Prisma.PrismaClientKnownRequestError) {
      if (error.code === "P2002") {
        return res.status(409).json({
          status: "fail",
          message: "Email already exist, please use another email address",
        });
      }
    }
    res.status(500).json({
      status: "error",
      message: error.message,
    });
  }
};
Let’s evaluate the above code:
- First, we extracted the credentials from the request body
- We called Prisma’s
.create()method to add the new record to the database. - Then, we returned a success message to the client
- Lastly, we used a catch block to handle any possible errors.
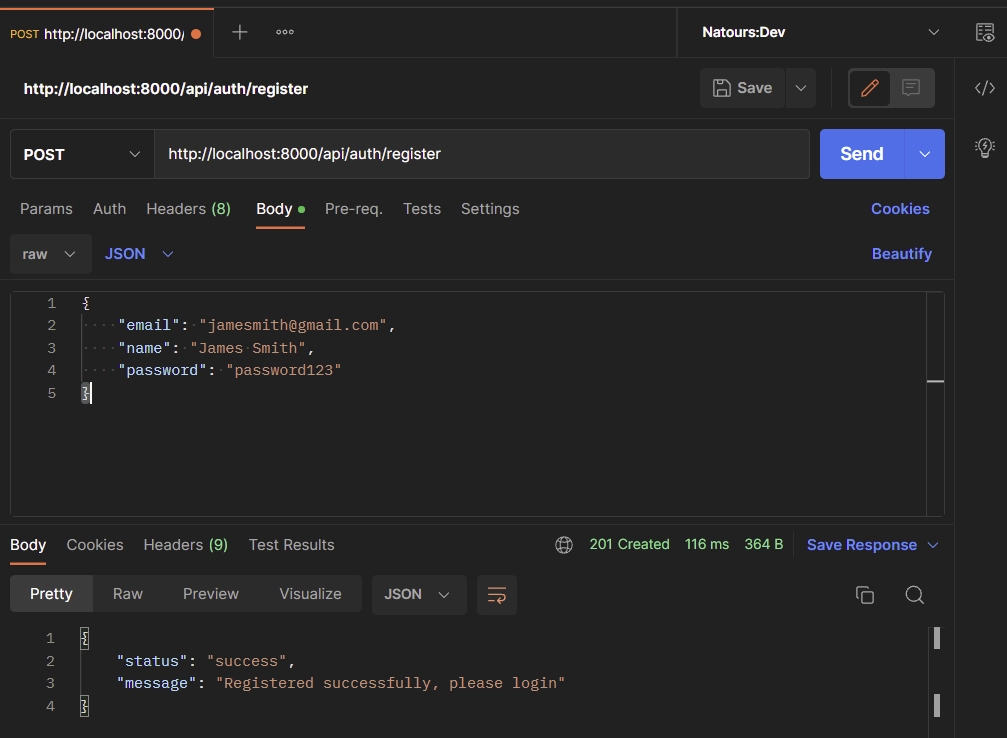
When a request is made to the /api/auth/register endpoint with the credentials included in the request body, the RegisterUser handler will be evoked to register the user.
Sign-in User
Here, let’s create the route handler that will be called to log the user into the API. To simplify the authentication process, we will ignore other authentication methods and return the user’s data to the client.
The API will assume the user is authenticated when the client includes the user_id in the request body.
controllers/auth.controller.ts
// [...] Register user

// [...] Login user
const LoginUser = async (req: Request, res: Response, next: NextFunction) => {
  try {
    const { email, password } = req.body;

    const user = await prisma.user.findUnique({ where: { email } });

    if (!user) {
      return res.status(404).json({
        status: "fail",
        message: "No user with that email exists",
      });
    }

    res.status(200).json({
      status: "success",
      user: {
        id: user.id,
        name: user.name,
        email: user.email,
        otp_enabled: user.otp_enabled,
      },
    });
  } catch (error) {
    res.status(500).json({
      status: "error",
      message: error.message,
    });
  }
};
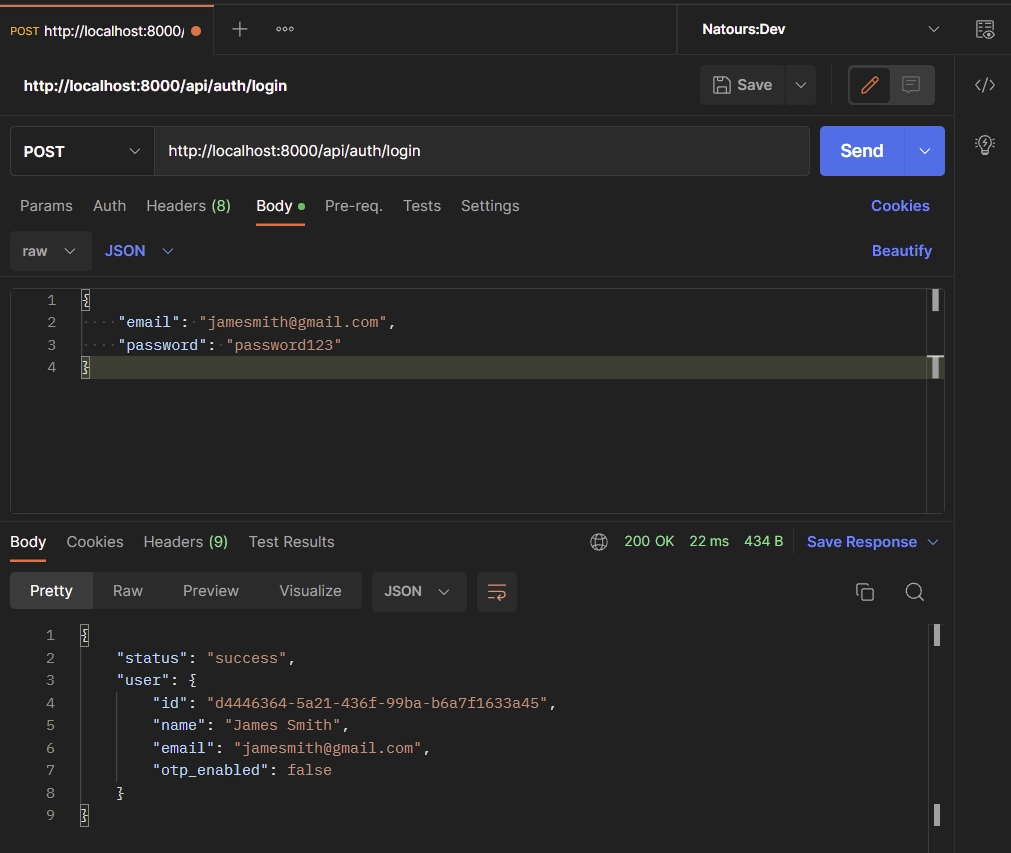
This route controller will query the database to check if the user exists and return the found record to the client.
When you make a request to the /api/auth/login endpoint, the LoginUser function will be evoked to sign the user into the API.
Generate the OTP
It’s now time to create the route handler function that will generate the secret key and the OTP Auth URL. The secret key will link the server and the application that will generate the two-factor authentication tokens.
To generate the base32 encoded secret key, we’ll implement a utility function named generateRandomBase32(). This function leverages the power of Node.js Crypto module and the hi-base32 library to generate a 24-character base32-encoded string. Although a 32-character string can also be generated, a 24-character string suffices for our purposes.
If you require the secret key in different formats such as utf8, hex, buffer, base32, or latin1, the OTPAuth.Secret.fromBase32() method can be utilized to generate the corresponding representations from the base32 string. Here’s an example:
const {base32, hex, utf8,buffer, latin1} =OTPAuth.Secret.fromBase32(generateRandomBase32());
Moving forward, we’ll invoke the totp.toString() method to obtain the OTP Auth URL. This URL encapsulates the encoded secrets as part of the URL structure, alongside other essential configurations required for generating the QR Code. Users can also utilize the base32 string directly to generate the QR Code, providing them with multiple options for setting up their two-factor authentication.
controllers/auth.controller.ts
// [...] Register user

// [...] Login user

// [...] Generate OTP
const generateRandomBase32 = () => {
  const buffer = crypto.randomBytes(15);
  const base32 = encode(buffer).replace(/=/g, "").substring(0, 24);
  return base32;
};

const GenerateOTP = async (req: Request, res: Response) => {
  try {
    const { user_id } = req.body;

    const user = await prisma.user.findUnique({ where: { id: user_id } });

    if (!user) {
      return res.status(404).json({
        status: "fail",
        message: "No user with that email exists",
      });
    }

    const base32_secret = generateRandomBase32();

    let totp = new OTPAuth.TOTP({
      issuer: "codevoweb.com",
      label: "CodevoWeb",
      algorithm: "SHA1",
      digits: 6,
      secret: base32_secret,
    });

    let otpauth_url = totp.toString();

    await prisma.user.update({
      where: { id: user_id },
      data: {
        otp_auth_url: otpauth_url,
        otp_base32: base32_secret,
      },
    });

    res.status(200).json({
      base32: base32_secret,
      otpauth_url,
    });
  } catch (error) {
    res.status(500).json({
      status: "error",
      message: error.message,
    });
  }
};
In the provided code snippet, we created the generateRandomBase32() function, responsible for generating a base32-encoded secret key. This key serves as the foundation for the TOTP generation process. Furthermore, we instantiated the OTPAuth.TOTP class with the necessary parameters, assigning it to the totp variable.
Next, we obtained the TOTP Auth URL by invoking the totp.toString() method. This URL contains the encoded secrets and relevant configurations required for generating the QR code or setting up the TOTP authentication in an application. Moreover, we persisted the base32 string and the TOTP Auth URL in the database, ensuring they are readily available for future usage.
Finally, we included the base32 string and the TOTP Auth URL in the JSON response. By returning these values, the client can choose to utilize either the base32 string or the URL to generate the corresponding TOTP tokens, providing flexibility and convenience for the client-side implementation.
When a request is made to the /api/auth/otp/generate endpoint, the GenerateOTP handler will be evoked to generate the two-factor authentication secrets and return them.
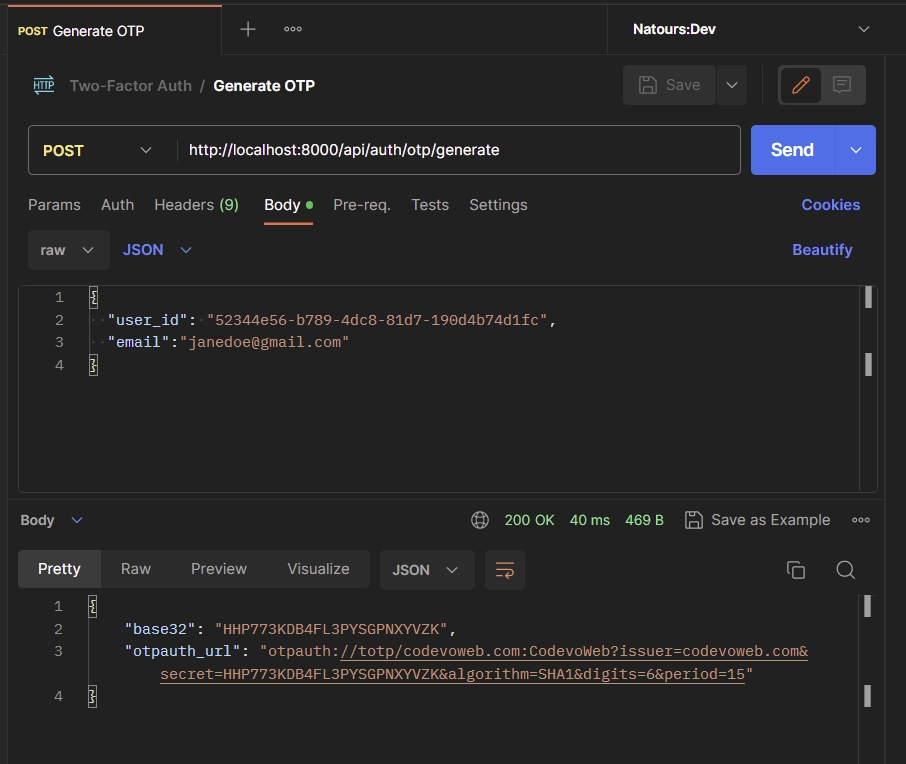
Open the Google Authenticator app or Chrome Authenticator extension and enter the base64 string sent by the API.
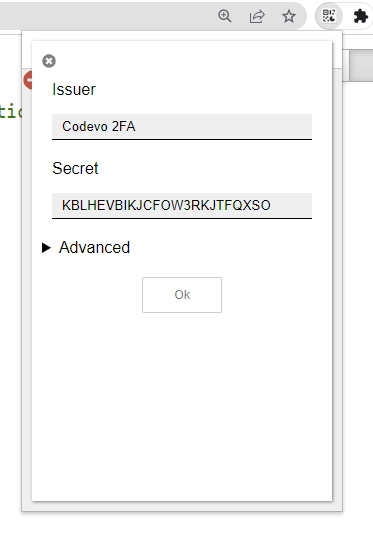
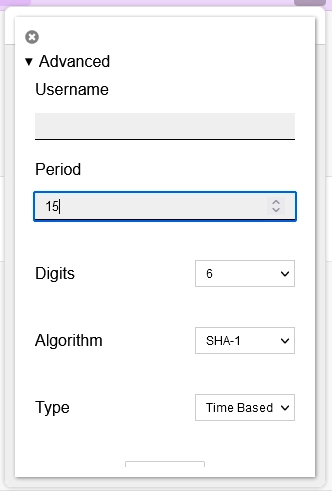
You’re not quite finished yet! There’s another essential step to ensure reliable TOTP verification without any pesky invalid errors. It’s crucial to follow this next instruction attentively. Open the Advanced settings, and in the Period field, set the time period to 15 seconds. This value must align perfectly with the server configuration for accurate TOTP validation. Once you’ve made this adjustment, simply click the Ok button to proceed confidently.
Verify the OTP
After entering the secret key, you should see the TOTP displayed in the authenticator app or extension. It’s now time to verify the TOTP code to enable the 2FA feature on the API.
You will notice that the otp_enabled column in the “users” table has a default value of false. After the TOTP token has been verified, we will go ahead and set the value of the otp_enabled column to true.
To perform the verification, we need to create a route handler that extracts the user_id and the token generated by the authenticator app from the request body.
controllers/auth.controller.ts
// [...] Register user

// [...] Login user

// [...] Generate OTP

// [...] Verify OTP
const VerifyOTP = async (req: Request, res: Response) => {
  try {
    const { user_id, token } = req.body;

    const user = await prisma.user.findUnique({ where: { id: user_id } });
    const message = "Token is invalid or user doesn't exist";
    if (!user) {
      return res.status(401).json({
        status: "fail",
        message,
      });
    }

    let totp = new OTPAuth.TOTP({
      issuer: "codevoweb.com",
      label: "CodevoWeb",
      algorithm: "SHA1",
      digits: 6,
      secret: user.otp_base32!,
    });

    let delta = totp.validate({ token });

    if (delta === null) {
      return res.status(401).json({
        status: "fail",
        message,
      });
    }

    const updatedUser = await prisma.user.update({
      where: { id: user_id },
      data: {
        otp_enabled: true,
        otp_verified: true,
      },
    });

    res.status(200).json({
      otp_verified: true,
      user: {
        id: updatedUser.id,
        name: updatedUser.name,
        email: updatedUser.email,
        otp_enabled: updatedUser.otp_enabled,
      },
    });
  } catch (error) {
    res.status(500).json({
      status: "error",
      message: error.message,
    });
  }
};
Let’s evaluate the above code snippet to gain a better understanding of its functionality. Here’s a detailed analysis:
- We begin by extracting the user ID and the TOTP token from the request body. This allows us to retrieve the necessary information for validation.
- Using Prisma, we search for a user with the provided ID. If no matching user is found, we return a 401 Unauthorized response to the client, indicating that the token is invalid or the user does not exist.
- Next, we instantiate a new instance of the
OTPAuth.TOTPclass. This class provides functionality for generating and validating TOTP tokens. We initialize it with the base32-encoded key retrieved from the database as the secret key for verification. - We then call the
totp.validate()method to validate the provided token. This method compares the token against the expected value generated by the TOTP algorithm. If the token is not found within the valid time window, the method returnsnull, indicating that the token is invalid. - Upon successful verification of the token, we update the user’s credentials in the database. By setting both the
otp_verifiedandotp_enabledfields to true, we indicate that the user’s TOTP authentication is verified and enabled.
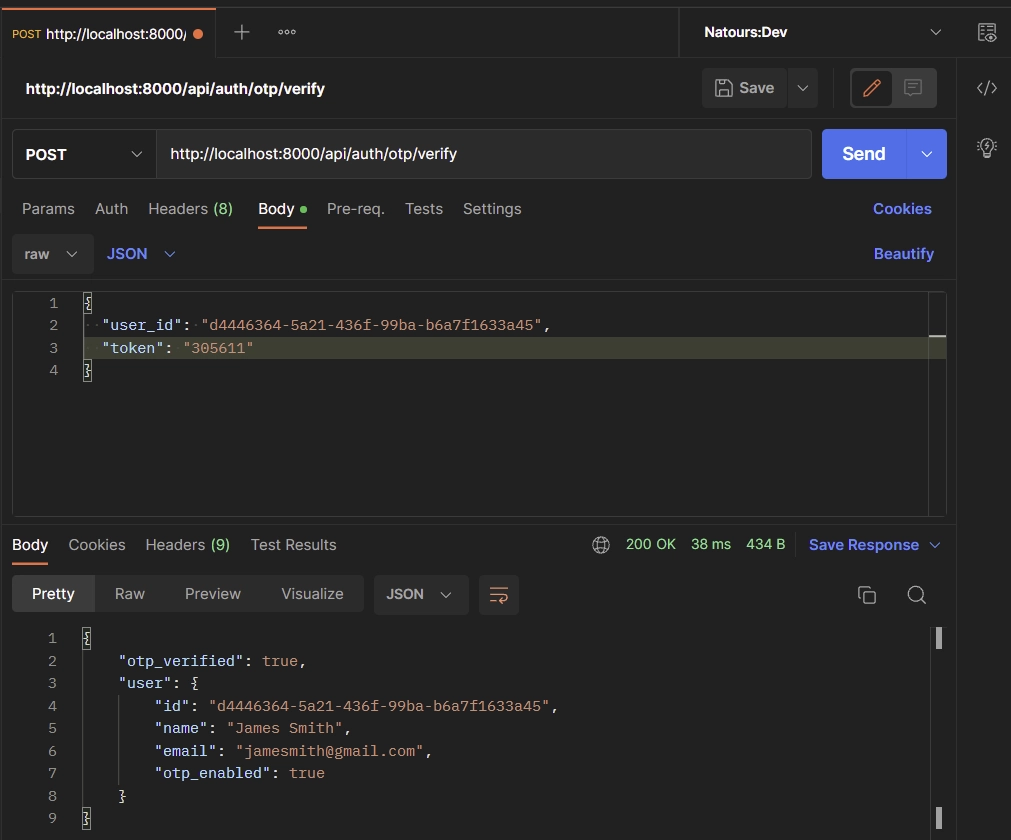
To verify the TOTP token, make a POST request to the /api/auth/otp/verify endpoint with the user_id and token included in the request body.
Validate the OTP
To validate the TOTP token entered by the user from their authenticator app during subsequent logins, we will create a dedicated route handler named ValidateOTP. This function is designed to verify the token against the secret key stored in the database.
The ValidateOTP function shares a similar logic with the VerifyOTP function mentioned earlier, but with a distinct purpose. Unlike VerifyOTP, the ValidateOTP function does not update the user’s credentials in the database. Its primary objective is to validate the provided token and return the result indicating whether it is valid or not.
controllers/auth.controller.ts
// [...] Register user

// [...] Login user

// [...] Generate OTP

// [...] Verify OTP

// [...] Validate OTP
const ValidateOTP = async (req: Request, res: Response) => {
  try {
    const { user_id, token } = req.body;
    const user = await prisma.user.findUnique({ where: { id: user_id } });

    const message = "Token is invalid or user doesn't exist";
    if (!user) {
      return res.status(401).json({
        status: "fail",
        message,
      });
    }
    let totp = new OTPAuth.TOTP({
      issuer: "codevoweb.com",
      label: "CodevoWeb",
      algorithm: "SHA1",
      digits: 6,
      secret: user.otp_base32!,
    });

    let delta = totp.validate({ token, window: 1 });

    if (delta === null) {
      return res.status(401).json({
        status: "fail",
        message,
      });
    }

    res.status(200).json({
      otp_valid: true,
    });
  } catch (error) {
    res.status(500).json({
      status: "error",
      message: error.message,
    });
  }
};
As you can see in the code snippet above, we instantiate a new object of the OTPAuth.TOTP class, passing in the base32-encoded string retrieved from the database. This object represents the TOTP configuration associated with the user.
Next, we use the totp.validate() method to compare the token provided by the user with the expected value generated by the TOTP algorithm. If the validation fails, indicating an incorrect or expired token, we send a 401 UnAuthorized response back to the client, signaling that the token is invalid.
On the other hand, if the validation succeeds, we include otp_valid: true in the JSON response, indicating that the token is valid and authentication is successful.
If you’d like to learn more about the window parameter and its role, you can check out the ReadMe on the Speakeasy library’s GitHub page at https://github.com/speakeasyjs/speakeasy. Even though we’re not using that library in our project, the ReadMe provides a detailed guide on how TOTP generation and validation work. It’s worth reading and understanding to get a clearer picture of the concepts involved, even if you’re not directly using the library itself.
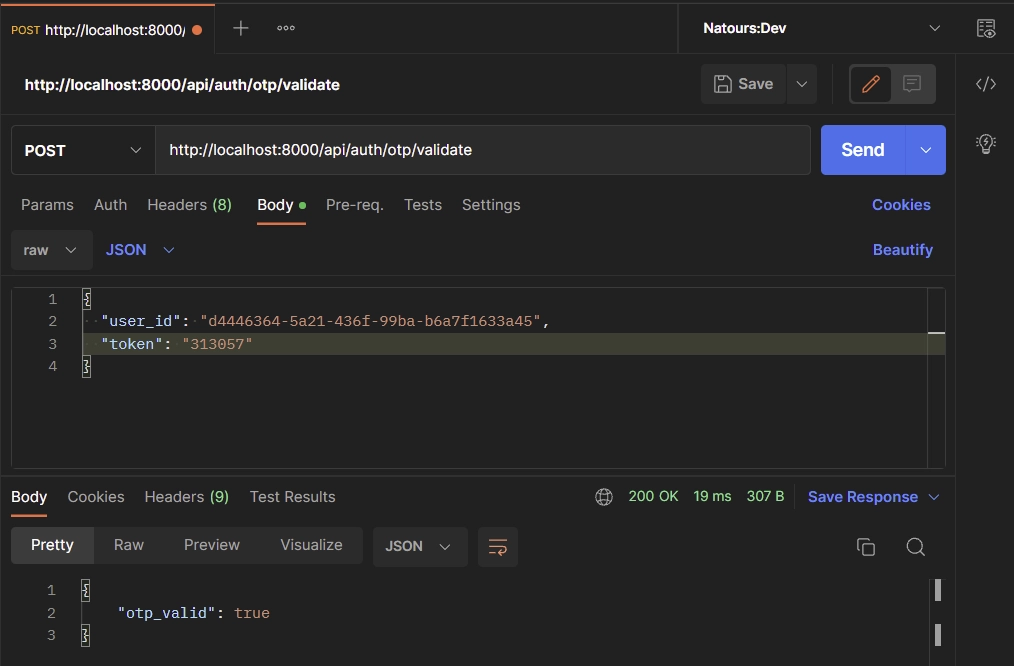
Now make a POST request to the /api/auth/otp/validate endpoint with the user_id and token provided in the request body to validate the token.
Disable the OTP Feature
The final step in the two-factor (2FA) authentication is to create a controller that will be evoked to disable the 2FA feature. When this function is called, it will update the otp_enabled column to false in the database.
controllers/auth.controller.ts
// [...] Register user

// [...] Login user

// [...] Generate OTP

// [...] Verify OTP

// [...] Validate OTP

// [...] Disable OTP
const DisableOTP = async (req: Request, res: Response) => {
  try {
    const { user_id } = req.body;

    const user = await prisma.user.findUnique({ where: { id: user_id } });
    if (!user) {
      return res.status(401).json({
        status: "fail",
        message: "User doesn't exist",
      });
    }

    const updatedUser = await prisma.user.update({
      where: { id: user_id },
      data: {
        otp_enabled: false,
      },
    });

    res.status(200).json({
      otp_disabled: true,
      user: {
        id: updatedUser.id,
        name: updatedUser.name,
        email: updatedUser.email,
        otp_enabled: updatedUser.otp_enabled,
      },
    });
  } catch (error) {
    res.status(500).json({
      status: "error",
      message: error.message,
    });
  }
};
To disable the 2FA feature, make a POST request to the /api/auth/otp/disable endpoint with the TOTP token and user_id provided in the request body.
Complete Code of the Route Handlers
controllers/auth.controller.ts
import crypto from "crypto";
import { Prisma } from "@prisma/client";
import { Request, Response, NextFunction } from "express";
import { prisma } from "../server";
import * as OTPAuth from "otpauth";
import { encode } from "hi-base32";

const RegisterUser = async (
  req: Request,
  res: Response,
  next: NextFunction
) => {
  try {
    const { name, email, password } = req.body;

    await prisma.user.create({
      data: {
        name,
        email,
        password: crypto.createHash("sha256").update(password).digest("hex"),
      },
    });

    res.status(201).json({
      status: "success",
      message: "Registered successfully, please login",
    });
  } catch (error) {
    if (error instanceof Prisma.PrismaClientKnownRequestError) {
      if (error.code === "P2002") {
        return res.status(409).json({
          status: "fail",
          message: "Email already exist, please use another email address",
        });
      }
    }
    res.status(500).json({
      status: "error",
      message: error.message,
    });
  }
};

const LoginUser = async (req: Request, res: Response, next: NextFunction) => {
  try {
    const { email, password } = req.body;

    const user = await prisma.user.findUnique({ where: { email } });

    if (!user) {
      return res.status(404).json({
        status: "fail",
        message: "No user with that email exists",
      });
    }

    res.status(200).json({
      status: "success",
      user: {
        id: user.id,
        name: user.name,
        email: user.email,
        otp_enabled: user.otp_enabled,
      },
    });
  } catch (error) {
    res.status(500).json({
      status: "error",
      message: error.message,
    });
  }
};

const generateRandomBase32 = () => {
  const buffer = crypto.randomBytes(15);
  const base32 = encode(buffer).replace(/=/g, "").substring(0, 24);
  return base32;
};

const GenerateOTP = async (req: Request, res: Response) => {
  try {
    const { user_id } = req.body;

    const user = await prisma.user.findUnique({ where: { id: user_id } });

    if (!user) {
      return res.status(404).json({
        status: "fail",
        message: "No user with that email exists",
      });
    }

    const base32_secret = generateRandomBase32();

    let totp = new OTPAuth.TOTP({
      issuer: "codevoweb.com",
      label: "CodevoWeb",
      algorithm: "SHA1",
      digits: 6,
      secret: base32_secret,
    });

    let otpauth_url = totp.toString();

    await prisma.user.update({
      where: { id: user_id },
      data: {
        otp_auth_url: otpauth_url,
        otp_base32: base32_secret,
      },
    });

    res.status(200).json({
      base32: base32_secret,
      otpauth_url,
    });
  } catch (error) {
    res.status(500).json({
      status: "error",
      message: error.message,
    });
  }
};

const VerifyOTP = async (req: Request, res: Response) => {
  try {
    const { user_id, token } = req.body;

    const user = await prisma.user.findUnique({ where: { id: user_id } });
    const message = "Token is invalid or user doesn't exist";
    if (!user) {
      return res.status(401).json({
        status: "fail",
        message,
      });
    }

    let totp = new OTPAuth.TOTP({
      issuer: "codevoweb.com",
      label: "CodevoWeb",
      algorithm: "SHA1",
      digits: 6,
      secret: user.otp_base32!,
    });

    let delta = totp.validate({ token });

    if (delta === null) {
      return res.status(401).json({
        status: "fail",
        message,
      });
    }

    const updatedUser = await prisma.user.update({
      where: { id: user_id },
      data: {
        otp_enabled: true,
        otp_verified: true,
      },
    });

    res.status(200).json({
      otp_verified: true,
      user: {
        id: updatedUser.id,
        name: updatedUser.name,
        email: updatedUser.email,
        otp_enabled: updatedUser.otp_enabled,
      },
    });
  } catch (error) {
    res.status(500).json({
      status: "error",
      message: error.message,
    });
  }
};

const ValidateOTP = async (req: Request, res: Response) => {
  try {
    const { user_id, token } = req.body;
    const user = await prisma.user.findUnique({ where: { id: user_id } });

    const message = "Token is invalid or user doesn't exist";
    if (!user) {
      return res.status(401).json({
        status: "fail",
        message,
      });
    }
    let totp = new OTPAuth.TOTP({
      issuer: "codevoweb.com",
      label: "CodevoWeb",
      algorithm: "SHA1",
      digits: 6,
      secret: user.otp_base32!,
    });

    let delta = totp.validate({ token, window: 1 });

    if (delta === null) {
      return res.status(401).json({
        status: "fail",
        message,
      });
    }

    res.status(200).json({
      otp_valid: true,
    });
  } catch (error) {
    res.status(500).json({
      status: "error",
      message: error.message,
    });
  }
};

const DisableOTP = async (req: Request, res: Response) => {
  try {
    const { user_id } = req.body;

    const user = await prisma.user.findUnique({ where: { id: user_id } });
    if (!user) {
      return res.status(401).json({
        status: "fail",
        message: "User doesn't exist",
      });
    }

    const updatedUser = await prisma.user.update({
      where: { id: user_id },
      data: {
        otp_enabled: false,
      },
    });

    res.status(200).json({
      otp_disabled: true,
      user: {
        id: updatedUser.id,
        name: updatedUser.name,
        email: updatedUser.email,
        otp_enabled: updatedUser.otp_enabled,
      },
    });
  } catch (error) {
    res.status(500).json({
      status: "error",
      message: error.message,
    });
  }
};

export default {
  RegisterUser,
  LoginUser,
  GenerateOTP,
  VerifyOTP,
  ValidateOTP,
  DisableOTP,
};
Step 7 – Create the Express API Routes
Now that we have all the route handlers defined, let’s create routes to evoke them. To do that, create a routes/auth.route.ts file and add the following code.
routes/auth.route.ts
import express from "express";
import authController from "../controllers/auth.controller";

const router = express.Router();

router.post("/register", authController.RegisterUser);
router.post("/login", authController.LoginUser);
router.post("/otp/generate", authController.GenerateOTP);
router.post("/otp/verify", authController.VerifyOTP);
router.post("/otp/validate", authController.ValidateOTP);
router.post("/otp/disable", authController.DisableOTP);

export default router;
Step 8 – Add the Routes to the Middleware Stack
Finally, add the Express router we defined above to the middleware pipeline.
server.ts
import { PrismaClient } from "@prisma/client";
import express, { Request, Response } from "express";
import cors from "cors";
import authRouter from "./routes/auth.route";
import morgan from "morgan";

export const prisma = new PrismaClient();
const app = express();

async function main() {
  // Middleware
  app.use(morgan("dev"));
  app.use(
    cors({
      origin: ["http://localhost:3000"],
      credentials: true,
    })
  );
  app.use(express.json());

  //   Health Checker
  app.get("/api/healthchecker", (res: Response) => {
    res.status(200).json({
      status: "success",
      message: "Welcome to Two-Factor Authentication with Node.js",
    });
  });

  app.use("/api/auth", authRouter);

  app.all("*", (req: Request, res: Response) => {
    return res.status(404).json({
      status: "fail",
      message: `Route: ${req.originalUrl} not found`,
    });
  });

  const PORT = 8000;
  app.listen(PORT, () => {
    console.info(`Server started on port: ${PORT}`);
  });
}

main()
  .then(async () => {
    await prisma.$disconnect();
  })
  .catch(async (e) => {
    console.error(e);
    await prisma.$disconnect();
    process.exit(1);
  });
Start the Node.js server by running:
yarn ts-node-dev --respawn --transpile-only --exit-child server.ts
# or
npx ts-node-dev --respawn --transpile-only --exit-child server.ts
Conclusion
In this article, you learned how to implement two-factor (2FA) authentication in Node.js using the hi-base32 and otpauth libraries. You also learned how to use the authenticator extension in chrome to generate the TOTP tokens.
You can find the frontend and backend source code on this GitHub repository:
Thank you for this article and the code repos, this was excellent! No better way to understand exactly how it works.
I’m glad the article was helpful to you. Cheers and happy coding!
Speakeasy is no longer maintained, do you have a suggestion for another library to use? Otplib seems to be abandoned as well.
You are right, the Speakeasy library is no longer maintained.
When I was creating the project, I couldn’t find a different Node.js OTP library, that’s why I went with Speakeasy. You can give this https://www.npmjs.com/package/otp a try
thank you for your demo. I notice that the app won’t check the stable password. It only checks the dynamic password.
Thanks for sharing the helpful topic
I’m glad you found this tutorial helpful.
Thanks for the article.
Could you please suggest another totp library other than speakeasy since it is not maintained anymore?
I noticed that many users had the same question regarding an alternative library to Speakeasy. In response, I have made updates to both the source code and the article, incorporating a new TOTP library called
otpauth. You can find detailed instructions on how to implement this in the article itself.Edem,
Thank you for for an Article
Thank you so much for the article, it was really helpful! There is one thing that I am curious about. When you are generating base32, you are removing “=” characters, which I understand. But why are you taking only 24 characters?
The length of the base32 string does not matter. In my case, I wanted it to fit well in the input box on the frontend, which is why I chose 24 characters.
the postman requests just do not work after creating the routes.
You might have missed a particular step. Try running the source code attached to the article and use Postman to interact with it.
If it works, go through the source code and compare it to yours to find where the mistake is coming from.
encode is not a function in javascript
the postman queries just do not seem to work. there is no response whatsoever after creating the auth.controller.ts file
Thanks so much! One thing I don’t understand: when a user successfully logs in, how is the session stored? When I log in, I am able to see my profile page, but when I go again to my profile page, it asks again to log in again.
It seems the session is not stored? I don’t see any cookies for example.
Thanks!
I decided to omit other authentication methods that involve hashing passwords, generating JWTs, storing sessions, or cookies just to make the article focus on how to set up 2FA in Node.js. This way, everybody will be able to follow the article without any difficulty.
Thanks for the quick reply! So do I understand correctly it is not possible to ‘stay signed in’ using the current method? What would you advise (in general terms I will figure the rest out myself) to implement this?
I am curious what your ideas would be and how to tackle this.
On the Node.js server, you can implement JWT authentication using either symmetric or asymmetric keys. I would recommend using asymmetric keys, which involves using private and public keys. I have articles on how to implement this that you can check out.
On the frontend, you can use Axios interceptors to handle the automatic refresh of the access token when it expires. This is just a basic approach, but depending on how secure you want your application to be, you can write other authentication logic.
Thanks a lot for this tutorial.
I’m stucked on an error when I click the “validate” button with the 6 digit pass:
“TypeError: Cannot read properties of undefined (reading ‘length’)
at E.validate (otpauth.umd.js:2:26491)
at N.validate (otpauth.umd.js:2:28101)
at N.validate (otpauth.umd.js:2:28238)
at PageModule.validarQRCode (perfil-page.js:96:24)
at Object.perform (callModuleFunctionAction.js:92:1)
at action.js:48:1”
What can it be?
I think you need to do a couple of console.log or use a debugging tool to inspect the variables and their values during the validation process. This can help you identify where the ‘undefined’ property is coming from.
I’ve found out the problem.
Thanks for the advice.
I have another question.
I’m not understanding the Validate part:
“res.status(200).json({
otp_valid: true,
});”
“otp_valid” is not a field on the database (at least I miss the part where you tell to create it), just “otp_verified” and “otp_enabled”.
So when a user validate the TOTP on the Login Screen how I’m suposed to let the user validated until his logout or X hour have passed?
After the user successfully validates the TOTP, you can generate a JWT (JSON Web Token) and send it to their browser or API client to authenticate them within the application.
I omitted other authentication methods and only focused on the TOTP implementation to keep things easier to understand.
Are you available to intergrate your 2FA code into an existing node.js / express website?
What would you charge?
Yes, I’m available. I would charge $70 for the integration. Let me know if that works for you!