

In this article, we will explore how to use Rust, Actix Web, SQLX, and MySQL to build a CRUD (Create, Read, Update, Delete) API. We will start by setting up a MySQL database, defining our data model, and creating the necessary database tables. Next, we will use SQLX to interact with the database and Actix Web to build the API endpoints.
Building a CRUD API in Rust may seem challenging, especially if you’re new to the language. However, Rust’s speed, safety, and reliability make it an excellent choice for developing web applications.
Over the past few weeks, I have built backend APIs in Rust that I had previously built in Golang, Node.js, and Python. What I’ve discovered is that Rust’s strong typing system and memory safety guarantees have been incredibly helpful in preventing bugs and security vulnerabilities in my code.
Before we dive into the article, I want to touch on a few points about MySQL. Although I typically use PostgreSQL in my projects, I wanted to experiment with MySQL for this particular implementation. Unfortunately, I encountered a few setbacks, such as the lack of support for the boolean data type and MySQL not returning the record after it’s been inserted or updated in the database.
But fear not! I found workarounds for these issues, and throughout this article, I will show you how to use MySQL with SQLX and address the missing parts of MySQL. By the end of this tutorial, you’ll have a solid understanding of how to build a CRUD API with Rust, Actix Web, SQLX, and MySQL, and how to overcome any challenges that may arise. So, let’s get started!
More practice:
- Rust – Build a CRUD API with SQLX and PostgreSQL
- Build a Simple API in Rust
- Build a Simple API with Rust and Rocket
- Build a CRUD API with Rust and MongoDB
- Build a Simple API with Rust and Actix Web
- Build a CRUD API with Node.js and Sequelize
- Build a CRUD App with FastAPI and SQLAlchemy
- Build CRUD API with Django REST framework

Prerequisites
Before we dive into the exciting stuff, there are a few prerequisites you need to have in order to make the most out of this article. These include:
- Docker should be installed on your machine to run the MySQL server.
- Basic knowledge of HTTP and Web development concepts will be helpful.
- It’s recommended that you have a basic understanding of Rust and its ecosystem to understand the code examples we’ll be using.
- If you have some experience with Actix Web or any other Rust web framework, it will be an advantage.
By having these prerequisites, you’ll be better equipped to follow along with the tutorial and gain a deeper understanding of how to build a CRUD API using Rust, Actix Web, SQLX, and MySQL.
Run the Actix-Web MySQL CRUD API Project
- Download or clone the SQLX MySQL Rust project from https://github.com/wpcodevo/rust-mysql-crud-sqlx and open the source code in a code editor.
- Launch the MySQL server in the Docker container by running
docker-compose up -dcommand. - Install the SQLx CLI by running the command
cargo install sqlx-cliif not already installed. Push the migration script to the MySQL database by runningsqlx migrate run. - Install the necessary crates and build the project by running the command
cargo build. - Run the command
cargo rto start the Actix-Web HTTP server. - After completing the necessary steps to start the Actix-web server, it’s time to test the CRUD API endpoints. You can do this by importing the
Note App.postman_collection.jsonfile into Postman or Thunder Client VS Code extension. This allows you to easily test each endpoint and ensure that they are working correctly.
Alternatively, if you prefer to use a front-end framework like React to interact with the API, you can follow the steps outlined in the section below to set it up.
Run the Actix-Web API with a Frontend App
If you’d like to use a front-end framework like React to interact with the API, follow the steps below to set up a sample React CRUD app quickly. For a more comprehensive guide on building a React.js CRUD app, you can refer to the post titled “Build a React.js CRUD App using a RESTful API“.
To get started with the sample app, follow these steps:
- Make sure you have Node.js and Yarn installed on your machine.
- Download or clone the React CRUD project from https://github.com/wpcodevo/reactjs-crud-note-app and open it in your favourite IDE or text editor.
- Install the project’s dependencies by running
yarnoryarn installin the console from the root directory. - Start the Vite development server by running
yarn devin the console. - Finally, navigate to
http://localhost:3000/to test the CRUD functionalities against the Rust API. Note: To avoid any CORS errors or “site can’t be reached” issues, make sure to usehttp://localhost:3000/instead ofhttp://127.0.0.1:3000/.
Setup the Rust Project with Cargo
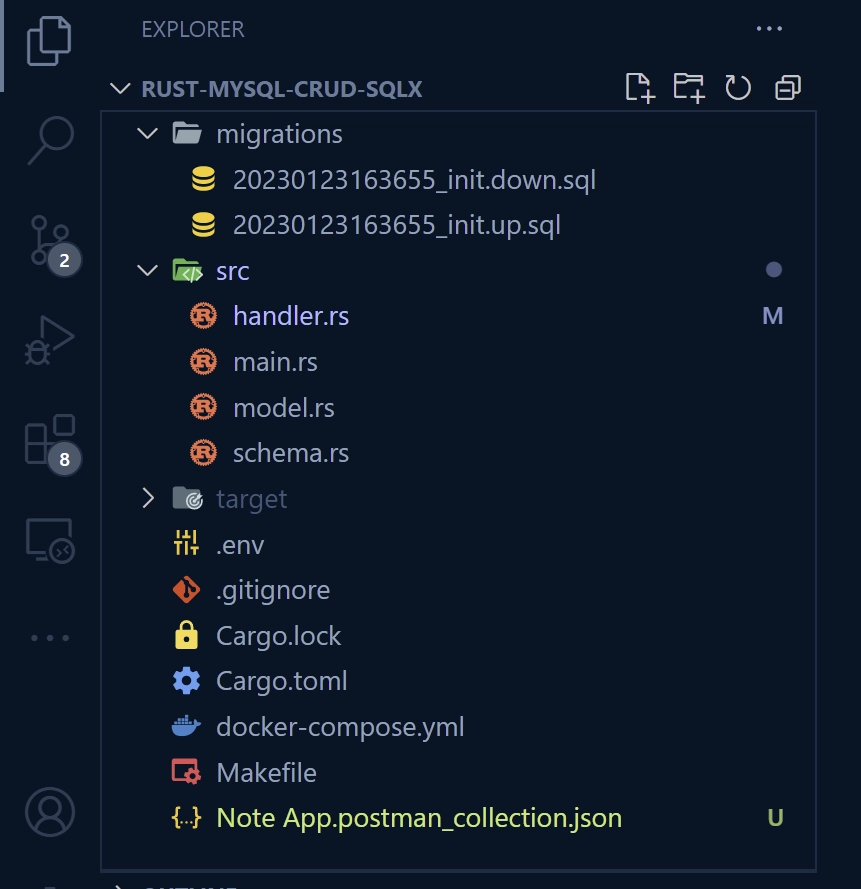
By the end of this tutorial, you will have a folder structure that resembles the screenshot below, excluding the Makefile and Note App.postman_collection.json files.
To get started, open a terminal window in a convenient location on your machine and run the following commands to create the project folder, initialize the Rust project with Cargo, and open the project in VS Code.
Note that you are free to use any IDE or text editor that you are comfortable with. However, for the purpose of this tutorial, Visual Studio Code will be used.
mkdir rust-mysql-crud-sqlx
cd rust-mysql-crud-sqlx
cargo init && code .
After opening the project in your IDE, navigate to the integrated terminal and install the necessary crates by running the following commands.
cargo add actix-web
cargo add actix-cors
cargo add serde --features derive
cargo add serde_json
cargo add chrono --features serde
cargo add env_logger
cargo add dotenv
cargo add uuid --features "serde v4"
cargo add sqlx --features "runtime-async-std-native-tls mysql chrono uuid"
actix-web– Is a high-performance, actor-based web framework for Rust.actix-cors– A CORS middleware for Actix Web.serde_json– A library for serializing and deserializing JSON data.serde– A library for serializing and deserializing data structures in Rust.chrono– Date and time library for Rust.env_logger– Provides an easy way to configure and initialize a logger using environment variables.dotenv– Load environment variables from a.envfile.uuid– A library to generate and parse UUIDs.sqlx– This crate provides a type-safe SQL query interface for various database engines, including PostgreSQL, MySQL, and SQLite.
As Rust and its crates continue to evolve rapidly, it’s possible that newer versions may introduce breaking changes that affect your application. If this occurs, you can revert to the versions specified in the Cargo.toml file provided below.
Cargo.toml
[package]
name = "rust-mysql-crud-sqlx"
version = "0.1.0"
edition = "2021"

# See more keys and their definitions at https://doc.rust-lang.org/cargo/reference/manifest.html

[dependencies]
actix-cors = "0.6.4"
actix-web = "4.3.0"
chrono = { version = "0.4.23", features = ["serde"] }
dotenv = "0.15.0"
env_logger = "0.10.0"
serde = { version = "1.0.152", features = ["derive"] }
serde_json = "1.0.91"
sqlx = { version = "0.6.2", features = ["runtime-async-std-native-tls", "mysql", "chrono", "uuid"] }
uuid = { version = "1.2.2", features = ["serde", "v4"] }
Now, it’s time to roll up our sleeves and dive into the project. Let’s start by creating a basic Actix Web server that responds with a JSON object to a GET request made to the health checker route.
To do this, we’ll need to open the src/main.rs file and replace its content with the following code.
src/main.rs
use actix_web::middleware::Logger;
use actix_web::{get, App, HttpResponse, HttpServer, Responder};
use serde_json::json;
#[get("/api/healthchecker")]
async fn health_checker_handler() -> impl Responder {
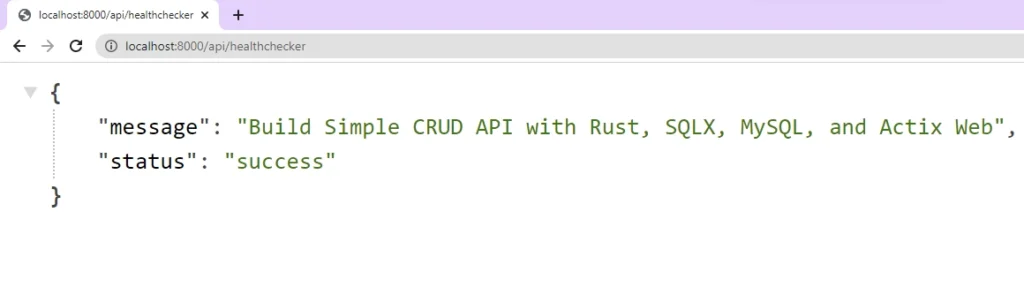
const MESSAGE: &str = "Build Simple CRUD API with Rust, SQLX, MySQL, and Actix Web";
HttpResponse::Ok().json(json!({"status": "success","message": MESSAGE}))
}
#[actix_web::main]
async fn main() -> std::io::Result<()> {
if std::env::var_os("RUST_LOG").is_none() {
std::env::set_var("RUST_LOG", "actix_web=info");
}
env_logger::init();
println!("🚀 Server started successfully");
HttpServer::new(move || {
App::new()
.service(health_checker_handler)
.wrap(Logger::default())
})
.bind(("127.0.0.1", 8000))?
.run()
.await
}
If you’re familiar with Node.js, you might have used Nodemon, which hot-reloads the server upon file changes. In Rust, we have a similar package called Cargo Watch. It watches the source code for file changes and rebuilds the project automatically. To install the cargo-watch binary, run the following command:
cargo install cargo-watch
With Cargo Watch installed, you can now build all the crates listed in the Cargo.toml file, as well as start the Actix Web HTTP server with hot-reloading capabilities. Run the command below, and Cargo Watch will watch for any changes in the files within the src directory and automatically reload the server as needed.
cargo watch -q -c -w src/ -x run
After starting the Actix Web HTTP server using the previous command, it’s now ready to process requests. To check if the server is working correctly, you can make a GET request to http://localhost:8000/api/healthchecker and see the resulting JSON object.
Setup MySQL with Docker
To run the MySQL server, we will use Docker. If you already have a MySQL server running on your machine, feel free to skip this section. In case you plan to use your own MySQL server, remember to add the appropriate credentials to the .env file.
If you don’t have a MySQL server, create a docker-compose.yml file in the project’s root directory and paste the following Docker Compose configurations.
docker-compose.yml
version: '3'
services:
  mysql:
    image: mysql:latest
    container_name: mysql
    env_file:
      - ./.env
    ports:
      - '6500:3306'
    volumes:
      - mysqlDB:/var/lib/mysql
volumes:
  mysqlDB:
To set up the credentials Docker Compose will use to build the MySQL server, create a .env file in the root folder and include the following information.
.env
MYSQL_DATABASE=rust_sqlx
MYSQL_USER=admin
MYSQL_PASSWORD=password123
MYSQL_ROOT_PASSWORD=password123

# Don't worry about the placeholders. Rust supports this feature.
DATABASE_URL=mysql://${MYSQL_USER}:${MYSQL_PASSWORD}@localhost:6500/${MYSQL_DATABASE}
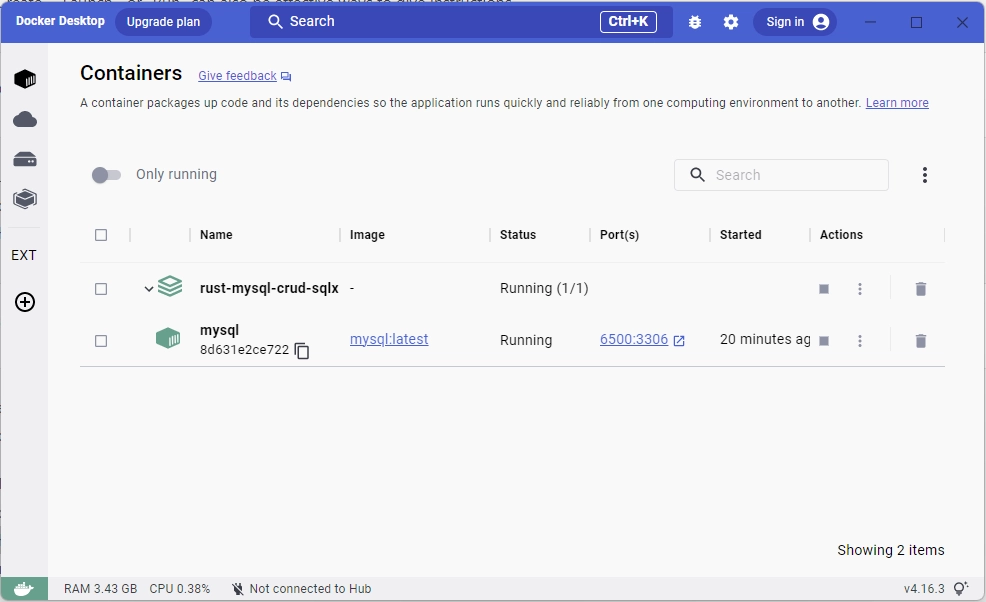
Launch the MySQL server by running the command docker-compose up -d. Once the command is executed, you can verify that the MySQL container is running by using docker ps or by checking the Docker Desktop application.
Run Database Migrations with SQLX
Now that we have our MySQL server up and running, it’s time to create the database migration files and push the schema to the server using SQLx command-line tool. If you haven’t installed the SQLx CLI binary yet, start by installing it.
cargo install sqlx-cli
Once you have the SQLx CLI tool installed, run the following command to generate the migration files. This will create a ‘migrations‘ folder in the project’s root directory and populate it with ‘up‘ and ‘down‘ scripts that the SQLx command-line tool will use to apply and roll back the database changes. You can rename the ‘init‘ argument to something else if you prefer.
sqlx migrate add -r init
After running the command, open the ‘up‘ script located in the ‘migrations‘ directory and add the SQL queries shown below.
migrations/20230123163655_init.up.sql
-- Add up migration script here

CREATE TABLE
    IF NOT EXISTS notes (
        id CHAR(36) PRIMARY KEY NOT NULL,
        title VARCHAR(255) NOT NULL UNIQUE,
        content TEXT NOT NULL,
        category VARCHAR(100),
        published BOOLEAN NOT NULL DEFAULT FALSE,
        created_at TIMESTAMP DEFAULT CURRENT_TIMESTAMP,
        updated_at TIMESTAMP DEFAULT CURRENT_TIMESTAMP ON UPDATE CURRENT_TIMESTAMP
    );
To undo the changes made by the ‘up‘ script, open the ‘down‘ script in the ‘migrations‘ folder and add the following SQL code. This will delete the ‘notes‘ table that was created by the ‘up‘ script, effectively reverting the changes made to the database.
migrations/20230123163655_init.down.sql
-- Add down migration script here

DROP TABLE IF EXISTS notes;
Let’s now apply the ‘up‘ migration script to the database. This script will create a ‘notes‘ table with the required columns in the MySQL database. Once applied, the database will be ready to store the notes data. To apply the migration, run the command below in your terminal.
sqlx migrate run
To revert the changes, you can run the command sqlx migrate revert. This will delete the ‘notes‘ table from the database.
Create the SQLX Database Model
Let’s define a NoteModel struct that represents the ‘notes‘ table and its columns using the FromRow trait provided by SQLX. Because MySQL uses TinyInt to represent boolean values, we need to use an i8 data type to represent the published field to avoid potential errors.
To easily convert the i8 value of the published field to a boolean value, we will create a separate NoteModelResponse struct at the bottom of the file.
To define the SQLX model, create a file named model.rs in the src directory and add the following code:
src/model.rs
use serde::{Deserialize, Serialize};

#[derive(Debug, Deserialize, Serialize, sqlx::FromRow)]
#[allow(non_snake_case)]
pub struct NoteModel {
    pub id: String,
    pub title: String,
    pub content: String,
    pub category: Option<String>,
    pub published: i8,
    pub created_at: Option<chrono::DateTime<chrono::Utc>>,
    pub updated_at: Option<chrono::DateTime<chrono::Utc>>,
}

#[derive(Debug, Deserialize, Serialize)]
#[allow(non_snake_case)]
pub struct NoteModelResponse {
    pub id: String,
    pub title: String,
    pub content: String,
    pub category: String,
    pub published: bool,
    pub createdAt: chrono::DateTime<chrono::Utc>,
    pub updatedAt: chrono::DateTime<chrono::Utc>,
}
We could create a separate src/response.rs file for the NoteModelResponse struct, but to keep things simple, we will leave it within the src/model.rs file.
Create the Request Validation Structs
To ensure that incoming request bodies contain valid data types, we need to create structs that Actix Web can use to parse and validate them. These structs specify the expected fields and data types, allowing for accurate validation of the incoming data.
In the src directory, create a schema.rs file and add the following code:
src/schema.rs
use serde::{Deserialize, Serialize};

#[derive(Deserialize, Debug)]
pub struct FilterOptions {
    pub page: Option<usize>,
    pub limit: Option<usize>,
}

#[derive(Deserialize, Debug)]
pub struct ParamOptions {
    pub id: String,
}

#[derive(Serialize, Deserialize, Debug)]
pub struct CreateNoteSchema {
    pub title: String,
    pub content: String,
    #[serde(skip_serializing_if = "Option::is_none")]
    pub category: Option<String>,
    #[serde(skip_serializing_if = "Option::is_none")]
    pub published: Option<bool>,
}

#[derive(Serialize, Deserialize, Debug)]
pub struct UpdateNoteSchema {
    pub title: Option<String>,
    pub content: Option<String>,
    pub category: Option<String>,
    pub published: Option<bool>,
}
Implement the CRUD Functionalities
Now that we have successfully synchronized the MySQL database with the migration files and created the SQLX model, it’s time to implement the CRUD operations against the database using Actix Web and SQLX.
To begin, let’s create a file named handler.rs in the src directory that will handle incoming HTTP requests and send responses back to the client. At the top of this file, we need to add the necessary crates and dependencies. Open the src/handler.rs file and include the following code:
src/handler.rs
use crate::{
    model::{NoteModel, NoteModelResponse},
    schema::{CreateNoteSchema, FilterOptions, UpdateNoteSchema},
    AppState,
};
use actix_web::{delete, get, patch, post, web, HttpResponse, Responder};
use serde_json::json;
To convert the i8 value of the published field in the NoteModel struct to a boolean value, we will create a filter_db_record function that utilizes the NoteModelResponse struct for mapping each field. This function will ensure that the published field has a boolean value instead of a number.
Create the function by opening the src/handler.rs file and including the following code:
src/handler.rs
fn filter_db_record(note: &NoteModel) -> NoteModelResponse {
    NoteModelResponse {
        id: note.id.to_owned(),
        title: note.title.to_owned(),
        content: note.content.to_owned(),
        category: note.category.to_owned().unwrap(),
        published: note.published != 0,
        createdAt: note.created_at.unwrap(),
        updatedAt: note.updated_at.unwrap(),
    }
}
Actix-Web Route Handler to Fetch All Records
Our first CRUD operation is READ, which involves creating an Actix Web route function to handle pagination, filtering, and returning a list of records to the client.
This route function will be triggered by a GET request to the /api/notes?page=1&limit=10 endpoint. If the page and limit query parameters are missing from the URL, default values of 1 and 10 will be used.
To define the route handler, navigate to the handler.rs file in the src directory and add the following code:
src/handler.rs
#[get("/notes")]
pub async fn note_list_handler(
opts: web::Query<FilterOptions>,
data: web::Data<AppState>,
) -> impl Responder {
let limit = opts.limit.unwrap_or(10);
let offset = (opts.page.unwrap_or(1) - 1) * limit;
let notes: Vec<NoteModel> = sqlx::query_as!(
NoteModel,
r#"SELECT * FROM notes ORDER by id LIMIT ? OFFSET ?"#,
limit as i32,
offset as i32
)
.fetch_all(&data.db)
.await
.unwrap();
let note_responses = notes
.into_iter()
.map(|note| filter_db_record(¬e))
.collect::<Vec<NoteModelResponse>>();
let json_response = serde_json::json!({
"status": "success",
"results": note_responses.len(),
"notes": note_responses
});
HttpResponse::Ok().json(json_response)
}
Let’s evaluate the above code. The ‘note_list_handler‘ function takes two parameters: ‘opts‘ of type web::Query<FilterOptions> and ‘data‘ of type web::Data<AppState>.
The ‘opts‘ parameter is used to retrieve query parameters that specify the number of note items to retrieve and the pagination offset. The data parameter provides access to the application state, which includes the MySQL database connection pool.
The function then uses the sqlx crate to execute an SQL query that fetches the note items from the MySQL database. By using the query_as macro, the results of the query are automatically converted into a Vec<NoteModel> data structure. The query is constructed with the help of the LIMIT and OFFSET clauses, which enable limiting the number of notes returned and providing pagination support.
Next, the function proceeds to map the retrieved note items to a vector of NoteModelResponse by utilizing the filter_db_record function. This function transforms the note model into a response model containing only the necessary information. Additionally, the function converts the value of the published field from an i8 type to a boolean type for better readability. Finally, the collect method is called to collect the mapped values into a new vector.
The function then generates a JSON response containing information about the retrieved notes, including a status field, the count of notes returned, and an array of note responses. This JSON response is then returned as an HttpResponse object with a status code of 200 OK.
Actix-Web Route Handler to Create a Record
The second CRUD operation we will implement is CREATE, which will allow adding new note items to the MySQL database. This route function will be triggered when a POST request is sent to the /api/notes/ endpoint.
Upon receiving the request, the handler will generate a new UUID for the note ID and execute an SQL INSERT query to insert the note data into the MySQL database. If a note item with the provided title already exists or the query execution fails, the function will return an error response to the client.
However, if the query execution is successful, the handler will execute another SQL query to retrieve the newly-inserted note from the database. If the retrieval is successful, the handler will return a successful response containing the created note record in JSON format. If the retrieval fails, the handler will return an error response.
src/handler.rs
#[post("/notes/")]
async fn create_note_handler(
body: web::Json<CreateNoteSchema>,
data: web::Data<AppState>,
) -> impl Responder {
let user_id = uuid::Uuid::new_v4().to_string();
let query_result =
sqlx::query(r#"INSERT INTO notes (id,title,content,category) VALUES (?, ?, ?, ?)"#)
.bind(user_id.clone())
.bind(body.title.to_string())
.bind(body.content.to_string())
.bind(body.category.to_owned().unwrap_or_default())
.execute(&data.db)
.await
.map_err(|err: sqlx::Error| err.to_string());
if let Err(err) = query_result {
if err.contains("Duplicate entry") {
return HttpResponse::BadRequest().json(
serde_json::json!({"status": "fail","message": "Note with that title already exists"}),
);
}
return HttpResponse::InternalServerError()
.json(serde_json::json!({"status": "error","message": format!("{:?}", err)}));
}
let query_result = sqlx::query_as!(NoteModel, r#"SELECT * FROM notes WHERE id = ?"#, user_id)
.fetch_one(&data.db)
.await;
match query_result {
Ok(note) => {
let note_response = serde_json::json!({"status": "success","data": serde_json::json!({
"note": filter_db_record(¬e)
})});
return HttpResponse::Ok().json(note_response);
}
Err(e) => {
return HttpResponse::InternalServerError()
.json(serde_json::json!({"status": "error","message": format!("{:?}", e)}));
}
}
}
Actix-Web Route Handler to Get a Record
We’ve already implemented the READ operation for retrieving a list of records. Now, we need to implement another READ operation to retrieve a single record from the database based on its ID.
To achieve this, we’ll define a route function that will be triggered by a GET request to the /api/notes/{id} endpoint. This function will retrieve the note ID from the request URL path and execute a SQL query using the sqlx library to retrieve the corresponding note from the database.
src/handler.rs
#[get("/notes/{id}")]
async fn get_note_handler(
path: web::Path<uuid::Uuid>,
data: web::Data<AppState>,
) -> impl Responder {
let note_id = path.into_inner().to_string();
let query_result = sqlx::query_as!(NoteModel, r#"SELECT * FROM notes WHERE id = ?"#, note_id)
.fetch_one(&data.db)
.await;
match query_result {
Ok(note) => {
let note_response = serde_json::json!({"status": "success","data": serde_json::json!({
"note": filter_db_record(¬e)
})});
return HttpResponse::Ok().json(note_response);
}
Err(sqlx::Error::RowNotFound) => {
return HttpResponse::NotFound().json(
serde_json::json!({"status": "fail","message": format!("Note with ID: {} not found", note_id)}),
);
}
Err(e) => {
return HttpResponse::InternalServerError()
.json(serde_json::json!({"status": "error","message": format!("{:?}", e)}));
}
};
}
If the query execution is successful, the function will return a JSON response containing the note record wrapped in a data field.
However, if the query execution fails because the note with the specified ID is not found or for any other reason, the function will return an error response.
Actix-Web Route Handler to Edit a Record
Let’s implement the UPDATE operation of CRUD to allow the editing of note items in the database. We will define a route function that will be triggered when a PATCH request is made to the /api/notes/{id} endpoint.
When a user sends a PATCH request, the function will first extract the note ID from the request URL path and query the database using the sqlx library to retrieve the note record with that ID. If the note record is not found or the query fails, an error response will be returned.
Next, the function will extract the note data from the request body and update the corresponding fields of the note record in the database using another SQL query.
Since MySQL doesn’t return the mutated data, another query will be executed to retrieve the updated note record and it will be returned in the response along with a success status code.
src/handler.rs
#[patch("/notes/{id}")]
async fn edit_note_handler(
path: web::Path<uuid::Uuid>,
body: web::Json<UpdateNoteSchema>,
data: web::Data<AppState>,
) -> impl Responder {
let note_id = path.into_inner().to_string();
let query_result = sqlx::query_as!(NoteModel, r#"SELECT * FROM notes WHERE id = ?"#, note_id)
.fetch_one(&data.db)
.await;
let note = match query_result {
Ok(note) => note,
Err(sqlx::Error::RowNotFound) => {
return HttpResponse::NotFound().json(
serde_json::json!({"status": "fail","message": format!("Note with ID: {} not found", note_id)}),
);
}
Err(e) => {
return HttpResponse::InternalServerError()
.json(serde_json::json!({"status": "error","message": format!("{:?}", e)}));
}
};
let published = body.published.unwrap_or(note.published != 0);
let i8_publised = published as i8;
let update_result = sqlx::query(
r#"UPDATE notes SET title = ?, content = ?, category = ?, published = ? WHERE id = ?"#,
)
.bind(body.title.to_owned().unwrap_or_else(|| note.title.clone()))
.bind(
body.content
.to_owned()
.unwrap_or_else(|| note.content.clone()),
)
.bind(
body.category
.to_owned()
.unwrap_or_else(|| note.category.clone().unwrap()),
)
.bind(i8_publised)
.bind(note_id.to_owned())
.execute(&data.db)
.await;
match update_result {
Ok(result) => {
if result.rows_affected() == 0 {
let message = format!("Note with ID: {} not found", note_id);
return HttpResponse::NotFound().json(json!({"status": "fail","message": message}));
}
}
Err(e) => {
let message = format!("Internal server error: {}", e);
return HttpResponse::InternalServerError()
.json(json!({"status": "error","message": message}));
}
}
let updated_note_result = sqlx::query_as!(
NoteModel,
r#"SELECT * FROM notes WHERE id = ?"#,
note_id.to_owned()
)
.fetch_one(&data.db)
.await;
match updated_note_result {
Ok(note) => {
let note_response = serde_json::json!({"status": "success","data": serde_json::json!({
"note": filter_db_record(¬e)
})});
HttpResponse::Ok().json(note_response)
}
Err(e) => HttpResponse::InternalServerError()
.json(serde_json::json!({"status": "error","message": format!("{:?}", e)})),
}
}
Actix-Web Route Handler to Delete a Record
To complete the CRUD operations, we need to implement the DELETE operation to remove a note from the database. This will be achieved by defining a route function that will be called when a DELETE request is made to the /api/notes/{id} endpoint.
The function will extract the note ID from the request URL path, and execute a SQL query using the sqlx library to delete the note record from the database with the specified ID.
src/handler.rs
#[delete("/notes/{id}")]
async fn delete_note_handler(
    path: web::Path<uuid::Uuid>,
    data: web::Data<AppState>,
) -> impl Responder {
    let note_id = path.into_inner().to_string();
    let query_result = sqlx::query!(r#"DELETE FROM notes WHERE id = ?"#, note_id)
        .execute(&data.db)
        .await;

    match query_result {
        Ok(result) => {
            if result.rows_affected() == 0 {
                let message = format!("Note with ID: {} not found", note_id);
                HttpResponse::NotFound().json(json!({"status": "fail","message": message}))
            } else {
                HttpResponse::NoContent().finish()
            }
        }
        Err(e) => {
            let message = format!("Internal server error: {}", e);
            HttpResponse::InternalServerError().json(json!({"status": "error","message": message}))
        }
    }
}
If the note record with the specified ID is not found in the database or the query execution fails, the function will return an error response.
However, If the query execution is successful, the function will return a response with a 204 status code, indicating that the request was successful but there is no content to return.
Merge the Route Functions
Now that we’ve implemented the CRUD operations, let’s use Actix-web’s web::ServiceConfig struct and web::scope function to define a common prefix for all the routes. By defining a common prefix, we can avoid repeating the same prefix for each route and make the code more readable and maintainable.
src/handler.rs
pub fn config(conf: &mut web::ServiceConfig) {
    let scope = web::scope("/api")
        .service(health_checker_handler)
        .service(note_list_handler)
        .service(create_note_handler)
        .service(get_note_handler)
        .service(edit_note_handler)
        .service(delete_note_handler);

    conf.service(scope);
}
The Complete Code of the Route Functions
src/handler.rs
use crate::{
model::{NoteModel, NoteModelResponse},
schema::{CreateNoteSchema, FilterOptions, UpdateNoteSchema},
AppState,
};
use actix_web::{delete, get, patch, post, web, HttpResponse, Responder};
use serde_json::json;
#[get("/healthchecker")]
async fn health_checker_handler() -> impl Responder {
const MESSAGE: &str = "Build Simple CRUD API with Rust, SQLX, MySQL, and Actix Web";
HttpResponse::Ok().json(json!({"status": "success","message": MESSAGE}))
}
#[get("/notes")]
pub async fn note_list_handler(
opts: web::Query<FilterOptions>,
data: web::Data<AppState>,
) -> impl Responder {
let limit = opts.limit.unwrap_or(10);
let offset = (opts.page.unwrap_or(1) - 1) * limit;
let notes: Vec<NoteModel> = sqlx::query_as!(
NoteModel,
r#"SELECT * FROM notes ORDER by id LIMIT ? OFFSET ?"#,
limit as i32,
offset as i32
)
.fetch_all(&data.db)
.await
.unwrap();
let note_responses = notes
.into_iter()
.map(|note| filter_db_record(¬e))
.collect::<Vec<NoteModelResponse>>();
let json_response = serde_json::json!({
"status": "success",
"results": note_responses.len(),
"notes": note_responses
});
HttpResponse::Ok().json(json_response)
}
#[post("/notes/")]
async fn create_note_handler(
body: web::Json<CreateNoteSchema>,
data: web::Data<AppState>,
) -> impl Responder {
let user_id = uuid::Uuid::new_v4().to_string();
let query_result =
sqlx::query(r#"INSERT INTO notes (id,title,content,category) VALUES (?, ?, ?, ?)"#)
.bind(user_id.clone())
.bind(body.title.to_string())
.bind(body.content.to_string())
.bind(body.category.to_owned().unwrap_or_default())
.execute(&data.db)
.await
.map_err(|err: sqlx::Error| err.to_string());
if let Err(err) = query_result {
if err.contains("Duplicate entry") {
return HttpResponse::BadRequest().json(
serde_json::json!({"status": "fail","message": "Note with that title already exists"}),
);
}
return HttpResponse::InternalServerError()
.json(serde_json::json!({"status": "error","message": format!("{:?}", err)}));
}
let query_result = sqlx::query_as!(NoteModel, r#"SELECT * FROM notes WHERE id = ?"#, user_id)
.fetch_one(&data.db)
.await;
match query_result {
Ok(note) => {
let note_response = serde_json::json!({"status": "success","data": serde_json::json!({
"note": filter_db_record(¬e)
})});
return HttpResponse::Ok().json(note_response);
}
Err(e) => {
return HttpResponse::InternalServerError()
.json(serde_json::json!({"status": "error","message": format!("{:?}", e)}));
}
}
}
#[get("/notes/{id}")]
async fn get_note_handler(
path: web::Path<uuid::Uuid>,
data: web::Data<AppState>,
) -> impl Responder {
let note_id = path.into_inner().to_string();
let query_result = sqlx::query_as!(NoteModel, r#"SELECT * FROM notes WHERE id = ?"#, note_id)
.fetch_one(&data.db)
.await;
match query_result {
Ok(note) => {
let note_response = serde_json::json!({"status": "success","data": serde_json::json!({
"note": filter_db_record(¬e)
})});
return HttpResponse::Ok().json(note_response);
}
Err(sqlx::Error::RowNotFound) => {
return HttpResponse::NotFound().json(
serde_json::json!({"status": "fail","message": format!("Note with ID: {} not found", note_id)}),
);
}
Err(e) => {
return HttpResponse::InternalServerError()
.json(serde_json::json!({"status": "error","message": format!("{:?}", e)}));
}
};
}
#[patch("/notes/{id}")]
async fn edit_note_handler(
path: web::Path<uuid::Uuid>,
body: web::Json<UpdateNoteSchema>,
data: web::Data<AppState>,
) -> impl Responder {
let note_id = path.into_inner().to_string();
let query_result = sqlx::query_as!(NoteModel, r#"SELECT * FROM notes WHERE id = ?"#, note_id)
.fetch_one(&data.db)
.await;
let note = match query_result {
Ok(note) => note,
Err(sqlx::Error::RowNotFound) => {
return HttpResponse::NotFound().json(
serde_json::json!({"status": "fail","message": format!("Note with ID: {} not found", note_id)}),
);
}
Err(e) => {
return HttpResponse::InternalServerError()
.json(serde_json::json!({"status": "error","message": format!("{:?}", e)}));
}
};
let published = body.published.unwrap_or(note.published != 0);
let i8_publised = published as i8;
let update_result = sqlx::query(
r#"UPDATE notes SET title = ?, content = ?, category = ?, published = ? WHERE id = ?"#,
)
.bind(body.title.to_owned().unwrap_or_else(|| note.title.clone()))
.bind(
body.content
.to_owned()
.unwrap_or_else(|| note.content.clone()),
)
.bind(
body.category
.to_owned()
.unwrap_or_else(|| note.category.clone().unwrap()),
)
.bind(i8_publised)
.bind(note_id.to_owned())
.execute(&data.db)
.await;
match update_result {
Ok(result) => {
if result.rows_affected() == 0 {
let message = format!("Note with ID: {} not found", note_id);
return HttpResponse::NotFound().json(json!({"status": "fail","message": message}));
}
}
Err(e) => {
let message = format!("Internal server error: {}", e);
return HttpResponse::InternalServerError()
.json(json!({"status": "error","message": message}));
}
}
let updated_note_result = sqlx::query_as!(
NoteModel,
r#"SELECT * FROM notes WHERE id = ?"#,
note_id.to_owned()
)
.fetch_one(&data.db)
.await;
match updated_note_result {
Ok(note) => {
let note_response = serde_json::json!({"status": "success","data": serde_json::json!({
"note": filter_db_record(¬e)
})});
HttpResponse::Ok().json(note_response)
}
Err(e) => HttpResponse::InternalServerError()
.json(serde_json::json!({"status": "error","message": format!("{:?}", e)})),
}
}
#[delete("/notes/{id}")]
async fn delete_note_handler(
path: web::Path<uuid::Uuid>,
data: web::Data<AppState>,
) -> impl Responder {
let note_id = path.into_inner().to_string();
let query_result = sqlx::query!(r#"DELETE FROM notes WHERE id = ?"#, note_id)
.execute(&data.db)
.await;
match query_result {
Ok(result) => {
if result.rows_affected() == 0 {
let message = format!("Note with ID: {} not found", note_id);
HttpResponse::NotFound().json(json!({"status": "fail","message": message}))
} else {
HttpResponse::NoContent().finish()
}
}
Err(e) => {
let message = format!("Internal server error: {}", e);
HttpResponse::InternalServerError().json(json!({"status": "error","message": message}))
}
}
}
fn filter_db_record(note: &NoteModel) -> NoteModelResponse {
NoteModelResponse {
id: note.id.to_owned(),
title: note.title.to_owned(),
content: note.content.to_owned(),
category: note.category.to_owned().unwrap(),
published: note.published != 0,
createdAt: note.created_at.unwrap(),
updatedAt: note.updated_at.unwrap(),
}
}
pub fn config(conf: &mut web::ServiceConfig) {
let scope = web::scope("/api")
.service(health_checker_handler)
.service(note_list_handler)
.service(create_note_handler)
.service(get_note_handler)
.service(edit_note_handler)
.service(delete_note_handler);
conf.service(scope);
}
Register the Routes and Add CORS
We’ve written a lot of code, but now we’re ready to register the routes, connect to the MySQL server, and set up CORS. Setting up CORS will enable the server to accept cross-origin requests from specific origins.
To get started, open the src/main.rs file and replace its contents with the following code. We’ll use the configure method available on the Actix Web app instance to register the routes.
After that, we’ll connect the server to the MySQL server. Finally, we’ll set up CORS by specifying the allowed origins for requests.
src/main.rs
mod handler;
mod model;
mod schema;

use actix_cors::Cors;
use actix_web::middleware::Logger;
use actix_web::{http::header, web, App, HttpServer};
use dotenv::dotenv;
use sqlx::mysql::{MySqlPool, MySqlPoolOptions};

pub struct AppState {
    db: MySqlPool,
}

#[actix_web::main]
async fn main() -> std::io::Result<()> {
    if std::env::var_os("RUST_LOG").is_none() {
        std::env::set_var("RUST_LOG", "actix_web=info");
    }
    dotenv().ok();
    env_logger::init();

    let database_url = std::env::var("DATABASE_URL").expect("DATABASE_URL must be set");
    let pool = match MySqlPoolOptions::new()
        .max_connections(10)
        .connect(&database_url)
        .await
    {
        Ok(pool) => {
            println!("✅Connection to the database is successful!");
            pool
        }
        Err(err) => {
            println!("🔥 Failed to connect to the database: {:?}", err);
            std::process::exit(1);
        }
    };

    println!("🚀 Server started successfully");

    HttpServer::new(move || {
        let cors = Cors::default()
            .allowed_origin("http://localhost:3000")
            .allowed_methods(vec!["GET", "POST", "PATCH", "DELETE"])
            .allowed_headers(vec![
                header::CONTENT_TYPE,
                header::AUTHORIZATION,
                header::ACCEPT,
            ])
            .supports_credentials();
        App::new()
            .app_data(web::Data::new(AppState { db: pool.clone() }))
            .configure(handler::config)
            .wrap(cors)
            .wrap(Logger::default())
    })
    .bind(("127.0.0.1", 8000))?
    .run()
    .await
}
You’re just one step away from running your code! Run the command below to build the project and start the Actix Web HTTP server:
cargo watch -q -c -w src/ -x run
Test the Actix-Web MySQL CRUD API
With the Actix Web HTTP server up and running, it’s time to test the API with a front-end application. You can follow the instructions outlined in the “Run the Actix-Web API with a Frontend App” section to quickly set up a React CRUD app and begin testing the API.
Alternatively, you can download the source code of the project from https://github.com/wpcodevo/rust-mysql-crud-sqlx and import the Note App.postman_collection.json collection into Postman or Thunder Client VS Code extension. This will enable you to make HTTP requests to the endpoints and test the CRUD functionality of the API.
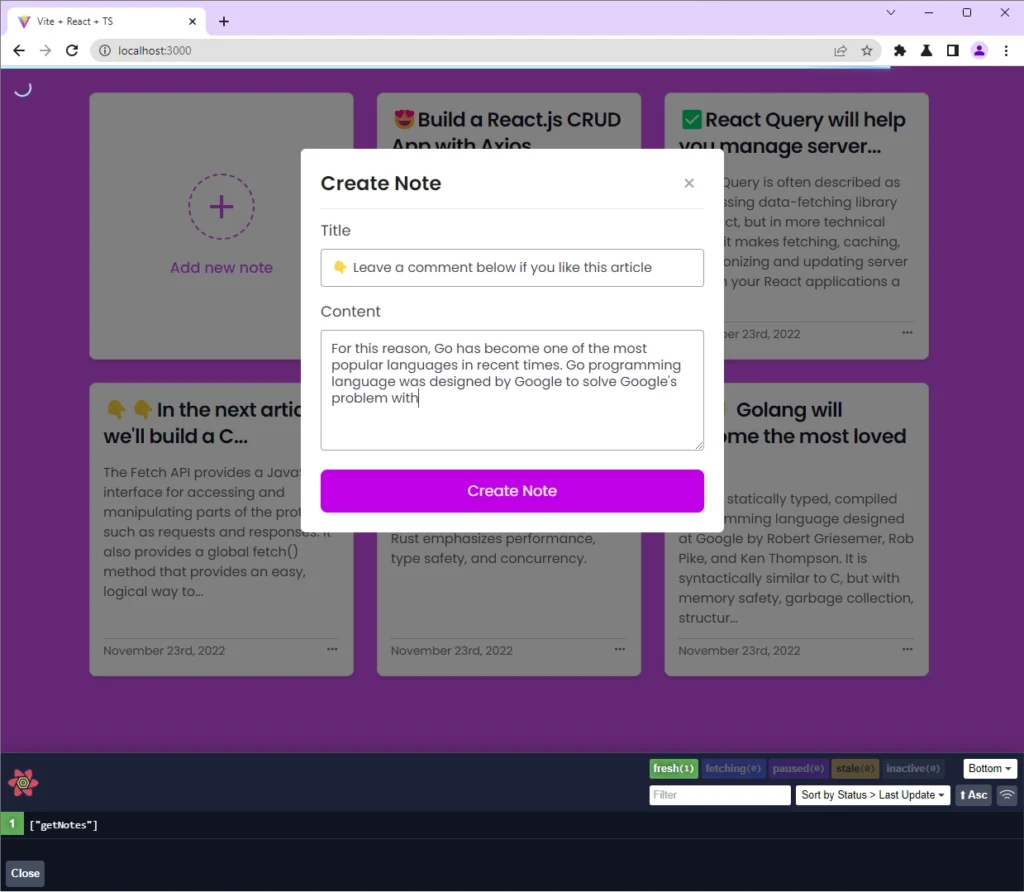
Perform the CREATE Operation of CRUD
To add a new note item, you can click on the plus icon or the “Add new note” button found on the first grid. This will open up a popup modal where you can enter the note’s title and content. Once you’ve filled out the form, click on the “Create Note” button to submit the request to the Rust API.
The Rust API will then validate the request body, insert the new note into the MySQL database, and send back the newly-created record to the React app. If the request is successful, the React app will re-render the DOM to display the new note item on the UI.
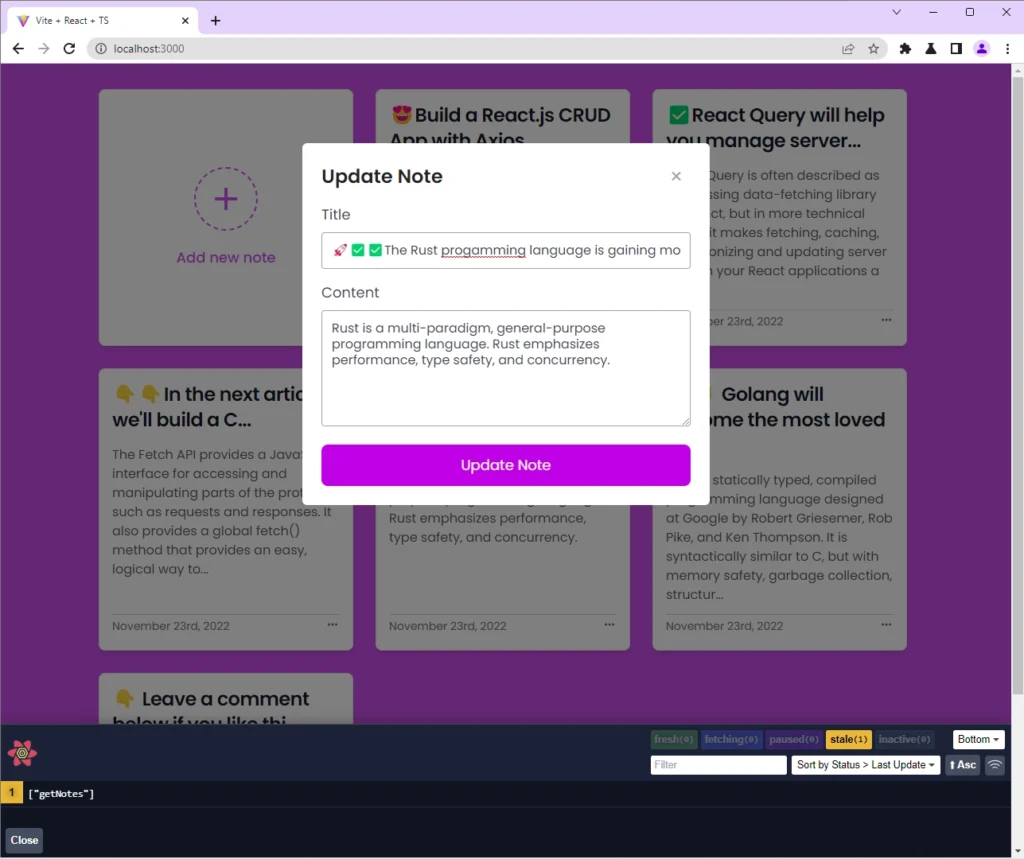
Perform the UPDATE Operation of CRUD
To modify the title or content of a note item, simply click on the three dots located next to the date element and select “Edit“. This action will open a popup modal where you can make the desired changes. After making the necessary modifications, click the “Update Note” button to submit the form to the Rust API.
Once the Rust API receives the request, it will update the corresponding record in the database based on the information provided in the request body. The updated record will then be returned to the React app. If the request is successful, the React app will refresh the DOM to display the updated information.
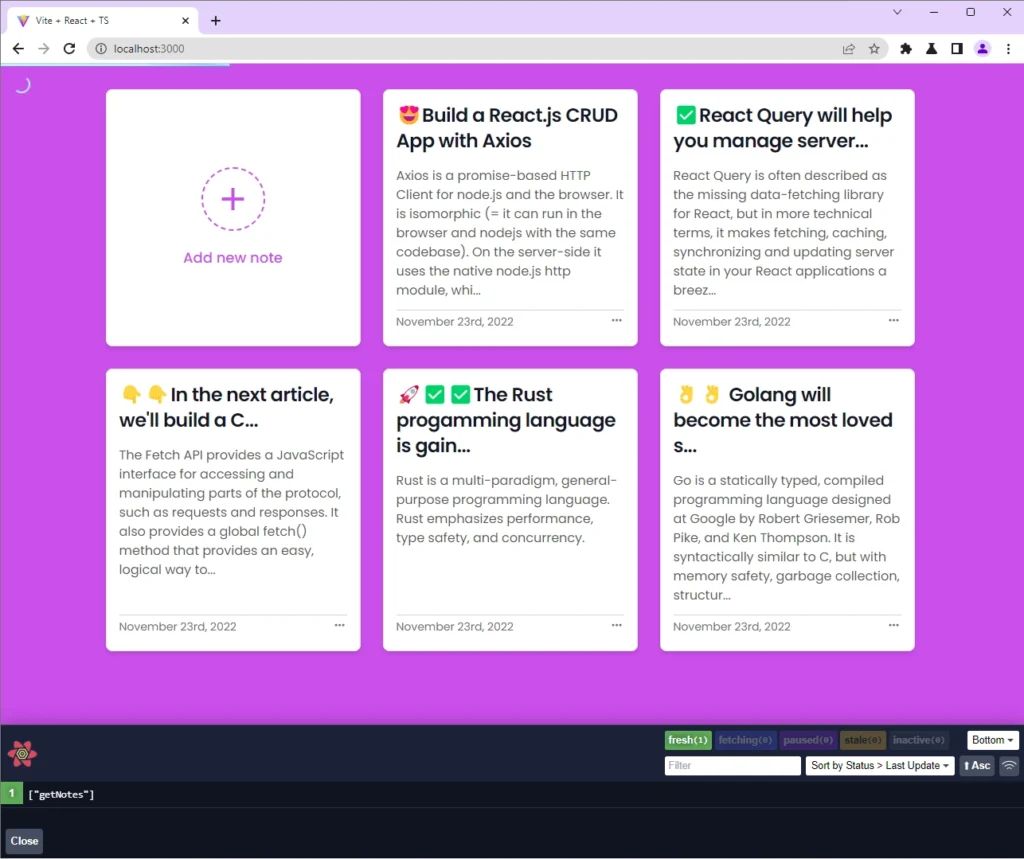
Perform the READ Operation of CRUD
After successfully testing the CREATE and UPDATE operations of CRUD, it’s time to perform the READ operation to retrieve a paginated list of records from the Rust API. When you land on the root route of the React app, a GET request is triggered to retrieve a filtered list of records. If the request is successful, React will update the DOM to display the list of records in the UI.
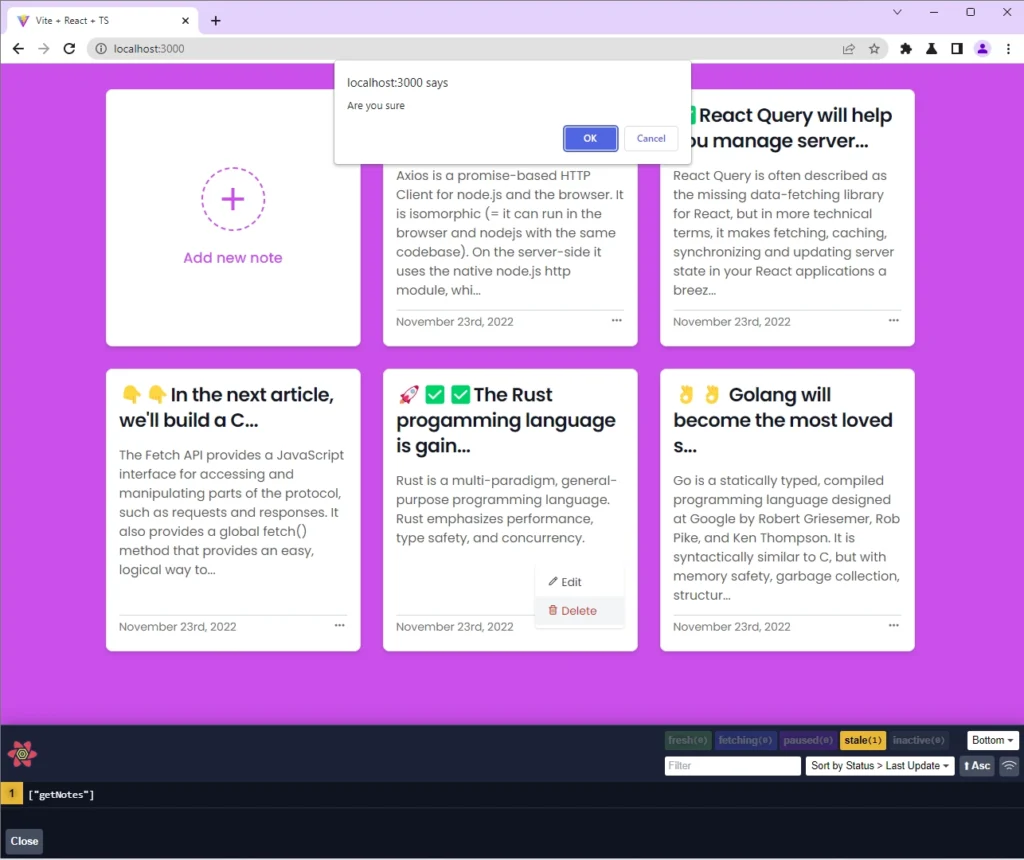
Perform the DELETE Operation of CRUD
We will now test the DELETE operation of CRUD to remove a note item from the database. To delete an item, simply click on the three dots next to the date element and select “Delete“. As this operation is irreversible, you will be prompted to confirm your action before the request is sent to the Rust API.
Upon receiving the request, the Rust API will delete the record that matches the query and send a success message to the React app. The app will then update the user interface by removing the deleted note item from the DOM.
Conclusion
And there you have it! This article has guided you through the process of creating a powerful CRUD API in Rust using the Actix Web framework, SQLX, and MySQL. I hope you found this tutorial informative and enjoyable to follow along. If you have any questions or feedback, please don’t hesitate to leave a comment below. Thanks for reading!