

This article will teach you how to integrate Google OAuth2 into your Rust application, all without relying on third-party OAuth crates such as https://crates.io/crates/oauth2. We’ll be utilizing the Actix-Web HTTP framework, known for its high performance, to power the API. Additionally, we’ll store data in a centralized in-memory database.
What is Google OAuth2? Google OAuth2 is a secure authorization framework that allows users to grant third-party applications limited access to their Google accounts without giving away their account credentials.
Why should you integrate Google OAuth2 into your Rust application? By implementing Google OAuth2 in your Rust application, users can easily sign in to your application using their Google accounts, which can improve the overall user experience.
Instead of requiring users to reveal their login credentials, they simply provide your application with an authorization code. This authorization code can then be exchanged for an access token, which can be used to retrieve relevant information, such as the user’s email address, name, and profile picture, from Google APIs.
More practice:
- How to Implement GitHub OAuth in React.js
- How to Implement Google OAuth2 in React.js
- How to Implement GitHub OAuth in Node.js
- How to Implement Google OAuth2 in Golang
- Google OAuth Authentication React.js and Node.js(No Passport)
- GitHub OAuth Authentication React.js and Node.js(No Passport)
- GitHub OAuth Authentication Vuejs, MongoDB and Golang
- Google OAuth Authentication React.js, MongoDB and Golang
Run the Rust Google OAuth2 Project
- To access the source code of the Rust Google OAuth2 project, navigate to the repository at https://github.com/wpcodevo/google-github-oauth2-rust and either download the files or clone the repository to your local system. Once the files are accessible, open them in a code editor of your choice.
- Follow the instructions provided in the “Obtain the Google OAuth2 Credentials” section of the article to retrieve the Google OAuth2 client ID and secret from the Google API Console.
- Add the Google OAuth2 client ID and secret to the
.envfile. - After adding the OAuth credentials to the
.envfile, you can proceed to install the packages and dependencies required by the project by executing the commandcargo build. - Start the Actix-Web HTTP server by running
cargo run. - Set up the React application to interact with the Rust API.
Run the Rust OAuth2 API with a React.js App
For a detailed guide on integrating Google OAuth2 in a React.js application, see the post “How to Implement Google OAuth2 in React.js“. Nonetheless, use these steps to set up the application quickly.
- To get started, head over to https://github.com/wpcodevo/google-github-oath2-reactjs and either download or clone the React Google OAuth2 project. Once you have the project downloaded, open the source code in your preferred IDE or text editor.
- After opening your preferred IDE, access the integrated terminal and proceed to install the project’s dependencies by executing the command
yarnoryarn install. This will ensure that all necessary packages and modules are downloaded and installed for the project to run seamlessly. - Duplicate the
example.envfile and rename the copied file to.env.local. This is an important step as the.env.localfile will hold important environment variables needed for the application to function correctly. - Add the OAuth2 client ID and client secret to the
.env.localfile. - Launch the Vite development server by running
yarn dev. - Now that you’ve finished setting up and configuring the Google OAuth2 integration for the React application and Rust API, it’s time to test its functionality. This will ensure that the authentication process is working correctly and that the necessary user information is being retrieved accurately.
Setup the Rust Project with Cargo
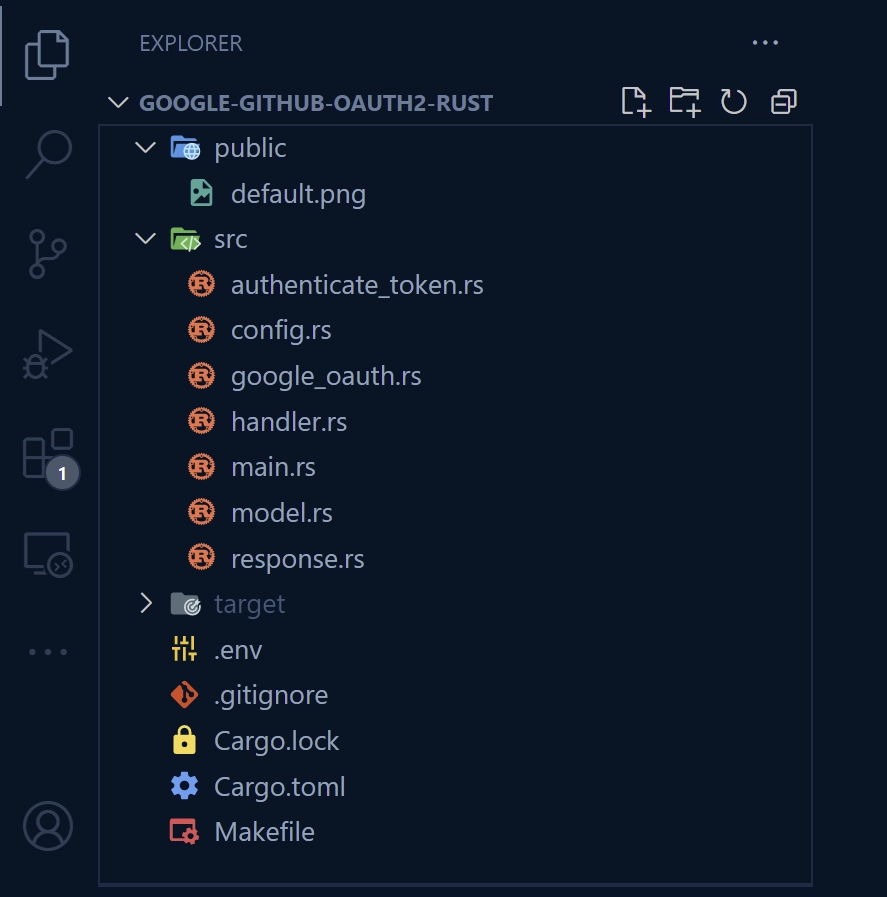
Upon finishing this comprehensive guide, the arrangement of your folders and files will resemble the screenshot below.
To start off, create a folder named google-oauth2-rust in a convenient location, such as your desktop. Once you have created the folder, navigate into it and initialize a Rust project using the command cargo init.
mkdir google-oauth2-rust
cd google-oauth2-rust
cargo init
Now that you have initialized the project, it’s time to install the necessary dependencies. To do this, execute the following commands in the terminal of the root directory.
cargo add actix-web
cargo add actix-cors
cargo add serde --features derive
cargo add serde_json
cargo add chrono --features serde
cargo add env_logger
cargo add jsonwebtoken
cargo add dotenv
cargo add uuid --features v4
cargo add reqwest --features json
# HotReload
cargo install cargo-watch
In the event that your application is broken by installing the latest versions of the crates, you can revert to the versions specified in the Cargo.toml file shown below.
Cargo.toml
[package]
name = "google-github-oauth2-rust"
version = "0.1.0"
edition = "2021"

# See more keys and their definitions at https://doc.rust-lang.org/cargo/reference/manifest.html

[dependencies]
actix-cors = "0.6.4"
actix-files = "0.6.2"
actix-web = "4.2.1"
chrono = { version = "0.4.23", features = ["serde"] }
dotenv = "0.15.0"
env_logger = "0.10.0"
jsonwebtoken = "8.2.0"
reqwest = { version = "0.11.14", features = ["json"] }
serde = { version = "1.0.152", features = ["derive"] }
serde_json = "1.0.91"
uuid = { version = "1.2.2", features = ["v4"] }
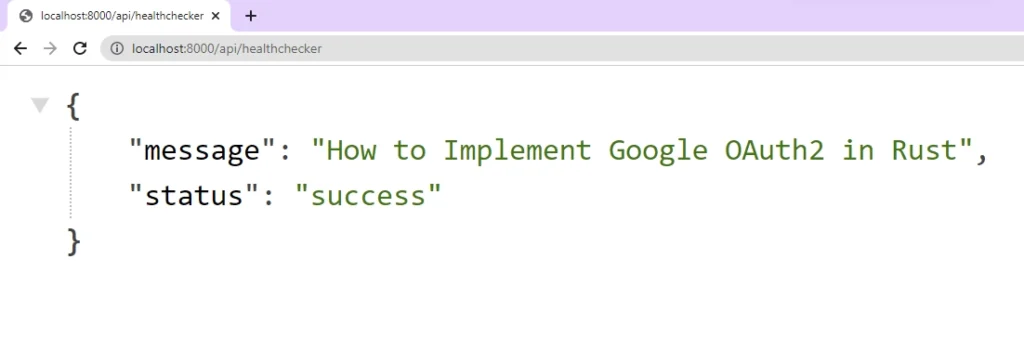
To get a feel of the project, let’s create a basic Actix-Web HTTP server that responds with a simple JSON object when the server receives a GET request at the /api/healthchecker endpoint.
To accomplish this, create an “src” folder within the root directory. Inside the “src” directory, create a main.rs file and add the code provided below.
src/main.rs
use actix_web::middleware::Logger;
use actix_web::{get, App, HttpServer};
use actix_web::{HttpResponse, Responder};

#[get("/api/healthchecker")]
async fn health_checker_handler() -> impl Responder {
    const MESSAGE: &str = "How to Implement Google OAuth2 in Rust";

    HttpResponse::Ok().json(serde_json::json!({"status": "success", "message": MESSAGE}))
}

#[actix_web::main]
async fn main() -> std::io::Result<()> {
    if std::env::var_os("RUST_LOG").is_none() {
        std::env::set_var("RUST_LOG", "actix_web=info");
    }
    env_logger::init();

    println!("🚀 Server started successfully");

    HttpServer::new(move || {
        App::new()
            .service(health_checker_handler)
            .wrap(Logger::default())
    })
    .bind(("127.0.0.1", 8000))?
    .run()
    .await
}
In the above code, we first imported the required dependencies from the Actix-Web crate. Next, we defined a function health_checker_handler using the get attribute macro, which specifies that this function will respond to HTTP GET requests. This function will return a JSON object with a message key that is set to “How to Implement Google OAuth2 in Rust“.
We then defined the main function that creates an instance of the HttpServer struct from the Actix-Web crate. Inside the server, we created an instance of the App struct and registered the health_checker_handler function as a service using the service method.
Finally, we specified that the server should be bound to the IP address 127.0.0.1 and port 8000, and then we called the run method to start the server. Moreover, we utilized the await keyword to guarantee that the server runs asynchronously.
With cargo-watch installed, you can both build and run the Rust project as well as automatically restart the server when changes are made to specific files. To accomplish this, execute the command cargo watch -q -c -w src/ -x run to start the Actix-Web HTTP server and hot-reload the server when the files in the “src” directory change.
Now that the Actix-Web HTTP server is listening on port 8000 and ready to process requests, make a GET request to the http://localhost:8000/api/healthchecker URL to see the JSON object.
Obtain the Google OAuth2 Credentials
This section will guide you on obtaining the Google OAuth2 client ID and secret from the Google Cloud Console. To acquire the OAuth2 credentials, please follow the steps outlined below.
- Ensure that you are currently signed in to your Google account and navigate to the Google Cloud Console by visiting https://console.developers.google.com/.
- At the top of the page, there is a dropdown menu that you can click to display a pop-up window. This window enables you to choose an existing project or create a new one according to your needs.
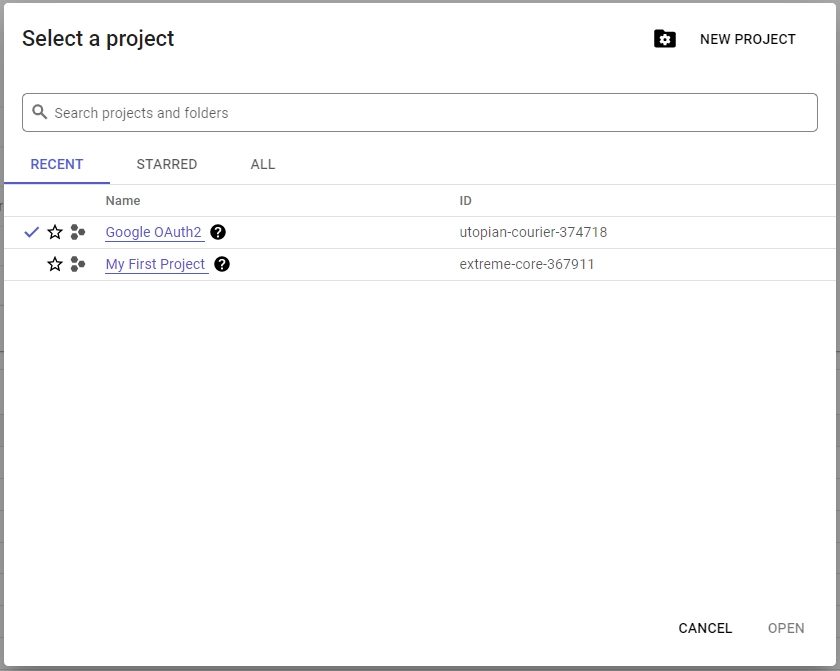
- To create a new project, simply click the “New Project” button located in the top-right corner of the pop-up window. You will then be directed to a new page where you can enter a name for your project and then click the “Create” button to complete the process.
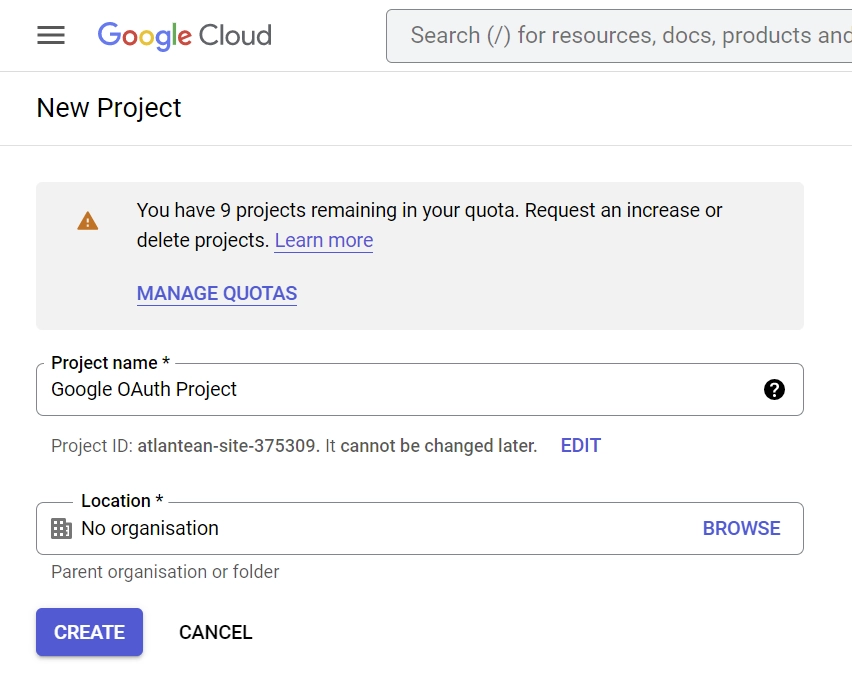
- Within a matter of milliseconds, your new project will be created and a notification will appear on your screen.

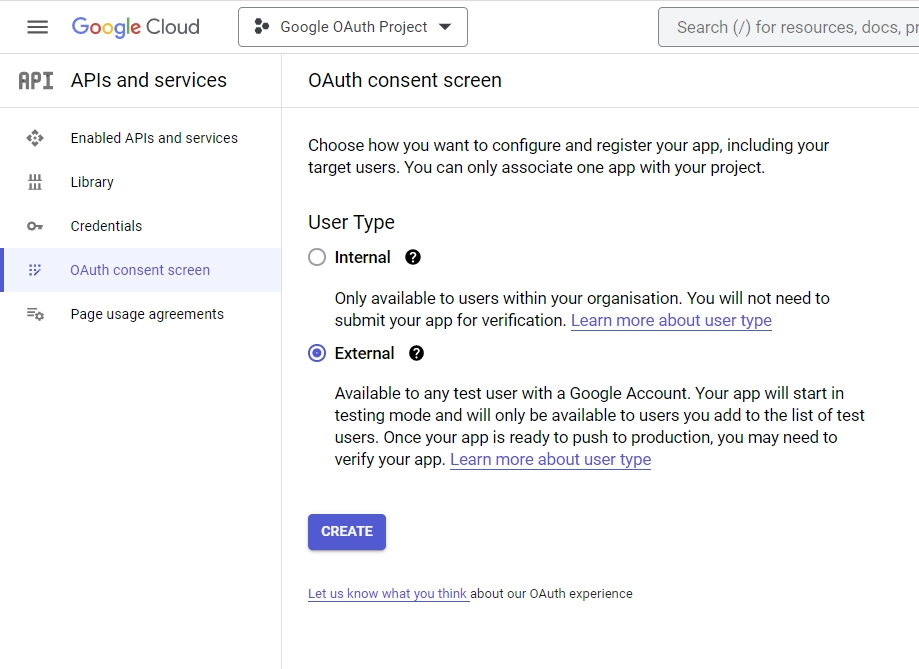
From the notifications, click the “SELECT PROJECT” button on the newly created project. - Click the “OAuth consent screen” menu on the left sidebar. Next, you’ll be directed to a new page where you should choose “External” as the “User Type” and click on the “CREATE” button.
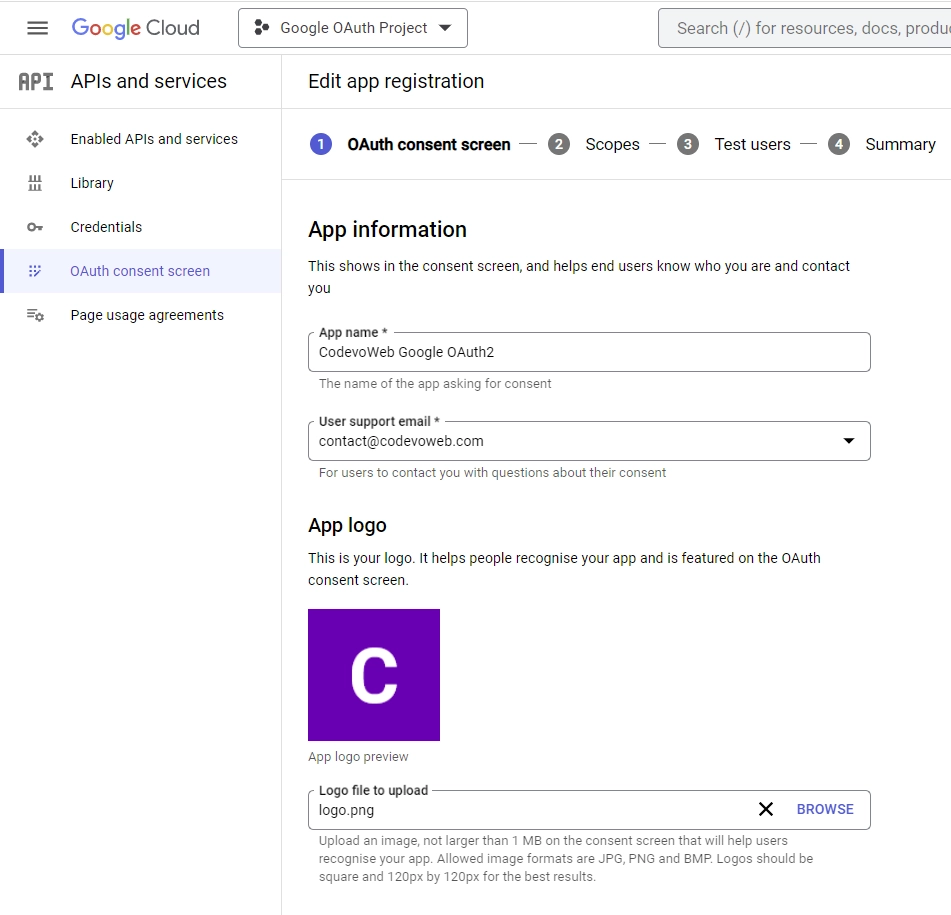
- Following that, you will be directed to the “Edit app registration” screen where you can input your OAuth consent screen credentials. Once you’re on this page, navigate to the “App information” tab and fill in the required details. Don’t forget to include a logo for the consent screen.
Next, scroll down to the “App domain” section and provide the links to your homepage, privacy policy, and terms of service pages.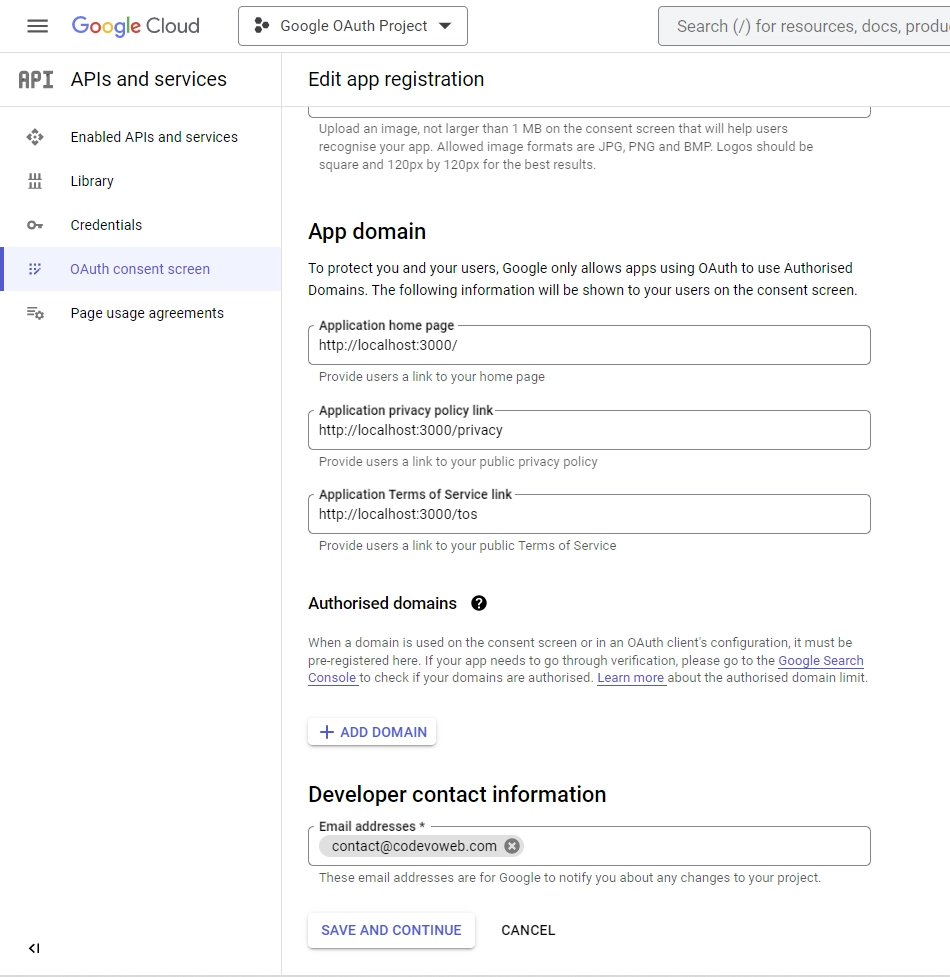
Under the “Developer contact information” section, make sure to input your email address. Once you’ve entered your email, click on the “SAVE AND CONTINUE” button to proceed. - After that, you’ll be taken to the “Scopes” screen, where you can specify the scopes required for your application. To begin, click on the “ADD OR REMOVE SCOPES” button, select
.../auth/userinfo.emailand.../auth/userinfo.profilefrom the list of options, and then click on the “UPDATE” button located at the bottom of the page.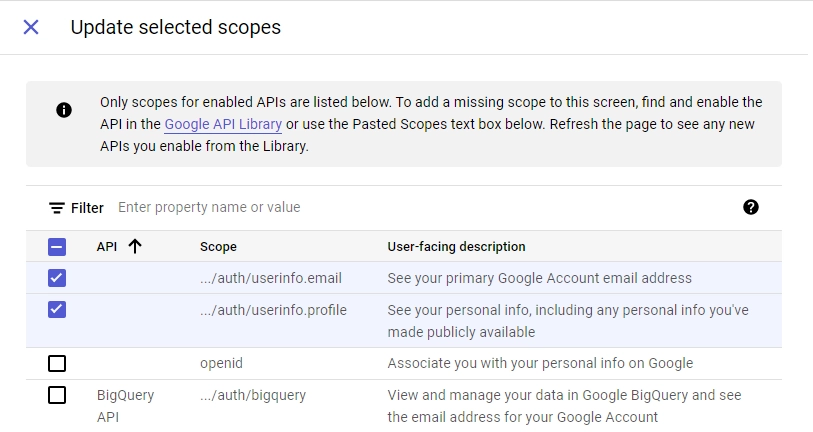
Once you’ve added the required scopes, scroll down and click the “SAVE AND CONTINUE” button to proceed. - Next, you will be directed to the “Test users” screen, where you can add the email addresses of Google accounts that will be authorized to test your application while it is in sandbox mode. To begin, click on the “ADD USERS” button and input the email addresses you want to add. Keep in mind that these emails must be associated with a Google account.
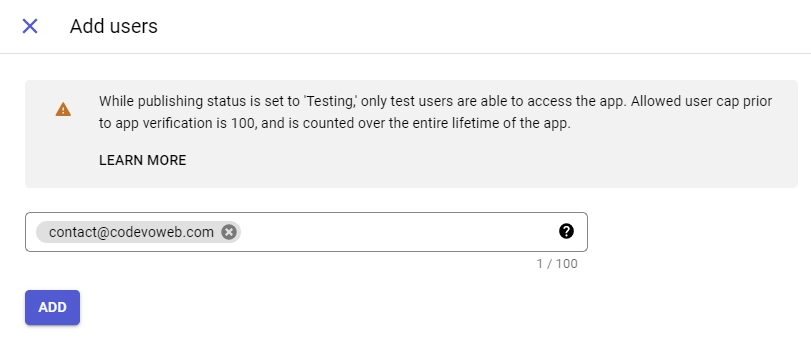
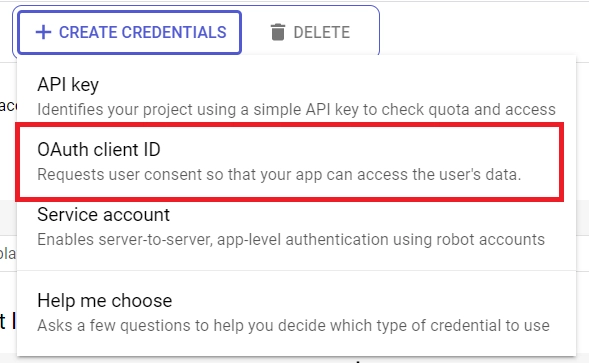
Once you’ve added the test users, click the “SAVE AND CONTINUE” button to proceed. Make sure to review the information provided on the “Summary” screen before moving on. After confirming everything is correct, you can click the “BACK TO DASHBOARD” button. - Now that you’ve finished setting up the consent screen, it’s time to create your credentials. Start by clicking on the “Credentials” option located in the left sidebar. Next, select the “CREATE CREDENTIALS” button and then choose “OAuth client ID” from the list of options provided.
- Once you’ve selected “OAuth client ID“, you’ll be directed to the “Create OAuth client ID” screen. From there, choose “Web application” as the application type, and input a name for your app. Don’t forget to specify the authorized redirect URI as well.
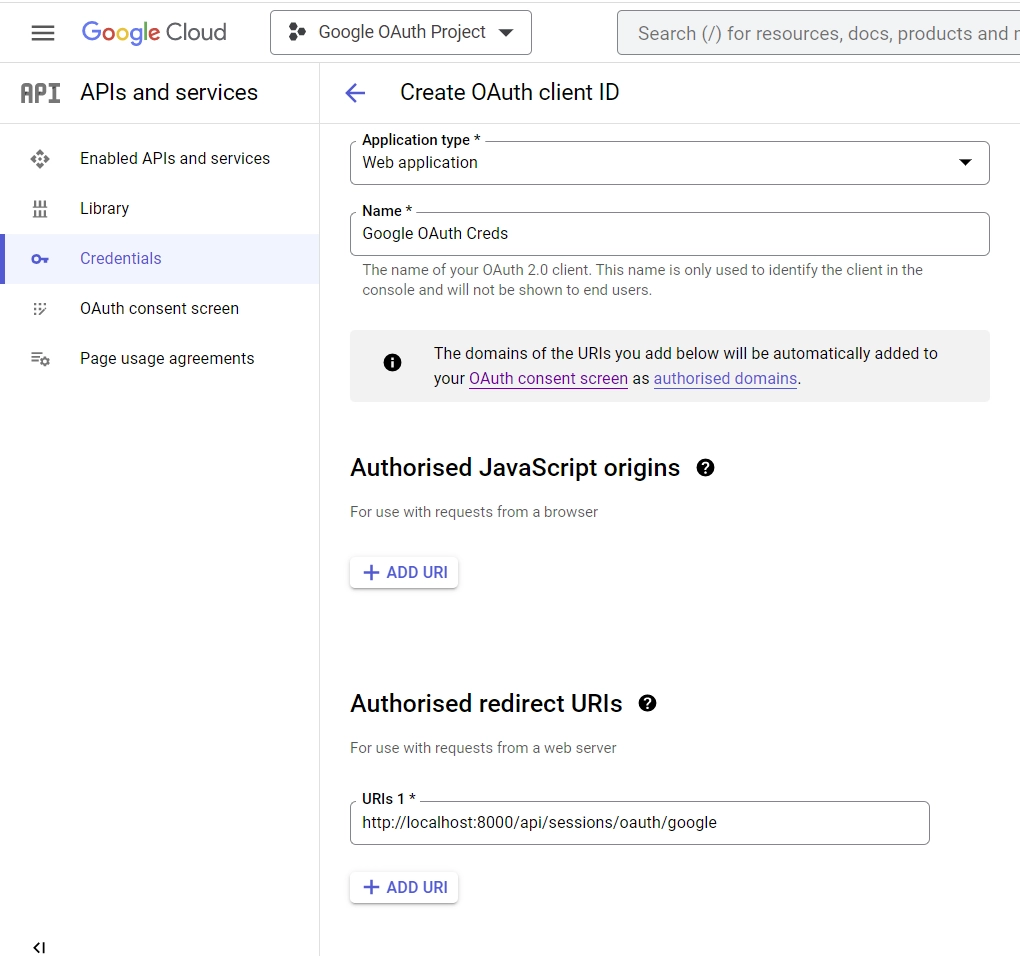
For this example, enter http://localhost:8000/api/sessions/oauth/google as the authorized redirect URI and click the “Create” button at the bottom.
After the client ID has been created, you will be directed to the “Credentials” page where you can find the client ID and secret.
Since the credentials are sensitive and must be kept well, create a .env file in the root directory and add the following environment variables. Remember to add your OAuth client id and secret to their respective placeholders in the .env file.
.env
CLIENT_ORIGIN=http://localhost:3000

JWT_SECRET=my_ultra_secure_secret
TOKEN_EXPIRED_IN=60m
TOKEN_MAXAGE=60

GOOGLE_OAUTH_CLIENT_ID=
GOOGLE_OAUTH_CLIENT_SECRET=
GOOGLE_OAUTH_REDIRECT_URL=http://localhost:8000/api/sessions/oauth/google
To avoid accidentally sharing or uploading the .env file to version control, it’s essential to add it to your project’s .gitignore file.
This will ensure that the file is not included when you commit your code to your repository, helping to keep your sensitive information secure.
Load the Environment Variables
Now that we have all the necessary environment variables in place, we can create a utility function that will use Rust’s std::env standard library to load the environment variables and unmarshal the content into a Config struct, which can be accessed from anywhere in the application.
To accomplish this, create a config.rs file in the “src” directory and add the following code:
src/config.rs
#[derive(Debug, Clone)]
pub struct Config {
    pub client_origin: String,
    pub jwt_secret: String,
    pub jwt_expires_in: String,
    pub jwt_max_age: i64,
    pub google_oauth_client_id: String,
    pub google_oauth_client_secret: String,
    pub google_oauth_redirect_url: String,
}

impl Config {
    pub fn init() -> Config {
        let client_origin = std::env::var("CLIENT_ORIGIN").expect("CLIENT_ORIGIN must be set");
        let jwt_secret = std::env::var("JWT_SECRET").expect("JWT_SECRET must be set");
        let jwt_expires_in =
            std::env::var("TOKEN_EXPIRED_IN").expect("TOKEN_EXPIRED_IN must be set");
        let jwt_max_age = std::env::var("TOKEN_MAXAGE").expect("TOKEN_MAXAGE must be set");
        let google_oauth_client_id =
            std::env::var("GOOGLE_OAUTH_CLIENT_ID").expect("GOOGLE_OAUTH_CLIENT_ID must be set");
        let google_oauth_client_secret = std::env::var("GOOGLE_OAUTH_CLIENT_SECRET")
            .expect("GOOGLE_OAUTH_CLIENT_SECRET must be set");
        let google_oauth_redirect_url = std::env::var("GOOGLE_OAUTH_REDIRECT_URL")
            .expect("GOOGLE_OAUTH_REDIRECT_URL must be set");

        Config {
            client_origin,
            jwt_secret,
            jwt_expires_in,
            jwt_max_age: jwt_max_age.parse::<i64>().unwrap(),
            google_oauth_client_id,
            google_oauth_client_secret,
            google_oauth_redirect_url,
        }
    }
}
Create an In-memory Database
To keep things simple, we won’t be using an ORM or a real database to store data. Instead, we’ll use Rust’s standard libraries Arc and Mutex to create a thread-safe, in-memory database.
The Arc library will allow multiple ownership of the database, while the Mutex library will ensure that only one thread can access the database at any given time, preventing data races and other concurrency issues.
To achieve this, we will define two structs: User and AppState. The User struct will contain fields for storing user data, such as id, name, email, etc. The AppState struct, on the other hand, will contain two fields: db, which will be an Arc wrapped around a Mutex that will hold a vector of User instances, and env, which will hold the configuration information.
Next, we’ll create an “init” method on the AppState struct to initialize the state. This method will create a new instance of “AppState” with an empty vector for the db field and load the environment variables using the config::Config::init() method for the env field.
src/model.rs
use chrono::prelude::*;
use serde::{Deserialize, Serialize};
use std::sync::{Arc, Mutex};

use crate::config;

#[allow(non_snake_case)]
#[derive(Debug, Deserialize, Serialize, Clone)]
pub struct User {
    pub id: Option<String>,
    pub name: String,
    pub email: String,
    pub password: String,
    pub role: String,
    pub photo: String,
    pub verified: bool,
    pub provider: String,
    pub createdAt: Option<DateTime<Utc>>,
    pub updatedAt: Option<DateTime<Utc>>,
}

pub struct AppState {
    pub db: Arc<Mutex<Vec<User>>>,
    pub env: config::Config,
}

impl AppState {
    pub fn init() -> AppState {
        AppState {
            db: Arc::new(Mutex::new(Vec::new())),
            env: config::Config::init(),
        }
    }
}

#[derive(Debug, Serialize, Deserialize)]
pub struct TokenClaims {
    pub sub: String,
    pub iat: usize,
    pub exp: usize,
}

#[derive(Debug, Deserialize)]
pub struct QueryCode {
    pub code: String,
    pub state: String,
}

#[derive(Debug, Deserialize)]
pub struct RegisterUserSchema {
    pub name: String,
    pub email: String,
    pub password: String,
}

#[derive(Debug, Deserialize)]
pub struct LoginUserSchema {
    pub email: String,
    pub password: String,
}
To maintain simplicity, we will avoid creating a separate src/schema.rs file for the “QueryCode“, “RegisterUserSchema“, and “LoginUserSchema” structs. Instead, we will keep them within the src/model.rs file.
Create the Response Structs
In order to prevent sensitive information such as passwords from being sent to the client, we need to create structs that will enable us to filter the records retrieved from the in-memory data.
To do this, create a response.rs file in the “src” directory and add the following structs.
src/response.rs
use chrono::prelude::*;
use serde::Serialize;

#[allow(non_snake_case)]
#[derive(Debug, Serialize)]
pub struct FilteredUser {
    pub id: String,
    pub name: String,
    pub email: String,
    pub role: String,
    pub photo: String,
    pub verified: bool,
    pub provider: String,
    pub createdAt: DateTime<Utc>,
    pub updatedAt: DateTime<Utc>,
}

#[derive(Serialize, Debug)]
pub struct UserData {
    pub user: FilteredUser,
}

#[derive(Serialize, Debug)]
pub struct UserResponse {
    pub status: String,
    pub data: UserData,
}
Get the Google OAuth2 Access Token and User Info
Now that we have finished setting up the in-memory database and loaded the environment variables into the Rust runtime, we can move on to the next step, which involves creating two utility functions: request_token and get_google_user.
The request_token function will utilize the reqwest crate to obtain an access token from the Google OAuth2 token endpoint, whereas the get_google_user function will use the access token to retrieve the user’s public Google account information. Create a google_oauth.rs file in the “src” directory and add the following code.
src/google_oauth.rs
use actix_web::web;
use reqwest::{Client, Url};
use serde::Deserialize;
use std::error::Error;
use crate::model::AppState;
#[derive(Deserialize)]
pub struct OAuthResponse {
pub access_token: String,
pub id_token: String,
}
#[derive(Deserialize)]
pub struct GoogleUserResult {
pub id: String,
pub email: String,
pub verified_email: bool,
pub name: String,
pub given_name: String,
pub family_name: String,
pub picture: String,
pub locale: String,
}
pub async fn request_token(
authorization_code: &str,
data: &web::Data<AppState>,
) -> Result<OAuthResponse, Box<dyn Error>> {
let redirect_url = data.env.google_oauth_redirect_url.to_owned();
let client_secret = data.env.google_oauth_client_secret.to_owned();
let client_id = data.env.google_oauth_client_id.to_owned();
let root_url = "https://oauth2.googleapis.com/token";
let client = Client::new();
let params = [
("grant_type", "authorization_code"),
("redirect_uri", redirect_url.as_str()),
("client_id", client_id.as_str()),
("code", authorization_code),
("client_secret", client_secret.as_str()),
];
let response = client.post(root_url).form(¶ms).send().await?;
if response.status().is_success() {
let oauth_response = response.json::<OAuthResponse>().await?;
Ok(oauth_response)
} else {
let message = "An error occurred while trying to retrieve access token.";
Err(From::from(message))
}
}
pub async fn get_google_user(
access_token: &str,
id_token: &str,
) -> Result<GoogleUserResult, Box<dyn Error>> {
let client = Client::new();
let mut url = Url::parse("https://www.googleapis.com/oauth2/v1/userinfo").unwrap();
url.query_pairs_mut().append_pair("alt", "json");
url.query_pairs_mut()
.append_pair("access_token", access_token);
let response = client.get(url).bearer_auth(id_token).send().await?;
if response.status().is_success() {
let user_info = response.json::<GoogleUserResult>().await?;
Ok(user_info)
} else {
let message = "An error occurred while trying to retrieve user information.";
Err(From::from(message))
}
}
grant_type: This parameter specifies the grant type being used. For an authorization code grant, this will be set to “authorization_code“.code: This is the authorization code obtained from the user’s authorization grant flow.client_id: This is the client ID we got after registering the application in the Google API Console.client_secret: This is the client secret we got after registering the application in the Google API Console.redirect_uri: This is the redirect URI we specified in the application’s registration. It must match the redirect URI used in the authorization grant flowscope: This is a space-separated list of the permissions that the application is requesting access to. The user will be prompted to grant these permissions when they authorize your application.
Create the Actix-Web Route Handlers
In this section, you will create Actix-Web route controllers that will handle the API’s authentication process. These route handlers will allow users to sign up, sign in, and sign out. Moreover, we will create an Actix-Web middleware guard to validate the JWT and protect private routes
To begin, create a handler.rs file in the “src” folder and include the following crates and dependencies.
src/handler.rs
use crate::{
    authenticate_token::AuthenticationGuard,
    google_oauth::{get_google_user, request_token},
    model::{AppState, LoginUserSchema, QueryCode, RegisterUserSchema, TokenClaims, User},
    response::{FilteredUser, UserData, UserResponse},
};
use actix_web::{
    cookie::{time::Duration as ActixWebDuration, Cookie},
    get, post, web, HttpResponse, Responder,
};
use chrono::{prelude::*, Duration};
use jsonwebtoken::{encode, EncodingKey, Header};
use reqwest::header::LOCATION;
use uuid::Uuid;
Following that, create a user_to_response function that will utilize the FilteredUser struct to filter out sensitive fields from the data retrieved from the in-memory database.
src/handler.rs
pub fn user_to_response(user: &User) -> FilteredUser {
    FilteredUser {
        id: user.id.to_owned().unwrap(),
        name: user.name.to_owned(),
        email: user.email.to_owned(),
        verified: user.verified.to_owned(),
        photo: user.photo.to_owned(),
        provider: user.provider.to_owned(),
        role: user.role.to_owned(),
        createdAt: user.createdAt.unwrap(),
        updatedAt: user.updatedAt.unwrap(),
    }
}
Register User Actix-Web Route Handler
This route function will be responsible for registering new users. It will be called when a POST request is made to the /api/auth/register endpoint.
When Actix-Web forwards the request to this function, it will first check the in-memory data to see if a user with the provided email already exists. If a matching user is found, a 409 Conflict response will be returned to the client.
src/handler.rs
#[post("/auth/register")]
async fn register_user_handler(
    body: web::Json<RegisterUserSchema>,
    data: web::Data<AppState>,
) -> impl Responder {
    let mut vec = data.db.lock().unwrap();

    let user = vec.iter().find(|user| user.email == body.email);

    if user.is_some() {
        return HttpResponse::Conflict()
            .json(serde_json::json!({"status": "fail","message": "Email already exist"}));
    }

    let uuid_id = Uuid::new_v4();
    let datetime = Utc::now();

    let user = User {
        id: Some(uuid_id.to_string()),
        name: body.name.to_owned(),
        verified: false,
        email: body.email.to_owned().to_lowercase(),
        provider: "local".to_string(),
        role: "user".to_string(),
        password: "".to_string(),
        photo: "default.png".to_string(),
        createdAt: Some(datetime),
        updatedAt: Some(datetime),
    };

    vec.push(user.to_owned());

    let json_response = UserResponse {
        status: "success".to_string(),
        data: UserData {
            user: user_to_response(&user),
        },
    };

    HttpResponse::Ok().json(json_response)
}
To keep things simple, we will skip the password hashing process and other authentication methods.
Assuming there are no conflicts with the provided user data, the new user will be saved to the in-memory database and a filtered version of the record returned from the query will be sent in the JSON response.
Login User Actix-Web Route Handler
Here, you’ll create a route function to sign in a user. This handler will be called when a POST request is made to the /api/auth/login endpoint.
Upon receiving the request, Actix-Web will delegate it to this function. The function will first verify whether a user with the provided email address exists in the in-memory database. If so, the function will then check if the user registered using Google OAuth. If this is the case, the function will return an Unauthorized response to the client.
Subsequently, the function will sign a JWT token with the user’s information and return the token as an HTTP-only cookie within the response.
src/handler.rs
#[post("/auth/login")]
async fn login_user_handler(
    body: web::Json<LoginUserSchema>,
    data: web::Data<AppState>,
) -> impl Responder {
    let vec = data.db.lock().unwrap();

    let user = vec
        .iter()
        .find(|user| user.email == body.email.to_lowercase());

    if user.is_none() {
        return HttpResponse::BadRequest()
            .json(serde_json::json!({"status": "fail", "message": "Invalid email or password"}));
    }

    let user = user.unwrap().clone();

    if user.provider == "Google" {
        return HttpResponse::Unauthorized()
            .json(serde_json::json!({"status": "fail", "message": "Use Google OAuth2 instead"}));
    }

    let jwt_secret = data.env.jwt_secret.to_owned();
    let now = Utc::now();
    let iat = now.timestamp() as usize;
    let exp = (now + Duration::minutes(data.env.jwt_max_age)).timestamp() as usize;
    let claims: TokenClaims = TokenClaims {
        sub: user.id.unwrap(),
        exp,
        iat,
    };

    let token = encode(
        &Header::default(),
        &claims,
        &EncodingKey::from_secret(jwt_secret.as_ref()),
    )
    .unwrap();

    let cookie = Cookie::build("token", token)
        .path("/")
        .max_age(ActixWebDuration::new(60 * data.env.jwt_max_age, 0))
        .http_only(true)
        .finish();

    HttpResponse::Ok()
        .cookie(cookie)
        .json(serde_json::json!({"status": "success"}))
}
Implement the Google OAuth2
src/handler.rs
#[get("/sessions/oauth/google")]
async fn google_oauth_handler(
    query: web::Query<QueryCode>,
    data: web::Data<AppState>,
) -> impl Responder {
    let code = &query.code;
    let state = &query.state;

    if code.is_empty() {
        return HttpResponse::Unauthorized().json(
            serde_json::json!({"status": "fail", "message": "Authorization code not provided!"}),
        );
    }

    let token_response = request_token(code.as_str(), &data).await;
    if token_response.is_err() {
        let message = token_response.err().unwrap().to_string();
        return HttpResponse::BadGateway()
            .json(serde_json::json!({"status": "fail", "message": message}));
    }

    let token_response = token_response.unwrap();
    let google_user = get_google_user(&token_response.access_token, &token_response.id_token).await;
    if google_user.is_err() {
        let message = google_user.err().unwrap().to_string();
        return HttpResponse::BadGateway()
            .json(serde_json::json!({"status": "fail", "message": message}));
    }

    let google_user = google_user.unwrap();

    let mut vec = data.db.lock().unwrap();
    let email = google_user.email.to_lowercase();
    let user = vec.iter_mut().find(|user| user.email == email);

    let user_id: String;

    if user.is_some() {
        let user = user.unwrap();
        user_id = user.id.to_owned().unwrap();
        user.email = email.to_owned();
        user.photo = google_user.picture;
        user.updatedAt = Some(Utc::now());
    } else {
        let datetime = Utc::now();
        let id = Uuid::new_v4();
        user_id = id.to_owned().to_string();
        let user_data = User {
            id: Some(id.to_string()),
            name: google_user.name,
            verified: google_user.verified_email,
            email,
            provider: "Google".to_string(),
            role: "user".to_string(),
            password: "".to_string(),
            photo: google_user.picture,
            createdAt: Some(datetime),
            updatedAt: Some(datetime),
        };

        vec.push(user_data.to_owned());
    }

    let jwt_secret = data.env.jwt_secret.to_owned();
    let now = Utc::now();
    let iat = now.timestamp() as usize;
    let exp = (now + Duration::minutes(data.env.jwt_max_age)).timestamp() as usize;
    let claims: TokenClaims = TokenClaims {
        sub: user_id,
        exp,
        iat,
    };

    let token = encode(
        &Header::default(),
        &claims,
        &EncodingKey::from_secret(jwt_secret.as_ref()),
    )
    .unwrap();

    let cookie = Cookie::build("token", token)
        .path("/")
        .max_age(ActixWebDuration::new(60 * data.env.jwt_max_age, 0))
        .http_only(true)
        .finish();

    let frontend_origin = data.env.client_origin.to_owned();
    let mut response = HttpResponse::Found();
    response.append_header((LOCATION, format!("{}{}", frontend_origin, state)));
    response.cookie(cookie);
    response.finish()
}
Logout User Actix-Web Route Handler
src/handler.rs
#[get("/auth/logout")]
async fn logout_handler(_: AuthenticationGuard) -> impl Responder {
    let cookie = Cookie::build("token", "")
        .path("/")
        .max_age(ActixWebDuration::new(-1, 0))
        .http_only(true)
        .finish();

    HttpResponse::Ok()
        .cookie(cookie)
        .json(serde_json::json!({"status": "success"}))
}
Retrieve the Authenticated User
src/handler.rs
#[get("/users/me")]
async fn get_me_handler(
    auth_guard: AuthenticationGuard,
    data: web::Data<AppState>,
) -> impl Responder {
    let vec = data.db.lock().unwrap();

    let user = vec
        .iter()
        .find(|user| user.id == Some(auth_guard.user_id.to_owned()));

    let json_response = UserResponse {
        status: "success".to_string(),
        data: UserData {
            user: user_to_response(&user.unwrap()),
        },
    };

    HttpResponse::Ok().json(json_response)
}
Merge the Actix-Web Route Handlers
Now that we have defined the route handlers, we can use Actix-web’s web::ServiceConfig struct along with the web::scope function to create a common path prefix for them. This will make it easier to manage and organize the different routes.
The web::scope function will enable us to define a common path prefix for the routes, whereas the ServiceConfig struct will allow us to configure the routes for the scope.
src/handler.rs
pub fn config(conf: &mut web::ServiceConfig) {
    let scope = web::scope("/api")
        .service(health_checker_handler)
        .service(register_user_handler)
        .service(login_user_handler)
        .service(google_oauth_handler)
        .service(logout_handler)
        .service(get_me_handler);

    conf.service(scope);
}
The Complete Code of the Route Handlers
src/handler.rs
use crate::{
    authenticate_token::AuthenticationGuard,
    google_oauth::{get_google_user, request_token},
    model::{AppState, LoginUserSchema, QueryCode, RegisterUserSchema, TokenClaims, User},
    response::{FilteredUser, UserData, UserResponse},
};
use actix_web::{
    cookie::{time::Duration as ActixWebDuration, Cookie},
    get, post, web, HttpResponse, Responder,
};
use chrono::{prelude::*, Duration};
use jsonwebtoken::{encode, EncodingKey, Header};
use reqwest::header::LOCATION;
use uuid::Uuid;

#[get("/healthchecker")]
async fn health_checker_handler() -> impl Responder {
    const MESSAGE: &str = "How to Implement Google OAuth2 in Rust";

    HttpResponse::Ok().json(serde_json::json!({"status": "success", "message": MESSAGE}))
}

#[post("/auth/register")]
async fn register_user_handler(
    body: web::Json<RegisterUserSchema>,
    data: web::Data<AppState>,
) -> impl Responder {
    let mut vec = data.db.lock().unwrap();

    let user = vec.iter().find(|user| user.email == body.email);

    if user.is_some() {
        return HttpResponse::Conflict()
            .json(serde_json::json!({"status": "fail","message": "Email already exist"}));
    }

    let uuid_id = Uuid::new_v4();
    let datetime = Utc::now();

    let user = User {
        id: Some(uuid_id.to_string()),
        name: body.name.to_owned(),
        verified: false,
        email: body.email.to_owned().to_lowercase(),
        provider: "local".to_string(),
        role: "user".to_string(),
        password: "".to_string(),
        photo: "default.png".to_string(),
        createdAt: Some(datetime),
        updatedAt: Some(datetime),
    };

    vec.push(user.to_owned());

    let json_response = UserResponse {
        status: "success".to_string(),
        data: UserData {
            user: user_to_response(&user),
        },
    };

    HttpResponse::Ok().json(json_response)
}
#[post("/auth/login")]
async fn login_user_handler(
    body: web::Json<LoginUserSchema>,
    data: web::Data<AppState>,
) -> impl Responder {
    let vec = data.db.lock().unwrap();

    let user = vec
        .iter()
        .find(|user| user.email == body.email.to_lowercase());

    if user.is_none() {
        return HttpResponse::BadRequest()
            .json(serde_json::json!({"status": "fail", "message": "Invalid email or password"}));
    }

    let user = user.unwrap().clone();

    if user.provider == "Google" {
        return HttpResponse::Unauthorized()
            .json(serde_json::json!({"status": "fail", "message": "Use Google OAuth2 instead"}));
    } else if user.provider == "GitHub" {
        return HttpResponse::Unauthorized()
            .json(serde_json::json!({"status": "fail", "message": "Use GitHub OAuth instead"}));
    }

    let jwt_secret = data.env.jwt_secret.to_owned();
    let now = Utc::now();
    let iat = now.timestamp() as usize;
    let exp = (now + Duration::minutes(data.env.jwt_max_age)).timestamp() as usize;
    let claims: TokenClaims = TokenClaims {
        sub: user.id.unwrap(),
        exp,
        iat,
    };

    let token = encode(
        &Header::default(),
        &claims,
        &EncodingKey::from_secret(jwt_secret.as_ref()),
    )
    .unwrap();

    let cookie = Cookie::build("token", token)
        .path("/")
        .max_age(ActixWebDuration::new(60 * data.env.jwt_max_age, 0))
        .http_only(true)
        .finish();

    HttpResponse::Ok()
        .cookie(cookie)
        .json(serde_json::json!({"status": "success"}))
}

#[get("/sessions/oauth/google")]
async fn google_oauth_handler(
    query: web::Query<QueryCode>,
    data: web::Data<AppState>,
) -> impl Responder {
    let code = &query.code;
    let state = &query.state;

    if code.is_empty() {
        return HttpResponse::Unauthorized().json(
            serde_json::json!({"status": "fail", "message": "Authorization code not provided!"}),
        );
    }

    let token_response = request_token(code.as_str(), &data).await;
    if token_response.is_err() {
        let message = token_response.err().unwrap().to_string();
        return HttpResponse::BadGateway()
            .json(serde_json::json!({"status": "fail", "message": message}));
    }

    let token_response = token_response.unwrap();
    let google_user = get_google_user(&token_response.access_token, &token_response.id_token).await;
    if google_user.is_err() {
        let message = google_user.err().unwrap().to_string();
        return HttpResponse::BadGateway()
            .json(serde_json::json!({"status": "fail", "message": message}));
    }

    let google_user = google_user.unwrap();

    let mut vec = data.db.lock().unwrap();
    let email = google_user.email.to_lowercase();
    let user = vec.iter_mut().find(|user| user.email == email);

    let user_id: String;

    if user.is_some() {
        let user = user.unwrap();
        user_id = user.id.to_owned().unwrap();
        user.email = email.to_owned();
        user.photo = google_user.picture;
        user.updatedAt = Some(Utc::now());
    } else {
        let datetime = Utc::now();
        let id = Uuid::new_v4();
        user_id = id.to_owned().to_string();
        let user_data = User {
            id: Some(id.to_string()),
            name: google_user.name,
            verified: google_user.verified_email,
            email,
            provider: "Google".to_string(),
            role: "user".to_string(),
            password: "".to_string(),
            photo: google_user.picture,
            createdAt: Some(datetime),
            updatedAt: Some(datetime),
        };

        vec.push(user_data.to_owned());
    }

    let jwt_secret = data.env.jwt_secret.to_owned();
    let now = Utc::now();
    let iat = now.timestamp() as usize;
    let exp = (now + Duration::minutes(data.env.jwt_max_age)).timestamp() as usize;
    let claims: TokenClaims = TokenClaims {
        sub: user_id,
        exp,
        iat,
    };

    let token = encode(
        &Header::default(),
        &claims,
        &EncodingKey::from_secret(jwt_secret.as_ref()),
    )
    .unwrap();

    let cookie = Cookie::build("token", token)
        .path("/")
        .max_age(ActixWebDuration::new(60 * data.env.jwt_max_age, 0))
        .http_only(true)
        .finish();

    let frontend_origin = data.env.client_origin.to_owned();
    let mut response = HttpResponse::Found();
    response.append_header((LOCATION, format!("{}{}", frontend_origin, state)));
    response.cookie(cookie);
    response.finish()
}

#[get("/auth/logout")]
async fn logout_handler(_: AuthenticationGuard) -> impl Responder {
    let cookie = Cookie::build("token", "")
        .path("/")
        .max_age(ActixWebDuration::new(-1, 0))
        .http_only(true)
        .finish();

    HttpResponse::Ok()
        .cookie(cookie)
        .json(serde_json::json!({"status": "success"}))
}

#[get("/users/me")]
async fn get_me_handler(
    auth_guard: AuthenticationGuard,
    data: web::Data<AppState>,
) -> impl Responder {
    let vec = data.db.lock().unwrap();

    let user = vec
        .iter()
        .find(|user| user.id == Some(auth_guard.user_id.to_owned()));

    let json_response = UserResponse {
        status: "success".to_string(),
        data: UserData {
            user: user_to_response(&user.unwrap()),
        },
    };

    HttpResponse::Ok().json(json_response)
}

pub fn user_to_response(user: &User) -> FilteredUser {
    FilteredUser {
        id: user.id.to_owned().unwrap(),
        name: user.name.to_owned(),
        email: user.email.to_owned(),
        verified: user.verified.to_owned(),
        photo: user.photo.to_owned(),
        provider: user.provider.to_owned(),
        role: user.role.to_owned(),
        createdAt: user.createdAt.unwrap(),
        updatedAt: user.updatedAt.unwrap(),
    }
}

pub fn config(conf: &mut web::ServiceConfig) {
    let scope = web::scope("/api")
        .service(health_checker_handler)
        .service(register_user_handler)
        .service(login_user_handler)
        .service(google_oauth_handler)
        .service(logout_handler)
        .service(get_me_handler);

    conf.service(scope);
}
Register the Actix-Web Config and Add CORS
Oops, quite a lot of code. Now let’s configure the Actix-web server with CORS and register the routes using the configure method available on the app instance.
To enable CORS, we will use the actix_cors::Cors middleware, which we will add to the app’s middleware stack by chaining it to the App::new() function. Finally, we’ll use the configure method to register the routes we defined earlier with the app instance.
src/main.rs
mod authenticate_token;
mod config;
mod google_oauth;
mod handler;
mod model;
mod response;

use actix_cors::Cors;
use actix_web::middleware::Logger;
use actix_web::{http::header, web, App, HttpServer};
use dotenv::dotenv;
use model::AppState;

#[actix_web::main]
async fn main() -> std::io::Result<()> {
    if std::env::var_os("RUST_LOG").is_none() {
        std::env::set_var("RUST_LOG", "actix_web=info");
    }
    dotenv().ok();
    env_logger::init();

    let db = AppState::init();
    let app_data = web::Data::new(db);
    let public_dir = std::env::current_dir().unwrap().join("public");

    println!("🚀 Server started successfully");

    HttpServer::new(move || {
        let cors = Cors::default()
            .allowed_origin("http://localhost:3000")
            .allowed_methods(vec!["GET", "POST"])
            .allowed_headers(vec![
                header::CONTENT_TYPE,
                header::AUTHORIZATION,
                header::ACCEPT,
            ])
            .supports_credentials();
        App::new()
            .app_data(app_data.clone())
            .service(actix_files::Files::new("/api/images", &public_dir))
            .configure(handler::config)
            .wrap(cors)
            .wrap(Logger::default())
    })
    .bind(("127.0.0.1", 8000))?
    .run()
    .await
}
And we are done! we have successfully implemented Google OAuth in a Rust application. To start the Actix-Web server, you can use cargo run -r or cargo watch -q -c -w src/ -x run. By using the cargo watch tool, the server will automatically restart whenever necessary files are modified.
Test the Rust Google OAuth Flow
At this point, we are ready to test the Google OAuth flow by integrating the Rust API with a frontend application. Refer to the “Run the Rust OAuth2 API with a React.js App” section for instructions on running the React app.
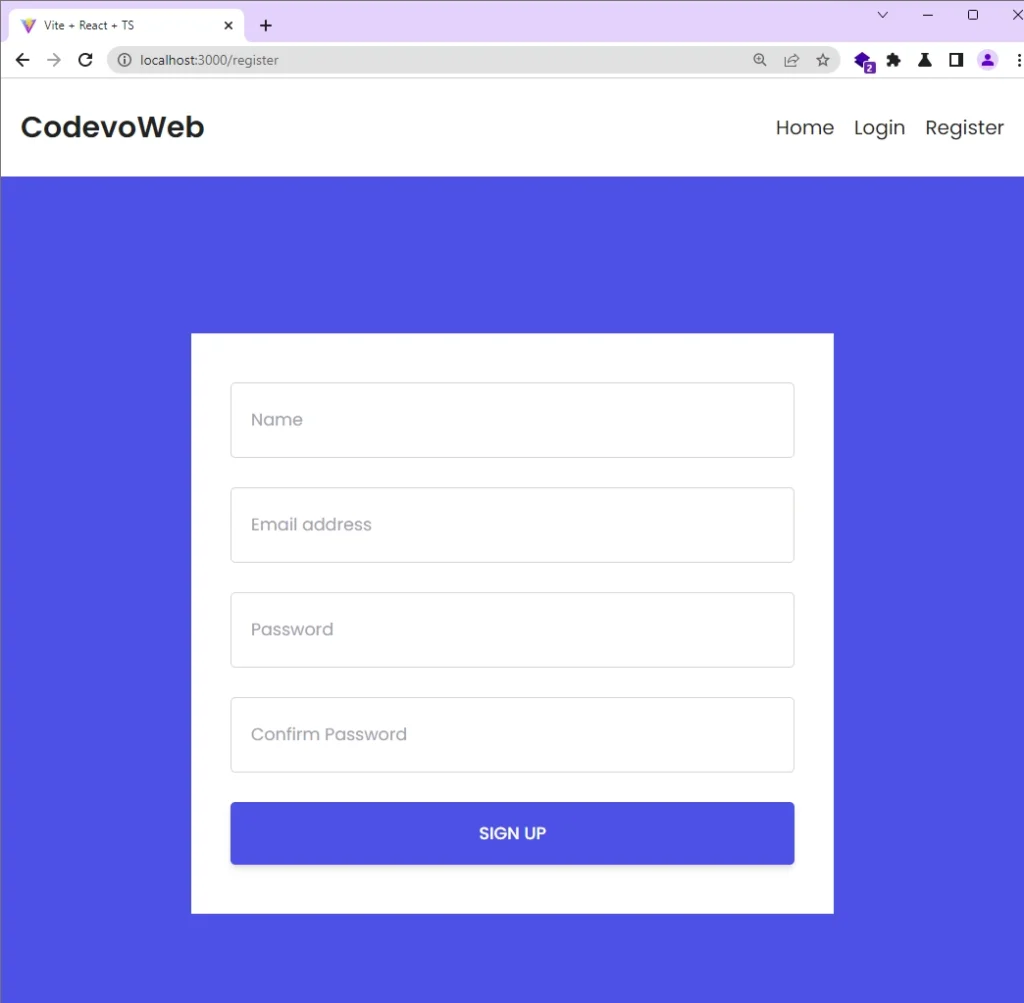
Register User
Before proceeding with any authentication procedure, it’s essential to register for an account. To create a new account, please provide the necessary credentials on the account registration page, and then click the “SIGN UP” button to submit the form data to the Rust API.
{
    "email": "admin@admin.com",
    "name": "Admin",
    "password": "password123",
    "passwordConfirm": "password123"
}
After the Rust API receives the request, it will verify the provided credentials, save the user’s data in the in-memory database, and send back the newly-created user information to the React app. When the React app receives a successful response, it will redirect you to the account login page.
Login User
The account login page presents two choices to sign into the app: using your email and password or selecting the Google OAuth alternative. If you created your account with email and password, please enter those credentials into the form, and then click the “SIGN IN” button to submit the form data to the Rust API.
{
    "email": "admin@admin.com",
    "password": "password123"
}
Once the Rust API receives the request, it will validate the credentials, check the database to see if a user with the provided email exists, generate a JWT token if the user exists, and return the token as an HTTP-only cookie along with the response.
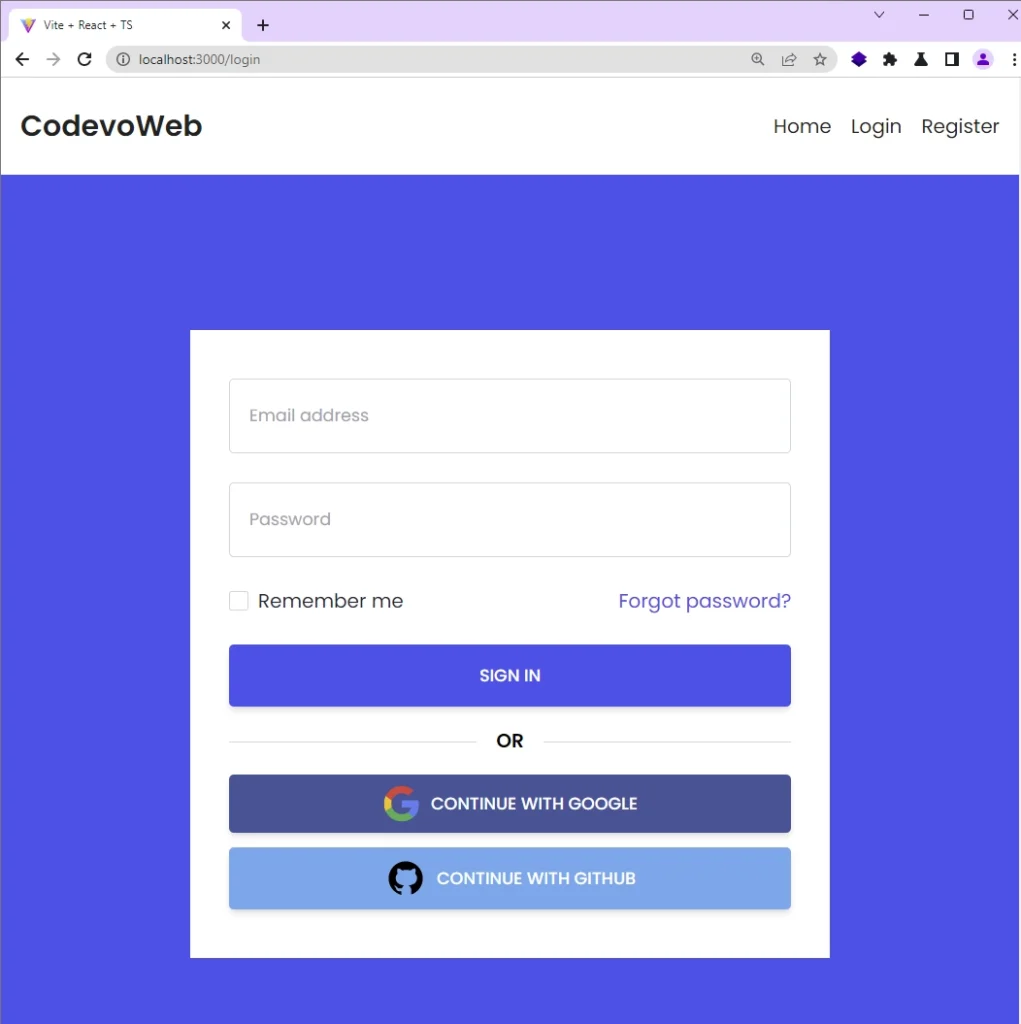
Next, let’s discuss the alternative method, which is to sign in using the Google OAuth option. By clicking the “CONTINUE WITH GOOGLE” button, you will be redirected to the OAuth consent screen.
Authenticate with Google OAuth
When presented with the Google OAuth consent screen, select the Google account that you added as a test user during the application’s registration process. This will allow the React app to obtain the necessary permissions.
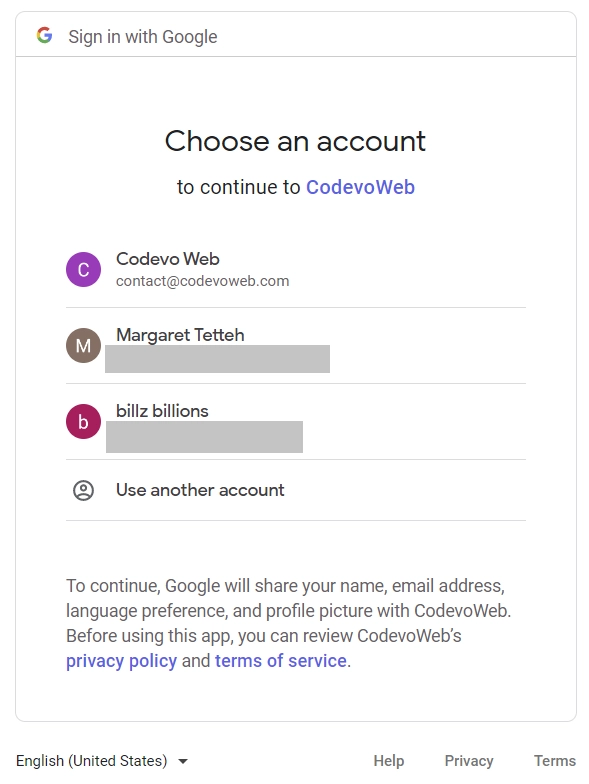
Once you’ve selected the appropriate Google account, the Google OAuth authorization server will validate the OAuth client ID and secret, grant the necessary permissions, and redirect the request to the authorized redirect URI that you specified during the application’s registration process. In this example, the redirect URI directs to an endpoint on the Rust server.
After the Rust API receives the request, it will extract the authorization code appended to the URL by the Google OAuth authorization server and send a GET request to the OAuth token endpoint to obtain an access token.
Following the acquisition of the access token, the Rust API will make another request using the access token to retrieve the user’s Google account information. If the request is successful, the information will be saved in the in-memory database, and a JWT token will be generated and sent back as an HTTP-only cookie in the response.
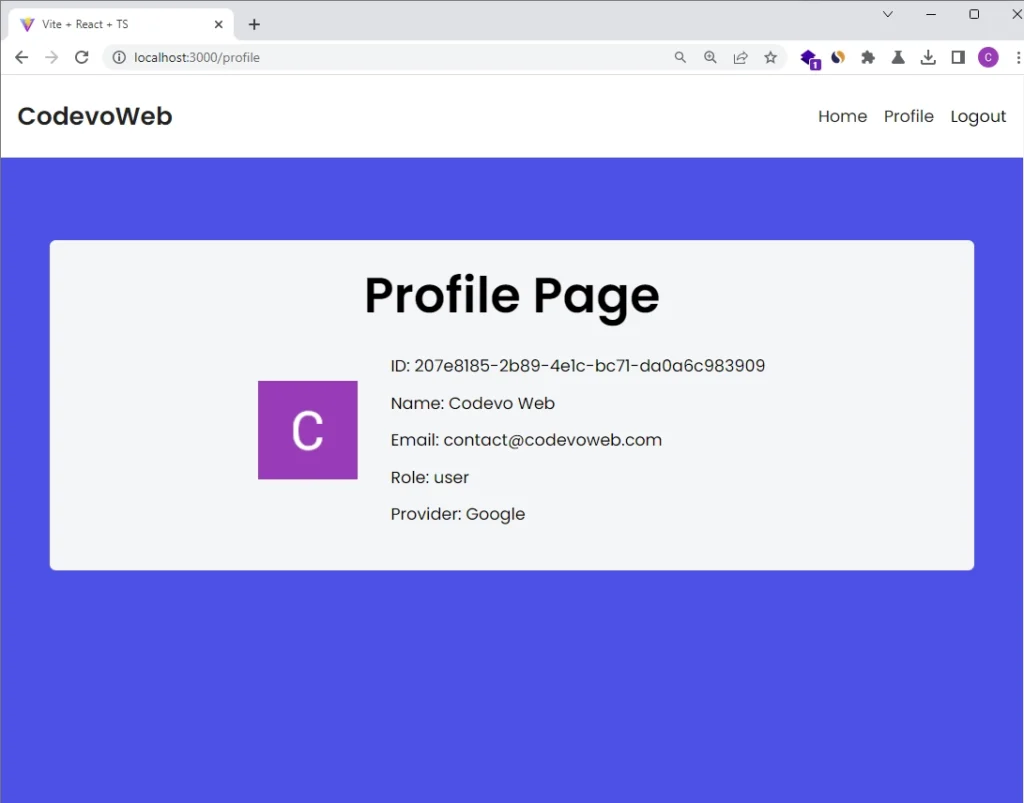
Get Profile Information
After successful authentication, the React app will redirect you to the profile page. Upon mounting the profile page component, a GET request will be sent using the JWT token provided by the Rust API in exchange for the account information. Once the information is obtained, React will re-render the DOM to display it in the UI.
Conclusion
That is it! You can find the complete source code for the Google OAuth implementation in Rust on GitHub.
In this article, you created a Rust API that includes user signup, login, signout functionality, and a JWT middleware to secure private resources, as well as an option to sign in using Google OAuth.