

tRPC is a remote procedure call framework used to build full-stack TypeScript applications with a minimal footprint.
Usually, when we build full-stack applications that leverage TypeScript, sharing types between the API boundaries and web app becomes challenging.
You may already be familiar with GraphQL which solved most of the flaws of REST (REpresentational State Transfer) architecture by providing tools to build type-safe full-stack applications.
While GraphQL was the dominant library for building type-safe applications, it came at a cost in the form of extra complexities.
Some of the flaws of GraphQL include:
- It depends solely on schemas defined on the backend
- You have to install extra dependencies to generate the TypeScript types, mutations, queries, and subscriptions on the client.
- Since GraphQL is a query language, it requires developers to learn the language first before building projects with it.
tRPC on the other hand provides a type-safe way to build APIs with TypeScript and infer the type from the functions defined on the server.
In this article, we’ll build a full-stack Next.js tRPC app to register and sign in a user using React Query, TypeScript, React-Hook-Form, and Zod.
This project will teach you how to make tRPC requests to the tRPC API we built in the previous article to:
- Signup new users
- Sign in the registered user
- Refresh the access token
- Fetch the currently authenticated user’s profile information
- Logout the user
tRPC API Server and Client with Next.js, PostgreSQL, and Prisma Series
- How to Setup tRPC API Server & Client with Next.js and Prisma
- tRPC Server API with Next.js & PostgreSQL: Access & Refresh Tokens
- Full-Stack Next.js tRPC App: User Registration & Login Example
Related articles:
- Build tRPC API with React.js, Node.js & MongoDB: Project Setup
- Build tRPC API with React.js & Node.js: Access and Refresh Tokens
- Full-Stack App tRPC, React.js, & Node.js: JWT Authentication
- Build Full-Stack tRPC CRUD Application with Node.js, and React.js

Prerequisites
Before going further with this article, you should:
- Have basic knowledge of React.js, TypeScript, and Next.js
- Be comfortable with CSS and tailwindCss
Next.js tRPC API Server and Client Overview
These are the tRPC endpoints we will be making the requests to:
| Methods | Endpoints | Descriptions |
|---|---|---|
| POST | api/trpc/auth.login | Login the user |
| POST | api/trpc/auth.register | Register the user |
| POST | api/trpc/auth.logout | Logout the user |
| GET | api/trpc/auth.refresh | Refresh the access token |
| GET | api/trpc/users.me | Fetch the user’s credentials |
| GET | api/trpc/hello | Welcome message |
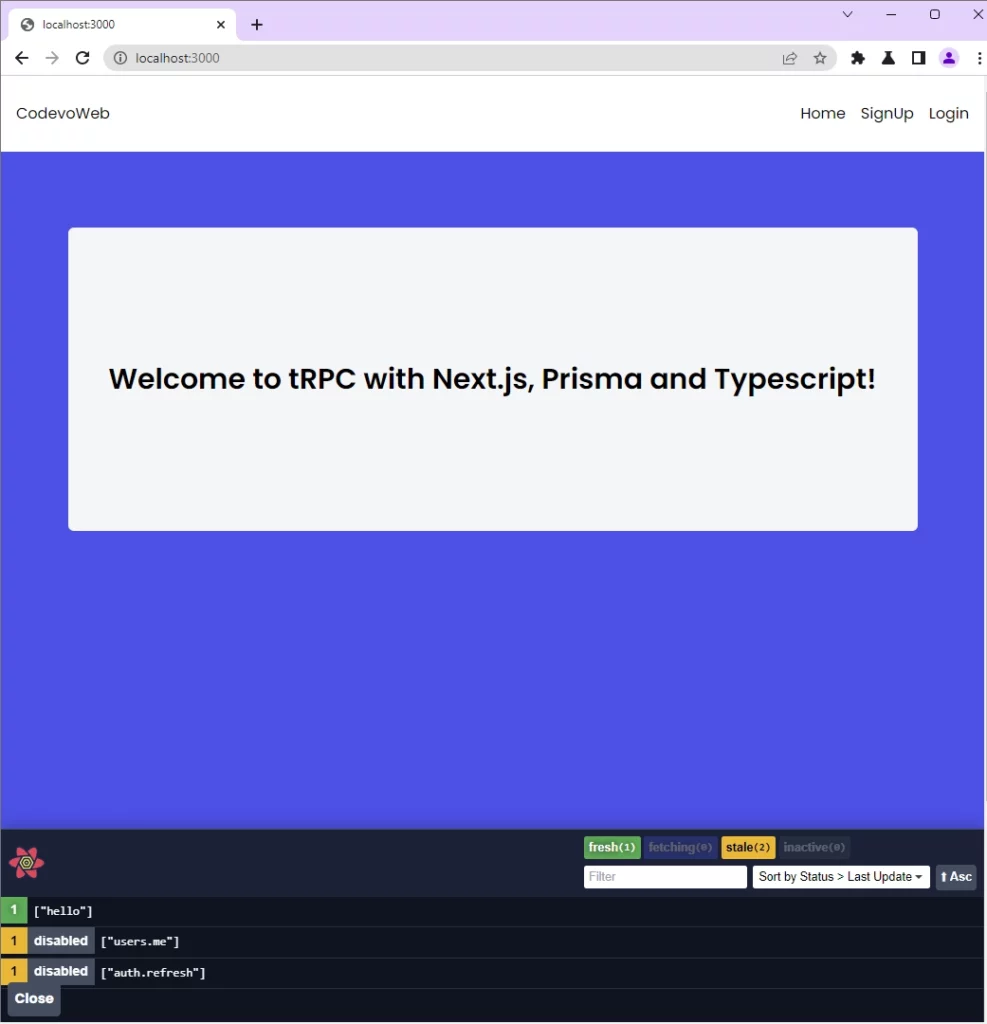
On the homepage, the “hello” tRPC function is evoked to return the message stored in the Redis database.
To create a new account, the user will click on the “SignUp” link on the navigation menu to display the registration page.
The user then provides the necessary credentials and clicks on the “Sign Up” button to evoke the api/trpc/auth.register tRPC procedure function.
The tRPC API server receives the request, validates the credentials, adds the user to the PostgreSQL database, and returns a success message to the tRPC client.
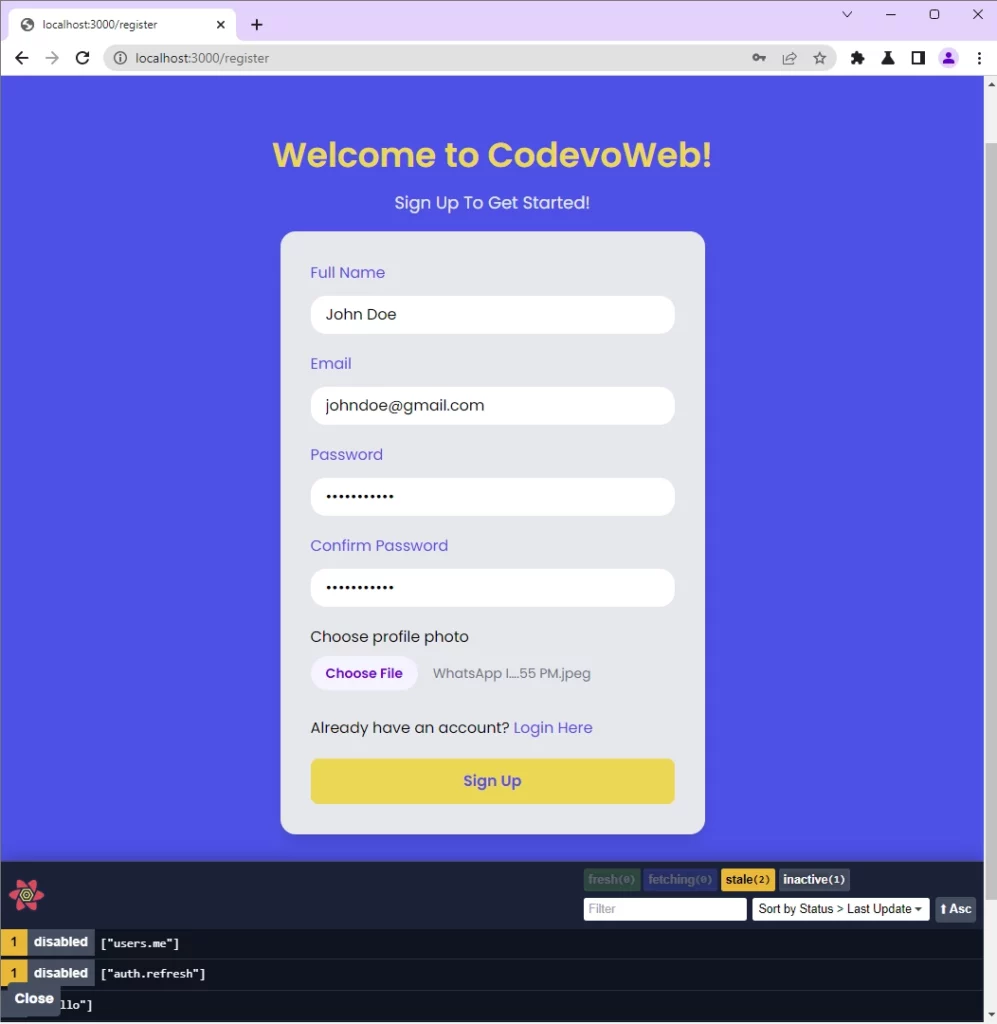
Next.js redirects the user to the login page upon receiving the success message from the server.
Now the user provides the credentials used in registering for the account and evokes the api/trpc/auth.login tRPC procedure function to sign into the account.
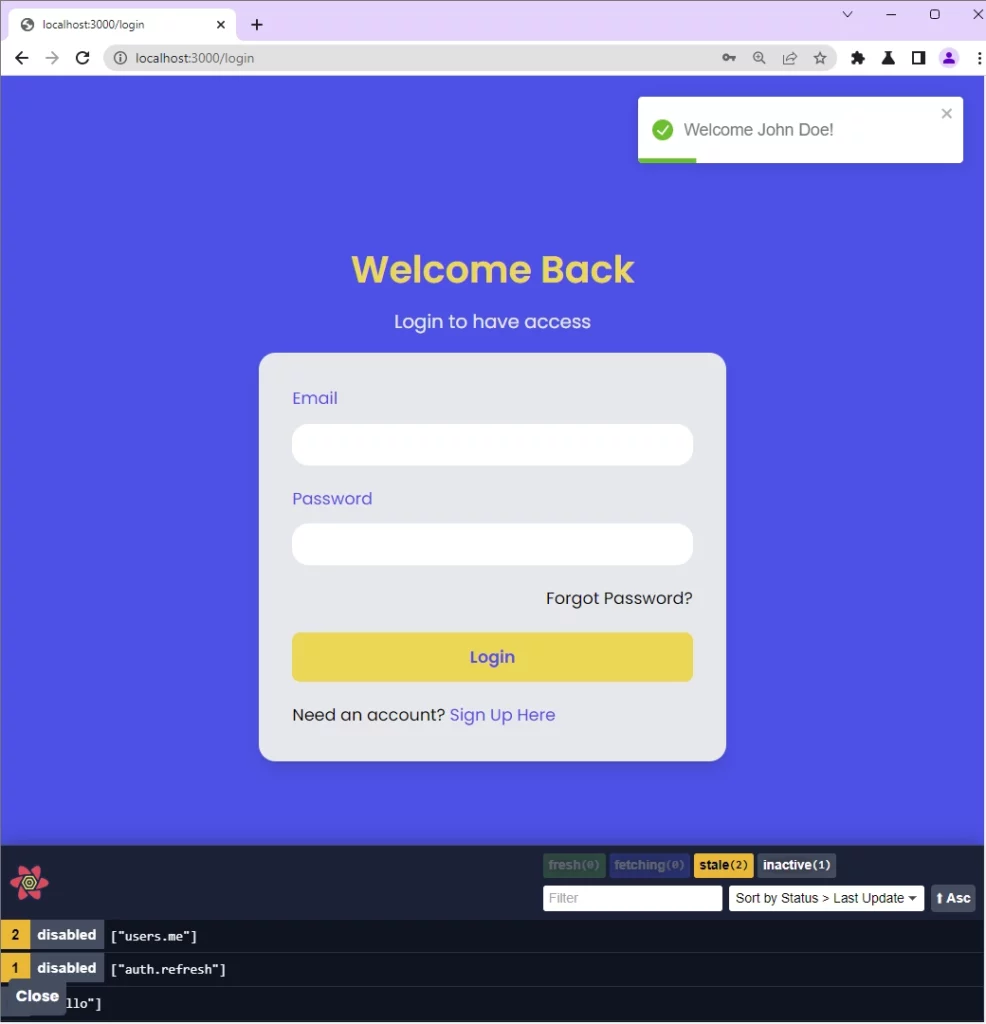
The tRPC server validates the login credentials, creates a session for the user in the Redis database, and returns a success message to the tRPC client.
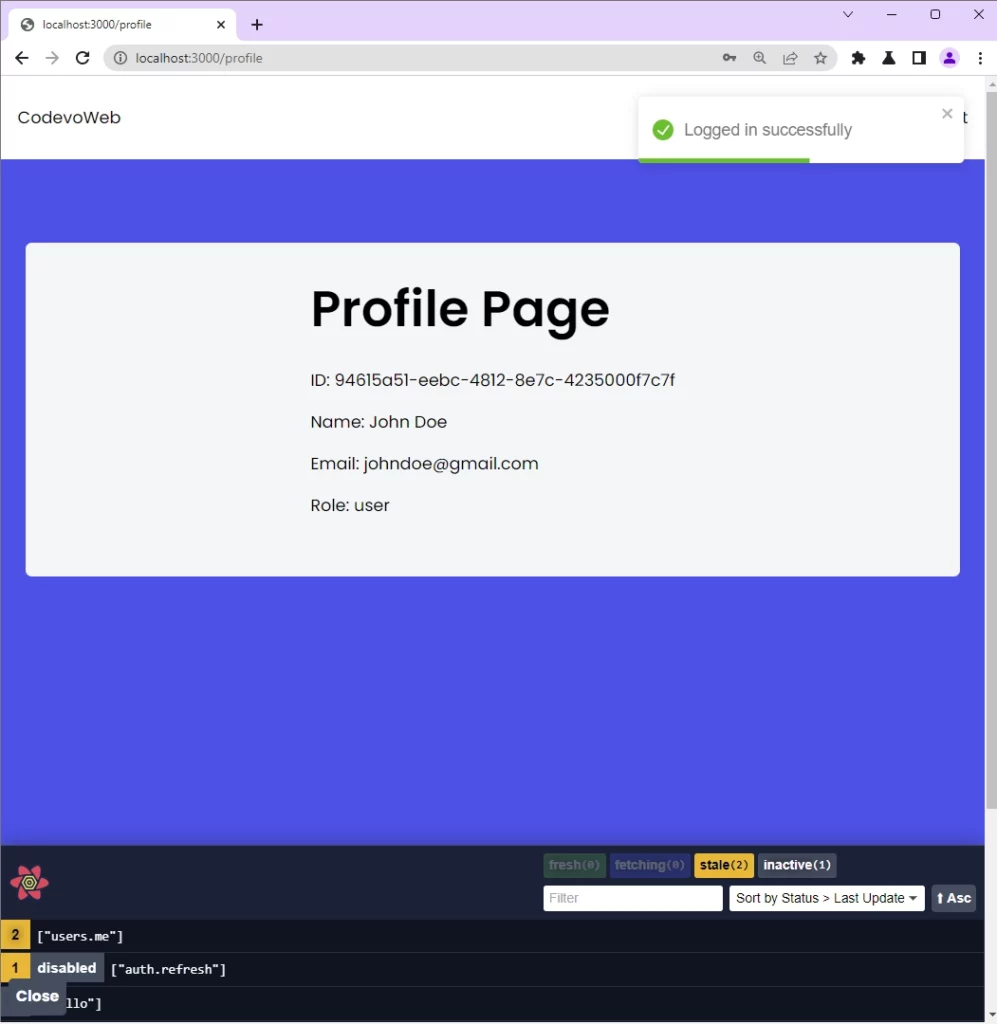
Next.js then redirects the user to the profile page where his profile information is displayed.
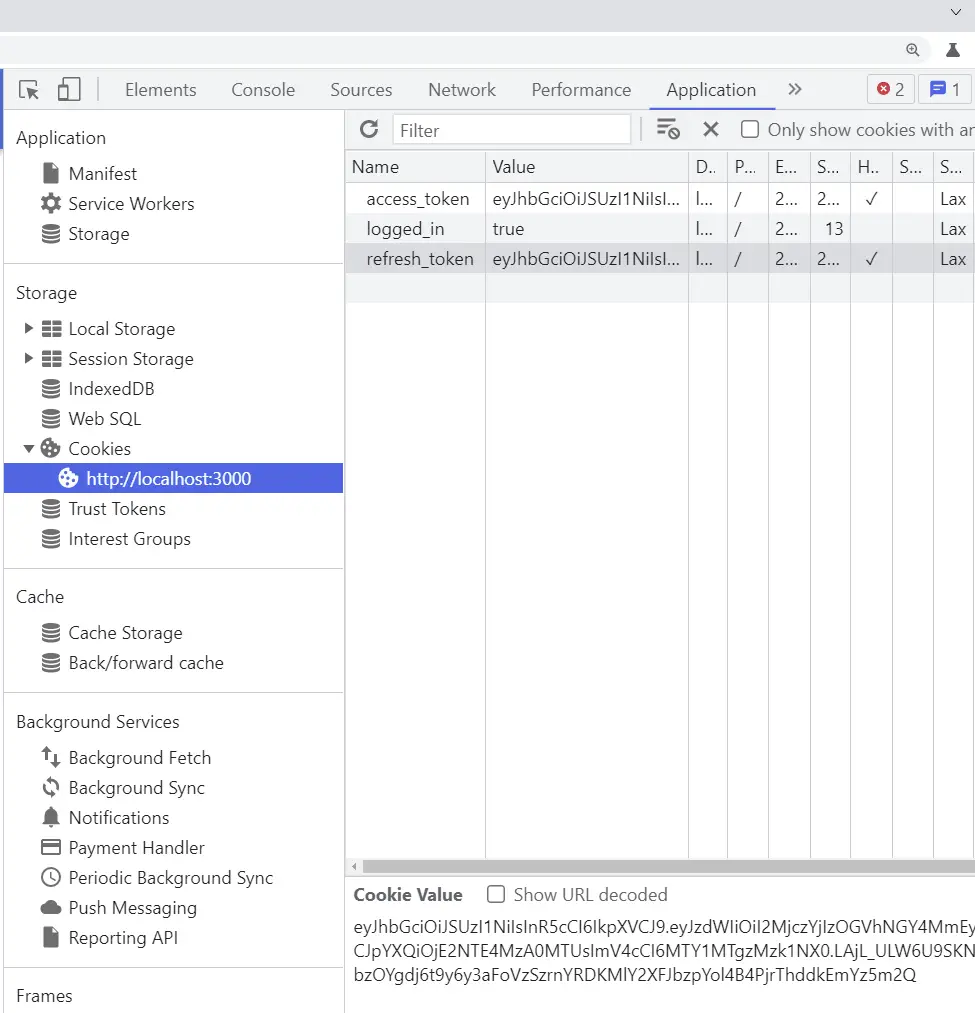
To see the cookies returned by the tRPC server, open the dev tools in your browser and click on the Application tab.
Next, click on the Cookies dropdown and select the Next.js URL from the list.
Step 1 – Setup the Next.js tRPC Server and Client
If you landed on this article from a Google search then you need to catch up by following these articles:
- How to Setup tRPC API Server & Client with Next.js and Prisma
- tRPC Server API with Next.js & PostgreSQL: Access & Refresh Tokens
The Setup tRPC API Server & Client article will help you set up the tRPC API server with Next.js, tailwindCss, React Query, Prisma, and PostgreSQL.
Also, the tRPC Server API with Next.js Access and Refresh Tokens article will help you build the tRPC API to register the user, refresh the access token, sign in the user, and log out the user.
Step 2 – Add the Zustand State Management Library
While Redux is undoubtedly the most popular React state management library, it requires a lot of code to get it up and running in a project. One major downside is that you have to create actions, dispatch functions, and reducers to update a single state.
With all these flaws of Redux, the Zustand library was introduced to eliminate the complexities involved with Redux and make client-side state management a breeze.
Zustand allows you to easily create a global state with few lines of code and inject it into any component in the DOM tree.
Also, Zustand allows you to retrieve data from the state in functions that are not Next.js/React.js components.
To begin, create a src/client/lib/types.ts file and add the following TypeScript type.
src/client/lib/types.ts
export type IUser = {
  _id: string;
  id: string;
  email: string;
  name: string;
  role: string;
  photo: string;
  updatedAt: string;
  createdAt: string;
};
Install the Zustand library with this command:
npm install zustand
# or
yarn add zustand
Now create a src/client/store/index.ts file and add these codes to create the Zustand store.
src/client/store/index.ts
import create from 'zustand';
import { IUser } from '../lib/types';

type Store = {
  authUser: IUser | null;
  uploadingImage: boolean;
  pageLoading: boolean;
  setAuthUser: (user: IUser) => void;
  setUploadingImage: (isUploading: boolean) => void;
  setPageLoading: (isLoading: boolean) => void;
};

const useStore = create<Store>((set) => ({
  authUser: null,
  uploadingImage: false,
  pageLoading: false,
  setAuthUser: (user) => set((state) => ({ ...state, authUser: user })),
  setUploadingImage: (isUploading) =>
    set((state) => ({ ...state, uploadingImage: isUploading })),
  setPageLoading: (isLoading) =>
    set((state) => ({ ...state, pageLoading: isLoading })),
}));

export default useStore;
Step 3 – Create Reusable Next.js Components
In this section, you will create reusable Next.js components and style them with Tailwind CSS. To begin, install the tailwind-merge package that will allow us to merge Tailwind CSS classes efficiently.
yarn add tailwind-merge
# or
npm install tailwind-merge
Create a Loading Spinner Component
Now let’s create a reusable loading Spinner component that will be used in other Next.js components. So, go into the src/client/components folder and create a Spinner.tsx file. After that, open the newly-created Spinner.tsx file and add the code below.
src/client/components/Spinner.tsx
import React from "react";
import { twMerge } from "tailwind-merge";
type SpinnerProps = {
  width?: number;
  height?: number;
  color?: string;
  bgColor?: string;
};
const Spinner: React.FC<SpinnerProps> = ({
  width = 5,
  height = 5,
  color,
  bgColor,
}) => {
  return (
    <svg
      role="status"
      className={twMerge(
        "w-5 h-5 mr-2 text-gray-200 animate-spin dark:text-gray-600 fill-blue-600",
        `${color} ${bgColor}`
      )}
      viewBox="0 0 100 101"
      fill="none"
      xmlns="http://www.w3.org/2000/svg"
    >
      <path
        d="M100 50.5908C100 78.2051 77.6142 100.591 50 100.591C22.3858 100.591 0 78.2051 0 50.5908C0 22.9766 22.3858 0.59082 50 0.59082C77.6142 0.59082 100 22.9766 100 50.5908ZM9.08144 50.5908C9.08144 73.1895 27.4013 91.5094 50 91.5094C72.5987 91.5094 90.9186 73.1895 90.9186 50.5908C90.9186 27.9921 72.5987 9.67226 50 9.67226C27.4013 9.67226 9.08144 27.9921 9.08144 50.5908Z"
        fill="currentColor"
      />
      <path
        d="M93.9676 39.0409C96.393 38.4038 97.8624 35.9116 97.0079 33.5539C95.2932 28.8227 92.871 24.3692 89.8167 20.348C85.8452 15.1192 80.8826 10.7238 75.2124 7.41289C69.5422 4.10194 63.2754 1.94025 56.7698 1.05124C51.7666 0.367541 46.6976 0.446843 41.7345 1.27873C39.2613 1.69328 37.813 4.19778 38.4501 6.62326C39.0873 9.04874 41.5694 10.4717 44.0505 10.1071C47.8511 9.54855 51.7191 9.52689 55.5402 10.0491C60.8642 10.7766 65.9928 12.5457 70.6331 15.2552C75.2735 17.9648 79.3347 21.5619 82.5849 25.841C84.9175 28.9121 86.7997 32.2913 88.1811 35.8758C89.083 38.2158 91.5421 39.6781 93.9676 39.0409Z"
        fill="currentFill"
      />
    </svg>
  );
};

export default Spinner;
Create a Loading Button Component
Here, you’ll create a custom button to make use of the loading Spinner component. The button will display the Spinner component when a request is been processed by the API. Within the src/client/components folder, create a LoadingButton.tsx file and add the following code snippets.
src/client/components/LoadingButton.tsx
import React from 'react';
import Spinner from './Spinner';

type LoadingButtonProps = {
  loading: boolean;
  btnColor?: string;
  textColor?: string;
  children: React.ReactNode;
};

export const LoadingButton: React.FC<LoadingButtonProps> = ({
  textColor = 'text-white',
  btnColor = 'bg-ct-yellow-600',
  children,
  loading = false,
}) => {
  return (
    <button
      type='submit'
      className={`w-full py-3 font-semibold ${btnColor} rounded-lg outline-none border-none flex justify-center ${
        loading ? 'bg-[#ccc]' : ''
      }`}
    >
      {loading ? (
        <div className='flex items-center gap-3'>
          <Spinner />
          <span className='text-slate-500 inline-block'>Loading...</span>
        </div>
      ) : (
        <span className={`${textColor}`}>{children}</span>
      )}
    </button>
  );
};
Create a FullScreen Loader Component
Let’s create a component that will cover the full viewport and display the Spinner component to give visual feedback to the user when a request is being handled by the tRPC API server. So, navigate to the src/client/components directory and create a FullScreenLoader.tsx file. Then, open the FullScreenLoader.tsx file and add the code below.
src/client/components/FullScreenLoader.tsx
import Spinner from './Spinner';

const FullScreenLoader = () => {
  return (
    <div className='w-screen h-screen fixed'>
      <div className='absolute top-64 left-1/2 -translate-x-1/2'>
        <Spinner width={8} height={8} />
      </div>
    </div>
  );
};

export default FullScreenLoader;
Create the tRPC Client Header Component
Here, let’s create a header component to display a list of navigation menus. Also, this component will be responsible for logging the user out of the app. Open your terminal and install the react-toastify library to help us show alert notifications.
yarn add react-toastify
# or
npm install react-toastify
Apart from displaying the navigation menus, this component will make a mutation request to sign out the user from the tRPC app and API. React Query will clear the server cache when the mutation resolves in errors or success. After that, React will reload the browser and redirect the user to the login page.
src/client/components/Header.tsx
import Link from "next/link";
import { useQueryClient } from "@tanstack/react-query";
import { toast } from "react-toastify";
import useStore from "../store";
import { trpc } from "../utils/trpc";
import Spinner from "./Spinner";

const Header = () => {
  const store = useStore();
  const user = store.authUser;

  const queryClient = useQueryClient();
  const { mutate: logoutUser } = trpc.logoutUser.useMutation({
    onSuccess(data) {
      queryClient.clear();
      document.location.href = "/login";
    },
    onError(error) {
      toast(error.message, {
        type: "error",
        position: "top-right",
      });
      queryClient.clear();
      document.location.href = "/login";
    },
  });

  const handleLogout = () => {
    logoutUser();
  };

  return (
    <>
      <header className="bg-white h-20">
        <nav className="h-full flex justify-between container items-center">
          <div>
            <Link href="/" className="text-ct-dark-600 text-2xl font-semibold">
              CodevoWeb
            </Link>
          </div>
          <ul className="flex items-center gap-4">
            <li>
              <Link href="/" className="text-ct-dark-600">
                Home
              </Link>
            </li>
            {!user && (
              <>
                <li>
                  <Link href="/register" className="text-ct-dark-600">
                    SignUp
                  </Link>
                </li>
                <li>
                  <Link href="/login" className="text-ct-dark-600">
                    Login
                  </Link>
                </li>
              </>
            )}
            {user && (
              <>
                <li>
                  <Link href="/profile" className="text-ct-dark-600">
                    Profile
                  </Link>
                </li>
                <li className="cursor-pointer">Create Post</li>
                <li className="cursor-pointer" onClick={handleLogout}>
                  Logout
                </li>
              </>
            )}
          </ul>
        </nav>
      </header>
      <div className="pt-4 pl-2 bg-ct-blue-600 fixed">
        {store.pageLoading && <Spinner color="text-ct-yellow-600" />}
      </div>
    </>
  );
};

export default Header;
When the logout menu is clicked, the handleLogout() function will be evoked which will in turn call the logoutUser() mutation hook. The logoutUser() mutation hook will then evoke the “logoutUser” tRPC procedure on the server and return a success message after the user has been logged out of the API.
Create an InputField Component with React-Hook-Form
Let’s use the power of React-Hook-Form’s useFormContext() hook to create a reusable Input component that we can use in the Login and Registration forms or any other component that needs it. To begin, install react-hook-form , zod and @hookform/resolvers libraries.
yarn add react-hook-form zod @hookform/resolvers
react-hook-form– A library for validating forms in React.js and Next.js applications.zod– A TypeScript-first schema declaration and validation library@hookform/resolvers– A validation resolver for React Hook Form.
src/client/components/FormInput.tsx
import React from 'react';
import { useFormContext } from 'react-hook-form';

type FormInputProps = {
  label: string;
  name: string;
  type?: string;
};

const FormInput: React.FC<FormInputProps> = ({
  label,
  name,
  type = 'text',
}) => {
  const {
    register,
    formState: { errors },
  } = useFormContext();
  return (
    <div className=''>
      <label htmlFor={name} className='block text-ct-blue-600 mb-3'>
        {label}
      </label>
      <input
        type={type}
        placeholder=' '
        className='block w-full rounded-2xl appearance-none focus:outline-none py-2 px-4'
        {...register(name)}
      />
      {errors[name] && (
        <span className='text-red-500 text-xs pt-1 block'>
          {errors[name]?.message as unknown as string}
        </span>
      )}
    </div>
  );
};

export default FormInput;
Create an Image Uploader Component
In this section, you will create an image uploader component to upload images to Cloudinary.
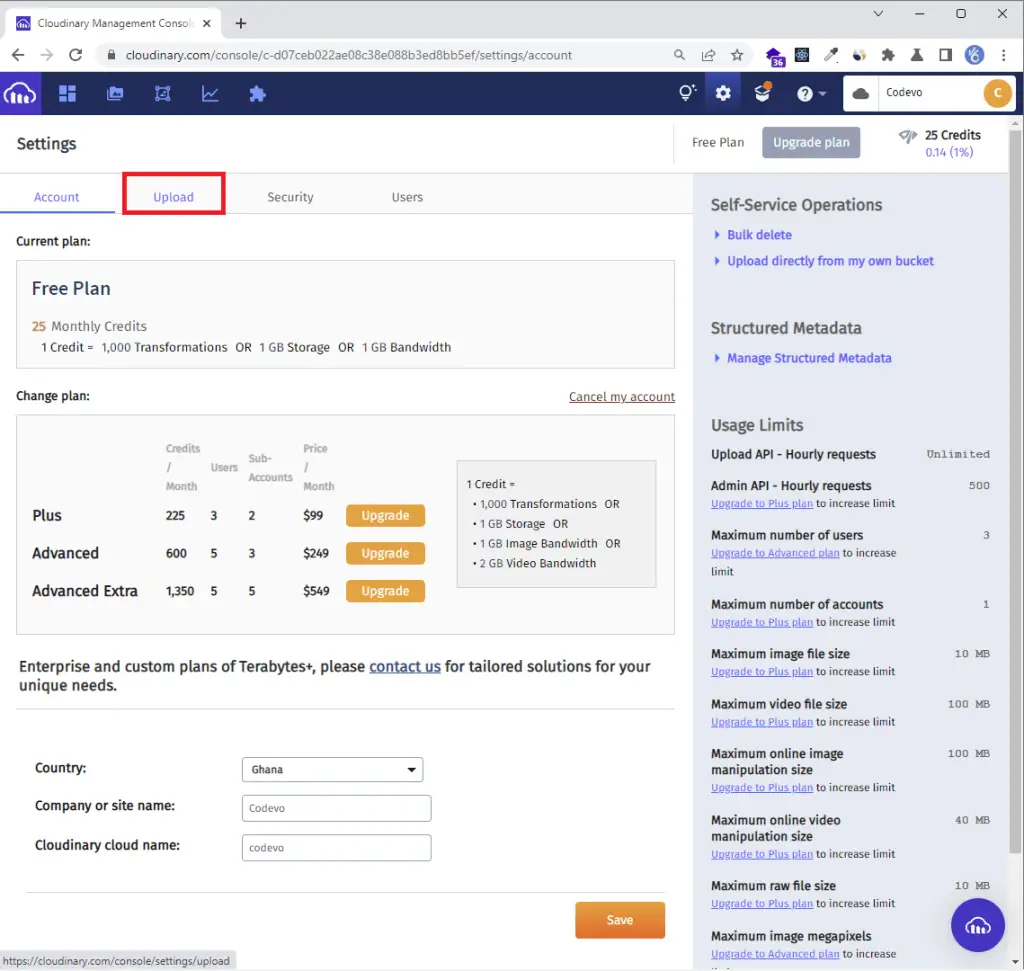
To get started, create a Cloudinary account and follow the steps below to configure the upload preset on your account.
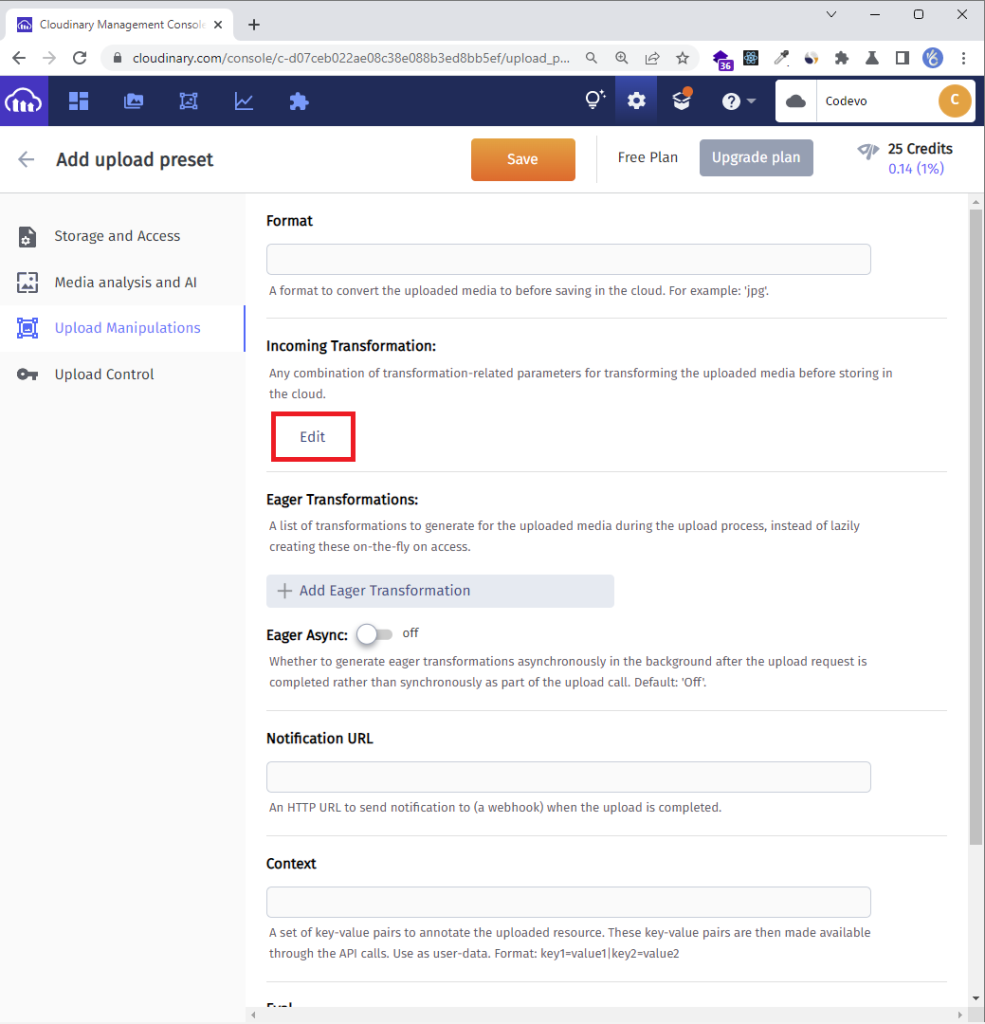
Step 1: Click on the gear icon on the top navigation bar to display the settings page.

Step 2: On the settings page, click the “Upload” tab.
Step 3: Scroll down to the Upload presets area and click the Add upload preset link.
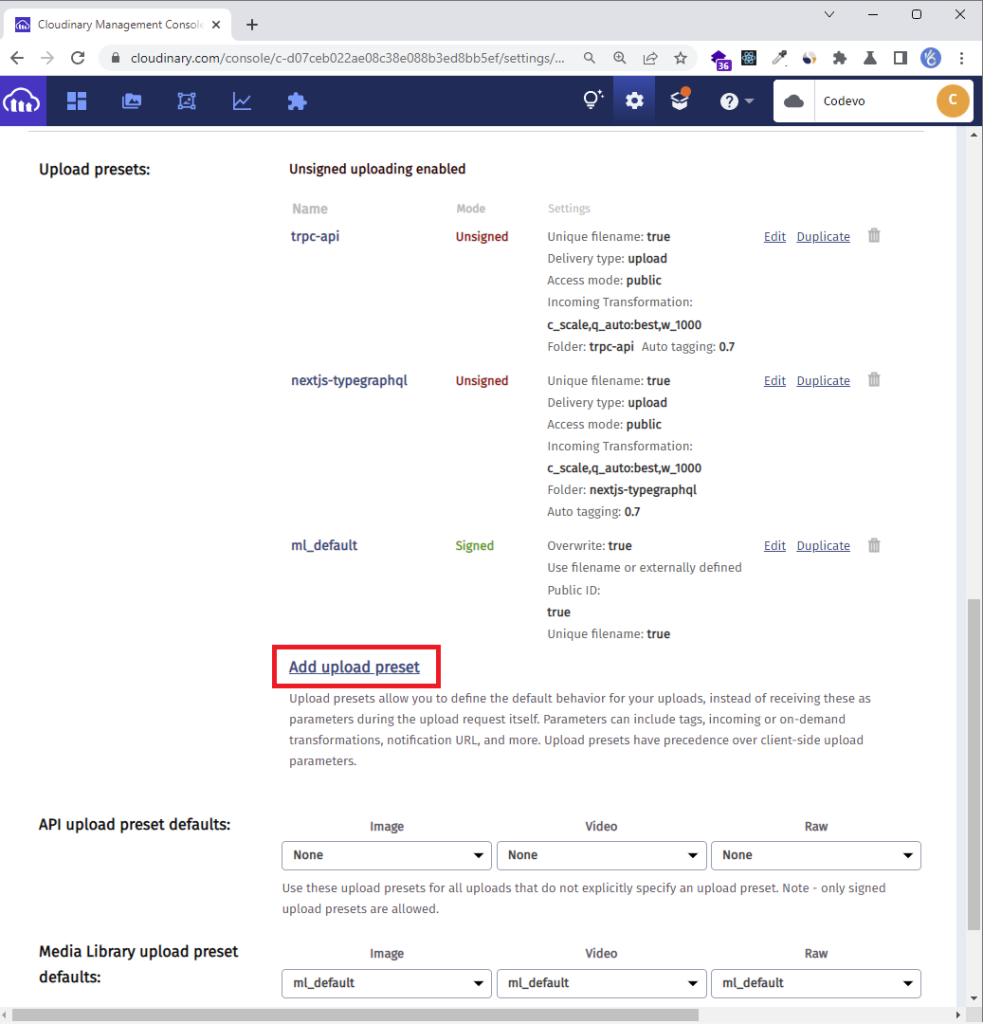
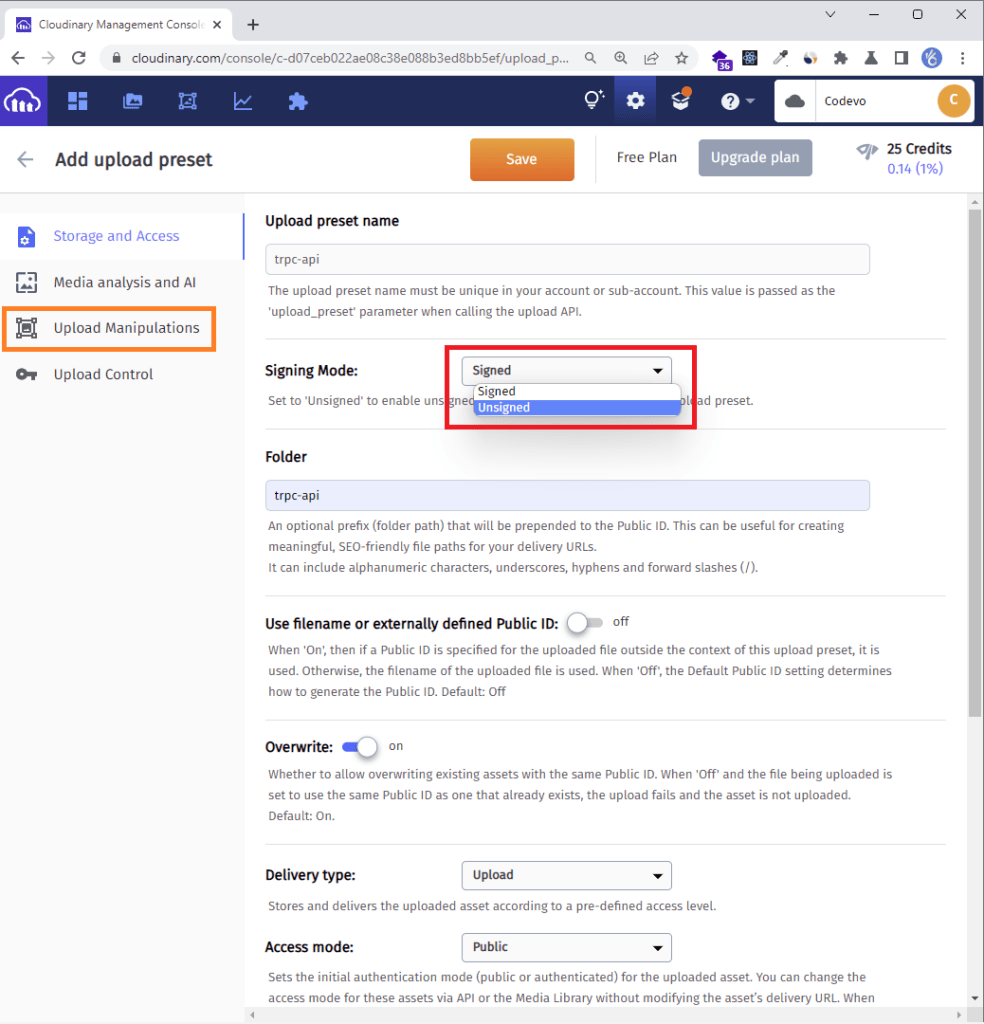
Step 4: Provide the Upload preset name and change the Signing Mode to Unsigned. Using an Unsigned mode will allow us to upload the images using the Upload API.
Now use the preset name as the folder name and click on the Upload Manipulations tab.
Step 5: Click on the Edit link below the Incoming Transformation section to display the Edit Transformation modal.
Step 6: Change the image Width and Height to a reasonable size.
Next, change the image quality type from Manual to Automatic – best quality and click on the ok button.
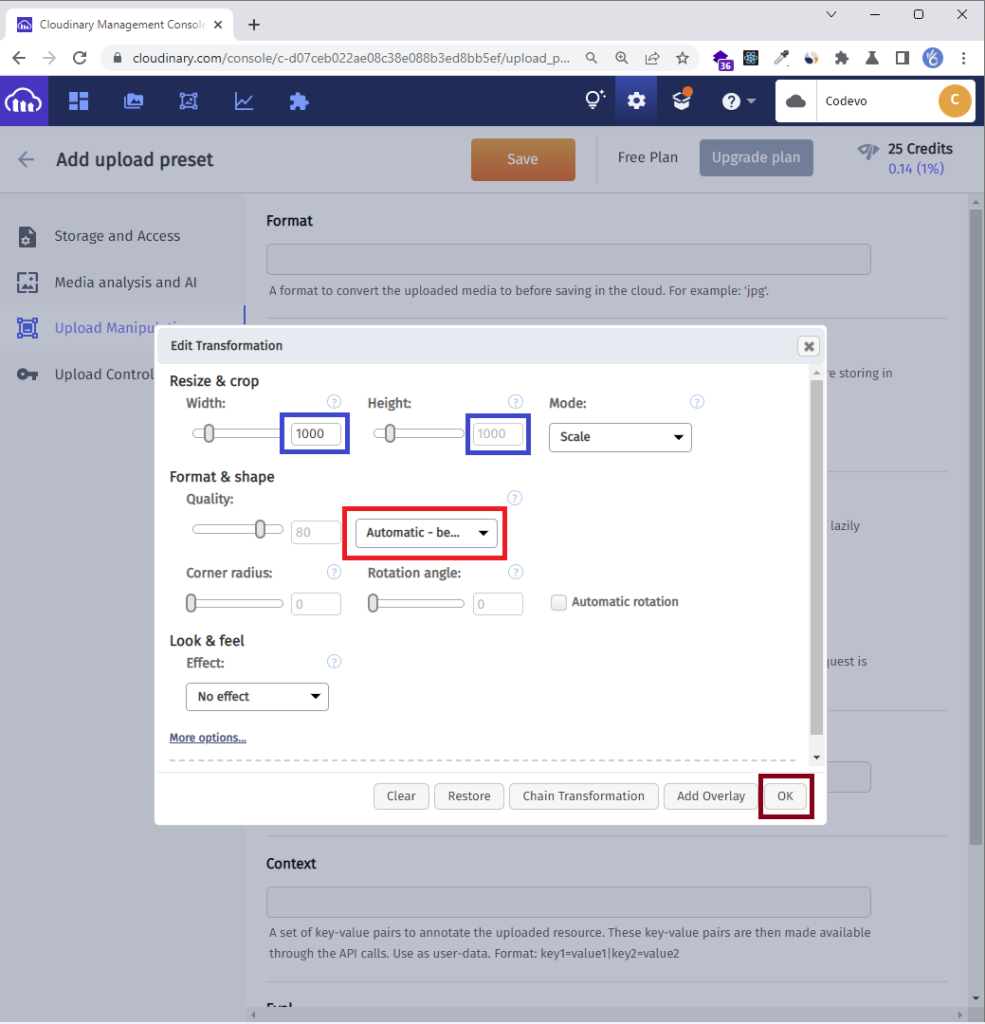
Step 7: Click on the Save button to commit the changes.
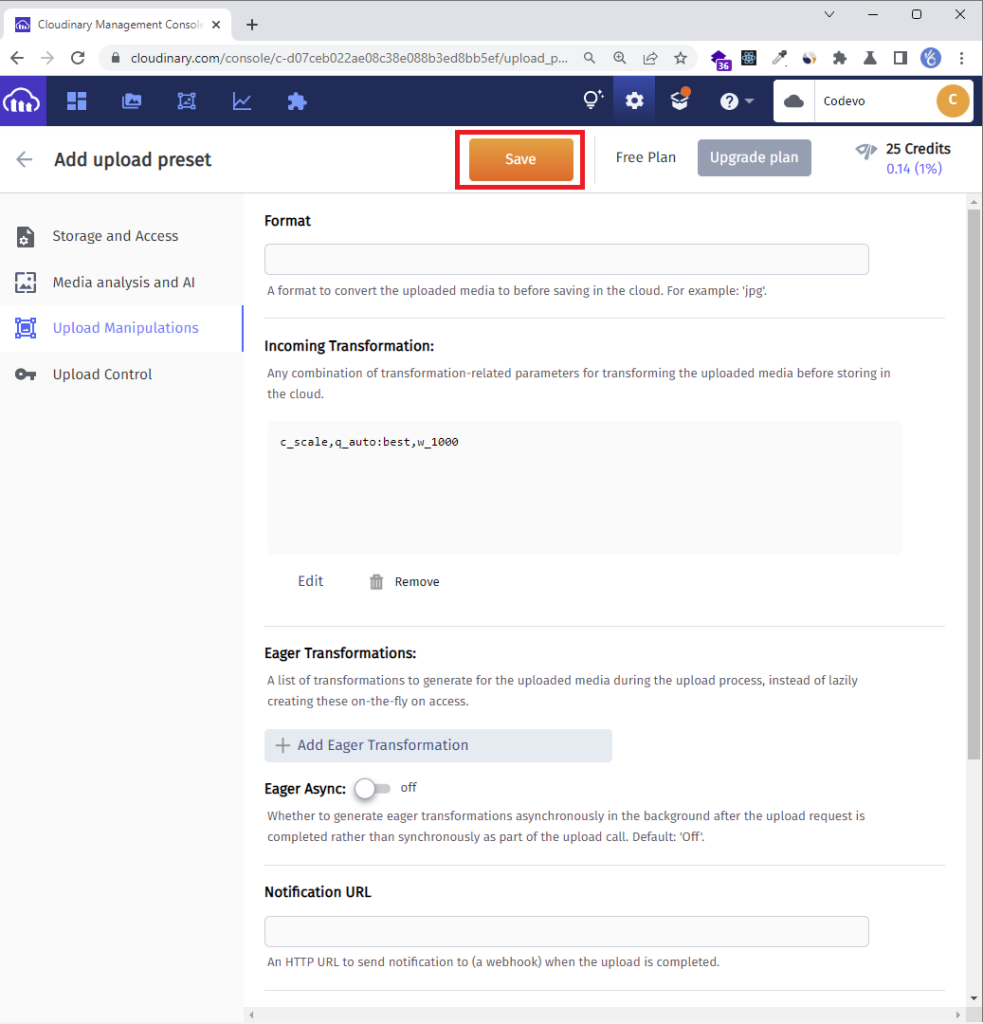
To avoid unsolicited upload of images to your account, you need to keep your upload preset name a secret.
Now create a src/client/components/FileUpload.tsx file and add the following code to upload the images to Cloudinary.
src/client/components/FileUpload.tsx
import React, { useCallback } from 'react';
import { Controller, useController, useFormContext } from 'react-hook-form';
import useStore from '../store';
import Spinner from './Spinner';

const CLOUDINARY_UPLOAD_PRESET = 'nextjs-trpc';
const CLOUDINARY_URL = 'https://api.cloudinary.com/v1_1/Codevo/image/upload';

type FileUpLoaderProps = {
  name: string;
};
const FileUpLoader: React.FC<FileUpLoaderProps> = ({ name }) => {
  const {
    control,
    formState: { errors },
  } = useFormContext();
  const { field } = useController({ name, control });
  const store = useStore();

  const onFileDrop = useCallback(
    async (e: React.SyntheticEvent<EventTarget>) => {
      const target = e.target as HTMLInputElement;
      if (!target.files) return;
      const newFile = Object.values(target.files).map((file: File) => file);
      const formData = new FormData();
      formData.append('file', newFile[0]!);
      formData.append('upload_preset', CLOUDINARY_UPLOAD_PRESET);

      store.setUploadingImage(true);
      const data = await fetch(CLOUDINARY_URL, {
        method: 'POST',
        body: formData,
      })
        .then((res) => {
          store.setUploadingImage(false);

          return res.json();
        })
        .catch((err) => {
          store.setUploadingImage(false);
          console.log(err);
        });

      if (data.secure_url) {
        field.onChange(data.secure_url);
      }
    },

    [field, store]
  );

  return (
    <Controller
      name={name}
      defaultValue=''
      control={control}
      render={({ field: { name, onBlur, ref } }) => (
        <>
          <div className='mb-2 flex justify-between items-center'>
            <div>
              <span className='block mb-2'>Choose profile photo</span>
              <input
                className='block text-sm mb-2 text-slate-500 file:mr-4 file:py-2 file:px-4 file:rounded-full file:border-0 file:text-sm file:font-semibold file:bg-violet-50 file:text-violet-700 hover:file:bg-violet-100'
                type='file'
                name={name}
                onBlur={onBlur}
                ref={ref}
                onChange={onFileDrop}
                multiple={false}
                accept='image/jpg, image/png, image/jpeg'
              />
            </div>
            <div>
              {store.uploadingImage && <Spinner color='text-yellow-400' />}
            </div>
          </div>
          <p
            className={`text-red-500 text-xs italic mb-2 ${
              errors[name] ? 'visible' : 'invisible'
            }`}
          >
            {errors[name] && (errors[name]?.message as unknown as string)}
          </p>
        </>
      )}
    />
  );
};

export default FileUpLoader;
To upload the image to Cloudinary, you need to make a POST request with the formData as the payload.
POST https://api.cloudinary.com/v1_1/:cloud_name/image/uploadYou need to replace the :cloud_name with your Cloudinary cloud name and append the preset name to the formData.
Step 4 – Create the tRPC Client to Register a User
Oops, quite a lot of configurations. Now let’s create a component to register new users. The user registration component will have a form that will contain name, email, photo, password, and password confirm fields. The form validation will be handled by React-Hook-Form and the validation rules will be created with the Zod schema validation library.
When the form is submitted and there are no validation errors, React-Hook-Form will evoke the onSubmitHandler() function which will in turn call the SignUpUser() function to trigger the registerUser mutation hook.
The registerUser mutation hook will then add the form data to the request body and evoke the registerUser tRPC procedure on the API.
src/pages/register.tsx
import type { GetServerSideProps, NextPage } from "next";
import { object, string, TypeOf, z } from "zod";
import { zodResolver } from "@hookform/resolvers/zod";
import { useForm, FormProvider, SubmitHandler } from "react-hook-form";
import { useEffect } from "react";
import FormInput from "../client/components/FormInput";
import Link from "next/link";
import { LoadingButton } from "../client/components/LoadingButton";
import { useRouter } from "next/router";
import { toast } from "react-toastify";
import FileUpLoader from "../client/components/FileUpload";
import { trpc } from "../client/utils/trpc";

const registerSchema = object({
  name: string().min(1, "Full name is required").max(100),
  email: string()
    .min(1, "Email address is required")
    .email("Email Address is invalid"),
  photo: string().min(1, "Photo is required"),
  password: string()
    .min(1, "Password is required")
    .min(8, "Password must be more than 8 characters")
    .max(32, "Password must be less than 32 characters"),
  passwordConfirm: string().min(1, "Please confirm your password"),
}).refine((data) => data.password === data.passwordConfirm, {
  path: ["passwordConfirm"],
  message: "Passwords do not match",
});

export type RegisterInput = TypeOf<typeof registerSchema>;

const RegisterPage: NextPage = () => {
  const router = useRouter();
  const { mutate: SignUpUser, isLoading } = trpc.registerUser.useMutation({
    onSuccess(data) {
      toast(`Welcome ${data.data.user.name}!`, {
        type: "success",
        position: "top-right",
      });
      router.push("/login");
    },
    onError(error) {
      toast(error.message, {
        type: "error",
        position: "top-right",
      });
    },
  });

  const methods = useForm<RegisterInput>({
    resolver: zodResolver(registerSchema),
  });

  const {
    reset,
    handleSubmit,
    formState: { isSubmitSuccessful },
  } = methods;

  useEffect(() => {
    if (isSubmitSuccessful) {
      reset();
    }
    // eslint-disable-next-line react-hooks/exhaustive-deps
  }, [isSubmitSuccessful]);

  const onSubmitHandler: SubmitHandler<RegisterInput> = (values) => {
    // 👇 Execute the Mutation
    SignUpUser(values);
  };
  return (
    <section className="py-8 bg-ct-blue-600 min-h-screen grid place-items-center">
      <div className="w-full">
        <h1 className="text-4xl xl:text-6xl text-center font-[600] text-ct-yellow-600 mb-4">
          Welcome to CodevoWeb!
        </h1>
        <h2 className="text-lg text-center mb-4 text-ct-dark-200">
          Sign Up To Get Started!
        </h2>
        <FormProvider {...methods}>
          <form
            onSubmit={handleSubmit(onSubmitHandler)}
            className="max-w-md w-full mx-auto overflow-hidden shadow-lg bg-ct-dark-200 rounded-2xl p-8 space-y-5"
          >
            <FormInput label="Full Name" name="name" />
            <FormInput label="Email" name="email" type="email" />
            <FormInput label="Password" name="password" type="password" />
            <FormInput
              label="Confirm Password"
              name="passwordConfirm"
              type="password"
            />
            <FileUpLoader name="photo" />
            <span className="block">
              Already have an account?{" "}
              <Link href="/login">
                <a className="text-ct-blue-600">Login Here</a>
              </Link>
            </span>
            <LoadingButton loading={isLoading} textColor="text-ct-blue-600">
              Sign Up
            </LoadingButton>
          </form>
        </FormProvider>
      </div>
    </section>
  );
};

export const getServerSideProps: GetServerSideProps = async () => {
  return {
    props: {
      requireAuth: false,
      enableAuth: false,
    },
  };
};

export default RegisterPage;
On successful mutation, React will redirect the user to the login page. On the login page, the user can log into the app with the credentials used in registering the account. When the mutation resolves in errors, alert notifications will be displayed to show the errors returned by the tRPC API.
Step 5 – Create the tRPC Client to Sign in the User
Now that we’ve implemented the user registration logic, let’s create a component to sign the user into the app. This component will contain a form that has email and password input fields. The validation schema will be defined with the Zod schema validation library and the form validation will be done with React-Hook-Form.
When the form is submitted and is valid, the loginUser() function will be called which will trigger the loginUser mutation hook to submit the form data to the tRPC server.
src/pages/login.tsx
import type { GetServerSideProps, NextPage } from "next";
import { object, string, TypeOf } from "zod";
import { useEffect } from "react";
import { useForm, FormProvider, SubmitHandler } from "react-hook-form";
import { zodResolver } from "@hookform/resolvers/zod";
import FormInput from "../client/components/FormInput";
import { LoadingButton } from "../client/components/LoadingButton";
import Link from "next/link";
import { toast } from "react-toastify";
import { useRouter } from "next/router";
import useStore from "../client/store";
import { IUser } from "../client/lib/types";
import { trpc } from "../client/utils/trpc";

const loginSchema = object({
  email: string()
    .min(1, "Email address is required")
    .email("Email Address is invalid"),
  password: string()
    .min(1, "Password is required")
    .min(8, "Password must be more than 8 characters")
    .max(32, "Password must be less than 32 characters"),
});

export type LoginInput = TypeOf<typeof loginSchema>;

const LoginPage: NextPage = () => {
  const router = useRouter();
  const store = useStore();

  const query = trpc.getMe.useQuery(undefined, {
    enabled: false,
    onSuccess: (data) => {
      store.setAuthUser(data.data.user as unknown as IUser);
    },
  });

  const { isLoading, mutate: loginUser } = trpc.loginUser.useMutation({
    onSuccess(data) {
      toast("Logged in successfully", {
        type: "success",
        position: "top-right",
      });
      query.refetch();
      router.push("/profile");
    },
    onError(error) {
      toast(error.message, {
        type: "error",
        position: "top-right",
      });
    },
  });

  const methods = useForm<LoginInput>({
    resolver: zodResolver(loginSchema),
  });

  const {
    reset,
    handleSubmit,
    formState: { isSubmitSuccessful },
  } = methods;

  useEffect(() => {
    if (isSubmitSuccessful) {
      reset();
    }
    // eslint-disable-next-line react-hooks/exhaustive-deps
  }, [isSubmitSuccessful]);

  const onSubmitHandler: SubmitHandler<LoginInput> = (values) => {
    // 👇 Executing the loginUser Mutation
    loginUser(values);
  };
  return (
    <section className="bg-ct-blue-600 min-h-screen grid place-items-center">
      <div className="w-full">
        <h1 className="text-4xl xl:text-6xl text-center font-[600] text-ct-yellow-600 mb-4">
          Welcome Back
        </h1>
        <h2 className="text-lg text-center mb-4 text-ct-dark-200">
          Login to have access
        </h2>
        <FormProvider {...methods}>
          <form
            onSubmit={handleSubmit(onSubmitHandler)}
            className="max-w-md w-full mx-auto overflow-hidden shadow-lg bg-ct-dark-200 rounded-2xl p-8 space-y-5"
          >
            <FormInput label="Email" name="email" type="email" />
            <FormInput label="Password" name="password" type="password" />

            <div className="text-right">
              <Link href="#" className="">
                Forgot Password?
              </Link>
            </div>
            <LoadingButton loading={isLoading} textColor="text-ct-blue-600">
              Login
            </LoadingButton>
            <span className="block">
              Need an account?{" "}
              <Link href="/register">
                <a className="text-ct-blue-600">Sign Up Here</a>
              </Link>
            </span>
          </form>
        </FormProvider>
      </div>
    </section>
  );
};

export const getServerSideProps: GetServerSideProps = async () => {
  return {
    props: {
      requireAuth: false,
      enableAuth: false,
    },
  };
};

export default LoginPage;
On successful mutation, React Query will trigger the getMe mutation hook to fetch the authenticated user’s credentials. Otherwise, an alert notification will display the error sent by the tRPC API.
Step 6 – Create the tRPC Authentication Guard
To persist user login when the access token expires, let’s create a middleware guard that will automatically refresh the access token. First, the getMe query will evoke the getMe tRPC procedure to retrieve the authenticated user’s profile information. When the tRPC API returns a “must be logged in” error message, the refreshAccessToken query will be triggered to refresh the access token by evoking the refreshAccessToken procedure on the API.
src/client/middleware/AuthMiddleware.tsx
import React from "react";
import { IUser } from "../lib/types";
import useStore from "../store";
import { trpc } from "../utils/trpc";
import { useQueryClient } from "@tanstack/react-query";

type AuthMiddlewareProps = {
  children: React.ReactNode;
  requireAuth?: boolean;
  enableAuth?: boolean;
};

const AuthMiddleware: React.FC<AuthMiddlewareProps> = ({
  children,
  requireAuth,
  enableAuth,
}) => {
  const store = useStore();
  const queryClient = useQueryClient();
  const query = trpc.refreshAccessToken.useQuery(undefined, {
    refetchOnWindowFocus: false,
    refetchOnReconnect: false,
    enabled: false,
    retry: false,
    onError(error: any) {
      store.setPageLoading(false);
      document.location.href = "/login";
    },
    onSuccess(data: any) {
      store.setPageLoading(false);
      queryClient.refetchQueries(["users.me"]);
    },
    trpc: {
      context: {
        skipBatch: true,
      },
    },
  });
  const { isLoading, isFetching } = trpc.getMe.useQuery(undefined, {
    retry: false,
    enabled: enableAuth,
    refetchOnWindowFocus: false,
    refetchOnReconnect: false,
    onSuccess: (data) => {
      store.setPageLoading(false);
      store.setAuthUser(data.data.user as unknown as IUser);
    },
    onError(error) {
      store.setPageLoading(false);
      if (error.message.includes("must be logged in")) {
        query.refetch({ throwOnError: true });
      }
    },
    trpc: {
      context: {
        skipBatch: true,
      },
    },
  });

  return <>{children}</>;
};

export default AuthMiddleware;
If the refresh token included in the request is invalid or has expired, an error response will be returned by the API which will cause React to redirect the user to the login page. That means the user has to sign in again to receive new access and refresh tokens.
Step 7 – Create the Remaining Next.js Pages
At this point, we’ve implemented all the tRPC mutations. Now let’s create two components to evoke the remaining queries.
Home Page
Let’s update the src/pages/index.tsx file to display a simple message when a user visits the root route. When this component mounts, the getHello query will be triggered to evoke the getHello procedure on the tRPC API.
After the getHello query returns the message, React will re-render the DOM to display it in the UI.
src/pages/index.tsx
import type { NextPage } from "next";
import Header from "../client/components/Header";
import { trpc } from "../client/utils/trpc";

export const getServerSideProps = async () => {
  return {
    props: {
      requireAuth: false,
      enableAuth: false,
    },
  };
};

const HomePage: NextPage = () => {
  const { data } = trpc.getHello.useQuery();

  return (
    <>
      <Header />
      <section className="bg-ct-blue-600 min-h-screen pt-20">
        <div className="max-w-4xl mx-auto bg-ct-dark-100 rounded-md h-[20rem] flex justify-center items-center">
          <p className="text-3xl font-semibold">{data?.message}</p>
        </div>
      </section>
    </>
  );
};

export default HomePage;
Profile Page
Here, let’s create a component to display the user’s credentials. This component will only be seen by authenticated users. When React redirects the authenticated user to the profile page, React Query will trigger the getMe query to fetch the currently authenticated user’s credentials.
After the getMe query resolves successfully, React will re-render the DOM to display the user’s profile information in the UI.
src/pages/profile.tsx
import type { GetServerSideProps, NextPage } from "next";
import Header from "../client/components/Header";
import { IUser } from "../client/lib/types";
import useStore from "../client/store";
import { trpc } from "../client/utils/trpc";

const ProfilePage: NextPage = () => {
  const store = useStore();

  const user = store.authUser;
  const query = trpc.getMe.useQuery(undefined, {
    retry: 1,
    onSuccess: (data) => {
      store.setAuthUser(data.data.user as unknown as IUser);
    },
  });

  return (
    <>
      <Header />
      <section className="bg-ct-blue-600 min-h-screen pt-20">
        <div className="max-w-4xl mx-auto bg-ct-dark-100 rounded-md h-[20rem] flex justify-center items-center">
          <div>
            <p className="text-5xl font-semibold">Profile Page</p>
            <div className="mt-8">
              <p className="mb-4">ID: {user?.id}</p>
              <p className="mb-4">Name: {user?.name}</p>
              <p className="mb-4">Email: {user?.email}</p>
              <p className="mb-4">Role: {user?.role}</p>
            </div>
          </div>
        </div>
      </section>
    </>
  );
};

export const getServerSideProps: GetServerSideProps = async ({ req }) => {
  if (!req.cookies.access_token) {
    return {
      redirect: {
        destination: "/login",
        permanent: false,
      },
    };
  }

  return {
    props: {
      requireAuth: true,
      enableAuth: true,
    },
  };
};

export default ProfilePage;
Step 8 – Update the App File
Finally, let’s update the src/pages/_app.tsx file. Open the src/pages/_app.tsx file and replace its content with the following code.
src/pages/_app.tsx
import "../styles/globals.css";
import "react-toastify/dist/ReactToastify.css";
import type { AppProps } from "next/app";
import { ToastContainer } from "react-toastify";
import AuthMiddleware from "../client/middleware/AuthMiddleware";
import { trpc } from "~/client/utils/trpc";
import { ReactQueryDevtools } from "@tanstack/react-query-devtools";

function MyApp({ Component, pageProps }: AppProps) {
  return (
    <AuthMiddleware
      requireAuth={pageProps.requireAuth || false}
      enableAuth={pageProps.enableAuth || false}
    >
      <ToastContainer />
      <Component {...pageProps} />
      <ReactQueryDevtools initialIsOpen={false} />
    </AuthMiddleware>
  );
}

export default trpc.withTRPC(MyApp);
In the above, we wrapped the AuthMiddleware component around the root component so that the refresh token functionality can work.
Conclusion
With this Next.js, React Query, tRPC Client, tailwindCss, Zustand, and React-Hook-Form example in Typescript, you’ve learned how to add access and refresh token functionality to your Next.js tRPC application.
Full-Stack Next.js tRPC App Source Code
Check out the complete source code for:
Mate, this is a great series. I want to ask you some questions though:
1. Can I use the zod schema that is defined in the server in the React form hook validation? 2. And the prisma.User type in the zustand instead of redefining a User?
1. Yes, you can share the Zod schema between the server and client since it’s a Next.js project. However, if you intend to use different validation messages then it will be better to define separate schemas.
2. Yes, you can use the
prisma.Usertype in the Zustand store.What is the point of use of setPageLoading? When should we setPageLoading to be true? Because in the code you provided, there is no use case that setPageLoading(true)
The
setPageLoading()function changes thepageLoadingstate in the Zustand store when a request is made to the tRPC API.In the
Header.tsxfile, we used it to display a Spinner component when a request is being processed by the tRPC API.I have a big problem with deserializeUser.ts when I console.log(access_token) it is undefined.
This happens when I refresh the browser.
Having said that I cannot get protectedProcedure to work propery. It will always throw error TRPCClientError: You must be logged in to access this resource
Is there a solution to this ?
I just cloned the project and tested it in Chrome, Firefox, and Brave but I couldn’t reproduce the problem you are facing. Everything seems to work on my end.
To resolve the “You must be logged in to access this resource” error, disable any Cookie blocker or test the app in a different browser to see if the problem will be resolved.
Hi, It’s me again.
I register the user just fine and get redirected tologin, but I always get “Invalid email or Password”, which is strange because , dev 🙂
I went toauth.controller – loginHandler, the user is found just fine, but
For some reasons, bycrypt.compare given password Vs stored hash is returning FALSE,
Here I tried to console log the stored password when registering, and compared with the result of hashing the given password at login, surprisingly the hashes were different!
I don’t understand what I’m missing because using the same salt used during hashing, same passord (12345678) produces different hash every time.
Can you assist?
Thank you for responding so promptly. I was conducting a test and was unable to replicate the Bcrypt issue.
If you have made any changes to the source code, could you kindly push your project to GitHub and provide me with the repository link so I can further examine where the issue may be originating from?
Thanks for the quick reply! 🙂
my repo is https://github.com/reanzi/shared-trpc.git
though I didn’t use redis, thought to find a work around it, like storing refreshTokens in the db and query later, because setting redis on windos is a bit tedious and I’m not ready for docker; also I use mongodb, atlas.
Currently; I’ve disabled checking password (for testing), so if user is found it’s enough we log the user in; But I face another issue, the user is loggedin even redirected to /profile (though no user details are presented), then suddenly the window refreshes and redirects to login!
Cookies are stored fine, access & refresh and “logged_in” key is true.
Those are the behaviours you’ll find if you clone the repo.
Thanks, Greetings from Tanzania ::)
I have reviewed the project and noticed that the
.envfile, which contains the environment variables, is missing.Can you please include it in the project and make sure to remove the values of any sensitive information such as passwords or API keys from it before pushing the changes to GitHub?
Another option would be to create a separate
example.envfile, copy the content of the missing.envfile into it, and remove the values of any sensitive information such as passwords or API keys.Then, commit and push these changes to GitHub. Please let me know once you have completed this task.
Done! I’ve made the changes, the file is example.env
I have successfully established a connection to the MongoDB database and launched the application.
Currently, I am in the process of writing an article. Later this evening, I will allocate time to thoroughly review the code.
After reviewing the code, I noticed that there seems to be a misunderstanding regarding the
bcrypt.hash()andbcrypt.compare()functions.It’s important to note that every time the
bcrypt.hash()function is used, a new hash will be generated. This is to prevent two users with the same password from having the same hash.As a result, even if the same password string is passed multiple times to the
bcrypt.hash()function, different hashes will be produced. To check if a user exists and their password is correct, you can use the following code:if (
!user ||
!(await bcrypt.compare(input.password.trim(), user.password))
) {
throw new TRPCError({
code: "BAD_REQUEST",
message: "Invalid email or password",
});
}
A more secure method would be to assign a unique salt to each user and store it in their corresponding records. This ensures that even if multiple users have the same password, their hashes will differ.
During the login process, you can use the salt that was previously saved in the user’s record during registration to verify their password authenticity.
I’ve tried to store plain text on db, but for some reasons I only get hashed dbPass ,I can’t figure out where does the system hash the given password.
This is the object I get on console – server
User: {
isMatch: false,
dbPass: ‘$2a$12$b1ORooRwlcm/aW5/yrQmk.HE1pm0wVGtjEAyRY3SkJQaKo3p3koQq’,
userPlain: ‘123456789’,
userHashed: ‘$2a$10$7iIKINzoNEwkyXTzhllmZOQxrDmSX9sD3Ru.BMAUSj4i81567X3QK’
}
//check !user || !isMatch
With the current configuration, Bcrypt will produce different hashes for the same password. It eliminates the risk of multiple users who have registered using the same password from obtaining identical hashes stored in the database.
So how can a user login in;
Even this I’ve been playing it it, used bcrypt insteady of bcryptjs but same trouble; How Can I make compare the passwords then?
Made a progress,
On your repo, auth.controller line 81:
// Get the user from the collection
const user = await findUser({ email: input.email });
it should be await findUniqueUser(), because findUser is usering prisma.user.findFirst() which will always return the first user even if is not correct.
But I’m having another issue, after successfull loging in I get redirected back to login, How is this possible, because I still see cokies in my browser.
Other thing, I’ve tried to console.log({ isLoading, isFetching }) from authMiddleware, isLoading is always true !! how is that?
Thanks again for your help
Thank you for correcting me. I actually intended to use
findUniqueUser()instead offindUser().To troubleshoot the issue more efficiently, use the Network tab in the Developer Tools of your browser to get a better understanding of which requests are failing the authentication process.
Additionally, use a tool like https://jwt.io/ to decode the tokens and ensure the correctness of their payloads.
There are two potential reasons why you are being redirected to the login page: either the
trpc.getMe.useQuery()that retrieves the authenticated user’s information is failing or thetrpc.refreshAccessToken.useQuery()that refreshes the access token is failing.You can temporarily remove the code for the
src/pages/_app.tsxfile. This component is only necessary for refreshing the access token once it has expired, and commenting it out can aid in resolving the issue at hand.Once you have corrected the problem, don’t forget to uncomment the code for
The Error is coming from create-context.ts file,
const isAuthed = t.middleware(({ next, ctx }) => {
if (!ctx?.user) {
throw new TRPCError({
code: “UNAUTHORIZED”,
message: “You must be logged in to access this resource”, // this is the error I see in network tab
});
}
return next();
});
Looks like no user is found in the context,
Where do we put the current user in the Context in your code? Because as you know I had to put user field in when creating a context just to make typescript happy for which I asked if it won’t bring trouble down the road, looks like I’m swimming in it now.
So how do you put the current user in the context
Manually adding the user type to the
createContext()function should not produce any errors. ThedeserializeUser()function is responsible for handling authentication and adding the user information to the context object after all verification steps have been completed successfully.To troubleshoot the issue, review the code in the
src/server/middleware/deserializeUser.tsfile to determine why the user record is not being added to the context. Nonetheless, I just tested the application by adding the user type to the context and I didn’t encounter any errors.Exactly, now where do we use the deserializeUser function, on my end looks like it’s never called. Sorry for the trouble.
Please refer to the source code of the project to review the implementation of the functionality in question.
Sorry, the code for the
createContext()function should be this:export function createContext({
req,
res,
}: {
req: NextApiRequest;
res: NextApiResponse;
}) {
return deserializeUser({ req, res });
}
Thanks mate 🙂
I had to comment out session thing in deserializeUser file because I don’t use redis at a moment. And everything works now.
I real appreciate your guidance throughout. Looking forward to other posts,
Something is tripping me, using multple layouts in nextjs 13 stable version (without app directory) with typescript; like AuthLayout, ProtectedLayout & PublicLayout, as all might have different layouts, currently I can’t wrap my head around the docs
Again, Thanks a lot,,
You are welcome.
I had originally intended to build projects using Next.js 13, however, as it is currently in an unstable state and many libraries are still in the process of updating their code to accommodate the new features in Next.js, I have decided to wait until it is more stable before utilizing it in my projects.
Thanks, one last thing; Currently how can I prevent logged in user to visit login/register pages. Seems if we manually type in url we can access them though we’re logged in !
If you take a closer look at the backend login route function, you’ll find that a cookie named “logged_in” is sent along with the access and refresh tokens. This cookie, which is not restricted to HTTP-only access, can be utilized within the Next.js component to determine if the user is already logged in.
If the user has already logged in and tries to access the login page, you can check if the “logged_in” cookie is available and redirect the user to a protected page like the profile page.
There are other conditions you can check for but using the “logged_in” cookie is an option.
import { useCookies } from "react-cookie";
  const [cookies] = useCookies(["logged_in"]);

  const router = useRouter();

  const logged_in = cookies.logged_in;
  useEffect(() => {

    if (logged_in) {

      router.push("/profile");

    }

  }, []);
Hi,
First of all congrats on the amazing code,
I could follow and understand it well.
I am facing a headache, src/client/store:
import { create } from ‘zustand’;
import { IUser } from ‘../lib/types’;
type Store = {
authUser: IUser | null;
uploadingImage: boolean;
pageLoading: boolean;
setAuthUser: (user: IUser) => void;
setUploadingImage: (isUploading: boolean) => void;
setPageLoading: (isLoading: boolean) => void;
};
const useStore = create((set) => ({
authUser: null,
uploadingImage: false,
pageLoading: false,
setAuthUser: (user) => set((state) => ({ …state, authUser: user })),
setUploadingImage: (isUploading) =>
set((state) => ({ …state, uploadingImage: isUploading })),
setPageLoading: (isLoading) =>
set((state) => ({ …state, pageLoading: isLoading })),
}));
export default useStore;
the authUser is still null, and Profile page doesnt get the values (user also is null or empty object)
Any help is appreciated 🙂
Could you please check the Network tab in your browser’s developer tools to identify the failing requests? Additionally, kindly ensure that your browser is not blocking cookies as the tRPC server relies on cookies to function optimally.
Thank you for the quick response! I could fix it, I actually miss one step (I check back the steps and I was missing one)
Thank you very much it is working fine!
Hello Do you have article on how to test your trpc with jest ?
No