
Golang is a popular and modern language of cloud computing and while it’s a no-brainer that Golang has impressive features that support the needs of microservice architecture, large-scale enterprise applications, and distributed systems.
Nevertheless, Golang was built with web development in mind and has sophisticated web packages that are part of its core library to help developers build high performant web applications.
The Golang community is rapidly growing and many developers are already using Golang for full-stack development and mastering new modules and frameworks that make Golang a strong language for web development.
As of Golang 1.15 release, the core library has been updated with improvements to encoding/json, net/http, database/sql, and database/sql/driver.
This article will guide you on how you can set up a Golang project with the GORM library and PostgreSQL to build CRUD RESTful API to perform the basic Create/Get/Update/Delete operations.
Golang GORM RESTful API with Gin Gonic and PostgreSQL Series:
- How to Setup Golang GORM RESTful API Project with Postgres
- API with Golang + GORM + PostgreSQL: Access & Refresh Tokens
- Golang and GORM – User Registration and Email Verification
- Forgot/Reset Passwords in Golang with HTML Email
- Build a RESTful CRUD API with Golang
Related articles:
- API with Golang, PostgreSQL, SQLC & Gin Gonic: Project Setup
- Build Golang & PostgreSQL API: JWT Access and Refresh Tokens
- Golang & MongoDB: JWT Authentication and Authorization
- API with Golang + MongoDB: Send HTML Emails with Gomail
- API with Golang, Gin Gonic & MongoDB: Forget/Reset Password
- Build Golang gRPC Server and Client: SignUp User & Verify Email
- Build Golang gRPC Server and Client: Access & Refresh Tokens

Prerequisites
Before going further with this tutorial, you will need:
- A development environment running Golang. Click here to download the latest version of Go.
- Familiarity with Golang, SQL, and PostgreSQL queries will be highly beneficial.
- Have PostgreSQL installed. This is optional since we will be using Docker to run the Postgres server.
- Have Docker installed on your machine.
- VSCode as the IDE for Developing Go. I recommend VS Code because it has tools, extensions, and an integrated terminal to make your development process a breeze.
What is an ORM?
Object-Relational Mapping (ORM) is a technique that enables developers to use their native programming paradigm to query and manipulate data from a database.
In layman’s terms, an ORM provides a data mapper pattern to transform data defined in classes or objects to SQL. ORMs also come with CRUD functions already implemented making it easier for developers to perform CRUD operations against the database.
Luckily for us, the Golang community has built a number of developer-friendly Object Relational Mapping libraries to allow Golang developers to use JSON key:value pair syntax and encoding to map directly to any SQL database like SQLite, MySQL, PostgreSQL, and many more.
Step 1 – Setup the Golang Project
In this step, you will initialize a new Golang project, create a PostgreSQL Docker server, and validate the environment variables with the Golang Viper package.
Initialize the Golang Project
To begin, go into your Go environment folder and create a new project folder. In this example, you can use golang-gorm-postgresql . Once the folder is created, navigate to the newly created folder and open it with VS Code using the commands below:
1. mkdir golang-gorm-postgresql
2. cd golang-gorm-postgresql
3. code .
Running the code . command will open the project in VS Code. Now open the integrated terminal in VS Code and run the following command to initialize a new Go module to manage our project’s dependencies.
go mod init github.com/YOUR_GITHUB_USERNAME/golang-gorm-postgres
Create a PostgreSQL Docker Container
As part of the prerequisites, you should have Docker installed on your system, which includes Docker Compose by default.
Now create a docker-compose.yml file in the newly-created project to help us manage an instance of PostgreSQL on our machine.
docker-compose.yml
services:
  postgres:
    image: postgres
    container_name: postgres
    ports:
      - 6500:5432
    env_file:
      - ./app.env
    volumes:
      - postgres:/var/lib/postgresql/data
volumes:
  postgres:
In the above, we mapped our local port 6500 to the Postgres default port 5432 inside the container. Mapping the ports will allow us to connect and access our running PostgreSQL server outside the container.
Also, we created a named volume to prevent data loss when deleting the Postgres container.
Now let’s create an app.env file to contain the credentials required by the Postgres image to configure the PostgreSQL server.
app.env
POSTGRES_HOST=127.0.0.1
POSTGRES_USER=postgres
POSTGRES_PASSWORD=password123
POSTGRES_DB=golang-gorm
POSTGRES_PORT=6500

PORT=8000
CLIENT_ORIGIN=http://localhost:3000
To avoid accidental pushing of the environment variables to GitHub, create a .gitignore file and add the following code.
.gitignore
# Binaries for programs and plugins
*.exe
*.exe~
*.dll
*.so
*.dylib

# Test binary, built with `go test -c`
*.test

# Output of the go coverage tool, specifically when used with LiteIDE
*.out

# Dependency directories (remove the comment below to include it)
# vendor/
.DS_Store
TODO.md
logs.txt
.idea/
secret.md
app.env
Now start the Postgres Docker container in detached mode with this command:
docker-compose up -d
And stop the running Postgres Docker container with this command:
docker-compose down
Load and Validate the Environment Variables
Next, install the viper package to load the environment variables we added to the app.env file.
go get github.com/spf13/viper
Create a initializers/loadEnv.go file and add the following configurations:
initializers/loadEnv.go
package initializers

import (
	"github.com/spf13/viper"
)

type Config struct {
	DBHost         string `mapstructure:"POSTGRES_HOST"`
	DBUserName     string `mapstructure:"POSTGRES_USER"`
	DBUserPassword string `mapstructure:"POSTGRES_PASSWORD"`
	DBName         string `mapstructure:"POSTGRES_DB"`
	DBPort         string `mapstructure:"POSTGRES_PORT"`
	ServerPort     string `mapstructure:"PORT"`

	ClientOrigin string `mapstructure:"CLIENT_ORIGIN"`
}

func LoadConfig(path string) (config Config, err error) {
	viper.AddConfigPath(path)
	viper.SetConfigType("env")
	viper.SetConfigName("app")

	viper.AutomaticEnv()

	err = viper.ReadInConfig()
	if err != nil {
		return
	}

	err = viper.Unmarshal(&config)
	return
}
Let’s evaluate the above code. We defined a struct to contain the allowed environment variables.
Then, we created LoadConfig() function to load the environment variables from the app.env file and make them accessible in other files and packages within the application code.
Create a Utility Function to Connect to PostgreSQL
Here, let’s create a helper function to connect the Golang application to the running PostgreSQL server.
To do that, we will need the GORM package and the Postgres driver recommended by GORM. Run this command to install the GORM library and the Postgres driver.
go get -u gorm.io/gorm
go get gorm.io/driver/postgres
You can easily adapt the code in this tutorial to work with any GORM-supported database like:
- PostgreSQL
- MySQL
- SQLite
- SQL Server
Now create a initializers/connectDB.go file and add the following code to connect the app to the Postgres server.
initializers/connectDB.go
package initializers

import (
	"fmt"
	"log"

	"gorm.io/driver/postgres"
	"gorm.io/gorm"
)

var DB *gorm.DB

func ConnectDB(config *Config) {
	var err error
	dsn := fmt.Sprintf("host=%s user=%s password=%s dbname=%s port=%s sslmode=disable TimeZone=Asia/Shanghai", config.DBHost, config.DBUserName, config.DBUserPassword, config.DBName, config.DBPort)

	DB, err = gorm.Open(postgres.Open(dsn), &gorm.Config{})
	if err != nil {
		log.Fatal("Failed to connect to the Database")
	}
	fmt.Println("? Connected Successfully to the Database")
}
The ConnectDB() function will be evoked in the init() function to create a new connection pool with the Postgres database.
Then, the connection object will be stored in the *gorm.DB struct, which we can use to perform the CRUD operations on the Postgres database.
Step 2 – Data Modeling and Migration with GORM
In this section, you will learn how to build a database model with GORM, install the UUID OSSP plugin and run a migration to push the schema to the PostgreSQL database.
Database migration simply refers to the techniques used by developers to track incremental, and reversible changes in database schemas. You can relate it to Git version control, which allows developers to track changes in a file or source code.
Creating the Database Model with GORM
Now let’s build the database model. A model is a class or struct containing the attributes that represent columns in the database table.
In GORM, we create Go structs that will be transformed into SQL tables. Create a models/user.model.go with the following Golang struct.
models/user.model.go
package models

import (
	"time"

	"github.com/google/uuid"
)

type User struct {
	ID uuid.UUID `gorm:"type:uuid;default:uuid_generate_v4();primary_key"`
	// ID     uint   `gorm:"primary_key"`
	Name      string `gorm:"type:varchar(255);not null"`
	Email     string `gorm:"uniqueIndex;not null"`
	CreatedAt time.Time
	UpdatedAt time.Time
}
Quite a lot happening in the above, let’s break it down:
- We created a
Userstruct to represent the SQL table in the Postgres database. - We used UUID (Universally Unique Identifier) as the default value for the ID column. Feel free to use incremental numbers if that’s the requirement of your project.
- Then, we specified tags with backtick annotation on the fields that need modification.
- Lastly, we added a unique constraint on the Email column to ensure that no two users end up with the same email addresses.
Install the UUID OSSP Module for PostgreSQL
By default, PostgreSQL natively supports the UUID (Universally Unique Identifier) data type but since we are using the uuid_generate_v4() function as a default value on the ID column, we need to manually install the UUID OSSP plugin for it to work.
The uuid_generate_v4() function will be evoked to generate a UUID value for each record we insert into the database. Most PostgreSQL distributions include the UUID OSSP Module by default but do not activate it.
To install the plugin, we need to run the CREATE EXTENSION command in the Postgres shell.
Now access the bash shell of the running Postgres container with this command docker exec -it <container name> bash
docker exec -it postgres bash
Follow these steps to install the UUID OSSP Module:
Step 1: Enter the Postgres shell with this command psql -U admin <database name>:
psql -U admin golang-gormStep 2: List all the available extensions
select * from pg_available_extensions;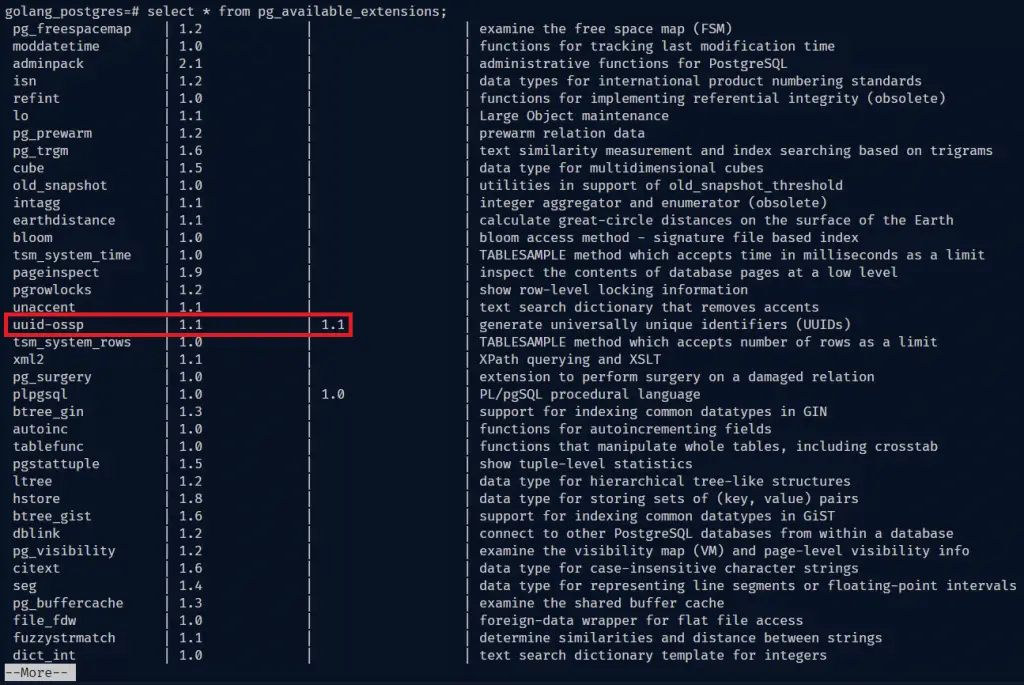
After listing the extensions, you will notice the uuid-ossp plugin is available but not installed.
Step 3: Install the uuid-ossp extension
CREATE EXTENSION IF NOT EXISTS "uuid-ossp";Step 4: Exit the Postgres shell with \q .
Step 5: Exit the Postgres Docker container bash shell with exit .
Migrating the Schema with GORM
GORM has a feature to automatically migrate your schema to the database and keep the schema up to date.
The AutoMigrate function will create tables, missing foreign keys, constraints, columns, and indexes. Also, it will update the existing column’s type if its size, precision, and nullable were changed.
Now, create a migrate/migrate.go file and add the following code:
migrate/migrate.go
package main

import (
	"fmt"
	"log"

	"github.com/wpcodevo/golang-gorm-postgres/initializers"
	"github.com/wpcodevo/golang-gorm-postgres/models"
)

func init() {
	config, err := initializers.LoadConfig(".")
	if err != nil {
		log.Fatal("? Could not load environment variables", err)
	}

	initializers.ConnectDB(&config)
}

func main() {
	initializers.DB.AutoMigrate(&models.User{})
	fmt.Println("? Migration complete")
}
In the above, we loaded the environment variables and created a connection pool to the Postgres database in the init() function.
Then, we evoked the AutoMigrate() function provided by GORM to create the database migration and push the changes to the database.
Now open the integrated terminal in VS Code and run this command to migrate the schema to the database.
go run migrate/migrate.go
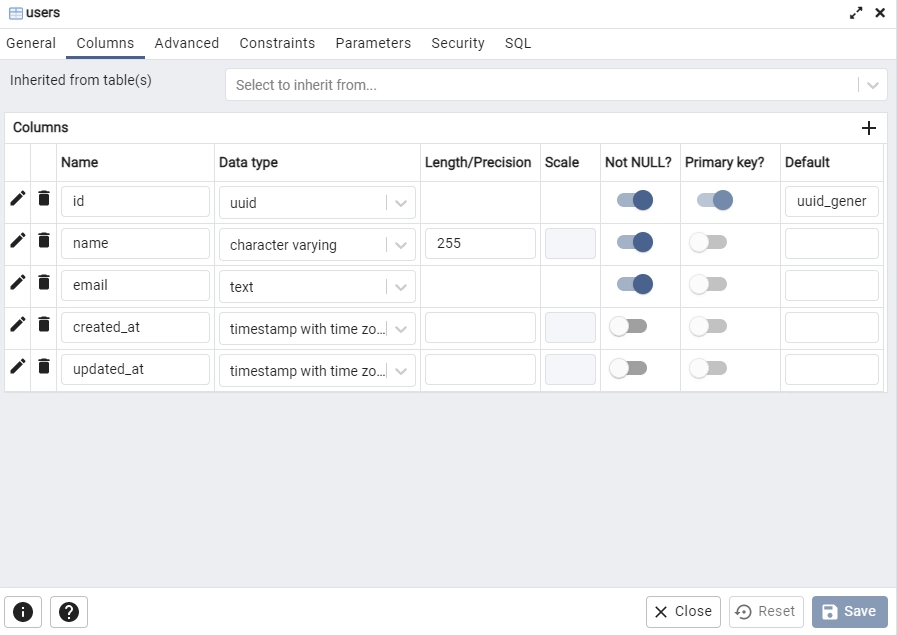
Once the migration is successful, log into pgAdmin with the credentials provided in the app.env file.
After logging in, inspect the users table to see the columns added by the GORM migration tool.
Step 3 – Create the Golang Server with Gin Gonic
In this step, you will connect to the Postgres database and create a simple Golang server with the Gin Gonic web framework.
Install the Gin Gonic framework and the Air package with the following commands:
go get github.com/gin-gonic/gin
go install github.com/cosmtrek/air@latest
The Golang air package will help us to hot-reload the Gin server upon every file change.
Create a main.go file and add the following code:
package main

import (
	"log"
	"net/http"

	"github.com/gin-gonic/gin"
	"github.com/wpcodevo/golang-gorm-postgres/initializers"
)

var (
	server *gin.Engine
)

func init() {
	config, err := initializers.LoadConfig(".")
	if err != nil {
		log.Fatal("? Could not load environment variables", err)
	}

	initializers.ConnectDB(&config)

	server = gin.Default()
}

func main() {
	config, err := initializers.LoadConfig(".")
	if err != nil {
		log.Fatal("? Could not load environment variables", err)
	}

	router := server.Group("/api")
	router.GET("/healthchecker", func(ctx *gin.Context) {
		message := "Welcome to Golang with Gorm and Postgres"
		ctx.JSON(http.StatusOK, gin.H{"status": "success", "message": message})
	})

	log.Fatal(server.Run(":" + config.ServerPort))
}
Let’s evaluate the above code:
- First, we loaded the environment variables with Viper and created a connection pool to the Postgres database in the
init()function. - Then, we created a Gin router and assigned it to the
servervariable. - Next, we created a new router group. This approach will enable us to group all the routes that have common middlewares or the same path prefix.
- Next, we defined a
GETroute to the/api/healthcheckerendpoint. You should be familiar with this pattern if you’ve worked with Express.js, FastAPI, Fastify, or Flask.
To define a route, we specify the endpoint and a handler. The endpoint is the path to a resource on the server. The handler on the other hand is the function that will be evoked to perform some business logic or return data to the client. - Lastly, we evoked the
Runmethod to attach the router to thehttp.Server. This will enable the router to start listening and serving HTTP requests.
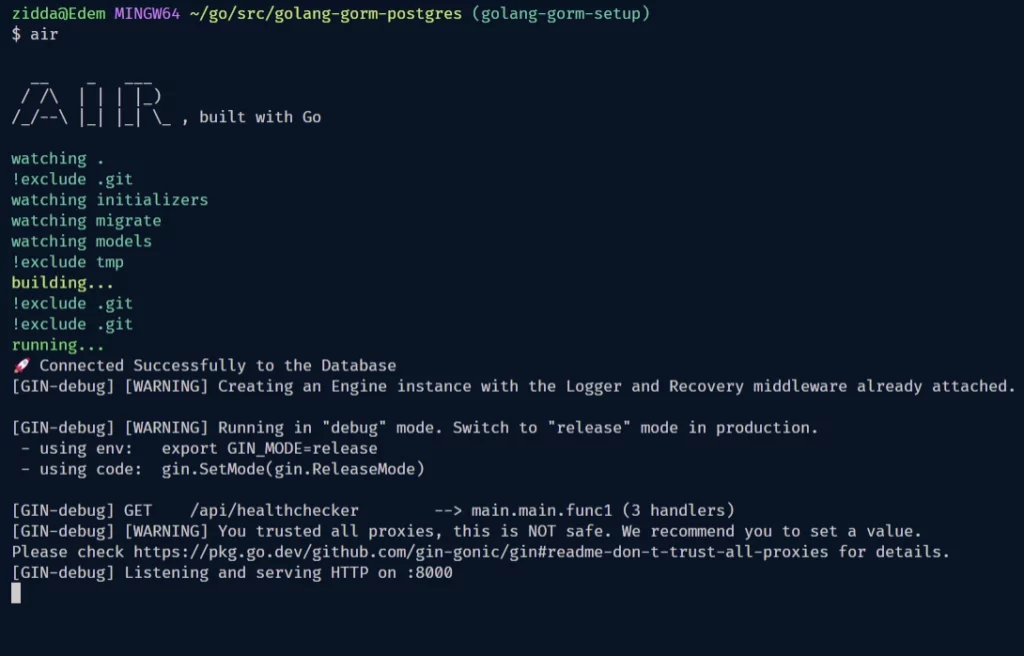
Now open the built-in terminal in VS Code and run this command to start the Golang Gin server.
air
The above command will connect the app to the Postgres database and start the server on port 8000.
You should see a preview in your terminal like this:
Step 4 – Testing the Golang API Server
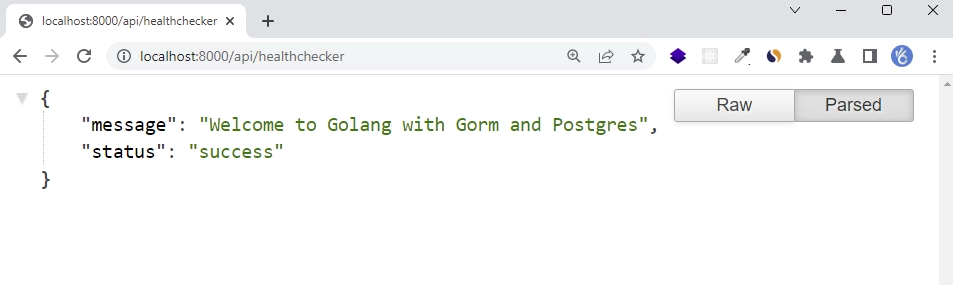
Once the server is up and running, open any API testing tool and make a request to the /api/healthchecker endpoint.
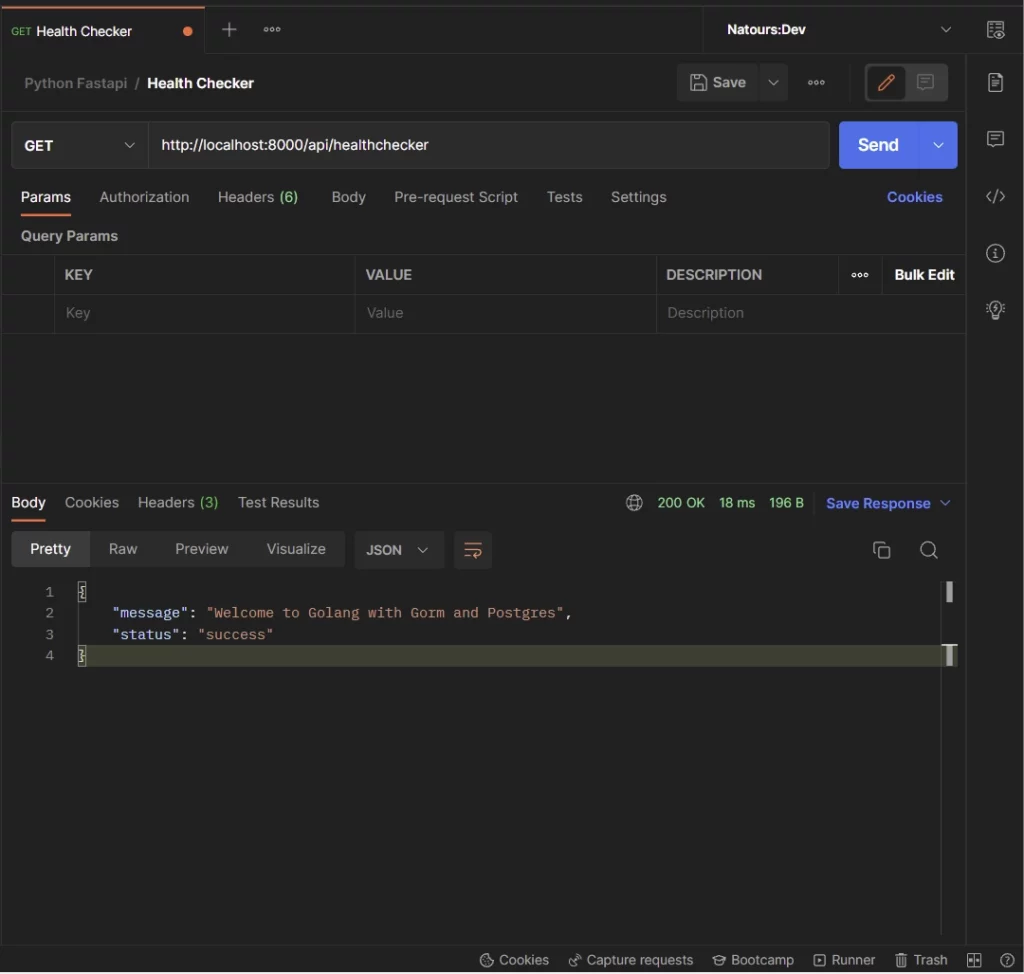
Alternatively, open http://localhost:8000/api/healthchecker in your browser and you should see the JSON response sent by the Gin server.
Conclusion
With this Golang and Gin Gonic setup example with GORM, PostgreSQL, and Docker-compose, you’ve learned how to set up a Golang project with PostgreSQL, GORM, and Gin Gonic.
Golang, GORM, and Gin Gonic Setup Source Code
You can find the complete source code on my GitHub page
Thank you for this tutorial, it is concise and helpful!!
Am glad you found this tutorial helpful. Cheers and happy coding!
Thanks, this has been very helpful
You’re welcome! I’m glad that the article was helpful for you.
hello!, when i get github.com/wpcodevo/golang-gorm-postgres/initializers. I have error: Repository not found. And yeah i acces it in the chrome found 404 🙂
I’m sorry to hear that you encountered an error with the GitHub repository. Could you please clarify if you were trying to run the project on your machine or if there was something else you were attempting to do? Let me know so that I can assist you further.
By the way, the correct URL for the repository should be: https://github.com/wpcodevo/golang-gorm-postgres/tree/master/initializers.
Very impressive and awesome tutorial!
Highly recommend it.