
In this comprehensive guide, you will learn how to secure a Golang RESTful API with JSON Web Tokens and Email verification. We will start by registering the user, verifying the user’s email address, logging in the registered user, and logging out the authenticated user.
In this example, we will be using GORM, a popular Object-Relational Mapping (ORM) library for Golang that comes with CRUD operations already implemented and other fantastic features.
Build Golang, GORM, PostgreSQL RESTful API Series:
- How to Setup Golang GORM RESTful API Project with Postgres
- API with Golang + GORM + PostgreSQL: Access & Refresh Tokens
- Golang and GORM – User Registration and Email Verification
- Forgot/Reset Passwords in Golang with HTML Email
- Build a RESTful CRUD API with Golang
Related articles:
- Golang & MongoDB: JWT Authentication and Authorization
- API with Golang + MongoDB: Send HTML Emails with Gomail
- API with Golang, Gin Gonic & MongoDB: Forget/Reset Password
- Build Golang gRPC Server and Client: SignUp User & Verify Email
- Build Golang gRPC Server and Client: Access & Refresh Tokens
- Node.js + TypeScript + MongoDB: JWT Authentication
- Node.js + TypeScript + MongoDB: JWT Refresh Token
- API with Node.js + PostgreSQL + TypeORM: JWT Authentication
Prerequisites
Before proceeding with this article, you will need:
- Visual Studio Code as the IDE for Building the Golang app. VS Code is a lightweight IDE with many tools and extensions to streamline the development of applications in many languages.
- Basic knowledge of Golang, GORM, how ORMs work, and how to use pgAdmin will be beneficial.
- Have Golang installed on your system. Click here to download the most current version of Go.
- Have Docker installed in your working environment
If you landed on this article from a Google search then you need to catch up by following the Golang setup article before continuing with this article.
Running the Golang GORM Project Locally
To run the Golang project on your computer, please follow these steps:
- Download or clone the project from the GitHub repository: https://github.com/wpcodevo/golang-gorm-postgres. Open the source code in your preferred IDE or text editor.
- Switch the Git branch to
golang-gorm-signup-emailwhich contains the source code for user registration and email verification. - Update the
app.envfile by adding your SMTP username and password to theSMTP_USERandSMTP_PASSfields, respectively. If you don’t have these credentials, you can register for an account on https://mailtrap.io/, sign in with your credentials, create a new inbox, and access the SMTP username and password from the credentials section. - Launch a PostgreSQL server in a Docker container by running the command
docker-compose up -d. - Apply the GORM migrations to the Postgres database by running the command
go run migrate/migrate.go. - Start the Gin Gonic HTTP server by running
go run main.go. - Import the
Golang_GORM.postman_collection.jsonPostman collection into Postman or use the Thunder Client VS Code extension. Use this collection to send HTTP requests to the Golang server and test its functionality. - When you register for an account, an email will be sent to the provided email address. If you’re using https://mailtrap.io/, you can check the inbox to view the email. Copy the verification code from the email and send the appropriate request to the Golang server to verify the email.
- Alternatively, if you prefer to test the Golang API using a frontend application built with React.js, you can follow the steps below.
Running the Golang API with a Frontend App
If you’re interested in building the React application from scratch, you can refer to the detailed guide titled “React Query and Axios: User Registration and Email Verification“. However, if you prefer to quickly run the application without writing any code, follow these steps:
- Download or clone the source code of the React.js project from the GitHub repository: https://github.com/wpcodevo/react-query-axios-tailwindcss. Open the source code in a text editor.
- Open the integrated terminal of your code editor and run
yarnoryarn installto install all the required dependencies. - Start the React development server by running
yarn dev. Then, visithttp://localhost:3000/in your browser to view the application. You can now utilize the provided features to interact with the Golang API.
Golang and GORM JWT Authentication Overview
With this RESTful API example with Golang, GORM, Gin Gonic, Postgres, and Docker, the user will be able to perform the following actions:
- Register an account
- Verify the email address
- Login with his credentials
- Request the profile information
- Log out from the account
| RESOURCE | HTTP METHOD | ROUTE | DESCRIPTION |
|---|---|---|---|
| users | GET | /api/users/me | Retrieve profile data |
| auth | POST | /api/auth/register | Create a new user |
| auth | GET | /api/auth/verifyemail/:code | Verify the email address |
| auth | POST | /api/auth/login | Sign in the user |
| auth | GET | /api/auth/logout | Logout the user |
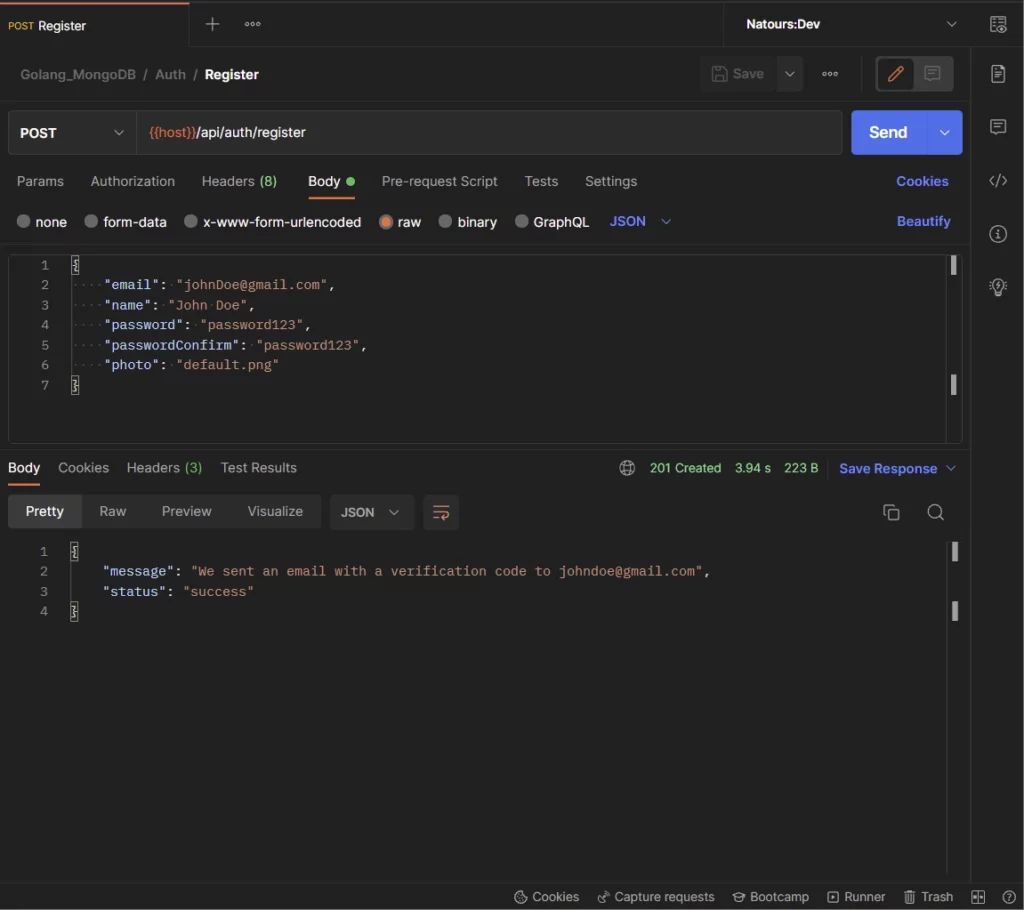
Open the Postman software on your machine and import the Postman collection I used in testing the API to make your life easier.
-Here, the user provides the required credentials and makes a POST request to the /api/auth/register endpoint to create a new account.
The Golang server receives the request, validates the credentials, adds the user to the database, and sends a verification code to the user’s email address.
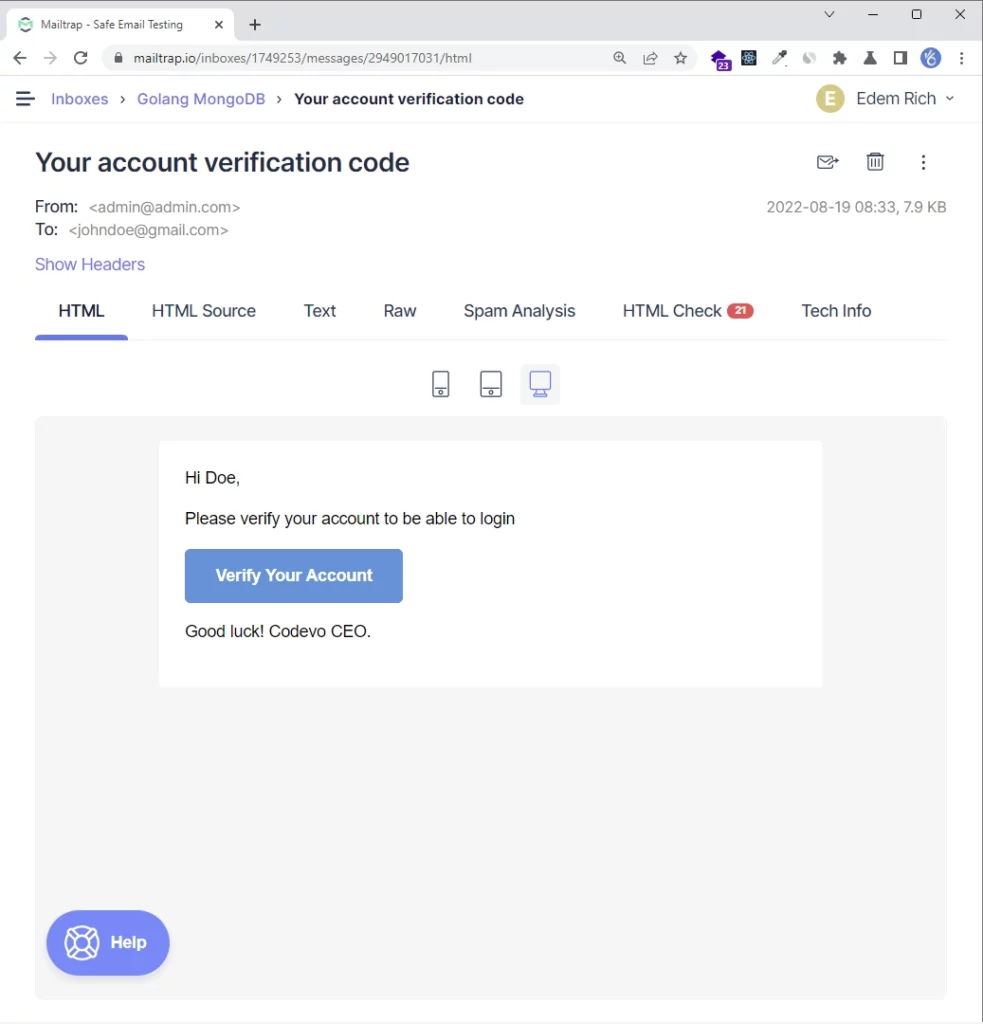
In the email, the user clicks on the “Verify Your Account” button for the frontend application to make a GET request with the verification code to the Golang server.
However, since there is no frontend application, you need to copy the verification code from the redirect URL and manually make the request to the server.
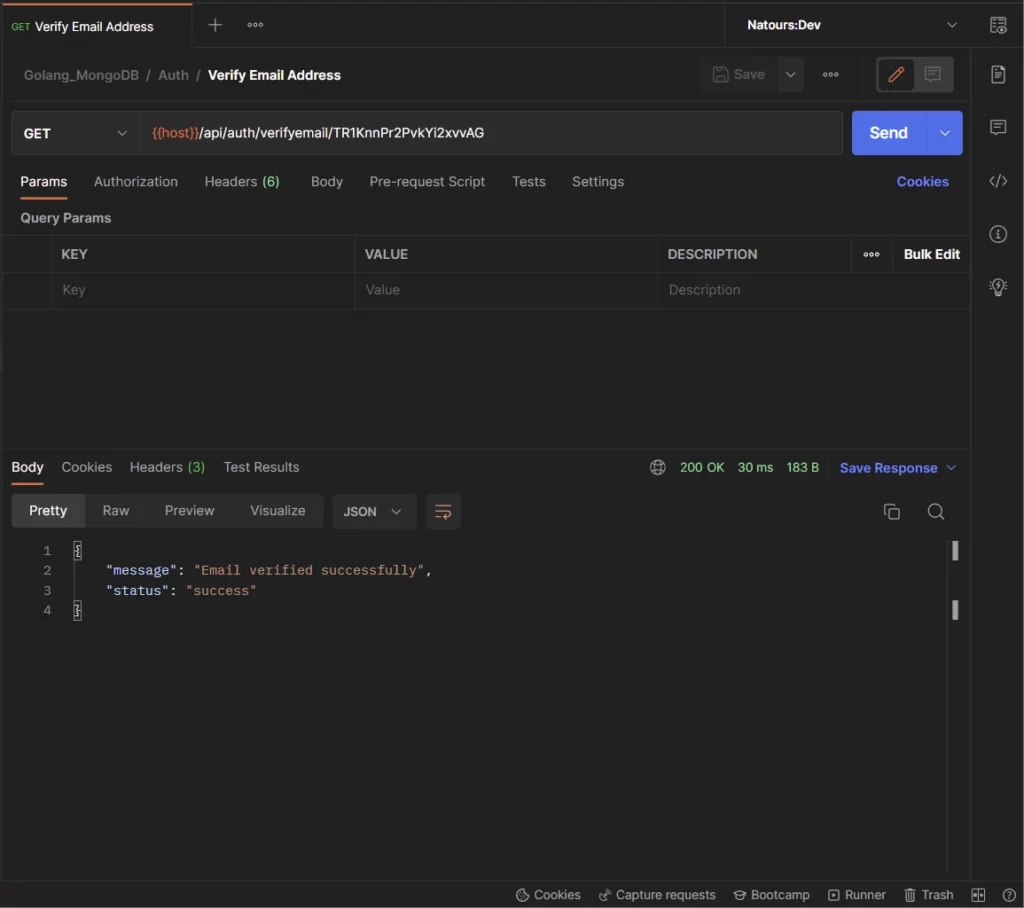
-Paste the verification code in the URL and make a GET request to the /api/verifyemail/:verificationCode endpoint to verify the email address.
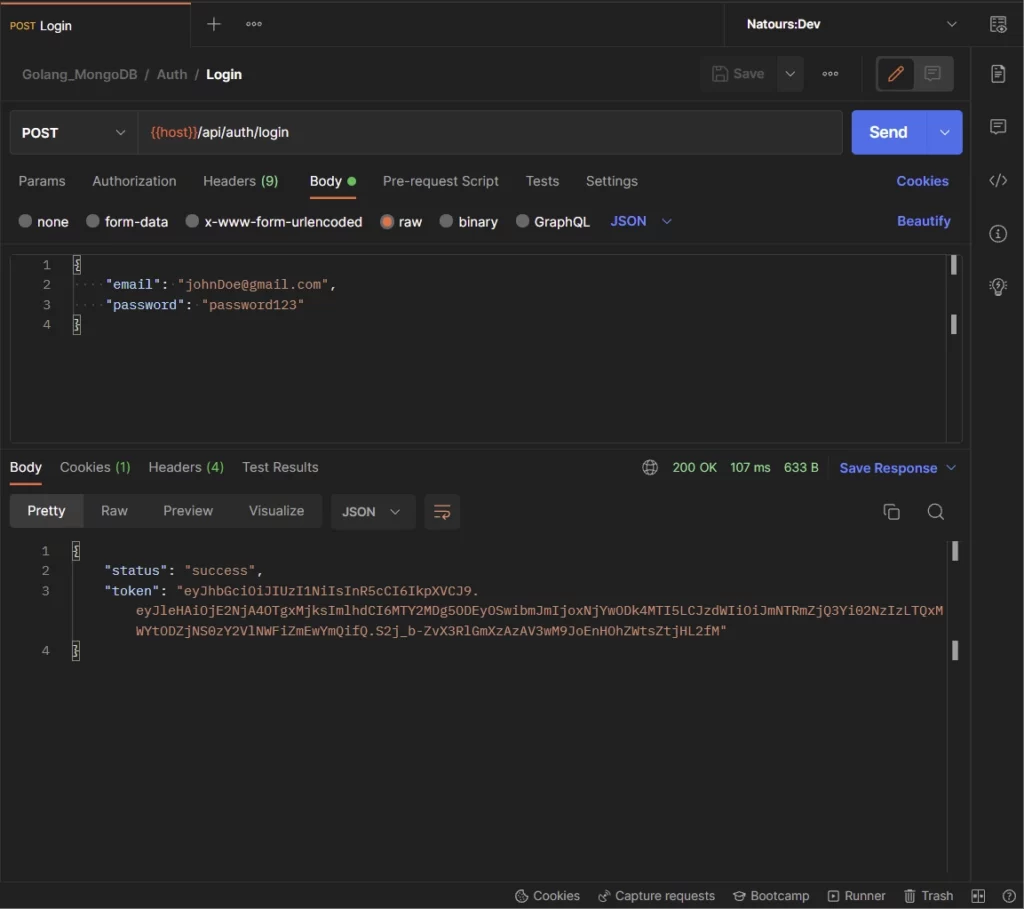
-Once the account has been verified, the user can provide the email and password used in registering for the account and make a POST request to the /api/auth/login endpoint to sign into the account.
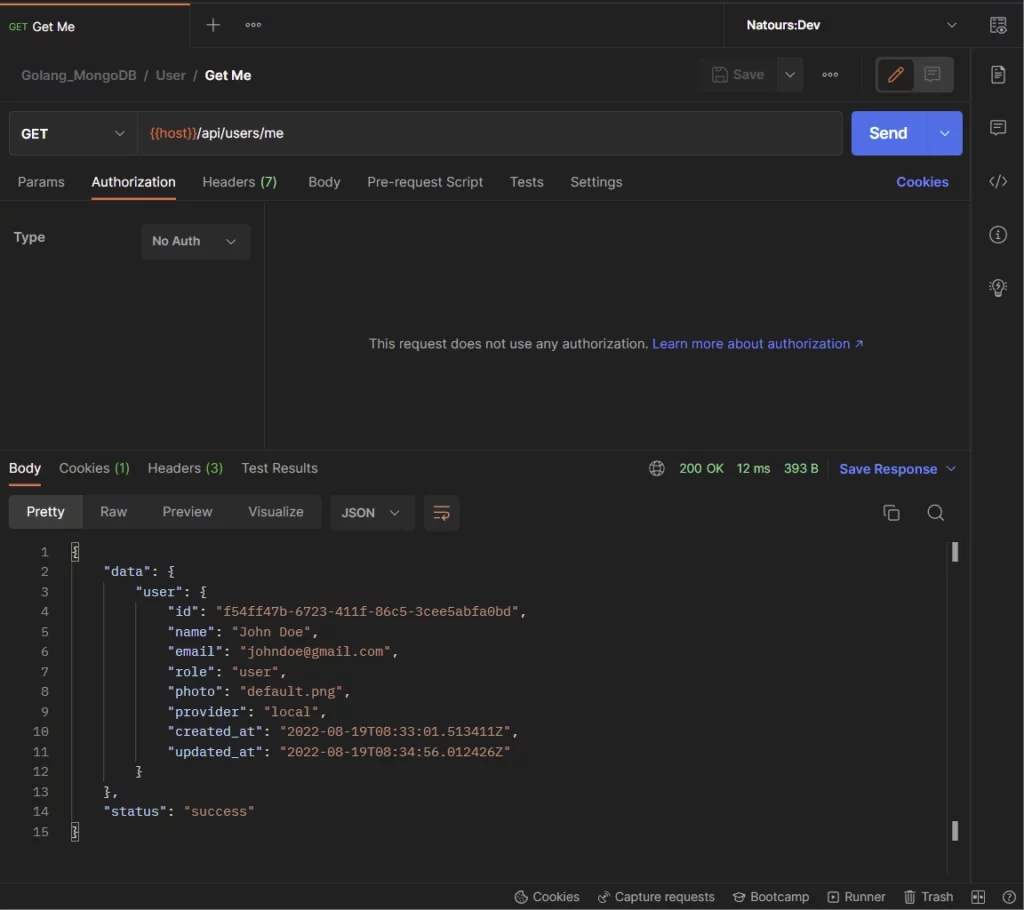
-Here, the user can make a GET request to the /api/users/me endpoint with the token received from the server to retrieve his credentials.
-Lastly, the user can make a GET request to the /api/auth/logout endpoint to sign out from the server.

With that out of the way, let’s build the Golang server with Gin Gonic and GORM to authenticate users with JSON Web Tokens.
Step 1 – Create the Database Models with GORM
In this step, we will create a Golang struct that will be used by the GORM library under the hood to generate the corresponding SQL code. Also, we will create other structs that will be used by the Gin Gonic framework to validate the request and response data.
By default, GORM uses the ID field in the Golang struct as the primary key in the database and snake_case syntax for the table names and columns.
A recommended approach is to define the Golang structs with singular names since GORM will pluralize them in the database by default.
For security reasons, we will use UUID data type for the ID column instead of sequential integers to prevent hackers from using incremental numbers to inspect the data stored in the database.
Since we will be using the uuid_generate_v4() function as a default value for the ID column, we need to install the UUID OSSP plugin in the Postgres database.
Read the Golang, GORM & PostgreSQL setup article to learn how to install the UUID OSSP extension.
models/user.model.go
package models

import (
	"time"

	"github.com/google/uuid"
)

type User struct {
	ID               uuid.UUID `gorm:"type:uuid;default:uuid_generate_v4();primary_key"`
	Name             string    `gorm:"type:varchar(255);not null"`
	Email            string    `gorm:"uniqueIndex;not null"`
	Password         string    `gorm:"not null"`
	Role             string    `gorm:"type:varchar(255);not null"`
	Provider         string    `gorm:"not null"`
	Photo            string    `gorm:"not null"`
	VerificationCode string
	Verified         bool      `gorm:"not null"`
	CreatedAt        time.Time `gorm:"not null"`
	UpdatedAt        time.Time `gorm:"not null"`
}

type SignUpInput struct {
	Name            string `json:"name" binding:"required"`
	Email           string `json:"email" binding:"required"`
	Password        string `json:"password" binding:"required,min=8"`
	PasswordConfirm string `json:"passwordConfirm" binding:"required"`
	Photo           string `json:"photo" binding:"required"`
}

type SignInInput struct {
	Email    string `json:"email"  binding:"required"`
	Password string `json:"password"  binding:"required"`
}

type UserResponse struct {
	ID        uuid.UUID `json:"id,omitempty"`
	Name      string    `json:"name,omitempty"`
	Email     string    `json:"email,omitempty"`
	Role      string    `json:"role,omitempty"`
	Photo     string    `json:"photo,omitempty"`
	Provider  string    `json:"provider"`
	CreatedAt time.Time `json:"created_at"`
	UpdatedAt time.Time `json:"updated_at"`
}
Step 2 – Database Migration with GORM
Database migration is a popular programming technique used to track the migration history of a database model and push the schema to the target database. This paradigm is comparable to how we track different versions of the same file with Git version control.
Luckily, GORM provides an intuitive database migration tool to automatically migrate the GORM models to the database and keep the database schemas in sync with the models.
By default, the AutoMigrate function automatically creates the database foreign key constraints but you can disable this feature during the initialization step.
To begin, create a migrate/migrate.go file and add the following code to help you migrate the GORM models to the Postgres database.
migrate/migrate.go
package main

import (
	"fmt"
	"log"

	"github.com/wpcodevo/golang-gorm-postgres/initializers"
	"github.com/wpcodevo/golang-gorm-postgres/models"
)

func init() {
	config, err := initializers.LoadConfig(".")
	if err != nil {
		log.Fatal("? Could not load environment variables", err)
	}

	initializers.ConnectDB(&config)
}

func main() {
	initializers.DB.AutoMigrate(&models.User{})
	fmt.Println("? Migration complete")
}
In the above code, we created an init function to load the environment variables from the app.env file and connect the Golang server to the Postgres database.
Next, we evoked the AutoMigrate method in the main function and provided it with a reference to the User struct.
Now open the integrated terminal in VS Code and run the Golang file to migrate the schema to the database.
go run migrate/migrate.go
Note: Install the UUID OSSP extension for the migration to work. Follow the Golang, GORM & PostgreSQL setup article to install it.
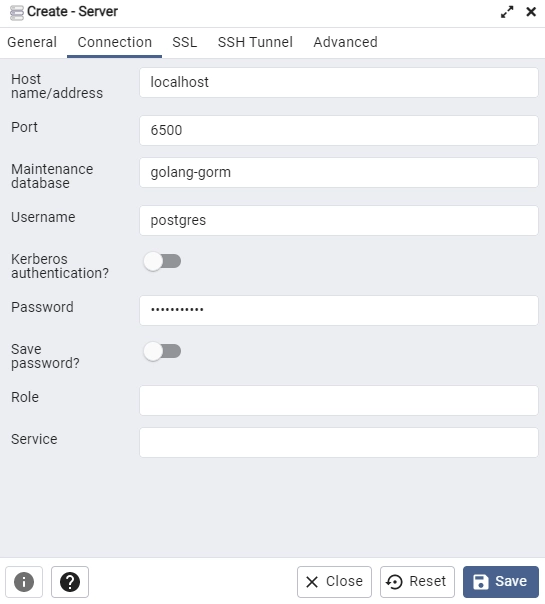
Open any Postgres client and sign in with the credentials used in setting up the Postgres server.
Open the users table added by GORM to see the columns we defined in the Golang struct.
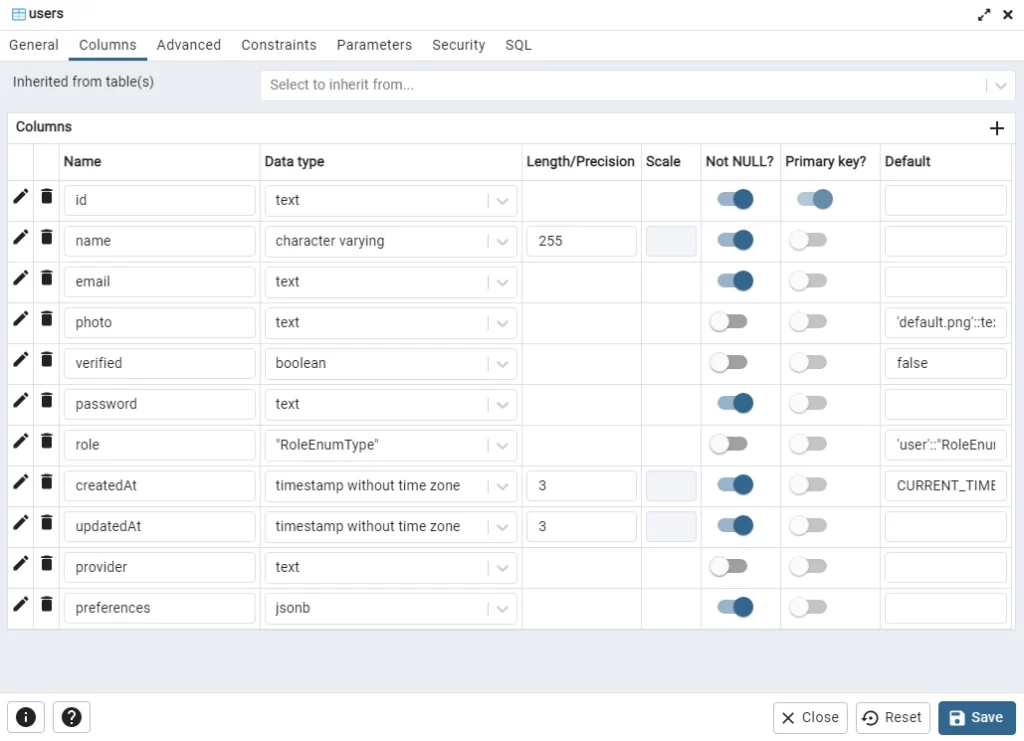
Step 3 – Generate and Verify the Password
In this section, we will use the well-known Golang Bcrypt package to hash the plain-text passwords before saving the records to the database. Hashing the passwords with a powerful algorithm will make it difficult for a hacker to easily retrieve the original plain-text passwords.
In this modern age, we can use a Cost Factor of 10 as the default or 12 since computers now have powerful CPUs to calculate the hashes within a short period of time.
The Cost Factor is the number of rounds the hashing algorithm has to go through to transform each password. The higher the Cost Factor, the higher the time needed to calculate the hash and the more difficult it is to brute force.
utils/password.go
package utils

import (
	"fmt"

	"golang.org/x/crypto/bcrypt"
)

func HashPassword(password string) (string, error) {
	hashedPassword, err := bcrypt.GenerateFromPassword([]byte(password), bcrypt.DefaultCost)

	if err != nil {
		return "", fmt.Errorf("could not hash password %w", err)
	}
	return string(hashedPassword), nil
}

func VerifyPassword(hashedPassword string, candidatePassword string) error {
	return bcrypt.CompareHashAndPassword([]byte(hashedPassword), []byte(candidatePassword))
}
- The HashPassword function is responsible for hashing the plain-text password
- The VerifyPassword function is responsible for validating the passwords.
Step 4 – Sign and Verify the JWT
In the previous article API with Golang + GORM + PostgreSQL: Access & Refresh Tokens, we used asymmetric cryptography, where we used a private key to generate the signature, and used the corresponding public key to validate the signature.
In this article, we will make things simple by using symmetric cryptography (HMAC SHA256) to create and validate the signature.
To begin, install the Golang JWT package with this command:
go get github.com/golang-jwt/jwt
Update the Environment Variables File
After installing the Golang JWT package, update the app.env file to have the secret passphrase we will be using to sign and verify the JWT tokens.
app.env
POSTGRES_HOST=127.0.0.1
POSTGRES_USER=postgres
POSTGRES_PASSWORD=password123
POSTGRES_DB=golang-gorm
POSTGRES_PORT=6500

PORT=8000
CLIENT_ORIGIN=http://localhost:3000

TOKEN_EXPIRED_IN=60m
TOKEN_MAXAGE=60

TOKEN_SECRET=my-ultra-secure-json-web-token-string
Validate the Variables with Viper
Here, add the variables to the Config struct defined in the initializers/loadEnv.go file. This will enable the Golang Viper package to load and make them available in the project.
initializers/loadEnv.go
package initializers

import (
	"time"

	"github.com/spf13/viper"
)

type Config struct {
	DBHost         string `mapstructure:"POSTGRES_HOST"`
	DBUserName     string `mapstructure:"POSTGRES_USER"`
	DBUserPassword string `mapstructure:"POSTGRES_PASSWORD"`
	DBName         string `mapstructure:"POSTGRES_DB"`
	DBPort         string `mapstructure:"POSTGRES_PORT"`
	ServerPort     string `mapstructure:"PORT"`

	ClientOrigin string `mapstructure:"CLIENT_ORIGIN"`

	TokenSecret    string        `mapstructure:"TOKEN_SECRET"`
	TokenExpiresIn time.Duration `mapstructure:"TOKEN_EXPIRED_IN"`
	TokenMaxAge    int           `mapstructure:"TOKEN_MAXAGE"`
}

func LoadConfig(path string) (config Config, err error) {
	viper.AddConfigPath(path)
	viper.SetConfigType("env")
	viper.SetConfigName("app")

	viper.AutomaticEnv()

	err = viper.ReadInConfig()
	if err != nil {
		return
	}

	err = viper.Unmarshal(&config)
	return
}
Generate the JSON Web Tokens
Now create a utils/token.go file and add the following code to help you sign the JWT tokens:
utils/token.go
package utils

import (
	"fmt"
	"time"

	"github.com/golang-jwt/jwt"
)

func GenerateToken(ttl time.Duration, payload interface{}, secretJWTKey string) (string, error) {
	token := jwt.New(jwt.SigningMethodHS256)

	now := time.Now().UTC()
	claims := token.Claims.(jwt.MapClaims)

	claims["sub"] = payload
	claims["exp"] = now.Add(ttl).Unix()
	claims["iat"] = now.Unix()
	claims["nbf"] = now.Unix()

	tokenString, err := token.SignedString([]byte(secretJWTKey))

	if err != nil {
		return "", fmt.Errorf("generating JWT Token failed: %w", err)
	}

	return tokenString, nil
}
Verify the JSON Web Tokens
Since we have the code to sign the tokens, let’s add this function to verify the signature and extract the payload stored in them.
utils/token.go
func ValidateToken(token string, signedJWTKey string) (interface{}, error) {
	tok, err := jwt.Parse(token, func(jwtToken *jwt.Token) (interface{}, error) {
		if _, ok := jwtToken.Method.(*jwt.SigningMethodHMAC); !ok {
			return nil, fmt.Errorf("unexpected method: %s", jwtToken.Header["alg"])
		}

		return []byte(signedJWTKey), nil
	})
	if err != nil {
		return nil, fmt.Errorf("invalidate token: %w", err)
	}

	claims, ok := tok.Claims.(jwt.MapClaims)
	if !ok || !tok.Valid {
		return nil, fmt.Errorf("invalid token claim")
	}

	return claims["sub"], nil
}
Step 5 – Create the SMTP Credentials
In this section, we will create a Mailtrap account to capture the development emails instead of sending them to real email addresses.
Alternatively, you can create an account with these SMTP providers (SendGrid, Mailgun, Sendinblue, and more) to send real emails to your users.
Follow these steps to create and configure the Mailtrap account.
Step 1: Register for an account on the Mailtrap website.
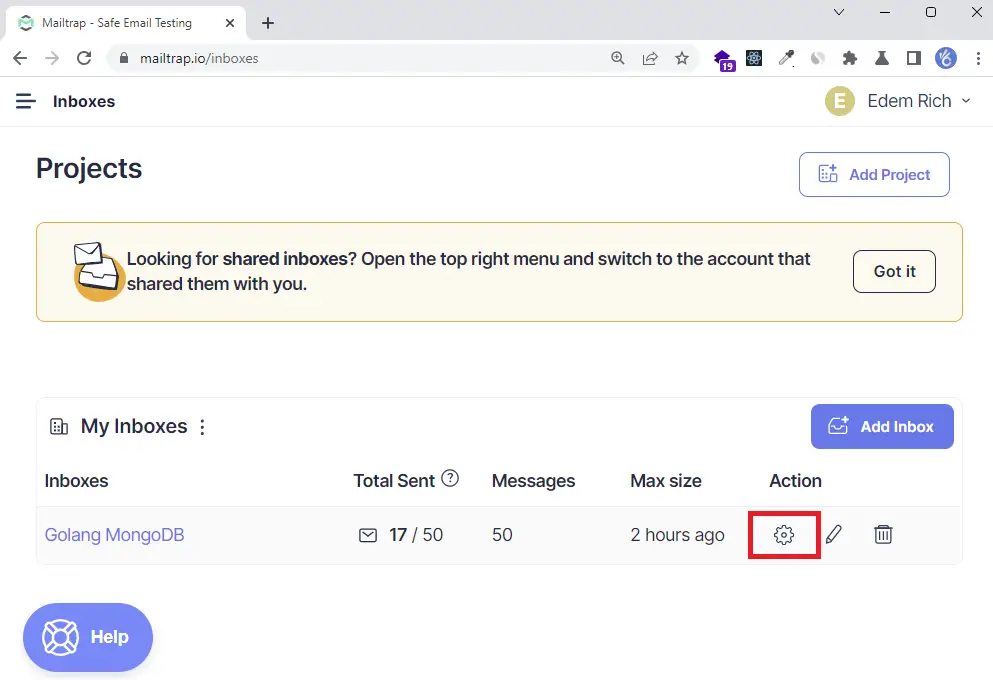
Step 2: Sign in with your credentials and click on the Add Inbox button to create a new inbox.
Then, click the gear icon on the newly-created inbox to display the settings page.
Step 3: On the settings page, click on the Show Credentials dropdown to display the SMTP and POP3 credentials.
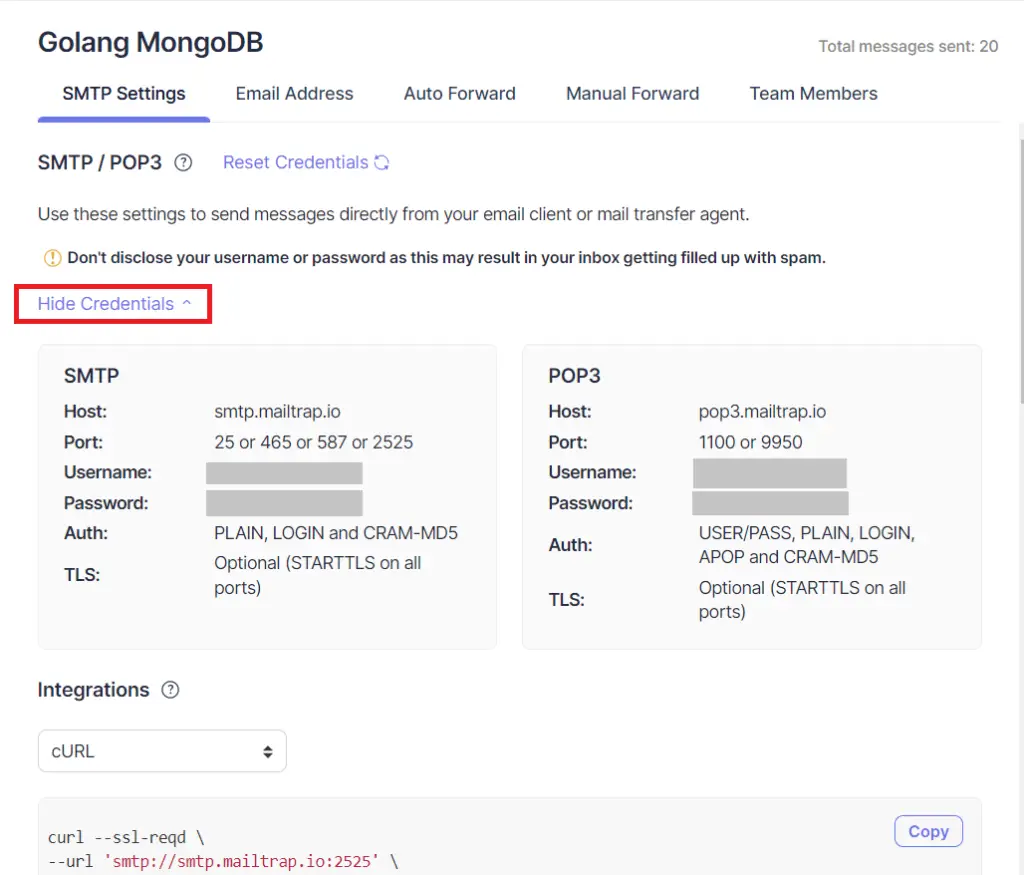
Step 4: Add the SMTP credentials to the app.env file.
app.env
POSTGRES_HOST=127.0.0.1
POSTGRES_USER=postgres
POSTGRES_PASSWORD=password123
POSTGRES_DB=golang-gorm
POSTGRES_PORT=6500

PORT=8000
CLIENT_ORIGIN=http://localhost:3000

EMAIL_FROM=admin@admin.com
SMTP_HOST=smtp.mailtrap.io
SMTP_USER=
SMTP_PASS=
SMTP_PORT=587

TOKEN_EXPIRED_IN=60m
TOKEN_MAXAGE=60

TOKEN_SECRET=my-ultra-secure-json-web-token-string
Step 5: Add the variables to the Config struct in the initializers/loadEnv.go file.
initializers/loadEnv.go
package initializers

import (
	"time"

	"github.com/spf13/viper"
)

type Config struct {
	DBHost         string `mapstructure:"POSTGRES_HOST"`
	DBUserName     string `mapstructure:"POSTGRES_USER"`
	DBUserPassword string `mapstructure:"POSTGRES_PASSWORD"`
	DBName         string `mapstructure:"POSTGRES_DB"`
	DBPort         string `mapstructure:"POSTGRES_PORT"`
	ServerPort     string `mapstructure:"PORT"`

	ClientOrigin string `mapstructure:"CLIENT_ORIGIN"`

	TokenSecret    string        `mapstructure:"TOKEN_SECRET"`
	TokenExpiresIn time.Duration `mapstructure:"TOKEN_EXPIRED_IN"`
	TokenMaxAge    int           `mapstructure:"TOKEN_MAXAGE"`

	EmailFrom string `mapstructure:"EMAIL_FROM"`
	SMTPHost  string `mapstructure:"SMTP_HOST"`
	SMTPPass  string `mapstructure:"SMTP_PASS"`
	SMTPPort  int    `mapstructure:"SMTP_PORT"`
	SMTPUser  string `mapstructure:"SMTP_USER"`
}

func LoadConfig(path string) (config Config, err error) {
	viper.AddConfigPath(path)
	viper.SetConfigType("env")
	viper.SetConfigName("app")

	viper.AutomaticEnv()

	err = viper.ReadInConfig()
	if err != nil {
		return
	}

	err = viper.Unmarshal(&config)
	return
}
Step 6 – Setup the HTML Templates
In this step, we will be using the standard Golang template engine to dynamically generate the email verification template.
Add the Base Template
templates/base.html
{{define "base"}}
<!DOCTYPE html>
<html>
<head>
<meta name="viewport" content="width=device-width, initial-scale=1.0" />
<meta http-equiv="Content-Type" content="text/html; charset=UTF-8" />
{{template "styles" .}}
<title>{{ .Subject}}</title>
</head>
<body>
<table
role="presentation"
border="0"
cellpadding="0"
cellspacing="0"
class="body"
>
<tr>
<td> </td>
<td class="container">
<div class="content">
<!-- START CENTERED WHITE CONTAINER -->
{{block "content" .}}{{end}}
<!-- END CENTERED WHITE CONTAINER -->
</div>
</td>
<td> </td>
</tr>
</table>
</body>
</html>
{{end}}
Add the CSS Styles
templates/styles.html
{{define "styles"}}
<style>
  /* -------------------------------------
          GLOBAL RESETS
      ------------------------------------- */

  /*All the styling goes here*/

  img {
    border: none;
    -ms-interpolation-mode: bicubic;
    max-width: 100%;
  }

  body {
    background-color: #f6f6f6;
    font-family: sans-serif;
    -webkit-font-smoothing: antialiased;
    font-size: 14px;
    line-height: 1.4;
    margin: 0;
    padding: 0;
    -ms-text-size-adjust: 100%;
    -webkit-text-size-adjust: 100%;
  }

  table {
    border-collapse: separate;
    mso-table-lspace: 0pt;
    mso-table-rspace: 0pt;
    width: 100%;
  }
  table td {
    font-family: sans-serif;
    font-size: 14px;
    vertical-align: top;
  }

  /* -------------------------------------
          BODY & CONTAINER
      ------------------------------------- */

  .body {
    background-color: #f6f6f6;
    width: 100%;
  }

  /* Set a max-width, and make it display as block so it will automatically stretch to that width, but will also shrink down on a phone or something */
  .container {
    display: block;
    margin: 0 auto !important;
    /* makes it centered */
    max-width: 580px;
    padding: 10px;
    width: 580px;
  }

  /* This should also be a block element, so that it will fill 100% of the .container */
  .content {
    box-sizing: border-box;
    display: block;
    margin: 0 auto;
    max-width: 580px;
    padding: 10px;
  }

  /* -------------------------------------
          HEADER, FOOTER, MAIN
      ------------------------------------- */
  .main {
    background: #ffffff;
    border-radius: 3px;
    width: 100%;
  }

  .wrapper {
    box-sizing: border-box;
    padding: 20px;
  }

  .content-block {
    padding-bottom: 10px;
    padding-top: 10px;
  }

  .footer {
    clear: both;
    margin-top: 10px;
    text-align: center;
    width: 100%;
  }
  .footer td,
  .footer p,
  .footer span,
  .footer a {
    color: #999999;
    font-size: 12px;
    text-align: center;
  }

  /* -------------------------------------
          TYPOGRAPHY
      ------------------------------------- */
  h1,
  h2,
  h3,
  h4 {
    color: #000000;
    font-family: sans-serif;
    font-weight: 400;
    line-height: 1.4;
    margin: 0;
    margin-bottom: 30px;
  }

  h1 {
    font-size: 35px;
    font-weight: 300;
    text-align: center;
    text-transform: capitalize;
  }

  p,
  ul,
  ol {
    font-family: sans-serif;
    font-size: 14px;
    font-weight: normal;
    margin: 0;
    margin-bottom: 15px;
  }
  p li,
  ul li,
  ol li {
    list-style-position: inside;
    margin-left: 5px;
  }

  a {
    color: #3498db;
    text-decoration: underline;
  }

  /* -------------------------------------
          BUTTONS
      ------------------------------------- */
  .btn {
    box-sizing: border-box;
    width: 100%;
  }
  .btn > tbody > tr > td {
    padding-bottom: 15px;
  }
  .btn table {
    width: auto;
  }
  .btn table td {
    background-color: #ffffff;
    border-radius: 5px;
    text-align: center;
  }
  .btn a {
    background-color: #ffffff;
    border: solid 1px #3498db;
    border-radius: 5px;
    box-sizing: border-box;
    color: #3498db;
    cursor: pointer;
    display: inline-block;
    font-size: 14px;
    font-weight: bold;
    margin: 0;
    padding: 12px 25px;
    text-decoration: none;
    text-transform: capitalize;
  }

  .btn-primary table td {
    background-color: #3498db;
  }

  .btn-primary a {
    background-color: #3498db;
    border-color: #3498db;
    color: #ffffff;
  }

  /* -------------------------------------
          OTHER STYLES THAT MIGHT BE USEFUL
      ------------------------------------- */
  .last {
    margin-bottom: 0;
  }

  .first {
    margin-top: 0;
  }

  .align-center {
    text-align: center;
  }

  .align-right {
    text-align: right;
  }

  .align-left {
    text-align: left;
  }

  .clear {
    clear: both;
  }

  .mt0 {
    margin-top: 0;
  }

  .mb0 {
    margin-bottom: 0;
  }

  .preheader {
    color: transparent;
    display: none;
    height: 0;
    max-height: 0;
    max-width: 0;
    opacity: 0;
    overflow: hidden;
    mso-hide: all;
    visibility: hidden;
    width: 0;
  }

  .powered-by a {
    text-decoration: none;
  }

  hr {
    border: 0;
    border-bottom: 1px solid #f6f6f6;
    margin: 20px 0;
  }

  /* -------------------------------------
          RESPONSIVE AND MOBILE FRIENDLY STYLES
      ------------------------------------- */
  @media only screen and (max-width: 620px) {
    table.body h1 {
      font-size: 28px !important;
      margin-bottom: 10px !important;
    }
    table.body p,
    table.body ul,
    table.body ol,
    table.body td,
    table.body span,
    table.body a {
      font-size: 16px !important;
    }
    table.body .wrapper,
    table.body .article {
      padding: 10px !important;
    }
    table.body .content {
      padding: 0 !important;
    }
    table.body .container {
      padding: 0 !important;
      width: 100% !important;
    }
    table.body .main {
      border-left-width: 0 !important;
      border-radius: 0 !important;
      border-right-width: 0 !important;
    }
    table.body .btn table {
      width: 100% !important;
    }
    table.body .btn a {
      width: 100% !important;
    }
    table.body .img-responsive {
      height: auto !important;
      max-width: 100% !important;
      width: auto !important;
    }
  }

  /* -------------------------------------
          PRESERVE THESE STYLES IN THE HEAD
      ------------------------------------- */
  @media all {
    .ExternalClass {
      width: 100%;
    }
    .ExternalClass,
    .ExternalClass p,
    .ExternalClass span,
    .ExternalClass font,
    .ExternalClass td,
    .ExternalClass div {
      line-height: 100%;
    }
    .apple-link a {
      color: inherit !important;
      font-family: inherit !important;
      font-size: inherit !important;
      font-weight: inherit !important;
      line-height: inherit !important;
      text-decoration: none !important;
    }
    #MessageViewBody a {
      color: inherit;
      text-decoration: none;
      font-size: inherit;
      font-family: inherit;
      font-weight: inherit;
      line-height: inherit;
    }
    .btn-primary table td:hover {
      background-color: #34495e !important;
    }
    .btn-primary a:hover {
      background-color: #34495e !important;
      border-color: #34495e !important;
    }
  }
</style>
{{end}}
Add the Email Verification Template
templates/verificationCode.html
{{template "base" .}} {{define "content"}}
<table role="presentation" class="main">
  <!-- START MAIN CONTENT AREA -->
  <tr>
    <td class="wrapper">
      <table role="presentation" border="0" cellpadding="0" cellspacing="0">
        <tr>
          <td>
            <p>Hi {{ .FirstName}},</p>
            <p>Please verify your account to be able to login</p>
            <table
              role="presentation"
              border="0"
              cellpadding="0"
              cellspacing="0"
              class="btn btn-primary"
            >
              <tbody>
                <tr>
                  <td align="left">
                    <table
                      role="presentation"
                      border="0"
                      cellpadding="0"
                      cellspacing="0"
                    >
                      <tbody>
                        <tr>
                          <td>
                            <a href="{{.URL}}" target="_blank"
                              >Verify your account</a
                            >
                          </td>
                        </tr>
                      </tbody>
                    </table>
                  </td>
                </tr>
              </tbody>
            </table>
            <p>Good luck! Codevo CEO.</p>
          </td>
        </tr>
      </table>
    </td>
  </tr>

  <!-- END MAIN CONTENT AREA -->
</table>
{{end}}
Create the Email Utility Function
Here, we will create a utility function to generate the email template and send it to the user’s email address.
Before that install these two packages:
go get github.com/k3a/html2text gopkg.in/gomail.v2
The HTML2Text package will convert the HTML code to text whereas the Gomail package will send the SMTP email to the user.
Now create a utils/email.go file and the following code:
utils/email.go
package utils

import (
	"bytes"
	"crypto/tls"
	"html/template"
	"log"
	"os"
	"path/filepath"

	"github.com/k3a/html2text"
	"github.com/wpcodevo/golang-gorm-postgres/initializers"
	"github.com/wpcodevo/golang-gorm-postgres/models"
	"gopkg.in/gomail.v2"
)

type EmailData struct {
	URL       string
	FirstName string
	Subject   string
}

// ? Email template parser

func ParseTemplateDir(dir string) (*template.Template, error) {
	var paths []string
	err := filepath.Walk(dir, func(path string, info os.FileInfo, err error) error {
		if err != nil {
			return err
		}
		if !info.IsDir() {
			paths = append(paths, path)
		}
		return nil
	})

	if err != nil {
		return nil, err
	}

	return template.ParseFiles(paths...)
}

func SendEmail(user *models.User, data *EmailData) {
	config, err := initializers.LoadConfig(".")

	if err != nil {
		log.Fatal("could not load config", err)
	}

	// Sender data.
	from := config.EmailFrom
	smtpPass := config.SMTPPass
	smtpUser := config.SMTPUser
	to := user.Email
	smtpHost := config.SMTPHost
	smtpPort := config.SMTPPort

	var body bytes.Buffer

	template, err := ParseTemplateDir("templates")
	if err != nil {
		log.Fatal("Could not parse template", err)
	}

	template.ExecuteTemplate(&body, "verificationCode.html", &data)

	m := gomail.NewMessage()

	m.SetHeader("From", from)
	m.SetHeader("To", to)
	m.SetHeader("Subject", data.Subject)
	m.SetBody("text/html", body.String())
	m.AddAlternative("text/plain", html2text.HTML2Text(body.String()))

	d := gomail.NewDialer(smtpHost, smtpPort, smtpUser, smtpPass)
	d.TLSConfig = &tls.Config{InsecureSkipVerify: true}

	// Send Email
	if err := d.DialAndSend(m); err != nil {
		log.Fatal("Could not send email: ", err)
	}

}
Step 7 – Create the Controller Functions
After all the above configurations, we are now ready to create the route handlers.
Function to Generate the Verification Code
To begin, create a utils/encode.go file and these codes to help you generate and verify the email verification code.
utils/encode.go
package utils

import "encoding/base64"

func Encode(s string) string {
	data := base64.StdEncoding.EncodeToString([]byte(s))
	return string(data)
}

func Decode(s string) (string, error) {
	data, err := base64.StdEncoding.DecodeString(s)
	if err != nil {
		return "", err
	}

	return string(data), nil
}
User Registration Controller
Here, let’s create the route handler that will be called to register new users. In this controller, we will validate the credentials provided by the user with Gin Gonic, add the user to the database, send the email verification code and return a success message to the client.
Install the randstr package to help you generate the 20-byte string that will be used as the verification code:
go get -u github.com/thanhpk/randstr
controllers/auth.controller.go
package controllers

import (
	"net/http"
	"strings"
	"time"

	"github.com/gin-gonic/gin"
	"github.com/thanhpk/randstr"
	"github.com/wpcodevo/golang-gorm-postgres/initializers"
	"github.com/wpcodevo/golang-gorm-postgres/models"
	"github.com/wpcodevo/golang-gorm-postgres/utils"
	"gorm.io/gorm"
)

type AuthController struct {
	DB *gorm.DB
}

func NewAuthController(DB *gorm.DB) AuthController {
	return AuthController{DB}
}

// [...] SignUp User
func (ac *AuthController) SignUpUser(ctx *gin.Context) {
	var payload *models.SignUpInput

	if err := ctx.ShouldBindJSON(&payload); err != nil {
		ctx.JSON(http.StatusBadRequest, gin.H{"status": "fail", "message": err.Error()})
		return
	}

	if payload.Password != payload.PasswordConfirm {
		ctx.JSON(http.StatusBadRequest, gin.H{"status": "fail", "message": "Passwords do not match"})
		return
	}

	hashedPassword, err := utils.HashPassword(payload.Password)
	if err != nil {
		ctx.JSON(http.StatusBadGateway, gin.H{"status": "error", "message": err.Error()})
		return
	}

	now := time.Now()
	newUser := models.User{
		Name:      payload.Name,
		Email:     strings.ToLower(payload.Email),
		Password:  hashedPassword,
		Role:      "user",
		Verified:  false,
		Photo:     payload.Photo,
		Provider:  "local",
		CreatedAt: now,
		UpdatedAt: now,
	}

	result := ac.DB.Create(&newUser)

	if result.Error != nil && strings.Contains(result.Error.Error(), "duplicate key value violates unique") {
		ctx.JSON(http.StatusConflict, gin.H{"status": "fail", "message": "User with that email already exists"})
		return
	} else if result.Error != nil {
		ctx.JSON(http.StatusBadGateway, gin.H{"status": "error", "message": "Something bad happened"})
		return
	}

	config, _ := initializers.LoadConfig(".")

	// Generate Verification Code
	code := randstr.String(20)

	verification_code := utils.Encode(code)

	// Update User in Database
	newUser.VerificationCode = verification_code
	ac.DB.Save(newUser)

	var firstName = newUser.Name

	if strings.Contains(firstName, " ") {
		firstName = strings.Split(firstName, " ")[1]
	}

	// ? Send Email
	emailData := utils.EmailData{
		URL:       config.ClientOrigin + "/verifyemail/" + code,
		FirstName: firstName,
		Subject:   "Your account verification code",
	}

	utils.SendEmail(&newUser, &emailData)

	message := "We sent an email with a verification code to " + newUser.Email
	ctx.JSON(http.StatusCreated, gin.H{"status": "success", "message": message})
}
Verify Email Controller
Now that we have the handler to register new users, let’s create a controller that will be evoked to validate the verification code sent to the user’s email address.
controllers/auth.controller.go
// [...] Verify Email
func (ac *AuthController) VerifyEmail(ctx *gin.Context) {

	code := ctx.Params.ByName("verificationCode")
	verification_code := utils.Encode(code)

	var updatedUser models.User
	result := ac.DB.First(&updatedUser, "verification_code = ?", verification_code)
	if result.Error != nil {
		ctx.JSON(http.StatusBadRequest, gin.H{"status": "fail", "message": "Invalid verification code or user doesn't exists"})
		return
	}

	if updatedUser.Verified {
		ctx.JSON(http.StatusConflict, gin.H{"status": "fail", "message": "User already verified"})
		return
	}

	updatedUser.VerificationCode = ""
	updatedUser.Verified = true
	ac.DB.Save(&updatedUser)

	ctx.JSON(http.StatusOK, gin.H{"status": "success", "message": "Email verified successfully"})
}
Login User Controller
Next, let’s create a handler to sign and send the JWT token to the user’s browser or client.
controllers/auth.controller.go
// [...] SignIn User
func (ac *AuthController) SignInUser(ctx *gin.Context) {
	var payload *models.SignInInput

	if err := ctx.ShouldBindJSON(&payload); err != nil {
		ctx.JSON(http.StatusBadRequest, gin.H{"status": "fail", "message": err.Error()})
		return
	}

	var user models.User
	result := ac.DB.First(&user, "email = ?", strings.ToLower(payload.Email))
	if result.Error != nil {
		ctx.JSON(http.StatusBadRequest, gin.H{"status": "fail", "message": "Invalid email or Password"})
		return
	}

	if !user.Verified {
		ctx.JSON(http.StatusForbidden, gin.H{"status": "fail", "message": "Please verify your email"})
		return
	}

	if err := utils.VerifyPassword(user.Password, payload.Password); err != nil {
		ctx.JSON(http.StatusBadRequest, gin.H{"status": "fail", "message": "Invalid email or Password"})
		return
	}

	config, _ := initializers.LoadConfig(".")

	// Generate Token
	token, err := utils.GenerateToken(config.TokenExpiresIn, user.ID, config.TokenSecret)
	if err != nil {
		ctx.JSON(http.StatusBadRequest, gin.H{"status": "fail", "message": err.Error()})
		return
	}

	ctx.SetCookie("token", token, config.TokenMaxAge*60, "/", "localhost", false, true)

	ctx.JSON(http.StatusOK, gin.H{"status": "success", "token": token})
}
Logout User Controller
Lastly, create a controller to return an expired cookie to the user’s browser or client. Sending the expired cookie will delete the cookie having the same key from the user’s browser or client.
controllers/auth.controller.go
// [...] SignOut User
func (ac *AuthController) LogoutUser(ctx *gin.Context) {
	ctx.SetCookie("token", "", -1, "/", "localhost", false, true)
	ctx.JSON(http.StatusOK, gin.H{"status": "success"})
}
Get User Profile Controller
Here, let’s define a controller that will be called to retrieve the currently logged-in user’s information.
controllers/user.controller.go
package controllers

import (
	"net/http"

	"github.com/gin-gonic/gin"
	"github.com/wpcodevo/golang-gorm-postgres/models"
	"gorm.io/gorm"
)

type UserController struct {
	DB *gorm.DB
}

func NewUserController(DB *gorm.DB) UserController {
	return UserController{DB}
}

func (uc *UserController) GetMe(ctx *gin.Context) {
	currentUser := ctx.MustGet("currentUser").(models.User)

	userResponse := &models.UserResponse{
		ID:        currentUser.ID,
		Name:      currentUser.Name,
		Email:     currentUser.Email,
		Photo:     currentUser.Photo,
		Role:      currentUser.Role,
		Provider:  currentUser.Provider,
		CreatedAt: currentUser.CreatedAt,
		UpdatedAt: currentUser.UpdatedAt,
	}

	ctx.JSON(http.StatusOK, gin.H{"status": "success", "data": gin.H{"user": userResponse}})
}
Step 8 – Create the Authentication Guard
To protect private resources on the server, let’s create a middleware guard to extract and validate the token from the request headers.
This middleware will ensure that users provide the token signed by the login controller before accessing protected routes.
middleware/deserialize-user.go
package middleware

import (
	"fmt"
	"net/http"
	"strings"

	"github.com/gin-gonic/gin"
	"github.com/wpcodevo/golang-gorm-postgres/initializers"
	"github.com/wpcodevo/golang-gorm-postgres/models"
	"github.com/wpcodevo/golang-gorm-postgres/utils"
)

func DeserializeUser() gin.HandlerFunc {
	return func(ctx *gin.Context) {
		var token string
		cookie, err := ctx.Cookie("token")

		authorizationHeader := ctx.Request.Header.Get("Authorization")
		fields := strings.Fields(authorizationHeader)

		if len(fields) != 0 && fields[0] == "Bearer" {
			token = fields[1]
		} else if err == nil {
			token = cookie
		}

		if token == "" {
			ctx.AbortWithStatusJSON(http.StatusUnauthorized, gin.H{"status": "fail", "message": "You are not logged in"})
			return
		}

		config, _ := initializers.LoadConfig(".")
		sub, err := utils.ValidateToken(token, config.TokenSecret)
		if err != nil {
			ctx.AbortWithStatusJSON(http.StatusUnauthorized, gin.H{"status": "fail", "message": err.Error()})
			return
		}

		var user models.User
		result := initializers.DB.First(&user, "id = ?", fmt.Sprint(sub))
		if result.Error != nil {
			ctx.AbortWithStatusJSON(http.StatusForbidden, gin.H{"status": "fail", "message": "the user belonging to this token no logger exists"})
			return
		}

		ctx.Set("currentUser", user)
		ctx.Next()
	}
}
After validating the token and checking the database to see if the user still exists, we will add the user record returned by the database to the Gin context to make it available in other controllers.
Step 9 – Create Routes for the Controllers
Now that we have all the route handlers defined, let’s add them to their respective routes.
Auth Routes
routes/auth.routes.go
package routes

import (
	"github.com/gin-gonic/gin"
	"github.com/wpcodevo/golang-gorm-postgres/controllers"
	"github.com/wpcodevo/golang-gorm-postgres/middleware"
)

type AuthRouteController struct {
	authController controllers.AuthController
}

func NewAuthRouteController(authController controllers.AuthController) AuthRouteController {
	return AuthRouteController{authController}
}

func (rc *AuthRouteController) AuthRoute(rg *gin.RouterGroup) {
	router := rg.Group("/auth")

	router.POST("/register", rc.authController.SignUpUser)
	router.POST("/login", rc.authController.SignInUser)
	router.GET("/logout", middleware.DeserializeUser(), rc.authController.LogoutUser)
	router.GET("/verifyemail/:verificationCode", rc.authController.VerifyEmail)
}
User Routes
routes/user.routes.go
package routes

import (
	"github.com/gin-gonic/gin"
	"github.com/wpcodevo/golang-gorm-postgres/controllers"
	"github.com/wpcodevo/golang-gorm-postgres/middleware"
)

type UserRouteController struct {
	userController controllers.UserController
}

func NewRouteUserController(userController controllers.UserController) UserRouteController {
	return UserRouteController{userController}
}

func (uc *UserRouteController) UserRoute(rg *gin.RouterGroup) {

	router := rg.Group("users")
	router.GET("/me", middleware.DeserializeUser(), uc.userController.GetMe)
}
Step 10 – Update and Configure the Main File
Now let’s install the CORS package to enable the Golang server to accept cross-origin requests.
go get github.com/gin-contrib/cors
Then, replace the content of the main.go file with the following code snippets.
main.go
package main

import (
	"log"
	"net/http"

	"github.com/gin-contrib/cors"
	"github.com/gin-gonic/gin"
	"github.com/wpcodevo/golang-gorm-postgres/controllers"
	"github.com/wpcodevo/golang-gorm-postgres/initializers"
	"github.com/wpcodevo/golang-gorm-postgres/routes"
)

var (
	server              *gin.Engine
	AuthController      controllers.AuthController
	AuthRouteController routes.AuthRouteController

	UserController      controllers.UserController
	UserRouteController routes.UserRouteController
)

func init() {
	config, err := initializers.LoadConfig(".")
	if err != nil {
		log.Fatal("? Could not load environment variables", err)
	}

	initializers.ConnectDB(&config)

	AuthController = controllers.NewAuthController(initializers.DB)
	AuthRouteController = routes.NewAuthRouteController(AuthController)

	UserController = controllers.NewUserController(initializers.DB)
	UserRouteController = routes.NewRouteUserController(UserController)

	server = gin.Default()
}

func main() {
	config, err := initializers.LoadConfig(".")
	if err != nil {
		log.Fatal("? Could not load environment variables", err)
	}

	corsConfig := cors.DefaultConfig()
	corsConfig.AllowOrigins = []string{"http://localhost:8000", config.ClientOrigin}
	corsConfig.AllowCredentials = true

	server.Use(cors.New(corsConfig))

	router := server.Group("/api")
	router.GET("/healthchecker", func(ctx *gin.Context) {
		message := "Welcome to Golang with Gorm and Postgres"
		ctx.JSON(http.StatusOK, gin.H{"status": "success", "message": message})
	})

	AuthRouteController.AuthRoute(router)
	UserRouteController.UserRoute(router)
	log.Fatal(server.Run(":" + config.ServerPort))
}
Conclusion
With this HMAC SHA256 JWT authentication example with Golang, GORM, PostgreSQL, Gin Gonic, and Docker-compose, you’ve learned how to secure a Golang application by signing and verifying an HMAC SHA256 token.
for what is function from docker-compose.yaml?
If I, am not use docker-compose, how can I run the project?
I am still confused with docker-compose.yml
The
docker-compose.ymlfile is required to run the Postgres database in the Docker container. GORM supports SQLite so you can adjust the DB connection to use SQLite instead.With this approach, you won’t need the
docker-compose.ymlfile since SQLite is a file-based database.This article/tutorial is just the best.
I’ve been having technical issues trying to consume it in the front end(Reactjs), please can you create a tutorial so that this could be a full-stack project ?
Thanks for all you do for us
Great news! I actually have articles that cover email verification and password reset in React.js. You can find them by clicking on the links below:
I hope you find them helpful! Let me know if you have any further questions.
I can’t register user. i get the 403 response everytime. Same thing I got from running the code on your Github as well. Please help
I cloned the project and tested it on my machine, and everything is working correctly. I made a small change to the
models/user.model.gofile, making thephotofield optional during account registration.This modification was necessary for the frontend application to work seamlessly with the Golang API.
To ensure you have the latest code, you can pull the recent changes from the project’s GitHub repository by running
git pull.Then, follow the instructions outlined in the ‘Running the Golang GORM Project Locally‘ section to set up and run the application.
Additionally, you can proceed to the next section, which covers setting up a React application to interact with the Golang API.
I hope this information helps. If you encounter any issues, please feel free to let me know, and I’ll be happy to assist you further.
Hello there, a month later and i’m still haunted by this error, please how do I reach you personally ?
I understand that you’re still troubled by the error you encountered. To provide the best assistance possible, could you kindly provide more details about the error in the comments section? By sharing specific information, we can work together to find a solution here. This approach will not only help address your concern but also benefit other individuals who might come across the same error in the future.
after i follow the tutorial, i run the code and I the initial “…api/healthchecker” returns the welcome message. for the register it keeps returning 403 in postman. I cloned your code yesterday and its the same thing, I don’t know if there’s a config error somewhere, please I really need help on this
I just cloned the project and followed the instructions outlined in the section “Running the Golang GORM Project Locally“, and I didn’t encounter any errors. Please follow the instructions provided in the “Running the Golang GORM Project Locally” section.
If you are unsure about generating the SMTP credentials, refer to the instructions in the “Step 5 – Create the SMTP Credentials” section. If you continue to experience errors after following the instructions, please let me know.
i can’t thank you enough for your patience, IT WORKS!!
Hello, why is this code not using a pointer to update the user?
auth.controller.go line 76
ac.DB.Save(newUser)
DUUUDE!!
You are amazing, I am pretty much good at implementing and managing the auth in NodeJs, Express and NestJs, and switched to GO recently.
This tutorial is the best in the world of GO as a server.
I did the implementation using GO CHI with its JWT Auth middleware, and your tutorials is easy to understand and work with any framework or HTTP library.
As my use case is more complex (multi tenancy), I had no issue following your examples.
Most appreciated section is the emailing which I believe that’s the best bonus someone can add to a tutorial outlining Auth in GO.
MUST DONATE.
Thanks for your kind words.