
This article will teach you how to secure a Golang application with access and refresh tokens using GORM, Postgres, Docker, and Docker-compose. Also, you will learn how to use the RS256 algorithm with private and public keys to sign the tokens.
Build Golang, GORM, PostgreSQL RESTful API Series:
- How to Setup Golang GORM RESTful API Project with Postgres
- API with Golang + GORM + PostgreSQL: Access & Refresh Tokens
- Golang and GORM – User Registration and Email Verification
- Forgot/Reset Passwords in Golang with HTML Email
- Build a RESTful CRUD API with Golang
Related articles:
- Golang & MongoDB: JWT Authentication and Authorization
- API with Golang + MongoDB: Send HTML Emails with Gomail
- API with Golang, Gin Gonic & MongoDB: Forget/Reset Password
- Build Golang gRPC Server and Client: SignUp User & Verify Email
- Build Golang gRPC Server and Client: Access & Refresh Tokens
- Node.js + TypeScript + MongoDB: JWT Authentication
- Node.js + TypeScript + MongoDB: JWT Refresh Token
- API with Node.js + PostgreSQL + TypeORM: JWT Authentication
Prerequisites
Before you begin, you will need:
- VSCode as the IDE for Developing the Golang app. VS Code comes with a lot of tools and extensions to help ease your development process with Go.
- Be familiar with the basics of Golang, SQL, pgAdmin, and Postgres queries.
- A working Golang environment on your machine. Click here to download the latest version of Go.
- Docker installed in your working environment
Golang, Gin & GORM JWT Authentication Overview
If you are using Postman as your API testing tool then import the Postman collection I used in testing the Golang, GORM, Postgres, and Gin RESTful API to make your life easier.
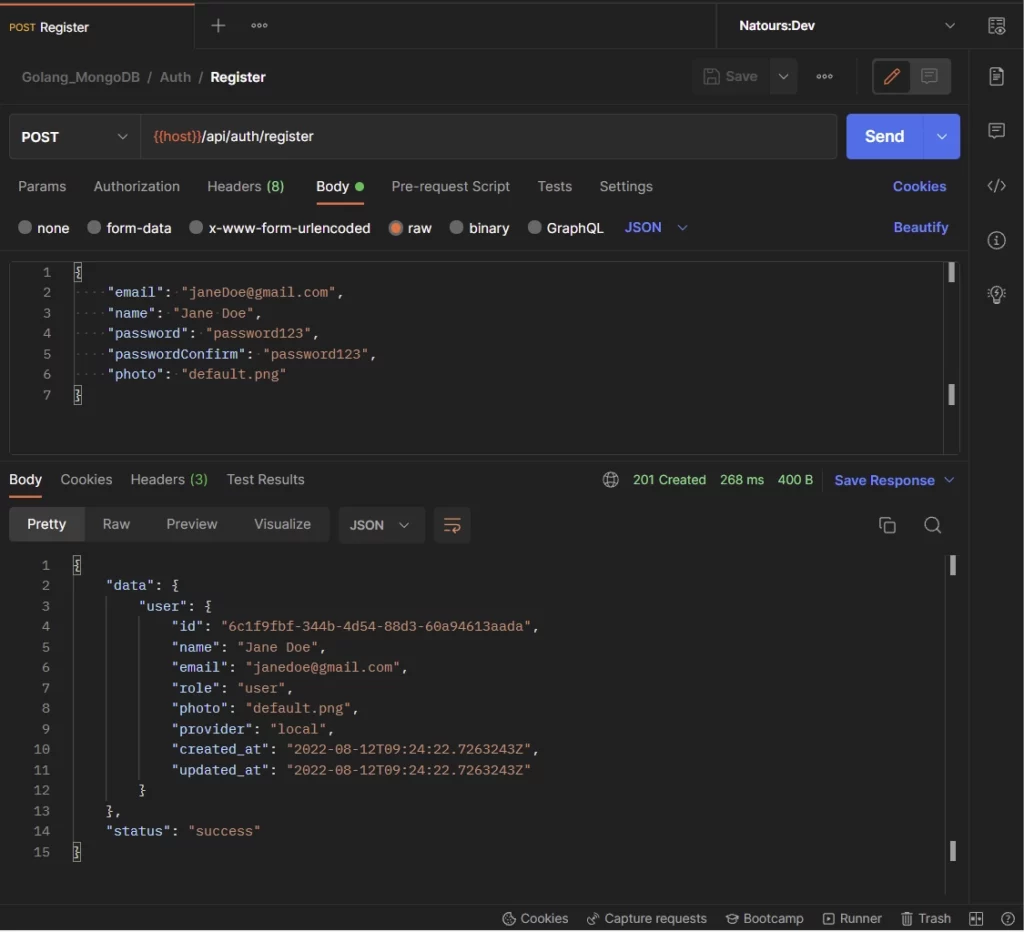
-Here, the user provides the necessary credentials and makes a POST request to the /api/auth/register endpoint to register for an account.
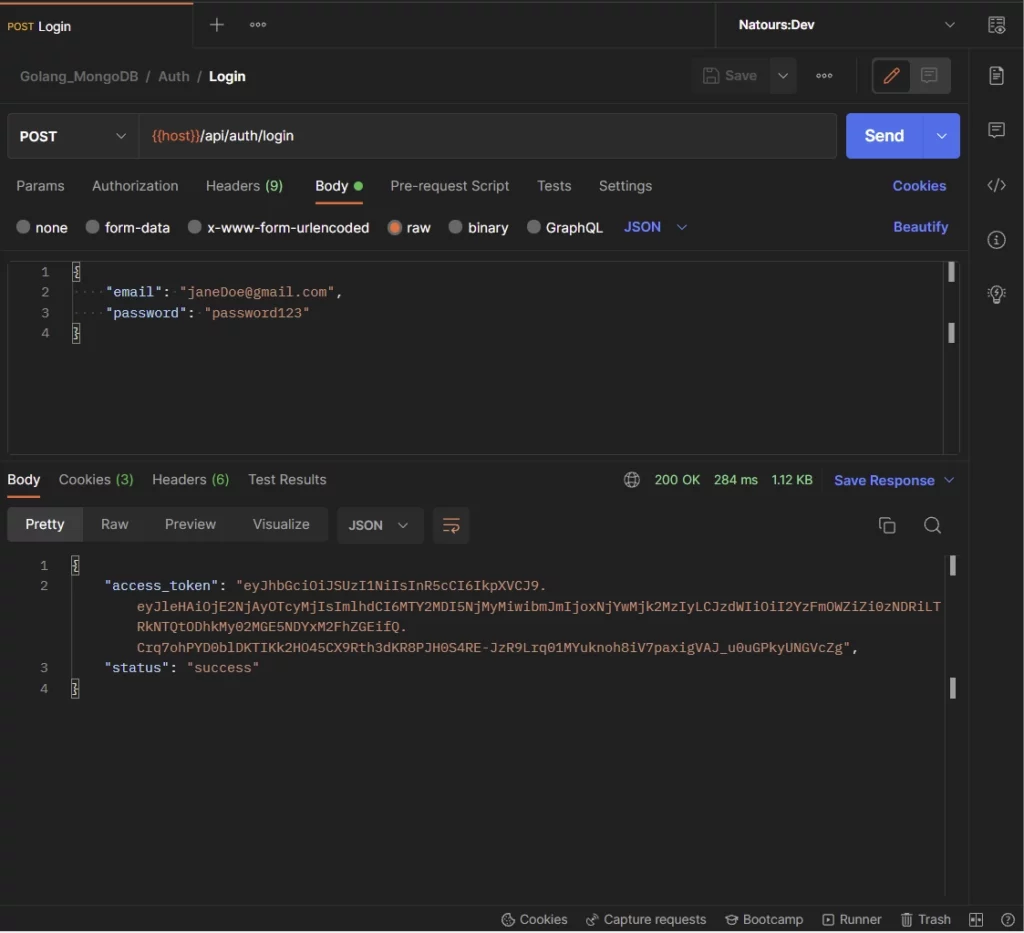
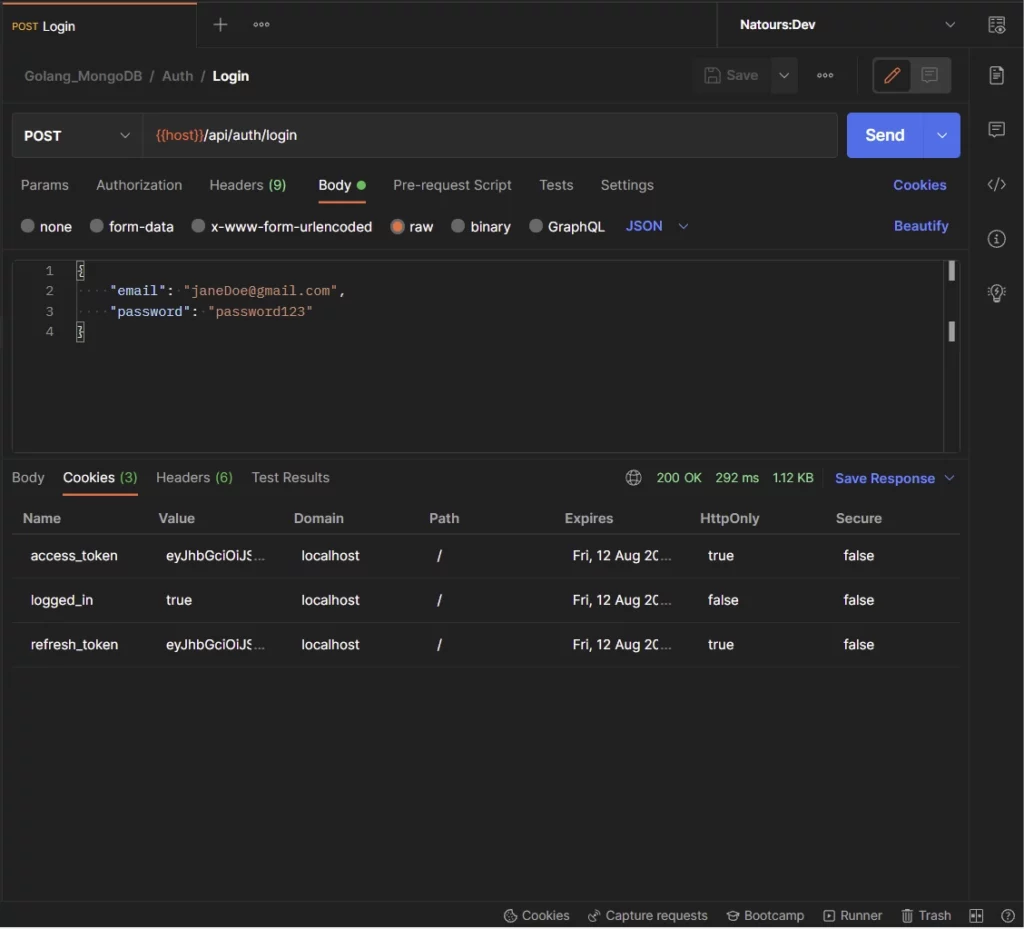
-Then, the user makes a POST request with the credentials used in registering for the account to the /api/auth/login endpoint.
The Golang server validates the credentials and returns access and refresh tokens to the client.
Next, click on the Cookies tab in your API testing tool to see the cookies returned by the Golang server.
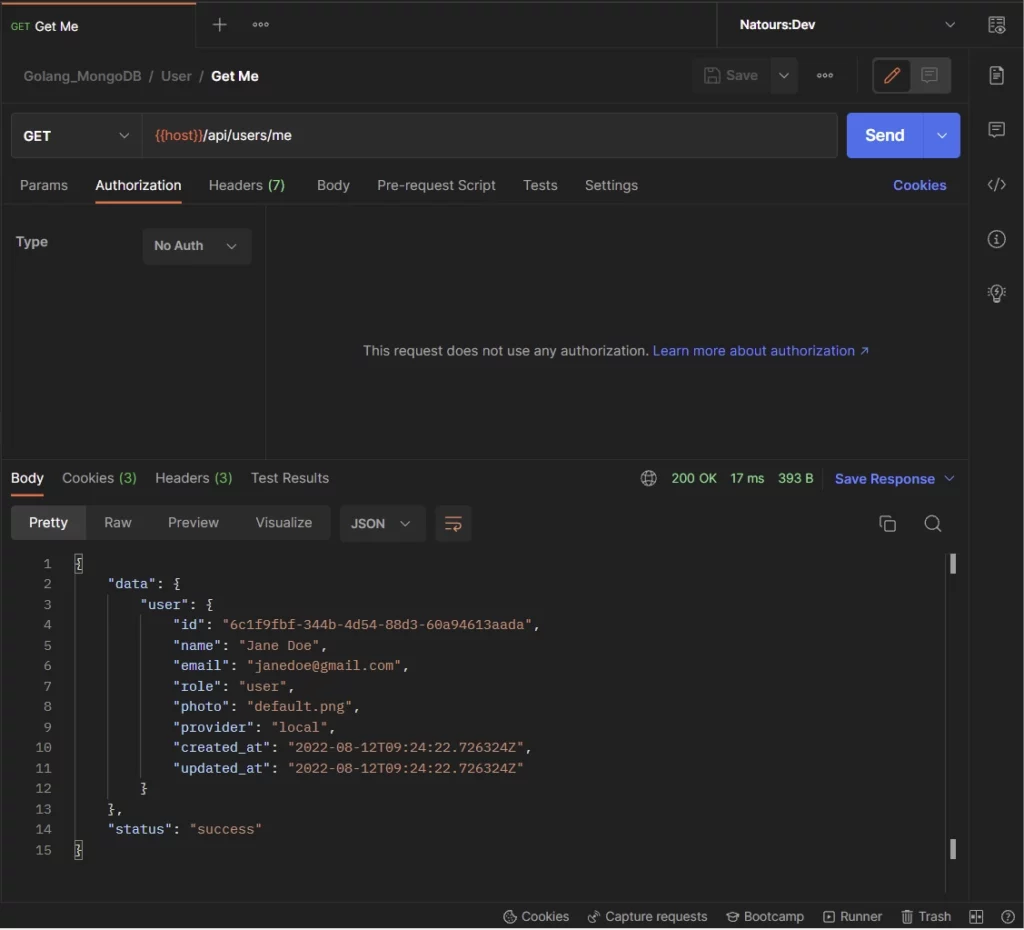
-Upon receiving the cookies, the user makes a GET request to the /api/users/me endpoint to retrieve the profile information.
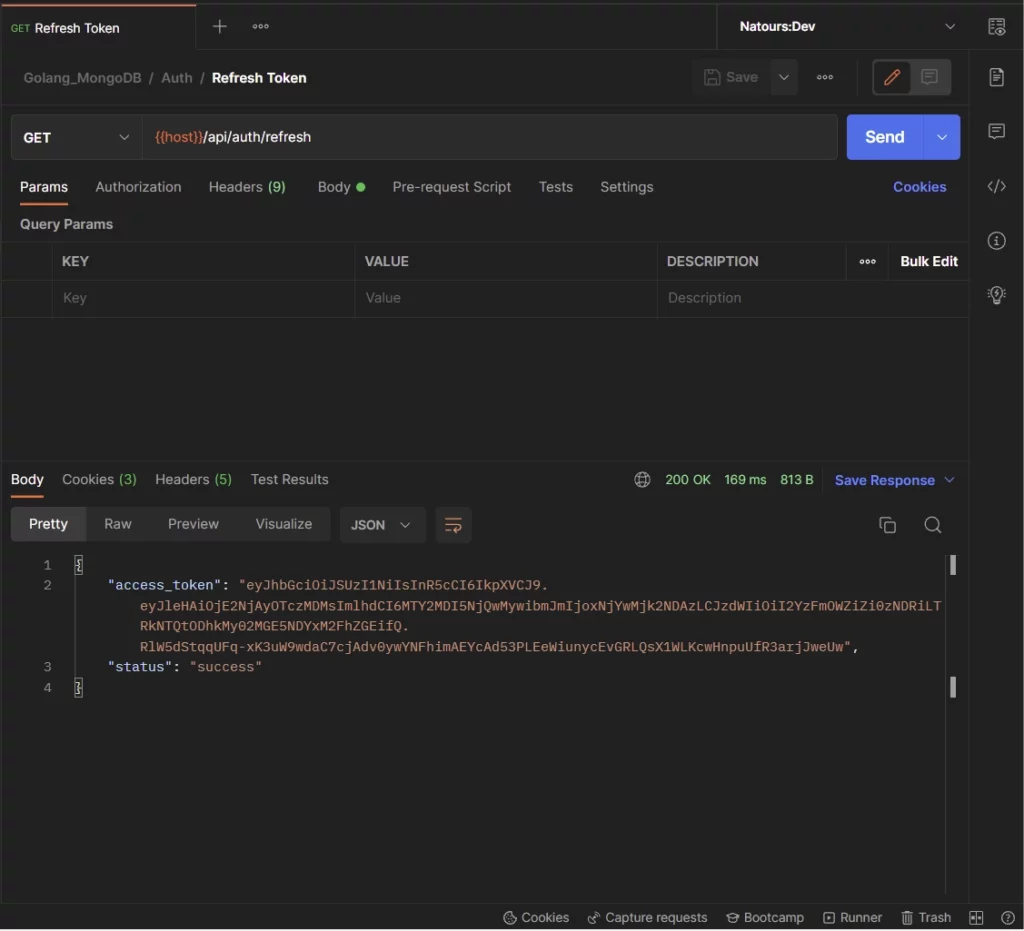
-Once the access token has expired, the user makes a GET request to the /api/auth/refresh endpoint to retrieve a new access token.
The Golang server extracts the refresh token cookie from the request header, validates it, checks to see if the user belonging to the token still exists, and returns a new access token to the client.
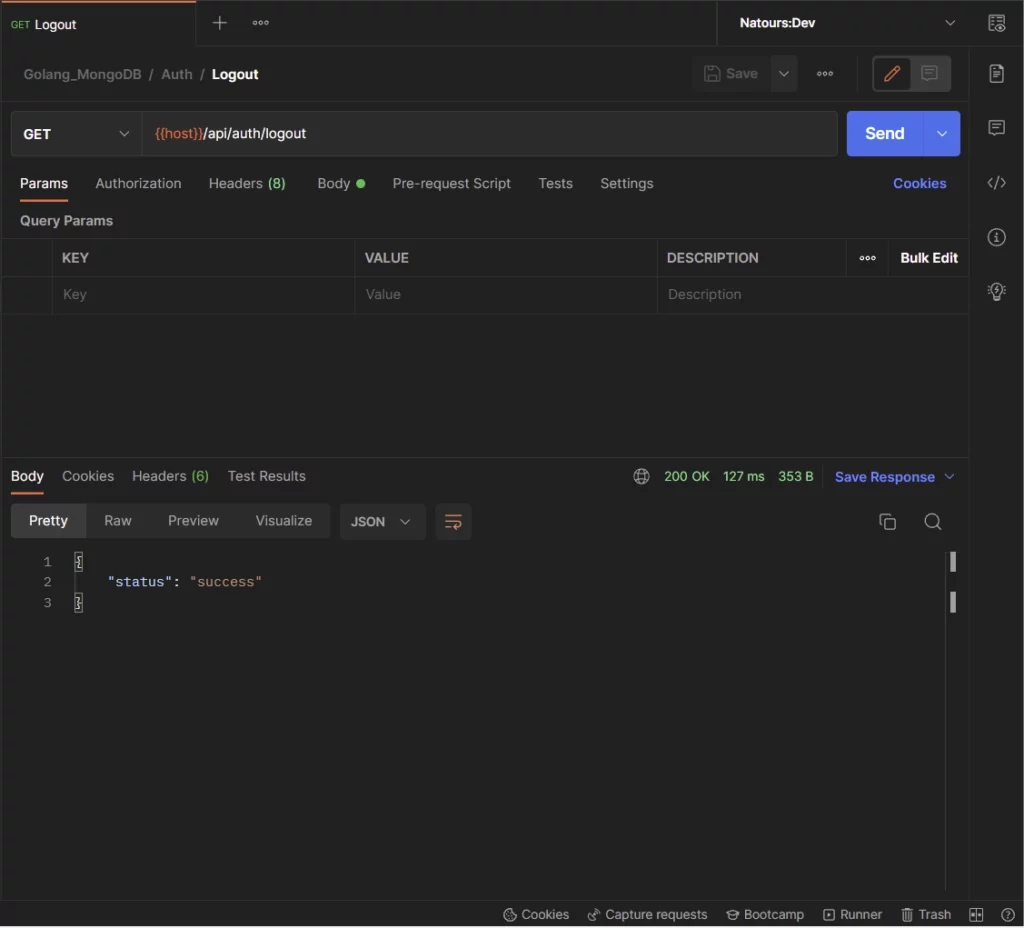
-Lastly, the user can make a GET request to the /api/auth/logout endpoint to sign out from the server.
The Golang server will return expired cookies to the user’s browser or client to clear the existing cookies.
Note: If you landed here from a Google search, make sure you catch up by following the Golang, GORM & PostgreSQL setup article.
JWT Authentication Example with Golang and GORM
With this Golang, GORM, Gin Gonic, and Postgres example, the user will be able to do the following:
- Create a new account
- Sign in with his credentials
- Refresh the access token
- Retrieve his profile data
- Log out from the account
| RESOURCE | HTTP METHOD | ROUTE | DESCRIPTION |
|---|---|---|---|
| users | GET | /api/users/me | Retrieve profile data |
| auth | POST | /api/auth/register | Create a new user |
| auth | POST | /api/auth/login | Sign in the user |
| auth | GET | /api/auth/refresh | Refresh the access token |
| auth | GET | /api/auth/logout | Logout the user |
Step 1 – Generate the Private and Public Keys
In this step, you will generate a private key to sign the JSON Web Token and a public key to verify the token. Also, you will use the RS256 algorithm (asymmetric algorithm) to sign the access and refresh tokens.
If you are only here to learn how to implement JWT authentication with Golang then use the private and public keys included in the environment variables file.
However, you can follow the steps below to generate them yourself:
Step 1: Click here to open the key generation site. On the website, click on the “Generate New Keys” button to generate the private and public keys.
Alternatively, you can use the Web Crypto API to generate them with code.
Step 2: Copy the generated private key and visit this Base64 encoding website to convert it to base64.
Step 3: Copy the base64 encoded key and add it to the app.env file as ACCESS_TOKEN_PRIVATE_KEY .
Step 4: Go back to the key generation site and copy the corresponding public key.
Step 5: Navigate to the Base64 encoding website again and convert the public key to base64.
Step 6: Add the base64 encoded public key to the app.env file as ACCESS_TOKEN_PUBLIC_KEY .
Step 7: Repeat the above steps for the refresh token.
If you couldn’t generate and encode the keys, copy the environment variables below and add them to your app.env file.
app.env
POSTGRES_HOST=127.0.0.1
POSTGRES_USER=postgres
POSTGRES_PASSWORD=password123
POSTGRES_DB=golang-gorm
POSTGRES_PORT=6500

PORT=8000
CLIENT_ORIGIN=http://localhost:3000

ACCESS_TOKEN_PRIVATE_KEY=LS0tLS1CRUdJTiBSU0EgUFJJVkFURSBLRVktLS0tLQpNSUlCUEFJQkFBSkJBTzVIKytVM0xrWC91SlRvRHhWN01CUURXSTdGU0l0VXNjbGFFKzlaUUg5Q2VpOGIxcUVmCnJxR0hSVDVWUis4c3UxVWtCUVpZTER3MnN3RTVWbjg5c0ZVQ0F3RUFBUUpCQUw4ZjRBMUlDSWEvQ2ZmdWR3TGMKNzRCdCtwOXg0TEZaZXMwdHdtV3Vha3hub3NaV0w4eVpSTUJpRmI4a25VL0hwb3piTnNxMmN1ZU9wKzVWdGRXNApiTlVDSVFENm9JdWxqcHdrZTFGY1VPaldnaXRQSjNnbFBma3NHVFBhdFYwYnJJVVI5d0loQVBOanJ1enB4ckhsCkUxRmJxeGtUNFZ5bWhCOU1HazU0Wk1jWnVjSmZOcjBUQWlFQWhML3UxOVZPdlVBWVd6Wjc3Y3JxMTdWSFBTcXoKUlhsZjd2TnJpdEg1ZGdjQ0lRRHR5QmFPdUxuNDlIOFIvZ2ZEZ1V1cjg3YWl5UHZ1YStxeEpXMzQrb0tFNXdJZwpQbG1KYXZsbW9jUG4rTkVRdGhLcTZuZFVYRGpXTTlTbktQQTVlUDZSUEs0PQotLS0tLUVORCBSU0EgUFJJVkFURSBLRVktLS0tLQ==
ACCESS_TOKEN_PUBLIC_KEY=LS0tLS1CRUdJTiBQVUJMSUMgS0VZLS0tLS0KTUZ3d0RRWUpLb1pJaHZjTkFRRUJCUUFEU3dBd1NBSkJBTzVIKytVM0xrWC91SlRvRHhWN01CUURXSTdGU0l0VQpzY2xhRSs5WlFIOUNlaThiMXFFZnJxR0hSVDVWUis4c3UxVWtCUVpZTER3MnN3RTVWbjg5c0ZVQ0F3RUFBUT09Ci0tLS0tRU5EIFBVQkxJQyBLRVktLS0tLQ==
ACCESS_TOKEN_EXPIRED_IN=15m
ACCESS_TOKEN_MAXAGE=15


REFRESH_TOKEN_PRIVATE_KEY=LS0tLS1CRUdJTiBSU0EgUFJJVkFURSBLRVktLS0tLQpNSUlCT1FJQkFBSkJBSWFJcXZXeldCSndnYjR1SEhFQ01RdHFZMTI5b2F5RzVZMGlGcG51a0J1VHpRZVlQWkE4Cmx4OC9lTUh3Rys1MlJGR3VxMmE2N084d2s3TDR5dnY5dVY4Q0F3RUFBUUpBRUZ6aEJqOUk3LzAxR285N01CZUgKSlk5TUJLUEMzVHdQQVdwcSswL3p3UmE2ZkZtbXQ5NXNrN21qT3czRzNEZ3M5T2RTeWdsbTlVdndNWXh6SXFERAplUUloQVA5UStrMTBQbGxNd2ZJbDZtdjdTMFRYOGJDUlRaZVI1ZFZZb3FTeW40YmpBaUVBaHVUa2JtZ1NobFlZCnRyclNWZjN0QWZJcWNVUjZ3aDdMOXR5MVlvalZVRlVDSUhzOENlVHkwOWxrbkVTV0dvV09ZUEZVemhyc3Q2Z08KU3dKa2F2VFdKdndEQWlBdWhnVU8yeEFBaXZNdEdwUHVtb3hDam8zNjBMNXg4d012bWdGcEFYNW9uUUlnQzEvSwpNWG1heWtsaFRDeWtXRnpHMHBMWVdkNGRGdTI5M1M2ZUxJUlNIS009Ci0tLS0tRU5EIFJTQSBQUklWQVRFIEtFWS0tLS0t
REFRESH_TOKEN_PUBLIC_KEY=LS0tLS1CRUdJTiBQVUJMSUMgS0VZLS0tLS0KTUZ3d0RRWUpLb1pJaHZjTkFRRUJCUUFEU3dBd1NBSkJBSWFJcXZXeldCSndnYjR1SEhFQ01RdHFZMTI5b2F5Rwo1WTBpRnBudWtCdVR6UWVZUFpBOGx4OC9lTUh3Rys1MlJGR3VxMmE2N084d2s3TDR5dnY5dVY4Q0F3RUFBUT09Ci0tLS0tRU5EIFBVQkxJQyBLRVktLS0tLQ==
REFRESH_TOKEN_EXPIRED_IN=60m
REFRESH_TOKEN_MAXAGE=60
Step 2 – Load and Validate the Environment Variables
While there are numerous ways to load environment variables in Golang, we will be using the Viper package because of the following reasons:
- It can locate, load, unmarshal, and validate values from a configuration file.
- It can be used to set or override the default values
- It allows both encrypted and unencrypted values
- It supports JSON, ENV, TOML, YAML, or INI extensions
- It also allows values from environment variables or the command line.
With that out of the way, install the Viper package with this command
go get github.com/spf13/viper
After installing the Viper package, create a initializers/loadEnv.go file and add the following code to configure Viper to use the mapstructure package behind the scene to unmarshaling values.
initializers/loadEnv.go
package initializers

import (
	"time"

	"github.com/spf13/viper"
)

type Config struct {
	DBHost         string `mapstructure:"POSTGRES_HOST"`
	DBUserName     string `mapstructure:"POSTGRES_USER"`
	DBUserPassword string `mapstructure:"POSTGRES_PASSWORD"`
	DBName         string `mapstructure:"POSTGRES_DB"`
	DBPort         string `mapstructure:"POSTGRES_PORT"`
	ServerPort     string `mapstructure:"PORT"`

	ClientOrigin string `mapstructure:"CLIENT_ORIGIN"`

	AccessTokenPrivateKey  string        `mapstructure:"ACCESS_TOKEN_PRIVATE_KEY"`
	AccessTokenPublicKey   string        `mapstructure:"ACCESS_TOKEN_PUBLIC_KEY"`
	RefreshTokenPrivateKey string        `mapstructure:"REFRESH_TOKEN_PRIVATE_KEY"`
	RefreshTokenPublicKey  string        `mapstructure:"REFRESH_TOKEN_PUBLIC_KEY"`
	AccessTokenExpiresIn   time.Duration `mapstructure:"ACCESS_TOKEN_EXPIRED_IN"`
	RefreshTokenExpiresIn  time.Duration `mapstructure:"REFRESH_TOKEN_EXPIRED_IN"`
	AccessTokenMaxAge      int           `mapstructure:"ACCESS_TOKEN_MAXAGE"`
	RefreshTokenMaxAge     int           `mapstructure:"REFRESH_TOKEN_MAXAGE"`
}

func LoadConfig(path string) (config Config, err error) {
	viper.AddConfigPath(path)
	viper.SetConfigType("env")
	viper.SetConfigName("app")

	viper.AutomaticEnv()

	err = viper.ReadInConfig()
	if err != nil {
		return
	}

	err = viper.Unmarshal(&config)
	return
}
Let’s evaluate the above code. We defined a struct and used the mapstructure tags to list the environment variables we want Viper to load.
In the LoadConfig() receiver function, we evoked the viper.AddConfigPath() method to tell Viper the location of the environment variables file.
Next, we evoked the viper.SetConfigType() method to tell Viper the type of configuration file we used.
The viper.ReadInConfig() method tells Viper to start reading the values in the config file.
Lastly, we called the viper.Unmarshal() method to unmarshal the values into the provided struct.
Step 3 – Create the Database Models with GORM
In this section, you will define a struct that will be used by GORM to generate the corresponding SQL table in the database. In addition, you will create other structs that will be used by the Gin Gonic framework to validate the request and response body.
GORM provides an intuitive way to create structs that represent the underlying SQL tables in the database. By default, GORM uses the ID column as the primary key and snake_case notation for the table name and columns.
A common approach is to use singular names for the Go structs that will be transformed into the SQL tables. Doing it this way will allow GORM to pluralize them in the database.
Instead of using sequential integers for the ID column, I decided to use the UUID data type instead. This step requires you to install the UUID OSSP module in the Postgres database.
Read the Golang, GORM & PostgreSQL setup article to learn how to install the UUID OSSP extension.
models/user.model.go
package models
import (
"time"
"github.com/google/uuid"
)
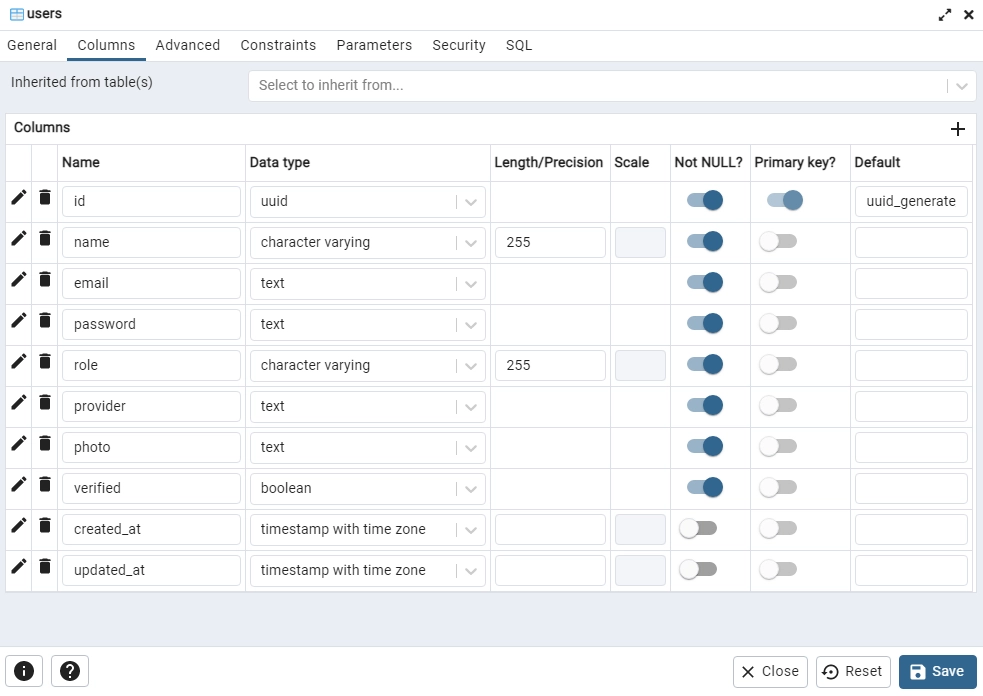
type User struct {
ID uuid.UUID `gorm:"type:uuid;default:uuid_generate_v4();primary_key"`
Name string `gorm:"type:varchar(255);not null"`
Email string `gorm:"uniqueIndex;not null"`
Password string `gorm:"not null"`
Role string `gorm:"type:varchar(255);not null"`
Provider string `gorm:"not null"`
Photo string `gorm:"not null"`
Verified bool `gorm:"not null"`
CreatedAt time.Time
UpdatedAt time.Time
}
type SignUpInput struct {
Name string `json:"name" binding:"required"`
Email string `json:"email" binding:"required"`
Password string `json:"password" binding:"required,min=8"`
PasswordConfirm string `json:"passwordConfirm" binding:"required"`
Photo string `json:"photo" binding:"required"`
}
type SignInInput struct {
Email string `json:"email" binding:"required"`
Password string `json:"password" binding:"required"`
}
type UserResponse struct {
ID uuid.UUID `json:"id,omitempty"`
Name string `json:"name,omitempty"`
Email string `json:"email,omitempty"`
Role string `json:"role,omitempty"`
Photo string `json:"photo,omitempty"`
Provider string `json:"provider"`
CreatedAt time.Time `json:"created_at"`
UpdatedAt time.Time `json:"updated_at"`
}
Step 4 – Run the Database Migration
Database migration is a technique used to track the migration history of your database model throughout the life cycle of the application. It’s similar to how we track source codes with Git version control.
GORM provides a database migration tool called AutoMigrate. This tool automatically migrates the schema to the database and keeps the database schema in sync with the GORM model.
By default, AutoMigrate automatically creates database foreign key constraints, however, you can disable this feature during initialization.
To get started, create a migrate/migrate.go file and add the following settings to configure the AutoMigrate tool.
migrate/migrate.go
package main

import (
	"fmt"
	"log"

	"github.com/wpcodevo/golang-gorm-postgres/initializers"
	"github.com/wpcodevo/golang-gorm-postgres/models"
)

func init() {
	config, err := initializers.LoadConfig(".")
	if err != nil {
		log.Fatal("? Could not load environment variables", err)
	}

	initializers.ConnectDB(&config)
}

func main() {
	initializers.DB.AutoMigrate(&models.User{})
	fmt.Println("? Migration complete")
}
We created an init function to load the environment variables and create a database connection pool to the Postgres server.
Then, we called the AutoMigrate function and provided it with the User struct we defined above.
Now open the integrated terminal in VS Code and run this command to migrate the schema to the database.
go run migrate/migrate.go
Note: Install the UUID OSSP module for the migration to work. Follow the Golang, GORM & PostgreSQL setup article to install it.
Open any Postgres client and sign in with the PostgreSQL credentials provided in the app.env file to view the SQL table added by the GORM migration tool.
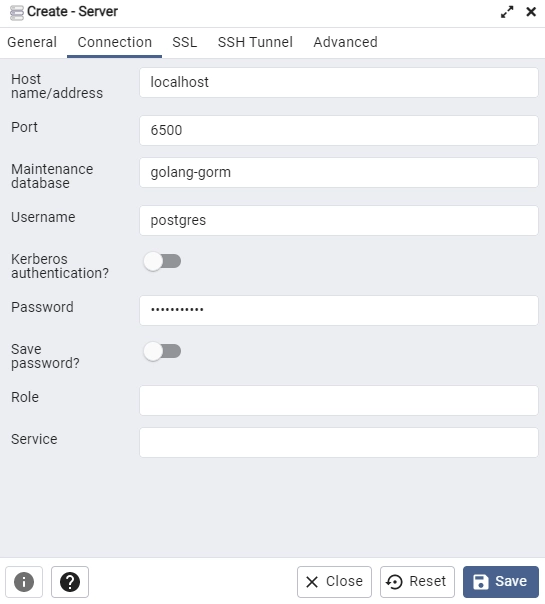
In this example, am going to use pgAdmin.
Step 5 – Hash and Verify the Password
Password management is a critical step to mitigating data breaches that may put the reputation of an organization in jeopardy. It’s best practice to encrypt the plain-text password provided by the user before saving the record to the database.
In this section, you will use a well-known hashing algorithm to transform the plain password into a hashed one. This will make it difficult for a hacker to easily decrypt the hashed password to obtain the original plain-text password.
The Golang community has built a Bcrypt package to help developers easily hash strings. To hash the password, we will use a Cost Factor 10 to make it difficult to brute force.
The Cost Factor is the number of iterations used by the hashing algorithm to transform each password.
Now create a utils/password.go file and add the following code:
utils/password.go
package utils

import (
	"fmt"

	"golang.org/x/crypto/bcrypt"
)

func HashPassword(password string) (string, error) {
	hashedPassword, err := bcrypt.GenerateFromPassword([]byte(password), bcrypt.DefaultCost)

	if err != nil {
		return "", fmt.Errorf("could not hash password %w", err)
	}
	return string(hashedPassword), nil
}

func VerifyPassword(hashedPassword string, candidatePassword string) error {
	return bcrypt.CompareHashAndPassword([]byte(hashedPassword), []byte(candidatePassword))
}
HashPasswordfunction – takes a plain-text password and returns a hashed one.VerifyPasswordfunction- takes the hashed and plain-text passwords as arguments and verifies them.
Step 6 – Sign and Verify the JSON Web Tokens
In this step, you will use the popular RS256 algorithm with the private/public keys to sign and verify the access and refresh tokens.
JSON Web Token gives us the ability to implement stateless authentication to securely transmit information between parties using JSON objects.
Once the user has obtained the JWT token from the server, each subsequent request to the server will include the token, allowing the user to access protected routes, services, and resources.
Function to Generate the Tokens
With that brief explanation, let’s create a utils/token.go file and add the function below to sign the access and refresh tokens.
utils/token.go
package utils

import (
	"encoding/base64"
	"fmt"
	"time"

	"github.com/golang-jwt/jwt"
)

func CreateToken(ttl time.Duration, payload interface{}, privateKey string) (string, error) {
	decodedPrivateKey, err := base64.StdEncoding.DecodeString(privateKey)
	if err != nil {
		return "", fmt.Errorf("could not decode key: %w", err)
	}
	key, err := jwt.ParseRSAPrivateKeyFromPEM(decodedPrivateKey)

	if err != nil {
		return "", fmt.Errorf("create: parse key: %w", err)
	}

	now := time.Now().UTC()

	claims := make(jwt.MapClaims)
	claims["sub"] = payload
	claims["exp"] = now.Add(ttl).Unix()
	claims["iat"] = now.Unix()
	claims["nbf"] = now.Unix()

	token, err := jwt.NewWithClaims(jwt.SigningMethodRS256, claims).SignedString(key)

	if err != nil {
		return "", fmt.Errorf("create: sign token: %w", err)
	}

	return token, nil
}
Quite a lot happening in the above, let’s break it down:
- To begin, we decoded the base64 encoded private key back to a UTF8 string.
- Then, we parsed the PEM encoded private key and defined the cookie options with the built-in
makefunction provided by Go. - Finally, we signed the token with the RS256 algorithm and returned it from the function.
Function to Verify the Tokens
Now that we are able to sign the access and refresh tokens, let’s create a function to verify them.
This function will validate the token and check to see if the token was manipulated or has expired.
utils/token.go
func ValidateToken(token string, publicKey string) (interface{}, error) {
	decodedPublicKey, err := base64.StdEncoding.DecodeString(publicKey)
	if err != nil {
		return nil, fmt.Errorf("could not decode: %w", err)
	}

	key, err := jwt.ParseRSAPublicKeyFromPEM(decodedPublicKey)

	if err != nil {
		return "", fmt.Errorf("validate: parse key: %w", err)
	}

	parsedToken, err := jwt.Parse(token, func(t *jwt.Token) (interface{}, error) {
		if _, ok := t.Method.(*jwt.SigningMethodRSA); !ok {
			return nil, fmt.Errorf("unexpected method: %s", t.Header["alg"])
		}
		return key, nil
	})

	if err != nil {
		return nil, fmt.Errorf("validate: %w", err)
	}

	claims, ok := parsedToken.Claims.(jwt.MapClaims)
	if !ok || !parsedToken.Valid {
		return nil, fmt.Errorf("validate: invalid token")
	}

	return claims["sub"], nil
}
Step 7 – Create the Authentication Controllers
In this section, you will create controllers that will be called to:
- Add the new user to the database
- Sign in the registered user
- Request a new access token
- Sign out the authenticated user
Also, you will create a struct to extend the functionalities of the gorm.DB struct. This will allow us to access all the CRUD functions defined by GORM.
Register User Controller
Now let’s create the handler to add the new user to the Postgres database.
controllers/auth.controller.go
package controllers

import (
	"fmt"
	"net/http"
	"strings"
	"time"

	"github.com/gin-gonic/gin"
	"github.com/wpcodevo/golang-gorm-postgres/initializers"
	"github.com/wpcodevo/golang-gorm-postgres/models"
	"github.com/wpcodevo/golang-gorm-postgres/utils"
	"gorm.io/gorm"
)

type AuthController struct {
	DB *gorm.DB
}

func NewAuthController(DB *gorm.DB) AuthController {
	return AuthController{DB}
}

// [...] SignUp User
func (ac *AuthController) SignUpUser(ctx *gin.Context) {
	var payload *models.SignUpInput

	if err := ctx.ShouldBindJSON(&payload); err != nil {
		ctx.JSON(http.StatusBadRequest, gin.H{"status": "fail", "message": err.Error()})
		return
	}

	if payload.Password != payload.PasswordConfirm {
		ctx.JSON(http.StatusBadRequest, gin.H{"status": "fail", "message": "Passwords do not match"})
		return
	}

	hashedPassword, err := utils.HashPassword(payload.Password)
	if err != nil {
		ctx.JSON(http.StatusBadGateway, gin.H{"status": "error", "message": err.Error()})
		return
	}

	now := time.Now()
	newUser := models.User{
		Name:      payload.Name,
		Email:     strings.ToLower(payload.Email),
		Password:  hashedPassword,
		Role:      "user",
		Verified:  true,
		Photo:     payload.Photo,
		Provider:  "local",
		CreatedAt: now,
		UpdatedAt: now,
	}

	result := ac.DB.Create(&newUser)

	if result.Error != nil && strings.Contains(result.Error.Error(), "duplicate key value violates unique") {
		ctx.JSON(http.StatusConflict, gin.H{"status": "fail", "message": "User with that email already exists"})
		return
	} else if result.Error != nil {
		ctx.JSON(http.StatusBadGateway, gin.H{"status": "error", "message": "Something bad happened"})
		return
	}

	userResponse := &models.UserResponse{
		ID:        newUser.ID,
		Name:      newUser.Name,
		Email:     newUser.Email,
		Photo:     newUser.Photo,
		Role:      newUser.Role,
		Provider:  newUser.Provider,
		CreatedAt: newUser.CreatedAt,
		UpdatedAt: newUser.UpdatedAt,
	}
	ctx.JSON(http.StatusCreated, gin.H{"status": "success", "data": gin.H{"user": userResponse}})
}
Let’s evaluate the above code:
- First, we validated the request body against the
models.SignUpInputstruct and returned a validation error if any of the rules were broken. - Then, we compared the passwords to see if they match before calling the
HashPasswordutility function to hash the plain-text password. - Next, we defined the
models.Userarguments and called the Create function provided by GORM to add the user to the database. - Lastly, we used the
models.UserResponsestruct to filter the data returned by the PostgreSQL database. This step is needed to avoid sending sensitive data to the client.
Login User Controller
controllers/auth.controller.go
// [...] SignUp User

// [...] Login User
func (ac *AuthController) SignInUser(ctx *gin.Context) {
	var payload *models.SignInInput

	if err := ctx.ShouldBindJSON(&payload); err != nil {
		ctx.JSON(http.StatusBadRequest, gin.H{"status": "fail", "message": err.Error()})
		return
	}

	var user models.User
	result := ac.DB.First(&user, "email = ?", strings.ToLower(payload.Email))
	if result.Error != nil {
		ctx.JSON(http.StatusBadRequest, gin.H{"status": "fail", "message": "Invalid email or Password"})
		return
	}

	if err := utils.VerifyPassword(user.Password, payload.Password); err != nil {
		ctx.JSON(http.StatusBadRequest, gin.H{"status": "fail", "message": "Invalid email or Password"})
		return
	}

	config, _ := initializers.LoadConfig(".")

	// Generate Tokens
	access_token, err := utils.CreateToken(config.AccessTokenExpiresIn, user.ID, config.AccessTokenPrivateKey)
	if err != nil {
		ctx.JSON(http.StatusBadRequest, gin.H{"status": "fail", "message": err.Error()})
		return
	}

	refresh_token, err := utils.CreateToken(config.RefreshTokenExpiresIn, user.ID, config.RefreshTokenPrivateKey)
	if err != nil {
		ctx.JSON(http.StatusBadRequest, gin.H{"status": "fail", "message": err.Error()})
		return
	}

	ctx.SetCookie("access_token", access_token, config.AccessTokenMaxAge*60, "/", "localhost", false, true)
	ctx.SetCookie("refresh_token", refresh_token, config.RefreshTokenMaxAge*60, "/", "localhost", false, true)
	ctx.SetCookie("logged_in", "true", config.AccessTokenMaxAge*60, "/", "localhost", false, false)

	ctx.JSON(http.StatusOK, gin.H{"status": "success", "access_token": access_token})
}
In the above code, we used the models.SignInInput struct to validate the credentials provided by the user.
Next, we queried the database to check if a user with that email address exists before calling the VerifyPassword utility function to validate the provided password against the hashed one.
Lastly, we generated the access and refresh tokens and sent them to the client as HTTPOnly cookies.
Refresh Access Token Controller
Here, you will create a function that will be evoked to refresh the access token when it expires.
controllers/auth.controller.go
// [...] SignUp User

// [...] Login User

// [...] Refresh Access Token
func (ac *AuthController) RefreshAccessToken(ctx *gin.Context) {
	message := "could not refresh access token"

	cookie, err := ctx.Cookie("refresh_token")

	if err != nil {
		ctx.AbortWithStatusJSON(http.StatusForbidden, gin.H{"status": "fail", "message": message})
		return
	}

	config, _ := initializers.LoadConfig(".")

	sub, err := utils.ValidateToken(cookie, config.RefreshTokenPublicKey)
	if err != nil {
		ctx.AbortWithStatusJSON(http.StatusForbidden, gin.H{"status": "fail", "message": err.Error()})
		return
	}

	var user models.User
	result := ac.DB.First(&user, "id = ?", fmt.Sprint(sub))
	if result.Error != nil {
		ctx.AbortWithStatusJSON(http.StatusForbidden, gin.H{"status": "fail", "message": "the user belonging to this token no logger exists"})
		return
	}

	access_token, err := utils.CreateToken(config.AccessTokenExpiresIn, user.ID, config.AccessTokenPrivateKey)
	if err != nil {
		ctx.AbortWithStatusJSON(http.StatusForbidden, gin.H{"status": "fail", "message": err.Error()})
		return
	}

	ctx.SetCookie("access_token", access_token, config.AccessTokenMaxAge*60, "/", "localhost", false, true)
	ctx.SetCookie("logged_in", "true", config.AccessTokenMaxAge*60, "/", "localhost", false, false)

	ctx.JSON(http.StatusOK, gin.H{"status": "success", "access_token": access_token})
}
Logout Controller
Finally, let’s create a controller to send expired cookies to the user in order to delete the existing cookies from their browser or API client.
controllers/auth.controller.go
// [...] SignUp User

// [...] Login User

// [...] Refresh Access Token

// [...] Logout user
func (ac *AuthController) LogoutUser(ctx *gin.Context) {
	ctx.SetCookie("access_token", "", -1, "/", "localhost", false, true)
	ctx.SetCookie("refresh_token", "", -1, "/", "localhost", false, true)
	ctx.SetCookie("logged_in", "", -1, "/", "localhost", false, false)

	ctx.JSON(http.StatusOK, gin.H{"status": "success"})
}
Complete Code of the Auth Controllers
controllers/auth.controller.go
package controllers

import (
	"fmt"
	"net/http"
	"strings"
	"time"

	"github.com/gin-gonic/gin"
	"github.com/wpcodevo/golang-gorm-postgres/initializers"
	"github.com/wpcodevo/golang-gorm-postgres/models"
	"github.com/wpcodevo/golang-gorm-postgres/utils"
	"gorm.io/gorm"
)

type AuthController struct {
	DB *gorm.DB
}

func NewAuthController(DB *gorm.DB) AuthController {
	return AuthController{DB}
}

// [...] SignUp User
func (ac *AuthController) SignUpUser(ctx *gin.Context) {
	var payload *models.SignUpInput

	if err := ctx.ShouldBindJSON(&payload); err != nil {
		ctx.JSON(http.StatusBadRequest, gin.H{"status": "fail", "message": err.Error()})
		return
	}

	if payload.Password != payload.PasswordConfirm {
		ctx.JSON(http.StatusBadRequest, gin.H{"status": "fail", "message": "Passwords do not match"})
		return
	}

	hashedPassword, err := utils.HashPassword(payload.Password)
	if err != nil {
		ctx.JSON(http.StatusBadGateway, gin.H{"status": "error", "message": err.Error()})
		return
	}

	now := time.Now()
	newUser := models.User{
		Name:      payload.Name,
		Email:     strings.ToLower(payload.Email),
		Password:  hashedPassword,
		Role:      "user",
		Verified:  true,
		Photo:     payload.Photo,
		Provider:  "local",
		CreatedAt: now,
		UpdatedAt: now,
	}

	result := ac.DB.Create(&newUser)

	if result.Error != nil && strings.Contains(result.Error.Error(), "duplicate key value violates unique") {
		ctx.JSON(http.StatusConflict, gin.H{"status": "fail", "message": "User with that email already exists"})
		return
	} else if result.Error != nil {
		ctx.JSON(http.StatusBadGateway, gin.H{"status": "error", "message": "Something bad happened"})
		return
	}

	userResponse := &models.UserResponse{
		ID:        newUser.ID,
		Name:      newUser.Name,
		Email:     newUser.Email,
		Photo:     newUser.Photo,
		Role:      newUser.Role,
		Provider:  newUser.Provider,
		CreatedAt: newUser.CreatedAt,
		UpdatedAt: newUser.UpdatedAt,
	}
	ctx.JSON(http.StatusCreated, gin.H{"status": "success", "data": gin.H{"user": userResponse}})
}

// [...] Login User
func (ac *AuthController) SignInUser(ctx *gin.Context) {
	var payload *models.SignInInput

	if err := ctx.ShouldBindJSON(&payload); err != nil {
		ctx.JSON(http.StatusBadRequest, gin.H{"status": "fail", "message": err.Error()})
		return
	}

	var user models.User
	result := ac.DB.First(&user, "email = ?", strings.ToLower(payload.Email))
	if result.Error != nil {
		ctx.JSON(http.StatusBadRequest, gin.H{"status": "fail", "message": "Invalid email or Password"})
		return
	}

	if err := utils.VerifyPassword(user.Password, payload.Password); err != nil {
		ctx.JSON(http.StatusBadRequest, gin.H{"status": "fail", "message": "Invalid email or Password"})
		return
	}

	config, _ := initializers.LoadConfig(".")

	// Generate Tokens
	access_token, err := utils.CreateToken(config.AccessTokenExpiresIn, user.ID, config.AccessTokenPrivateKey)
	if err != nil {
		ctx.JSON(http.StatusBadRequest, gin.H{"status": "fail", "message": err.Error()})
		return
	}

	refresh_token, err := utils.CreateToken(config.RefreshTokenExpiresIn, user.ID, config.RefreshTokenPrivateKey)
	if err != nil {
		ctx.JSON(http.StatusBadRequest, gin.H{"status": "fail", "message": err.Error()})
		return
	}

	ctx.SetCookie("access_token", access_token, config.AccessTokenMaxAge*60, "/", "localhost", false, true)
	ctx.SetCookie("refresh_token", refresh_token, config.RefreshTokenMaxAge*60, "/", "localhost", false, true)
	ctx.SetCookie("logged_in", "true", config.AccessTokenMaxAge*60, "/", "localhost", false, false)

	ctx.JSON(http.StatusOK, gin.H{"status": "success", "access_token": access_token})
}

// [...] Refresh Access Token
func (ac *AuthController) RefreshAccessToken(ctx *gin.Context) {
	message := "could not refresh access token"

	cookie, err := ctx.Cookie("refresh_token")

	if err != nil {
		ctx.AbortWithStatusJSON(http.StatusForbidden, gin.H{"status": "fail", "message": message})
		return
	}

	config, _ := initializers.LoadConfig(".")

	sub, err := utils.ValidateToken(cookie, config.RefreshTokenPublicKey)
	if err != nil {
		ctx.AbortWithStatusJSON(http.StatusForbidden, gin.H{"status": "fail", "message": err.Error()})
		return
	}

	var user models.User
	result := ac.DB.First(&user, "id = ?", fmt.Sprint(sub))
	if result.Error != nil {
		ctx.AbortWithStatusJSON(http.StatusForbidden, gin.H{"status": "fail", "message": "the user belonging to this token no logger exists"})
		return
	}

	access_token, err := utils.CreateToken(config.AccessTokenExpiresIn, user.ID, config.AccessTokenPrivateKey)
	if err != nil {
		ctx.AbortWithStatusJSON(http.StatusForbidden, gin.H{"status": "fail", "message": err.Error()})
		return
	}

	ctx.SetCookie("access_token", access_token, config.AccessTokenMaxAge*60, "/", "localhost", false, true)
	ctx.SetCookie("logged_in", "true", config.AccessTokenMaxAge*60, "/", "localhost", false, false)

	ctx.JSON(http.StatusOK, gin.H{"status": "success", "access_token": access_token})
}

// [...] Logout user
func (ac *AuthController) LogoutUser(ctx *gin.Context) {
	ctx.SetCookie("access_token", "", -1, "/", "localhost", false, true)
	ctx.SetCookie("refresh_token", "", -1, "/", "localhost", false, true)
	ctx.SetCookie("logged_in", "", -1, "/", "localhost", false, false)

	ctx.JSON(http.StatusOK, gin.H{"status": "success"})
}
Step 8 – Create a Middleware Guard
In this section, we will create a middleware guard to extract the access token from the request headers and validate it.
The DeserializeUser function will be able to extract the access token from either the cookies object or the Authorization header.
middleware/deserialize-user.go
package middleware

import (
	"fmt"
	"net/http"
	"strings"

	"github.com/gin-gonic/gin"
	"github.com/wpcodevo/golang-gorm-postgres/initializers"
	"github.com/wpcodevo/golang-gorm-postgres/models"
	"github.com/wpcodevo/golang-gorm-postgres/utils"
)

func DeserializeUser() gin.HandlerFunc {
	return func(ctx *gin.Context) {
		var access_token string
		cookie, err := ctx.Cookie("access_token")

		authorizationHeader := ctx.Request.Header.Get("Authorization")
		fields := strings.Fields(authorizationHeader)

		if len(fields) != 0 && fields[0] == "Bearer" {
			access_token = fields[1]
		} else if err == nil {
			access_token = cookie
		}

		if access_token == "" {
			ctx.AbortWithStatusJSON(http.StatusUnauthorized, gin.H{"status": "fail", "message": "You are not logged in"})
			return
		}

		config, _ := initializers.LoadConfig(".")
		sub, err := utils.ValidateToken(access_token, config.AccessTokenPublicKey)
		if err != nil {
			ctx.AbortWithStatusJSON(http.StatusUnauthorized, gin.H{"status": "fail", "message": err.Error()})
			return
		}

		var user models.User
		result := initializers.DB.First(&user, "id = ?", fmt.Sprint(sub))
		if result.Error != nil {
			ctx.AbortWithStatusJSON(http.StatusForbidden, gin.H{"status": "fail", "message": "the user belonging to this token no logger exists"})
			return
		}

		ctx.Set("currentUser", user)
		ctx.Next()
	}
}
In the above, we called the ValidateToken function to validate the access token and extract the payload (user’s ID) we stored in it.
Next, we queried the database to check if the user belonging to the access token still exists.
Then, we attached the returned user to the Gin context struct to make it available in the controllers.
Step 9 – Create a User Controller
Here, let’s create a controller that will be called to return the user we stored in the Gin context struct.
controllers/user.controller.go
package controllers

import (
	"net/http"

	"github.com/gin-gonic/gin"
	"github.com/wpcodevo/golang-gorm-postgres/models"
	"gorm.io/gorm"
)

type UserController struct {
	DB *gorm.DB
}

func NewUserController(DB *gorm.DB) UserController {
	return UserController{DB}
}

func (uc *UserController) GetMe(ctx *gin.Context) {
	currentUser := ctx.MustGet("currentUser").(models.User)

	userResponse := &models.UserResponse{
		ID:        currentUser.ID,
		Name:      currentUser.Name,
		Email:     currentUser.Email,
		Photo:     currentUser.Photo,
		Role:      currentUser.Role,
		Provider:  currentUser.Provider,
		CreatedAt: currentUser.CreatedAt,
		UpdatedAt: currentUser.UpdatedAt,
	}

	ctx.JSON(http.StatusOK, gin.H{"status": "success", "data": gin.H{"user": userResponse}})
}
Step 10 – Add the Controllers to the Routes
Now that we have all the controllers defined, let’s create routes to evoke them. The syntax is similar to how we handle routes in Express, Fastify, FastAPI, and Django.
Authentication Routes
routes/auth.routes.go
package routes

import (
	"github.com/gin-gonic/gin"
	"github.com/wpcodevo/golang-gorm-postgres/controllers"
	"github.com/wpcodevo/golang-gorm-postgres/middleware"
)

type AuthRouteController struct {
	authController controllers.AuthController
}

func NewAuthRouteController(authController controllers.AuthController) AuthRouteController {
	return AuthRouteController{authController}
}

func (rc *AuthRouteController) AuthRoute(rg *gin.RouterGroup) {
	router := rg.Group("/auth")

	router.POST("/register", rc.authController.SignUpUser)
	router.POST("/login", rc.authController.SignInUser)
	router.GET("/refresh", rc.authController.RefreshAccessToken)
	router.GET("/logout", middleware.DeserializeUser(), rc.authController.LogoutUser)
}
User Routes
routes/user.routes.go
package routes

import (
	"github.com/gin-gonic/gin"
	"github.com/wpcodevo/golang-gorm-postgres/controllers"
	"github.com/wpcodevo/golang-gorm-postgres/middleware"
)

type UserRouteController struct {
	userController controllers.UserController
}

func NewRouteUserController(userController controllers.UserController) UserRouteController {
	return UserRouteController{userController}
}

func (uc *UserRouteController) UserRoute(rg *gin.RouterGroup) {

	router := rg.Group("users")
	router.GET("/me", middleware.DeserializeUser(), uc.userController.GetMe)
}
Step 11 – Update the Main File
let’s bring everything together in the main file. To begin, install the CORS package to enable the Gin server to accept cross-origin requests.
go get github.com/gin-contrib/cors
Next, let’s create an init function to connect the Golang app to the Postgres database and instantiate the constructors of the controllers and routes.
In the main function, evoke the AuthRoute and UserRoute to register the routes we defined.
main.go
package main

import (
	"log"
	"net/http"

	"github.com/gin-contrib/cors"
	"github.com/gin-gonic/gin"
	"github.com/wpcodevo/golang-gorm-postgres/controllers"
	"github.com/wpcodevo/golang-gorm-postgres/initializers"
	"github.com/wpcodevo/golang-gorm-postgres/routes"
)

var (
	server              *gin.Engine
	AuthController      controllers.AuthController
	AuthRouteController routes.AuthRouteController

	UserController      controllers.UserController
	UserRouteController routes.UserRouteController
)

func init() {
	config, err := initializers.LoadConfig(".")
	if err != nil {
		log.Fatal("? Could not load environment variables", err)
	}

	initializers.ConnectDB(&config)

	AuthController = controllers.NewAuthController(initializers.DB)
	AuthRouteController = routes.NewAuthRouteController(AuthController)

	UserController = controllers.NewUserController(initializers.DB)
	UserRouteController = routes.NewRouteUserController(UserController)

	server = gin.Default()
}

func main() {
	config, err := initializers.LoadConfig(".")
	if err != nil {
		log.Fatal("? Could not load environment variables", err)
	}

	corsConfig := cors.DefaultConfig()
	corsConfig.AllowOrigins = []string{"http://localhost:8000", config.ClientOrigin}
	corsConfig.AllowCredentials = true

	server.Use(cors.New(corsConfig))

	router := server.Group("/api")
	router.GET("/healthchecker", func(ctx *gin.Context) {
		message := "Welcome to Golang with Gorm and Postgres"
		ctx.JSON(http.StatusOK, gin.H{"status": "success", "message": message})
	})

	AuthRouteController.AuthRoute(router)
	UserRouteController.UserRoute(router)
	log.Fatal(server.Run(":" + config.ServerPort))
}
Conclusion
With this JWT authentication example with Golang, GORM, PostgreSQL, Gin Gonic, and Docker-compose, you’ve learned how to secure a Golang application with access and refresh tokens.
Golang, Gin, and GORM JWT Source Code
You can find the complete source code on GitHub.
Hello Friend,
i am getting below error while hitting: localhost:8000/api/auth/login request : –
400 Bad Request
{
“message”: “create: parse key: Invalid Key: Key must be a PEM encoded PKCS1 or PKCS8 key”,
“status”: “fail”
}
Please help
This error message usually indicates that you’re attempting to use a key that isn’t in the correct format. Your key needs to be in either PEM encoded PKCS1 or PKCS8 format.
If you’ve modified the source code, make sure to follow the key generation section carefully to generate the correct keys.
Alternatively, you can use the ones provided in the
app.envfile. If you’ve tried both options and still encounter the error, please leave a comment so that I can investigate the issue more closely.you are the best !
this article is the best ! you are amazing i swear <3 wow god bless you and thank you so much !!
hello bro,
i am getting below error while hitting: http://127.0.0.1:8000/api/auth/refresh
{
“message”: “validate: unexpected method: HS256”,
“status”: “fail 2”
}
please help me
I can see you made a couple of changes to some of the files in your version of the source code.
I just cloned the original source code and tested it on my machine, but I couldn’t replicate the error.
What I would advise is to compare the files you changed to the original to see where you are making the mistakes.