

Prisma is an open-source next-generation ORM (Object Relational Mapping) that makes it easy to work with MySQL, SQLite, PostgreSQL, MongoDB, SQL Server databases, and more in Node.js. An Object Relational Mapping (ORM) is a programming technique for handling database records by representing the data as objects.
Despite Prisma being an ORM, It takes a different approach, similar to Doctrine ORM in PHP instead of the traditional patterns used by ORMs like TypeORM, and MikroORM. It leverages custom Schema Definition Language (SDL) to automatically create migration files and generate type-safe code.
Traditional ORMs use classes or decorators to define database models, Prisma, on the other hand, uses pre-defined schemas for its code generation, similar to the popular GraphQL Code Generator tool.
The generated TypeScript types are used by the Prisma Client to provide a stricter type-safe and rich auto-completion environment in the IDE. Overall, Prisma includes support for transactions and batch queries, database synchronization, associations, and database migrations.
In this tutorial, you will learn how to set up and configure a PostgreSQL instance on your local development environment using Docker and Docker Compose. Next, you will use Prisma to create databases and models, as well as perform the basic CRUD, Create/Read/Update/Delete operations. Then, you will create Prisma associations for one-to-one, one-to-many, and many-to-many relationships.
Practice with other articles:
- API Node.js, TypeScript, Prisma, PostgreSQL: Project Setup
- Node.js + Prisma + TypeScript + PostgreSQL: Access & Refresh Tokens
- API with Node.js, Prisma, TypeScript & PostgreSQL: Forget/Reset Password
- How to Setup tRPC API with Prisma, PostgreSQL, TypeScript, Node & React
- tRPC API with Postgres, Prisma, TypeScript, & Node.js: JWT Authentication
- How to Setup tRPC API Server & Client with Next.js, TypeScript, and Prisma

Prerequisites
Before going future with this tutorial, here are some prerequisites:
- You should have a development environment running Node.js, ideally the LTS version.
- Basic knowledge of PostgreSQL queries and how ORMs work will be beneficial.
- Knowledge and some experience with JavaScript, and TypeScript will be beneficial.
- You should have PostgreSQL and pgAdmin installed in your working environment. It’s optional since we will be using Docker.
- VSCode as the IDE. I recommend VS Code because it provides tools and extensions for developing applications in many programming languages.
This tutorial was tested on Node.js version 16.14.0 and Yarn version 1.22.19 on Windows 11 computer.
How Does Prisma Work?
Prisma consists of three components:
- Prisma Client: This is an auto-generated and type-safe query builder used for reading data, writing data, and performing advanced patterns like creating transactions, raw queries, logging, and middleware.
- Prisma Migrate: This is an imperative database schema migration tool that keeps the database schema in sync with the defined Prisma schema.
- Prisma Studio: A visual editor (GUI) to view and modify data in your database.
The Prisma migrate tool takes the models defined in the schema file and generates a history of .sql migration files as well as types that are stored in anode_modules/.prisma/client folder.
Step 1 – Create a Sample PostgreSQL Database
As part of the prerequisites, you should have a running PostgreSQL server, however, we will create a Postgres instance using Docker and Docker-compose.
To do that, first, create a project folder. In this example, you can use explore-prisma . Once the folder has been created, open it with VS Code.
1. mkdir  explore-prisma
2. cd  explore-prisma
3. code .
Now create a docker-compose.yml file in the root folder and add the following configurations to help us manage the PostgreSQL instance on our machine.
docker-compose.yml
services:
  postgres:
    image: postgres
    container_name: postgres
    ports:
      - 6500:5432
    env_file:
      - ./.env
    volumes:
      - postgres:/var/lib/postgresql/data
volumes:
  postgres:
We mapped our local port 6500 to the Postgres default port 5432 to allow us to connect and interact with the running PostgreSQL server outside the Docker container.
We also created a named volume postgres to prevent data loss when deleting the Postgres container.
Create a .env file with the following environment variables. These credentials will be used by the Postgres image to configure the Postgres server.
.env
POSTGRES_USER=postgres
POSTGRES_PASSWORD=password123
POSTGRES_DB=explore-prisma
Now open the integrated terminal in VS Code and start the Postgres server with this command:
docker-compose up -d
You can stop the container with this command:
docker-compose down
Step 2 – Install and Configure Prisma
In this step, you will initialize a TypeScript Node.js project and set up Prisma.
Initialize a Node.js TypeScript Project
Execute this command to create a sample Node.js application:
yarn init
# or
npm init
Next, you will be presented with some optional prompts to set up the project. Press the ENTER key to accept the default values and don’t forget to set the entry point file to server.ts. This creates a package.json file with an initial setup for the TypeScript Node.js app.
package.json
{
  "name": "explore-prisma",
  "version": "1.0.0",
  "description": "Explore Prisma Tutorial",
  "main": "server.ts",
  "author": "Admin",
  "license": "MIT"
}
Next, install these dependencies to add TypeScript to the Node.js project:
yarn add -D typescript ts-node-dev @types/node && yarn tsc --init
# or
npm install -D typescript ts-node-dev @types/node && npx tsc --init
typescript– To use thetsccommand in the project.ts-node-dev– To hot-reload the server upon every file change@types/node– Has the TypeScript definitions for Node.js
The above command will generate a tsconfig.json file with some default configurations.
Now replace the content of the tsconfig.json file with the following Prisma recommended configurations:
tsconfig.json file
{
  "compilerOptions": {
    "sourceMap": true,
    "outDir": "dist",
    "strict": true,
    "lib": [
      "esnext",
      "DOM"
    ],
    "esModuleInterop": true
  }
}
Next, create an empty server.ts file in the root directory:
touch server.ts
Now add a console.log("Welcome to Prisma") to the server.ts file:
console.log('Welcome to Prisma');
After that add a start script to the package.json file:
{
  "name": "explore-prisma",
  "version": "1.0.0",
  "description": "Explore Prisma Tutorial",
  "main": "server.ts",
  "scripts": {
    "start": "ts-node-dev --respawn --transpile-only server.ts"
  },
  "author": "Admin",
  "license": "MIT",
  "devDependencies": {
    "@types/node": "^18.6.5",
    "ts-node-dev": "^2.0.0",
    "typescript": "^4.7.4"
  }
}
Run yarn start or npm start and you should see the “Welcome to Prisma” message in the console.
Set up Prisma
We are now ready to install the Prisma CLI. Execute this command to install the Prisma CLI as a development dependency:
yarn add -D prisma
# or
npm install prisma --save-dev
After that, run the Prisma init command to initialize the Prisma schema:
yarn prisma init --datasource-provider postgresql
# or
npx prisma init --datasource-provider postgresql
This will create a new prisma folder with the Prisma schema file and add a dummy DATABASE_URL variable to the .env file.
Open the .env file and update the DATABASE_URL variable with the credentials used in setting up the Postgres server.
.env
POSTGRES_USER=postgres
POSTGRES_PASSWORD=password123
POSTGRES_DB=explore-prisma

# This was inserted by `prisma init`:
# Environment variables declared in this file are automatically made available to Prisma.
# See the documentation for more detail: https://pris.ly/d/prisma-schema#accessing-environment-variables-from-the-schema

# Prisma supports the native connection string format for PostgreSQL, MySQL, SQLite, SQL Server, MongoDB and CockroachDB.
# See the documentation for all the connection string options: https://pris.ly/d/connection-strings

DATABASE_URL="postgresql://postgres:password123@localhost:6500/explore-prisma?schema=public"
Consequently, the generated Prisma schema file, which is the SDL should look like this:
prisma/schema.prisma
// This is your Prisma schema file,
// learn more about it in the docs: https://pris.ly/d/prisma-schema

generator client {
  provider = "prisma-client-js"
}

datasource db {
  provider = "postgresql"
  url      = env("DATABASE_URL")
}
If you’re using VS Code, install the Prisma VS Code extension for syntax highlighting, formatting, auto-completion and a lot more amazing features.
In the above, the generator tells Prisma the language we will be using with the Prisma Client. Also, we can have one or more generators, represented by the generator block.
For example, we can have a generator for our Prisma Client and a generator for some type of GraphQL API. There are NPM libraries for different generators and you can include them based on your project specifications.
When it comes to data sources, you can only have one data source, however, you can programmatically override the data source URL when creating the Prisma Client.
The data source tells Prisma the type of database we want to use and how to connect to it. Also, it’s really important to use environment variables to store the database URL.
Create a Simple Schema
Now let’s define the most basic Prisma model just to have something to playground with before getting into the more complex stuff.
The models defined in the Prisma schema will be used to generate the tables in the database and the Prisma Client API.
The recommended Prisma naming conventions are:
- PascalCase for model names
- camelCase for field names
prisma/schema.prisma
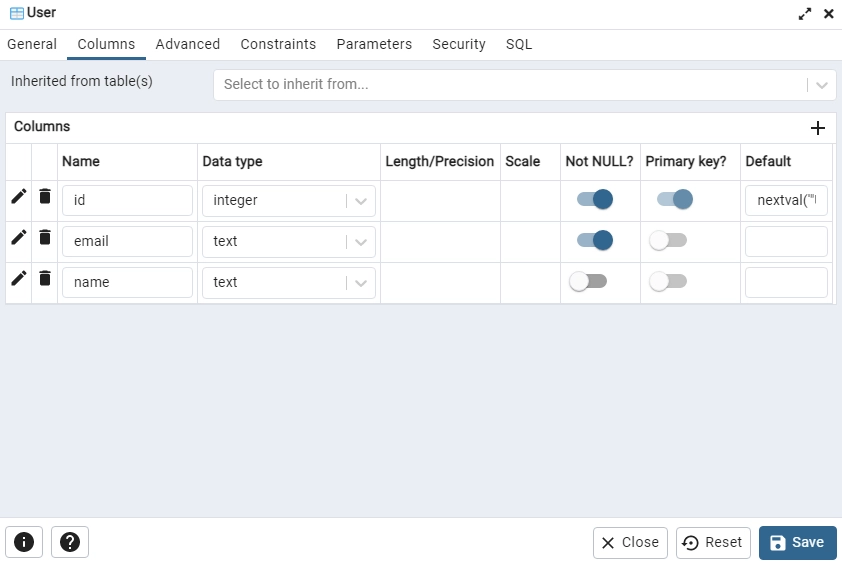
model User {
  id    Int     @id @default(autoincrement())
  email String
  name  String?
}
Let’s evaluate the above model. We defined a User model with name , id , and email . Each field has a name followed by the field type and optional field attributes.
For example, the id field has a String type and a @id field attribute, indicating that it’s the primary key of the table. The @default(autoincrement()) attribute creates a sequence of integers in the database and assigns the incremented values to the ID values of the inserted records based on the sequence.
By default, all the fields are required but you can make a field optional by adding a ? after the field type.
Run the Database Migration with Prisma
Now that we’ve our model defined, let’s tell Prisma to generate the SQL table and push the changes to the database.
Before that, install the Prisma Client library:
yarn add @prisma/client
# or
npm install @prisma/client
Run the following command to create the PostgreSQL database and the User table.
yarn prisma migrate dev --name init
# or
npx prisma migrate dev --name init
The above command will do two things:
- Create the SQL migration file in the
prisma/migrationsdirectory and push the changes to the database. - Generates the TypeScript types from the defined model.
Alternatively, you can add these scripts to the package.json file
package.json
{
 "scripts": {
    "db:migrate": "npx prisma migrate dev --name user-entity --create-only && npx prisma generate",
    "db:push": "npx prisma db push"
  }
}
--name– sets the name of the migration file. Don’t forget to change the name before running the migrate command.--create-only– tells Prisma to create the migration file without applying it.db:migrate– This command generates the migration file and the TypeScript types.db:push– This command pushes the migration file to the database.
Run this command to generate the migration file and push the changes to the database.
yarn db:migrate && yarn db:push
# or
npm run db:migrate && npm run db:push
For curiosity seek, open the migration file to see the SQL code added by Prisma:
-- CreateTable
CREATE TABLE "User" (
    "id" SERIAL NOT NULL,
    "email" TEXT NOT NULL,
    "name" TEXT,

    CONSTRAINT "User_pkey" PRIMARY KEY ("id")
);

-- CreateIndex
CREATE UNIQUE INDEX "User_email_key" ON "User"("email");
Familiarity with pgAdmin is one of the prerequisites of this course, open pgAdmin with the credentials provided in the .env file to view the table added by Prisma.
Connecting the App to the Database
By default, the Prisma Client creates a connection pool to the database, however, let’s create a connectDB.ts file to export the Prisma Client instance.
connectDB.ts
import { PrismaClient } from '@prisma/client';

declare global {
  var prisma: PrismaClient | undefined;
}

export const prisma = global.prisma || new PrismaClient({ log: ['info'] });

if (process.env.NODE_ENV !== 'production') {
  global.prisma = prisma;
}

async function connectDB() {
  try {
    await prisma.$connect();
    console.log('? Database connected successfully');
  } catch (error) {
    console.log(error);
    await prisma.$disconnect();
    process.exit(1);
  } finally {
    await prisma.$disconnect();
  }
}

export default connectDB;
Start the Application
Now replace the content of the server.ts file with the following code:
server.ts
import connecDB, { prisma} from './connectDB'

// ConnectDB
connecDB()

async function main() {

}

main()
  .then(async () => {
    await prisma.$disconnect()
  })
  .catch(async (e) => {
    console.error(e)
    await prisma.$disconnect()
    process.exit(1)
  })
In the above, we created an asynchronous function to contain the project code and below it, we defined a simple logic to disconnect from the database after the promise resolves.
Manually disconnecting from the database is not something you technically have to do but it’s probably a good idea to disconnect after the code is done.
By default, Prisma will automatically discount from the database as soon as the program finishes running.
Also, we added a catch block to handle any possible errors rejected from the main function.
Run this command to start the application:
yarn start
# or
npm run start
Create/Read/Update/Delete with Prisma
Let’s define small queries to Create/Get/Update/Delete records from the database and log the result to the console.
I’m not going to explain each CRUD operation because you don’t have enough tools to understand them. This is just an overview of the CRUD operations generated from the Prisma model.
Add the following code snippets to your server.ts file and run them independently.
Run the app with this command:
yarn ts-node-dev --transpile-only server.ts
# or
npx ts-node-dev --transpile-only server.ts
Create a New Record
server.ts
import connecDB, { prisma } from './connectDB';

// ConnectDB
connecDB();

async function main() {
  // Insert a single user
  const user = await prisma.user.create({
    data: {
      name: 'John Doe',
      email: 'johndoe@gmail.com',
    },
  });
  console.log(JSON.stringify(user, undefined, 2));
}

main()
  .then(async () => {
    await prisma.$disconnect();
  })
  .catch(async (e) => {
    console.error(e);
    await prisma.$disconnect();
    process.exit(1);
  });
Create Many Records
server.ts
import connecDB, { prisma } from './connectDB';

// ConnectDB
connecDB();

async function main() {
  // Insert a single user

  // Insert multiple users
  const numberOfUsers = await prisma.user.createMany({
    data: [
      {
        name: 'Jane Doe',
        email: 'janedoe@gmail.com',
      },
      {
        name: 'Jack Doe',
        email: 'jackdoe@gmail.com',
      },
      {
        name: 'Jill Doe',
        email: 'jilldoe@gmail.com',
      },
    ],
  });

}

main()
  .then(async () => {
    await prisma.$disconnect();
  })
  .catch(async (e) => {
    console.error(e);
    await prisma.$disconnect();
    process.exit(1);
  });
Retrieve a Single Record
server.ts
import connecDB, { prisma } from './connectDB';

// ConnectDB
connecDB();

async function main() {
  // Insert a single user

  // Insert multiple users

  // Find a single user
  const uniqueUser = await prisma.user.findUnique({
    where: {
      id: user.id,
    },
  });
}

main()
  .then(async () => {
    await prisma.$disconnect();
  })
  .catch(async (e) => {
    console.error(e);
    await prisma.$disconnect();
    process.exit(1);
  });
Retrieve All Records
server.ts
import connecDB, { prisma } from './connectDB';

// ConnectDB
connecDB();

async function main() {
  // Insert a single user

  // Insert multiple users

  // Find a single user

  // Find all users
  const allUsers = await prisma.user.findMany();
}

main()
  .then(async () => {
    await prisma.$disconnect();
  })
  .catch(async (e) => {
    console.error(e);
    await prisma.$disconnect();
    process.exit(1);
  });
Update a Single Record
server.ts
import connecDB, { prisma } from './connectDB';

// ConnectDB
connecDB();

async function main() {
  // Insert a single user

  // Insert multiple users

  // Find a single user

  // Find all users

  // Update a single user
  const updatedUser = await prisma.user.update({
    where: {
      id: user.id,
    },
    data: {
      name: 'Prince Doe',
    },
  });
}

main()
  .then(async () => {
    await prisma.$disconnect();
  })
  .catch(async (e) => {
    console.error(e);
    await prisma.$disconnect();
    process.exit(1);
  });
Update Multiple Records
server.ts
import connecDB, { prisma } from './connectDB';

// ConnectDB
connecDB();

async function main() {
  // Insert a single user

  // Insert multiple users

  // Find a single user

  // Find all users

  // Update a single user

  // Update multiple users
  const numberOfUpdatedUsers = await prisma.user.updateMany({
    where: {
      OR: [{ id: 2 }, { id: 3 }],
    },
    data: {
      name: 'Micheal Doe',
    },
  });
}

main()
  .then(async () => {
    await prisma.$disconnect();
  })
  .catch(async (e) => {
    console.error(e);
    await prisma.$disconnect();
    process.exit(1);
  });
Delete a Single Record
server.ts
import connecDB, { prisma } from './connectDB';

// ConnectDB
connecDB();

async function main() {
  // Insert a single user

  // Insert multiple users

  // Find a single user

  // Find all users

  // Update a single user

  // Update multiple users

  // Delete a single user
  await prisma.user.delete({
    where: {
      id: user.id,
    },
  });
}

main()
  .then(async () => {
    await prisma.$disconnect();
  })
  .catch(async (e) => {
    console.error(e);
    await prisma.$disconnect();
    process.exit(1);
  });
Delete All Records
server.ts
import connecDB, { prisma } from './connectDB';

// ConnectDB
connecDB();

async function main() {
  // Insert a single user

  // Insert multiple users

  // Find a single user

  // Find all users

  // Update a single user

  // Update multiple users

  // Delete a single user

  // Delete all users
  const numberOfDeleteUsers = await prisma.user.deleteMany({});
  console.log(`${numberOfDeleteUsers.count} users deleted`);
}

main()
  .then(async () => {
    await prisma.$disconnect();
  })
  .catch(async (e) => {
    console.error(e);
    await prisma.$disconnect();
    process.exit(1);
  });
Step 3 – Create a Database Model with Prisma
Models represent the SQL tables in a relational database and collections in a NoSQL database.
By default, Prisma models do not always match the table names in the database and it’s always a good practice to follow the right naming conventions (singular form, PascalCase).
A recommended approach for naming tables/collections in a database is to use plural form and snake_case notation.
model users {
  // Fields
}
However, you can use the @@map API attribute to automatically map the single name to the plural form.
model User {
  // Fields

@@map(name: "users")
}
The @@map API attribute allows you to tune the shape of your Prisma Client API by decoupling the model from the table or collection in the underlying database.
The properties (fields) of a model consist of these components:
- field name
- field type
- Optional type modifiers
- Optional attributes, including native database type attributes
The fields in the model determine the structure of the table (relational databases) or collection (NoSQL databases). Each field will map to a column (relational databases) or document field (NoSQL databases).
The field type can be modified by appending either of these two modifiers:
Combining the type modifiers is not supported. A list cannot be optional.
By default, enums are considered scalar types in the Prisma model, however, enums are not supported by all the database connectors.
To be precise, the SQLite connector and the Microsoft SQL Server connector do not support the enum type.
prisma/schema.prisma
// This is your Prisma schema file,
// learn more about it in the docs: https://pris.ly/d/prisma-schema
generator client {
provider = "prisma-client-js"
}
datasource db {
provider = "postgresql"
url = env("DATABASE_URL")
}
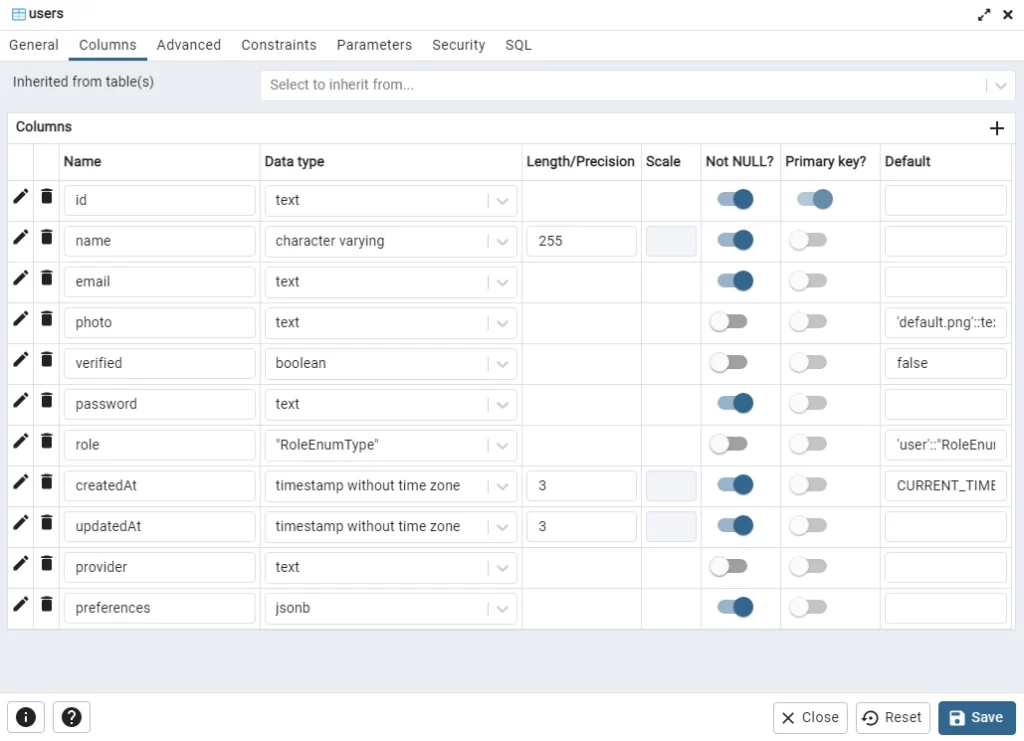
model User {
id String @id @default(uuid())
// id Int @id @default(autoincrement())
name String @db.VarChar(255)
email String @unique
photo String? @default("default.png")
verified Boolean? @default(false)
password String
role RoleEnumType? @default(user)
createdAt DateTime @default(now())
updatedAt DateTime @updatedAt
provider String?
preferences Json
// block level attributes
@@unique([email, name])
@@index([email])
@@map(name: "users")
}
enum RoleEnumType {
user
admin
}
In the above, we defined a User model with several fields. We added the attributes to modify the behavior of the fields or model blocks.
In this example, the id field has the @id attribute, specifying the field as the primary key of the table. The @default(uuid()) attribute tells Prisma to generate a UUID for every newly-created record.
Alternatively, you can use a sequence of integers for the id field. Using UUID instead of incremental numbers is more secure.
The RoleEnumType enum denotes whether a user is an admin or not and it’s referenced as an optional type in the User model.
The @@unique API attribute sets a unique constraint on the email and name fields. This will ensure that no two users have the same email and name in the database.
Lastly, the @@index API attribute sets a unique index on the email field.
Migrate the Prisma Model to the Database
Now that we have the Prisma model defined, let’s generate the Prisma client and typescript types from it before pushing the changes to the database.
Start the PostgreSQL Docker container with this command:
docker-compose up -d
Generate the Prisma Client and TypeScript types with this command:
yarn prisma migrate dev --name user-entity --create-only && yarn prisma generate
# or
npx prisma migrate dev --name user-entity --create-only && npx prisma generate
Migrate the schema to the Postgres database:
yarn prisma db push
# or
npx prisma db push
Open pgAdmin or any PostgreSQL client to see the user table added by Prisma.
Step 4 – Create Model Relationships with Prisma
Creating a One-to-One Relationship
In this section, you will learn how to implement one-to-one relations with Prisma. One-to-one relations refer to relations where one entity can be referenced on both sides. In the example below, there is a one-to-one relationship between the User and UserPreference models.
// This is your Prisma schema file,
// learn more about it in the docs: https://pris.ly/d/prisma-schema

generator client {
  provider = "prisma-client-js"
}

datasource db {
  provider = "postgresql"
  url      = env("DATABASE_URL")
}

model User {
  id       String   @id @default(uuid())
  // id Int @id @default(autoincrement())
  name     String   @db.VarChar(255)
  email    String   @unique
  photo    String?  @default("default.png")
  verified Boolean? @default(false)

  password  String
  role      RoleEnumType? @default(user)
  createdAt DateTime      @default(now())
  updatedAt DateTime      @updatedAt
  provider  String?

  writtenPosts  Post[] @relation("writtenPosts")
  favoritePosts Post[] @relation("favoritePosts")

  userPreference   UserPreference? @relation(fields: [userPreferenceId], references: [id])
  userPreferenceId String?         @unique

  @@map(name: "users")
}

enum RoleEnumType {
  user
  admin
}

model UserPreference {
  id           String  @id @default(uuid())
  emailUpdates Boolean @default(false)
  user         User?
  preference   String

  @@map(name: "userpreferences")
}
The userId relation scalar represents a foreign key in the underlying database. This one-to-one relationship expresses that:
- a UserPreference must always be referenced in one user
- a user can have zero or one UserPreference (because the
userPreferencefield is optional onUsermodel)
Creating a Single One-to-Many Relationship
One-to-many relations refer to relations where one entity on one side of the relation can reference zero or more entities on the other side.
In the example below, there is a single one-to-many relation between the User and Post models.
// This is your Prisma schema file,
// learn more about it in the docs: https://pris.ly/d/prisma-schema

generator client {
  provider = "prisma-client-js"
}

datasource db {
  provider = "postgresql"
  url      = env("DATABASE_URL")
}

model User {
  id       String   @id @default(uuid())
  // id Int @id @default(autoincrement())
  name     String   @db.VarChar(255)
  email    String   @unique
  photo    String?  @default("default.png")
  verified Boolean? @default(false)

  password  String
  role      RoleEnumType? @default(user)
  createdAt DateTime      @default(now())
  updatedAt DateTime      @updatedAt
  provider  String?

  preferences Json

  posts Post[]

  @@map(name: "users")
}

enum RoleEnumType {
  user
  admin
}

model Post {
  id        String   @id @default(uuid())
  title     String   @db.VarChar(255)
  content   String
  published Boolean  @default(false)
  author    User     @relation(fields: [authorId], references: [id])
  authorId  String
  createdAt DateTime @default(now())
  updatedAt DateTime @updatedAt

  @@map(name: "posts")
}
This one-to-many relationship shows that:
- a post in the database must always have an author
- a user can have zero or more posts.
Creating Multiple One-to-Many Relationships
The multiple one-to-many relationships are similar to the previous example except that we have to name the relationships in the User model since they both point to the Post model.
// This is your Prisma schema file,
// learn more about it in the docs: https://pris.ly/d/prisma-schema

generator client {
  provider = "prisma-client-js"
}

datasource db {
  provider = "postgresql"
  url      = env("DATABASE_URL")
}

model User {
  id       String   @id @default(uuid())
  // id Int @id @default(autoincrement())
  name     String   @db.VarChar(255)
  email    String   @unique
  photo    String?  @default("default.png")
  verified Boolean? @default(false)

  password  String
  role      RoleEnumType? @default(user)
  createdAt DateTime      @default(now())
  updatedAt DateTime      @updatedAt
  provider  String?

  preferences Json

  writtenPosts  Post[] @relation("writtenPosts")
  favoritePosts Post[] @relation("favoritePosts")

  @@map(name: "users")
}

enum RoleEnumType {
  user
  admin
}

model Post {
  id            String   @id @default(uuid())
  title         String   @db.VarChar(255)
  content       String
  published     Boolean  @default(false)
  authorId      String
  favoritedById String?
  author        User     @relation("writtenPosts", fields: [authorId], references: [id])
  favoritedBy   User?    @relation("favoritePosts", fields: [favoritedById], references: [id])
  createdAt     DateTime @default(now())
  updatedAt     DateTime @updatedAt

  @@map(name: "posts")
}
Creating Many-to-Many Relationships
Many-to-many relations refer to relations where zero or more entities on one side of the relation can reference zero or more entities on the other side.
Prisma provides an intuitive way to represent many-to-many relations with either explicit or implicit approaches.
In the following example, there is an implicit many-to-many relationship between the Category and the Post.
With the implicit many-to-many relationship, Prisma will automatically deduce the relationships so there is no need to manually define them.
// This is your Prisma schema file,
// learn more about it in the docs: https://pris.ly/d/prisma-schema

generator client {
  provider = "prisma-client-js"
}

datasource db {
  provider = "postgresql"
  url      = env("DATABASE_URL")
}

model User {
  id       String   @id @default(uuid())
  // id Int @id @default(autoincrement())
  name     String   @db.VarChar(255)
  email    String   @unique
  photo    String?  @default("default.png")
  verified Boolean? @default(false)

  password  String
  role      RoleEnumType? @default(user)
  createdAt DateTime      @default(now())
  updatedAt DateTime      @updatedAt
  provider  String?

  preferences Json

  writtenPosts  Post[] @relation("writtenPosts")
  favoritePosts Post[] @relation("favoritePosts")

  @@map(name: "users")
}

enum RoleEnumType {
  user
  admin
}

model Post {
  id            String   @id @default(uuid())
  title         String   @db.VarChar(255)
  content       String
  image         String
  published     Boolean  @default(false)
  authorId      String
  favoritedById String?
  author        User     @relation("writtenPosts", fields: [authorId], references: [id])
  favoritedBy   User?    @relation("favoritePosts", fields: [favoritedById], references: [id])
  createdAt     DateTime @default(now())
  updatedAt     DateTime @updatedAt

  categories Category[]

  @@map(name: "posts")
}

model Category {
  id        String   @id @default(uuid())
  tilte     String   @db.VarChar(255)
  slug      String
  createdAt DateTime @default(now())
  updatedAt DateTime @updatedAt

  posts Post[]

  @@map(name: "categories")
}
This many-to-many relation expresses that:
- a post can have multiple categories
- a category can have multiple posts
Complete Code of All the Relationships
// This is your Prisma schema file,
// learn more about it in the docs: https://pris.ly/d/prisma-schema

generator client {
  provider = "prisma-client-js"
}

datasource db {
  provider = "postgresql"
  url      = env("DATABASE_URL")
}

model User {
  id       String   @id @default(uuid())
  // id Int @id @default(autoincrement())
  name     String   @db.VarChar(255)
  email    String   @unique
  photo    String?  @default("default.png")
  verified Boolean? @default(false)

  password  String
  role      RoleEnumType? @default(user)
  createdAt DateTime      @default(now())
  updatedAt DateTime      @updatedAt
  provider  String?

  writtenPosts  Post[] @relation("writtenPosts")
  favoritePosts Post[] @relation("favoritePosts")

  userPreference   UserPreference? @relation(fields: [userPreferenceId], references: [id])
  userPreferenceId String?         @unique

  @@map(name: "users")
}

enum RoleEnumType {
  user
  admin
}

model UserPreference {
  id           String  @id @default(uuid())
  emailUpdates Boolean @default(false)
  user         User?
  preference   String

  @@map(name: "userpreferences")
}

model Post {
  id            String   @id @default(uuid())
  title         String   @db.VarChar(255)
  content       String
  image         String
  published     Boolean  @default(false)
  authorId      String
  favoritedById String?
  author        User     @relation("writtenPosts", fields: [authorId], references: [id])
  favoritedBy   User?    @relation("favoritePosts", fields: [favoritedById], references: [id])
  createdAt     DateTime @default(now())
  updatedAt     DateTime @updatedAt

  categories Category[]

  @@map(name: "posts")
}

model Category {
  id        String   @id @default(uuid())
  tilte     String   @db.VarChar(255)
  slug      String
  createdAt DateTime @default(now())
  updatedAt DateTime @updatedAt

  posts Post[]

  @@map(name: "categories")
}
Once you are done defining the associations between the models, run the Prisma generate and migrate commands to:
- Generate the TypeScript types and the Prisma Client.
- Push the schema changes to the database
The following command will generate the migration file and the TypeScript types without applying the schema changes.
yarn prisma migrate dev --name added-more-entities --create-only && yarn prisma generate
# or
npx prisma migrate dev --name added-more-entities --create-only && npx prisma generate
The command below will push the schema to the database
yarn prisma db push
# or
npx prisma db push
Prisma also comes with a GUI that you can use to view and mutate data in the database. To access the Prisma studio, you need to run this command in the terminal:
yarn prisma studio
# or
npx prisma studio
After the Studio link has been generated, hold CMD or CTRL and click on it to open it in the browser.
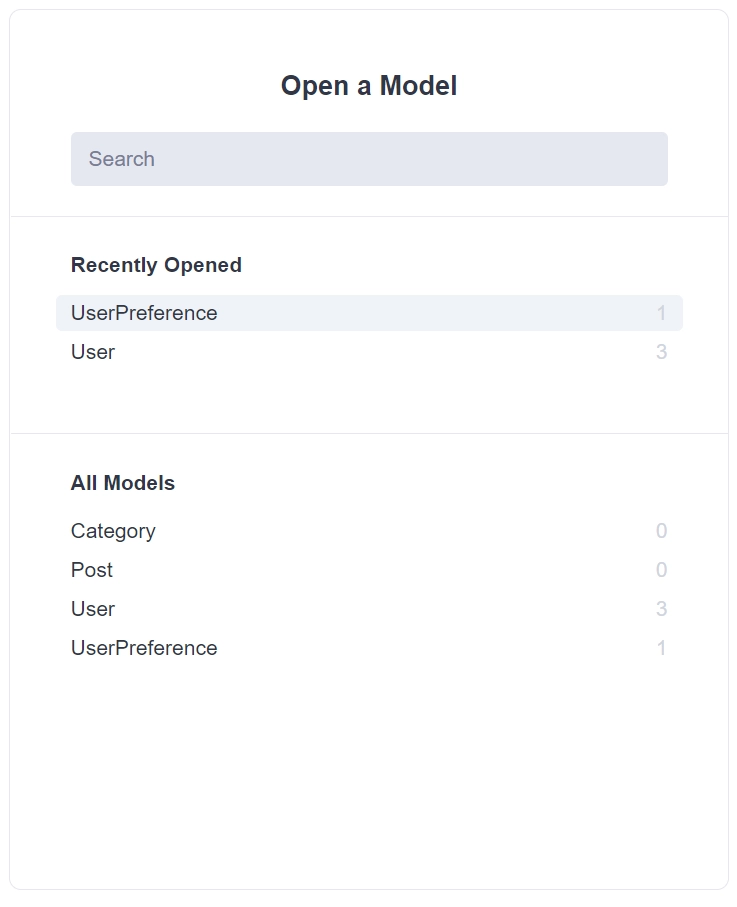
You should see a representation of the models you defined in the Prisma schema file.
Step 5 – Using Prisma Client for Database Queries
Inserting a New Record
import connecDB, { prisma } from './connectDB';

// ConnectDB
connecDB();

async function main() {
  const user = await prisma.user.create({
    data: {
      name: 'John Doe',
      email: 'johndoe@gmail.com',
      password: '123456',
      photo: 'default.jpg',
      role: 'user',
      provider: 'local',
      verified: true,
      userPreference: {
        create: {
          emailUpdates: true,
          preference: 'all',
        },
      },
    },
    include: { userPreference: true },
  });

  console.log(user);
}

main()
  .then(async () => {
    await prisma.$disconnect();
  })
  .catch(async (e) => {
    console.error(e);
    await prisma.$disconnect();
    process.exit(1);
  });
Inserting Multiple Records
import connecDB, { prisma } from './connectDB';

// ConnectDB
connecDB();

async function main() {
  const numberOfUsers = await prisma.user.createMany({
    data: [
      {
        name: 'Jane Doe',
        email: 'janedoe@gmail.com',
        password: '123456',
        photo: 'default.jpg',
        role: 'user',
        provider: 'local',
        verified: true,
      },
      {
        name: 'Micheal Smith',
        email: 'michealsmith@gmail.com',
        password: '123456',
        photo: 'default.jpg',
        role: 'admin',
        provider: 'google',
        verified: true,
      },
    ],
  });

  console.log(`Created ${numberOfUsers.count} users`);
}

main()
  .then(async () => {
    await prisma.$disconnect();
  })
  .catch(async (e) => {
    console.error(e);
    await prisma.$disconnect();
    process.exit(1);
  });
Query All Records
import connecDB, { prisma } from './connectDB';

// ConnectDB
connecDB();

async function main() {
  const users = await prisma.user.findMany({
    where: {
      OR: [{ verified: true }, { provider: 'local' }],
      email: { contains: '@gmail.com' },
      AND: [{ verified: true }, { provider: 'local' }],
    },
    select: {
      id: true,
      email: true,
      name: true,
      verified: true,
      provider: true,
      createdAt: true,
      updatedAt: true,
    },
    skip: 0,
    take: 10,
    orderBy: {
      createdAt: 'desc',
    },
  });

  console.log(users);
}

main()
  .then(async () => {
    await prisma.$disconnect();
  })
  .catch(async (e) => {
    console.error(e);
    await prisma.$disconnect();
    process.exit(1);
  });
Query a Single Record
import connecDB, { prisma } from './connectDB';

// ConnectDB
connecDB();

async function main() {
  const user = await prisma.user.findUnique({
    where: {
      id: '193e462a-0e9d-4bd0-9603-3ca636fbd3cb',
    },
    select: {
      id: true,
      name: true,
      email: true,
      password: true,
      createdAt: true,
      updatedAt: true,
    },
  });

  console.log(user);
}

main()
  .then(async () => {
    await prisma.$disconnect();
  })
  .catch(async (e) => {
    console.error(e);
    await prisma.$disconnect();
    process.exit(1);
  });
Update a Record
import connecDB, { prisma } from './connectDB';

// ConnectDB
connecDB();

async function main() {
  const updatedUser = await prisma.user.update({
    where: {
      email: 'johndoe@gmail.com',
    },
    data: {
      name: 'Alexander Smith',
      email: 'alexandersmith@gmail.com',
    },
    select: {
      id: true,
      name: true,
      email: true,
      password: true,
      createdAt: true,
    },
  });

  console.log(updatedUser);
}

main()
  .then(async () => {
    await prisma.$disconnect();
  })
  .catch(async (e) => {
    console.error(e);
    await prisma.$disconnect();
    process.exit(1);
  });
Update Multiple Records
import connecDB, { prisma } from './connectDB';

// ConnectDB
connecDB();

async function main() {
  const numberOfUpdatedUsers = await prisma.user.updateMany({
    where: {
      OR: [{ name: 'John Doe' }, { name: 'Jane Doe' }],
    },
    data: {
      verified: true,
    },
  });

  console.log(`Updated ${numberOfUpdatedUsers.count} users`);
}

main()
  .then(async () => {
    await prisma.$disconnect();
  })
  .catch(async (e) => {
    console.error(e);
    await prisma.$disconnect();
    process.exit(1);
  });
Delete Multiple Records
import connecDB, { prisma } from './connectDB';

// ConnectDB
connecDB();

async function main() {
  const numberOfDeletedUsers = await prisma.user.deleteMany({
    where: {
      verified: { equals: true },
    },
  });

  console.log(`${numberOfDeletedUsers.count} users deleted`);
}

main()
  .then(async () => {
    await prisma.$disconnect();
  })
  .catch(async (e) => {
    console.error(e);
    await prisma.$disconnect();
    process.exit(1);
  });
Step 6 – Create Services with Prisma
The following code is useful when you are building a RESTful API with Prisma. Since it’s not recommended to allow your controllers to have direct access to the database, you need to create services that will be called by the controllers to query and mutate the database.
user.service.ts
import { Prisma, User } from '@prisma/client';
import { prisma } from './connectDB';

export const createUser = async (input: Prisma.UserCreateInput) => {
  return (await prisma.user.create({
    data: input,
  })) as User;
};

export const findUser = async (
  where: Partial<Prisma.UserWhereInput>,
  select?: Prisma.UserSelect
) => {
  return (await prisma.user.findFirst({
    where,
    select,
  })) as User;
};

export const findUniqueUser = async (
  where: Prisma.UserWhereUniqueInput,
  select?: Prisma.UserSelect
) => {
  return (await prisma.user.findUnique({
    where,
    select,
  })) as User;
};

export const updateUser = async (
  where: Partial<Prisma.UserWhereUniqueInput>,
  data: Prisma.UserUpdateInput,
  select?: Prisma.UserSelect
) => {
  return (await prisma.user.update({ where, data, select })) as User;
};
Conclusion
In this tutorial, you installed Prisma and initialized a new Prisma schema. You also created models and established the different associations between them. Finally, you generated the Prisma Client and the TypeScript types from the models before migrating the schema to the database.
Next, you performed the different CRUD Create/Read/Update/Delete operations against the database.
To learn more about Prisma, check out the Prisma documentation.
You can find the source code of this project on my GitHub page.