
We all know we need to use strong passwords for every account we create on the internet. However, remembering the individual passwords we use on different websites isn’t that easy.
Most users who use unique passwords across different services are more likely to forget their passwords. To improve the user experience of our application, it’s crucial to add a password reset feature where users who forget their passwords can easily reset them.
This article will teach you how to add a secure forgot/reset password feature to a Golang RESTful API application.
Build Golang, GORM, PostgreSQL RESTful API Series:
- How to Setup Golang GORM RESTful API Project with Postgres
- API with Golang + GORM + PostgreSQL: Access & Refresh Tokens
- Golang and GORM – User Registration and Email Verification
- Forgot/Reset Passwords in Golang with HTML Email
- Build a RESTful CRUD API with Golang
More practice:
- Golang & MongoDB: JWT Authentication and Authorization
- API with Golang + MongoDB: Send HTML Emails with Gomail
- API with Golang, Gin Gonic & MongoDB: Forget/Reset Password
- Build Golang gRPC Server and Client: SignUp User & Verify Email
- Build Golang gRPC Server and Client: Access & Refresh Tokens
- Node.js + TypeScript + MongoDB: JWT Authentication
- Node.js + TypeScript + MongoDB: JWT Refresh Token
- API with Node.js + PostgreSQL + TypeORM: JWT Authentication
What you will learn
- How to generate the HTML Email template
- How to send SMTP emails with Gomail
- How to send the password reset link to the user’s email address
- How to reset the user’s password
Forgot Password and Password Reset Flow
The forgot/reset password workflow can be achieved in many ways depending on how usable and secure your application is.
In this article, we’ll implement a standard forgot/reset password design. Below are the Golang endpoints included in this workflow.
| HTTP METHOD | ROUTE | DESCRIPTION |
|---|---|---|
| POST | /api/auth/forgotpassword | To request a reset link |
| PATCH | /api/auth/resetpassword/:resetToken | To reset the password |
To make your life earlier, copy the JSON Postman collection I used in testing the Golang API and import it into your Postman software.
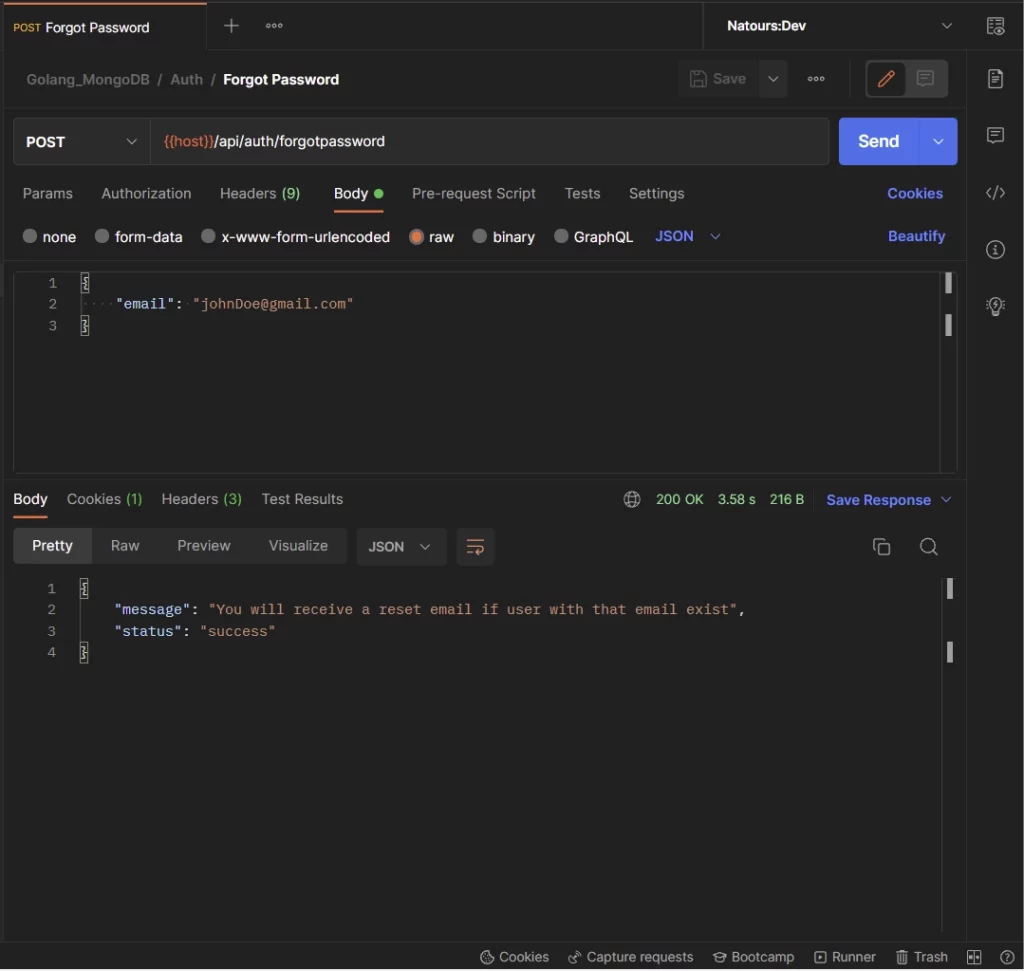
-Here, the user provides the email address and makes a POST request to the /api/auth/forgotpassword endpoint to request a password reset link.
The Golang server validates the request, checks the database to see if a user with that email address exists, generates the password reset code and the HTML template, and sends the SMTP email to the user.
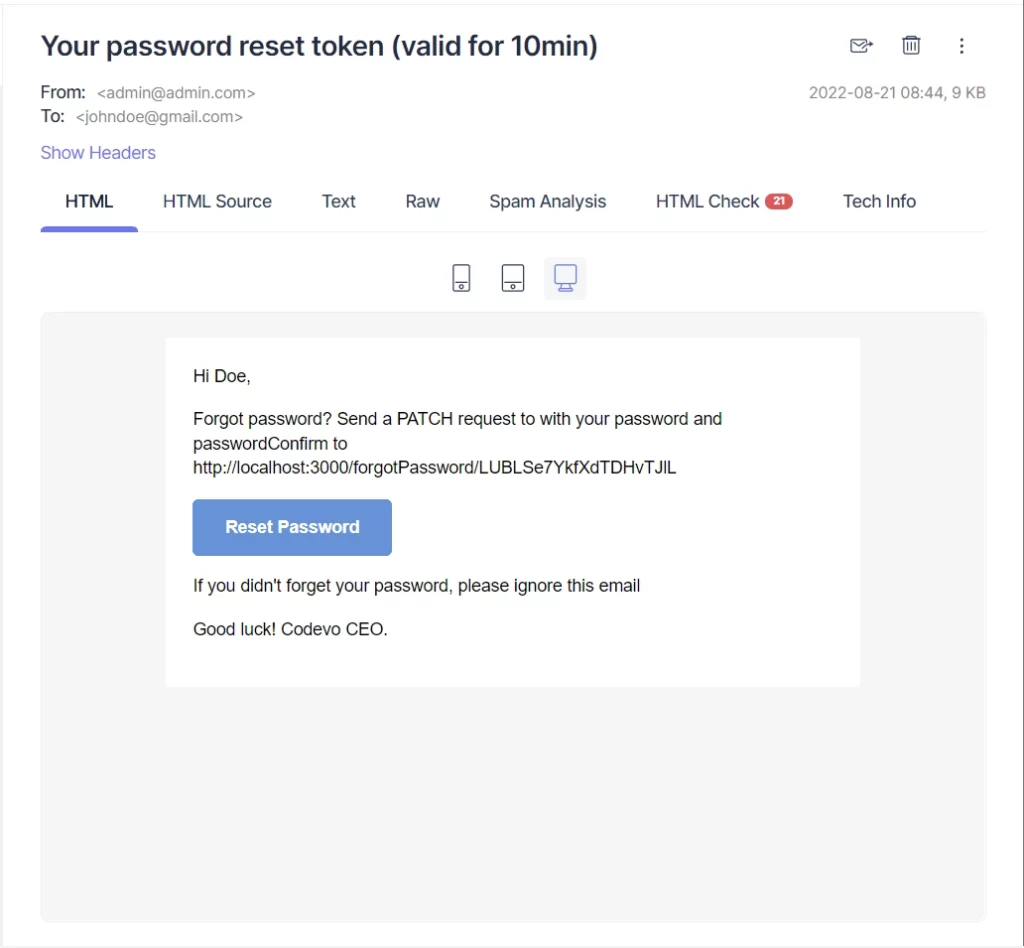
In the workflow, the user will be redirected to the frontend application upon clicking on the “Reset Password” button in the email. But since there is no frontend application, you need to copy the reset code and manually make the request to the Golang API.
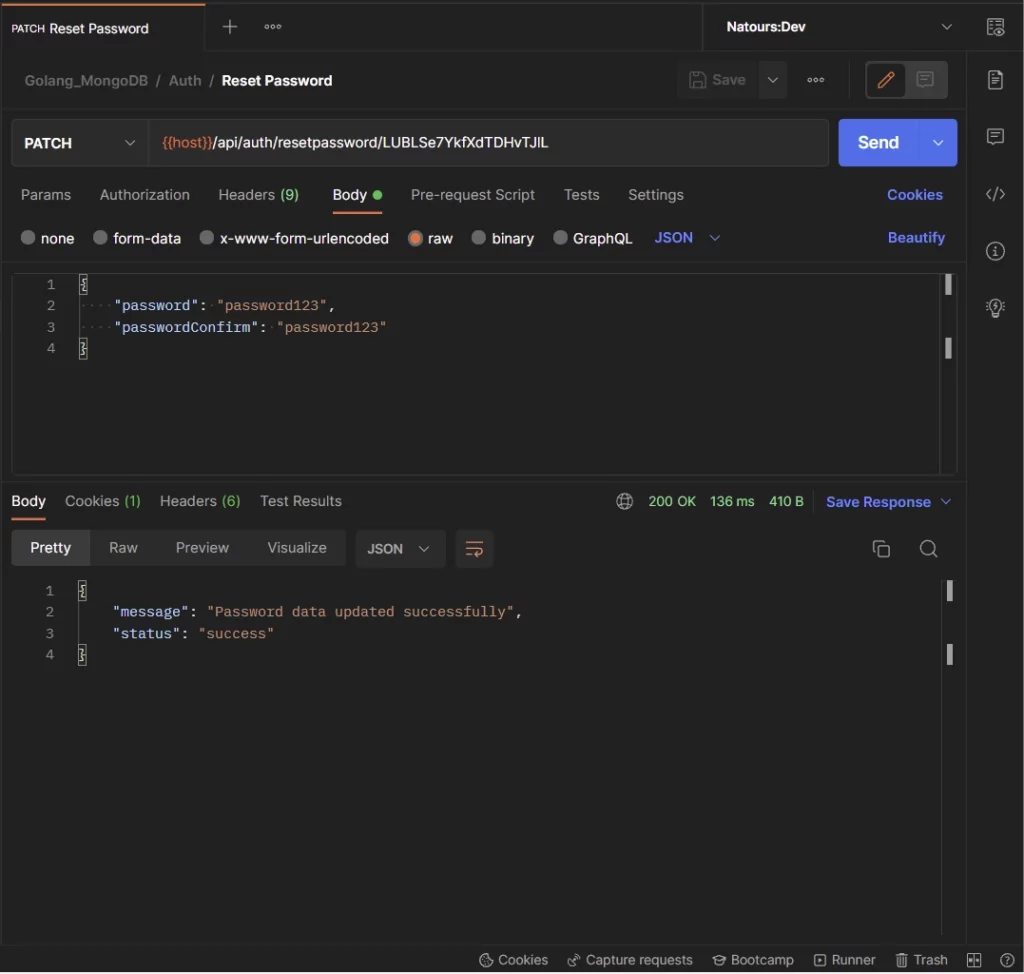
-Provide the new password and make a PATCH request with the reset code to the /api/auth/resetpassword/:resetToken endpoint.
The Golang server will then validate the password reset code and update the password data in the database.
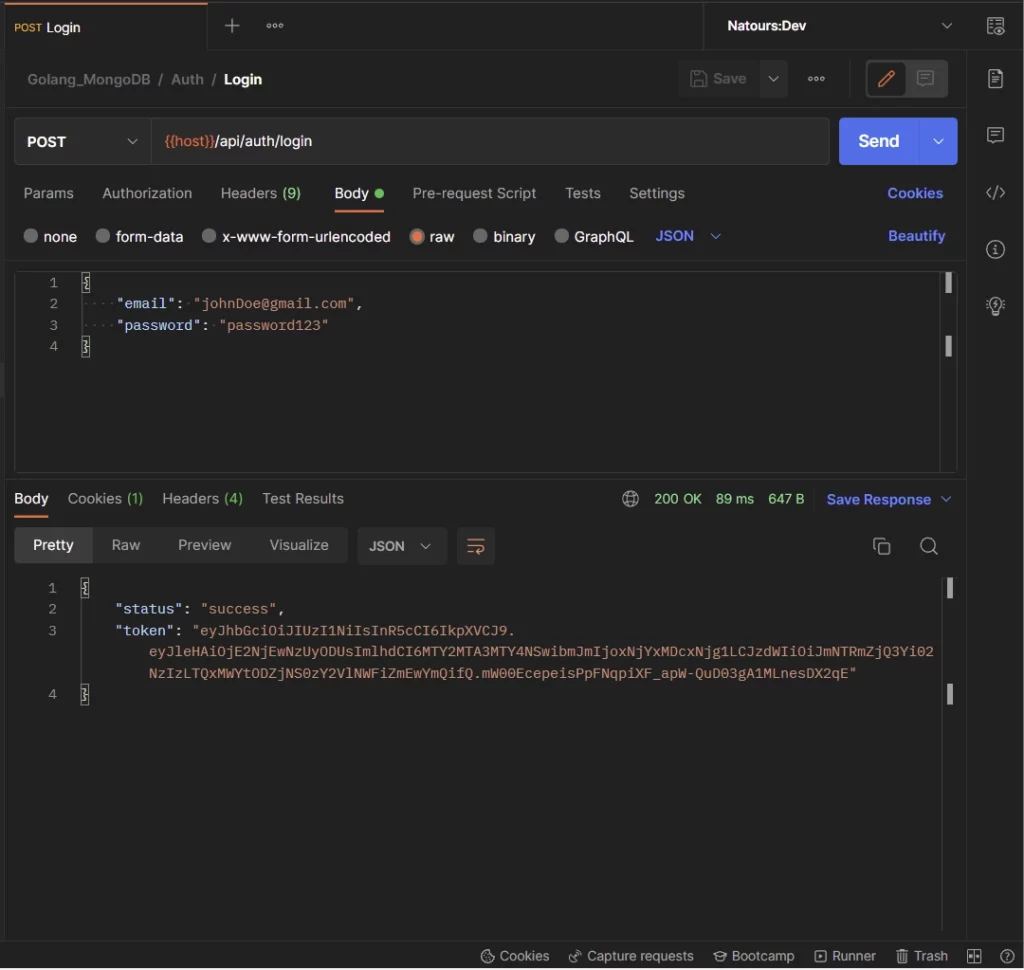
-After resetting the password, provide the new password and make a request to the Golang server to obtain a new JSON Web Token.
Step 1 – Create/Update the Database Models
Now create/update the models/user.model.go file to include the ResetPasswordInput and ForgotPasswordInput structs.
Gin Gonic will use these two structs to validate the request bodies to ensure that the user provides the required data.
models/user.model.go
package models

import (
	"time"

	"github.com/google/uuid"
)

type User struct {
	ID                 uuid.UUID `gorm:"type:uuid;default:uuid_generate_v4();primary_key"`
	Name               string    `gorm:"type:varchar(255);not null"`
	Email              string    `gorm:"uniqueIndex;not null"`
	Password           string    `gorm:"not null"`
	Role               string    `gorm:"type:varchar(255);not null"`
	Provider           string    `gorm:"not null"`
	Photo              string    `gorm:"not null"`
	VerificationCode   string
	PasswordResetToken string
	PasswordResetAt    time.Time
	Verified           bool      `gorm:"not null"`
	CreatedAt          time.Time `gorm:"not null"`
	UpdatedAt          time.Time `gorm:"not null"`
}

type SignUpInput struct {
	Name            string `json:"name" binding:"required"`
	Email           string `json:"email" binding:"required"`
	Password        string `json:"password" binding:"required,min=8"`
	PasswordConfirm string `json:"passwordConfirm" binding:"required"`
	Photo           string `json:"photo" binding:"required"`
}

type SignInInput struct {
	Email    string `json:"email"  binding:"required"`
	Password string `json:"password"  binding:"required"`
}

type UserResponse struct {
	ID        uuid.UUID `json:"id,omitempty"`
	Name      string    `json:"name,omitempty"`
	Email     string    `json:"email,omitempty"`
	Role      string    `json:"role,omitempty"`
	Photo     string    `json:"photo,omitempty"`
	Provider  string    `json:"provider"`
	CreatedAt time.Time `json:"created_at"`
	UpdatedAt time.Time `json:"updated_at"`
}

// ? ForgotPasswordInput struct
type ForgotPasswordInput struct {
	Email string `json:"email" binding:"required"`
}

// ? ResetPasswordInput struct
type ResetPasswordInput struct {
	Password        string `json:"password" binding:"required"`
	PasswordConfirm string `json:"passwordConfirm" binding:"required"`
}
The User struct represents the SQL table in the database. When the user makes a password reset request to the Golang API, the server will generate the reset token, and store the hashed code in the PasswordResetToken column in the database before sending the unhashed code to the user’s email address.
For security reasons, the password reset code will have an expiry time of 15 minutes. Within this period, the user is expected to complete the password reset process else a new reset link has to be requested since the old one will be deleted from the database.
Step 2 – Create an SMTP Account
In this example, we will use Mailtrap to capture the development emails so replace the SMTP credentials in the environment variables file with real SMTP credentials provided by services like Sendinblue, MailGun, SendGrid, and more when you are deploying the application to production.
Follow these steps to create the Mailtrap account:
Step 1: Create an account on Mailtrap if you don’t already have one.
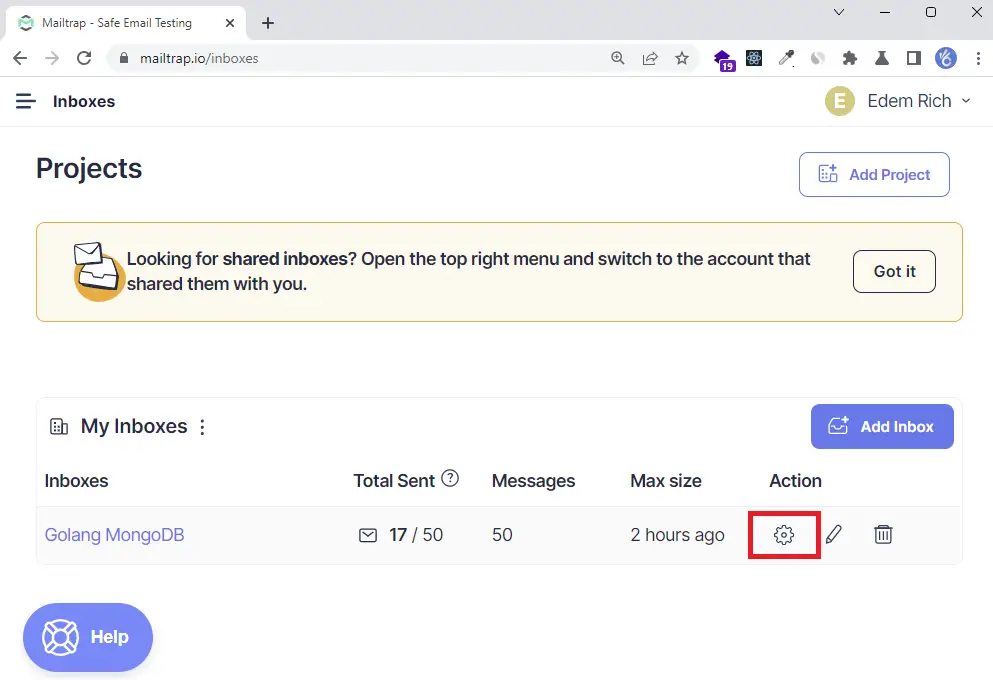
Step 2: Sign into the account and click on the Add Inbox button to create a new mailbox.
Next, click on the gear icon to display the SMTP credentials.
Step 3: Click on the Show Credentials dropdown to show the SMTP and POP3 credentials.
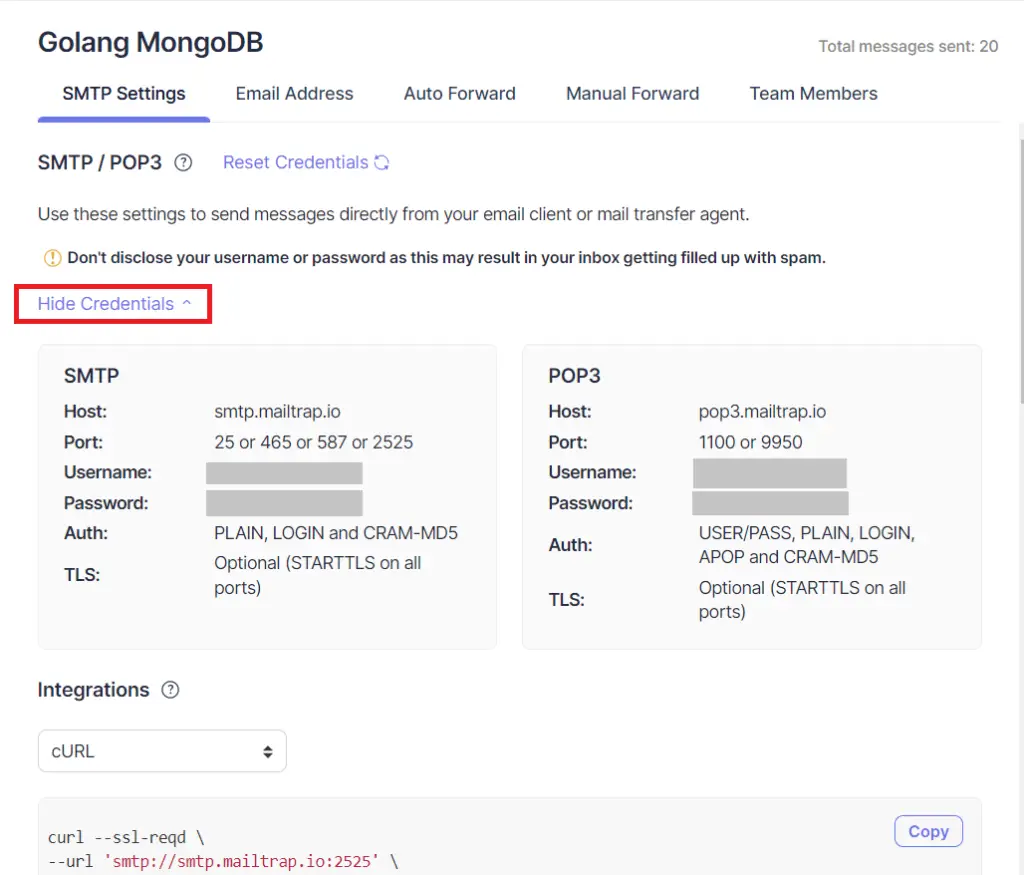
Step 4: Add the SMTP credentials to the environment variables file.
app.env
POSTGRES_HOST=127.0.0.1
POSTGRES_USER=postgres
POSTGRES_PASSWORD=password123
POSTGRES_DB=golang-gorm
POSTGRES_PORT=6500

PORT=8000
CLIENT_ORIGIN=http://localhost:3000

EMAIL_FROM=admin@admin.com
SMTP_HOST=smtp.mailtrap.io
SMTP_USER=
SMTP_PASS=
SMTP_PORT=587

TOKEN_EXPIRED_IN=60m
TOKEN_MAXAGE=60

TOKEN_SECRET=my-ultra-secure-json-web-token-string
Step 5: Update the initializers/loadEnv.go file with the variables.
initializers/loadEnv.go
package initializers

import (
	"time"

	"github.com/spf13/viper"
)

type Config struct {
	DBHost         string `mapstructure:"POSTGRES_HOST"`
	DBUserName     string `mapstructure:"POSTGRES_USER"`
	DBUserPassword string `mapstructure:"POSTGRES_PASSWORD"`
	DBName         string `mapstructure:"POSTGRES_DB"`
	DBPort         string `mapstructure:"POSTGRES_PORT"`
	ServerPort     string `mapstructure:"PORT"`

	ClientOrigin string `mapstructure:"CLIENT_ORIGIN"`

	TokenSecret    string        `mapstructure:"TOKEN_SECRET"`
	TokenExpiresIn time.Duration `mapstructure:"TOKEN_EXPIRED_IN"`
	TokenMaxAge    int           `mapstructure:"TOKEN_MAXAGE"`

	EmailFrom string `mapstructure:"EMAIL_FROM"`
	SMTPHost  string `mapstructure:"SMTP_HOST"`
	SMTPPass  string `mapstructure:"SMTP_PASS"`
	SMTPPort  int    `mapstructure:"SMTP_PORT"`
	SMTPUser  string `mapstructure:"SMTP_USER"`
}

func LoadConfig(path string) (config Config, err error) {
	viper.AddConfigPath(path)
	viper.SetConfigType("env")
	viper.SetConfigName("app")

	viper.AutomaticEnv()

	err = viper.ReadInConfig()
	if err != nil {
		return
	}

	err = viper.Unmarshal(&config)
	return
}
Step 3 – Setup the HTML Templates
In this section, you will set up the HTML email template. Handling HTML templates can be a bit tedious, luckily for us, the Golang community has created an html/template package that implements data-driven templates for generating HTML outputs that are safe from code injection.
Add the Email Template CSS
Just like in most web applications, we declare the stylesheet in a separate file and reuse it in any HTML file.
The Golang html/template package provides a simple syntax to create sub-templates that can be reused across other templates.
To declare a sub-template, we use this syntax:
{{define "sub-template"}}content{{end}}Now create a templates/styles.html file and add the following CSS code:
templates/styles.html
{{define "styles"}}
<style>
  /* -------------------------------------
          GLOBAL RESETS
      ------------------------------------- */

  /*All the styling goes here*/

  img {
    border: none;
    -ms-interpolation-mode: bicubic;
    max-width: 100%;
  }

  body {
    background-color: #f6f6f6;
    font-family: sans-serif;
    -webkit-font-smoothing: antialiased;
    font-size: 14px;
    line-height: 1.4;
    margin: 0;
    padding: 0;
    -ms-text-size-adjust: 100%;
    -webkit-text-size-adjust: 100%;
  }

  table {
    border-collapse: separate;
    mso-table-lspace: 0pt;
    mso-table-rspace: 0pt;
    width: 100%;
  }
  table td {
    font-family: sans-serif;
    font-size: 14px;
    vertical-align: top;
  }

  /* -------------------------------------
          BODY & CONTAINER
      ------------------------------------- */

  .body {
    background-color: #f6f6f6;
    width: 100%;
  }

  /* Set a max-width, and make it display as block so it will automatically stretch to that width, but will also shrink down on a phone or something */
  .container {
    display: block;
    margin: 0 auto !important;
    /* makes it centered */
    max-width: 580px;
    padding: 10px;
    width: 580px;
  }

  /* This should also be a block element, so that it will fill 100% of the .container */
  .content {
    box-sizing: border-box;
    display: block;
    margin: 0 auto;
    max-width: 580px;
    padding: 10px;
  }

  /* -------------------------------------
          HEADER, FOOTER, MAIN
      ------------------------------------- */
  .main {
    background: #ffffff;
    border-radius: 3px;
    width: 100%;
  }

  .wrapper {
    box-sizing: border-box;
    padding: 20px;
  }

  .content-block {
    padding-bottom: 10px;
    padding-top: 10px;
  }

  .footer {
    clear: both;
    margin-top: 10px;
    text-align: center;
    width: 100%;
  }
  .footer td,
  .footer p,
  .footer span,
  .footer a {
    color: #999999;
    font-size: 12px;
    text-align: center;
  }

  /* -------------------------------------
          TYPOGRAPHY
      ------------------------------------- */
  h1,
  h2,
  h3,
  h4 {
    color: #000000;
    font-family: sans-serif;
    font-weight: 400;
    line-height: 1.4;
    margin: 0;
    margin-bottom: 30px;
  }

  h1 {
    font-size: 35px;
    font-weight: 300;
    text-align: center;
    text-transform: capitalize;
  }

  p,
  ul,
  ol {
    font-family: sans-serif;
    font-size: 14px;
    font-weight: normal;
    margin: 0;
    margin-bottom: 15px;
  }
  p li,
  ul li,
  ol li {
    list-style-position: inside;
    margin-left: 5px;
  }

  a {
    color: #3498db;
    text-decoration: underline;
  }

  /* -------------------------------------
          BUTTONS
      ------------------------------------- */
  .btn {
    box-sizing: border-box;
    width: 100%;
  }
  .btn > tbody > tr > td {
    padding-bottom: 15px;
  }
  .btn table {
    width: auto;
  }
  .btn table td {
    background-color: #ffffff;
    border-radius: 5px;
    text-align: center;
  }
  .btn a {
    background-color: #ffffff;
    border: solid 1px #3498db;
    border-radius: 5px;
    box-sizing: border-box;
    color: #3498db;
    cursor: pointer;
    display: inline-block;
    font-size: 14px;
    font-weight: bold;
    margin: 0;
    padding: 12px 25px;
    text-decoration: none;
    text-transform: capitalize;
  }

  .btn-primary table td {
    background-color: #3498db;
  }

  .btn-primary a {
    background-color: #3498db;
    border-color: #3498db;
    color: #ffffff;
  }

  /* -------------------------------------
          OTHER STYLES THAT MIGHT BE USEFUL
      ------------------------------------- */
  .last {
    margin-bottom: 0;
  }

  .first {
    margin-top: 0;
  }

  .align-center {
    text-align: center;
  }

  .align-right {
    text-align: right;
  }

  .align-left {
    text-align: left;
  }

  .clear {
    clear: both;
  }

  .mt0 {
    margin-top: 0;
  }

  .mb0 {
    margin-bottom: 0;
  }

  .preheader {
    color: transparent;
    display: none;
    height: 0;
    max-height: 0;
    max-width: 0;
    opacity: 0;
    overflow: hidden;
    mso-hide: all;
    visibility: hidden;
    width: 0;
  }

  .powered-by a {
    text-decoration: none;
  }

  hr {
    border: 0;
    border-bottom: 1px solid #f6f6f6;
    margin: 20px 0;
  }

  /* -------------------------------------
          RESPONSIVE AND MOBILE FRIENDLY STYLES
      ------------------------------------- */
  @media only screen and (max-width: 620px) {
    table.body h1 {
      font-size: 28px !important;
      margin-bottom: 10px !important;
    }
    table.body p,
    table.body ul,
    table.body ol,
    table.body td,
    table.body span,
    table.body a {
      font-size: 16px !important;
    }
    table.body .wrapper,
    table.body .article {
      padding: 10px !important;
    }
    table.body .content {
      padding: 0 !important;
    }
    table.body .container {
      padding: 0 !important;
      width: 100% !important;
    }
    table.body .main {
      border-left-width: 0 !important;
      border-radius: 0 !important;
      border-right-width: 0 !important;
    }
    table.body .btn table {
      width: 100% !important;
    }
    table.body .btn a {
      width: 100% !important;
    }
    table.body .img-responsive {
      height: auto !important;
      max-width: 100% !important;
      width: auto !important;
    }
  }

  /* -------------------------------------
          PRESERVE THESE STYLES IN THE HEAD
      ------------------------------------- */
  @media all {
    .ExternalClass {
      width: 100%;
    }
    .ExternalClass,
    .ExternalClass p,
    .ExternalClass span,
    .ExternalClass font,
    .ExternalClass td,
    .ExternalClass div {
      line-height: 100%;
    }
    .apple-link a {
      color: inherit !important;
      font-family: inherit !important;
      font-size: inherit !important;
      font-weight: inherit !important;
      line-height: inherit !important;
      text-decoration: none !important;
    }
    #MessageViewBody a {
      color: inherit;
      text-decoration: none;
      font-size: inherit;
      font-family: inherit;
      font-weight: inherit;
      line-height: inherit;
    }
    .btn-primary table td:hover {
      background-color: #34495e !important;
    }
    .btn-primary a:hover {
      background-color: #34495e !important;
      border-color: #34495e !important;
    }
  }
</style>
{{end}}
Add the Password Reset HTML Template
Next, let’s create the templates/resetPassword.html file and include the CSS file.
templates/resetPassword.html
<!DOCTYPE html>
<html>
<head>
<meta name="viewport" content="width=device-width, initial-scale=1.0" />
<meta http-equiv="Content-Type" content="text/html; charset=UTF-8" />
{{template "styles" .}}
<title>{{ .Subject}}</title>
</head>
<body>
<table
role="presentation"
border="0"
cellpadding="0"
cellspacing="0"
class="body"
>
<tr>
<td> </td>
<td class="container">
<div class="content">
<!-- START CENTERED WHITE CONTAINER -->
<table role="presentation" class="main">
<!-- START MAIN CONTENT AREA -->
<tr>
<td class="wrapper">
<table
role="presentation"
border="0"
cellpadding="0"
cellspacing="0"
>
<tr>
<td>
<p>Hi {{ .FirstName}},</p>
<p>
Forgot password? Send a PATCH request to with your
password and passwordConfirm to {{.URL}}
</p>
<table
role="presentation"
border="0"
cellpadding="0"
cellspacing="0"
class="btn btn-primary"
>
<tbody>
<tr>
<td align="left">
<table
role="presentation"
border="0"
cellpadding="0"
cellspacing="0"
>
<tbody>
<tr>
<td>
<a href="{{.URL}}" target="_blank"
>Reset password</a
>
</td>
</tr>
</tbody>
</table>
</td>
</tr>
</tbody>
</table>
<p>
If you didn't forget your password, please ignore this
email
</p>
<p>Good luck! Codevo CEO.</p>
</td>
</tr>
</table>
</td>
</tr>
<!-- END MAIN CONTENT AREA -->
</table>
<!-- END CENTERED WHITE CONTAINER -->
</div>
</td>
<td> </td>
</tr>
</table>
</body>
</html>
Step 4 – Encoding/Decoding the Password Reset Code
Now, pay attention to this part: we will create two functions to encode and decode the 20-byte string that will be generated by the randstr package.
utils/encode.go
package utils

import "encoding/base64"

func Encode(s string) string {
	data := base64.StdEncoding.EncodeToString([]byte(s))
	return string(data)
}

func Decode(s string) (string, error) {
	data, err := base64.StdEncoding.DecodeString(s)
	if err != nil {
		return "", err
	}

	return string(data), nil
}
Step 5 – Create a Utility Function to Send the Emails
Golang comes with a standard SMTP package that implements the Simple Mail Transfer Protocol as defined in RFC 5321 but we will use the Gomail package to easily send the emails.
go get gopkg.in/gomail.v2 github.com/k3a/html2text
- Gomail is a simple and efficient package for sending SMTP emails in Goland
- HTMLtoText is a simple package used for converting HTML to plain text in Golang.
Now let’s evoke the template.ParseFiles function provided by the html/template package to parse all the nested templates into a cache. The function will also ensure that the templates defined with {{define}} are independent of each other.
utils/email.go
package utils

import (
	"bytes"
	"crypto/tls"
	"html/template"
	"log"
	"os"
	"path/filepath"

	"github.com/k3a/html2text"
	"github.com/wpcodevo/golang-gorm-postgres/initializers"
	"github.com/wpcodevo/golang-gorm-postgres/models"
	"gopkg.in/gomail.v2"
)

type EmailData struct {
	URL       string
	FirstName string
	Subject   string
}

// ? Email template parser

func ParseTemplateDir(dir string) (*template.Template, error) {
	var paths []string
	err := filepath.Walk(dir, func(path string, info os.FileInfo, err error) error {
		if err != nil {
			return err
		}
		if !info.IsDir() {
			paths = append(paths, path)
		}
		return nil
	})

	if err != nil {
		return nil, err
	}

	return template.ParseFiles(paths...)
}

func SendEmail(user *models.User, data *EmailData, emailTemp string) {
	config, err := initializers.LoadConfig(".")

	if err != nil {
		log.Fatal("could not load config", err)
	}

	// Sender data.
	from := config.EmailFrom
	smtpPass := config.SMTPPass
	smtpUser := config.SMTPUser
	to := user.Email
	smtpHost := config.SMTPHost
	smtpPort := config.SMTPPort

	var body bytes.Buffer

	template, err := ParseTemplateDir("templates")
	if err != nil {
		log.Fatal("Could not parse template", err)
	}

	template.ExecuteTemplate(&body, emailTemp, &data)

	m := gomail.NewMessage()

	m.SetHeader("From", from)
	m.SetHeader("To", to)
	m.SetHeader("Subject", data.Subject)
	m.SetBody("text/html", body.String())
	m.AddAlternative("text/plain", html2text.HTML2Text(body.String()))

	d := gomail.NewDialer(smtpHost, smtpPort, smtpUser, smtpPass)
	d.TLSConfig = &tls.Config{InsecureSkipVerify: true}

	// Send Email
	if err := d.DialAndSend(m); err != nil {
		log.Fatal("Could not send email: ", err)
	}

}
In the above, we created a SendEmail function that we will evoke in the route handlers to send any kind of email.
Step 6 – Add the Forgot Password Route Handler
In this section, you will create the forgot password route handler that will be called to send the SMTP email to the user.
Before that, install the randstr package to help us generate the string that will be used as the password reset token.
In this example, we will use a 20-byte string but feel free to change the number of bytes.
go get -u github.com/thanhpk/randstr
controllers/auth.controller.go
func (ac *AuthController) ForgotPassword(ctx *gin.Context) {
	var payload *models.ForgotPasswordInput

	if err := ctx.ShouldBindJSON(&payload); err != nil {
		ctx.JSON(http.StatusBadRequest, gin.H{"status": "fail", "message": err.Error()})
		return
	}

	message := "You will receive a reset email if user with that email exist"

	var user models.User
	result := ac.DB.First(&user, "email = ?", strings.ToLower(payload.Email))
	if result.Error != nil {
		ctx.JSON(http.StatusBadRequest, gin.H{"status": "fail", "message": "Invalid email or Password"})
		return
	}

	if !user.Verified {
		ctx.JSON(http.StatusUnauthorized, gin.H{"status": "error", "message": "Account not verified"})
		return
	}

	config, err := initializers.LoadConfig(".")
	if err != nil {
		log.Fatal("Could not load config", err)
	}

	// Generate Verification Code
	resetToken := randstr.String(20)

	passwordResetToken := utils.Encode(resetToken)
	user.PasswordResetToken = passwordResetToken
	user.PasswordResetAt = time.Now().Add(time.Minute * 15)
	ac.DB.Save(&user)

	var firstName = user.Name

	if strings.Contains(firstName, " ") {
		firstName = strings.Split(firstName, " ")[1]
	}

	// ? Send Email
	emailData := utils.EmailData{
		URL:       config.ClientOrigin + "/resetpassword/" + resetToken,
		FirstName: firstName,
		Subject:   "Your password reset token (valid for 10min)",
	}

	utils.SendEmail(&user, &emailData, "resetPassword.html")

	ctx.JSON(http.StatusOK, gin.H{"status": "success", "message": message})
}
Let’s evaluate the above code. First, we queried the database to check if a user with that email exists.
Then, we generated the password reset token and called the utils.Encode() function to hash the token.
Next, we stored the hashed token in the database, generated the HTML template, and sent the plain token to the user’s email.
The password reset link contains the reset token that will be used to verify the user’s identity before allowing them to reset their password.
Step 7 – Add the Reset Password Route Handler
In this section, you will create the password reset route handler that will be called to reset the user’s password.
Here, we will extract the unhashed password reset token from the request URL, hash it and query the database to check if the user belonging to the token exists.
Then, we will hash the new password with the Golang bcrypt package and update the user’s password data in the database.
controllers/auth.controller.go
func (ac *AuthController) ResetPassword(ctx *gin.Context) {
	var payload *models.ResetPasswordInput
	resetToken := ctx.Params.ByName("resetToken")

	if err := ctx.ShouldBindJSON(&payload); err != nil {
		ctx.JSON(http.StatusBadRequest, gin.H{"status": "fail", "message": err.Error()})
		return
	}

	if payload.Password != payload.PasswordConfirm {
		ctx.JSON(http.StatusBadRequest, gin.H{"status": "fail", "message": "Passwords do not match"})
		return
	}

	hashedPassword, _ := utils.HashPassword(payload.Password)

	passwordResetToken := utils.Encode(resetToken)

	var updatedUser models.User
	result := ac.DB.First(&updatedUser, "password_reset_token = ? AND password_reset_at > ?", passwordResetToken, time.Now())
	if result.Error != nil {
		ctx.JSON(http.StatusBadRequest, gin.H{"status": "fail", "message": "The reset token is invalid or has expired"})
		return
	}

	updatedUser.Password = hashedPassword
	updatedUser.PasswordResetToken = ""
	ac.DB.Save(&updatedUser)

	ctx.SetCookie("token", "", -1, "/", "localhost", false, true)

	ctx.JSON(http.StatusOK, gin.H{"status": "success", "message": "Password data updated successfully"})
}
Step 8 – Create/Update the Routes File
Now that we have the route handlers defined, add them to the routes file to enable the Gin Gonic framework to register them.
routes/auth.routes.go
package routes

import (
	"github.com/gin-gonic/gin"
	"github.com/wpcodevo/golang-gorm-postgres/controllers"
	"github.com/wpcodevo/golang-gorm-postgres/middleware"
)

type AuthRouteController struct {
	authController controllers.AuthController
}

func NewAuthRouteController(authController controllers.AuthController) AuthRouteController {
	return AuthRouteController{authController}
}

func (rc *AuthRouteController) AuthRoute(rg *gin.RouterGroup) {
	router := rg.Group("/auth")

	router.POST("/register", rc.authController.SignUpUser)
	router.POST("/login", rc.authController.SignInUser)
	router.GET("/logout", middleware.DeserializeUser(), rc.authController.LogoutUser)
	router.GET("/verifyemail/:verificationCode", rc.authController.VerifyEmail)
	router.POST("/forgotpassword", rc.authController.ForgotPassword)
	router.PATCH("/resetpassword/:resetToken", rc.authController.ResetPassword)
}
Conclusion
Through this article, you’ve learned how to add a secure password reset feature to a Golang application. Hackers are always exploiting new ways to hack systems and it’s your duty as a developer to put security measures in place to mitigate data breaches that may put the organization’s reputation in a jeopardy.
Check out the source code: