

GraphQL Code Generator is a plugin-based toolkit for automating and generating full-typed GraphQL operations. This article will teach you how to add access and refresh token functionalities to your Next.js app using React Query, graphql-request, GraphQL CodeGen, React-Hook-Form, and Zod.
Next.js, React Query, and GraphQL Series:
- GraphQL API with Next.js & MongoDB: Access & Refresh Tokens
- GraphQL CRUD API with Next.js, MongoDB, and TypeGraphQL
- Next.js, GraphQL-CodeGen, & React Query: JWT Authentication
- Next.js Full-Stack App with React Query, and GraphQL-CodeGen
More practice:
- React Query, & GraphQL-CodeGen: Access, and Refresh Tokens
- React, Material UI and React Hook Form: Login and Signup Forms
- React, RTK Query, React Hook Form and Material UI – Image Upload
- React + Redux Toolkit: JWT Authentication and Authorization
- React.js + Redux Toolkit: Refresh Tokens Authentication
- Build Vue.js, Vue Query, and Axios CRUD App with RESTful API

Next.js, React Query & GraphQL-CodeGen Overview
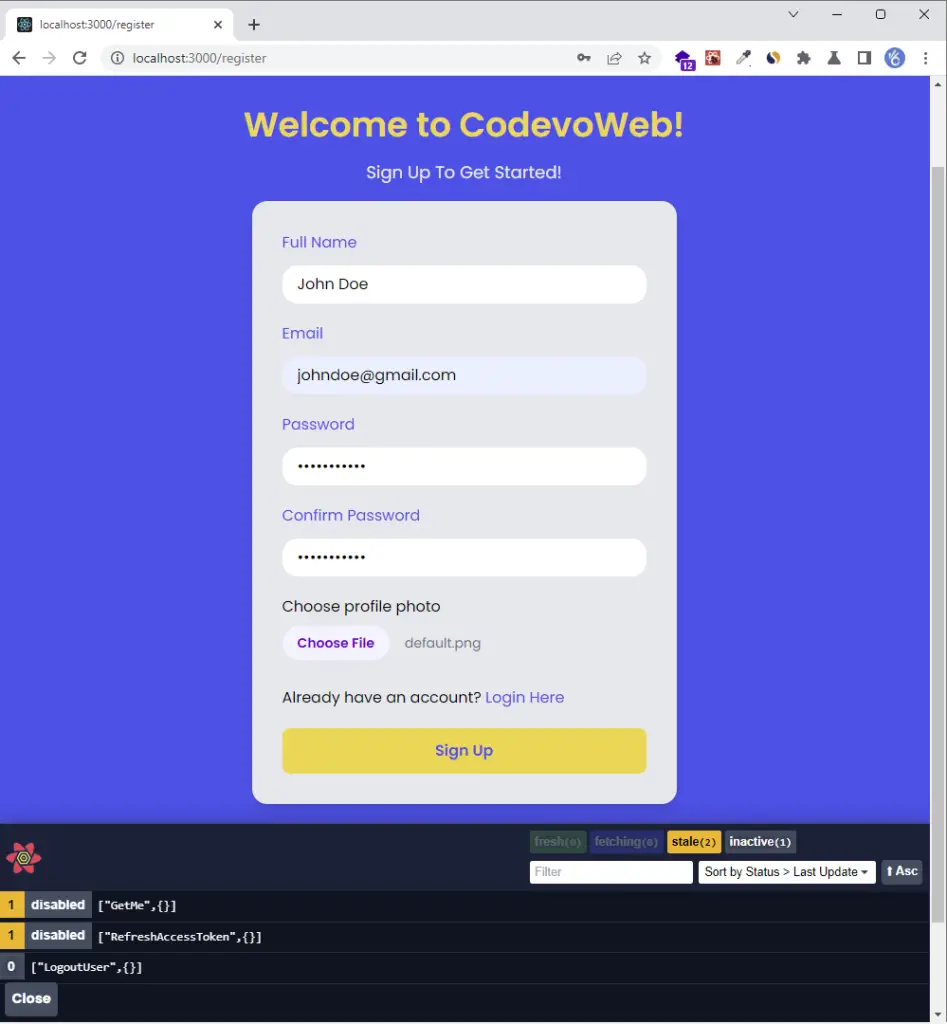
The user clicks on the “SignUp” link from the navigation menu to register for an account.
On the signup page, the user is required to provide the necessary credentials to create a new account.
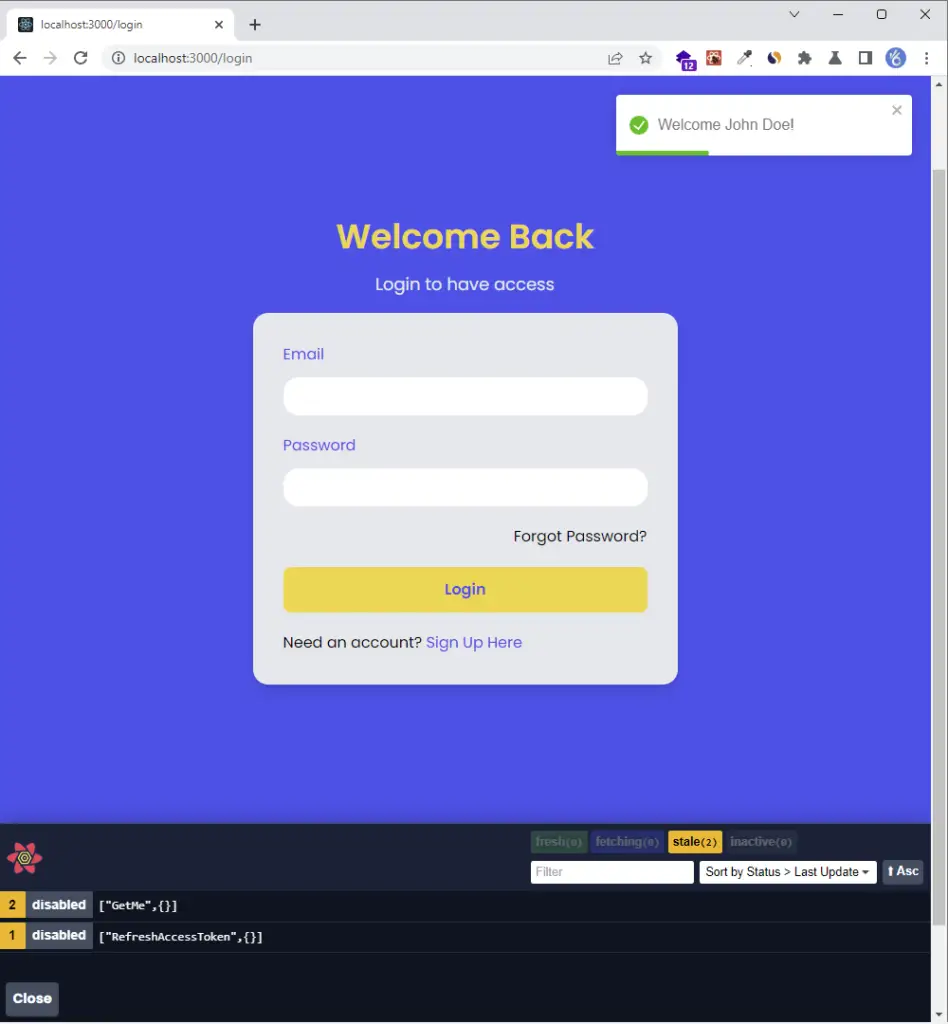
After the GraphQL server has successfully added the user to the database, React redirects the user to the login page.
Next, the user makes a GraphQL request with React Query and graphql-request to the Next.js GraphQL server in order to sign in.
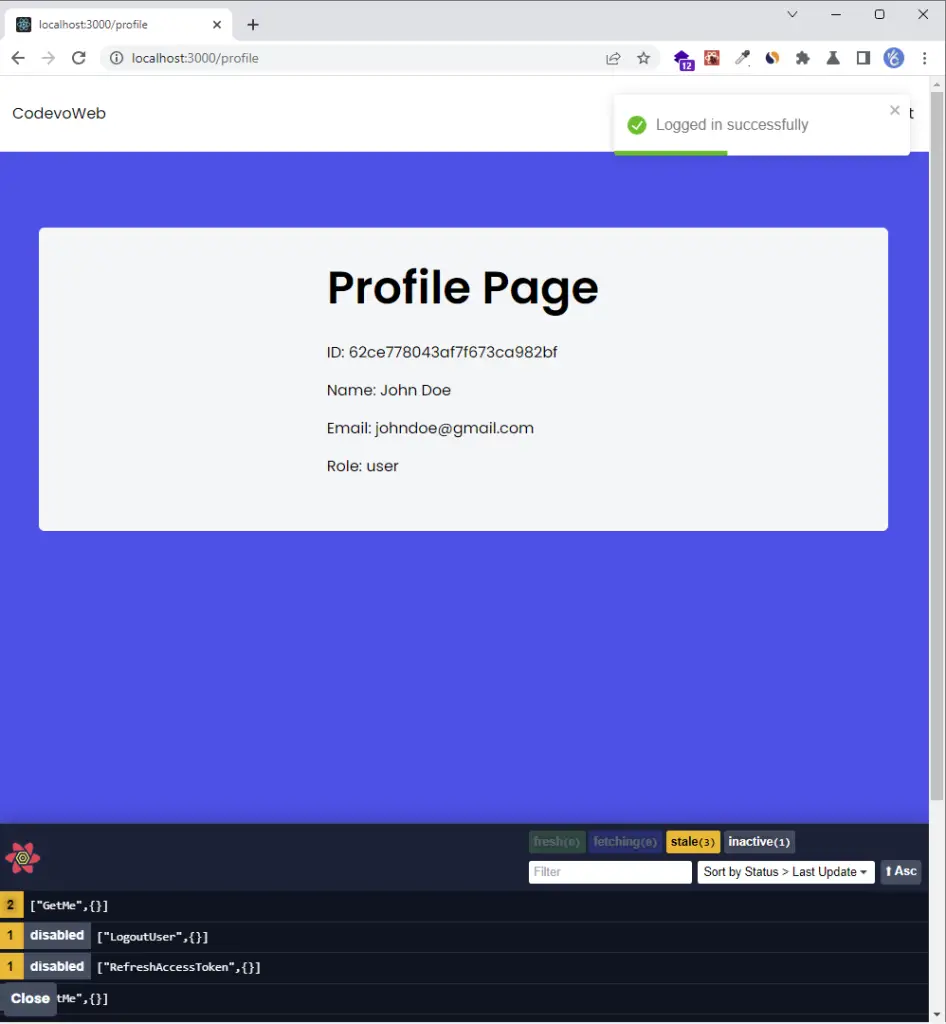
After the user has been authenticated by the Next.js GraphQL server, Next.js redirects the user to the profile page where his credentials are displayed.
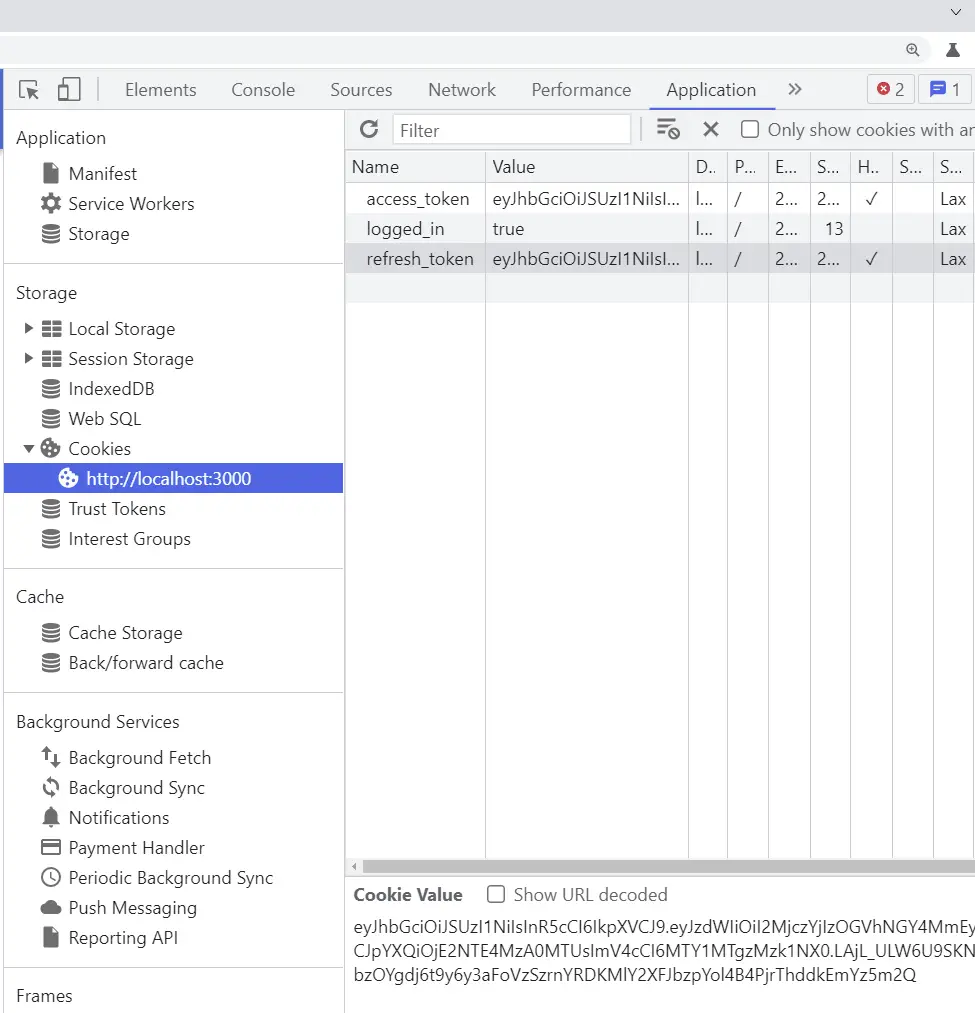
To see the cookies returned by the Next.js GraphQL server, open the dev tools then click on the “Application” tab and select “Cookies” from the storage section.
Setup React Query & GraphQL CodeGen in Next.js
GraphQL Code Generator supports popular clients (React Query, React Apollo Client, URQL, and other clients) and provides specific plugins to be used in conjunction with each target client.
You can find the plugins and configuration options available for each target client from the following guides:
However, we will focus on GraphQL CodeGen with React Query, the available plugins, and configuration options.
Install and Setup React Query
With that out of the way, run this command to install React Query:
yarn add react-query
# or
npm install react-query
Note: React Query is compatible with React v16.8+ and works well with ReactDOM and React Native.
In this section, we will add Next.js support for server-side rendering and React Query prefetching.
There are two ways we can handle React Query prefetching for our server-side rendered pages:
- We can prefetch the data ourselves and pass it to the
useQuery()hook asinitialData. This strategy is simple and requires minimal setup but it has some caveats. - The second approach is to prefetch the query on the server, dehydrate the cache and rehydrate it on the client.
To set up server-side query caching and hydration with Next.js and React Query, we need to create the QueryClient instance and pass it to the <QueryClientProvider> component.
Next, let’s wrap the app component with the <Hydrate> component and provide it with a dehydratedState prop from pageProps .
import '../styles/globals.css';
import type { AppProps } from 'next/app';
import { QueryClientProvider, Hydrate, QueryClient } from 'react-query';
import { ReactQueryDevtools } from 'react-query/devtools';
import React from 'react';

function MyApp({ Component, pageProps }: AppProps) {
  const [queryClient] = React.useState(() => new QueryClient());
  return (
      <QueryClientProvider client={queryClient}>
        <Hydrate state={pageProps.dehydratedState}>
            <Component {...pageProps} />
          <ReactQueryDevtools initialIsOpen={false} />
        </Hydrate>
      </QueryClientProvider>
  );
}

export default MyApp;
Install GraphQL and GraphQL-Request
yarn add graphql graphql-request
# or
npm install graphql graphql-request
graphql-request– is a minimalist GraphQL client similar to Axios but designed specifically for making GraphQL requests.graphql– a query language and runtime which can be used in a Node.js server and the browser.
GraphQL-CodeGen Manual Setup
GraphQL-CodeGen is a tool designed to automate the generation of typed queries, mutations, and subscriptions for React, Next.js, Vue, Angular, Svelte, and other frontend frameworks.
Now open your terminal and run this command to install the GraphQL Code Generator CLI tool to help us generate the GraphQL React Query hooks.
yarn add -D graphql @graphql-codegen/cli
# or
npm install -D graphql @graphql-codegen/cli
Before we can generate the typed React Query hooks for the GraphQL operations, we need to install these required plugins.
yarn add -D @graphql-codegen/typescript-operations @graphql-codegen/typescript @graphql-codegen/typescript-react-query
# or
npm install -D @graphql-codegen/typescript-operations @graphql-codegen/typescript @graphql-codegen/typescript-react-query
@graphql-codegen/typescript-operations– a plugin for generating the TypeScript types for only used Queries, Mutations, Subscriptions, and Fragments.@graphql-codegen/typescript– a plugin that generates the base TypeScript types, based on the exact structure of the GraphQL schema.@graphql-codegen/typescript-react-query– a plugin that generates typed hooks for the GraphQL operations.
The GraphQL Code Generator relies on a configuration file which can either be a codegen.yml , codegen.js or codegen.json to manage all possible options.
Now create a codegen.yml file with these configuration options to instruct CodeGen on how to generate the codes.
codegen.yml
schema: http://localhost:3000/api/graphql
documents: './client/**/*.graphql'
generates:
  ./client/generated/graphql.ts:
    plugins:
      - typescript
      - typescript-operations
      - typescript-react-query
    config:
      fetcher: graphql-request
schema– the URL to the GraphQL endpoint.documents– an array of paths to tell CodeGen the location of the GraphQL files. It can also be a plain string like./src/**/*.graphql.generates– this field tells CodeGen where to output the generated code.plugins– this field holds the list of plugins needed by CodeGen to generate the code.fetcherthis field tells CodeGen the GraphQL client we will be using to make the requests.
Next, let’s add the GraphQL Code Generator script to the package.json file and provide it the path to the codegen.yml file with the --config options.
package.json
{
"scripts": {
    "generate": "graphql-codegen --config codegen.yml"
  }
}
Create the GraphQL Mutations and Queries
GraphQL mutations allow us to modify data on the server. In other words, we can perform insert, update and delete operations using mutations.
Queries on the other hand only allow us to request data from the GrapQL server.
To define a mutation, query, or subscription, we specify the operation type (query, mutation, or subscription) followed by the operation name.
- The operation type (query, mutation, or subscription) describes the type of GraphQL operation.
- The operation name is simply a meaningful name that we need to specify for each GraphQL operation. The operation name is really important since GraphQL Code Generator will use it to create the React Query hook and the query key.
Now create a client/graphql folder and add the following mutations and queries.
Sign-up User Mutation
client/graphql/SignUpMutation.graphql
mutation SignUpUser($input: SignUpInput!) {
  signupUser(input: $input) {
    status
    user {
      name
      email
      photo
      role
    }
  }
}
Sign-in User Mutation
client/graphql/LoginMutation.graphql
mutation LoginUser($input: LoginInput!) {
  loginUser(input: $input) {
    status
    access_token
  }
}
Get Authenticated User Query
client/graphql/GetMeQuery.graphql
query GetMe {
  getMe {
    status
    user {
      _id
      id
      email
      name
      role
      photo
      updatedAt
      createdAt
    }
  }
}
Refresh Access Token Query
client/graphql/RefreshAccessTokenQuery.graphql
query RefreshAccessToken {
  refreshAccessToken {
    status
    access_token
  }
}
Logout User Query
client/graphql/LogoutQuery.graphql
query LogoutUser {
  logoutUser
}
Generating the Typescript Types & React Query Hooks
Now that we have all the mutations and queries defined, let’s execute the generate script we added to the package.json file.
yarn generate
# or
npm run generate
Once CodeGen has successfully generated the code, you should see a newly-created ./client/generated/graphql.ts file containing the Typescript types, and React Query hooks.
Setup tailwindCss in Next.js
Install tailwindCss and its peer dependencies
let’s begin by installing tailwindCss and its peer dependencies with npm or yarn.
npm install -D tailwindcss postcss autoprefixer
# or
yarn add -D tailwindcss postcss autoprefixer
Next, run the init command to auto-generate the tailwind.config.js and postcss.config.js files.
npx tailwindcss init -p
Configure the template paths
Next, add the paths to the template files in the tailwind.config.js file. Also, don’t forget to add your custom colors and fonts.
tailwind.config.js
/** @type {import('tailwindcss').Config} */
module.exports = {
  content: ['./src/**/*.{js,jsx,ts,tsx}'],
  theme: {
    extend: {
      colors: {
        'ct-dark-600': '#222',
        'ct-dark-200': '#e5e7eb',
        'ct-dark-100': '#f5f6f7',
        'ct-blue-600': '#2363eb',
        'ct-yellow-600': '#f9d13e',
      },
      fontFamily: {
        Poppins: ['Poppins, sans-serif'],
      },
      container: {
        center: true,
        padding: '1rem',
        screens: {
          lg: '1125px',
          xl: '1125px',
          '2xl': '1125px',
        },
      },
    },
  },
  plugins: [],
};
Add the TailwindCSS directives to your CSS File
Next, add the @tailwind directives and font to the ./styles/globals.css file generated by Next.js.
styles/globals.css
@import url('https://fonts.googleapis.com/css2?family=Poppins:wght@300;400;500;600;700&display=swap');

@tailwind base;
@tailwind components;
@tailwind utilities;

html {
  font-family: Poppins, sans-serif;
}
Import the CSS File
Now, import the ./styles/globals.css file into the ./pages/_app.tsx file.
Creating React Query, Axios & GraphQL Clients
Add the Next.js GraphQL API endpoint to the .env.local file with NEXT_PUBLIC_ prefix.
.env.local
NEXT_PUBLIC_GRAPHQL_ENDPOINT=http://localhost:3000/api/graphql
GraphQL Request Client
client/requests/graphqlRequestClient.ts
import { GraphQLClient } from 'graphql-request';
import { QueryClient } from 'react-query';

const GRAPHQL_ENDPOINT = process.env.NEXT_PUBLIC_GRAPHQL_ENDPOINT as string;

const graphqlRequestClient = new GraphQLClient(GRAPHQL_ENDPOINT, {
  credentials: 'include',
  mode: 'cors',
});

export const queryClient = new QueryClient({
  defaultOptions: {
    queries: {
      staleTime: 5 * 1000,
    },
  },
});

export default graphqlRequestClient;
Note: You need to set
credentials: 'include'in thegraphql-requestconfig options to enable it to include the cookies in the requests.
Axios GraphQL Request Client
Axios is an HTTP client library used in both Node.js and the browser. However, Axios also supports GraphQL requests and I decided to include it in this project because I couldn’t refresh the access token with graphql-request in thegetServerSideProps function of Next.js
Install the Axios library with the following command:
yarn add axios
# or
npm install axios
client/requests/axiosClient.ts
import axios from 'axios';
import { GetMeQuery } from '../generated/graphql';
const BASE_URL = 'http://localhost:3000/api/graphql';

export const authApi = axios.create({
  baseURL: BASE_URL,
  withCredentials: true,
});

export const axiosGetMe = async (data: string, access_token: string) => {
  const response = await authApi.post<GetMeQuery>(
    '',
    { query: data },
    {
      headers: {
        cookie: `access_token=${access_token}`,
        'Content-Type': 'application/json',
      },
    }
  );
  return response.data;
};
State Management with Zustand
Currently Redux is the dominant React.js state management library, however, you have to write some amount of code to make it work with React.
Some of the flaws of Redux include:
- Requires actions, dispatch functions, and reducers to be able to update the state.
- A provider component needs to be wrapped around the entry point of the application to make the Redux store available to any nested components.
Zustand is hands down one of the best libraries for managing client-side states in React. It works seamlessly well out-of-the-box, with zero-config, and can even be used in none React components to retrieve data from the state.
Now create a client/lib/types.ts file and add the following TypeScript type:
client/lib/types.ts
export type IUser = {
  _id: string;
  id: string;
  email: string;
  name: string;
  role: string;
  photo: string;
  updatedAt: string;
  createdAt: string;
};
Run this command to install the Zustand library:
yarn add zustand
# or
npm install zustand
Next, create a client/store/index.ts file and add the following code to create the Zustand store.
client/store/index.ts
import create from 'zustand';
import { IUser } from '../lib/types';

type Store = {
  authUser: IUser | null;
  uploadingImage: boolean;
  pageLoading: boolean;
  setAuthUser: (user: IUser) => void;
  setUploadingImage: (isUploading: boolean) => void;
  setPageLoading: (isLoading: boolean) => void;
};

const useStore = create<Store>((set) => ({
  authUser: null,
  uploadingImage: false,
  pageLoading: false,
  setAuthUser: (user) => set((state) => ({ ...state, authUser: user })),
  setUploadingImage: (isUploading) =>
    set((state) => ({ ...state, uploadingImage: isUploading })),
  setPageLoading: (isLoading) =>
    set((state) => ({ ...state, pageLoading: isLoading })),
}));

export default useStore;
Creating React Components with TailwindCSS
Install these packages with either Yarn or NPM:
yarn add tailwind-merge react-cookie
# or
npm install tailwind-merge react-cookie
react-cookie– a library for accessing and modifying cookies in Reacttailwind-merge– a library for merging Tailwind CSS classes
Creating a Loading Spinner
client/components/Spinner.tsx
import React from 'react';
import { twMerge } from 'tailwind-merge';
type SpinnerProps = {
  width?: number;
  height?: number;
  color?: string;
  bgColor?: string;
};
const Spinner: React.FC<SpinnerProps> = ({
  width = 5,
  height = 5,
  color,
  bgColor,
}) => {
  return (
    <svg
      role='status'
      className={twMerge(
        'w-5 h-5 mr-2 text-gray-200 animate-spin dark:text-gray-600 fill-blue-600',
        `w-${width} h-${height} ${color} ${bgColor}`
      )}
      viewBox='0 0 100 101'
      fill='none'
      xmlns='http://www.w3.org/2000/svg'
    >
      <path
        d='M100 50.5908C100 78.2051 77.6142 100.591 50 100.591C22.3858 100.591 0 78.2051 0 50.5908C0 22.9766 22.3858 0.59082 50 0.59082C77.6142 0.59082 100 22.9766 100 50.5908ZM9.08144 50.5908C9.08144 73.1895 27.4013 91.5094 50 91.5094C72.5987 91.5094 90.9186 73.1895 90.9186 50.5908C90.9186 27.9921 72.5987 9.67226 50 9.67226C27.4013 9.67226 9.08144 27.9921 9.08144 50.5908Z'
        fill='currentColor'
      />
      <path
        d='M93.9676 39.0409C96.393 38.4038 97.8624 35.9116 97.0079 33.5539C95.2932 28.8227 92.871 24.3692 89.8167 20.348C85.8452 15.1192 80.8826 10.7238 75.2124 7.41289C69.5422 4.10194 63.2754 1.94025 56.7698 1.05124C51.7666 0.367541 46.6976 0.446843 41.7345 1.27873C39.2613 1.69328 37.813 4.19778 38.4501 6.62326C39.0873 9.04874 41.5694 10.4717 44.0505 10.1071C47.8511 9.54855 51.7191 9.52689 55.5402 10.0491C60.8642 10.7766 65.9928 12.5457 70.6331 15.2552C75.2735 17.9648 79.3347 21.5619 82.5849 25.841C84.9175 28.9121 86.7997 32.2913 88.1811 35.8758C89.083 38.2158 91.5421 39.6781 93.9676 39.0409Z'
        fill='currentFill'
      />
    </svg>
  );
};

export default Spinner;
Creating the Header Component
client/components/Header.tsx
import Link from 'next/link';
import { useQueryClient } from 'react-query';
import { toast } from 'react-toastify';
import { LogoutUserQuery, useLogoutUserQuery } from '../generated/graphql';
import graphqlRequestClient from '../requests/graphqlRequestClient';
import useStore from '../store';
import Spinner from './Spinner';

const Header = () => {
  const store = useStore();
  const user = store.authUser;

  const queryClient = useQueryClient();
  const { refetch } = useLogoutUserQuery(
    graphqlRequestClient,
    {},
    {
      enabled: false,
      onSuccess(data: LogoutUserQuery) {
        queryClient.clear();
        document.location.href = '/login';
      },
      onError(error: any) {
        error.response.errors.forEach((err: any) => {
          toast(err.message, {
            type: 'error',
            position: 'top-right',
          });
          queryClient.clear();
          document.location.href = '/login';
        });
      },
    }
  );

  const handleLogout = () => {
    refetch();
  };

  return (
    <>
      <header className='bg-white h-20'>
        <nav className='h-full flex justify-between container items-center'>
          <div>
            <Link href='/' className='text-ct-dark-600 text-2xl font-semibold'>
              CodevoWeb
            </Link>
          </div>
          <ul className='flex items-center gap-4'>
            <li>
              <Link href='/' className='text-ct-dark-600'>
                Home
              </Link>
            </li>
            {!user && (
              <>
                <li>
                  <Link href='/register' className='text-ct-dark-600'>
                    SignUp
                  </Link>
                </li>
                <li>
                  <Link href='/login' className='text-ct-dark-600'>
                    Login
                  </Link>
                </li>
              </>
            )}
            {user && (
              <>
                <li>
                  <Link href='/profile' className='text-ct-dark-600'>
                    Profile
                  </Link>
                </li>
                <li className='cursor-pointer'>Create Post</li>
                <li className='cursor-pointer' onClick={handleLogout}>
                  Logout
                </li>
              </>
            )}
          </ul>
        </nav>
      </header>
      <div className='pt-4 pl-2 bg-ct-blue-600 fixed'>
        {store.pageLoading && <Spinner color='text-ct-yellow-600' />}
      </div>
    </>
  );
};

export default Header;
Creating a Full-Screen Loader
client/components/FullScreenLoader.tsx
import Spinner from './Spinner';

const FullScreenLoader = () => {
  return (
    <div className='w-screen h-screen fixed'>
      <div className='absolute top-64 left-1/2 -translate-x-1/2'>
        <Spinner width={8} height={8} />
      </div>
    </div>
  );
};

export default FullScreenLoader;
Creating a Loading Button
client/components/LoadingButton.tsx
import React from 'react';
import Spinner from './Spinner';

type LoadingButtonProps = {
  loading: boolean;
  btnColor?: string;
  textColor?: string;
  children: React.ReactNode;
};

export const LoadingButton: React.FC<LoadingButtonProps> = ({
  textColor = 'text-white',
  btnColor = 'bg-ct-yellow-600',
  children,
  loading = false,
}) => {
  return (
    <button
      type='submit'
      className={`w-full py-3 font-semibold ${btnColor} rounded-lg outline-none border-none flex justify-center ${
        loading ? 'bg-[#ccc]' : ''
      }`}
    >
      {loading ? (
        <div className='flex items-center gap-3'>
          <Spinner />
          <span className='text-slate-500 inline-block'>Loading...</span>
        </div>
      ) : (
        <span className={`${textColor}`}>{children}</span>
      )}
    </button>
  );
};
Creating an InputField Component with React-Hook-Form
yarn add react-hook-form zod @hookform/resolvers
react-hook-form– a form validation library for React.jszod– a TypeScript-first schema declaration and validation library
client/components/FormInput.tsx
import React from 'react';
import { useFormContext } from 'react-hook-form';

type FormInputProps = {
  label: string;
  name: string;
  type?: string;
};

const FormInput: React.FC<FormInputProps> = ({
  label,
  name,
  type = 'text',
}) => {
  const {
    register,
    formState: { errors },
  } = useFormContext();
  return (
    <div className=''>
      <label htmlFor={name} className='block text-ct-blue-600 mb-3'>
        {label}
      </label>
      <input
        type={type}
        placeholder=' '
        className='block w-full rounded-2xl appearance-none focus:outline-none py-2 px-4'
        {...register(name)}
      />
      {errors[name] && (
        <span className='text-red-500 text-xs pt-1 block'>
          {errors[name]?.message as string}
        </span>
      )}
    </div>
  );
};

export default FormInput;
Creating a FileUpload with Cloudinary and React
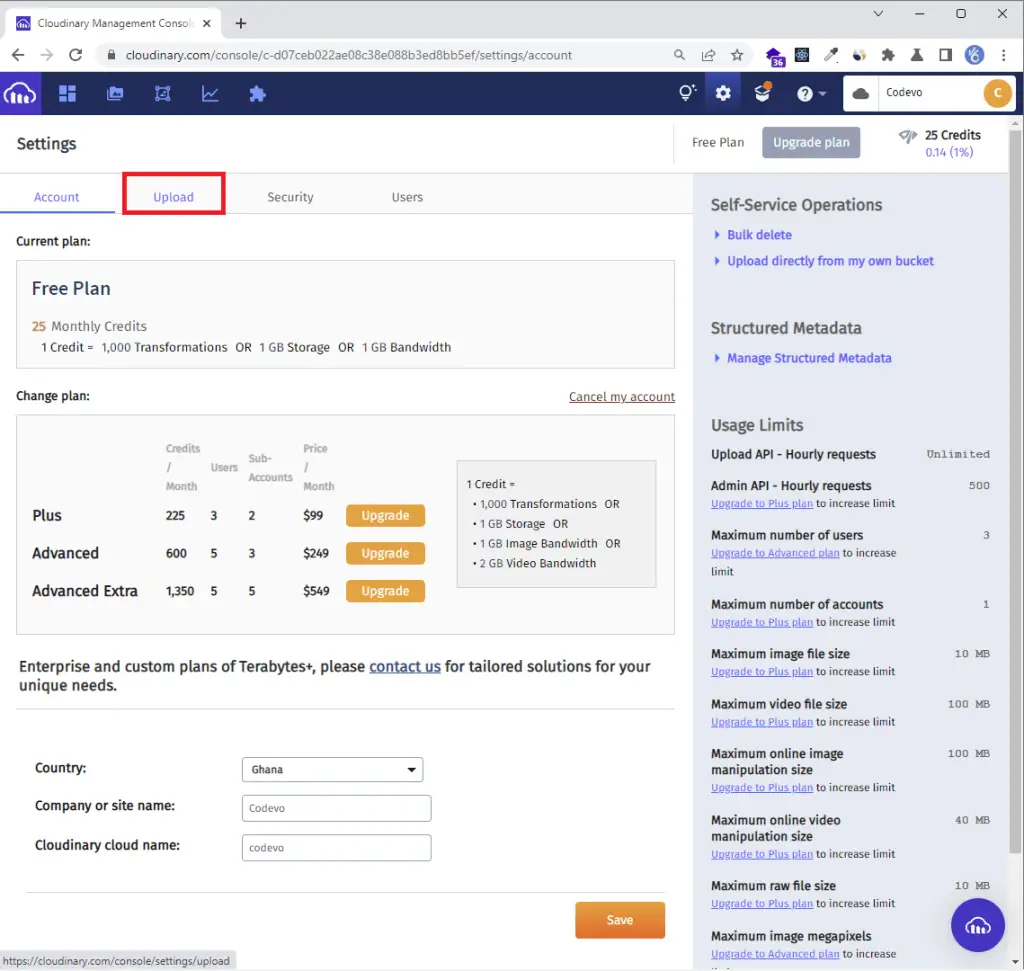
First and foremost, you need to register for an account on Cloudinary and follow the steps below to configure the upload preset.
Step 1: Click on the Settings icon on the top right side.

Step 2: Select the “Upload” tab on the settings screen.
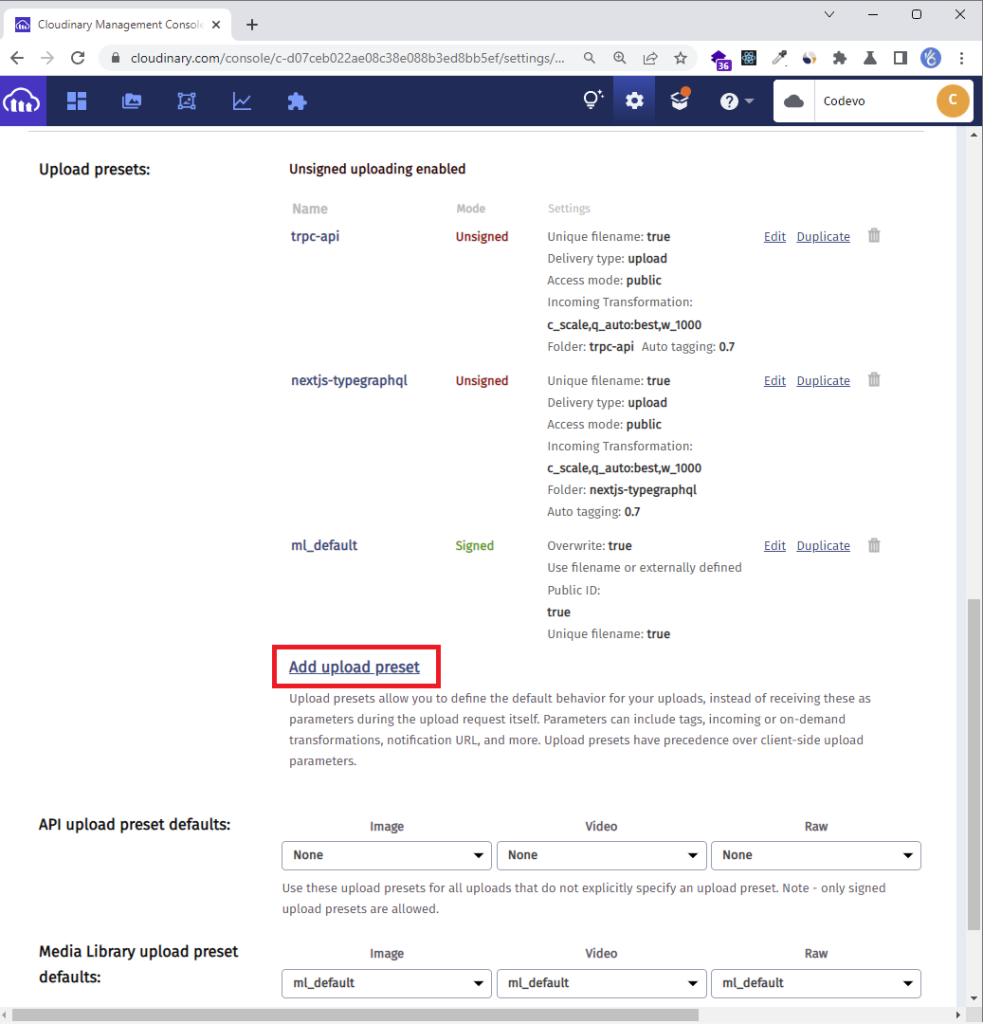
Step 3: Scroll down and click the “Add upload preset” link.
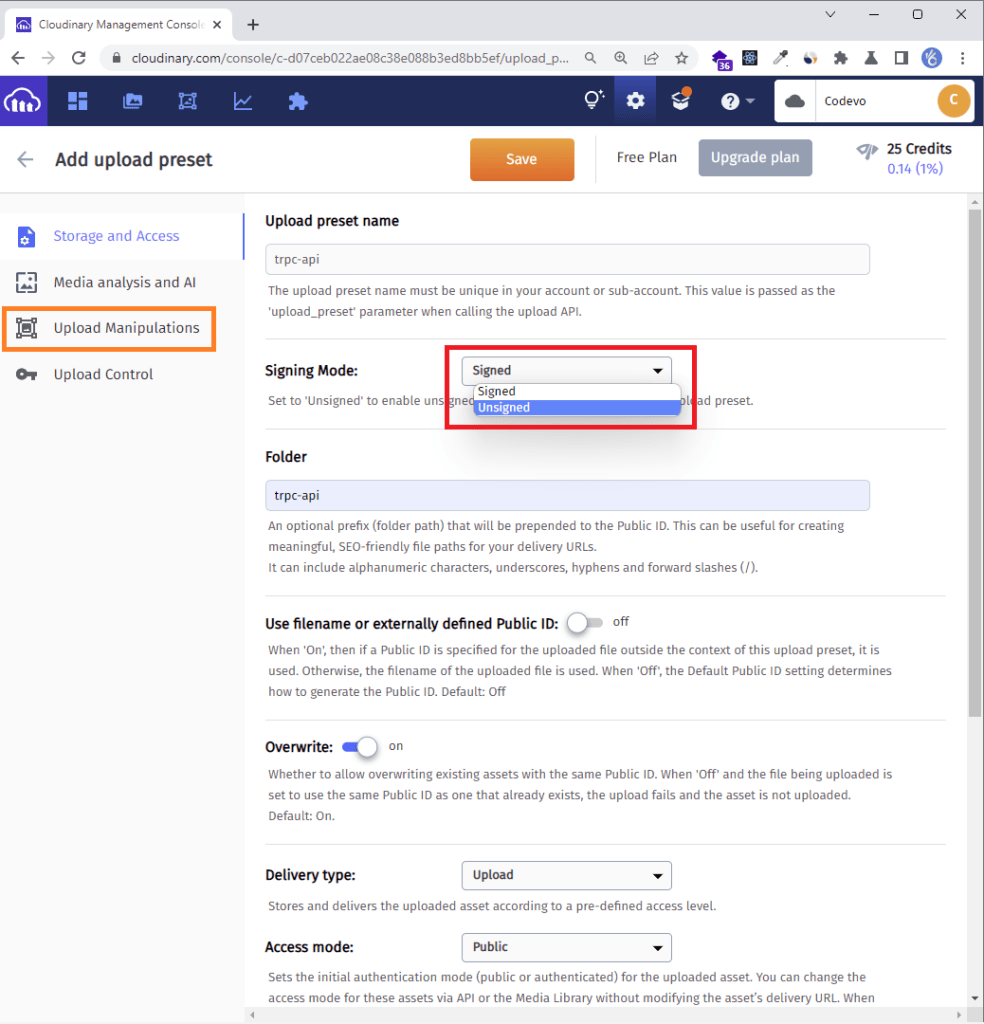
Step 4: Input your preset name and change the “Signing Mode” from “Signed” to “Unsigned“.
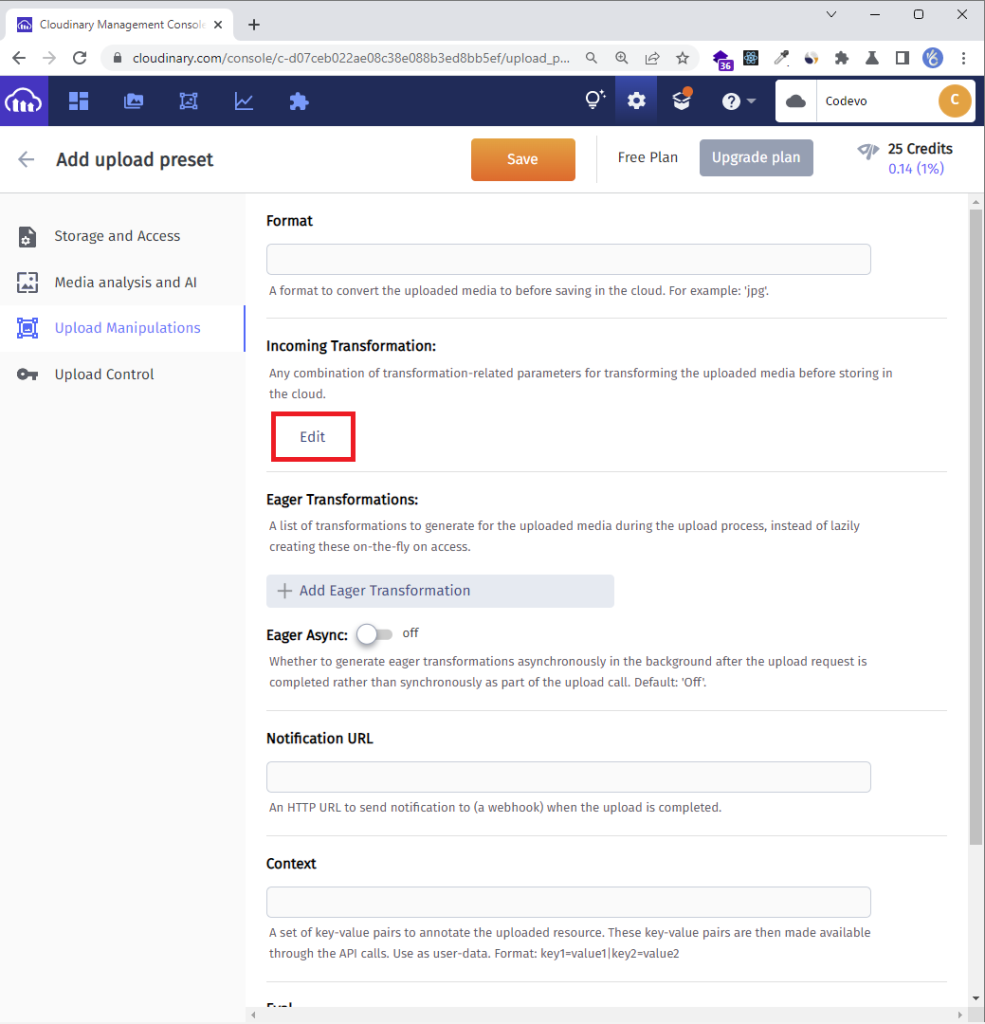
Enter the preset name as the folder name and click on the “Upload Manipulations” tab.
Step 5: Click on the Edit link to display the “Edit Transformation” popup.
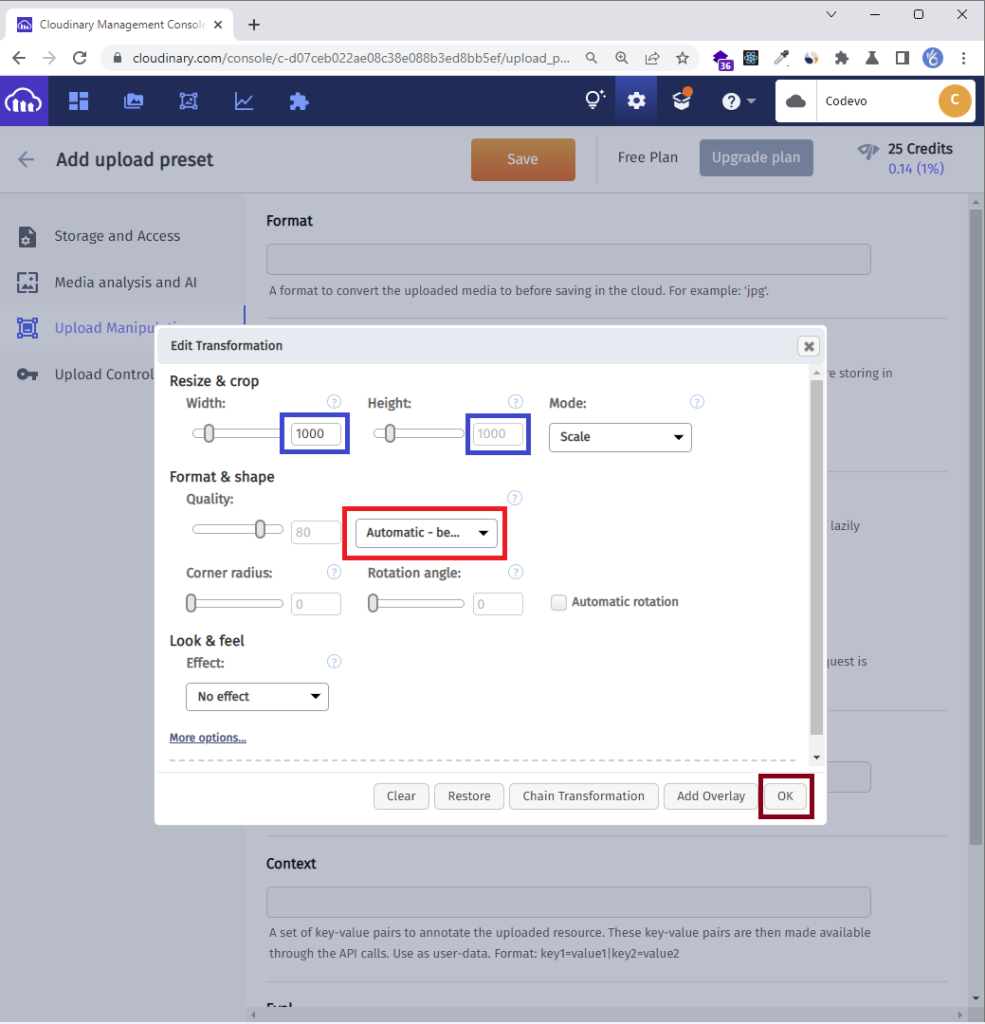
Step 6: Update the width and height to your preferred sizes and change the image quality type to “Automatic – best quality“
Next, click the ok button to save the settings.
Step 7: Click on the “Save” button to commit the changes.
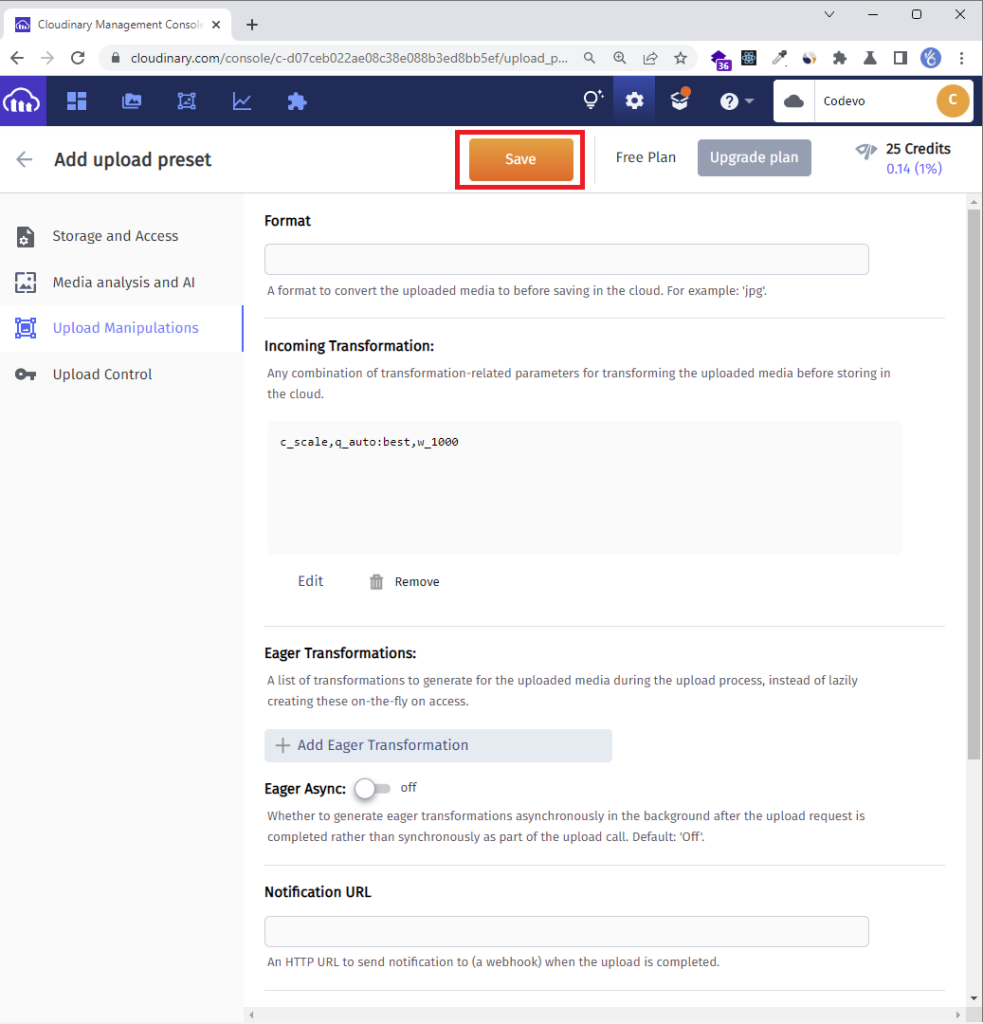
Keep your “upload preset name” a secret to avoid unsolicited upload of images by random users.
Now create a client/components/FileUpload.tsx file and add the following code snippets to handle the image upload request.
client/components/FileUpload.tsx
import React, { useCallback } from 'react';
import { Controller, useController, useFormContext } from 'react-hook-form';
import useStore from '../store';
import Spinner from './Spinner';

const CLOUDINARY_UPLOAD_PRESET = 'nextjs-typegraphql';
const CLOUDINARY_URL = 'https://api.cloudinary.com/v1_1/Codevo/image/upload';

type FileUpLoaderProps = {
  name: string;
};
const FileUpLoader: React.FC<FileUpLoaderProps> = ({ name }) => {
  const {
    control,
    formState: { errors },
  } = useFormContext();
  const { field } = useController({ name, control });
  const store = useStore();

  const onFileDrop = useCallback(
    async (e: React.SyntheticEvent<EventTarget>) => {
      const target = e.target as HTMLInputElement;
      if (!target.files) return;
      const newFile = Object.values(target.files).map((file: File) => file);
      const formData = new FormData();
      formData.append('file', newFile[0]);
      formData.append('upload_preset', CLOUDINARY_UPLOAD_PRESET);

      store.setUploadingImage(true);
      const data = await fetch(CLOUDINARY_URL, {
        method: 'POST',
        body: formData,
      })
        .then((res) => {
          store.setUploadingImage(false);

          return res.json();
        })
        .catch((err) => {
          store.setUploadingImage(false);
          console.log(err);
        });

      if (data.secure_url) {
        field.onChange(data.secure_url);
      }
    },

    [field, store]
  );

  return (
    <Controller
      name={name}
      defaultValue=''
      control={control}
      render={({ field: { name, onBlur, ref } }) => (
        <>
          <div className='mb-2 flex justify-between items-center'>
            <div>
              <span className='block mb-2'>Choose profile photo</span>
              <input
                className='block text-sm mb-2 text-slate-500 file:mr-4 file:py-2 file:px-4 file:rounded-full file:border-0 file:text-sm file:font-semibold file:bg-violet-50 file:text-violet-700 hover:file:bg-violet-100'
                type='file'
                name={name}
                onBlur={onBlur}
                ref={ref}
                onChange={onFileDrop}
                multiple={false}
                accept='image/jpg, image/png, image/jpeg'
              />
            </div>
            <div>
              {store.uploadingImage && <Spinner color='text-yellow-400' />}
            </div>
          </div>
          <p
            className={`text-red-500 text-xs italic mb-2 ${
              errors[name] ? 'visible' : 'invisible'
            }`}
          >
            {errors[name] && (errors[name]?.message as string)}
          </p>
        </>
      )}
    />
  );
};

export default FileUpLoader;
To upload images using the Cloudinary RESTful image upload Endpoint, you are going to need two things:
- the Cloudinary cloud name
- the upload preset name
With these two pieces of information, you can construct the URL like this:
POST https://api.cloudinary.com/v1_1/:cloud_name/image/uploadYou need to replace the :cloud_name with your Cloudinary Cloud name and append your upload preset to the formData before making the POST request to upload the image.
React Query & GraphQL Request: Sign-up User
pages/register.tsx
import type { GetServerSideProps, NextPage } from 'next';
import { object, string, TypeOf, z } from 'zod';
import { zodResolver } from '@hookform/resolvers/zod';
import { useForm, FormProvider, SubmitHandler } from 'react-hook-form';
import { useEffect } from 'react';
import FormInput from '../client/components/FormInput';
import Link from 'next/link';
import { LoadingButton } from '../client/components/LoadingButton';
import { useRouter } from 'next/router';
import {
  SignUpUserMutation,
  useSignUpUserMutation,
} from '../client/generated/graphql';
import graphqlRequestClient from '../client/requests/graphqlRequestClient';
import { toast } from 'react-toastify';
import FileUpLoader from '../client/components/FileUpload';

const registerSchema = object({
  name: string().min(1, 'Full name is required').max(100),
  email: string()
    .min(1, 'Email address is required')
    .email('Email Address is invalid'),
  photo: string().min(1, 'Photo is required'),
  password: string()
    .min(1, 'Password is required')
    .min(8, 'Password must be more than 8 characters')
    .max(32, 'Password must be less than 32 characters'),
  passwordConfirm: string().min(1, 'Please confirm your password'),
}).refine((data) => data.password === data.passwordConfirm, {
  path: ['passwordConfirm'],
  message: 'Passwords do not match',
});

export type RegisterInput = TypeOf<typeof registerSchema>;

const RegisterPage: NextPage = () => {
  const router = useRouter();
  const { mutate: SignUpUser, isLoading } = useSignUpUserMutation<Error>(
    graphqlRequestClient,
    {
      onSuccess(data: SignUpUserMutation) {
        toast(`Welcome ${data.signupUser.user.name}!`, {
          type: 'success',
          position: 'top-right',
        });
        console.log(data.signupUser.user);
        router.push('/login');
      },
      onError(error: any) {
        error.response.errors.forEach((err: any) => {
          toast(err.message, {
            type: 'error',
            position: 'top-right',
          });
        });
      },
    }
  );

  const methods = useForm<RegisterInput>({
    resolver: zodResolver(registerSchema),
  });

  const {
    reset,
    handleSubmit,
    formState: { isSubmitSuccessful },
  } = methods;

  useEffect(() => {
    if (isSubmitSuccessful) {
      reset();
    }
    // eslint-disable-next-line react-hooks/exhaustive-deps
  }, [isSubmitSuccessful]);

  const onSubmitHandler: SubmitHandler<RegisterInput> = (values) => {
    // ? Execute the Mutation
    SignUpUser({ input: values });
  };
  return (
    <section className='py-8 bg-ct-blue-600 min-h-screen grid place-items-center'>
      <div className='w-full'>
        <h1 className='text-4xl xl:text-6xl text-center font-[600] text-ct-yellow-600 mb-4'>
          Welcome to CodevoWeb!
        </h1>
        <h2 className='text-lg text-center mb-4 text-ct-dark-200'>
          Sign Up To Get Started!
        </h2>
        <FormProvider {...methods}>
          <form
            onSubmit={handleSubmit(onSubmitHandler)}
            className='max-w-md w-full mx-auto overflow-hidden shadow-lg bg-ct-dark-200 rounded-2xl p-8 space-y-5'
          >
            <FormInput label='Full Name' name='name' />
            <FormInput label='Email' name='email' type='email' />
            <FormInput label='Password' name='password' type='password' />
            <FormInput
              label='Confirm Password'
              name='passwordConfirm'
              type='password'
            />
            <FileUpLoader name='photo' />
            <span className='block'>
              Already have an account?{' '}
              <Link href='/login'>
                <a className='text-ct-blue-600'>Login Here</a>
              </Link>
            </span>
            <LoadingButton loading={isLoading} textColor='text-ct-blue-600'>
              Sign Up
            </LoadingButton>
          </form>
        </FormProvider>
      </div>
    </section>
  );
};

export const getServerSideProps: GetServerSideProps = async () => {
  return {
    props: {
      requireAuth: false,
      enableAuth: false,
    },
  };
};

export default RegisterPage;
React Query & GraphQL Request: Login User
pages/login.tsx
import type { GetServerSideProps, NextPage } from 'next';
import { object, string, TypeOf } from 'zod';
import { useEffect } from 'react';
import { useForm, FormProvider, SubmitHandler } from 'react-hook-form';
import { zodResolver } from '@hookform/resolvers/zod';
import FormInput from '../client/components/FormInput';
import { LoadingButton } from '../client/components/LoadingButton';
import Link from 'next/link';
import {
  LoginUserMutation,
  useGetMeQuery,
  useLoginUserMutation,
} from '../client/generated/graphql';
import graphqlRequestClient from '../client/requests/graphqlRequestClient';
import { toast } from 'react-toastify';
import { useRouter } from 'next/router';
import useStore from '../client/store';
import { IUser } from '../client/lib/types';

const loginSchema = object({
  email: string()
    .min(1, 'Email address is required')
    .email('Email Address is invalid'),
  password: string()
    .min(1, 'Password is required')
    .min(8, 'Password must be more than 8 characters')
    .max(32, 'Password must be less than 32 characters'),
});

export type LoginInput = TypeOf<typeof loginSchema>;

const LoginPage: NextPage = () => {
  const router = useRouter();
  const store = useStore();

  const query = useGetMeQuery(
    graphqlRequestClient,
    {},
    {
      enabled: false,
      onSuccess: (data) => {
        store.setAuthUser(data.getMe.user as IUser);
      },
    }
  );

  const { isLoading, mutate: loginUser } = useLoginUserMutation<Error>(
    graphqlRequestClient,
    {
      onSuccess(data: LoginUserMutation) {
        toast('Logged in successfully', {
          type: 'success',
          position: 'top-right',
        });
        query.refetch();
        router.push('/profile');
      },
      onError(error: any) {
        error.response.errors.forEach((err: any) => {
          toast(err.message, {
            type: 'error',
            position: 'top-right',
          });
        });
      },
    }
  );

  const methods = useForm<LoginInput>({
    resolver: zodResolver(loginSchema),
  });

  const {
    reset,
    handleSubmit,
    formState: { isSubmitSuccessful },
  } = methods;

  useEffect(() => {
    if (isSubmitSuccessful) {
      reset();
    }
    // eslint-disable-next-line react-hooks/exhaustive-deps
  }, [isSubmitSuccessful]);

  const onSubmitHandler: SubmitHandler<LoginInput> = (values) => {
    // ? Executing the loginUser Mutation
    loginUser({ input: values });
  };
  return (
    <section className='bg-ct-blue-600 min-h-screen grid place-items-center'>
      <div className='w-full'>
        <h1 className='text-4xl xl:text-6xl text-center font-[600] text-ct-yellow-600 mb-4'>
          Welcome Back
        </h1>
        <h2 className='text-lg text-center mb-4 text-ct-dark-200'>
          Login to have access
        </h2>
        <FormProvider {...methods}>
          <form
            onSubmit={handleSubmit(onSubmitHandler)}
            className='max-w-md w-full mx-auto overflow-hidden shadow-lg bg-ct-dark-200 rounded-2xl p-8 space-y-5'
          >
            <FormInput label='Email' name='email' type='email' />
            <FormInput label='Password' name='password' type='password' />

            <div className='text-right'>
              <Link href='#' className=''>
                Forgot Password?
              </Link>
            </div>
            <LoadingButton loading={isLoading} textColor='text-ct-blue-600'>
              Login
            </LoadingButton>
            <span className='block'>
              Need an account?{' '}
              <Link href='/register'>
                <a className='text-ct-blue-600'>Sign Up Here</a>
              </Link>
            </span>
          </form>
        </FormProvider>
      </div>
    </section>
  );
};

export const getServerSideProps: GetServerSideProps = async () => {
  return {
    props: {
      requireAuth: false,
      enableAuth: false,
    },
  };
};

export default LoginPage;
React Query & GraphQL Request: Middleware Guard
client/middleware/AuthMiddleware.tsx
import React, { useEffect } from 'react';
import {
  useGetMeQuery,
  useRefreshAccessTokenQuery,
} from '../generated/graphql';
import { IUser } from '../lib/types';
import graphqlRequestClient, {
  queryClient,
} from '../requests/graphqlRequestClient';
import useStore from '../store';

type AuthMiddlewareProps = {
  children: React.ReactNode;
  requireAuth?: boolean;
  enableAuth?: boolean;
};

const AuthMiddleware: React.FC<AuthMiddlewareProps> = ({
  children,
  requireAuth,
  enableAuth,
}) => {
  console.log('I was called from AuthMiddleware');
  const store = useStore();
  const query = useRefreshAccessTokenQuery(
    graphqlRequestClient,
    {},
    {
      enabled: false,
      retry: 1,
      onError(error: any) {
        store.setPageLoading(false);
        document.location.href = '/login';
      },
      onSuccess(data: any) {
        store.setPageLoading(false);
        queryClient.refetchQueries('getMe');
      },
    }
  );
  const { isLoading, isFetching } = useGetMeQuery(
    graphqlRequestClient,
    {},
    {
      onSuccess: (data) => {
        store.setPageLoading(false);
        store.setAuthUser(data.getMe.user as IUser);
      },
      retry: 1,
      enabled: !!enableAuth,
      onError(error: any) {
        store.setPageLoading(false);
        error.response.errors.forEach((err: any) => {
          if (err.message.includes('No access token found')) {
            query.refetch({ throwOnError: true });
          }
        });
      },
    }
  );

  const loading =
    isLoading || isFetching || query.isLoading || query.isFetching;

  useEffect(() => {
    if (loading) {
      store.setPageLoading(true);
    }
    // eslint-disable-next-line react-hooks/exhaustive-deps
  }, [loading]);

  return <>{children}</>;
};

export default AuthMiddleware;
Creaeting the Profile and Home Pages
Home Page
import type { NextPage } from 'next';
import Header from '../client/components/Header';
export const getServerSideProps = async () => {
return {
props: {
requireAuth: false,
enableAuth: false,
},
};
};
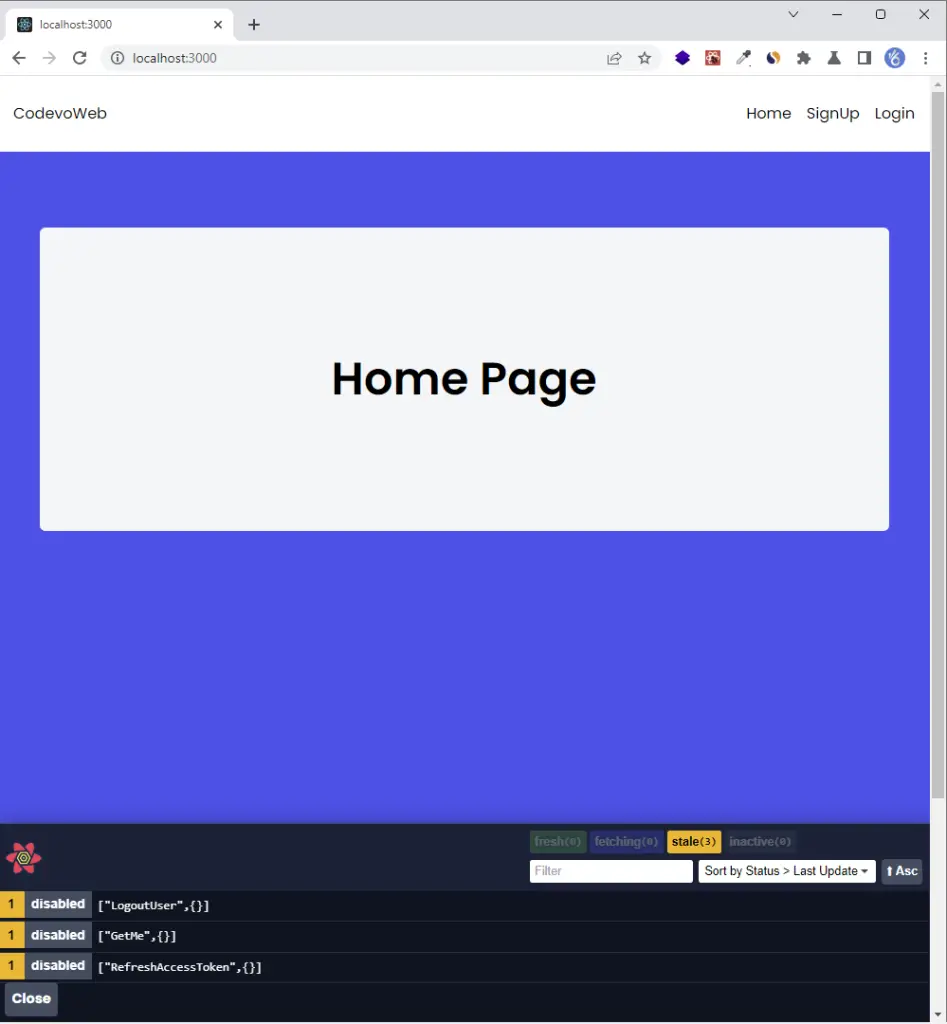
const HomePage: NextPage = () => {
return (
<>
<Header />
<section className='bg-ct-blue-600 min-h-screen pt-20'>
<div className='max-w-4xl mx-auto bg-ct-dark-100 rounded-md h-[20rem] flex justify-center items-center'>
<p className='text-5xl font-semibold'>Home Page</p>
</div>
</section>
</>
);
};
export default HomePage;
Profile Page
import type { GetServerSideProps, NextPage } from 'next';
import { dehydrate } from 'react-query';
import Header from '../client/components/Header';
import {
  GetMeDocument,
  GetMeQuery,
  useGetMeQuery,
} from '../client/generated/graphql';
import { IUser } from '../client/lib/types';
import { axiosGetMe } from '../client/requests/axiosClient';
import graphqlRequestClient, {
  queryClient,
} from '../client/requests/graphqlRequestClient';
import useStore from '../client/store';

type ProfileProps = {};

const ProfilePage: NextPage<ProfileProps> = ({}) => {
  const store = useStore();

  const user = store.authUser;
  const query = useGetMeQuery<GetMeQuery, Error>(
    graphqlRequestClient,
    {},
    {
      retry: 1,
      onSuccess: (data) => {
        store.setAuthUser(data.getMe.user as IUser);
      },
    }
  );

  return (
    <>
      <Header />
      <section className='bg-ct-blue-600 min-h-screen pt-20'>
        <div className='max-w-4xl mx-auto bg-ct-dark-100 rounded-md h-[20rem] flex justify-center items-center'>
          <div>
            <p className='text-5xl font-semibold'>Profile Page</p>
            <div className='mt-8'>
              <p className='mb-4'>ID: {user?.id}</p>
              <p className='mb-4'>Name: {user?.name}</p>
              <p className='mb-4'>Email: {user?.email}</p>
              <p className='mb-4'>Role: {user?.role}</p>
            </div>
          </div>
        </div>
      </section>
    </>
  );
};

export const getServerSideProps: GetServerSideProps = async ({ req }) => {
  if (req.cookies.access_token) {
    await queryClient.prefetchQuery(['getMe', {}], () =>
      axiosGetMe(GetMeDocument, req.cookies.access_token as string)
    );
  } else {
    return {
      redirect: {
        destination: '/login',
        permanent: false,
      },
    };
  }

  return {
    props: {
      dehydratedState: dehydrate(queryClient),
      requireAuth: true,
      enableAuth: true,
    },
  };
};

export default ProfilePage;
Update the App File
pages/_app.tsx
import '../styles/globals.css';
import 'react-toastify/dist/ReactToastify.css';
import type { AppProps } from 'next/app';
import { QueryClientProvider, Hydrate } from 'react-query';
import { ReactQueryDevtools } from 'react-query/devtools';
import { CookiesProvider } from 'react-cookie';
import { queryClient } from '../client/requests/graphqlRequestClient';
import AuthMiddleware from '../client/middleware/AuthMiddleware';
import { ToastContainer } from 'react-toastify';

function MyApp({ Component, pageProps }: AppProps) {
  return (
    <CookiesProvider>
      <QueryClientProvider client={queryClient}>
        <Hydrate state={pageProps.dehydratedState}>
          <AuthMiddleware
            requireAuth={pageProps.requireAuth}
            enableAuth={pageProps.enableAuth}
          >
            <Component {...pageProps} />
          </AuthMiddleware>
          <ToastContainer />
          <ReactQueryDevtools initialIsOpen={false} />
        </Hydrate>
      </QueryClientProvider>
    </CookiesProvider>
  );
}

export default MyApp;
Conclusion
With this React Query, GraphQL-Request, GraphQL-CodeGen, tailwindCss, and React-Hook-Form example in Typescript, you’ve learned how to add access and refresh token functionalities to your Next.js applications.
Next.js, GraphQL CodeGen & React Query Source Code
Check out the complete source code for: