

Next.js is a React framework that enables you to build server-side rendered and static web applications. This article will teach you how to build a GraphQL API with Next.js to implement JWT Authentication using apollo-server-micro, TypeGraphQL, MongoDB, Redis, Mongoose, and Typegoose.
Next.js, React Query, and GraphQL Series:
- GraphQL API with Next.js & MongoDB: Access & Refresh Tokens
- GraphQL CRUD API with Next.js, MongoDB, and TypeGraphQL
- Next.js, GraphQL-CodeGen, & React Query: JWT Authentication
Related Articles:
- GraphQL API with Node.js & MongoDB: JWT Authentication
- Build Golang gRPC Server and Client: Access & Refresh Tokens
- Node.js + Prisma + PostgreSQL: Access & Refresh Tokens
- Golang & MongoDB: JWT Authentication and Authorization
- API with Node.js + PostgreSQL + TypeORM: JWT Authentication
- Node.js + TypeScript + MongoDB: JWT Authentication
- Node.js + TypeScript + MongoDB: JWT Refresh Token

Initialize a Typescript Next.js Project
To begin, let’s initialize a Next.js Typescript boilerplate application with the following commands:
yarn create next-app nextjs-typegraphql --typescript
# or
npx create-next-app@latest nextjs-typegraphql --typescript
Next, replace the content of the tsconfig.json file with the following configuration to make Typescript happy:
tsconfig.json
{
  "compilerOptions": {
    "target": "es2018",
    "lib": ["dom", "dom.iterable", "esnext", "ESNext.AsyncIterable"],
    "allowJs": true,
    "skipLibCheck": true,
    "strict": true,
    "forceConsistentCasingInFileNames": true,
    "noEmit": true,
    "esModuleInterop": true,
    "module": "esnext",
    "moduleResolution": "node",
    "resolveJsonModule": true,
    "isolatedModules": true,
    "jsx": "preserve",
    "incremental": true,
    "emitDecoratorMetadata": true,
    "experimentalDecorators": true,
    "strictPropertyInitialization": false
  },
  "include": ["next-env.d.ts", "**/*.ts", "**/*.tsx"],
  "exclude": ["node_modules"]
}
emitDecoratorMetadata– Should be set totrueto enable experimental support for emitting type metadata for the decorators.experimentalDecorators– Should be set totrueto enable experimental support for decorators.strictPropertyInitialization– Should be set tofalseto prevent Typescript from raising errors when we declare the Typegoose class properties without setting them in the constructor.target– Should be set toes2018to enable TypeGraphQL to use the features from ES2018.ESNext.AsyncIterable– Should be added to thelibarray since thegraphql-subscriptiondependency relies on anAsyncIterator.
Setup MongoDB and Redis Database Servers
The most obvious way to get the Redis and MongoDB servers running on our computer is to use Docker and Docker-compose.
At this point, am going to assume you already have Docker and Docker-compose installed on your computer.
Create a docker-compose.yml file in the root project and add the following configurations to help us run the MongoDB and Redis containers.
docker-compose.yml
version: '3.8'
services:
  mongo:
    image: mongo
    container_name: mongodb
    ports:
      - '6000:27017'
    volumes:
      - mongodb:/data/db
    env_file:
      - ./.env
    environment:
      MONGO_INITDB_ROOT_USERNAME: ${MONGO_INITDB_ROOT_USERNAME}
      MONGO_INITDB_ROOT_PASSWORD: ${MONGO_INITDB_ROOT_PASSWORD}
      MONGO_INITDB_DATABASE: ${MONGO_INITDB_DATABASE}
  redis:
    image: redis:latest
    container_name: redis
    ports:
      - '6379:6379'
    volumes:
      - redis:/data
volumes:
  redis:
  mongodb:
Now create a .env file in the root project and add the following credentials needed by the MongoDB Docker image.
.env
MONGO_INITDB_ROOT_USERNAME=admin
MONGO_INITDB_ROOT_PASSWORD=password123
MONGO_INITDB_DATABASE=nextjs_typegraphql
Run this command in your terminal to start the Redis and MongoDB Docker containers:
docker-compose up -d
To stop the Redis and MongoDB containers from running, you can run this command:
docker-compose down
Setting up Environment Variables
Next.js has built-in support for loading environment variables from the .env.local file into the Node.js environment allowing us to use them in Next.js data fetching methods and API routes.
To validate the environment variables in order to ensure that all the necessary environment variables are defined in the .env.local file, we need to install the dotenv-safe package.
yarn add dotenv-safe
# or
npm install --save dotenv-safe
The dotenv-safe package will raise an exception error if any of the variables defined in the .env.example file is missing in the .env.local file .
.env.local
MONGODB_LOCAL_URI=mongodb://admin:password123@localhost:6000/nextjs_typegraphql?authSource=admin

ACCESS_TOKEN_PRIVATE_KEY=LS0tLS1CRUdJTiBSU0EgUFJJVkFURSBLRVktLS0tLQpNSUlCT1FJQkFBSkJBTUJSTHZIZkw1ei9NbkZyZWlxRzZ4eG10K1dFdERMZ0d4S3pyaW8vZzhYVTRyMS91a1FBClJjaUlteXcvSlh3djdMQldKMHYraGlKTXI5SVh4UUx2L2lrQ0F3RUFBUUpBQ0RMdDEyMzJiN0VKaTRCVGd3Q2gKZ1dKM3NKZEp2Mm1DZmZlZkV6b0YraWNZV1NuL2lEb1dJSnZJaG9LUFluenpwSE5HTDFScE82WUF4eXJ4RDFHVApJUUloQU9vd0EydjkxWk1lVVhwZk1IY0tmZmNRMXl6KzNRZXB2SjZOdDBTUjlkczFBaUVBMGpyTzR6eE9aaStoCklEbHhHS0lLMHR4QVA0T3ZSeC9Cc0dkblF0aDBnYVVDSUhNaFZaMVN0aHZVak9QblJqRlB4Q3VoYU5lakdGQzcKSHBLb1F3Ly8zZWw5QWlCeFF0V3JmeFlOMzZOREpTOVZRaGZxdWxheTRWTlJVajZidDFuZW5aZEhNUUlnVHQ3ZApEREhuYjhlT1R2MzhMV0c0SEhRa1c2YUZhM1Y4aU1xQ0VUZDdMV1E9Ci0tLS0tRU5EIFJTQSBQUklWQVRFIEtFWS0tLS0t
ACCESS_TOKEN_PUBLIC_KEY=LS0tLS1CRUdJTiBQVUJMSUMgS0VZLS0tLS0KTUZ3d0RRWUpLb1pJaHZjTkFRRUJCUUFEU3dBd1NBSkJBTUJSTHZIZkw1ei9NbkZyZWlxRzZ4eG10K1dFdERMZwpHeEt6cmlvL2c4WFU0cjEvdWtRQVJjaUlteXcvSlh3djdMQldKMHYraGlKTXI5SVh4UUx2L2lrQ0F3RUFBUT09Ci0tLS0tRU5EIFBVQkxJQyBLRVktLS0tLQ==

REFRESH_TOKEN_PRIVATE_KEY=LS0tLS1CRUdJTiBSU0EgUFJJVkFURSBLRVktLS0tLQpNSUlCT0FJQkFBSkFVOThRakVkZXVySnJJRjgvOEVGMldOZGFPR3pXMlE2RmlTdy9XUmMxQUVKV1lqWnVGbS9jCkFQNnIyOURWU2R2Umw5bDJSRjkvTEQ5R0xHeUxKWEgrMXdJREFRQUJBa0F3cVArSjA3S1RNUWJVTGs4RFRvZWkKUGJkN2V6SWZscnhFL0tYNFEyMmRxelRHRHNYemR1WWRyUUJvOTB3bGVoMUFBRlN4eEdBaWN5TjY3T2dQbVBJWgpBaUVBblp0Sy9sR2lxZ0REeHZpY0kxQXVucllYQURuckRtQW53QVE5aUFpNlVNVUNJUUNJTzJTU2ppeENFWEhvCkxoaXNOUE00cTlpd0lXZ0laTFZhb3N4V09Zd1M2d0lnTGtUdzkwaXdJSWlvOFRqN1hjS2tiU080RFBEeitQeHgKcndXUHF1Z2xDcUVDSUJnUUpadWRjVVBhUVB4NTUvSERDSk1pQjR4VTJrTmhSb2RUNmpQd3hrVXhBaUJCa1VDbworemwzQm8yNmIrd3BhQ29IZ0VZSEozZWExUy94Mk5vV1BqSEZQUT09Ci0tLS0tRU5EIFJTQSBQUklWQVRFIEtFWS0tLS0t
REFRESH_TOKEN_PUBLIC_KEY=LS0tLS1CRUdJTiBQVUJMSUMgS0VZLS0tLS0KTUZzd0RRWUpLb1pJaHZjTkFRRUJCUUFEU2dBd1J3SkFVOThRakVkZXVySnJJRjgvOEVGMldOZGFPR3pXMlE2RgppU3cvV1JjMUFFSldZalp1Rm0vY0FQNnIyOURWU2R2Umw5bDJSRjkvTEQ5R0xHeUxKWEgrMXdJREFRQUIKLS0tLS1FTkQgUFVCTElDIEtFWS0tLS0t
.env.example
MONGO_INITDB_ROOT_USERNAME=
MONGO_INITDB_ROOT_PASSWORD=
MONGO_INITDB_DATABASE=
MONGODB_LOCAL_URI=

ACCESS_TOKEN_PRIVATE_KEY=
ACCESS_TOKEN_PUBLIC_KEY=

REFRESH_TOKEN_PRIVATE_KEY=
REFRESH_TOKEN_PUBLIC_KEY=
Since the security of our application is really important, remember to add the .env and .env.local files to the .gitignore file in order to exclude them from your Git commits.
Now to evoke the dotenv-safe config function, let’s create a _document.tsx file in the pages folder since the _document.tsx file is only rendered on the server.
pages/_document.tsx
import { Html, Head, Main, NextScript } from 'next/document';
import dotenv from 'dotenv-safe';
dotenv.config();

export default function Document() {
  return (
    <Html>
      <Head />
      <body>
        <Main />
        <NextScript />
      </body>
    </Html>
  );
}
Connect the Redis and MongoDB Servers to Next.js
Now that we have our Redis and MongoDB servers running in the Docker containers, let’s connect them to the Next.js application.
Connect to the MongoDB Server
Let’s face it, writing MongoDB validation, type casting, and business logic can be really challenging. That is why the Mongoose library was created and it comes with built-in type casting, validation, query building, pre/post hooks, and many more features.
Run the following command to install the Mongoose library:
yarn add mongoose
# or
npm i mongoose
Now create an server folder in the root project then create a utils/connectDB.ts file and add the following code.
server/utils/connectDB.ts
import mongoose from 'mongoose';

const localUri = process.env.MONGODB_LOCAL_URI as string;
const connection: any = {};
export async function connectDB() {
  if (connection.isConnected) {
    console.log('DB is already connected');
    return;
  }

  if (mongoose.connections.length > 0) {
    connection.isConnected = mongoose.connections[0].readyState;
    if (connection.isConnected === 1) {
      console.log('use previous connection');
      return;
    }
    await mongoose.disconnect();
  }

  const db = await mongoose.connect(localUri);
  console.log('? MongoDB Database Connected Successfully');
  connection.isConnected = db.connections[0].readyState;
}

export async function disconnectDB() {
  if (connection.isConnected) {
    if (process.env.NODE_ENV === 'production') {
      await mongoose.disconnect();
      connection.isConnected = false;
    } else {
      console.log('not discounted');
    }
  }
}
Connect to the Redis Server
To connect the Next.js app to the Redis server, we gonna use the Node.js Redis package:
yarn add redis
# or
npm install redis
Within the server/utils folder, create a connectRedis.ts file and add the following code.
server/utils/connectRedis.ts
import { createClient } from 'redis';

const redisUrl = 'redis://localhost:6379';

const redisClient = createClient({
  url: redisUrl,
});

const connectRedis = async () => {
  try {
    await redisClient.connect();
  } catch (error: any) {
    setInterval(connectRedis, 5000);
  }
};

connectRedis();

redisClient.on('connect', () =>
  console.log('? Redis client connected successfully')
);

redisClient.on('error', (err) => console.error(err));

export default redisClient;
Start the GraphQL Apollo Server
To make the Next.js app run the Apollo server, create a graphql.ts file in the api folder.
Run the following command in the terminal to install the required dependencies:
yarn add reflect-metadata apollo-server-micro type-graphql cors micro graphql@15.x
# or
npm install reflect-metadata apollo-server-micro type-graphql cors micro graphql@15.x
apollo-server-micro– is the Micro integration for building the Apollo GraphQL server.type-graphql– a Node.js framework for building GraphQL schema and resolvers using Typescript classes and decorators.cors– a package to enable the Next.js GraphQL server to accept requests from cross-origin domains.
Now add the following code snippets to the pages/api/graphql.ts file to help us initialize the Apollo GraphQL server.
pages/api/graphql.ts
import 'reflect-metadata';
import { NextApiRequest, NextApiResponse } from 'next';
import { ApolloServer } from 'apollo-server-micro';
import { buildSchema, Query, Resolver } from 'type-graphql';
import Cors from 'cors';
import { connectDB } from '../../server/utils/connectDB';

// Setup cors
const cors = Cors({
  methods: ['GET', 'HEAD', 'POST', 'PUT', 'DELETE', 'PATCH', 'OPTIONS'],
  credentials: true,
  origin: [
    'https://studio.apollographql.com',
    'http://localhost:8000',
    'http://localhost:3000',
  ],
});

// Middleware to run the cors configuration
function runMiddleware(req: NextApiRequest, res: NextApiResponse, fn: any) {
  return new Promise((resolve, reject) => {
    fn(req, res, (result: any) => {
      if (result instanceof Error) {
        return reject(result);
      }

      return resolve(result);
    });
  });
}

@Resolver()
class HelloResolver {
  @Query(() => String)
  hello() {
    return 'Hello World!';
  }
}

const schema = await buildSchema({
  resolvers: [HelloResolver],
});

const server = new ApolloServer({
  schema,
});

export const config = {
  api: {
    bodyParser: false,
  },
};

const startServer = server.start();

export default async function handler(
  req: NextApiRequest,
  res: NextApiResponse
) {
  await runMiddleware(req, res, cors);
  await connectDB();
  await startServer;
  await server.createHandler({ path: '/api/graphql' })(req, res);
}
Before we start the server, let’s configure Webpack in the next.config.js file to enable top-level await .
next.config.js
/** @type {import('next').NextConfig} */
const nextConfig = {
  reactStrictMode: true,
  webpack: (config) => {
    config.experiments = config.experiments || {};
    config.experiments.topLevelAwait = true;
    return config;
  },
};

module.exports = nextConfig;
We’re ready to start the Apollo GraphQL server. Run this command to start the Next.js app.
yarn dev
# or
npm run dev
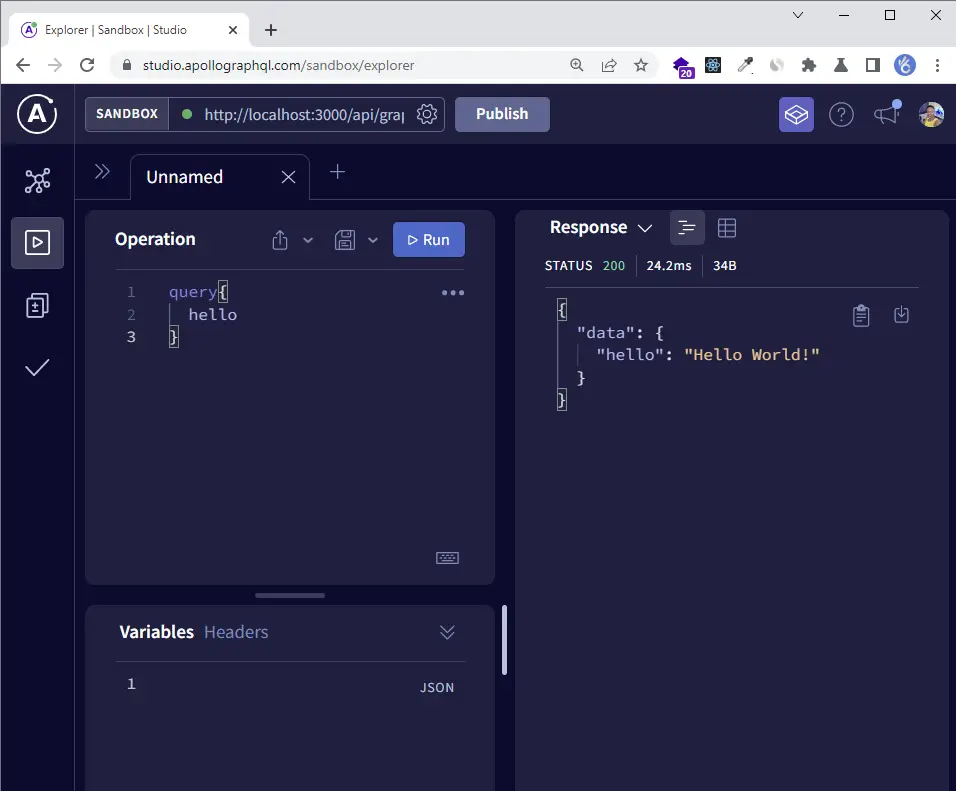
Visit http://localhost:3000/api/graphql in your browser and you should see Apollo Server’s default landing page:
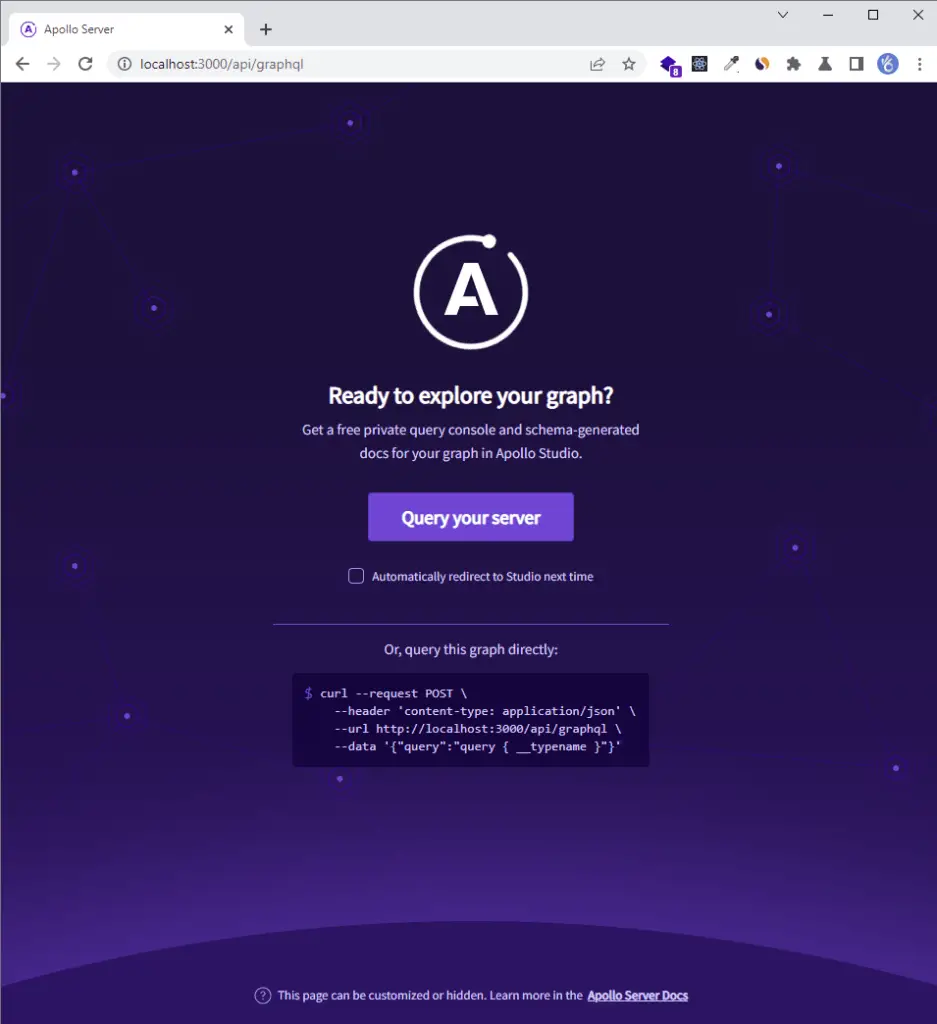
Click the “Query your server” button to open the Apollo Sandbox. Execute the hello query in the operation panel and you should get the “Hello World!” message.
Creating TypeGraphQL and Typegoose Schemas
The GraphQL schema aka type definitions refers to the data structure of the queries and mutations.
Now run the following commands to install the required packages:
yarn add @typegoose/typegoose class-validator bcryptjs && yarn add -D @types/bcryptjs
# or
npm install @typegoose/typegoose class-validator bcryptjs && npm install -D @types/bcryptjs
@typegoose/typegoose– a library that wraps around Mongoose to enable us to write Mongoose models using Typescript classes and decorators.class-validator– a library that allows you to use either decorator or non-decorator-based validation.bcryptjs– for hashing strings
Create a models/user.model.ts file in the server folder and add the following imports:
server/models/user.model.ts
import {
  getModelForClass,
  prop,
  pre,
  ModelOptions,
  Severity,
  index,
} from '@typegoose/typegoose';
import bcrypt from 'bcryptjs';
Creating the Typegoose Schema
Typegoose is a library that wraps around Mongoose to allow us to write Mongoose models using Typescript decorators and classes. Typegoose makes heavy use of decorators to make the models type-rich with TypeScript.
server/models/user.model.ts
// Imports
@pre<User>('save', async function (next) {
  if (!this.isModified('password')) return next();

  this.password = await bcrypt.hash(this.password, 12);
  this.passwordConfirm = undefined;
  return next();
})
@ModelOptions({
  schemaOptions: {
    timestamps: true,
  },
  options: {
    allowMixed: Severity.ALLOW,
  },
})
@index({ email: 1 })
export class User {
  readonly _id: string;

  @prop({ required: true })
  name: string;

  @prop({ required: true, unique: true, lowercase: true })
  email: string;

  @prop({ default: 'user' })
  role: string;

  @prop({ required: true, select: false })
  password: string;

  @prop({ required: true })
  passwordConfirm: string | undefined;

  @prop({ default: 'default.jpeg' })
  photo: string;

  @prop({ default: true, select: false })
  verified: boolean;

  static async comparePasswords(
    hashedPassword: string,
    candidatePassword: string
  ) {
    return await bcrypt.compare(candidatePassword, hashedPassword);
  }
}

const UserModel = getModelForClass<typeof User>(User);
export default UserModel;
Now let me explain what I did above:
- I first created and exported the
Userclass and added all the attributes the user model should have using the Typegoose decorators. - To ensure all users have a unique email, I added a
unique: trueto the email field. In addition to that, I added an index to the email field using the@index({ email: 1 })decorator. - Next, to make sure Mongoose automatically adds the
createdAtandupdatedAtfields, we use the@ModelOptions({})decorator and provide it with the necessary configurations. - Next, we used the Typegoose pre-save hook decorator to hash the user’s plain password with a cost factor of 12 before saving the document to the database. Also, we set the
passwordConfirmfield toundefinedin order to remove it from the document. - Lastly, we used the Typegoose
getModelForClass()function to extract the Mongoose model from the class we defined above.
Creating the TypeGraphQL Schemas
With TypeGraphQL, we use the @InputType() and @ObjectType() decorators to define the GraphQL data structures.
Create a schemas/user.schema.ts file in the server folder and add the following code:
server/schemas/user.schema.ts
import { Field, InputType, ObjectType } from 'type-graphql';
import { IsEmail, MaxLength, MinLength } from 'class-validator';

@InputType()
export class SignUpInput {
  @Field(() => String)
  name: string;

  @IsEmail()
  @Field(() => String)
  email: string;

  @MinLength(8, { message: 'Password must be at least 8 characters long' })
  @MaxLength(32, { message: 'Password must be at most 32 characters long' })
  @Field(() => String)
  password: string;

  @Field(() => String)
  passwordConfirm: string | undefined;

  @Field(() => String)
  photo: string;
}

@InputType()
export class LoginInput {
  @IsEmail()
  @Field(() => String)
  email: string;

  @MinLength(8, { message: 'Invalid email or password' })
  @MaxLength(32, { message: 'Invalid email or password' })
  @Field(() => String)
  password: string;
}

@ObjectType()
export class UserData {
  @Field(() => String)
  readonly _id: string;

  @Field(() => String, { nullable: true })
  readonly id: string;

  @Field(() => String)
  name: string;

  @Field(() => String)
  email: string;

  @Field(() => String)
  role: string;

  @Field(() => String)
  photo: string;

  @Field(() => Date)
  createdAt: Date;

  @Field(() => Date)
  updatedAt: Date;
}

@ObjectType()
export class UserResponse {
  @Field(() => String)
  status: string;

  @Field(() => UserData)
  user: UserData;
}

@ObjectType()
export class LoginResponse {
  @Field(() => String)
  status: string;

  @Field(() => String)
  access_token: string;
}
In brief, the class defined with the @InputType() decorator describes the structure of the data the GraphQL server will receive whereas the class created with the @ObjectType() decorator describes the structure of the data the server will return to the client.
If you take a careful look at the input classes, you will notice we omitted the ID field since it will be auto-generated by MongoDB when a new document is being inserted into the database.
Creating an Error Handler
Now that we’ve defined the Typegoose model and TypegraphQL schemas, let’s create an error controller to return the appropriate Apollo Error to the client.
The Apollo server library has a built-in error class that we can leverage to send the right error to the client.
server/controllers/error.controller.ts
import { ValidationError } from 'apollo-server-micro';

const handleCastError = (error: any) => {
  const message = `Invalid ${error.path}: ${error.value}`;
  throw new ValidationError(message);
};

const handleValidationError = (error: any) => {
  const message = Object.values(error.errors).map((el: any) => el.message);
  throw new ValidationError(`Invalid input: ${message.join(', ')}`);
};

const errorHandler = (err: any) => {
  if (err.name === 'CastError') handleCastError(err);
  if (err.name === 'ValidationError') handleValidationError(err);
  throw err;
};

export default errorHandler;
Here we are catching all the possible validation errors that will be generated by MongoDB to prevent the Next.js application from crashing.
Create Utility Functions to Generate and Verify JWTs
A JSON Web Token is a structured security token format that consists of three parts a header, payload, and signature separated by dots.
The header and payload are Base64-URL encoded JSON whereas the signature is cryptographically encrypted. The signature consists of the encoded header and payload, a secret, and the algorithm specified in the header.
To increase the security level of the application, we will utilize Redis to store the authenticated user’s session and expire it after a given time.
Run this command to install the jsonwebtoken package:
yarn add jsonwebtoken && yarn add -D @types/jsonwebtoken
# or
npm install jsonwebtoken && npm install -D @types/jsonwebtoken
Due to the security vulnerabilities of our app, we will store the access and refresh tokens in HTTPOnly cookies to make it difficult for hackers to access and manipulate them.
If you want to learn more about JWT Authentication with React, check out React + Redux Toolkit: JWT Authentication and Authorization
If you want to learn more about Refresh Tokens with React, check out React.js + Redux Toolkit: Refresh Tokens Authentication
How to Generate the Private and Public Keys
To make your life easier, I already generated and added the private and public keys to the .env.local file but you can follow these simple steps to generate them.
Step 1: Visit this website to generate the private and public keys.
Step 2: Go to this website to encode the private and public keys into Base64 to avoid getting unnecessary warnings in the terminal when building the Docker images.
Step 3: Open the .env.local file and add the encoded private and public keys to the ACCESS_TOKEN_PUBLIC_KEY and ACCESS_TOKEN_PRIVATE_KEY variables respectively.
Step 4: Repeat the above process for the refresh token
With that out of the way, let’s create two utility functions to generate and verify the JSON Web Tokens.
In each of the utility functions, you need to decode the private and public keys back to ASCII strings before passing them to the jsonwebtoken functions.
server/utils/jwt.ts
import jwt, { SignOptions } from 'jsonwebtoken';

export const signJwt = (
  payload: Object,
  keyName: 'accessTokenPrivateKey' | 'refreshTokenPrivateKey',
  options?: SignOptions
) => {
  const accessTokenPrivateKey = process.env.ACCESS_TOKEN_PRIVATE_KEY as string;
  const refreshTokenPrivateKey = process.env
    .REFRESH_TOKEN_PRIVATE_KEY as string;
  let privateKey = '';
  if (keyName === 'accessTokenPrivateKey') {
    privateKey = Buffer.from(accessTokenPrivateKey, 'base64').toString('ascii');
  } else if (keyName === 'refreshTokenPrivateKey') {
    privateKey = Buffer.from(refreshTokenPrivateKey, 'base64').toString(
      'ascii'
    );
  }

  return jwt.sign(payload, privateKey, {
    ...(options && options),
    algorithm: 'RS256',
  });
};

export const verifyJwt = <T>(
  token: string,
  keyName: 'accessTokenPublicKey' | 'refreshTokenPublicKey'
): T | null => {
  let publicKey = '';
  const accessTokenPublicKey = process.env.ACCESS_TOKEN_PUBLIC_KEY as string;
  const refreshTokenPublicKey = process.env.REFRESH_TOKEN_PUBLIC_KEY as string;
  if (keyName === 'accessTokenPublicKey') {
    publicKey = Buffer.from(accessTokenPublicKey, 'base64').toString('ascii');
  } else if (keyName === 'refreshTokenPublicKey') {
    publicKey = Buffer.from(refreshTokenPublicKey, 'base64').toString('ascii');
  }

  try {
    return jwt.verify(token, publicKey, {
      algorithms: ['RS256'],
    }) as T;
  } catch (error) {
    return null;
  }
};
Create an Authentication Guard
Run this command to install the cookies-next package to enable us to get and set the cookies in the request and response headers.
yarn add cookies-next
# or
npm install cookies-next
Now create a middleware/deserializeUser.ts file in the server folder and add the following code.
The deserializeUser middleware will serve as an authentication guard for all our protected routes.
server/middleware/deserializeUser.ts
import { AuthenticationError, ForbiddenError } from 'apollo-server-micro';
import { NextApiRequest, NextApiResponse } from 'next';
import { checkCookies, getCookie } from 'cookies-next';
import errorHandler from '../controllers/error.controller';
import UserModel from '../models/user.model';
import redisClient from '../utils/connectRedis';
import { verifyJwt } from '../utils/jwt';
import { disconnectDB } from '../utils/connectDB';

const deserializeUser = async (req: NextApiRequest, res: NextApiResponse) => {
  try {
    // Get the access token
    let access_token;
    if (
      req.headers.authorization &&
      req.headers.authorization.startsWith('Bearer')
    ) {
      access_token = req.headers.authorization.split(' ')[1];
    } else if (checkCookies('access_token', { req, res })) {
      access_token = getCookie('access_token', { req, res });
    }

    if (!access_token) throw new AuthenticationError('No access token found');

    // Validate the Access token
    const decoded = verifyJwt<{ userId: string }>(
      String(access_token),
      'accessTokenPublicKey'
    );

    if (!decoded) throw new AuthenticationError('Invalid access token');

    // Check if the session is valid
    const session = await redisClient.get(decoded.userId);

    if (!session) throw new ForbiddenError('Session has expired');

    // Check if user exist
    const user = await UserModel.findById(JSON.parse(session)._id)
      .select('+verified')
      .lean(true);
    await disconnectDB();

    if (!user || !user.verified) {
      throw new ForbiddenError(
        'The user belonging to this token no logger exist'
      );
    }

    return user;
  } catch (error: any) {
    errorHandler(error);
  }
};

export default deserializeUser;
Below is a summary of the above code:
- First and foremost, we retrieved the access token from the Authorization header or using the
cookies-nextpackage. - Then we called the
verifyJwt()utility function to validate the access token and extract the payload we stored in it. In this scenario, the payload is the user’s ID. - Next, we used the extracted user’s ID to check if that user still exists in the MongoDB database.
- Lastly, we returned to the user assuming there weren’t any errors.
Creating the Authentication Services
Now that we have our model, schemas, and authentication middleware, let’s create the services responsible for signing in the user, registering the new user, refreshing the expired access token, and logging out the authenticated user.
Before creating the services, let’s first define the cookie options, a function to sign both the access and refresh tokens, and the context type.
Now create a types/context.ts file in the server folder and add this code:
server/types/context.ts
import { NextApiRequest, NextApiResponse } from 'next';
import { User } from '../models/user.model';

export type Context = {
  req: NextApiRequest;
  res: NextApiResponse;
  deserializeUser: (
    req: NextApiRequest,
    res: NextApiResponse
  ) => Promise<User | undefined>;
};
Next, create a services/user.service.ts file in the server folder and add the following code to define the cookie options.
server/services/user.service.ts
import { AuthenticationError, ForbiddenError } from 'apollo-server-micro';
import { setCookies } from 'cookies-next';
import { OptionsType } from 'cookies-next/lib/types';
import errorHandler from '../controllers/error.controller';
import deserializeUser from '../middleware/deserializeUser';
import { LoginInput } from '../schemas/user.schema';
import UserModel, { User } from '../models/user.model';
import { Context } from '../types/context';
import { disconnectDB } from '../utils/connectDB';
import redisClient from '../utils/connectRedis';
import { signJwt, verifyJwt } from '../utils/jwt';

const accessTokenExpiresIn = 15;
const refreshTokenExpiresIn = 60;

const cookieOptions: OptionsType = {
  httpOnly: true,
  // domain: '/',
  sameSite: 'lax',
  // secure: true,
};

if (process.env.NODE_ENV === 'production') cookieOptions.secure = true;

const accessTokenCookieOptions = {
  ...cookieOptions,
  maxAge: accessTokenExpiresIn * 60,
  expires: new Date(Date.now() + accessTokenExpiresIn * 60 * 1000),
};

const refreshTokenCookieOptions = {
  ...cookieOptions,
  maxAge: refreshTokenExpiresIn * 60,
  expires: new Date(Date.now() + refreshTokenExpiresIn * 60 * 1000),
};

async function findByEmail(email: string): Promise<User | null> {
  return UserModel.findOne({ email }).select('+password');
}

function signTokens(user: User) {
  const userId: string = user._id.toString();
  const access_token = signJwt({ userId }, 'accessTokenPrivateKey', {
    expiresIn: `${accessTokenExpiresIn}m`,
  });

  const refresh_token = signJwt({ userId }, 'refreshTokenPrivateKey', {
    expiresIn: `${refreshTokenExpiresIn}m`,
  });

  redisClient.set(userId, JSON.stringify(user), {
    EX: refreshTokenExpiresIn * 60,
  });

  return { access_token, refresh_token };
}
Service to Register the User
If you quite remember when defining the Typegoose schema, we added a unique constraint on the email field to make sure that we don’t end up having two users with the same email addresses.
When the unique constraint is violated, MongoDB will return an error with a 11000 code. It makes a lot of sense to catch that error and return a nicely formatted error to the user.
server/services/user.service.ts
// Imports

// Cookie Options

// Generate Tokens

export default class UserService {
  // Sign up a new user
  async signUpUser(input: Partial<User>) {
    try {
      const user = await UserModel.create(input);
      await disconnectDB();
      return {
        status: 'success',
        user: user.toJSON(),
      };
    } catch (error: any) {
      if (error.code === 11000) {
        return new ForbiddenError('Email already exists');
      }
      errorHandler(error);
    }
  }
}
Service to Sign in the User
Now that we are able to register a user, let’s create the service to sign in the user.
After the user has been authenticated, we will return HTTPOnly access and refresh token cookies to their browser.
server/services/user.service.ts
// Imports

// Cookie Options

// Generate Tokens

export default class UserService {
  // Sign up a new user

  // Login a user
  async loginUser(input: LoginInput, { req, res }: Context) {
    try {
      const message = 'Invalid email or password';
      // 1. Find user by email
      const user = await findByEmail(input.email);
      await disconnectDB();

      if (!user) {
        return new AuthenticationError(message);
      }

      // 2. Compare passwords
      if (!(await UserModel.comparePasswords(user.password, input.password))) {
        return new AuthenticationError(message);
      }

      // 3. Sign JWT Tokens
      const { access_token, refresh_token } = signTokens(user);

      // 4. Add Tokens to Context
      setCookies('access_token', access_token, {
        req,
        res,
        ...accessTokenCookieOptions,
      });
      setCookies('refresh_token', refresh_token, {
        req,
        res,
        ...refreshTokenCookieOptions,
      });
      setCookies('logged_in', 'true', {
        req,
        res,
        ...accessTokenCookieOptions,
        httpOnly: false,
      });

      return {
        status: 'success',
        access_token,
      };
    } catch (error: any) {
      errorHandler(error);
    }
  }
}
Service to Get the Authenticated User
Now let’s create a service that will be called by the frontend app to return the authenticated user’s information.
server/services/user.service.ts
// Imports

// Cookie Options

// Generate Tokens

export default class UserService {
  // Sign up a new user

  // Login a user

  // Get Authenticated User
  async getMe({ req, res, deserializeUser }: Context) {
    try {
      const user = await deserializeUser(req, res);
      return {
        status: 'success',
        user: {
          ...user,
          id: user?._id,
        },
      };
    } catch (error: any) {
      errorHandler(error);
    }
  }
}
Service to Refresh the Access Token
server/services/user.service.ts
// Imports

// Cookie Options

// Generate Tokens

export default class UserService {
  // Sign up a new user

  // Login a user

  // Get Authenticated User

  // Refresh Access Token
  async refreshAccessToken({ req, res }: Context) {
    try {
      // Get the refresh token
      const { refresh_token } = req.cookies;

      if (!refresh_token) {
        throw new ForbiddenError('Could not refresh access token');
      }

      // Validate the RefreshToken
      const decoded = verifyJwt<{ userId: string }>(
        refresh_token,
        'refreshTokenPublicKey'
      );

      if (!decoded) {
        throw new ForbiddenError('Could not refresh access token');
      }

      // Check if user's session is valid
      const session = await redisClient.get(decoded.userId);

      if (!session) {
        throw new ForbiddenError('User session has expired');
      }

      // Check if user exist and is verified
      const user = await UserModel.findById(JSON.parse(session)._id).select(
        '+verified'
      );
      await disconnectDB();

      if (!user || !user.verified) {
        throw new ForbiddenError('Could not refresh access token');
      }

      // Sign new access token
      const access_token = signJwt(
        { userId: user._id },
        'accessTokenPrivateKey',
        {
          expiresIn: `${accessTokenExpiresIn}m`,
        }
      );

      // Send access token cookie
      setCookies('access_token', access_token, {
        req,
        res,
        ...accessTokenCookieOptions,
      });
      setCookies('logged_in', 'true', {
        req,
        res,
        ...accessTokenCookieOptions,
        httpOnly: false,
      });

      return {
        status: 'success',
        access_token,
      };
    } catch (error) {
      errorHandler(error);
    }
  }
}
Service to Logout the User
To sign out the user, the GraphQL server will return expired cookies to the user’s browser and also delete the user’s session from Redis.
server/services/user.service.ts
// Imports

// Cookie Options

// Generate Tokens

export default class UserService {
  // Sign up a new user

  // Login a user

  // Get Authenticated User

  // Refresh Access Token

  // Logout User
  async logoutUser({ req, res }: Context) {
    try {
      const user = await deserializeUser(req, res);

      // Delete the user's session
      await redisClient.del(String(user?._id));

      // Logout user
      setCookies('access_token', '', { req, res, maxAge: -1 });
      setCookies('refresh_token', '', { req, res, maxAge: -1 });
      setCookies('logged_in', '', { req, res, maxAge: -1 });

      return true;
    } catch (error) {
      errorHandler(error);
    }
  }
}
Complete the User Services Code
server/services/user.service.ts
import { AuthenticationError, ForbiddenError } from 'apollo-server-micro';
import { setCookies } from 'cookies-next';
import { OptionsType } from 'cookies-next/lib/types';
import errorHandler from '../controllers/error.controller';
import deserializeUser from '../middleware/deserializeUser';
import { LoginInput } from '../schemas/user.schema';
import UserModel, { User } from '../models/user.model';
import { Context } from '../types/context';
import { disconnectDB } from '../utils/connectDB';
import redisClient from '../utils/connectRedis';
import { signJwt, verifyJwt } from '../utils/jwt';

// Cookie Options
const accessTokenExpiresIn = 15;
const refreshTokenExpiresIn = 60;

const cookieOptions: OptionsType = {
  httpOnly: true,
  // domain: '/',
  sameSite: 'lax',
  // secure: true,
};

if (process.env.NODE_ENV === 'production') cookieOptions.secure = true;

const accessTokenCookieOptions = {
  ...cookieOptions,
  maxAge: accessTokenExpiresIn * 60,
  expires: new Date(Date.now() + accessTokenExpiresIn * 60 * 1000),
};

const refreshTokenCookieOptions = {
  ...cookieOptions,
  maxAge: refreshTokenExpiresIn * 60,
  expires: new Date(Date.now() + refreshTokenExpiresIn * 60 * 1000),
};

async function findByEmail(email: string): Promise<User | null> {
  return UserModel.findOne({ email }).select('+password');
}

// Generate Tokens
function signTokens(user: User) {
  const userId: string = user._id.toString();
  const access_token = signJwt({ userId }, 'accessTokenPrivateKey', {
    expiresIn: `${accessTokenExpiresIn}m`,
  });

  const refresh_token = signJwt({ userId }, 'refreshTokenPrivateKey', {
    expiresIn: `${refreshTokenExpiresIn}m`,
  });

  redisClient.set(userId, JSON.stringify(user), {
    EX: refreshTokenExpiresIn * 60,
  });

  return { access_token, refresh_token };
}

export default class UserService {
  // Sign up a new user
  async signUpUser(input: Partial<User>) {
    try {
      const user = await UserModel.create(input);
      await disconnectDB();
      return {
        status: 'success',
        user: user.toJSON(),
      };
    } catch (error: any) {
      if (error.code === 11000) {
        return new ForbiddenError('Email already exists');
      }
      errorHandler(error);
    }
  }

  // Login a user
  async loginUser(input: LoginInput, { req, res }: Context) {
    try {
      const message = 'Invalid email or password';
      // 1. Find user by email
      const user = await findByEmail(input.email);
      await disconnectDB();

      if (!user) {
        return new AuthenticationError(message);
      }

      // 2. Compare passwords
      if (!(await UserModel.comparePasswords(user.password, input.password))) {
        return new AuthenticationError(message);
      }

      // 3. Sign JWT Tokens
      const { access_token, refresh_token } = signTokens(user);

      // 4. Add Tokens to Context
      setCookies('access_token', access_token, {
        req,
        res,
        ...accessTokenCookieOptions,
      });
      setCookies('refresh_token', refresh_token, {
        req,
        res,
        ...refreshTokenCookieOptions,
      });
      setCookies('logged_in', 'true', {
        req,
        res,
        ...accessTokenCookieOptions,
        httpOnly: false,
      });

      return {
        status: 'success',
        access_token,
      };
    } catch (error: any) {
      errorHandler(error);
    }
  }

  // Get Authenticated User
  async getMe({ req, res, deserializeUser }: Context) {
    try {
      const user = await deserializeUser(req, res);
      return {
        status: 'success',
        user: {
          ...user,
          id: user?._id,
        },
      };
    } catch (error: any) {
      errorHandler(error);
    }
  }

  // Refresh Access Token
  async refreshAccessToken({ req, res }: Context) {
    try {
      // Get the refresh token
      const { refresh_token } = req.cookies;

      // Validate the RefreshToken
      const decoded = verifyJwt<{ userId: string }>(
        refresh_token,
        'refreshTokenPublicKey'
      );

      if (!decoded) {
        throw new ForbiddenError('Could not refresh access token');
      }

      // Check if user's session is valid
      const session = await redisClient.get(decoded.userId);

      if (!session) {
        throw new ForbiddenError('User session has expired');
      }

      // Check if user exist and is verified
      const user = await UserModel.findById(JSON.parse(session)._id).select(
        '+verified'
      );
      await disconnectDB();

      if (!user || !user.verified) {
        throw new ForbiddenError('Could not refresh access token');
      }

      // Sign new access token
      const access_token = signJwt(
        { userId: user._id },
        'accessTokenPrivateKey',
        {
          expiresIn: `${accessTokenExpiresIn}m`,
        }
      );

      // Send access token cookie
      setCookies('access_token', access_token, {
        req,
        res,
        ...accessTokenCookieOptions,
      });
      setCookies('logged_in', 'true', {
        req,
        res,
        ...accessTokenCookieOptions,
        httpOnly: false,
      });

      return {
        status: 'success',
        access_token,
      };
    } catch (error) {
      errorHandler(error);
    }
  }

  // Logout User
  async logoutUser({ req, res }: Context) {
    try {
      const user = await deserializeUser(req, res);

      // Delete the user's session
      await redisClient.del(String(user?._id));

      // Logout user
      setCookies('access_token', '', { req, res, maxAge: -1 });
      setCookies('refresh_token', '', { req, res, maxAge: -1 });
      setCookies('logged_in', '', { req, res, maxAge: -1 });

      return true;
    } catch (error) {
      errorHandler(error);
    }
  }
}
Create the TypeGraphQL Resolvers
Since we have our services defined, let’s create the Queries and Mutations with TypeGraphQL.
To create the queries and mutations with TypeGraphQL, we need to create a class and add the appropriate decorators.
server/resolvers/user.resolver.ts
import { Arg, Ctx, Mutation, Query, Resolver } from 'type-graphql';
import {
  LoginInput,
  LoginResponse,
  SignUpInput,
  UserResponse,
} from '../schemas/user.schema';
import UserService from '../services/user.service';
import type { Context } from '../types/context';

@Resolver()
export default class UserResolver {
  constructor(private userService: UserService) {
    this.userService = new UserService();
  }

  @Mutation(() => UserResponse)
  async signupUser(@Arg('input') input: SignUpInput) {
    return this.userService.signUpUser(input);
  }

  @Mutation(() => LoginResponse)
  async loginUser(@Arg('input') loginInput: LoginInput, @Ctx() ctx: Context) {
    return this.userService.loginUser(loginInput, ctx);
  }

  @Query(() => UserResponse)
  async getMe(@Ctx() ctx: Context) {
    return this.userService.getMe(ctx);
  }

  @Query(() => LoginResponse)
  async refreshAccessToken(@Ctx() ctx: Context) {
    return this.userService.refreshAccessToken(ctx);
  }

  @Query(() => Boolean)
  async logoutUser(@Ctx() ctx: Context) {
    return this.userService.logoutUser(ctx);
  }
}
One beautiful feature of TypeGraphQL is that it allows us to decouple the business logic from the services using Dependency Injection. That means we can create as many resolver classes as we want.
server/resolvers/index.ts
import UserResolver from './user.resolver';

export const resolvers = [UserResolver] as const;
Update the GraphQL Server
Now import the resolver array into the ./pages/api/graphql.ts file and add it to the schema builder.
Lastly, you need to import the deserializeUser middleware and pass it down to our resolvers using the context function.
pages/api/graphql.ts
import 'reflect-metadata';
import { NextApiRequest, NextApiResponse } from 'next';
import { ApolloServer } from 'apollo-server-micro';
import { buildSchema } from 'type-graphql';
import Cors from 'cors';
import { resolvers } from '../../server/resolvers';
import { connectDB } from '../../server/utils/connectDB';
import deserializeUser from '../../server/middleware/deserializeUser';

const cors = Cors({
  methods: ['GET', 'HEAD', 'POST', 'PUT', 'DELETE', 'PATCH', 'OPTIONS'],
  credentials: true,
  origin: [
    'https://studio.apollographql.com',
    'http://localhost:8000',
    'http://localhost:3000',
  ],
});

function runMiddleware(req: NextApiRequest, res: NextApiResponse, fn: any) {
  return new Promise((resolve, reject) => {
    fn(req, res, (result: any) => {
      if (result instanceof Error) {
        return reject(result);
      }

      return resolve(result);
    });
  });
}

const schema = await buildSchema({
  resolvers,
  dateScalarMode: 'isoDate',
});

const server = new ApolloServer({
  schema,
  csrfPrevention: true,
  context: ({ req, res }: { req: NextApiRequest; res: NextApiResponse }) => ({
    req,
    res,
    deserializeUser,
  }),
});

export const config = {
  api: {
    bodyParser: false,
  },
};

const startServer = server.start();

export default async function handler(
  req: NextApiRequest,
  res: NextApiResponse
) {
  await runMiddleware(req, res, cors);
  await connectDB();
  await startServer;
  await server.createHandler({ path: '/api/graphql' })(req, res);
}
Now start the MongoDB and Redis Docker containers if you haven’t already:
docker-compose up -d
Start the Next.js server:
yarn dev
# or
npm run dev
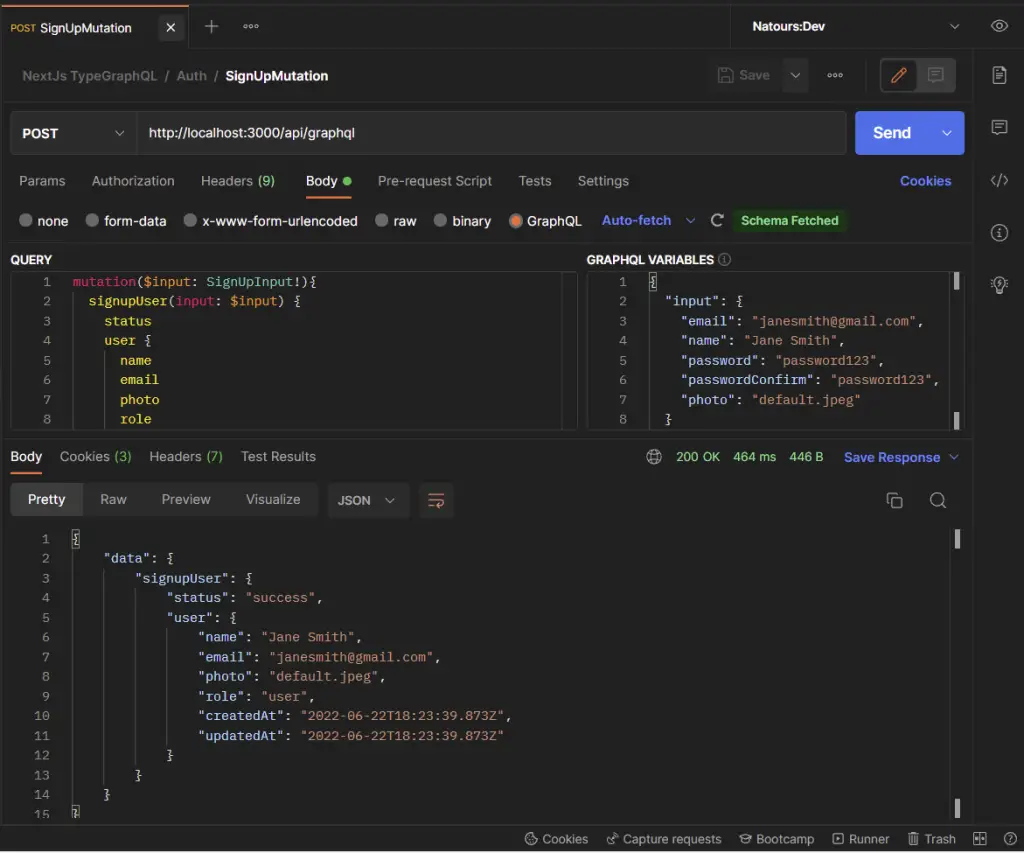
Testing the GraphQL API in Postman
When I was testing the GraphQL API with the Apollo Sandbox, I noticed the cookies were not been set so I decided to use Postman instead.
Postman is an API testing tool that allows developers to create, share, test, and document APIs.
To have access to the same collection I used in testing the GraphQL API, click on this link to import it into your Postman.
-Register a new user
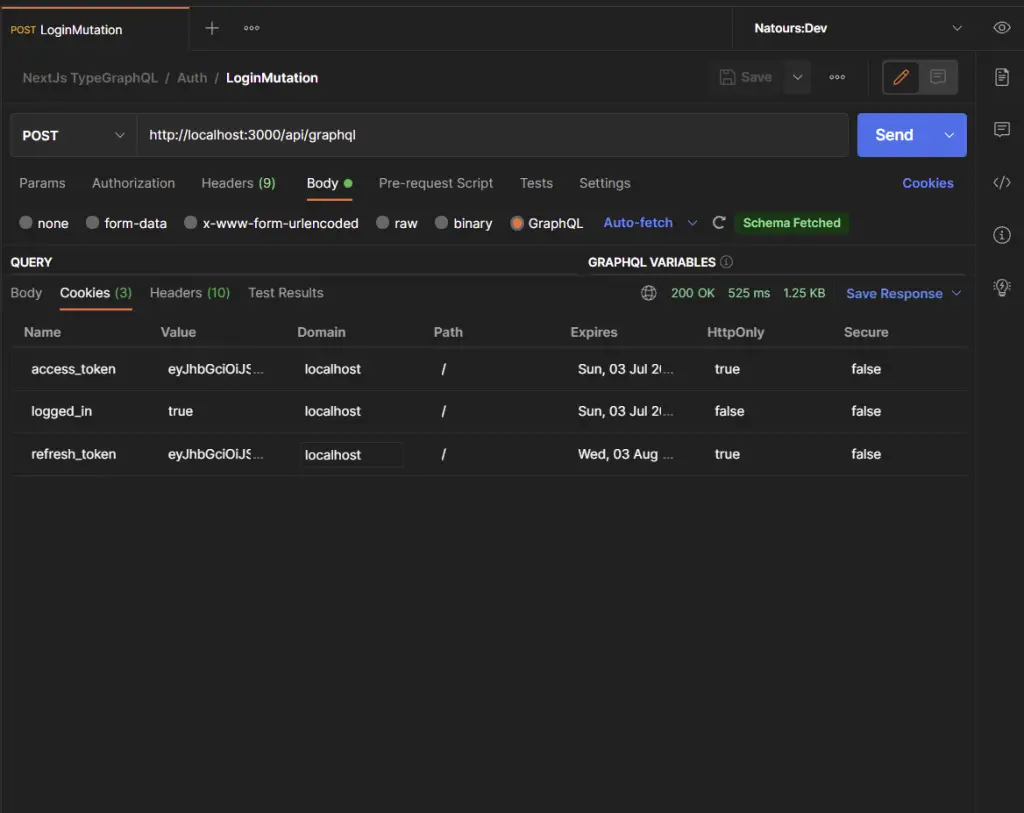
-Log in the user
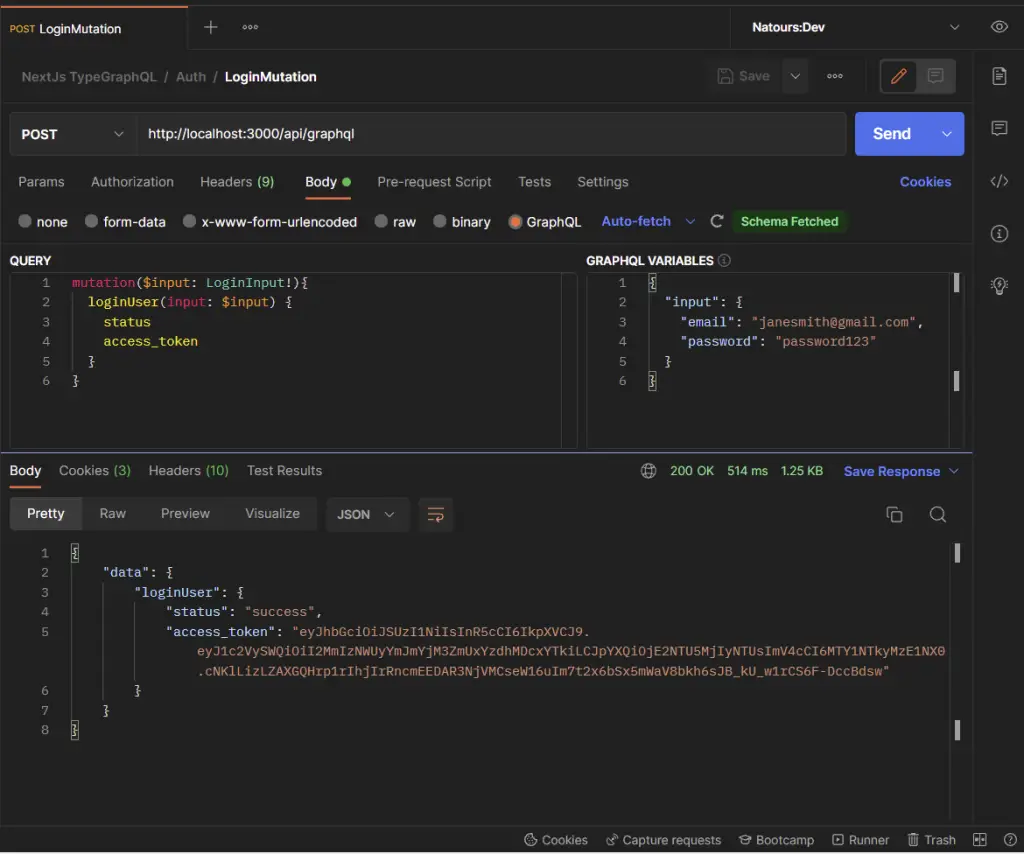
You can click on the Cookies tab in Postman to see the cookies sent by the GraphQL server
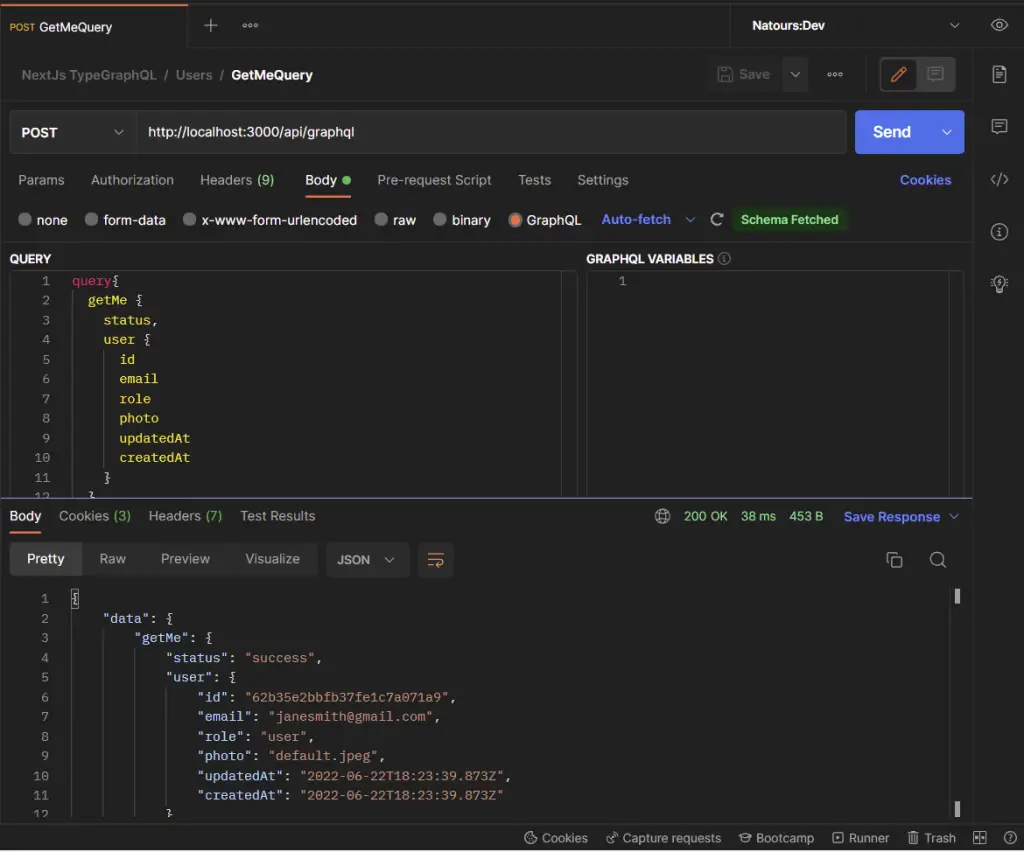
-Get the authenticated user’s information
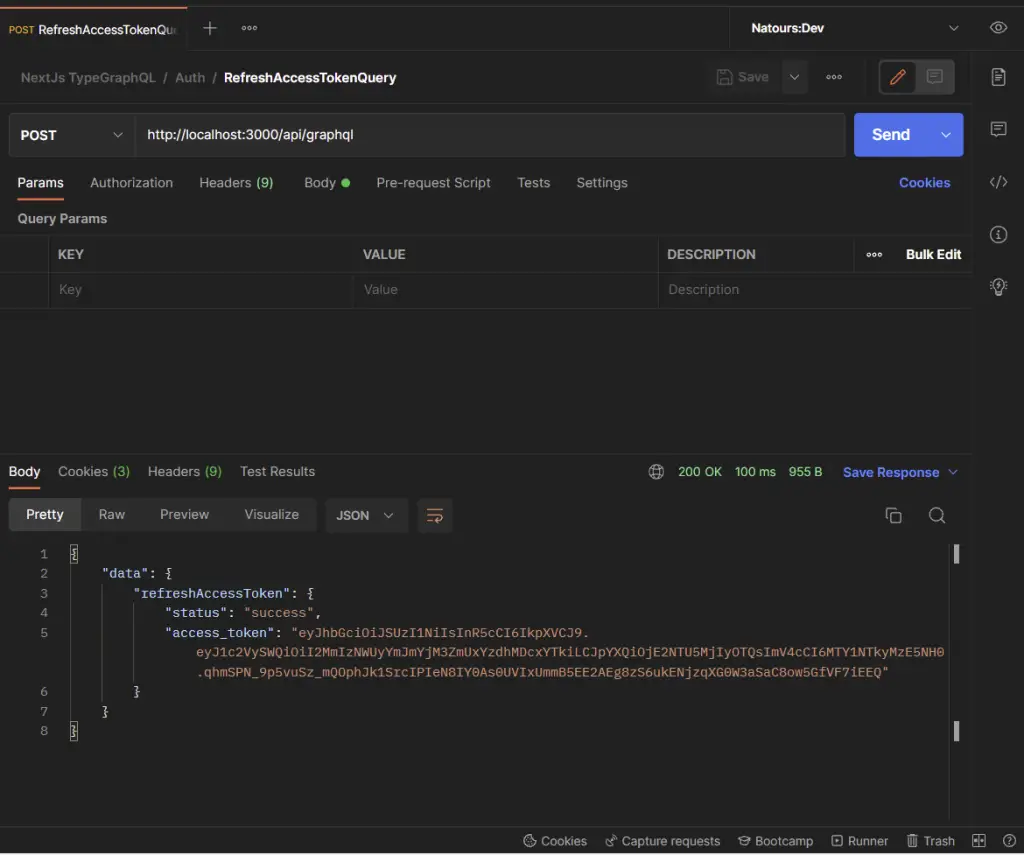
-Refresh the access token
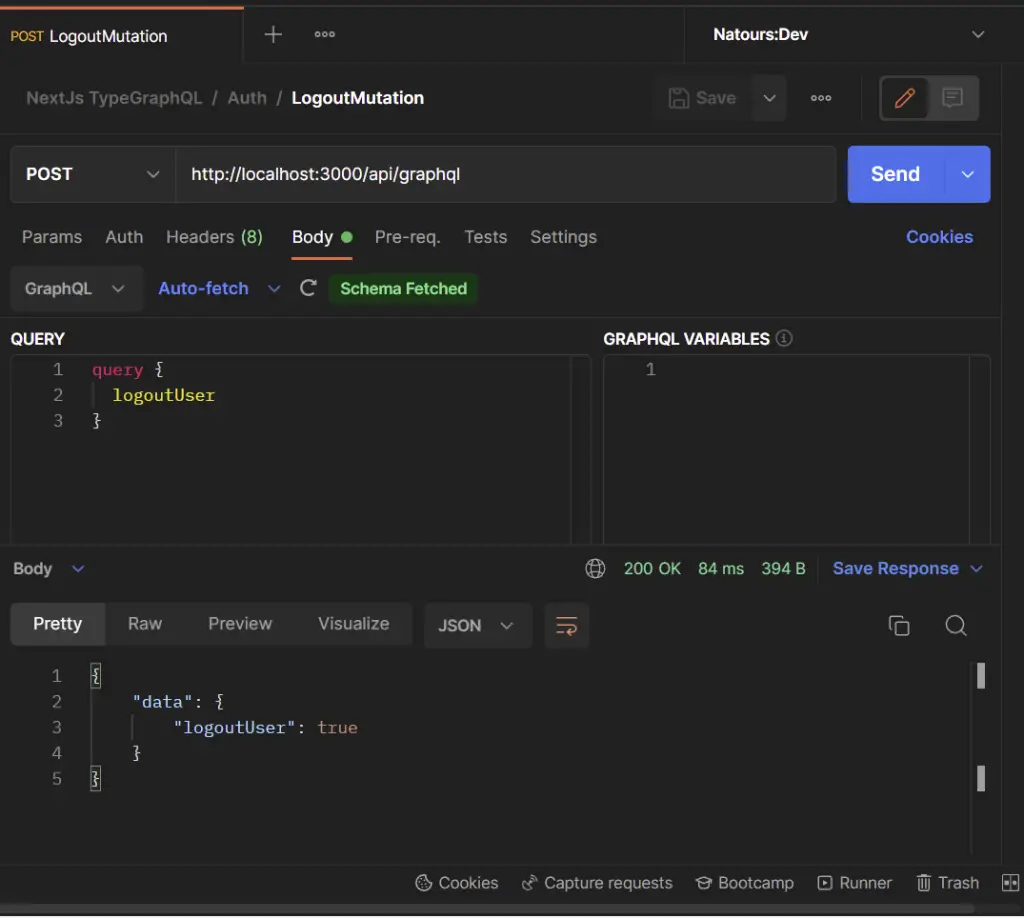
-Logout the user
Conclusion
With this Next.js, TypeGraphQL, apollo-server-micro, MongoDB, Class Validator, Typegoose, Mongoose, and Redis example in TypeScript, you’ve learned how to build a GraphQL API with Next.js to implement access and refresh token functionality.
Next.js, GraphQL, and TypeGraphQL Source Code
You can find the complete source code on my GitHub page